怎么在电脑上使用python-开始在 Windows 上使用 Python(初学者)
开始在 Windows 上使用 Python(初学者)Get started using Python on Windows for beginners
07/19/2019


本文内容
下面是一个分步指南,适用对了解 Python 感兴趣并使用 Windows 10 的初学者。The following is a step-by-step guide for beginners interested in learning Python using Windows 10.
设置开发环境Set up your development environment
For beginners who are new to Python, we recommend you install Python from the Microsoft Store. 通过 Microsoft Store 安装会使用基本 Python3 解释器,但会为当前用户设置 PATH 设置(避免需要管理员访问权限),以及提供自动更新。Installing via the Microsoft Store uses the basic Python3 interpreter, but handles set up of your PATH settings for the current user (avoiding the need for admin access), in addition to providing automatic updates. 如果处于教育环境中或所属组织限制计算机上的权限或管理访问权限,则这会特别有用。This is especially helpful if you are in an educational environment or a part of an organization that restricts permissions or administrative access on your machine.
如果在 Windows 上将 Python 用于 Web 开发,则建议为开发环境设置其他设置。If you are using Python on Windows for web development, we recommend a different set up for your development environment. 建议通过适用于 Linux 的 Windows 子系统安装和使用 Python,而不是直接在 Windows 上安装。Rather than installing directly on Windows, we recommend installing and using Python via the Windows Subsystem for Linux. 如果对在操作系统上自动执行常见任务感兴趣,请参阅我们的指南:开始在 Windows 上将 Python 用于脚本和自动化。If you're interested in automating common tasks on your operating system, see our guide: Get started using Python on Windows for scripting and automation. 对于某些高级方案(如需要访问/修改 Python 的已安装文件、创建二进制文件的副本或直接使用 Python DLL),可能需要考虑直接从 python.org 下载特定 Python 版本或考虑安装替代实现,如 Anaconda、Jython、PyPy、WinPython、IronPython 等。建议仅当你是更高级的 Python 程序员并且有特定原因需要选择替代实现时才使用此方法。For some advanced scenarios (like needing to access/modify Python's installed files, make copies of binaries, or use Python DLLs directly), you may want to consider downloading a specific Python release directly from python.org or consider installing an alternative, such as Anaconda, Jython, PyPy, WinPython, IronPython, etc. We only recommend this if you are a more advanced Python programmer with a specific reason for choosing an alternative implementation.
安装 PythonInstall Python
使用 Microsoft Store 安装 Python:To install Python using the Microsoft Store:
转到“开始”菜单(左下方 Windows 图标),输入“Microsoft Store”,选择用于打开应用商店的链接。Go to your Start menu (lower left Windows icon), type "Microsoft Store", select the link to open the store.
应用商店打开后,从右上方菜单中选择“搜索”,然后输入“Python”。Once the store is open, select Search from the upper-right menu and enter "Python". 从“应用”下的结果中打开“Python 3.7”。Open "Python 3.7" from the results under Apps. 选择“获取”。Select Get.
Python 完成下载和安装过程后,使用“开始”菜单(左下方 Windows 图标)打开 Windows PowerShell。Once Python has completed the downloading and installation process, open Windows PowerShell using the Start menu (lower left Windows icon). PowerShell 打开后,输入 Python --version 以确认已在计算机上安装了 Python3。Once PowerShell is open, enter Python --version to confirm that Python3 has installed on your machine.
Python 的 Microsoft Store 安装包括 pip(标准包管理器)。The Microsoft Store installation of Python includes pip, the standard package manager. 通过 pip 可以安装和管理不属于 Python 标准库的其他包。Pip allows you to install and manage additional packages that are not part of the Python standard library. 若要确认还可使用 pip 安装和管理包,请输入 pip --version。To confirm that you also have pip available to install and manage packages, enter pip --version.
安装 Visual Studio CodeInstall Visual Studio Code
通过使用 VS Code 作为文本编辑器/集成开发环境 (IDE),可以利用 IntelliSense(代码完成辅助)、Linting(可帮助避免在代码中发生错误)、调试支持(可帮助在运行代码之后查找代码中的错误)、代码片段(小型可重用代码块的模板)以及单元测试(使用不同类型的输入测试代码的接口)。By using VS Code as your text editor / integrated development environment (IDE), you can take advantage of IntelliSense (a code completion aid), Linting (helps avoid making errors in your code), Debug support (helps you find errors in your code after you run it), Code snippets (templates for small reusable code blocks), and Unit testing (testing your code's interface with different types of input).
VS Code 还包含一个内置终端,使你可以使用 Windows 命令提示符、PowerShell 或是所喜欢的任何工具打开 Python 命令行,从而在代码编辑器与命令行之间建立无缝工作流。VS Code also contains a built-in terminal that enables you to open a Python command line with Windows Command prompt, PowerShell, or whatever you prefer, establishing a seamless workflow between your code editor and command line.
若要安装 VS Code,请下载适用于 Windows 的 VS Code:https://code.visualstudio.com。To install VS Code, download VS Code for Windows: https://code.visualstudio.com.
安装 VS Code 以后,还需安装 Python 扩展。Once VS Code has been installed, you must also install the Python extension. 若要安装 Python 扩展,可以选择 VS Code 市场链接,也可以打开 VS Code 并在扩展菜单中搜索 Python (Ctrl+Shift+X)。To install the Python extension, you can select the VS Code Marketplace link or open VS Code and search for Python in the extensions menu (Ctrl+Shift+X).
Python 是一种解释型语言,若要运行 Python 代码,必须向 VS Code 告知要使用的解释器。Python is an interpreted language, and in order to run Python code, you must tell VS Code which interpreter to use. 建议坚持使用 Python 3.7,除非有特定原因需要选择其他解释器。We recommend sticking with Python 3.7 unless you have a specific reason for choosing something different. 安装 Python 扩展以后,请选择 Python 3 解释器,具体方法是:打开“命令面板”(Ctrl+Shift+P),开始输入命令“Python:选择解释器”进行搜索,然后选择命令。Once you've installed the Python extension, select a Python 3 interpreter by opening the Command Palette (Ctrl+Shift+P), start typing the command Python: Select Interpreter to search, then select the command. 在可用时,还可以使用底部状态栏上的“选择 Python 环境”选项(它可能已显示所选解释器)。You can also use the Select Python Environment option on the bottom Status Bar if available (it may already show a selected interpreter). 该命令提供 VS Code 可以自动找到的可用解释器列表(包括虚拟环境)。The command presents a list of available interpreters that VS Code can find automatically, including virtual environments. 如果看不到所需解释器,请参阅配置 Python 环境。If you don't see the desired interpreter, see Configuring Python environments.
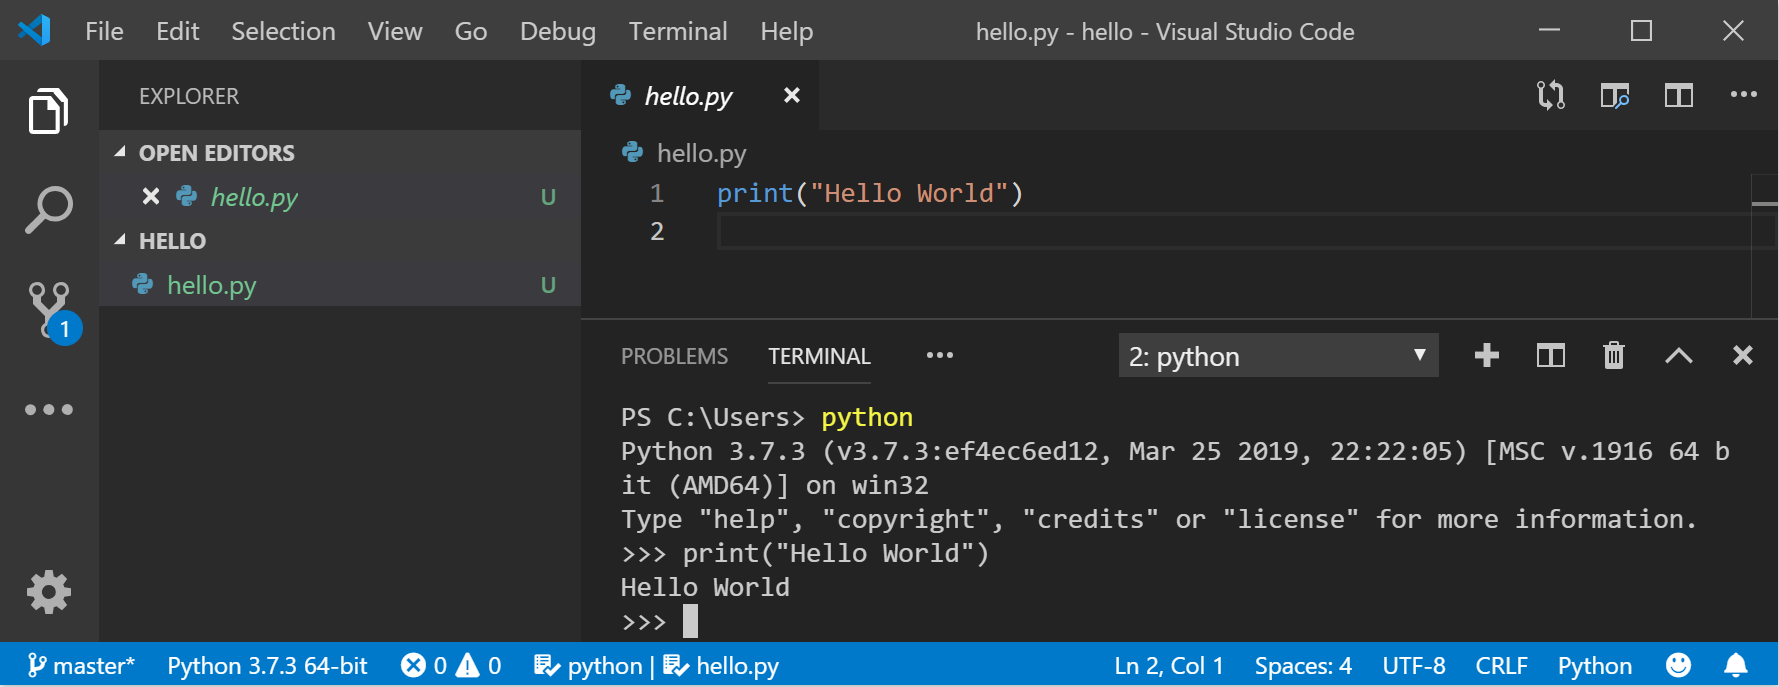
若要在 VS Code 中打开终端,请选择“视图” > “终端”,或者使用快捷方式 Ctrl+'(使用反撇号字符)。To open the terminal in VS Code, select View > Terminal, or alternatively use the shortcut Ctrl+` (using the backtick character). 默认终端是 PowerShell。The default terminal is PowerShell.
在 VS Code 终端中,只需通过输入以下命令即可打开 Python:pythonInside your VS Code terminal, open Python by simply entering the command: python
通过输入以下内容来尝试使用 Python 解释器:print("Hello World")。Try the Python interpreter out by entering: print("Hello World"). Python 会返回语句“Hello World”。Python will return your statement "Hello World".
安装 Git(可选)Install Git (optional)
如果计划与其他人协作处理 Python 代码,或是在开放源代码站点(例如 GitHub)上托管项目,则 VS Code 支持使用 Git 进行版本控制。If you plan to collaborate with others on your Python code, or host your project on an open-source site (like GitHub), VS Code supports version control with Git. VS Code 中的“源代码管理”选项卡可跟踪所有更改,并直接在 UI 中内置了常见 Git 命令(add、commit、push、pull)。The Source Control tab in VS Code tracks all of your changes and has common Git commands (add, commit, push, pull) built right into the UI. 需要先安装 Git,以便为“源代码管理”面板提供支持。You first need to install Git to power the Source Control panel.
从 git-scm 网站下载并安装适用于 Windows 的 Git。Download and install Git for Windows from the git-scm website.
其中包含了一个安装向导,该向导会询问一系列有关 Git 安装设置的问题。An Install Wizard is included that will ask you a series of questions about settings for your Git installation. 建议使用所有默认设置,除非有特定原因需要更改某些设置。We recommend using all of the default settings, unless you have a specific reason for changing something.
如果以前从未使用过 Git,则 GitHub 指南可以帮助入门。If you've never worked with Git before, GitHub Guides can help you get started.
有关一些 Python 基础知识的 Hello World 教程Hello World tutorial for some Python basics
据创建者 Guido van Rossum 所说,Python 是一种“高级编程语言”,其核心设计理念全都与代码可读性以及使程序员可以采用几行代码来表达概念的语法相关。Python, according to its creator Guido van Rossum, is a “high-level programming language, and its core design philosophy is all about code readability and a syntax which allows programmers to express concepts in a few lines of code.”
Python 是一种解释型语言。Python is an interpreted language. 与所编写的代码需要转换为机器码才能由计算机处理器运行的编译型语言不同,Python 代码直接传递给解释器并直接运行。In contrast to compiled languages, in which the code you write needs to be translated into machine code in order to be run by your computer's processor, Python code is passed straight to an interpreter and run directly. 只需键入代码并运行即可。You just type in your code and run it. 我们来试一试!Let's try it!
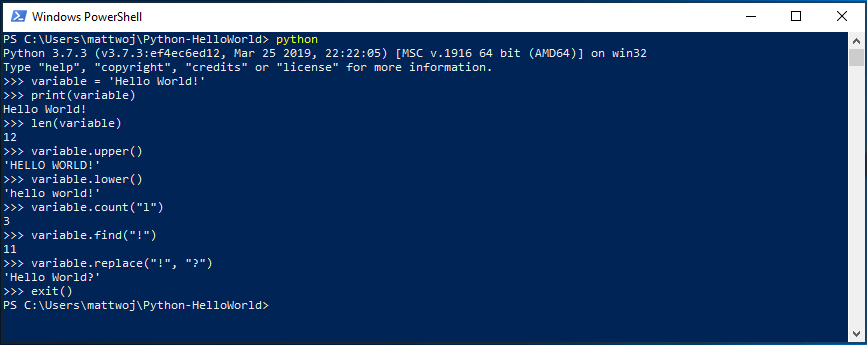
打开 PowerShell 命令行后,输入 python 以运行 Python 3 解释器。With your PowerShell command line open, enter python to run the Python 3 interpreter. (某些说明更喜欢使用命令 py 或 python3,这些方法也适用)。(Some instructions prefer to use the command py or python3, these should also work). 你会知道已成功执行,因为会显示一个 >>> 提示符(包含三个大于符号)。You will know that you're successful because a >>> prompt with three greater-than symbols will display.
可以通过几种内置方法修改 Python 中的字符串。There are several built-in methods that allow you to make modifications to strings in Python. 使用以下命令创建变量:variable = 'Hello World!'。Create a variable, with: variable = 'Hello World!'. 按 Enter 以换行。Press Enter for a new line.
使用以下命令打印变量:print(variable)。Print your variable with: print(variable). 这会显示文本“Hello World!”。This will display the text "Hello World!".
使用以下命令算出字符串变量的长度(使用的字符数):len(variable)。Find out the length, how many characters are used, of your string variable with: len(variable). 这会显示使用了 12 个字符。This will display that there are 12 characters used. (请注意,空格在总长度中计为一个字符。)(Note that the blank space it counted as a character in the total length.)
将字符串变量转换为大写字母:variable.upper()。Convert your string variable to upper-case letters: variable.upper(). 现在将字符串变量转换为小写字母:variable.lower()。Now convert your string variable to lower-case letters: variable.lower().
统计在字符串变量中使用字母“l”的次数:variable.count("l")。Count how many times the letter "l" is used in your string variable: variable.count("l").
在字符串变量中搜索特定字符,我们使用以下命令来查找感叹号:variable.find("!")。Search for a specific character in your string variable, let's find the exclamation point, with: variable.find("!"). 这会显示感叹号是字符串第 11 个位置的字符。This will display that the exclamation point is found in the 11th position character of the string.
将感叹号替换为问号:variable.replace("!", "?")。Replace the exclamation point with a question mark: variable.replace("!", "?").
若要退出 Python,可以输入 exit()、quit() 或选择 Ctrl-Z。To exit Python, you can enter exit(), quit(), or select Ctrl-Z.
希望你在使用 Python 的某些内置字符串修改方法时感受到乐趣。Hope you had fun using some of Python's built-in string modification methods. 现在来尝试使用 VS Code 创建 Python 程序文件并运行。Now try creating a Python program file and running it with VS Code.
将 Python 与 VS Code 一起使用的 Hello World 教程Hello World tutorial for using Python with VS Code
VS Code 团队结合了一个出色的 Python 入门教程,其中演练了如何使用 Python 创建 Hello World 程序、运行程序文件、配置和运行调试器以及安装 matplotlib 和 numpy 等包以在虚拟环境中创建图表。The VS Code team has put together a great Getting Started with Python tutorial walking through how to create a Hello World program with Python, run the program file, configure and run the debugger, and install packages like matplotlib and numpy to create a graphical plot inside a virtual environment.
打开 PowerShell 并创建名为“hello”的空文件夹,导航到此文件夹,然后在 VS Code 中打开它:Open PowerShell and create an empty folder called "hello", navigate into this folder, and open it in VS Code:
mkdir hello
cd hello
code .
VS Code 打开后,在左侧“资源管理器”窗口中会显示新的 hello 文件夹,在 VS Code 底部面板中打开命令行窗口,具体方法是按 Ctrl+'(使用反撇号),或选择“视图” > “终端”。Once VS Code opens, displaying your new hello folder in the left-side Explorer window, open a command line window in the bottom panel of VS Code by pressing Ctrl+` (using the backtick character) or selecting View > Terminal. 在一个文件夹中启动 VS Code 会使该文件夹成为“工作区”。By starting VS Code in a folder, that folder becomes your "workspace". VS Code 将特定于该工作区的设置存储在 .vscode/settings.json 中,这些设置与全局存储的用户设置分隔开来。VS Code stores settings that are specific to that workspace in .vscode/settings.json, which are separate from user settings that are stored globally.
使用 Pygame 创建简单游戏Create a simple game with Pygame
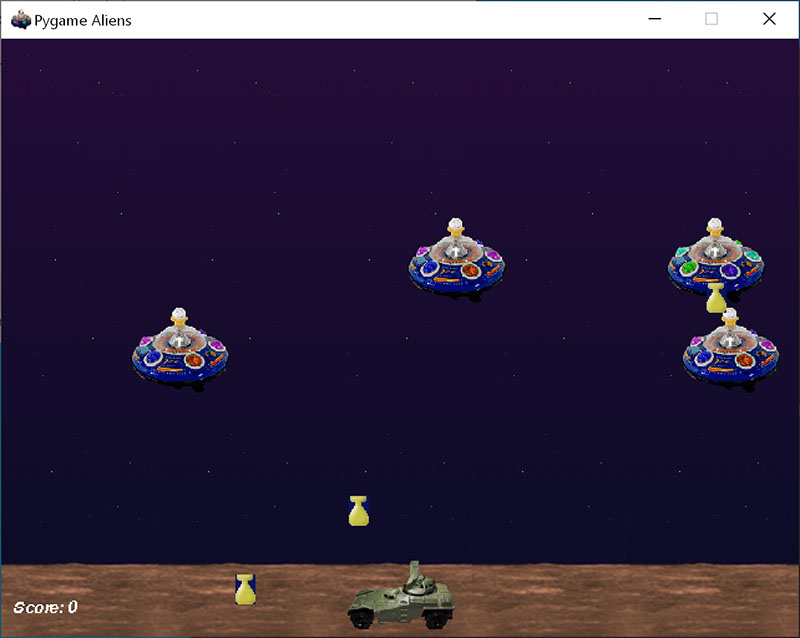
Pygame 是一种用于编写游戏的常用 Python 包 - 鼓励学生学习编程,同时创建有趣的内容。Pygame is a popular Python package for writing games - encouraging students to learn programming while creating something fun. Pygame 会在新窗口中显示图形,因此无法在 WSL 的纯命令行方法下工作。Pygame displays graphics in a new window, and so it will not work under the command-line-only approach of WSL. 但是,如果按照本教程中所述通过 Microsoft Store 安装了 Python,则它会正常工作。However, if you installed Python via the Microsoft Store as detailed in this tutorial, it will work fine.
安装 Python 后,通过键入 python -m pip install -U pygame --user 从命令行(或 VS Code 中的终端)安装 pygame。Once you have Python installed, install pygame from the command line (or the terminal from within VS Code) by typing python -m pip install -U pygame --user.
通过运行示例游戏来测试安装:python -m pygame.examples.aliensTest the installation by running a sample game : python -m pygame.examples.aliens
一切正常,游戏会打开一个窗口。All being well, the game will open a window. 玩完游戏后,关闭该窗口。Close the window when you are done playing.
下面介绍如何开始编写自己的游戏。Here's how to start writing your own game.
打开 PowerShell(或 Windows 命令提示符)并创建名为“bounce”的空文件夹。Open PowerShell (or Windows Command Prompt) and create an empty folder called "bounce". 导航到此文件夹并创建名为“bounce.py”的文件。Navigate to this folder and create a file named "bounce.py". 在 VS Code 中打开该文件夹:Open the folder in VS Code:
mkdir bounce
cd bounce
new-item bounce.py
code .
使用 VS Code 输入以下 Python 代码(或是复制并粘贴):Using VS Code, enter the following Python code (or copy and paste it):
import sys, pygame
pygame.init()
size = width, height = 640, 480
dx = 1
dy = 1
x= 163
y = 120
black = (0,0,0)
white = (255,255,255)
screen = pygame.display.set_mode(size)
while 1:
for event in pygame.event.get():
if event.type == pygame.QUIT: sys.exit()
x += dx
y += dy
if x < 0 or x > width:
dx = -dx
if y < 0 or y > height:
dy = -dy
screen.fill(black)
pygame.draw.circle(screen, white, (x,y), 8)
pygame.display.flip()
将它保存为:bounce.py。Save it as: bounce.py.
在 PowerShell 终端中,通过输入以下内容来运行它:python bounce.py。From the PowerShell terminal, run it by entering: python bounce.py.
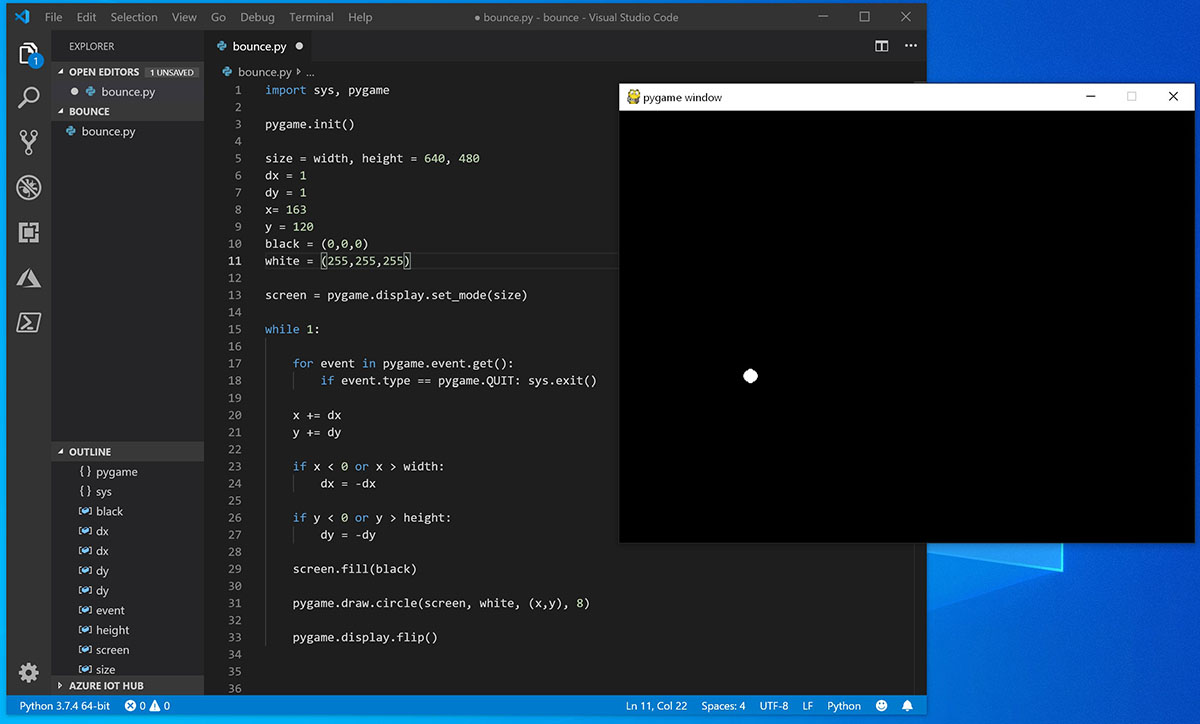
尝试调整某些数字,以查看它们对弹力球的影响。Try adjusting some of the numbers to see what effect they have on your bouncing ball.
可在 pygame.org 上阅读有关使用 pygame 编写游戏的更多信息。Read more about writing games with pygame at pygame.org.
用于继续了解的资源Resources for continued learning
建议通过以下资源来支持你继续了解 Windows 上的 Python 开发。We recommend the following resources to support you in continuing to learn about Python development on Windows.
学习 Python 的在线课程Online courses for learning Python
Microsoft Learn 上的 Python 简介:尝试使用交互式 Microsoft Learn 平台,并获得完成该模块的经验积分,该模块涵盖了有关如何编写基本 Python 代码、声明变量以及使用控制台输入和输出的基础知识。Introduction to Python on Microsoft Learn: Try the interactive Microsoft Learn platform and earn experience points for completing this module covering the basics on how to write basic Python code, declare variables, and work with console input and output. 对于尚未设置 Python 开发环境的人员来说,交互式沙箱环境是一个不错的起点。The interactive sandbox environment makes this a great place to start for folks who don't have their Python development environment set up yet.
Pluralsight 上的 Python:8 个课程,29 小时:Pluralsight 上的 Python 学习路径提供了涵盖与 Python 相关的各种主题的在线课程,包括用于衡量技能和查找知识缺口的工具。Python on Pluralsight: 8 Courses, 29 Hours: The Python learning path on Pluralsight offers online courses covering a variety of topics related to Python, including a tool to measure your skill and find your gaps.
LearnPython.org 教程:使用 DataCamp 的人员提供的这些免费的交互式 Python 教程,无需安装或设置任何内容即可开始学习 Python。LearnPython.org Tutorials: Get started on learning Python without needing to install or set anything up with these free interactive Python tutorials from the folks at DataCamp.
Python.org 教程:向读者通俗地介绍 Python 语言和系统的基本概念和功能。The Python.org Tutorials: Introduces the reader informally to the basic concepts and features of the Python language and system.
在 VS Code 中使用 PythonWorking with Python in VS Code
VS Code 中编辑 Python:详细了解如何利用适用于 Python 的 VS Code 自动完成和 IntelliSense 支持,包括如何自定义其行为或者只是将它们关闭。Editing Python in VS Code: Learn more about how to take advantage of VS Code's autocomplete and IntelliSense support for Python, including how to customize their behavior... or just turn them off.
Linting Python:Linting 是运行程序的过程,会分析代码以查找潜在错误。Linting Python: Linting is the process of running a program that will analyse code for potential errors. 了解 VS Code 为 Python 提供的不同形式的 linting 支持,以及如何进行设置。Learn about the different forms of linting support VS Code provides for Python and how to set it up.
调试 Python:调试是在计算机程序中识别并消除错误的过程。Debugging Python: Debugging is the process of identifying and removing errors from a computer program. 本文介绍如何使用 VS Code 初始化和配置 Python 的调试、如何设置和验证断点、如何附加本地脚本、如何针对不同应用类型或在远程计算机上执行调试以及一些基本的故障排除。This article covers how to initialize and configure debugging for Python with VS Code, how to set and validate breakpoints, attach a local script, perform debugging for different app types or on a remote computer, and some basic troubleshooting.
对Python 进行单元测试:介绍了一些说明单元测试含义的背景、一个示例演练、如何启用测试框架、如何创建和运行测试、如何调试测试以及测试配置设置。Unit testing Python: Covers some background explaining what unit testing means, an example walkthrough, enabling a test framework, creating and running your tests, debugging tests, and test configuration settings.
怎么在电脑上使用python-开始在 Windows 上使用 Python(初学者)相关推荐
- python:在Windows上使用 Python
python:在Windows上使用 Python 4.1. 完整安装程序 4.2. Microsoft Store包 4.3. nuget.org 安装包 4.4. 可嵌入的包 4.5. 替代捆绑包 ...
- Python在Linux,Windows上打开有密doc,docx文件(密码已知)
Python在Linux,Windows上打开有密doc,docx文件(密码已知) Linux Windows Linux Install: pip install msoffcrypto-tool ...
- linux下运行python unitest_Python unittest打印日志可以在Linux上运行,但在Windows上不行...
我正在尝试编写一个unittest,它将stdout和stderr重定向到一个写在Windows网络驱动器上的文件.出于某些原因,相同的脚本(只有diff.是目录路径)可以在Linux上工作,但在Wi ...
- python selenium 文件上传_Python Selenium通过Windows上传上传文件
我读了很多关于和大家的建议,不要使用Windows上传,直接写我文件的路径:我甚至尝试使用论坛上的一些命令,比如:swicthTo() switch_to_window() window_handle ...
- 《Python入门》Windows 7下Python Web开发环境搭建笔记
最近想尝试一下在IBM Bluemix上使用Python语言创建Web应用程序,所以需要在本地搭建Python Web的开发测试环境. 关于Python的版本 进入Python的网站,鼠标移到导航条上 ...
- 如何在windows上搭建mysql_如何在Windows上安装多个MySQL
[IT168 技术文档]本文以免安装版的mysql(Without installer)为例,对如何在Windows上安装多个MySQL进行讲解. 免安装版的mysql(Without install ...
- python无法在电脑上运行_无法在Windows上运行f2py
我在Windows7机器上安装了Python2.7.Numpy和gfortran.在 跑步python c:\Python27\Scripts\f2py.py -c --fcompiler=gnu95 ...
- 在 Mac上压缩的压缩包 在windows上都会产生.DS_Store这种垃圾文件 怎么办
2019独角兽企业重金招聘Python工程师标准>>> 很多Mac小伙伴们都会遇到这样的问题,在Mac下生成的压缩包在PC上解压之后会有一些垃圾文件,像是.DS_Store之类的,每 ...
- 【Python虚拟环境】Windows环境下Python虚拟环境的创建与激活
环境 win10+Python3.6 为什么要使用虚拟环境? 官方文档的解释是:Python应用程序通常会使用不在标准库内的软件包和模块.应用程序有时需要特定版本的库,因为应用程序可能需要修复特定的错 ...
最新文章
- 【教程】Python数据可视化技巧
- 剑桥大学在机器人,半导体,5G,区块链方面的研究实验室
- VMware ubuntu 上网2
- 【IDEA】Cause: invalid type code: 8D
- iOS手势学习UIGestureRecognizer cocos2d 手势推荐
- Eclipse或者MyEclipse—在Eclipse或MyEclipse中的操作(3)
- python爬取图片失败什么原因_请问下面这个python3.5下的爬虫程序有什么错误,为什么运行正常 但是不爬取图片?...
- CAD看图软件的快速搜索功能怎么用?
- ps里面的css,今天来为大家介绍PS中的图层样式
- Justinmind破解
- Python实现qq邮箱自动登录
- UGUI_03_补充之_Image的属性(image type这个属性simple、Sliced、tiled、filled样式详解)
- 〖Python自动化办公篇①〗- 文件自动化管理引言及shutil模块实现文件与文件内容的复制
- PHPstorm 函数或者方法的注释的时间和用户名,PHPstorm里函数方法的注释是没有动态时间设置的,但是看了PHP file里面有时间日期的注释,而PHP Function Doc Commen
- c语言编程刘备称帝,汉献帝得知刘备称帝后,为什么先是沉默不语,然后又仰天大笑?...
- xshell常用命令和快捷键----(备忘、随时更新)
- 计算机wlan打不开怎么回事,笔记本电脑wlan打不开怎么回事
- PC端“交易猫”网站爬虫项目
- Dialog based MFC
- 浙江万里学院计算机与科学技术,浙江万里学院计算机与信息学院介绍