Centos7 系统下搭建.NET Core2.0+Nginx+Supervisor+Mysql环境
一、简介
一直以来,微软只对自家平台提供.NET支持,这样等于让这个“理论上”可以跨平台的框架在Linux和macOS上的支持只能由第三方项目提供(比如Mono .NET)。直到微软推出完全开源的.NET Core。这个开源的平台兼容.NET Standard,并且能在Windows、Linux和MacOS上提供完全一致的API。虽然这个小巧的.NET框架只是标准.NET的一个子集,但是已经相当强大了。
一方面,这个小巧的框架可以让某些功能性应用同时运行在三个平台上(就像某些功能性的Python脚本一样),另一方面,这也可以让服务器运维人员将ASP .NET服务程序部署在Linux服务器上(特别是对于运行Windows Server较为吃力的服务器)。
官网参考资料:https://www.microsoft.com/net/core#linuxcentos
二、.NET Core2.0 环境部署前准备
1.环境说明:
服务器系统:CentOS 7.2.1511
2.安装前准备(关闭防火墙、关闭selinux)
1)关闭firewall:
systemctl stop firewalld.service #停止firewall
systemctl disable firewalld.service #禁止firewall开机启动
firewall-cmd --state #查看默认防火墙状态(关闭后显示notrunning,开启后显示running)
2)关闭selinux
sed -i "s/SELINUX=enforcing/SELINUX=disabled/g" /etc/selinux/config
查看改后文件如下:
[root@localhost ~]# cat /etc/selinux/config # This file controls the state of SELinux on the system.
# SELINUX= can take one of these three values:
#     enforcing - SELinux security policy is enforced.
#     permissive - SELinux prints warnings instead of enforcing.
#     disabled - No SELinux policy is loaded.
SELINUX=disabled
# SELINUXTYPE= can take one of three two values:
#     targeted - Targeted processes are protected,
#     minimum - Modification of targeted policy. Only selected processes are protected.
#     mls - Multi Level Security protection.
SELINUXTYPE=targeted
3.重启Centos
reboot
三、部署.NET Core2.0 环境
1.添加DOTNET产品
在安装.NET核心之前,您需要注册微软产品提要。这只需要做一次。首先,注册微软签名密钥,然后添加微软产品提要。
rpm --import https://packages.microsoft.com/keys/microsoft.asc
sh -c 'echo -e "[packages-microsoft-com-prod]\nname=packages-microsoft-com-prod \nbaseurl=https://packages.microsoft.com/yumrepos/microsoft-rhel7.3-prod\nenabled=1\ngpgcheck=1\ngpgkey=https://packages.microsoft.com/keys/microsoft.asc" > /etc/yum.repos.d/dotnetdev.repo'
2.安装.NET核心SDK
在下一步之前,请从您的系统中删除.NET .NET以前的任何预览版本。
以下命令更新用于安装的产品列表,安装.NET核心所需的组件,然后安装.NET核心SDK。
yum update
yum install libunwind libicu -y
yum install dotnet-sdk-2.0.0 -y
3.检查dotnet是否安装成功与版本查看
dotnet --infodotnet --version
四、测试.NET Core2.0 环境
1.在home目录下初始化一个测试环境并输出"Hello World "内容 (测试方式一,可忽略)
cd /home
dotnet new console -o hwapp
cd hwapp
dotnet run
输出空内容如下:
[root@localhost hwapp]# dotnet run
Hello World!
2.上传.net core的实例页面进行测试 (测试方式二、推荐)
Centos 下.net core 2 环境测试用例 (把它上传到/home目录下或自定义的目录)
下载地址:
http://down.51cto.com/data/2334968
执行以下命令
cd /home/WebApplication1
dotnet restore   //如果使过用测试方式一,就需先执行这命令重新加载一下当前新的网站文件
dotnet run
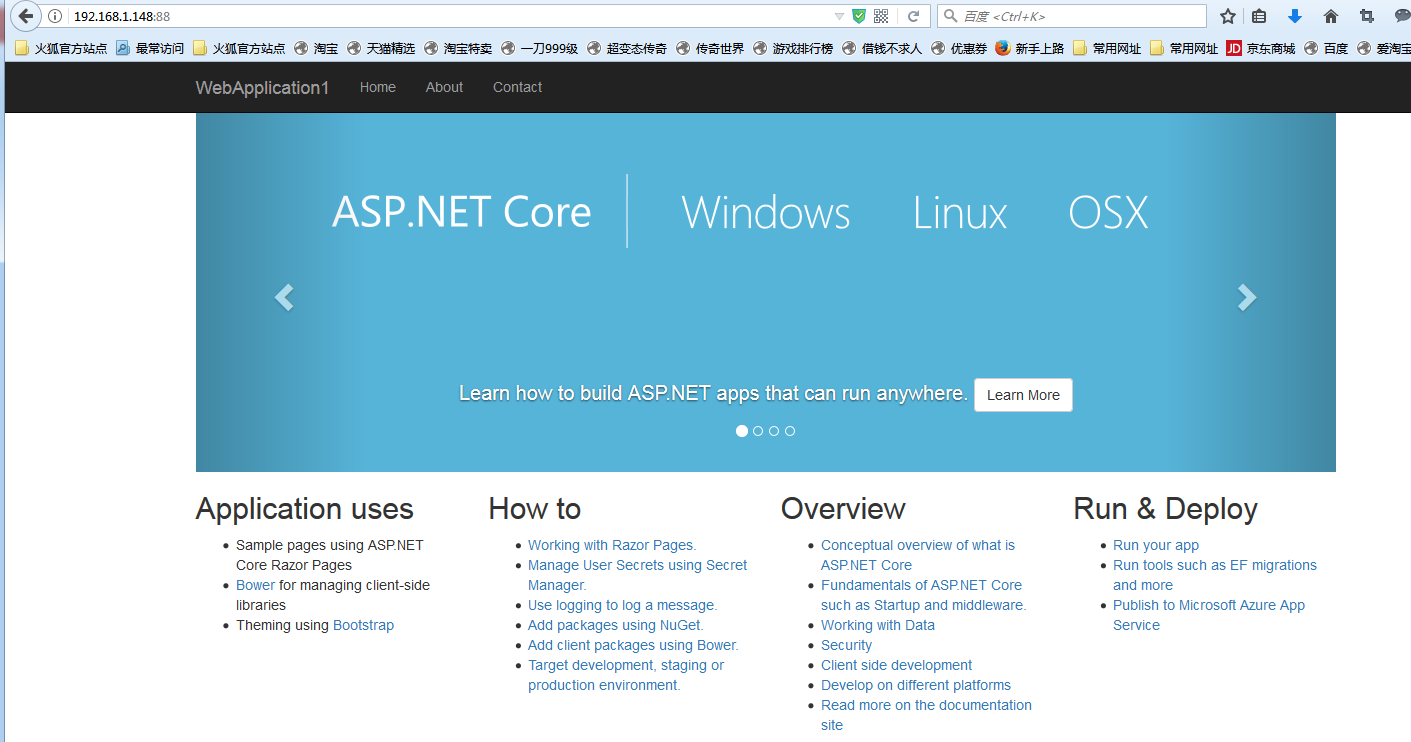
运行后如下图:

通过IE访问测试页
五、安装配置nginx对ASP.NET Core应用的转发
安装Nginx环境
[root@localhost ~]#curl -o  nginx.rpm http://nginx.org/packages/centos/7/noarch/RPMS/nginx-release-centos-7-0.el7.ngx.noarch.rpm
[root@localhost ~]#rpm -ivh nginx.rpm
[root@localhost ~]#yum install nginx -y
输入:systemctl start nginx 来启动nginx。
[root@localhost ~]# systemctl start nginx
输入:systemctl enable nginx 来设置nginx的开机启动(linux宕机、重启会自动运行nginx不需要连上去输入命令)。
[root@localhost ~]#systemctl enable nginx
Created symlink from /etc/systemd/system/multi-user.target.wants/nginx.service to /usr/lib/systemd/system/nginx.service.
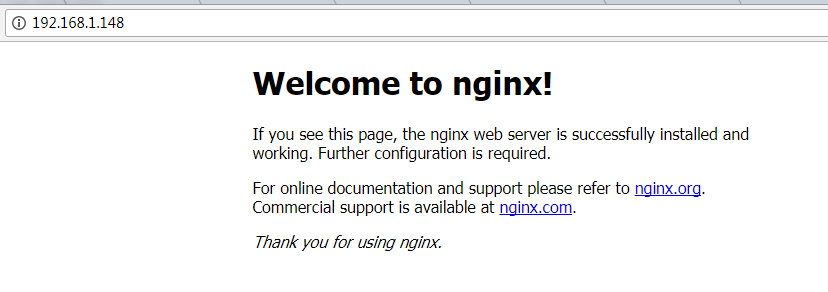
2.通过iE检查能否访问
[root@localhost nginx-1.8.1]# ps -ef|grep nginx
root      14626      1  0 08:47 ?        00:00:00 nginx: master process nginx
nginx     14627  14626  0 08:47 ?        00:00:00 nginx: worker process
root      14636   3269  0 08:49 pts/1    00:00:00 grep --color=auto nginx
nginx常用的操作命令
systemctl start nginx.service #启动nginx服务
systemctl enable nginx.service #设置开机自启动
systemctl disable nginx.service #停止开机自启动
systemctl status nginx.service #查看服务当前状态
systemctl restart nginx.service #重新启动服务
systemctl list-units --type=service #查看所有已启动的服务
4.防火墙配置(如果系统有防火墙就需要进行写入规则)
命令:firewall-cmd --zone=public --add-port=80/tcp --permanent(开放80端口)
命令:systemctl restart firewalld(重启防火墙以使配置即时生效)
5.配置nginx对ASP.NET Core应用的转发
修改 /etc/nginx/conf.d/default.conf 文件。
将文件内容替换为
server {
listen 80;
location / {
proxy_pass http://localhost:88;
proxy_http_version 1.1;
proxy_set_header Upgrade $http_upgrade;
proxy_set_header Connection keep-alive;
proxy_set_header Host $host;
proxy_cache_bypass $http_upgrade;
}
}
重新加载nignx
[root@localhost nginx]# nginx -s reload
nginx的配置己完成
6.开启dotnet run进行测试
[root@localhost ~]# cd /home/WebApplication1/
[root@localhost WebApplication1]# dotnet run
Using launch settings from /home/WebApplication1/Properties/launchSettings.json...
Hosting environment: Development
Content root path: /home/WebApplication1
Now listening on: http://[::]:88
Application started. Press Ctrl+C to shut down.
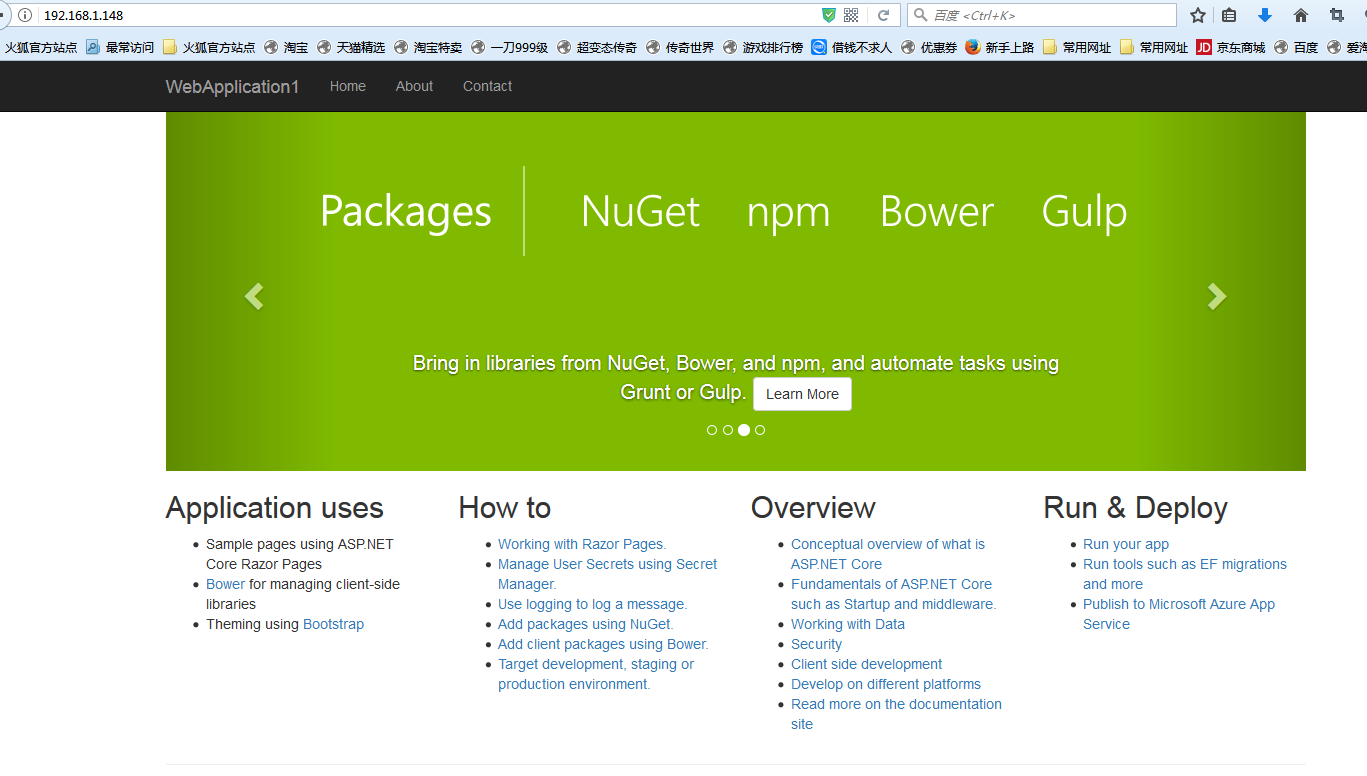
通过IP 80端口访问

六、配置守护服务(Supervisor)
目前存在三个问题
问题1:ASP.NET Core应用程序运行在shell之中,如果关闭shell则会发现ASP.NET Core应用被关闭,从而导致应用无法访问,这种情况当然是我们不想遇到的,而且生产环境对这种情况是零容忍的。
问题2:如果ASP.NET Core进程意外终止那么需要人为连进shell进行再次启动,往往这种操作都不够及时。
问题3:如果服务器宕机或需要重启我们则还是需要连入shell进行启动。
为了解决这个问题,我们需要有一个程序来监听ASP.NET Core 应用程序的状况。在应用程序停止运行的时候立即重新启动。这边我们用到了Supervisor这个工具,Supervisor使用Python开发的。
1.安装Supervisor
[root@localhost /]# yum install python-setuptools -y
[root@localhost /]#easy_install supervisor
2.配置Supervisor
[root@localhost /]#mkdir /etc/supervisor
[root@localhost /]#echo_supervisord_conf > /etc/supervisor/supervisord.conf
修改supervisord.conf文件,将文件尾部的配置
[root@localhost /]# vi /etc/supervisor/supervisord.conf
将里面的最后两行:
;[include]
;files = relative/directory/*.ini
改为
[include]
files = conf.d/*.conf
ps:如果服务已启动,修改配置文件可用“supervisorctl reload”命令来使其生效
3.配置对ASP.NET Core应用的守护
创建一个 WebApplication1.conf文件,内容大致如下
[root@localhost /]# vi WebApplication1.conf
[program:WebApplication1]
command=dotnet WebApplication1.dll ; 运行程序的命令
directory=/home/WebApplication1/ ; 命令执行的目录
autorestart=true ; 程序意外退出是否自动重启
stderr_logfile=/var/log/WebApplication1.err.log ; 错误日志文件
stdout_logfile=/var/log/WebApplication1.out.log ; 输出日志文件
environment=ASPNETCORE_ENVIRONMENT=Production ; 进程环境变量
user=root ; 进程执行的用户身份
stopsignal=INT
将文件拷贝至:“/etc/supervisor/conf.d/WebApplication1.conf”下
[root@localhost /]#mkdir /etc/supervisor/conf.d
[root@localhost /]#cp WebApplication1.conf /etc/supervisor/conf.d/
运行supervisord,查看是否生效
[root@localhost /]#supervisord -c /etc/supervisor/supervisord.confsupervisord -c /etc/supervisor/supervisord.conf
[root@localhost /]# ps -ef | grep WebApplication1
root      29878  29685  0 09:57 ?        00:00:00 dotnet WebApplication1.dll
root      29892  29363  0 09:57 pts/3    00:00:00 grep --color=auto WebApplication1
如果存在dotnet WebApplication1.dll 进程则代表运行成功,这时候在使用浏览器进行访问。

至此关于ASP.NET Core应用程序的守护即配置完成。
Supervisor守护进程常用操作
【启动supervisord】
确保配置无误后可以在每台主机上使用下面的命令启动supervisor的服务器端supervisord
supervisord
【停止supervisord】
supervisorctl shutdown
【重新加载配置文件】
supervisorctl reload
七 、配置Supervisor开机启动
新建一个“supervisord.service”文件
[root@localhost /]# vi supervisord.service
# dservice for systemd (CentOS 7.0+)
# by ET-CS (https://github.com/ET-CS)
[Unit]
Description=Supervisor daemon
[Service]
Type=forking
ExecStart=/usr/bin/supervisord -c /etc/supervisor/supervisord.conf
ExecStop=/usr/bin/supervisorctl shutdown
ExecReload=/usr/bin/supervisorctl reload
KillMode=process
Restart=on-failure
RestartSec=42s
[Install]
WantedBy=multi-user.target
将文件拷贝至:“/usr/lib/systemd/system/supervisord.service”
[root@localhost /]# cp supervisord.service /usr/lib/systemd/system/
执行命令:systemctl enable supervisord
[root@localhost /]# systemctl enable supervisord
Created symlink from /etc/systemd/system/multi-user.target.wants/supervisord.service to /usr/lib/systemd/system/supervisord.service.
执行命令:systemctl is-enabled supervisord #来验证是否为开机启动
[root@localhost /]# systemctl is-enabled supervisord
八、最后测试
重启系统看能否能成功访问
[root@localhost /]# reboot
转载于:https://blog.51cto.com/mrxiong2017/2083663
Centos7 系统下搭建.NET Core2.0+Nginx+Supervisor+Mysql环境相关推荐
- .nwt+core+2.0+mysql_Centos7 系统下搭建.NET Core2.0+Nginx+Supervisor+Mysql环境
一.简介 一直以来,微软只对自家平台提供.NET支持,这样等于让这个"理论上"可以跨平台的框架在Linux和macOS上的支持只能由第三方项目提供(比如Mono .NET).直到微 ...
- .nwt+core+2.0+mysql_Centos7系统下搭建.NET Core2.0+Nginx+Supervisor环境
一.Linux .NET Core简介 一直以来,微软只对自家平台提供.NET支持,这样等于让这个"理论上"可以跨平台的框架在Linux和macOS上的支持只能由第三方项目提供(比 ...
- centos7 系统下搭建 lnmp 环境
目录 目录 概述 准备工作 开始编译安装 1. 安装 Nginx 1. 解压 2. 环境准备 3. 编译过程 4. Nginx 服务 2. 安装 MySQL 1. 解压 2. 环境准备 3. 安装 C ...
- windows下搭建hadoop-2.6.0本地idea开发环境
概述 本文记录windows下hadoop本地开发环境的搭建: OS:windows hadoop执行模式:独立模式 安装包结构: Hadoop-2.6.0-Windows.zip- cygwinIn ...
- centos7php自启动,centos7系统下nginx安装并配置开机自启动操作
这篇文章主要介绍了centos7系统下nginx安装并配置开机自启动操作方法,非常不错,具有参考借鉴价值,需要的朋友可以参考下 这篇文章主要介绍了centos7系统下nginx安装并配置开机自启动操作 ...
- mac nginx php-fpm,Mac系统下搭建Nginx+php-fpm实例讲解
分享背景 由于一直在虚拟机的状态下开发PHP,尝试一下mac本地搭建环境.mac本身是自带Apache+php的,在低版本的mac系统中,mac中的php版本是5.6的版本. 本文分享的是在mac的1 ...
- Centos7.4系统下安装httpd,mariadb,php7.1环境运行禅道
Centos7.4系统下安装httpd,mariadb,php7.1环境运行禅道 简介:本文介绍如何在Centos7.4系统下面使用yum命令安装httpd,php7.1与mariadb服务,并使用禅 ...
- windows系统下搭建cloudreve网盘系统
最近博主想搭建属于自己的网盘系统,去github上看了一些开源项目,比较对cloudreve感兴趣,但是github的搭建步骤不全以及网上没有完整的搭建博文,于是,博主想自己搭建cloudreve网盘 ...
- 在CentOS7.6下搭建Oracle19c RAC集群
在CentOS7.6下搭建Oracle19c RAC集群 1.准备阶段 1.1 虚拟环境准备 1.2 Oracle版本包准备 2.服务器配置阶段 2.1.配置IP 2.2.停止不相关服务 2.3.配置 ...
最新文章
- 信息安全评论员18期
- AI Time|企业AutoML旨在流程自动化,可解释是人机交互的必经之路
- .NET/ASP.NET MVC Controller 控制器(IController控制器的创建过程)
- 流水灯c语言程序延时失败,用c8051f340做控制流水灯实验,程序会卡死在延时函数中 ,只要在那加延时函数程序就只能跑到那,代码如下...
- Windows.etc\hosts文件
- 您的JVM是否泄漏文件描述符-像我的一样?
- Mac OS下Tomcat native-APR的安装
- vue 里面引入高德地图
- 关于MySql5“data too long for column”问题的探解
- 新iPhone机模曝光:依旧三款配色 难有渐变机身
- Qt——P11 自定义的信号和槽发生重载的解决
- MyGui 3.2.0(OpenGL平台)的编译
- mysql数据库隔离级别 实现原理_MySQL事务及Spring隔离级别实现原理详解
- 二叉树的三种非递归遍历
- 小偷写给失主的一封信 雷人啊!!
- logback简介及引入方法
- android 版本更新 静默安装及自启动
- MySQL数据库—SQL汇总
- [科研][转载] 对科研思维方法的整理(节选) from 玉泉老博
- JAVA计算机毕业设计阿尔兹海默病Mybatis+系统+数据库+调试部署