pong_计算机视觉与终极Pong AI
pong
应用计算机视觉 (Applied Computer Vision)
One of my favourite YouTuber’s, CodeBullet, once attempted to create a pong AI to rule them all. Sadly he ran into troubles, not because he isn’t capable but I don’t think his experience at the time had much in the way of computer vision. He is absolutely hilarious and I highly recommend you watch him (parental advisory is advised) if you are at all considering reading the rest of this post. Also he is a genius at what he does. Love you mate. See his video here.
我最喜欢的YouTuber之一CodeBullet曾经尝试创建一个乒乓AI来统治所有人。 可悲的是,他遇到了麻烦,不是因为他没有能力,而是我认为他当时的经验在计算机视觉方面没有太多影响。 他绝对很搞笑,如果您考虑阅读这篇文章的其余部分,我强烈建议您观看他(建议家长咨询)。 同样,他是个天才。 爱你的队友。 在这里看他的视频。
This seemed like a really fun and simple task so I had to give it a go. In this post I will outline some of the considerations I took that may help if you wish to work on any similar project, and I think I will try my hand at a few more of these, so if you like this type of thing consider following me.
这似乎是一个非常有趣且简单的任务,所以我不得不尝试一下。 在这篇文章中,我将概述一些我考虑过的考虑因素,如果您希望从事任何类似的项目,它们可能会有所帮助,并且我想我会尝试其中的一些其他工作,因此,如果您喜欢这种事情,请考虑以下内容我。
The nice thing about using computer vision is that I can just use a already built game and process the images. Having said that, we will be using the same game version as the one CodeBullet was using from ponggame.org. It also has a 2 player mode so I can play against my own AI; which I did, and it was hard…
使用计算机视觉的好处是,我可以使用已经构建的游戏并处理图像。 话虽如此,我们将使用与ponggame.org使用的CodeBullet相同的游戏版本。 它还具有2人模式,因此我可以与自己的AI对抗; 我做到了,这很难……
捕捉屏幕 (Capturing the screen)
First things first, getting the screen. I wanted to make sure my frame rate was as fast as possible and for this I found MSS to be a great python package. With this I was easily maxing out at 60 fps and comparing this to PIL I was only getting about 20 fps. It returns as a numpy array so my life was complete.
开始步骤件事首先,让画面。 我想确保我的帧速率尽可能快,为此,我发现MSS是一个很棒的python软件包。 有了这个,我很容易以60 fps的速度达到最大值,并将其与PIL进行比较,我只得到了约20 fps。 它以numpy数组形式返回,因此我的生活已经完成。
桨检测 (Paddle detection)
Working our way in order of simplicity, we need to define the paddle locations. This could be done in a few different ways but I thought the most obvious was to mask the area for each paddle and run connected components to find the paddle object. Here is a snippet of that code:
W的简单的为了我们的工作会有的方式,我们需要定义桨位置。 可以用几种不同的方法来完成此操作,但我认为最明显的是为每个桨板遮盖区域并运行连接的组件以找到桨板对象。 这是该代码的一个片段:
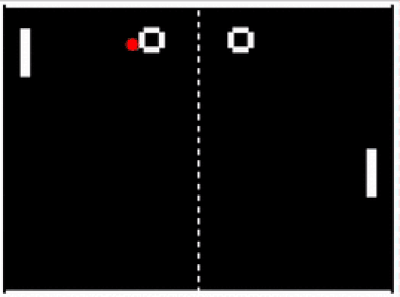
def get_objects_in_masked_region(img, vertices, connectivity = 8): ''':return connected components with stats in masked region [0] retval number of total labels 0 is background [1] labels image [2] stats[0] leftmostx, [1] topmosty, [2] horizontal size, [3] vertical size, [4] area [3] centroids ''' mask = np.zeros_like(img) # fill the mask cv2.fillPoly(mask, [vertices], 255) # now only show the area that is the mask mask = cv2.bitwise_and(img, mask) conn = cv2.connectedComponentsWithStats(mask, connectivity, cv2.CV_16U) return connIn the above, ‘vertices’ is just a list of the coordinates that define the masked region. Once I have the object within each region I can get their centroid position or the bounding box. One thing to note is that OpenCV includes the background as the 0'th object in any connected component list, so in this case I always grabbed the second largest object. The result is below — the paddle on the right with the green centroid is the player / soon-to-be AI controlled paddle.
在上面,“顶点”只是定义遮罩区域的坐标列表。 一旦在每个区域中都有对象,就可以得到它们的质心位置或边界框。 需要注意的一件事是,OpenCV将背景作为任何连接的组件列表中的第0个对象,因此在这种情况下,我总是抓住第二大的对象。 结果在下面-带有绿色质心的右边的桨是玩家/即将成为AI控制的桨。

移动桨 (Moving the paddle)
Now that we have our output, we need an input. For this I turned to a useful package and someone else’s code — thanks StackOverflow. It uses ctypes to simulate keyboard presses and in this case, the game is played using the ‘k’ and ‘m’ keys. I got the Scan Codes here. After testing that it worked by just randomly moving up and down, we are good to start tracking.
ñ流,我们有我们的产量,我们需要一个输入。 为此,我转向了一个有用的软件包和其他人的代码 -感谢StackOverflow。 它使用ctypes模拟键盘按键,在这种情况下,使用“ k”和“ m”键进行游戏。 我在这里找到了扫描代码。 在通过随机上下移动测试其工作原理之后,我们很好地开始跟踪。
乒乓检测 (Pong detection)
Next up is to identify and track the pong. Again, this could have been handled in several ways — one of which could have been to do object detection by using a template, however instead I again went with connected components and object properties, namely the area of the pong since it is the only object with it’s dimensions. I knew I would run into issues whenever the pong crossed or touched any of the other white objects but I also figured this was fine so long as I could track it the majority of the time. After all, it moves in a straight line. If you watch the video below you will see how the red circle marking the pong flickers. That is because it only finds it about 1 in every 2 frames. At 60 fps this really doesn’t matter.
ñ分机,就是坚持以识别和跟踪乒乓球。 同样,这可以通过几种方法来处理-其中一种方法可以通过使用模板来进行对象检测,但是相反,我再次使用了连接的组件和对象属性,即乒乓的区域,因为它是唯一的对象它的尺寸。 我知道只要乒乓球越过或碰到任何其他白色物体,我都会遇到问题,但我也认为,只要我能在大多数时间跟踪它,那就很好。 毕竟,它是直线移动的。 如果您观看下面的视频,您将看到标记乒乓的红色圆圈如何闪烁。 这是因为它每2帧仅发现约1个。 在60 fps下,这确实无关紧要。
射线投射以预测弹跳 (Ray cast for bounce prediction)
At this point we already have a working AI. If we just move the player paddle such that it is at the same y-position as the pong, it does a fairly good job. However, it does run into problems when the pong gets a good bounce going. The paddle is just too slow to keep up and needs to instead predict where the pong will be instead of just moving to where it currently is. This has already been implemented in the clips above but below is a comparison of the two methods.
在这一点上,我们已经有一个工作AI。 如果我们只是将球员的球拍移动到与乒乓球相同的y位置,那么它将做得很好。 但是,当乒乓球弹跳良好时,确实会出现问题。 球拍太慢而无法跟上,需要预测球的位置,而不是仅仅移动到当前位置。 这已经在上面的剪辑中实现,但是下面是两种方法的比较。
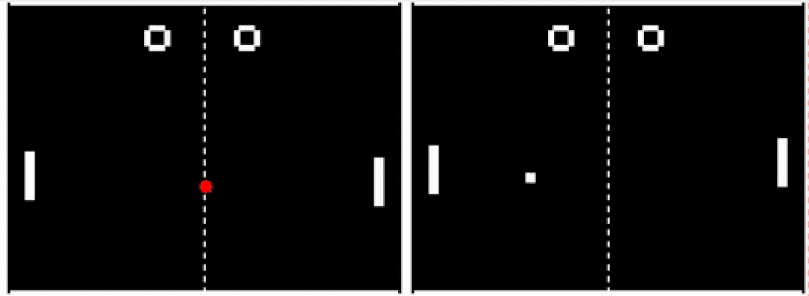
The difference isn’t huge but it is definitely a more consistent win with the right AI. To do this I first created a list of the positions for the pong. I kept this list at a length of just 5 for averaging sake, but more or less could be done. Probably don’t want more otherwise it takes longer to figure out it has changed directions. After getting the list of positions I used simple vector averaging to smooth out and obtain the direction vector — shown by the green arrow. This was also normalized to be a unit vector and then multiplied by a length for visualization purposes.
差别不大,但是绝对可以肯定的是,使用正确的AI可以获得更持久的胜利。 为此,我首先创建了一个乒乓球位置列表。 为了平均起见,我将此列表的长度保留为5,但是可以做更多或更少。 可能不希望更多,否则需要更长的时间才能确定方向已经改变。 得到位置列表后,我使用了简单的矢量平均来平滑并获得方向矢量-如绿色箭头所示。 也将其归一化为单位向量,然后乘以长度以进行可视化。
Casting the ray is just an extension of this — making the forward projection longer. I then checked if the future positions were outside the boundary of the top and bottom area. If so, it just projects the position back into the play area. For the left and right sides, it calculates where that intersection will occur with the paddle x-position and fixes the x- and y-position to that point. This makes sure the paddle is targeting to the correct position. Without this it would often move too far. Here is the code for defining the ray that predicts the future position of the pong:
投射射线只是此过程的一种扩展-使向前投影更长。 然后,我检查将来的头寸是否在顶部和底部区域的边界之外。 如果是这样,它只是将位置投射回游戏区域。 对于左侧和右侧,它将计算与桨叶x位置的相交处,并将x和y位置固定到该点。 这样可以确保桨板对准正确的位置。 没有这个,它通常会走得太远。 这是用于定义预测乒乓球未来位置的光线的代码:
def pong_ray(pong_pos, dir_vec, l_paddle, r_paddle, boundaries, steps = 250): future_pts_list = [] for i in range(steps): x_tmp = int(i * dir_vect[0] + pong_pos[0]) y_tmp = int(i * dir_vect[1] + pong_pos[1]) if y_tmp > boundaries[3]: #bottom y_end = int(2*boundaries[3] - y_tmp) x_end = x_tmp elif y_tmp < boundaries[2]: #top y_end = int(-1*y_tmp) x_end = x_tmp else: y_end = y_tmp ##stop where paddle can reach if x_tmp > r_paddle[0]: #right x_end = int(boundaries[1]) y_end = int(pong_pos[1] + ((boundaries[1] - pong_pos[0])/dir_vec[0])*dir_vec[1]) elif x_tmp < boundaries[0]: #left x_end = int(boundaries[0]) y_end = int(pong_pos[1] + ((boundaries[0] - pong_pos[0]) / dir_vec[0]) * dir_vec[1]) else: x_end = x_tmp end_pos = (x_end, y_end) future_pts_list.append(end_pos) return future_pts_listIn the above the perhaps less obvious calculation is determining the intercept of left or right positions for the paddles to target. We do this essentially by similar triangles with the diagram and equation show below. We know the intercept with the x-position of the paddle which is given in boundaries. We can then calculate how far the pong will travel and add that to the current y-position.
在上面,也许不太明显的计算是确定桨叶要瞄准的左位置或右位置的截距。 我们基本上是通过类似的三角形来完成此操作,如下图和等式所示。 我们知道在边界处给出的桨的x位置的截距。 然后,我们可以计算出乒乓球将走多远,并将其添加到当前的y位置。

The paddles, although look straight, actually have a rebound surface that is curved. That is, if you hit the ball with the paddle towards the ends it will bounce as if the paddle was angled. I therefore allowed the paddle to hit at the edges which adds some offense to the AI, causing the pong to fly around.
桨板虽然看上去笔直,但实际上具有弯曲的反弹表面。 也就是说,如果您将球拍拨向两端,击球,球将弹起,就像球拍倾斜一样。 因此,我允许桨拍打边缘,这给AI增添了一些进攻性,导致乒乓球飞来飞去。
结论 (Conclusions)
Although designed for this particular implementation of pong, the same concepts and code could be used for any version — it just comes down to changing some of the pre-processing steps. Of course, another method is to use machine learning through reinforcement learning or just simple conv net, but I like this classical approach; at least in this instance where I don’t need robust generality or difficult image processing steps. As I mentioned, this version of pong is 2 player, and I honestly cannot beat my own AI…
专为这个特定的实现乒乓球的 lthough,相同的概念和代码可用于任何版本-它仅仅归结为改变一些预处理步骤。 当然,另一种方法是通过强化学习或简单的卷积网络来使用机器学习,但是我喜欢这种经典方法。 至少在这种情况下,我不需要强大的一般性或困难的图像处理步骤。 如前所述,此版本的pong是2位玩家,老实说我无法击败自己的AI ...

If you any part of this post provided some useful information or just a bit of inspiration please follow me for more.
如果您这篇文章的任何部分提供了一些有用的信息或只是一些启发,请关注我以获取更多信息。
You can find the source code on my github.
您可以在我的github上找到源代码。
Link to my other posts:
链接到我的其他帖子:
Minecraft Mapper — Computer Vision and OCR to grab positions from screenshots and plot
Minecraft Mapper-计算机视觉和OCR可以从屏幕截图和绘图中获取位置
翻译自: https://towardsdatascience.com/computer-vision-and-the-ultimate-pong-ai-e6d70153fc45
pong
http://www.taodudu.cc/news/show-1874115.html
相关文章:
- linkedin爬虫_这些框架帮助LinkedIn大规模构建了机器学习
- 词嵌入生成词向量_使用词嵌入创建诗生成器
- 端到端车道线检测_如何使用Yolov5创建端到端对象检测器?
- 深度学习 检测异常_深度学习用于异常检测:全面调查
- 自我监督学习和无监督学习_弱和自我监督的学习-第3部分
- 聊天工具机器人开发_聊天机器人-精致的交流工具? 还是您的客户服务团队不可或缺的成员?...
- 自我监督学习和无监督学习_弱和自我监督的学习-第4部分
- ai星际探索 爪子_探索AI地牢
- 循环神经网络 递归神经网络_递归神经网络-第5部分
- 用于小儿肺炎检测的无代码AI
- 建筑业建筑业大数据行业现状_建筑—第2部分
- 脸部识别算法_面部识别技术是种族主义者吗? 先进算法的解释
- ai人工智能对话了_产品制造商如何缓解对话式AI中的偏见
- 深度神经网络 轻量化_正则化对深度神经网络的影响
- dbscan js 实现_DBSCAN在PySpark上的实现
- 深度学习行人检测简介_深度学习简介
- ai初创企业商业化落地_初创企业需要问的三个关于人工智能的问题
- scikit keras_使用Scikit-Learn,Scikit-Opt和Keras进行超参数优化
- 异常检测时间序列_DeepAnT —时间序列的无监督异常检测
- 机器学习 结构化数据_聊天机器人:根据结构化数据创建自然语言
- mc2180 刷机方法_MC控制和时差方法
- 城市ai大脑_激发AI研究的大脑五个功能
- 神经网络算法优化_训练神经网络的各种优化算法
- 算法偏见是什么_人工智能中的偏见有什么作用?
- 查看-增强会话_会话助手平台-Hinglish Voice等!
- 可解释ai_人工智能解释
- 机器学习做自动聊天机器人_聊天机器人业务领袖指南
- 神经网络 代码python_详细使用Python代码和数学构建神经网络— II
- tensorflow架构_TensorFlow半监督对象检测架构
- 最牛ai波士顿动力上台阶_波士顿动力的位置如何使美国成为人工智能的关键参与者...
pong_计算机视觉与终极Pong AI相关推荐
- 计算机视觉+自然语言处理=强AI?
所谓强AI是指和人一样能够用一种通用算法实现不同功能的AI. 现在任何有点常识的人一听到强AI,就会皱起眉头:那还是现在技术瓶颈以外的能力.但我一直在思考这个通向强AI的那把金钥匙究竟在哪里?最近突然 ...
- 计算机视觉系列-业界动态-AI快车道-PaddleOCR最新进展
计算机视觉系列-业界动态-AI快车道-PaddleOCR最新进展
- 计算机视觉:分割一切AI大模型segment-anything
1 segment-anything介绍 Segment Anything Model (SAM)来源于Facebook公司Meta AI实验室.据Mata实验室介绍,SAM 已经学会了关于物体的一般 ...
- 腾讯优图、AI Lab招聘计算机视觉算法工程师
点上方蓝字计算机视觉联盟获取更多干货 在右上方 ··· 设为星标 ★,与你不见不散 仅作学术分享,不代表本公众号立场,侵权联系删除 转载于:极市平台,腾讯 AI博士笔记系列推荐 周志华<机器学习 ...
- 【AI写作】怎样使用AI写作每天赚钱?—— 使用 AI 写作和每天产生被动收入的终极指南
使用 AI 写作和每天产生被动收入的终极指南 AI辅助写作:Rytr - Best AI Writer, Content Generator & Writing Assistant https ...
- 【AI人工智能写作】使用 AI 智能写作实现每天产生被动收入的终极指南!!!...
使用 AI 写作和每天产生被动收入的终极指南 AI辅助写作:Rytr - Best AI Writer, Content Generator & Writing Assistant https ...
- 智能新经济的AI平台:左手技术,右手行业
两手都要抓,两手都要硬. 作者 | 赵健 编辑 | 杨杨 每个时代都会诞生各时代的代表性企业,它们的一个共同特点是都成为了新经济发展的"基础设施"--从信息通讯,到互联网.移动互联 ...
- Deep Reinforcement Learning: Pong from Pixels
这是一篇迟来很久的关于增强学习(Reinforcement Learning, RL)博文.增强学习最近非常火!你一定有所了解,现在的计算机能不但能够被全自动地训练去玩儿ATARI(译注:一种游戏机) ...
- 计算机视觉技术学习路线(3D视觉)
前言 本文首发于公众号[3D视觉工坊],原文请见超详细的计算机视觉技术学习路线 3D视觉介绍 我们生活在三维空间中,如何智能地感知和探索外部环境一直是个热点难题.2D视觉技术借助强大的计算机视觉和深度 ...
- Deep Reinforcement Learning: Pong from Pixels翻译和简单理解
原文链接: http://karpathy.github.io/2016/05/31/rl/ 文章目录 原文链接: 前言 Policy-Gradient结构流程图 Deep Reinforcement ...
最新文章
- 使用Ceph集群作为Kubernetes的动态分配持久化存储
- 支持向量机(SVM):超平面及最大间隔化、支持向量机的数学模型、软间隔与硬间隔、线性可分支持向量机、线性支持向量机、非线性支持向量机、核函数、核函数选择、SMO算法、SVM vs LR、优缺点
- robots.txt网站爬虫文件设置
- python读取excel生成mysql建表语句_python读取excel文件并自动在mysql中建表导数据
- 利用C++模板编写的序列化框架
- 11月14日,西安,听说有一节百度AI快车道课程在等你上车
- PackagesNotFoundError: The following packages are not available from current channels: - python=3
- 分布式,集群,冗余的理解
- 怎样把RStudio字体调大
- 酷q显示无法连接到服务器,本机酷Q与服务器nonebot建立通信
- ubuntu 设置虚拟内存 解决内存不足
- 大数据学习——Hadoop本地模式搭建
- jpeg图片太大怎么办?一分钟轻松搞定
- win10 python3.6安装numpy路径报错_Python3.6的组件numpy的安装 猪悟能
- javapoet的认识
- 我为什么要写微信公众号
- 第一次用 Mac git 遇到的一些问题及解决方法,记录一下
- vscode远程连接服务器操作方法
- JavaScript-Tool:Numeral.js
- AUTOSAR_SWS_SecureOnboardCommunication(7)-功能规格 -1
热门文章
- (int)、Convert.ToInt32()与int.Parse()的区别
- ubuntu 18下安装vscode教程两种方法总计
- 20200728每日一句
- python学习笔记 程序执行过程 基本数据类型
- Atitit php pdo的api使用 目录 1.1. PHP PDO简介 1 1.2. 若要使用数据库长连接,:PDO::ATTR_PERSISTENT 1 2. 其他设置 2 2.1. )、P
- Atitit 小程序后端服务api艾提拉总结 目录 1. 服务端 1 1.1. 开放接口 1 1.1.1. 登录 1 1.1.2. 用户信息 1 1.1.3. 接口调用凭证 2 1.1.4. 数据分
- Atitti 文本分类 以及 垃圾邮件 判断原理 以及贝叶斯算法的应用解决方案
- paip.自定义java 泛型类与泛型方法的实现总结
- Julia:1.0与0.6 的几点不同
- 黑岩集团创建者Larry Fink 超长访谈