Unit Testing with JUnit - Tutorial
为什么80%的码农都做不了架构师?>>> 
1. Types of tests
1.1. Unit tests and unit testing
A unit test is a piece of code written by a developer that executes a specific functionality in the code which is tested. The percentage of code which is tested by unit tests is typically called test coverage.
A unit test targets a small unit of code, e.g. a method or a class, (local tests).
Unit tests ensure that code works as intended. They are also very helpful to ensure that the code still works as intended in case you need to modify code for fixing a bug or extending functionality. Having a high test coverage of your code allows you to continue developing features without having to perform lots of manual tests.
1.2. Test fixture
The text fixture is a fixed state of the software under test used as a baseline for running tests.
1.3. Functional and integration tests
An integration test has the target to test the behavior of a component or the integration between a set of components. The term functional test is sometimes used as synonym for integration test.
These kind of tests allow you to translate your user stories into a test suite, i.e., the test would resemble a expected user interaction with the application.
1.4. Performance tests
Performance tests are used to measure performance of software components in a repeatable way.
2. Test organization
2.1. Test organization for Java projects
Typically unit tests are created in a separate project or separate source folder to avoid that the normal code and the test code is mixed.
2.2. What should you test?
What is test is a hot topic for discussion. Some developers believe every statement in your code should be tested.
In general it is save to ignore trivial code, as for example getter and setter methods which simply assign values to fields. Writing tests for these statements is time consuming and pointless, as you would be testing the Java virtual machine. The JVM itself has already test cases for this and you are save to assume that field assignment works in Java if you are developing end user applications.
You should write software tests in any case for the critical and complex parts of your application. A solid test suite also protects you against regression in existing code, if you introduce new features.
2.3. Introducing tests in legacy code
If you start developing tests for an existing code base without any tests, it is good practice to start writing tests for the parts of the application in which most errors happened in the past. This way you can focus on the critical parts of your application.
3. Using JUnit
3.1. Unit testing with JUnit
JUnit in version 4.x is a test framework which uses annotations to identify methods that specify a test. Typically these test methods are contained in a class which is only used for testing. It is typically called a Test class.
The following code shows a JUnit test method . It can be created via File → New → JUnit → JUnit Test case.
@Test public void testMultiply() { // MyClass is tested MyClass tester = new MyClass(); // check if multiply(10,5) returns 50 assertEquals("10 x 5 must be 50", 50, tester.multiply(10, 5));}JUnit assumes that all test methods can be executed in an arbitrary order. Therefore tests should not depend on other tests.
To write a test with JUnit you annotate a method with the@org.junit.Test annotation and use a method provided by JUnit to check the expected result of the code execution versus the actual result.
You can use the Eclipse user interface to run the test, via right-click on the test class and selecting Run → Run As → JUnit Test. Outside of Eclipse you can useorg.junit.runner.JUnitCoreclass to run the test. You can also mark a test method in a class and select to run the test. Only the selected method will be executed.
3.2. Available JUnit annotations
The following table gives an overview of the available annotations in JUnit 4.x.
Table 1. Annotations
| Annotation | Description |
|---|---|
|
@Test |
The@Testannotation identifies a method as a test method. |
| @Test (expected = Exception.class) | Fails, if the method does not throw the named exception. |
| @Test(timeout=100) | Fails, if the method takes longer than 100 milliseconds. |
|
@Before public void method() |
This method is executed before each test. It is used to can prepare the test environment (e.g. read input data, initialize the class). |
|
@After public void method() |
This method is executed after each test. It is used to cleanup the test environment (e.g. delete temporary data, restore defaults). It can also save memory by cleaning up expensive memory structures. |
|
@BeforeClass public static void method() |
This method is executed once, before the start of all tests. It is used to perform time intensive activities, for example to connect to a database. Methods annotated with this annotation need to be defined asstaticto work with JUnit. |
|
@AfterClass public static void method() |
This method is executed once, after all tests have been finished. It is used to perform clean-up activities, for example to disconnect from a database. Methods annotated with this annotation need to be defined asstaticto work with JUnit. |
| @Ignore | Ignores the test method. This is useful when the underlying code has been changed and the test case has not yet been adapted. Or if the execution time of this test is too long to be included. |
3.3. Assert statements
JUnit provides static methods in theAssertclass to test for certain conditions. These assertion methods typically start withassertand allow you to specify the error message, the expected and the actual result. An assertion method compares the actual value returned by a test to the expected value, and throws anAssertionExceptionif the comparison test fails.
The following table gives an overview of these methods. Parameters in [] brackets are optional.
Table 2. Test methods
| Statement | Description |
|---|---|
| fail(String) | Let the method fail. Might be used to check that a certain part of the code is not reached. Or to have a failing test before the test code is implemented. The String parameter is optional. |
| assertTrue([message], boolean condition) | Checks that the boolean condition is true. |
| assertFalse([message], boolean condition) | Checks that the boolean condition is false. |
| assertEquals([String message], expected, actual) | Tests that two values are the same. Note: for arrays the reference is checked not the content of the arrays. |
| assertEquals([String message], expected, actual, tolerance) | Test that float or double values match. The tolerance is the number of decimals which must be the same. |
| assertNull([message], object) | Checks that the object is null. |
| assertNotNull([message], object) | Checks that the object is not null. |
| assertSame([String], expected, actual) | Checks that both variables refer to the same object. |
| assertNotSame([String], expected, actual) | Checks that both variables refer to different objects. |
Note
You should provide meaningful messages in assertions so that it is easier for the developer to identify the problem. This helps in fixing the issue, especially if someone looks at the problem, which did not write the code under test or the test code.
3.4. Create a JUnit test suite
If you have several test classes you can combine them into a test suite. Running a test suite will execute all test classes in that suite in the specified order.
The following example code shows a test suite which defines that two test classes should be executed. If you want to add another test class you can add it to@Suite.SuiteClassesstatement.
package com.vogella.junit.first; import org.junit.runner.RunWith; import org.junit.runners.Suite; import org.junit.runners.Suite.SuiteClasses; @RunWith(Suite.class) @SuiteClasses({ MyClassTest.class, MySecondClassTest.class }) public class AllTests {}3.5. Run your test outside Eclipse
Eclipse provides support for running your test interactively in the Eclipse IDE. You can also run your JUnit tests outside Eclipse via standard Java code. Theorg.junit.runner.JUnitCoreclass provides therunClasses()method which allows you to run one or several tests classes. As a return parameter you receive an object of the typeorg.junit.runner.Result. This object can be used to retrieve information about the tests.
In yourtestfolder create a new classMyTestRunnerwith the following code. This class will execute your test class and write potential failures to the console.
package de.vogella.junit.first; import org.junit.runner.JUnitCore; import org.junit.runner.Result; import org.junit.runner.notification.Failure; public class MyTestRunner { public static void main(String[] args) {Result result = JUnitCore.runClasses(MyClassTest.class); for (Failure failure : result.getFailures()) {System.out.println(failure.toString());}}
}
To run your JUnit tests outside Eclipse you need to add the JUnit library jar to the classpath of your program. Typically build frameworks like Apache Ant or Apache Maven are used to execute tests automatically on a regular basis.
4. Installation of JUnit
4.1. Using JUnit integrated into Eclipse
Eclipse allows you to use the version of JUnit which is integrated in Eclipse. If you use Eclipse no additional setup is required. In this case you can skip the following section.
4.2. Downloading the JUnit library
If you want to control the used JUnit library explicitly, download JUnit4.x.jar from the following JUnit website. The download contains thejunit-4.*.jarwhich is the JUnit library. Add this library to your Java project and add it to the classpath.
http://junit.org/ 5. Eclipse support for JUnit
5.1. Creating JUnit tests
You can write the JUnit tests manually but Eclipse supports the creation of JUnit tests via wizards.
For example to create a JUnit test or a test class for an existing class, right-click on your new class, select this class in the Package Explorer view, right-click on it and select New → JUnit Test Case.
Alternatively you can also use the JUnit wizards available under File → New → Other... → Java → JUnit.
5.2. Running JUnit tests
To run a test, select the class which contains the tests, right-click on it and select Run-as → JUnit Test. This starts JUnit and executes all test methods in this class.
Eclipse provides the Alt+Shift+X, ,T shortcut to run the test in the selected class. If you position the cursor on one method name, this shortcut runs only the selected test method.
To see the result of an JUnit test, Eclipse uses the JUnit view which shows the results of the tests. You can also select individual unit test in this view , right-click them and select Run to execute them again.
By default this view shows all tests you can also configure, that it shows only failing tests.

You can also define that the view is only activated if you have a failing test.

Note
Eclipse creates run configurations for tests. You can see and modify these via the Run → Run Configurations... menu.
5.3. JUnit static imports
JUnit uses static methods and Eclipse cannot always create the correspondingstatic importstatements automatically.
You can make the JUnit test methods available via the Content Assists. Content Assists is a functionality in Eclipse which allows the developer to get context sensitive code completion in an editor upon user request.
Open the Preferences via Window → Preferences and select Java → Editor → Content Assist → Favorites.
Use the new New Type button to add theorg.junit.Asserttype. This makes for example theassertTrue,assertFalseandassertEqualsmethods directly available in the Content Assists.

You can now use Content Assists (shortcut: Ctrl+Space) to add the method and the import.
5.4. Wizard for creating test suites
To create a test suite in Eclipse you select the test classes which should be included into this in the Package Explorer view, right-click on them and select New → Other... → JUnit → JUnit Test Suite.

5.5. Testing exception
The@Test (expected = Exception.class)annotation is limited as it can only test for one exception. To test exceptions you can use the following test pattern.
try {mustThrowException(); fail();
} catch (Exception e) { // expected // could also check for message of exception, etc. }
6. Exercise: Using JUnit
6.1. Project preparation
Create a new project called com.vogella.junit.first.
Create a new source foldertest. For this right-click on your project, select Properties and choose the Java Build Path . Select the Source tab.

Press the Add Folder button, afterwards press the Create New Folder button. Create thetestfolder.
The result is depicted in the following sceenshot.

Alternatively you can add a new source folder by right-clicking on a project and selecting New → Source Folder.
6.2. Create a Java class
In thesrcfolder, create thecom.vogella.junit.firstpackage and the following class.
package com.vogella.junit.first; public class MyClass { public int multiply(int x, int y) { // the following is just an example if (x > 999) { throw new IllegalArgumentException("X should be less than 1000");} return x / y;}
}
6.3. Create a JUnit test
Right-click on your new class in the Package Explorer view and select New → JUnit Test Case.
In the following wizard ensure that the New JUnit 4 test flag is selected and set the source folder totest, so that your test class gets created in this folder.

Press the Next button and select the methods that you want to test.

If the JUnit library is not part of the classpath of your project, Eclipse will prompt you to add it. Use this to add JUnit to your project.

Create a test with the following code.
package com.vogella.junit.first; import static org.junit.Assert.assertEquals; import org.junit.AfterClass; import org.junit.BeforeClass; import org.junit.Test; public class MyClassTest { @BeforeClass public static void testSetup() {} @AfterClass public static void testCleanup() { // Teardown for data used by the unit tests } @Test(expected = IllegalArgumentException.class) public void testExceptionIsThrown() {MyClass tester = new MyClass();tester.multiply(1000, 5);} @Test public void testMultiply() {MyClass tester = new MyClass();assertEquals("10 x 5 must be 50", 50, tester.multiply(10, 5));}
}
6.4. Run your test in Eclipse
Right-click on your new test class and select Run-As → JUnit Test.

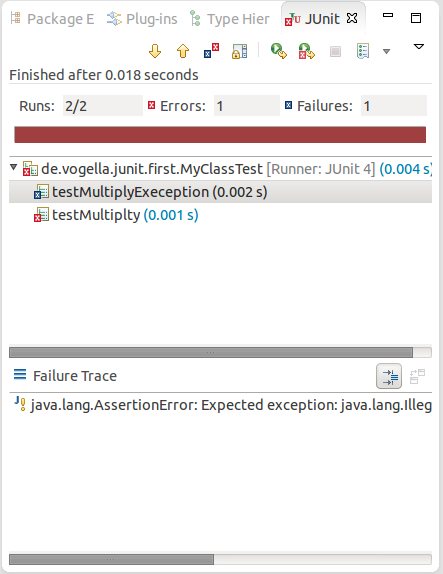
The result of the tests will be displayed in the JUnit view . In our example one test should be succesful and one test should show an error. This error is indicated by a red bar.

The test is failing because our multiplier class is currently not working correctly. It does a division instead of multiplication. Fix the bug and re-run test to get a green bar.
7. Advanced JUnit options
7.1. Parameterized test
JUnit allows you to use parameters in a tests class. This class can contain one test method and this method is executed with the different parameters provided.
You mark a test class as a parameterized test with the@RunWith(Parameterized.class)annotation.
Such a test class must contain a static method annotated with@Parametersthat generates and returns a Collection of Arrays. Each item in this collection is used as the parameters for the test method.
You need also to create a constructor in which you store the values for each test. The number of elements in each array provided by the method annotated with@Parametersmust correspond to the number of parameters in the constructor of the class. The class is created for each parameter and the test values are passed via the constructor to the class.
The following code shows an example for a parameterized test. It assume that you test themultiply()method of theMyClassclass which was used in an example earlier.
package de.vogella.junit.first; import static org.junit.Assert.assertEquals; import java.util.Arrays; import java.util.Collection; import org.junit.Test; import org.junit.runner.RunWith; import org.junit.runners.Parameterized; import org.junit.runners.Parameterized.Parameters; @RunWith(Parameterized.class) public class MyParameterizedClassTest { private int multiplier; public MyParameterizedClassTest(int testParameter) { this.multiplier = testParameter;} // creates the test data @Parameters public static Collection<Object[]> data() {Object[][] data = new Object[][] { { 1 }, { 5 }, { 121 } }; return Arrays.asList(data);} @Test public void testMultiplyException() {MyClass tester = new MyClass();assertEquals("Result", multiplier * multiplier,tester.multiply(multiplier, multiplier));}}If you run this test class, the test method is executed with each defined parameter. In the above example the test method is executed three times.
7.2. Rules
Via the@Ruleannotation you can create objects which can be used and configured in your test methods. This adds more flexibility to your tests. You could for example specify which exception message your expect during execution of your test code.
package de.vogella.junit.first; import org.junit.Rule; import org.junit.Test; import org.junit.rules.ExpectedException; public class RuleExceptionTesterExample { @Rule public ExpectedException exception = ExpectedException.none(); @Test public void throwsIllegalArgumentExceptionIfIconIsNull() {exception.expect(IllegalArgumentException.class);exception.expectMessage("Negative value not allowed");ClassToBeTested t = new ClassToBeTested();t.methodToBeTest(-1);}
}
JUnit provides already several useful implementations of rules. For example theTemporaryFolderclass allows to setup files and folders which are automatically removed after a test.
The following code shows an example for the usage of theTemporaryFolderimplementation.
package de.vogella.junit.first; import static org.junit.Assert.assertTrue; import java.io.File; import java.io.IOException; import org.junit.Rule; import org.junit.Test; import org.junit.rules.TemporaryFolder; public class RuleTester { @Rule public TemporaryFolder folder = new TemporaryFolder(); @Test public void testUsingTempFolder() throws IOException {File createdFolder = folder.newFolder("newfolder");File createdFile = folder.newFile("myfilefile.txt");assertTrue(createdFile.exists());}
}
To write your own rule you need to implement theTestRuleinterface.
8. Mocking
Unit testing uses also mocking of objects. In this case the real object is replaced by a replacement which has a predefined behavior the test.
There are several frameworks available for mocking. To learn more about mock frameworks please see the Mockito tutorial and the EasyMock tutorial
转载于:https://my.oschina.net/sayi/blog/176310
Unit Testing with JUnit - Tutorial相关推荐
- 《Pragmatic Unit Testing In Java with JUnit》—单元测试之道读后感
<Pragmatic Unit Testing In Java with JUnit> ...
- 《Pragmatic unit testing:in java with Junit》阅读
SQ3R阅读法: Survey:阅读之前的浏览,查阅 1.书名:<Pragmatic unit testing:in java with Junit>,中文译名<单元测试之道Ja ...
- Unit Testing in iOS
2019独角兽企业重金招聘Python工程师标准>>> Introduction Unit testing is a standard technique in computer p ...
- Unit testing Cmockery 简单使用
/*********************************************************************** Unit testing Cmockery 简单使用* ...
- 《Unit Testing》1.1 -1.2 单元测试的目的
本系列是<Unit Testing> 一书的读书笔记 + 精华提取. 书中的例子 C# 语言编写,但概念是通用的,只要懂得面向对象编程就可以. 单元测试当前的状态 目前,在(美国的)大部分 ...
- 体验VS2017的Live Unit Testing
相对于传统的Unit Test,VS2017 带来了一个新的功能,叫Live Unit Testing,从字面意思理解就是实时单元测试,在实际的使用中,这个功能就是可以在编写代码的时候进行实时的bac ...
- 我的测试生活感悟2 - Art Of Unit Testing
今天把<Art Of Unit Testing>的前四个章节读完了,作者以自己的亲身经历,使用简洁清晰的语言,为我们展现了单元测试的艺术. 怎么定义一个好的测试案例呢?好的测试案例应该是在 ...
- AY写给国人的教程- VS2017 Live Unit Testing[1/2]-C#人爱学不学-aaronyang技术分享
AY写给国人的教程- VS2017 Live Unit Testing[1/2]-C#人爱学不学-aaronyang技术分享 原文:AY写给国人的教程- VS2017 Live Unit Testin ...
- 对 React 组件进行单元测试(unit testing)
2019独角兽企业重金招聘Python工程师标准>>> 在这里说一下前端开发的一个特点是更多的会涉及用户界面,当开发规模达到一定程度时,几乎注定了其复杂度会成倍的增长. 无论是在代码 ...
- [Redux-Observable Unit Testing] Mocking an ajax request when testing epics
Often in unit tests we are focussing on the logic involved in crafting a network request, & how ...
最新文章
- 国内常用的学习flutter地址
- Qt4 如何使用QHttp实现post和get
- 我的notepad++
- pip/conda导出 requirements.txt 注意事项
- python 二维列表切片_Python中mutable与immutable和二维列表的初始化问题
- 《小艾上班记》—— 读后总结
- win10系统迁移到固态硬盘ssd
- Java注解:@IntDef 替换 Emum
- 优动漫PAINT的变形文字工具教程
- 【程序员学理财】有哪些普通人应该知道的经济学常识?
- Uml 类图 stereotype的值含义,该怎么解决
- 微信小程序正则表达式
- HTML5学习笔记--第六章 文本元素
- Web前端html5+css3前端开发入门学习笔记
- [bzoj3141][HNOI2013]旅行
- java inputstream长度_java.net.*下的相关问题 取得inputStream的长度
- 王道论坛机试指南学习笔记(四)图论
- c语言百鸡程序,百钱买百鸡C语言程序
- 数据库RocksDB优化方案
- Java、九个硬币的正反面