Linux集群服务知识点总结及通过案例介绍如何实现高性能web服务(三)
三:通过corosync+pacemaker实现web服务高可用,主要实现步骤:
既然给web应用服务器做高可用,那么httpd进程就不能开机自动运行,而且当前httpd服务属于停止状态,有corosync来自动启动某台的httpd进程
|
1
2
|
[root@Real1 ~]# service httpd stop && chkconfig httpd off
[root@Real2 ~]# service httpd stop && chkconfig httpd off
|
注:在安装corosync+pacemaker软件包之前,使用yum来安装它们所依赖的软件包:
|
1
|
[root@Real1 ~]# yum install libibverbs librdmacm lm_sensors libtool-ltdl openhpi-libs openhpi perl-TimeDate -y
|
第一步:在两台Realserver应用服务器上安装corosync+pacemaker软件包,相应软件包列表:
|
1
2
3
4
5
6
7
8
9
10
11
12
13
14
15
|
cluster-glue
cluster-glue-libs
heartbeat
openaislib
resource-agents
corosync
heartbeat-libs
pacemaker
corosynclib
libesmtp
pacemaker-libs
注:软件包下载地址:http://clusterlabs.org/rpm/。
请根据硬件平台及操作系统类型选择对应的软件包;这里建议每个软件包都使用目前最新的版本。
使用如下命令安装:
# yum -y --nogpgcheck localinstall *.rpm 略过验证码检测,使用本地安装
|
第二步:配置corosync和authkeys文件
|
1
2
3
4
5
6
7
8
9
10
11
12
13
14
15
|
[root@Real1 ~]# cp /etc/corosync/corosync.conf.example /etc/corosync/corosync.conf
[root@Real1 ~]# vim /etc/corosync/corosync.conf ##编辑corosync主配置文件,并添加如下内容
aisexec {
user: root
group: root
}
service {
name: pacemaker
ver: 0
use_mgmtd: yes
}
并设定此配置文件中 bindnetaddr后面的IP地址为你的网卡所在网络的网络地址
bindnetaddr 172.16.0.0
生成节点间通信时用到的认证密钥文件:
[root@Real1 ~]# corosync-keygen
|
注:Real2上也做同样的操作,例如安装包依赖关系及安装corosync+pacemaker软件包。
第三步:将Realserver1上的corosync和authkey复制至Realserver2上即可:
|
1
|
[root@Real1 ~]# scp -p corosync authkey Real2:/etc/corosync/ ##使用-p选项可以保留原来的属性信息
|
第四步:分别为两个节点创建corosync,生成的日志所在的目录:
|
1
2
|
[root@Real1 ~]# mkdir /var/log/cluster
[root@Real1 ~]# ssh Real2 'mkdir /var/log/cluster'
|
第五步:分别在每个节点上启动corosync进程服务
|
1
2
3
|
[root@Real1 ~]# service corosync restart
[root@Real1 ~]# ssh Real2 'service corosync restart'
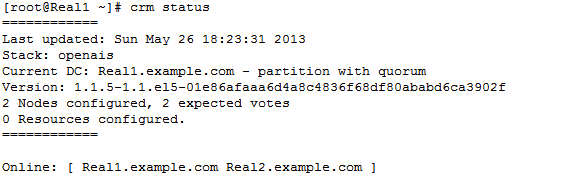
[root@Real1 ~]# crm status
|
◆ 查看corosync启动的相关进程
|
1
|
[root@Real1 ~]# ps auxf
|

第六步:检查corosync相关日志信息:
1:查看corosync引擎是否正常启动:
|
1
2
3
4
5
6
7
|
# grep -e "Corosync Cluster Engine"-e "configuration file"/var/log/cluster/corosync.log
May 1915:46:30corosync [MAIN ] Corosync Cluster Engine ('1.2.7'): started and ready to provide service.
May 1915:46:30corosync [MAIN ] Successfully read main configuration file'/etc/corosync/corosync.conf'.
May 1915:46:51corosync [MAIN ] Corosync Cluster Engine exiting withstatus 0at main.c:170.
May 1915:46:54corosync [MAIN ] Corosync Cluster Engine ('1.2.7'): started and ready to provide service.
May 1915:46:54corosync [MAIN ] Successfully read main configuration file'/etc/corosync/corosync.conf'.
May 1915:48:00corosync [MAIN ] Corosync Cluster Engine exiting withstatus 0at main.c:170.
|
2、查看初始化成员节点通知是否正常发出:
|
1
2
3
4
5
|
# grep TOTEM /var/log/cluster/corosync.log
May 1915:46:54corosync [TOTEM ] Initializing transport (UDP/IP).
May 1915:46:54corosync [TOTEM ] Initializing transmit/receive security: libtomcrypt SOBER128/SHA1HMAC (mode 0).
May 1915:46:56corosync [TOTEM ] The network interface[172.16.88.10] isnow up.
May 1915:46:57corosync [TOTEM ] A processor joined or left the membership and a newmembership was formed.
|
3、查看pacemaker是否正常启动:
|
1
2
3
4
5
6
|
# grep pcmk_startup /var/log/cluster/corosync.log
May 1915:46:33corosync [pcmk ] info: pcmk_startup: CRM: Initialized
May 1915:46:33corosync [pcmk ] Logging: Initialized pcmk_startup
May 1915:46:33corosync [pcmk ] info: pcmk_startup: Maximum core file size is: 4294967295
May 1915:46:33corosync [pcmk ] info: pcmk_startup: Service: 9
May 1915:46:33corosync [pcmk ] info: pcmk_startup: Local hostname: Real1.example.com
|
第七步:使用如下命令查看集群节点的启动状态:
第八步:配置集群工作属性及集群资源:
◆ 禁用stonith设备和关闭法定票数的默认策略为ingore


◆ 添加集群资源(vip、httpd):

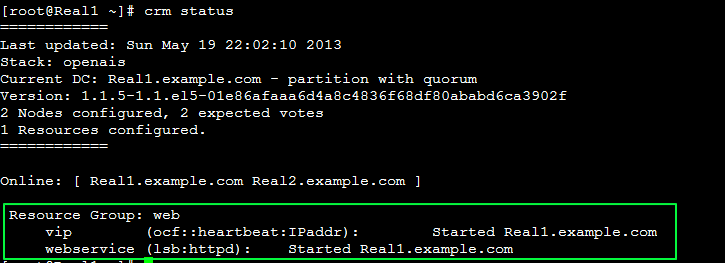
第九步:查看资源的启用状态(crm stauts)

◆ 如果想让两个资源运行在一个Realserver中的话,需要定义组资源,然后将vip和webservice加入到组中即可。

◆ 用windows客户端测试:

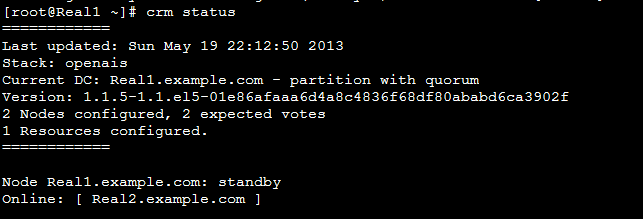
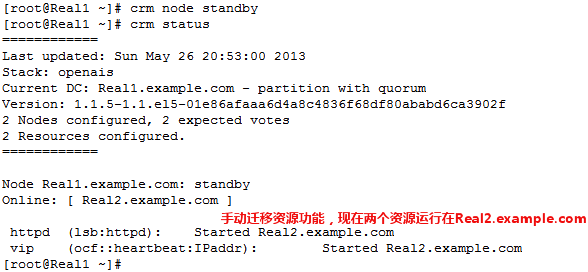
第十步:如果其中一个节点发生故障,另一个节点就会取代发生故障的节点,然后对外提供服务。
|
1
2
|
[root@Real1 ~]# crm node standby
[root@Real1 ~]# crm status
|
再次使用windows客户端测试:

◆ 我们知道限制资源运行在同一个节点上,有两种方法(定义资源组和设置排列约束),下面来如何使用排列约束来限制两个资源在同一个节点上,在设置前,我们将资源组web收到删除。
|
1
2
3
4
5
6
7
8
|
[root@Real1 ~]# crm resource
crm(live)resource# stop web
crm(live)resource# cleanup web
crm(live)resource# cd
crm(live)# configure
crm(live)configure# deleteweb
crm(live)configure# verify
crm(live)configure# commit
|
◆ 下面就可以使用排列约束来限制两个资源运行在同一个节点上:

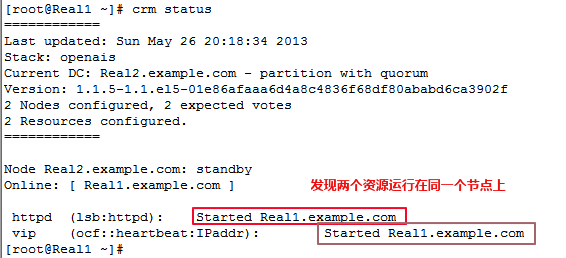
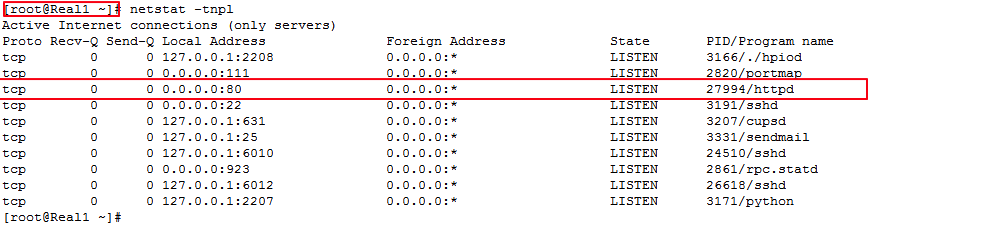
◆ 使用crm status命令查看资源运行节点状态并使用netstat
◆ 设置资源启动顺序


◆ 手动迁移资源到另一个节点:
◆ 用windows客户端测试

◆ 定义资源的黏贴性(倾向性),vip资源更倾向运行在Real1主机上:

◆ 使用crm status命令查看当前资源运行在那个节点上,并手动迁移资源,然后手动在上线,看是否vip资源更倾向于节点一上。
|
1
2
3
4
5
6
7
8
9
10
11
12
13
14
15
16
17
18
19
20
21
22
23
24
25
26
27
28
29
30
31
32
33
34
35
36
37
38
39
|
[root@Real1 ~]# crm status ##查看当前资源运行在那个节点上
============
Last updated: Sun May 2622:17:022013
Stack: openais
Current DC: Real1.example.com - partition withquorum
Version: 1.1.5-1.1.el5-01e86afaaa6d4a8c4836f68df80ababd6ca3902f
2Nodes configured, 2expected votes
2Resources configured.
============
Online: [ Real1.example.com Real2.example.com ]
httpd (lsb:httpd): Started Real1.example.com
vip (ocf::heartbeat:IPaddr): Started Real1.example.com
[root@Real1 ~]# crm node standby ##手动迁移资源,并成为被动节点
[root@Real1 ~]# crm status
============
Last updated: Sun May 2622:17:262013
Stack: openais
Current DC: Real1.example.com - partition withquorum
Version: 1.1.5-1.1.el5-01e86afaaa6d4a8c4836f68df80ababd6ca3902f
2Nodes configured, 2expected votes
2Resources configured.
============
Node Real1.example.com: standby
Online: [ Real2.example.com ]
httpd (lsb:httpd): Started Real2.example.com
vip (ocf::heartbeat:IPaddr): Started Real2.example.com
[root@Real1 ~]# crm node online ##将节点变为主节点
[root@Real1 ~]# crm status ##再次查看资源,因为默认黏贴值为0,所以发现vip更倾向运行在节点Real1节点上
============
Last updated: Sun May 2622:17:482013
Stack: openais
Current DC: Real1.example.com - partition withquorum
Version: 1.1.5-1.1.el5-01e86afaaa6d4a8c4836f68df80ababd6ca3902f
2Nodes configured, 2expected votes
2Resources configured.
============
Online: [ Real1.example.com Real2.example.com ]
httpd (lsb:httpd): Started Real1.example.com
vip (ocf::heartbeat:IPaddr): Started Real1.example.com
|
◆ 设定默认黏贴值为200,然后再手动迁移资源,看vip资源是否更倾向于运行在哪个节点上。

|
1
2
3
4
5
6
7
8
9
10
11
12
13
14
15
16
17
18
19
20
21
22
23
24
25
26
27
28
29
30
31
32
33
34
35
36
37
38
39
|
[root@Real1 ~]# crm status
============
Last updated: Sun May 2622:29:502013
Stack: openais
Current DC: Real1.example.com - partition withquorum
Version: 1.1.5-1.1.el5-01e86afaaa6d4a8c4836f68df80ababd6ca3902f
2Nodes configured, 2expected votes
2Resources configured.
============
Online: [ Real1.example.com Real2.example.com ]
httpd (lsb:httpd): Started Real1.example.com
vip (ocf::heartbeat:IPaddr): Started Real1.example.com
[root@Real1 ~]# crm node standby
[root@Real1 ~]# crm status
============
Last updated: Sun May 2622:30:052013
Stack: openais
Current DC: Real1.example.com - partition withquorum
Version: 1.1.5-1.1.el5-01e86afaaa6d4a8c4836f68df80ababd6ca3902f
2Nodes configured, 2expected votes
2Resources configured.
============
Node Real1.example.com: standby
Online: [ Real2.example.com ]
httpd (lsb:httpd): Started Real2.example.com
vip (ocf::heartbeat:IPaddr): Started Real2.example.com
[root@Real1 ~]# crm node online
[root@Real1 ~]# crm status ##因为资源的默认粘性为200,大于Real1节点上的粘性值,所以vip资源更倾向运行在节点2上。
============
Last updated: Sun May 2622:30:362013
Stack: openais
Current DC: Real1.example.com - partition withquorum
Version: 1.1.5-1.1.el5-01e86afaaa6d4a8c4836f68df80ababd6ca3902f
2Nodes configured, 2expected votes
2Resources configured.
============
Online: [ Real1.example.com Real2.example.com ]
httpd (lsb:httpd): Started Real2.example.com
vip (ocf::heartbeat:IPaddr): Started Real2.example.com
|
转载于:https://blog.51cto.com/smileyouth/1269169
Linux集群服务知识点总结及通过案例介绍如何实现高性能web服务(三)相关推荐
- Linux集群服务知识点总结及通过案例介绍如何实现高性能web服务
转自:http://guodayong.blog.51cto.com/263451/1201101 一:集群相关概念及知识点介绍: LVS(Linux Virtual System) 本项目在1998 ...
- Linux集群和自动化运维
Linux/Unix技术丛书 Linux集群和自动化运维 余洪春 著 图书在版编目(CIP)数据 Linux集群和自动化运维/余洪春著. -北京:机械工业出版社,2016.8 (Linux/Unix技 ...
- 多角度展现 Linux 集群之美
在很长一段时间内,开发和运维的工作泾渭分明.互不干涉,只有在系统出现故障时,双方才会认真地打个照面,长此以往,摩擦和误会必然存在. 此时,有经验的运维工程师会考虑将一部分手动工作脚本化,以减少人为操作 ...
- linux集群-keepalived介绍-用keepalived配置高可用集群
2019独角兽企业重金招聘Python工程师标准>>> linux集群介绍: 以功能划分:高可用和负载均衡 高可用集群:通常为两台服务器,一台工作,另外一台作为冗余.实现高可用的开源 ...
- 全面讲述linux集群负载均衡
学习linux时,你可能会遇到linux集群的问题,这里将介绍linux集群负载均衡的方法,经过仔细整理,在这里拿出来和大家分享一下,希望本文能教会你更多东西. 集群原理 linux集群系统包括集群节 ...
- Linux集群架构(下)——DR模式、keepalived+LVS
2019独角兽企业重金招聘Python工程师标准>>> Linux集群架构(下) 八.DR模式搭建 8.1 准备工作 试验需求三台机器: 分发器,也叫调度器(简写为dir) : 19 ...
- linux集群架构(一),集群概述、高可用配置
2019独角兽企业重金招聘Python工程师标准>>> linux集群概述 根据功能划分为两大类:高可用和负载均衡 高可用集群通常为两台服务器,一台工作,另外一台作为冗余,当提供服务 ...
- 项目实践中Linux集群的总结和思考
2019独角兽企业重金招聘Python工程师标准>>> 前言:作为一名Linux/unix系统工程师.项目实施工程师,这几年一直在涉及到对外项目,经手过许多小中型网站的架构,F5.L ...
- Linux Linux 集群
Linux 集群 Page navigation 什么是集群? 集群分类 基于 Linux 的集群 Linux 服务器集群系统 Linux 高性能计算集群 集群系统 MOSIX 构建 Linux 集群 ...
最新文章
- 第37件事 极简设计的3个方面
- sudo运行程序遇到的问题
- 使用异步Servlet改进应用性能
- android按钮点击后闪退_CAD如何恢复自动崩溃、闪退的文件?
- LeetCode —— 深搜水题记录
- kubernetes视频教程笔记 (20)-ingress
- ERROR Error loading vue.config.js: ERROR Error: Command failed: git describe --always报错可能的原因
- SSM框架原理以及流程简略
- 可视化学习第三周-对比型和分布型数据
- 使用腾讯云Ubuntu20.04搭建代理服务器
- python视频搬运_拒绝降权!教你用 Python 确保制作的短视频独一无二
- python 空集_Python——集(set)
- 超级壁纸android,【教程】MIUI最新超级壁纸安卓全机型安装指南
- 驰骋股市!手把手教你如何用Python和数据科学赚钱?
- zigbee网络启动流程 ---- 协调器
- R语言:R2OpenBUGS
- OTFS从零开始(一)
- java 读文件 二进制_JAVA中读取文件(二进制,字符)内容的几种方法总结
- 全国心力衰竭日:重症心衰的黑科技——永久型人工心脏
- ROS开发之如何将树莓派采集的雷达、IMU数据在虚拟机rviz中显示?