app.publish_获取eZ Publish 5.x以便在Homestead上工作的13个步骤
app.publish
I have since taken another look at eZ Publish (now eZ Platform) and things have improved significantly. Details here.
从那以后,我再次看了eZ Publish(现在是eZ平台),情况有了很大的改善。 详细信息在这里 。
This article was initially going to be a quick tip on how to install eZ Publish on Homestead in just a few steps. However, after I saw how much effort it took to get it up and working from scratch on a Vagrant box hosted on Windows, I decided to make it into a full article. I suffered, so you don’t have to :)
本文最初只是几个步骤,它是如何在Homestead上安装eZ Publish的快速技巧。 但是,当我看到在Windows托管的Vagrant盒上从头开始安装并花费了很多精力之后,我决定将其写成一整篇文章。 我受了苦,所以你不必:)
I’m hoping the eZ team will address the issues I state below, and as they do (if they do) I will alter this post accordingly. Granted, my environment is very specific: Vagrant on Windows. However, this shouldn’t matter. Every CMS, app, and framework I’ve tried to boot up in the same way was runnable in a matter of minutes. There is no reason in today’s modern web world for this not to work the same way on everything.
我希望eZ团队能够解决我在下面提到的问题,并且在他们这样做时(如果确实如此),我将相应地更改此职位。 当然,我的环境非常具体:Windows上的Vagrant。 但是,这无关紧要。 我尝试以相同方式启动的每个CMS,应用程序和框架都可以在几分钟内运行。 在当今的现代网络世界中,没有理由不以相同的方式处理所有事情。
流浪者友好型应用 (Vagrant-friendly apps)

Let’s define the purpose of Vagrant. The purpose of Vagrant is team unity, and production / development parity regardless of host operating system. In other words, the purpose of Vagrant is twofold:
让我们定义Vagrant的目的。 Vagrant的目的是团队团结,以及与主机操作系统无关的生产/开发对等 。 换句话说,Vagrant的目的是双重的:
Being able to provide each team member with the identical development environment to avoid “it works on my machine” excuses
能够为每个团队成员提供相同的开发环境,以避免“它在我的机器上工作”的借口
- Being able to replicate the production environment as closely as possible without disrupting either the host machine, or the environments dedicated to other clients on the same machine能够尽可能紧密地复制生产环境,而不会破坏主机或同一台计算机上专用于其他客户端的环境
Therefore, we use Vagrant to have identical copies of VMs dedicated to a single project, which can be easily destroyed and rebuilt without repercussions for easier, faster and more scalable development, experimentation and deployment.
因此,我们使用Vagrant拥有专用于单个项目的VM的相同副本,可以轻松销毁和重建这些副本,而不会造成影响,从而使开发,实验和部署变得更加轻松,快速和可扩展。
Through experimentation with the installation procedures below, I’ve found that eZ Publish does not make this easy. In 2014, most professional developers with multiple clients and/or projects use Vagrant even while soloing – having dedicated, separate, destructible and rebuildable environments for each project is priceless when considering the plethora of hosting options, tools, and versions of those tools at our disposal.
通过与下面的安装程序的实验,我发现,eZ Publish的不使这个容易。 2014年,大多数拥有多个客户和/或项目的专业开发人员甚至在单独工作时也使用Vagrant –考虑到我们的托管选项,工具和这些工具的版本过多,每个项目都有专用,独立,可破坏和可重建的环境是无价的处置。
I’m disappointed to not see more apps adopt a Vagrant-first approach these days. Just like we need to think mobile first when developing front ends, we should think VM-first when developing back end libraries, frameworks and apps – otherwise the whole Docker / Vagrant compartmentalization story the world is focusing on is moot, and the apps that fail to adapt will be left behind as the world moves to Heroku, GAE, Amazon and others.
我很失望,现在没有看到更多的应用程序采用流浪者优先的方法。 就像我们在开发前端时需要首先考虑移动性一样,在开发后端库,框架和应用程序时应首先考虑虚拟机-否则,整个世界关注的整个Docker / Vagrant隔离化故事都没有意义,而失败的应用程序随着世界迁移到Heroku,GAE,亚马逊等地,适应性将被抛在后面。
Let’s start the installation procedure now.
现在开始安装过程。
Important Note: If you’re not on Windows, Step 5 probably won’t happen to you. If you are on Windows, you can avoid Step 5 by running the entire procedure in an “elevated” Gitbash / command prompt (by running either as Administrator). Admin users are the only ones who have permission to create symlinks on Windows 8. There were rumors of this being fixable, but none of them reliably work. Running your dev environment as Admin opens a whole new can of worms, so do that at your own risk. If anyone successfully gives a regular Windows 8 user permission to create symlinks through Gitbash, please let me know.
重要说明:如果您不在Windows上,则可能不会发生步骤5。 如果您使用的是Windows,则可以通过在“提升的” Gitbash /命令提示符下运行整个过程来避免第5步(以管理员身份运行)。 管理员用户是唯一有权在Windows 8上创建符号链接的用户。有传言称此问题是可修复的 ,但没有一个可靠地起作用。 以Admin身份运行开发环境会打开一堆全新的蠕虫,因此,后果自负。 如果有人成功授予Windows 8常规用户权限以通过Gitbash创建符号链接,请告诉我。
步骤1:改良宅基地 (Step 1: Homestead Improved)
Have a Laravel Homestead Improved box prepared and working. If you did vagrant up to see if it works, do vagrant destroy so we can configure it.
准备并运行Laravel Homestead改进的盒子。 如果您做了vagrant up以查看其是否有效,请进行vagrant destroy工作,以便我们进行配置。
步骤2:添加网站 (Step 2: Add Site)
Open the Homestead.yaml file, and add a new site:
打开Homestead.yaml文件,并添加一个新站点:
- map: ez.app
to: /home/vagrant/Code/ezpub/web
Add ez.app to your host machine’s hosts file, as described in the Laravel Homestead Improved quick tip. Basically, make sure your hosts file contains 127.0.0.1 ez.app. Naturally, also map the shared folder.
添加ez.app到您的主机的hosts文件,如所描述的Laravel家园改进快速提示。 基本上,确保您的hosts文件包含127.0.0.1 ez.app 。 当然,还要映射共享文件夹。
Boot the VM with vagrant up and enter the VM with vagrant ssh.
使用vagrant up启动VM,然后使用vagrant ssh输入VM。
步骤3:安装必备组件 (Step 3: Install Prerequisites)
The project needs PHP to have the php-intl and php-xsl extensions installed. It will also ask you for sendmail throughout the setup wizard. In Homestead, you can install all of these with:
该项目需要PHP才能安装php-intl和php-xsl扩展。 它还会在整个设置向导中询问您sendmail 。 在Homestead中,您可以使用以下命令安装所有这些组件:
sudo apt-get update
sudo apt-get install php5-intl php5-xsl sendmail
步骤4:获取代码 (Step 4: Get Code)
cd Code
composer create-project ezsystems/ezpublish-community ezpub
The above will create an eZ project for use, not for development. To get the development version, refer to their Github page.
上面的代码将创建一个eZ项目以供使用 ,而不是用于开发。 要获得开发版本,请参阅其Github页面。
Note that eZ Publish is ridiculously large, and will take a while to do this. It is almost guaranteed you’ll be hitting the “60 requests per hour” unauthenticated GitHub API rate limit, so you might have to input your username and password during the installation process to get through that barrier.
请注意,eZ Publish非常大,需要一段时间才能完成。 几乎可以保证您将达到“每小时60个请求”的未经身份验证的GitHub API速率限制 ,因此在安装过程中可能必须输入用户名和密码才能克服这一障碍。
The process might fail a couple of times due to timeouts and the enormous amount of data that needs downloading. If that happens, just remove the entire ezpub folder with rm -rf ezpub and re-run the above create-project command – it will be faster every time, because each time a package is downloaded, it is served from local cache on subsequent requests, rather than being re-downloaded.
由于超时和需要下载的大量数据,该过程可能会失败几次。 如果发生这种情况,只需使用rm -rf ezpub删除整个ezpub文件夹,然后重新运行上述create-project命令–每次都会更快,因为每次下载软件包时,它将在后续请求中从本地缓存中提供,而不是重新下载。
The installer will ask you for some data near the end (secret, fallback locale, etc). Fill it out or just hit enter on each to use defaults.
安装程序将在结束时询问您一些数据(秘密,后备语言环境等)。 填写表格,或在每个表格上按Enter键以使用默认值。
The reason why we’re not using a prepared tar archive downloaded from eZ Publish’s website is because the prepared archive is packed with symlinks – and those don’t work if your VM is hosted on a Windows machine. In an effort to keep things multi-platform friendly, I’ve opted for the composer create-project approach.
我们之所以不使用从eZ Publish网站下载的已准备好的tar存档,是因为已准备好的存档中包含符号链接-如果您的VM托管在Windows计算机上,则这些链接将不起作用。 为了保持多平台友好性,我选择了composer create-project方法。
步骤5:处理安装程序错误[仅Windows主机] (Step 5: Handle Installer Bugs [Windows hosts only])
As it stands, eZ Publish isn’t really fine tuned for VMs or edge cases and there’s a lot the team didn’t consider – for example, running it in a VM on a Windows box. With all the dependencies, it’s guaranteed to break somewhere during installation. For me, and probably for you too, this will be the post install scripts that install Assets. Install assets is actually part of Symfony which, in the class which does it, does actually warn against Windows and symlinks, but doesn’t take it into consideration if the parent project forces symlinks, like eZ Publish does.
就目前而言,eZ Publish并不是真的针对VM或边缘案例进行了微调,并且团队没有考虑很多因素,例如,在Windows机上的VM中运行它。 由于具有所有依赖关系,因此可以确保在安装过程中在某处中断。 对于我来说,也许对您也一样,这将是安装Assets的安装后脚本。 安装资产实际上是Symfony的一部分,在执行该类的类中,它确实会警告Windows和符号链接,但如果父项目像eZ Publish那样强制符号链接,则不会考虑它。
If this happens (you’ll get an error about symlinks and some such), open composer.json and delete the line:
如果发生这种情况(您会收到有关符号链接等的错误),请打开composer.json并删除该行:
"symfony-assets-install": "relative",This will force the installer to copy the design assets rather than symlink them.
这将迫使安装程序复制设计资产,而不是将它们符号链接 。
Then, re-run the post-install scripts by executing:
然后,通过执行以下命令重新运行安装后脚本:
composer run-script post-install-cmdYou might still get an error about the legacy eZ version and a comments bundle of some sort, but I’m not sure how to fix that yet, or whether or not it matters.
您可能仍然会遇到有关旧版eZ版本和某种注释包的错误,但是我不确定如何解决它,或者它是否重要。

步骤6:创建数据库 (Step 6: Create a Database)
Create a database we’ll feed to eZ later on. Log into your MySQL instance in the VM with mysql -u homestead -psecret. Then, run:
创建一个数据库,稍后我们将提供给eZ。 使用mysql -u homestead -psecret登录到虚拟机中MySQL实例。 然后,运行:
CREATE SCHEMA `ez` DEFAULT CHARACTER SET utf8 COLLATE utf8_general_ci ;步骤7:设置文件夹权限 (Step 7: Set Up Folder Permissions)
This step can be skipped on Homestead, because the server already runs under the “vagrant” user, which owns all the subfolders in the ezpub folders.
可以在Homestead上跳过此步骤,因为服务器已经在“ vagrant”用户下运行,该用户拥有ezpub文件夹中的所有子文件夹。
步骤8:运行安装向导 (Step 8: Run the Setup Wizard)
Edit: see Jerome’s comment below for an approach that handles a part of Step 8 and Step 9 automatically.
编辑:请参见下面的Jerome评论,以获取一种自动处理步骤8和步骤9的一部分的方法。
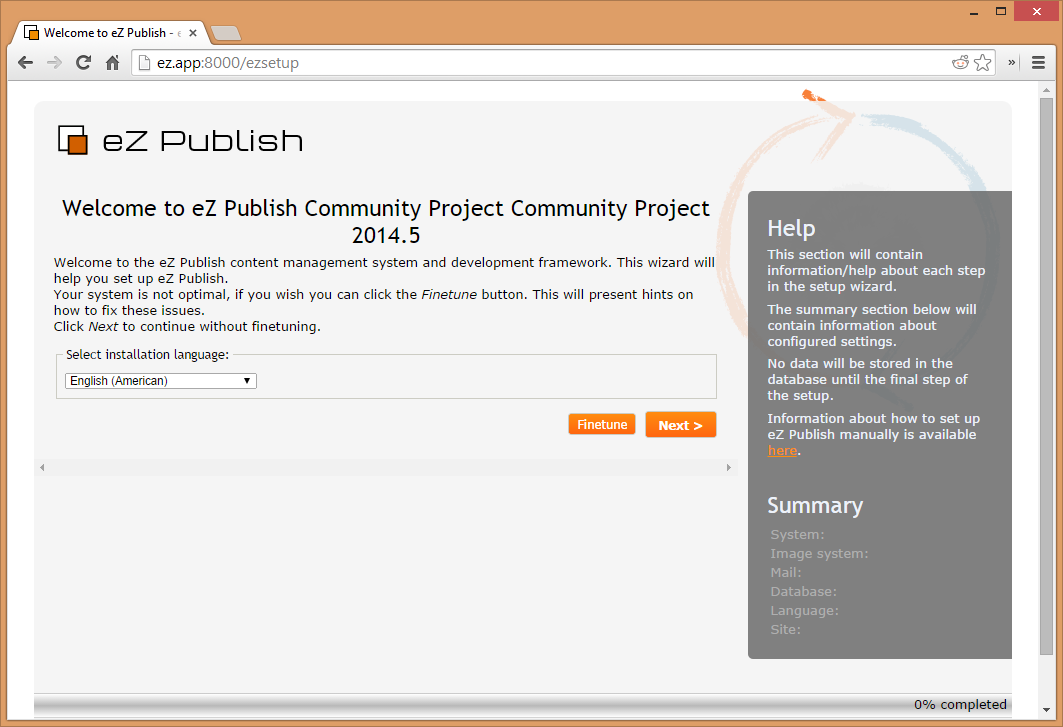
Visit ez.app:8000 and see the following screen.
访问ez.app:8000然后看到以下屏幕。
This is where it gets super weird. For no reason, this happens. Yes, it’s a problem that has remained unfixed for two years now – seriously, it’s a two year old unresolved bug in a PHP project. Fixing it in the core would take seven seconds of work, including commit and push (see 8.2). There are two ways to get around it in our case. None is pleasant, so it’s up to you to pick one.
这是超级奇怪的地方。 无缘无故, 这发生了 。 是的,这是一个至今仍未解决的问题,现在已经两年了-严重的是,这是PHP项目中两年未解决的错误 。 将其修复到核心将需要七秒钟的工作,包括提交和推送(请参阅8.2)。 在我们的案例中,有两种解决方法。 没有哪个是令人愉快的,所以要由您选择一个。
步骤8.1:进行欢闹 (Step 8.1: Hilarity Ensues)
In order to get around it, and I’m dead serious, this is not a joke – you need to open up dev tools, and put ezsetup at the end of the form’s action attribute, because by default it only says index.php. It’s baffling how such an issue can still exist in 2014, but here we are:
为了解决这个问题,我很认真,这不是在开玩笑-您需要打开开发工具,并将ezsetup放在表单的action属性的末尾,因为默认情况下,它仅显示index.php 。 令人困惑的是,如何在2014年仍然存在这样一个问题,但我们在这里:
Pick this approach if you don’t like altering a framework’s source files.
如果您不喜欢更改框架的源文件,请选择此方法。
步骤8.2:破解胆量 (Step 8.2: Hacking the Guts)
The second, perhaps slightly simpler approach is modifying the form of the wizard itself, and altering its action attribute.
第二种,也许稍微简单些的方法是修改向导本身的形式,并更改其操作属性。
Go into ezpub\ezpublish_legacy\kernel\setup\ezsetup.php, and find the line:
进入ezpub\ezpublish_legacy\kernel\setup\ezsetup.php ,找到以下行:
$tpl->setVariable( 'script', $script );Above it, put this:
在其上方放置:
$script = ($script == '/index.php') ? '/index.php/ezsetup' : $script;After this, the action attribute will be fixed.
此后,动作属性将被固定。
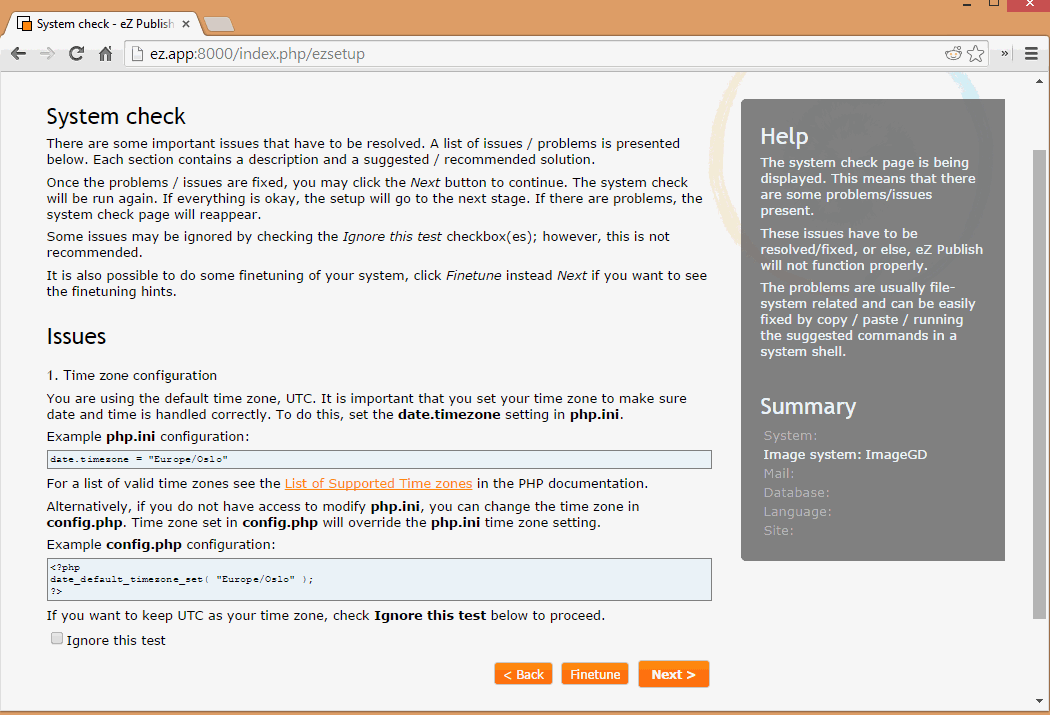
I do not recommend you try to manually set up eZ Publish by skipping the wizard because you will go insane. Objectively, their installation procedure and their documentation are some of the worst I’ve ever seen. You will lose all desire to even try it out if you attempt to follow their instructions. I hope the eZ team will soon completely remove all dependencies and references to their legacy system, leaving in place only the new core – I also hope they’ll soon update their documentation to something more readable and more 2014-like: people develop on dedicated VMs more and more now, and a short installation procedure along with ease of entry are the most crucial attributes of any CMS that wants to stand out.
我不建议您跳过该向导尝试手动设置 eZ Publish,因为那样会发疯 。 客观地讲,它们的安装过程和文档是我见过的最糟糕的情况。 如果您尝试遵循他们的指示,您将失去所有尝试的渴望。 我希望eZ团队会尽快完全删除对旧系统的所有依赖关系和引用,只保留新的核心–我也希望他们很快将文档更新为更具可读性和更像2014年的内容:人们致力于现在,越来越多的虚拟机,短的安装过程以及易于入门是所有想要脱颖而出的CMS的最关键属性。
步骤9:忽略向导错误 (Step 9: Ignore Wizard Errors)
The eZ Publish setup is out of date enough to know only of one server (Apache) and as such thinks it isn’t running in Vhost mode:
eZ Publish设置已经过时,足以仅了解一台服务器(Apache),因此认为它不在Vhost模式下运行:
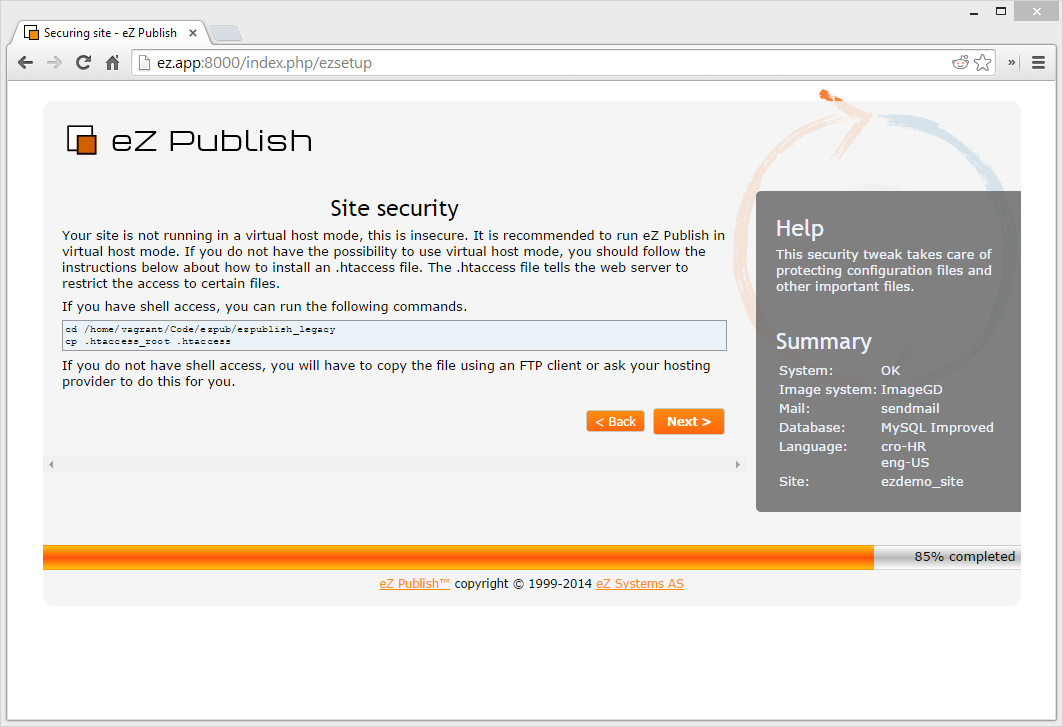
Ignore this warning. Continue on to the next screen (if you used 8.1., don’t forget to alter the form action again, else you’ll start over).
忽略此警告。 继续进入下一个屏幕(如果您使用的是8.1。,请不要忘记再次更改表单操作,否则将重新开始)。
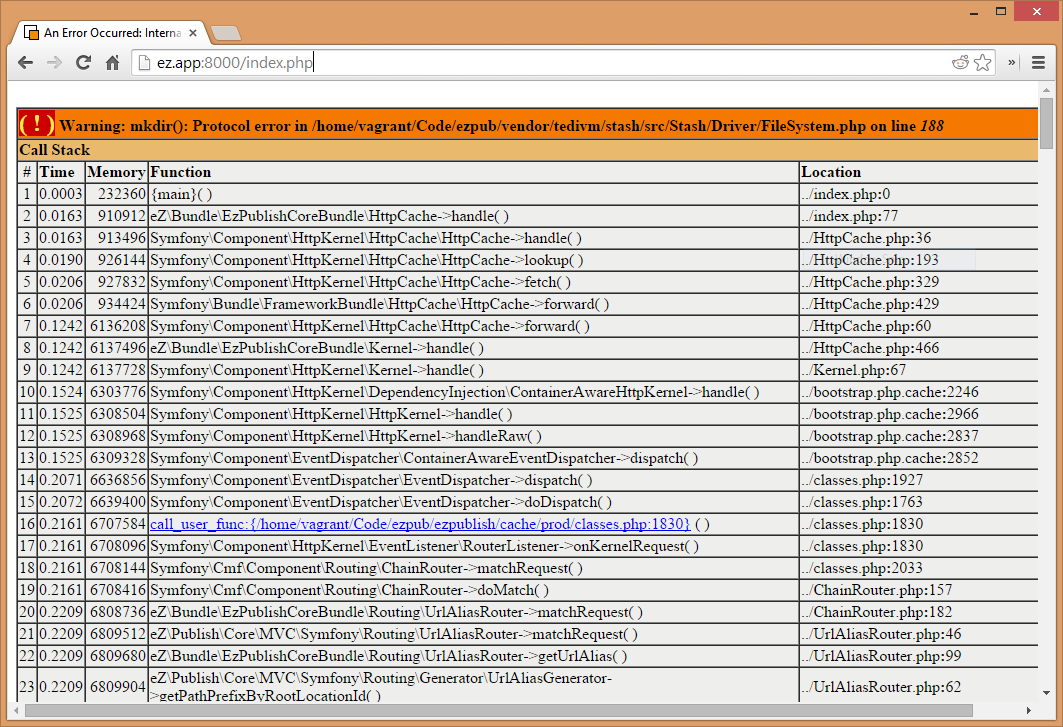
At the end of the setup wizard, you’ll get an Nginx timeout error. This is because eZ Publish is notoriously slow due to it having to process both the awful legacy version and the new version, and due to running on a VM, so when that happens, just remove anything to do with ezsetup from the URL and refresh. You will then be greeted by this beauty:
在安装向导的最后,您将收到Nginx超时错误。 这是因为众所周知eZ Publish速度很慢,因为它必须处理糟糕的旧版本和新版本,并且要在VM上运行,所以当发生这种情况时,只需从URL中删除与ezsetup有关的所有内容并刷新即可。 然后,您会被这种美丽迎接:
步骤10:停用快取 (Step 10: Disable Cache)
The error in the above screen happens while eZ is trying to create caches of PHP files, like this one: /home/vagrant/Code/ezpub/ezpublish/cache/prod/stash/0fea6a13c52b4d47/25368f24b045ca84/a1e4f174919d040af6d06113d677c9e0/4a1c6be177996f9e/03934ae1c1c02ffc/9a0364b9e99bb480/dd25e1f0284c8555/caf9b6b99962bf5c/2264824231d7a40c/d3d9446802a44259/755d38e6d163e820.php (ugh, don’t ask…).
上面的屏幕中的错误发生在eZ尝试创建PHP文件的缓存时,如下所示: /home/vagrant/Code/ezpub/ezpublish/cache/prod/stash/0fea6a13c52b4d47/25368f24b045ca84/a1e4f174919d040af6d06113d677c9e0/4a1c6be177996f9e/03934ae1c1c02ffc/9a0364b9e99bb480/dd25e1f0284c8555/caf9b6b99962bf5c/2264824231d7a40c/d3d9446802a44259/755d38e6d163e820.php ( /home/vagrant/Code/ezpub/ezpublish/cache/prod/stash/0fea6a13c52b4d47/25368f24b045ca84/a1e4f174919d040af6d06113d677c9e0/4a1c6be177996f9e/03934ae1c1c02ffc/9a0364b9e99bb480/dd25e1f0284c8555/caf9b6b99962bf5c/2264824231d7a40c/d3d9446802a44259/755d38e6d163e820.php ,不要问……)。
This cache engine isn’t clever enough to disable itself in case it fails, so we have to do it manually.
该缓存引擎还不够聪明,无法在失败时自行禁用,因此我们必须手动执行。
In ezpub\ezpublish\config\ezpublish.yml change the stash block to this:
在ezpub\ezpublish\config\ezpublish.yml将stash块更改为:
stash:
caches:
default:
handlers:
- BlackHole
inMemory: true
registerDoctrineAdapter: false
“In memory” means the memory will be used for stash cache, instead of the File System. Clear the cache with rm -rf ezpublish/cache/* and refresh. If need be, replace the cache engine with something more decent than FileSystem cache later on. I have no idea how else to alleviate the protocol error for mkdir – I know it’s VM-related, but not much more. Any advice is much appreciated.
“在内存中”意味着该内存将用于隐藏缓存,而不是文件系统。 使用rm -rf ezpublish/cache/*清除缓存并刷新。 如果需要,稍后用比FileSystem缓存更合适的东西替换缓存引擎。 我不知道如何通过其他方法来减轻mkdir的协议错误-我知道它与VM有关,但仅此而已。 任何建议深表感谢。
You will now likely be greeted by yet another flurry of warnings and a 503 error at the end:
现在,您可能会再受到一连串的警告和503错误的欢迎:
But at least we got the title to render!
但是至少我们有标题要渲染!
步骤11:Bootstrap.php.cache和响应限制 (Step 11: Bootstrap.php.cache and Response Limits)
The file causing all these warnings is, in fact, a compilation of all the required PHP files for eZ to load up. They’ve been merged into one (!!!) and put into the ezpublish folder, from whence it is served. The file is a mess of code and not easy to debug because, apart from not having the php extension and lacking IDE highlights, it also doesn’t respect any kind of coding standard (hence, dozens of classes in one file, no indentation and with that, no readability), it being “just a cache file”, after all. But when your entire application depends on a cache file, it would be nice to be able to debug it easily.
引起所有这些警告的文件实际上是eZ加载所需的所有PHP文件的编译。 它们已合并到一个(!!!)中,并从该ezpublish放到ezpublish文件夹中。 该文件是一堆代码,不容易调试,因为除了没有php扩展名和缺少IDE突出显示外,它还不遵守任何一种编码标准(因此,在一个文件中有数十个类,没有缩进和毕竟,它只是“一个缓存文件”。 但是,当您的整个应用程序都依赖缓存文件时,能够轻松地对其进行调试将是很好的选择。
Horrible caching practices aside, we can disable this entire mess and just load up eZ Publish in debug mode by changing the ENVIRONMENT environment variable. You can change this in Homestead.yaml so it gets autoconfigured during boot by adding it to the “variables” block:
除了可怕的缓存做法,我们可以禁用整个混乱,而只需通过更改ENVIRONMENT环境变量以调试模式加载eZ Publish。 您可以在Homestead.yaml进行更改,以便在启动期间通过将其添加到“变量”块中进行自动配置:
- key: ENVIRONMENT
value: dev
Or, you can just edit the index.php file under ezpub/web and put $environment = 'dev'; under $environment = getenv( "ENVIRONMENT" ); on line 8.
或者,您可以只编辑ezpub/web下的index.php文件,并放入$environment = 'dev'; 在$environment = getenv( "ENVIRONMENT" ); 在第8行。
At this point, the second approach is easier if you’ve followed along, because otherwise you’ll have to start over with the entire setup process if you destroy and up again.
在这一点上,第二种方法是比较容易,如果你跟着一起,否则你将不得不如果你与整个安装过程开始了destroy和up一次。
Finishing this, you should be able to get this to render:
完成此操作后,您应该可以将其呈现:

Due to eZ Publish request responses being so absurdly large, we need to up Nginx’s limits:
由于eZ Publish请求的响应是如此之大,我们需要提高Nginx的极限:
sudo vim /etc/nginx/sites-available/ez.appUnder the root directive, paste the following:
在根指令下,粘贴以下内容:
fastcgi_connect_timeout 60;
fastcgi_send_timeout 180;
fastcgi_read_timeout 180;
fastcgi_buffer_size 128k;
fastcgi_buffers 4 256k;
fastcgi_busy_buffers_size 256k;
fastcgi_temp_file_write_size 256k;
Save, exit, restart Nginx with sudo service nginx restart.
使用sudo service nginx restart保存,退出并重新启动Nginx。
Some pages will work (blog, discover), others, well, not so much. Debugging their Demo bundle, however, is outside the scope of this already too long article.
有些页面可以工作(博客,发现),而其他页面则不是很多。 但是,调试他们的Demo包不在本文的讨论范围之内。
步骤12:从网址中删除index.php (Step 12: Remove index.php from the URL)
By default, all Symfony apps have “app.php” or in eZ Publish’s case “index.php” in their URL for some reason. I guess someone has to support those hosting providers and developers from 2001. Let’s bring both projects into the 21st century by removing it.
默认情况下,由于某些原因,所有Symfony应用程序的URL均带有“ app.php”或eZ Publish的情况下为“ index.php”。 我想有人必须从2001年起就支持那些托管服务提供商和开发人员。让我们通过删除这两个项目将它们带入21世纪。
sudo vim /etc/nginx/sites-available/ez.appAs per instructions here, above the “location” block, add:
按照此处的说明 ,在“位置”块上方,添加:
rewrite ^/index\.php/?(.*)$ /$1 permanent;Save, exit, and restart nginx with sudo service nginx restart.
使用sudo service nginx restart保存,退出并重新启动nginx。
步骤13:欢喜 (Step 13: Rejoice)
After an arduous process, we’re finally done. What took me more than a day, hopefully took you less than 10 minutes (excluding download times). Now you too can try this powerful, albeit overbloated, overcomplicated and outdated CMS on your own Homestead instance. Let me know how it works out!
经过艰苦的过程,我们终于完成了。 我花了一天多的时间,希望您花了不到10分钟的时间(不包括下载时间)。 现在,您也可以在自己的Homestead实例上尝试使用此功能强大,功能过大,过于复杂和过时的CMS。 让我知道它是如何工作的!
结论 (Conclusion)
Any CMS that requires this much work to get up and running on a Vagrant box is, in my mind, not a CMS worth paying attention to. Sure, you can probably easily install it onto a host machine and run it that way, but that’s not a professional approach – development environments need to be encapsulated and isolated, and developers need to be able to destroy and rebuild an instance on a whim. A CMS should have scripts that auto-execute, detect all possible problems (like Symlinks not being available and switching to hard-copy mode automatically) and set everything up (from the database to the folder permissions, if necessary), only asking for sudo along the way.
在我看来,任何需要大量工作才能在Vagrant机器上运行的CMS都不是值得关注的CMS。 当然,您可能可以轻松地将其安装到主机上并以这种方式运行,但这不是专业的方法–开发环境需要封装和隔离,开发人员需要能够立即进行破坏和重建实例。 CMS应该具有自动执行,检测所有可能的问题(例如,符号链接不可用并自动切换到硬拷贝模式)并设置所有内容(从数据库到文件夹权限,如果需要)的脚本,仅询问sudo一路上。
This process has installed eZ Publish, but was it worth it? That’s up to you to decide. While eZ definitely is a powerful CMS, the difficulties of getting into it are detrimental at best. You now have a common starting point to test it out on, and I’ll be sure to find out more about these issues from the eZ people at PHP Summer Camp and elsewhere. Until then, let’s get some eZ tutorials going on this box, shall we?
这个过程已经安装了eZ Publish,但这值得吗? 由您决定。 尽管eZ绝对是一个强大的CMS,但进入它的困难充其量是有害的。 您现在有一个通用的起点可以对其进行测试,并且我一定会从PHP夏令营和其他地方的eZ人员那里找到更多有关这些问题的信息。 在此之前,让我们在此框上获取一些eZ教程,对吧?
Put your feedback in the comments below, I’m eager to hear different approaches, especially if you’ve tried to do this on a non-Windows host and made the demo bundle work!
将您的反馈意见放在下面的评论中,我很想听听其他方法,特别是如果您尝试在非Windows主机上执行此操作并使演示包正常工作!
Edit: This Github repo has been brought to my attention. It is a prepared vagrant configuration of eZ Publish that works. There are two caveats, though:
编辑:此Github存储库已引起我注意。 它是有效的eZ Publish的预先准备的无用配置。 但是,有两个警告:
- The point of the step-by-step here was to show you how simple it was to have an identical eZ instance up and running on any machine for development purposes (the fact that it turned out not to be simple is another story entirely). This is important because, for example, not everyone uses the same OS – the repo linked above is on CentOS, while Homestead is Ubuntu. The installation procedure should be equally simple on any OS.本文分步介绍的要点是向您展示在开发过程中在任何计算机上启动并运行相同的eZ实例多么简单(事实并非如此简单,这完全是另一回事)。 这很重要,因为例如,并不是每个人都使用相同的操作系统–上面链接的存储库位于CentOS上,而Homestead是Ubuntu。 在任何操作系统上,安装过程都应同样简单。
- The eZ Publish files inside this VM are literally inside it – there is no sharing of folders to the outside world (host machine), ergo no chance of symlink issues, but also no chance of opening the app’s files in an IDE installed on the host machine in order to hack on them. This prevents an effective development workflow.此VM内的eZ Publish文件实际上位于其中–不会与外界(主机)共享文件夹,因此不会出现符号链接问题,也没有机会在主机上安装的IDE中打开应用程序的文件机以黑客攻击他们。 这会阻止有效的开发工作流程。
翻译自: https://www.sitepoint.com/13-steps-get-ez-publish-5-x-homestead/
app.publish
app.publish_获取eZ Publish 5.x以便在Homestead上工作的13个步骤相关推荐
- android root权限函数,android 4.4下app永久获取root权限的方法
本帖最后由 jackson 于 2017-4-16 20:55 编辑 通过参照 [FAQ11414]android KK 4.4 版本后,user 版本su 权限严重被限制问题说明 http://ww ...
- eZ Publish 的 Site.INI文件的中文翻译
Site.INI文件的中文翻译 #?ini charset="iso-8859-1"? # eZ publish 配置文件 # 注意:并不建议直接修改这个文件,最好是写一个这个文件 ...
- eZ publish 3 安装指南
eZ publish 3 安装指南 --------------------- 这个文档包括如何安装eZ publish 3到windows,Linux和freeBSD的快速安装指南. 请吧有关这个安 ...
- eZ Publish 的文章
eZ Publish 的文章 http://www.irmagic.com/irphoto_f ... 0dac&forumid=10 eZ的部分文章翻译 eZ publish 3 READM ...
- CMS 平台: Drupal, eZ Publish, WordPress, CMS Made Simple 横向比较
世界上没有最好的 CMS,只有最适合的,最近的 DrupalCamp 大会在芬兰赫尔辛基召开,一家叫 Exove 当地公司提供了一个演示,对四大 CMS 平台,Drupal , WordPress , ...
- iOS利用HealthKit框架从健康app中获取步数信息
微信和QQ的每日步数最近十分火爆,我就想为自己写的项目中添加一个显示每日步数的功能,上网一搜好像并有相关的详细资料,自己动手丰衣足食. 统计步数信息并不需要我们自己去实现,iOS自带的健康app已经为 ...
- eZ Publish 2013.4 发布,CMS 内容管理系统
eZ Publish 2013.4 修复了 60 个bug,62 个 pull-request 合并和两个增强. eZ publish是一个专业的开源内容管理系统(CMS)和一个开发框架(CMF).作 ...
- fiddler抓app包获取不到HTTPS请求的2个解决方案
因为app要过等保(国家信息安全等级保护),要用到fiddler抓包. 碰到fiddler抓app包获取不到HTTPS请求,经验证发现以下2个解决方案可用.共享下. 原理解析: 安卓手机APP抓包时, ...
- 2022-01-26 Android app java 获取设备制造商的方法:Build.MANUFACTURER,实际上是读ro.product.manufacturer的值。
一.Android app java 获取设备制造商的方法:Build.MANUFACTURER 二.例如 二.分析Build.MANUFACTURER流程,实际上是读ro.product.manu ...
最新文章
- ios 静态库合成_iOS链接原理解析与应用实践
- Java 7并发编程实战手册
- 高斯旋转热源与双椭球热源_电力分公司:多措并举保证供暖质量效益双提升
- 计算机二级c语言题库缩印,计算机二级C语言上机题库(可缩印做考试小抄资料)...
- 汇编add和mov指令
- 移动端开发touchstart,touchmove,touchend事件详解和项目
- 抓包分析360浏览器和360搜索配对使用的安全性-WEB服务端分析
- 我觉得吧,这么学JavaScript,你才能通
- 算法导论9:栈的链表实现 2016.1.9
- 结合CDIB类,对图像的打开、显示、保存
- Form partner relationships early, even if informal
- .NET 文件相关的所有操作
- 论文---基于B/S中小型酒店客房管理系统的设计与实现
- Qt学习—qt编写定时关机程序
- iOS 修改app名称
- 当国际贸易撞上AI,会产生怎样的化学反应?
- 小鸟云服务器如何通过本地安全策略阻止IP访问?
- ADP530X功能分类汇总找不同
- python录制视频和声音_moviepy 视频编辑添加MP3没声音的问题
- 怎么样才能学好java_论新手该如何学习java?
热门文章
- Django搭建强大好用的文本编辑器
- JavaWeb 项目 --- 表白墙 和 在线相册
- 数据挖掘算法——序列模式
- springboot+jpa+mysql的小例子
- 微模块机房效果图制作|场景创建过程详细步骤
- java类加载器可以从互联网加载,Java类加载器深入解析(2)
- Quaternion kinematics for the error-state Kalman filter
- PDF文件在线转换成PPT
- python兼职平台信号处理_Python 中 FIR 数字滤波器设计与时序信号处理——信号与系统大作业...
- 使用date -s修改系统时间未成功hwclock --hctosys同步系统时间未生效——解决办法