opencv 识别火灾_使用深度学习和OpenCV早期火灾探测系统
opencv 识别火灾
深度学习| OpenCV (Deep learning | OpenCV)
Recent advancements in embedded processing have allowed vision-based systems to detect fire using Convolutional Neural Networks during surveillance. In this article, two custom CNN models have been implemented for a cost-effective fire detection CNN architecture for surveillance videos. The first model is a customized basic CNN architecture inspired by AlexNet architecture. We will implement and see its output and limitations and create a customized InceptionV3 model. To balance the efficiency and accuracy, the model is fine-tuned considering the nature of the target problem and fire data. We are going to use three different datasets for training our models. The links for the datasets are available at the end of this article. Let’s get to the coding part.
嵌入式处理技术的最新进展已使基于视觉的系统可以在监视过程中使用卷积神经网络检测火灾。 在本文中,已经实现了两个定制的CNN模型,以实现用于监视视频的经济有效的火灾探测CNN体系结构。 第一个模型是受AlexNet架构启发的定制的基本CNN架构。 我们将实现并查看其输出和限制,并创建一个定制的InceptionV3模型。 为了平衡效率和准确性,考虑目标问题和火灾数据的性质对模型进行了微调。 我们将使用三个不同的数据集来训练我们的模型。 数据集的链接在本文结尾处可用。 让我们进入编码部分。
1.创建定制的CNN架构 (1. Creating the customized CNN architecture)
We are going to use TensorFlow API Keras for building our model. Let’s first create our ImageDataGenerator for labeling our data. [1] and [2] datasets are used here for training. Finally, we will have 980 images for training and 239 images for validation. We are going to use data augmentation as well.
我们将使用TensorFlow API Keras构建模型。 首先创建用于标记数据的ImageDataGenerator。 [1]和[2]数据集在这里用于训练。 最后,我们将提供980张训练图像和239张验证图像。 我们还将使用数据增强。
import tensorflow as tfimport keras_preprocessingfrom keras_preprocessing import imagefrom keras_preprocessing.image import ImageDataGeneratorTRAINING_DIR = "Train"training_datagen = ImageDataGenerator(rescale = 1./255, horizontal_flip=True, rotation_range=30, height_shift_range=0.2, fill_mode='nearest')VALIDATION_DIR = "Validation"validation_datagen = ImageDataGenerator(rescale = 1./255)train_generator = training_datagen.flow_from_directory(TRAINING_DIR, target_size=(224,224), class_mode='categorical', batch_size = 64)validation_generator = validation_datagen.flow_from_directory( VALIDATION_DIR, target_size=(224,224), class_mode='categorical', batch_size= 16)In the above code, 3 data augmentation techniques are applied — horizontal flipping, rotation, and height shifting.
在上面的代码中,应用了3种数据增强技术-水平翻转,旋转和高度移位。
Now, we will create our CNN model. The model contains three Conv2D-MaxPooling2D layers pairs followed by 3 Dense layers. To overcome the problem of overfitting we will also add dropout layers. The last layer is the softmax layer which will give us the probability distribution for both the classes — Fire and Nonfire. One can also use ‘sigmoid’ activation function at the last layer by changing the number of classes to 1.
现在,我们将创建我们的CNN模型。 该模型包含三个Conv2D-MaxPooling2D层对,然后是3个密集层。 为了克服过度拟合的问题,我们还将添加辍学层。 最后一层是softmax层,它将为我们提供火灾和非火灾两类的概率分布。 通过将类数更改为1,还可以在最后一层使用“ Sigmoid”激活功能。
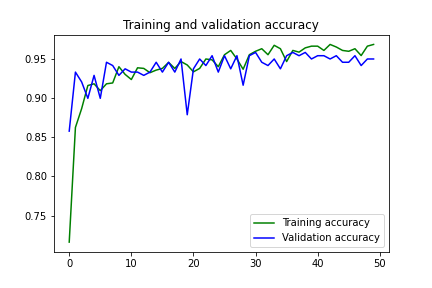
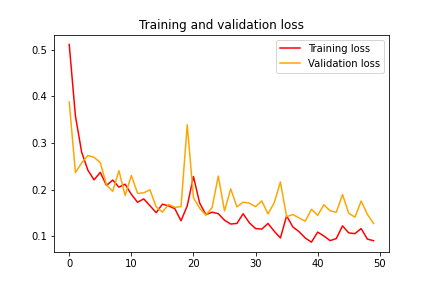
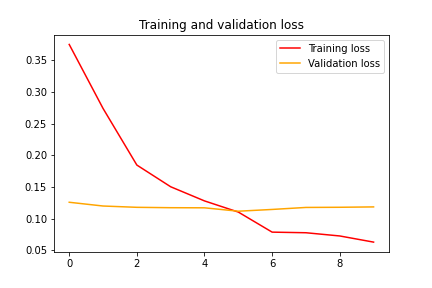
from tensorflow.keras.optimizers import Adammodel = tf.keras.models.Sequential([tf.keras.layers.Conv2D(96, (11,11), strides=(4,4), activation='relu', input_shape=(224, 224, 3)), tf.keras.layers.MaxPooling2D(pool_size = (3,3), strides=(2,2)),tf.keras.layers.Conv2D(256, (5,5), activation='relu'),tf.keras.layers.MaxPooling2D(pool_size = (3,3), strides=(2,2)),tf.keras.layers.Conv2D(384, (5,5), activation='relu'),tf.keras.layers.MaxPooling2D(pool_size = (3,3), strides=(2,2)),tf.keras.layers.Flatten(),tf.keras.layers.Dropout(0.2),tf.keras.layers.Dense(2048, activation='relu'),tf.keras.layers.Dropout(0.25),tf.keras.layers.Dense(1024, activation='relu'),tf.keras.layers.Dropout(0.2),tf.keras.layers.Dense(2, activation='softmax')])model.compile(loss='categorical_crossentropy',optimizer=Adam(lr=0.0001),metrics=['acc'])history = model.fit(train_generator,steps_per_epoch = 15,epochs = 50,validation_data = validation_generator,validation_steps = 15)We will use Adam as an optimizer with a learning rate of 0.0001. After training for 50 epochs, we get the training accuracy of 96.83 and validation accuracy of 94.98. The training and validation loss is 0.09 and 0.13 respectively.
我们将亚当用作学习率为0.0001的优化器。 经过50个纪元的训练,我们得到了96.83的训练准确度和94.98的验证准确度。 训练损失和验证损失分别为0.09和0.13。
Let’s test our model for any image and see if it can guess it right. For testing, I have selected 3 images that include a fire-image, a non-fire image, and a photo of me that contains the fire-like colors and shades.
让我们测试模型中的任何图像,看看它是否可以正确猜出。 为了进行测试,我选择了3张图像,其中包括火图像,非火图像以及包含火样颜色和阴影的我的照片。
Here, we can see that our above-created model is making a mistake in classifying my image. The model is 52% sure that the image has fire in it. This is because of the dataset it has been trained on. There are very few images in the dataset that teaches a model about indoor fires. So, the model only knows about outdoor fires and hence it errs when given an indoor fire-like shaded image. Another reason is that our model is not a complex one that can learn complex features of fire.
在这里,我们可以看到我们上面创建的模型在对我的图像进行分类时犯了一个错误。 该模型确保52%的图像中有火焰。 这是因为已对其进行训练的数据集。 数据集中几乎没有图像可以教给室内火灾模型。 因此,该模型仅知道室外着火情况,因此在获得室内类似火灾的阴影图像时会出错。 另一个原因是我们的模型不是可以学习火的复杂特征的复杂模型。
What we will do next is, use a standard InceptionV3 model and customize it. A complex model is capable of learning the complex features from the images.
接下来,我们将使用标准的InceptionV3模型并对其进行自定义。 复杂模型能够从图像中学习复杂特征。
2.创建定制的InceptionV3模型 (2. Creating customized InceptionV3 model)
We will use a different dataset [3] this time, the one which contains outdoor as well as indoor fire images. I have trained our previous CNN model in this dataset and the result was that it overfitted, as it could not handle this comparatively larger dataset and learn complex features from the images.
这次我们将使用不同的数据集[3],其中包含室外和室内火灾图像。 我已经在该数据集中训练了我们以前的CNN模型,结果是它过拟合,因为它无法处理这个相对较大的数据集,无法从图像中学习复杂的特征。
Let’s start with creating the ImageDataGenerator for our customized InceptionV3. The dataset contains 3 classes but for this article, we will only use 2 classes. It contains 1800 images for training and 200 images for validation. Also, I added 8 images of my living room to add some noise in the dataset.
让我们开始为自定义的InceptionV3创建ImageDataGenerator。 数据集包含3个类,但对于本文,我们将仅使用2个类。 它包含用于训练的1800张图像和用于验证的200张图像。 另外,我添加了8张客厅图像,以在数据集中添加一些噪点。
import tensorflow as tfimport keras_preprocessingfrom keras_preprocessing import imagefrom keras_preprocessing.image import ImageDataGeneratorTRAINING_DIR = "Train"training_datagen = ImageDataGenerator(rescale=1./255,zoom_range=0.15,horizontal_flip=True,fill_mode='nearest')VALIDATION_DIR = "/content/FIRE-SMOKE-DATASET/Test"validation_datagen = ImageDataGenerator(rescale = 1./255)train_generator = training_datagen.flow_from_directory(TRAINING_DIR,target_size=(224,224),shuffle = True,class_mode='categorical',batch_size = 128)validation_generator = validation_datagen.flow_from_directory(VALIDATION_DIR,target_size=(224,224),class_mode='categorical',shuffle = True,batch_size= 14)To make training even more accurate we can use data augmentation techniques. In the above code, 2 data augmentation techniques are applied — horizontal flipping and zooming.
为了使训练更加准确,我们可以使用数据增强技术。 在上面的代码中,应用了2种数据增强技术-水平翻转和缩放。
Let’s import our InceptionV3 model from the Keras API. We will add our layers at the top of the InceptionV3 model as shown below. We will add a global spatial average pooling layer followed by 2 dense layers and 2 dropout layers to ensure that our model does not overfit. At last, we will add a softmax activated dense layer for 2 classes.
让我们从Keras API导入InceptionV3模型。 我们将在InceptionV3模型的顶部添加图层,如下所示。 我们将添加一个全局空间平均池化层,然后添加2个密集层和2个辍学层,以确保我们的模型不会过拟合。 最后,我们将为2个类别添加一个softmax激活的密集层。
Next, we will first train only the layers that we added and are randomly initialized. We will use RMSprop as an optimizer here.
接下来,我们将首先仅训练我们添加并随机初始化的图层。 我们将在这里使用RMSprop作为优化器。
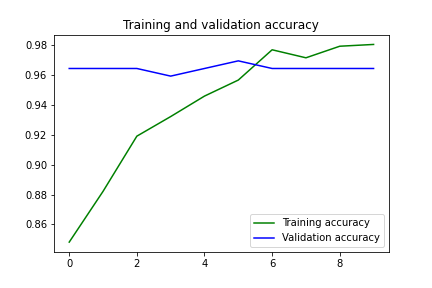
from tensorflow.keras.applications.inception_v3 import InceptionV3from tensorflow.keras.preprocessing import imagefrom tensorflow.keras.models import Modelfrom tensorflow.keras.layers import Dense, GlobalAveragePooling2D, Input, Dropoutinput_tensor = Input(shape=(224, 224, 3))base_model = InceptionV3(input_tensor=input_tensor, weights='imagenet', include_top=False)x = base_model.outputx = GlobalAveragePooling2D()(x)x = Dense(2048, activation='relu')(x)x = Dropout(0.25)(x)x = Dense(1024, activation='relu')(x)x = Dropout(0.2)(x)predictions = Dense(2, activation='softmax')(x)model = Model(inputs=base_model.input, outputs=predictions)for layer in base_model.layers: layer.trainable = Falsemodel.compile(optimizer='rmsprop', loss='categorical_crossentropy', metrics=['acc'])history = model.fit(train_generator,steps_per_epoch = 14,epochs = 20,validation_data = validation_generator,validation_steps = 14)After training our top layers for 20 epochs, we will freeze the first 249 layers of the models and train the rest i.e the top 2 inception blocks. Here, we will use SGD as an optimizer with a learning rate of 0.0001.
在训练了顶层20个纪元后,我们将冻结模型的前249层,并训练其余的层(即顶层2个初始块)。 在这里,我们将使用SGD作为优化器,学习率为0.0001。
#To train the top 2 inception blocks, freeze the first 249 layers and unfreeze the rest.for layer in model.layers[:249]: layer.trainable = Falsefor layer in model.layers[249:]: layer.trainable = True#Recompile the model for these modifications to take effectfrom tensorflow.keras.optimizers import SGDmodel.compile(optimizer=SGD(lr=0.0001, momentum=0.9), loss='categorical_crossentropy', metrics=['acc'])history = model.fit(train_generator,steps_per_epoch = 14,epochs = 10,validation_data = validation_generator,validation_steps = 14)After training for 10 epochs, we get a training accuracy of 98.04 and a validation accuracy of 96.43. The training and validation losses are 0.063 and 0.118 respectively.
经过10个时期的训练,我们获得了98.04的训练准确度和96.43的验证准确度。 训练损失和验证损失分别为0.063和0.118。
Let’s test our model for the same images and see if it can guess it right.
让我们测试相同图像的模型,看看它是否可以正确猜出。
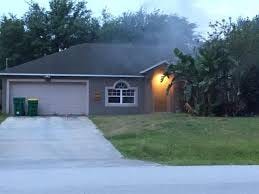
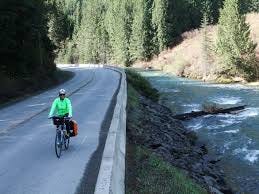
This time our model can get all three predictions correct. It is 96% sure that my image does not contain any fire. The other two images that I am using for testing are:
这次我们的模型可以使所有三个预测正确。 96%可以确定我的图像没有任何火。 我用于测试的其他两个图像是:
实时测试: (Real-time Testing:)
Now, our model is ready to be tested with real scenarios. Below is the sample code for using OpenCV to access our webcam and predicting whether each frame contains fire or not. If a frame contains fire in it, we want to change the color of that frame to B&W.
现在,我们的模型已准备好在实际场景中进行测试。 以下是使用OpenCV访问我们的网络摄像头并预测每个帧是否包含火的示例代码。 如果框架中包含火焰,我们想将该框架的颜色更改为B&W。
import cv2import numpy as npfrom PIL import Imageimport tensorflow as tffrom keras.preprocessing import image#Load the saved modelmodel = tf.keras.models.load_model('InceptionV3.h5')video = cv2.VideoCapture(0)while True: _, frame = video.read()#Convert the captured frame into RGB im = Image.fromarray(frame, 'RGB')#Resizing into 224x224 because we trained the model with this image size. im = im.resize((224,224)) img_array = image.img_to_array(im) img_array = np.expand_dims(img_array, axis=0) / 255 probabilities = model.predict(img_array)[0] #Calling the predict method on model to predict 'fire' on the image prediction = np.argmax(probabilities) #if prediction is 0, which means there is fire in the frame. if prediction == 0: frame = cv2.cvtColor(frame, cv2.COLOR_RGB2GRAY) print(probabilities[prediction])cv2.imshow("Capturing", frame) key=cv2.waitKey(1) if key == ord('q'): breakvideo.release()cv2.destroyAllWindows()Below is the live output of the above code.
下面是上面代码的实时输出。
The Github’s link for this project is here. You can find the dataset and all of the code above from there. You can connect with me on LinkedIn from here. If any query arises drop a response here or in my LinkedIn inbox.
这个项目的Github链接在这里 。 您可以从那里找到数据集和上面的所有代码。 您可以从此处通过LinkedIn与我联系。 如果有任何疑问,请在此处或我的LinkedIn收件箱中回复。
结论 (Conclusion)
Using smart cameras you can identify various suspicious incidents such as collisions, medical emergencies, and fires. Of such, fire is the most dangerous abnormal occurrence, because failure to control it at an early stage can lead to huge disasters, leading to human, ecological and economic losses. Inspired by the great potential of CNNs, we can detect fire from images or videos at an early stage. This article shows two custom models for fire detection. Considering the fair fire detection accuracy of the CNN model, it can be of assistance to disaster management teams in managing fire disasters on time, thus preventing huge losses.
使用智能相机,您可以识别各种可疑事件,例如碰撞,医疗紧急情况和火灾。 其中,火灾是最危险的异常事件,因为在早期阶段无法控制火灾会导致巨大的灾难,从而造成人员,生态和经济损失。 受CNN巨大潜力的启发,我们可以在早期阶段从图像或视频中检测到火灾。 本文显示了两个用于火灾探测的自定义模型。 考虑到CNN模型的合理火灾探测准确性,它可以帮助灾难管理团队按时管理火灾,从而避免巨额损失。
本文使用的数据集: (Datasets used for this article:)
翻译自: https://towardsdatascience.com/early-fire-detection-system-using-deep-learning-and-opencv-6cb60260d54a
opencv 识别火灾
相关文章:
- 与Maggy统一单主机和分布式机器学习
- 极速火箭网络助手怎么用_在检测火箭队方面,神经网络比灰烬更好吗? 如果是这样,如何?...
- nlu 意图识别_在NLU中,您无视危险的意图
- BERT-从业者的观点
- 检测和语义分割_分割和对象检测-第4部分
- 工业革命 书_工业革命以来最重大的变化
- 实现无缝滑屏怎么实现_无缝扩展人工智能以实现分布式大数据
- colab 数据集_Google Colab上的YOLOv4:轻松训练您的自定义数据集(交通标志)
- 人工智能和机器学习的前五门课程
- c语言儿童教学_五岁儿童的自然语言处理
- 星球大战telnet_重制星球大战:第四集(1977)
- ai人工智能的数据服务_建立AI系统的规则-来自数据科学家
- 语音库构建_推动数据采用,以通过语音接口构建更好的产品
- openai-gpt_GPT-3是“人类”吗?
- 自动化运维--python_自动化-设计师的朋友还是敌人?
- ai人工智能的数据服务_数据科学和人工智能如何改变超市购物
- 游戏ai人工智能_AI与游戏,第1部分:游戏如何推动了两门AI研究流派
- AI的帕雷多利亚
- ai转型指南_穿越AI转型的转折点
- 机器学习算法:马尔可夫链
- node-red 可视化_可视化与注意-第1部分
- 图像数据增强扩充数据库_分析数据扩充以进行图像分类
- ai伴侣2.4.7_人工智能:世界各地的活动(7月4日)
- 如何简化卷积神经网络_卷积神经网络:简化
- 人工智能ai医学辅助系统_不同的人工智能(AI)技术彻底改变了医学领域(AIM)...
- 仅使用Python代码从零开始进行Logistic回归
- python精妙算法_YOLOv4:高速物体检测的精妙之处
- watson机器人_使您的聊天机器人看起来更加智能! Watson Assistant的隐藏功能。
- 评估分类器模型性能
- 预测自适应滤波_使用自适应滤波的时间序列预测
opencv 识别火灾_使用深度学习和OpenCV早期火灾探测系统相关推荐
- 姿态检测 树莓派_基于深度学习的树莓派老人摔倒检测系统的制作方法
本发明属于电子器件技术领域,涉及基于深度学习的树莓派老人摔倒检测系统. 背景技术: 日益庞大的老年群体已成为人们关注的焦点.由于老年人身体活动不便等特点,摔倒已成为我国人员伤亡的第四位原因,而意外摔倒 ...
- python图像识别算法 识别数量_使用深度学习(CNN)算法进行图像识别工作时,有哪些data augmentation 的奇技淫巧?...
估计很多搞深度学习的都遇到过这个情况:有不错的想法,可以用深度学习模型实现.于是兴致勃勃的上网找相关数据集,结果却发现只有很少一部分图像. 你想起来,很多常见的数据集都有成千上万张井然有序的图像,你还 ...
- python dlib caffe人脸相似度_基于深度学习的人脸识别系统(Caffe+OpenCV+Dlib)【一】如何配置caffe属性表...
前言 基于深度学习的人脸识别系统,一共用到了5个开源库:OpenCV(计算机视觉库).Caffe(深度学习库).Dlib(机器学习库).libfacedetection(人脸检测库).cudnn(gp ...
- 深度学习模型建立过程_所有深度学习都是统计模型的建立
深度学习模型建立过程 Deep learning is often used to make predictions for data driven analysis. But what are th ...
- 深度学习:在图像上找到手势_使用深度学习的人类情绪和手势检测器:第1部分
深度学习:在图像上找到手势 情感手势检测 (Emotion Gesture Detection) Has anyone ever wondered looking at someone and tri ...
- 深度学习与OpenCV DNN模块:权威指南
计算机视觉领域自20世纪60年代末就已经存在.图像分类和目标检测是计算机视觉领域的一些最古老的问题,研究人员已经努力解决了几十年.使用神经网络和深度学习,我们已经达到了一个阶段,计算机可以开始真正地理 ...
- 深度学习 情感分析_使用深度学习进行情感分析
深度学习 情感分析 介绍 (Introduction) The growth of the internet due to social networks such as Facebook, Twit ...
- 深度学习-82:OpenCV与深度学习
深度学习-82:OpenCV与深度学习 深度学习原理与实践(开源图书)-总目录, 建议收藏,告别碎片阅读! 随着机器学习,计算机视觉和计算能力的日益成熟,计算机视觉被广泛应用于人机互动.物体识别.图像 ...
- 深度学习:Opencv的BlobfromImage如何工作
深度学习:Opencv的BlobfromImage如何工作 1. 原理 1.2 均值减法是什么 1.3 cv2.dnn.BlogFromImage 2. 源码 参考 想要从深度神经网络获取正确的预测, ...
- 深度学习将灰度图着色_通过深度学习为视频着色
深度学习将灰度图着色 零本地设置/ DeOldify / Colab笔记本 (Zero Local Setup / DeOldify / Colab Notebook) "Haal Kais ...
最新文章
- 使用webpack构建多页应用
- C++知识点1——基础
- 异步请求(简单一说)
- Mysql之WHERE子句
- Codeforces 982 C. Cut 'em all! 图的遍历
- JDBC登录功能实现
- go tool trace goalng调优工具
- 海底光缆,到底是怎么安装和维护的?
- 上海师范大学计算机技术考研分数线,上海师范大学2019年考研复试分数线已公布...
- python 状态机第三方库_Python 状态机 - osc_8g11urw7的个人空间 - OSCHINA - 中文开源技术交流社区...
- 面试常备题---插入排序
- 拓端tecdat|使用SAS Enterprise Miner进行数据挖掘:信用评分构建评分卡模型
- Android Studio 开发支付宝小程序
- 招商银行/招银网络科技面经、答案
- outlook怎么配置126邮箱服务器,outlook 如何配置126邮箱
- 曾鸣:互联网的本质是什么?| 内部干货
- HTML5期末大作业:宠物之家网站设计——代码质量好宠之家(5页) HTML+CSS+JavaScript web期末作业设计网页
- df.pivot函数用法
- 2022-2027年中国消防器材制造行业发展前景及投资战略咨询报告
- ai描边工具怎么打开_AI描边工具命令讲解,教你ai描边功能实用技巧
热门文章
- 自动生成小学四则运算题目(加强版)
- 图形数据库 Neo4j(2) ----Java
- sklearn,SVM 和文本分类
- C++ python 找标定圆点
- 七月算法机器学习2 数理统计与参数估计2
- 第9章 逻辑回归 学习笔记 下
- 基于Kinect 2.0深度摄像头的三维重建 and Kinect Fusion
- Atitit 消息系统 mq 的艺术 attilax总结 v5 t88.docx Atitit 消息系统 mq 之道 attilax总结 1. 概念 broker topic producer
- Atitit 号码规范 靓号指南 attilax总结 v4 r926.docx
- Atitit.收银系统pos 以及打印功能的行业标准