Installing OpenCV 2.4.9 in Ubuntu 14.04 LTS
出处:http://www.samontab.com/web/2014/06/installing-opencv-2-4-9-in-ubuntu-14-04-lts/
Term Support version of Ubuntu(14.04 LTS) is out and a new version of OpenCV was recently released as well. This means that now is a great opportunity to update my OpenCV installation guide to the latest versions, Ubuntu 14.04 LTS and OpenCV 2.4.9.
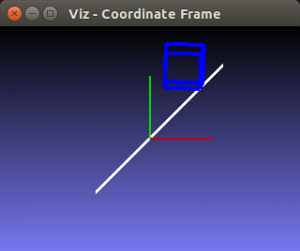
One of the great additions in this new release of OpenCV is the new viz module, which offers a nice 3D visualizer. This module is based on the great Visualization Toolkit library (VTK) and nicely prepares the users for the upcoming OpenCV 3.
In this guide, I will show you how to install OpenCV with a lot of the features it provides. Here are some of the things that are going to be enabled when you are finished following through with this installation tutorial:
- viz module (3D visualization)
- Qt version of the HighGUI module (Better 2D window interface with zoom, image saving capabilities, etc)
- OpenGL support
- C++ interface and examples
- C interface and examples
- Python interface and examples
- Java interface and examples
- Intel Threading Building Blocks (TBB)
Note: I have noticed some copies of my posts elsewhere, so make sure that you are reading this from the original source, at samontab dot com, accessible from here so that you don’t miss the comments.
OK, so the first step is to make sure that everything in the system is updated and upgraded. Open the terminal and write this:
1
|
sudo apt-get update
|
2
|
sudo apt-get upgrade
|
Now, you need to install many dependencies, such as support for reading and writing image files, drawing on the screen, some needed tools, other libraries, etc… This step is very easy, you only need to write the following command in the Terminal:
1
|
sudo apt-get install build-essential libgtk2.0-dev libjpeg-dev libtiff4-dev libjasper-dev libopenexr-dev cmake python-dev python-numpy python-tk libtbb-dev libeigen3-dev yasm libfaac-dev libopencore-amrnb-dev libopencore-amrwb-dev libtheora-dev libvorbis-dev libxvidcore-dev libx264-dev libqt4-dev libqt4-opengl-dev sphinx-common texlive-latex-extra libv4l-dev libdc1394-22-dev libavcodec-dev libavformat-dev libswscale-dev default-jdk ant libvtk5-qt4-dev
|
Time to get the OpenCV 2.4.9 source code:
1
|
cd ~
|
2
|
wgethttp://sourceforge.net/projects/opencvlibrary/files/opencv-unix/2.4.9/opencv-2.4.9.zip
|
3
|
unzip opencv-2.4.9.zip
|
4
|
cd opencv-2.4.9
|
Now we have to generate the Makefile by using cmake. In here we can define which parts of OpenCV we want to compile. Since we want to use the viz module, Python, Java, TBB, OpenGL, Qt, work with videos, etc, here is where we need to set that. Just execute the following line at the terminal to create the appropriate Makefile. Note that there are two dots at the end of the line, it is an argument for the cmake program and it means the parent directory (because we are inside the build directory, and we want to refer to the OpenCV directory, which is its parent).
1
|
mkdir build
|
2
|
cd build
|
3
|
cmake -D WITH_TBB=ON -D BUILD_NEW_PYTHON_SUPPORT=ON -D WITH_V4L=ON -D INSTALL_C_EXAMPLES=ON -D INSTALL_PYTHON_EXAMPLES=ON -D BUILD_EXAMPLES=ON -D WITH_QT=ON -D WITH_OPENGL=ON -D WITH_VTK=ON ..
|
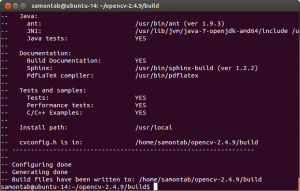
Check that the above command produces no error and that in particular it reports FFMPEG as YES. If this is not the case you will not be able to read or write videos. Check that Java, Python, TBB, OpenGL, V4L, OpenGL and Qt are all detected correctly.
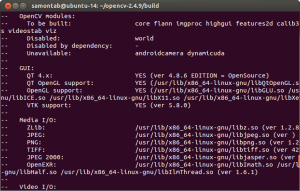
Make sure you scroll up and check that the modules that are going to be built are these:
core flann imgproc highgui features2d calib3d ml video legacy objdetect photo gpu ocl nonfree contrib java python stitching superres ts videostab viz.
If anything is wrong, go back, correct the errors by maybe installing extra packages and then run cmake again.
Now, you are ready to compile and install OpenCV 2.4.9:
1
|
make
|
2
|
sudo make install
|
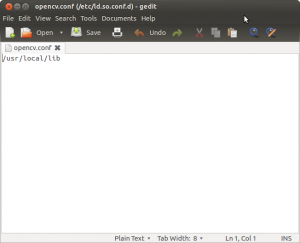
Now you have to configure OpenCV. First, open the opencv.conf file with the following code:
1
|
sudo gedit /etc/ld.so.conf.d/opencv.conf
|
Add the following line at the end of the file(it may be an empty file, that is ok) and then save it:
1
|
/usr/local/lib
|
Run the following code to configure the library:
1
|
sudo ldconfig
|
Now you have to open another file:
1
|
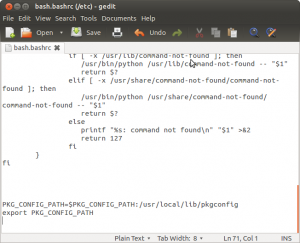
sudo gedit /etc/bash.bashrc
|
Add these two lines at the end of the file and save it:
1
|
PKG_CONFIG_PATH=$PKG_CONFIG_PATH:/usr/local/lib/pkgconfig
|
2
|
export PKG_CONFIG_PATH
|
Finally, close the console and open a new one, restart the computer or logout and then login again. OpenCV will not work correctly until you do this.
Now you have OpenCV 2.4.9 installed in your computer with 3D visualization, Python, Java, TBB, OpenGL, video, and Qt support.
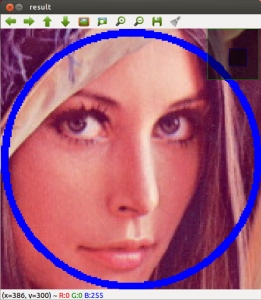
Check out the cool Qt interface which provides image viewing capabilities with zoom, as well as the ability to save the current image with just one click.
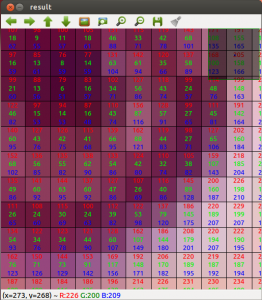
If you zoom in enough, you can see the RGB (or intensity) values for each pixel.
Now let’s build some samples included in OpenCV:
1
|
cd ~/opencv-2.4.9/samples/c
|
2
|
chmod +x build_all.sh
|
3
|
./build_all.sh
|
These examples use the old C interface:
1
|
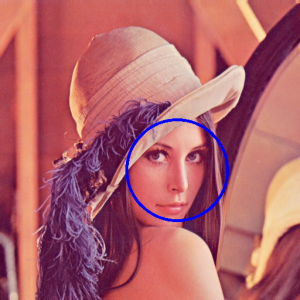
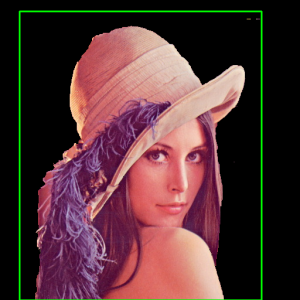
./facedetect --cascade="/usr/local/share/OpenCV/haarcascades/haarcascade_frontalface_alt.xml"--scale=1.5 lena.jpg
|
1
|
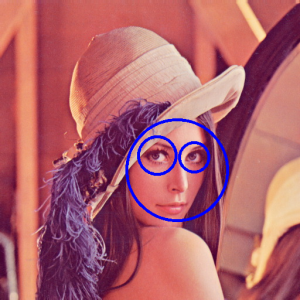
./facedetect --cascade="/usr/local/share/OpenCV/haarcascades/haarcascade_frontalface_alt.xml"--nested-cascade="/usr/local/share/OpenCV/haarcascades/haarcascade_eye.xml" --scale=1.5 lena.jpg
|
The following examples use the new C++ interface:
1
|
~/opencv-2.4.9/build/bin/cpp-example-grabcut ~/opencv-2.4.9/samples/cpp/lena.jpg
|
1
|
~/opencv-2.4.9/build/bin/cpp-example-calibration_artificial
|

Now let’s run some Python code:
1
|
python ~/opencv-2.4.9/samples/python2/turing.py
|

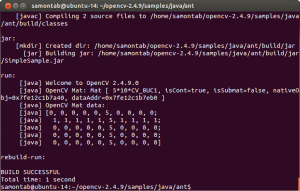
Now you can build a Java sample using ant for example. (Make sure that you change/home/samontab/ with your actual home directory):
1
|
cd ~/opencv-2.4.9/samples/java/ant
|
2
|
ant -DocvJarDir=/home/samontab/opencv-2.4.9/build/bin -DocvLibDir=/home/samontab/opencv-2.4.9/build/lib
|
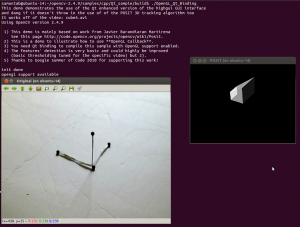
Now let’s read a video and use OpenGL with Qt through this great sample that detects the features from the video, then estimates the 3D location of the structure using POSIT, and finally uses OpenGL to draw in 3D (great sample Javier):
1
|
cd ~/opencv-2.4.9/samples/cpp/Qt_sample
|
2
|
mkdir build
|
3
|
cd build
|
4
|
cmake ..
|
5
|
make
|
6
|
./OpenGL_Qt_Binding
|
And finally, let’s build a sample using the 3D visualization module viz:
1
|
cd ~/opencv-2.4.9/samples/cpp/tutorial_code/viz
|
2
|
g++ -o widget_pose `pkg-config opencv --cflags` widget_pose.cpp `pkg-config opencv --libs`
|
3
|
./widget_pose
|
As you can see, now you can use OpenCV with C++, C, Python, and Java. The Qt enhanced 2D interface is enabled, 3D data can be displayed using OpenGL directly, or using the new viz module. Multi threading functionality is enabled using TBB. Also, video support is enabled as well.
If you correctly finished this tutorial, you are now ready to do some nice computer vision work.
Installing OpenCV 2.4.9 in Ubuntu 14.04 LTS相关推荐
- Installing OpenCV 2.4.9 in Ubuntu 14.04 LTS(好文章)
原文链接 http://www.samontab.com/web/2014/06/installing-opencv-2-4-9-in-ubuntu-14-04-lts/ Installing Ope ...
- 64位双系统Ubuntu 14.04 LTS + Caffe + CUDA 7.5 + Opencv 3.0 安装配置实战
一切的一切,开端便是这caffe,作为博客的第一篇文章,自然要讲讲一个哲学问题"我是从哪来的" 一.windows情况下安装双系统64位Ubuntu 本段落根据http://www ...
- yasm linux gcc,Ubuntu 14.04 LTS下使用arm-linux-gcc交叉编译OpenCV 2.4.9
Ubuntu 14.04 LTS下使用arm-linux-gcc交叉编译OpenCV 2.4.9 当前两个手头有两个项目都是都需要在ARM板中使用OpenCV,所以交叉编译必不可少.两三天里一直查阅各 ...
- 在 Ubuntu 14.04 LTS 中配置 certbot 自动更新
目录 前言 一.安装 snapd 二.确保安装的 snapd 版本为最新版本 三.删除 certbot-auto 及系统中已安装的任何 certbot 软件包 四.安装 Certbot 五.建立系统的 ...
- linux中文系统装offci,Ubuntu 14.04 LTS中安装fcitx中文输入法的教程
Ubuntu 14.04 LTS中自带的iBus输入法有多么的难用,这个不用我来说,今后你会看到各种吐嘈会像滔滔江水连绵不绝的.这里我们不抱怨,我们自己来着手解决中国人自己的Linux中文输入法问题. ...
- linux 爬虫工具,技术|如何在Ubuntu 14.04 LTS安装网络爬虫工具:Scrapy
这是一款提取网站数据的开源工具.Scrapy框架用Python开发而成,它使抓取工作又快又简单,且可扩展.我们已经在virtual box中创建一台虚拟机(VM)并且在上面安装了Ubuntu 14.0 ...
- Ubuntu 14.04 LTS 下升级 gcc 到 gcc-4.9、gcc-5 版本
转载: http://www.cnblogs.com/BlackStorm/p/5183490.html Ubuntu 14.04 LTS 下升级 gcc 到 gcc-4.9.gcc-5 版本 如果没 ...
- 从Ubuntu 14 04 LTS版升级到Ubuntu 16 04 LTS
从Ubuntu 14.04 LTS版升级到Ubuntu 16.04 LTS 作者:chszs,未经博主允许不得转载.经许可的转载需注明作者和博客主页:http://blog.csdn.net/chsz ...
- 【转】基于Ubuntu 14.04 LTS编译Android4.4.2源代码
原文网址:http://blog.csdn.net/gobitan/article/details/24367439 基于Ubuntu 14.04 LTS编译Android4.4.2源代码 Denni ...
最新文章
- Asynctask源码分析
- 那个博士生以死控告的教授,被ACM撤销了会员资格
- torch.log函数
- 【Java Web开发指南】redis笔记
- HttpRequest获取文件流,HttpResponse输出文件流
- asp.net web开发框架_百小僧:拥抱.NET 5,从这个极速开发Web应用框架开始,Fur开源了!...
- ABAP Smart Help调试截图
- c++归并排序_合并排序法
- python selenium自动化框架_一文讲透!实现一个Python+Selenium的自动化测试框架如此简单!...
- Ubuntu安装MinGW32
- Excel绘制CDF图
- 请问java如何跟isapi通讯,代码怎么实现?
- Mysql的高可用架构搭建(MHA)
- U盘安装kali linux
- js中大于0的正整数正则
- 码科速送同城跑腿小程序V2.7.4+骑手端+前端
- crc8 c语言代码,C的CRC8校验的源代码
- 我的电磁学讲义10:磁感应强度 毕奥-萨伐尔定律
- 如何手机网络连接电脑
- extjs,下拉多选