Spring系列之-Spring AOP设计原理(一)
2019独角兽企业重金招聘Python工程师标准>>> 
Spring AOP作为Spring中两大最要特性跟IOC一样重要,看了很多书籍,都没有把这个东西的来龙去脉讲清楚,网上很多文章标题也都是一知半解,甚至很多直接就切入到动态代理这块来讲。本文参考了网上相关分析以及《深入理解Spring技术设计原理》一书,从源码级别来分析Spring AOP的设计过程,用一个例子来从头到尾分析Spring AOP实现过程。
我们先上一个简单的例子:
public interface ShopService {public String getShopName();}public class ShopServiceImpl implements ShopService{public String getShopName() {System.out.println("nike shop");return "Nike";}}public class TimeHandler {public void printTime() {System.out.println("当前时间:" + System.currentTimeMillis());}}XML配置:
<bean id="shopService" class="com.dianping.aop.ShopServiceImpl"/><bean id="timeHandler" class="com.dianping.aop.TimeHandler"/><aop:config proxy-target-class="true"><aop:aspect id="time" ref="timeHandler"><aop:pointcut id="point" expression="execution(* com.dianping.aop.ShopService.*(..))"/><aop:before method="printTime" pointcut-ref="point"/><aop:after method="printTime" pointcut-ref="point"/></aop:aspect></aop:config>测试类:
public class Main {public static void main(String[] args) {BeanFactory beanFactory = new FileSystemXmlApplicationContext("classpath:appcontext.xml");ShopService shopService = (ShopService) beanFactory.getBean("shopService");shopService.getShopName();}
}
输出:
当前时间:1514042119262
nike shop
当前时间:1514042119283
可以看见在getShopName()方法执行前后都打印了当前时间,也就是执行了TimeHandler中的printTime()方法。
这是一个简单的AOP使用,下面将从这个例子触发解析Spring AOP设计实现。
可以发现打印时间是在getBean()方法之后执行的,说明AOP被Spring 容器处理过了,那么只有两个地方处理:
1.在Spring IOC容器初始化过程中处理。
2.在获取bean的过程中被处理。
前几篇文章分析过Spring IOC的初始化过程,在Spring IOC出事化过程中会调用XmlBeanDefinitionReader对XML文件中的Bean定义进行读取获取到Dom文档后进行解析,最终的解析BeanDefinition在DefaultBeanDefinitionDocumentReader的下述方法中。(本文源码均基于Spring 4.3.9)
protected void parseBeanDefinitions(Element root, BeanDefinitionParserDelegate delegate) {if (delegate.isDefaultNamespace(root)) {NodeList nl = root.getChildNodes();for (int i = 0; i < nl.getLength(); i++) {Node node = nl.item(i);if (node instanceof Element) {Element ele = (Element) node;if (delegate.isDefaultNamespace(ele)) {parseDefaultElement(ele, delegate);}else {delegate.parseCustomElement(ele);}}}}else {delegate.parseCustomElement(root);}}在Spring IOC容器初始化过程中调用的是这句代码parseDefaultElement(ele, delegate),因为我们的bean都是通过<bean id="">声明的,这属于Spring默认命名,从上面配置Spring AOP XML中可以看出AOP的配置为<aop:>,这种配置不属于Spring默认命名,故不会执行parseDefaultElement(ele, delegate),而会执行delegate.parseCustomElement(ele),这句代码是解析自定义命名bean定义,<aop:>就属于自定义命名。
进一步进去:
public BeanDefinition parseCustomElement(Element ele) {return parseCustomElement(ele, null);}public BeanDefinition parseCustomElement(Element ele, BeanDefinition containingBd) {//获取命名空间并根据命名空间获取相应的处理String namespaceUri = getNamespaceURI(ele);NamespaceHandler handler = this.readerContext.getNamespaceHandlerResolver().resolve(namespaceUri);if (handler == null) {error("Unable to locate Spring NamespaceHandler for XML schema namespace [" + namespaceUri + "]", ele);return null;}return handler.parse(ele, new ParserContext(this.readerContext, this, containingBd));}其中这句代码NamespaceHandler handler = this.readerContext.getNamespaceHandlerResolver().resolve(namespaceUri); 获得了命名空间处理Handler,而String namespaceUri = getNamespaceURI(ele);这个获得的值就是http://www.springframework.org/schema/aop
NamespaceHandlerResolver用于根据命名空间解析得到命名空间处理Handler,NamespaceHandlerResolver通过resolve方法来根据http://www.springframework.org/schema/aop过去AOP命名空间处理Handler,NamespaceHandlerResolver有个默认实现DefaultNamespaceHandlerResolver,内部resolve实现如下:
@Overridepublic NamespaceHandler resolve(String namespaceUri) {//加载handler map映射Map<String, Object> handlerMappings = getHandlerMappings();Object handlerOrClassName = handlerMappings.get(namespaceUri);if (handlerOrClassName == null) {return null;}else if (handlerOrClassName instanceof NamespaceHandler) {return (NamespaceHandler) handlerOrClassName;}else {String className = (String) handlerOrClassName;try {Class<?> handlerClass = ClassUtils.forName(className, this.classLoader);if (!NamespaceHandler.class.isAssignableFrom(handlerClass)) {throw new FatalBeanException("Class [" + className + "] for namespace [" + namespaceUri +"] does not implement the [" + NamespaceHandler.class.getName() + "] interface");}NamespaceHandler namespaceHandler = (NamespaceHandler) BeanUtils.instantiateClass(handlerClass);namespaceHandler.init();handlerMappings.put(namespaceUri, namespaceHandler);return namespaceHandler;}catch (ClassNotFoundException ex) {throw new FatalBeanException("NamespaceHandler class [" + className + "] for namespace [" +namespaceUri + "] not found", ex);}catch (LinkageError err) {throw new FatalBeanException("Invalid NamespaceHandler class [" + className + "] for namespace [" +namespaceUri + "]: problem with handler class file or dependent class", err);}}}其中Map<String, Object> handlerMappings = getHandlerMappings();获取到了url所对应的handler对应对象。getHandlerMappings()方法如下:
private Map<String, Object> getHandlerMappings() {if (this.handlerMappings == null) {synchronized (this) {if (this.handlerMappings == null) {try {Properties mappings =PropertiesLoaderUtils.loadAllProperties(this.handlerMappingsLocation, this.classLoader);if (logger.isDebugEnabled()) {logger.debug("Loaded NamespaceHandler mappings: " + mappings);}Map<String, Object> handlerMappings = new ConcurrentHashMap<String, Object>(mappings.size());CollectionUtils.mergePropertiesIntoMap(mappings, handlerMappings);this.handlerMappings = handlerMappings;}catch (IOException ex) {throw new IllegalStateException("Unable to load NamespaceHandler mappings from location [" + this.handlerMappingsLocation + "]", ex);}}}}return this.handlerMappings;}getHandlerMappings会在第一次调用时加载handler与url映射关系,并且会把class路径下的所有META-INF/spring.handlers下文件下的内容加载到Properties文件中然后转成map,其中Spring 每个Jar包下都有spring.handlers文件夹,在Spring-aop Jar包中该文件夹下内容是http\://www.springframework.org/schema/aop=org.springframework.aop.config.AopNamespaceHandler
故Map<String, Object>维护了http://www.springframework.org/schema/aop与org.springframework.aop.config.AopNamespaceHandler之间的映射关系,即Aop的handler为AopNamespaceHandler。
故NamespaceHandler handler = this.readerContext.getNamespaceHandlerResolver().resolve(namespaceUri);这句代码得到了AopNamespaceHandler。
return handler.parse(ele, new ParserContext(this.readerContext, this, containingBd));
上面这行代码对aop定义进行解析,具体解析过程是先得到BeanDefinitionParser然后再调用BeanDefinitionParser中的BeanDefinition parse(Element element, ParserContext parserContext);方法
解析得到BeanDefinition。具体过程在NamespaceHandlerSupport中,其中AopNamespaceHandler继承了NamespaceHandlerSupport,而NamespaceHandlerSupport实现了NamespaceHandler接口。
@Overridepublic BeanDefinition parse(Element element, ParserContext parserContext) {return findParserForElement(element, parserContext).parse(element, parserContext);}/*** Locates the {@link BeanDefinitionParser} from the register implementations using* the local name of the supplied {@link Element}.*/private BeanDefinitionParser findParserForElement(Element element, ParserContext parserContext) {String localName = parserContext.getDelegate().getLocalName(element);BeanDefinitionParser parser = this.parsers.get(localName);if (parser == null) {parserContext.getReaderContext().fatal("Cannot locate BeanDefinitionParser for element [" + localName + "]", element);}return parser;}其中String localName = parserContext.getDelegate().getLocalName(element),因为当前标签是<aop:config>,故得到的值为config,故获取到的BeanDefinitionParser为parser中key为config的对象,其中在AopNamespaceHandler初始化了下面几个BeanDefinitionParser,这个init方法是在 public NamespaceHandler resolve(String namespaceUri) {}即获取到AopNamespaceHandler后立即对其进行了初始化。
@Overridepublic void init() {// In 2.0 XSD as well as in 2.1 XSD.registerBeanDefinitionParser("config", new ConfigBeanDefinitionParser());registerBeanDefinitionParser("aspectj-autoproxy", new AspectJAutoProxyBeanDefinitionParser());registerBeanDefinitionDecorator("scoped-proxy", new ScopedProxyBeanDefinitionDecorator());// Only in 2.0 XSD: moved to context namespace as of 2.1registerBeanDefinitionParser("spring-configured", new SpringConfiguredBeanDefinitionParser());}故<aop:config>得到的BeanDefinitionParser为ConfigBeanDefinitionParser,其中ConfigBeanDefinitionParser的parser方法如下:
@Overridepublic BeanDefinition parse(Element element, ParserContext parserContext) {CompositeComponentDefinition compositeDef =new CompositeComponentDefinition(element.getTagName(), parserContext.extractSource(element));parserContext.pushContainingComponent(compositeDef);configureAutoProxyCreator(parserContext, element);List<Element> childElts = DomUtils.getChildElements(element);for (Element elt: childElts) {String localName = parserContext.getDelegate().getLocalName(elt);if (POINTCUT.equals(localName)) {parsePointcut(elt, parserContext);}else if (ADVISOR.equals(localName)) {parseAdvisor(elt, parserContext);}else if (ASPECT.equals(localName)) {parseAspect(elt, parserContext);}}parserContext.popAndRegisterContainingComponent();return null;}其中configureAutoProxyCreator(parserContext, element)向Spring容器中注册了一个beanName为org.springframework.aop.config.internalAutoProxyCreator的bean,这个bean的默认实现为AspectJAwareAdvisorAutoProxyCreator。这个类是Spring AOP中非常重要的类,本文主要介绍AOP的初始化XML解析过程,这个类留在后续做处理。
if (POINTCUT.equals(localName)) {parsePointcut(elt, parserContext);}else if (ADVISOR.equals(localName)) {parseAdvisor(elt, parserContext);}else if (ASPECT.equals(localName)) {parseAspect(elt, parserContext);}从名字很容易看出上面代码分别处理了<aop:config>下的<aop:pointcut> <aop:advisor>以及<aop:aspect>,从我们的例子使用中我们分别介绍:
<aop:aspect>标签解析:
private void parseAspect(Element aspectElement, ParserContext parserContext) {//得到 <aop:aspect id="time" ref="timeHandler">中的timeString aspectId = aspectElement.getAttribute(ID);//得到timeHandlerString aspectName = aspectElement.getAttribute(REF);try {//初始化一个切面实体this.parseState.push(new AspectEntry(aspectId, aspectName));List<BeanDefinition> beanDefinitions = new ArrayList<BeanDefinition>();List<BeanReference> beanReferences = new ArrayList<BeanReference>();//获取<aop:aspect>节点为declare-parents的元素,本次不会涉及到,这个有时间再研究List<Element> declareParents = DomUtils.getChildElementsByTagName(aspectElement, DECLARE_PARENTS);for (int i = METHOD_INDEX; i < declareParents.size(); i++) {Element declareParentsElement = declareParents.get(i);beanDefinitions.add(parseDeclareParents(declareParentsElement, parserContext));}// We have to parse "advice" and all the advice kinds in one loop, to get the// ordering semantics right.//获取<aop:aspect>下所有的节点NodeList nodeList = aspectElement.getChildNodes();boolean adviceFoundAlready = false;//循环遍历所有节点for (int i = 0; i < nodeList.getLength(); i++) {Node node = nodeList.item(i);if (isAdviceNode(node, parserContext)) {//如果节点为为通知类型即<aop:before>、<aop:after>、<aop:after-returning>、<aop:after-throwing method="">、<aop:around method=""> 5个节点if (!adviceFoundAlready) {adviceFoundAlready = true;if (!StringUtils.hasText(aspectName)) {parserContext.getReaderContext().error("<aspect> tag needs aspect bean reference via 'ref' attribute when declaring advices.",aspectElement, this.parseState.snapshot());return;}beanReferences.add(new RuntimeBeanReference(aspectName));}//解析定义AbstractBeanDefinition advisorDefinition = parseAdvice(aspectName, i, aspectElement, (Element) node, parserContext, beanDefinitions, beanReferences);beanDefinitions.add(advisorDefinition);}}AspectComponentDefinition aspectComponentDefinition = createAspectComponentDefinition(aspectElement, aspectId, beanDefinitions, beanReferences, parserContext);parserContext.pushContainingComponent(aspectComponentDefinition);List<Element> pointcuts = DomUtils.getChildElementsByTagName(aspectElement, POINTCUT);for (Element pointcutElement : pointcuts) {parsePointcut(pointcutElement, parserContext);}parserContext.popAndRegisterContainingComponent();}finally {this.parseState.pop();}}AbstractBeanDefinition advisorDefinition = parseAdvice( aspectName, i, aspectElement, (Element) node, parserContext, beanDefinitions, beanReferences);
这句代码对通知节点进行了解析,其实现如下。
private AbstractBeanDefinition parseAdvice(String aspectName, int order, Element aspectElement, Element adviceElement, ParserContext parserContext,List<BeanDefinition> beanDefinitions, List<BeanReference> beanReferences) {try {this.parseState.push(new AdviceEntry(parserContext.getDelegate().getLocalName(adviceElement)));// create the method factory beanRootBeanDefinition methodDefinition = new RootBeanDefinition(MethodLocatingFactoryBean.class);methodDefinition.getPropertyValues().add("targetBeanName", aspectName);methodDefinition.getPropertyValues().add("methodName", adviceElement.getAttribute("method"));methodDefinition.setSynthetic(true);// create instance factory definitionRootBeanDefinition aspectFactoryDef =new RootBeanDefinition(SimpleBeanFactoryAwareAspectInstanceFactory.class);aspectFactoryDef.getPropertyValues().add("aspectBeanName", aspectName);aspectFactoryDef.setSynthetic(true);// 注册切点AbstractBeanDefinition adviceDef = createAdviceDefinition(adviceElement, parserContext, aspectName, order, methodDefinition, aspectFactoryDef,beanDefinitions, beanReferences);// 配置通知RootBeanDefinition advisorDefinition = new RootBeanDefinition(AspectJPointcutAdvisor.class);advisorDefinition.setSource(parserContext.extractSource(adviceElement));advisorDefinition.getConstructorArgumentValues().addGenericArgumentValue(adviceDef);if (aspectElement.hasAttribute(ORDER_PROPERTY)) {advisorDefinition.getPropertyValues().add(ORDER_PROPERTY, aspectElement.getAttribute(ORDER_PROPERTY));}// 注册到beanFactory中parserContext.getReaderContext().registerWithGeneratedName(advisorDefinition);return advisorDefinition;}finally {this.parseState.pop();}} private AbstractBeanDefinition createAdviceDefinition(Element adviceElement, ParserContext parserContext, String aspectName, int order,RootBeanDefinition methodDef, RootBeanDefinition aspectFactoryDef,List<BeanDefinition> beanDefinitions, List<BeanReference> beanReferences) {RootBeanDefinition adviceDefinition = new RootBeanDefinition(getAdviceClass(adviceElement, parserContext));adviceDefinition.setSource(parserContext.extractSource(adviceElement));adviceDefinition.getPropertyValues().add(ASPECT_NAME_PROPERTY, aspectName);adviceDefinition.getPropertyValues().add(DECLARATION_ORDER_PROPERTY, order);if (adviceElement.hasAttribute(RETURNING)) {adviceDefinition.getPropertyValues().add(RETURNING_PROPERTY, adviceElement.getAttribute(RETURNING));}if (adviceElement.hasAttribute(THROWING)) {adviceDefinition.getPropertyValues().add(THROWING_PROPERTY, adviceElement.getAttribute(THROWING));}if (adviceElement.hasAttribute(ARG_NAMES)) {adviceDefinition.getPropertyValues().add(ARG_NAMES_PROPERTY, adviceElement.getAttribute(ARG_NAMES));}ConstructorArgumentValues cav = adviceDefinition.getConstructorArgumentValues();cav.addIndexedArgumentValue(METHOD_INDEX, methodDef);Object pointcut = parsePointcutProperty(adviceElement, parserContext);if (pointcut instanceof BeanDefinition) {cav.addIndexedArgumentValue(POINTCUT_INDEX, pointcut);beanDefinitions.add((BeanDefinition) pointcut);}else if (pointcut instanceof String) {RuntimeBeanReference pointcutRef = new RuntimeBeanReference((String) pointcut);cav.addIndexedArgumentValue(POINTCUT_INDEX, pointcutRef);beanReferences.add(pointcutRef);}cav.addIndexedArgumentValue(ASPECT_INSTANCE_FACTORY_INDEX, aspectFactoryDef);return adviceDefinition;}其中createAdviceDefinition创建了通知定义是一种Spring Bean定义RootBeanDefinition,其中针对每个通知有对应的bean与之对应。
private Class<?> getAdviceClass(Element adviceElement, ParserContext parserContext) {String elementName = parserContext.getDelegate().getLocalName(adviceElement);if (BEFORE.equals(elementName)) {return AspectJMethodBeforeAdvice.class;}else if (AFTER.equals(elementName)) {return AspectJAfterAdvice.class;}else if (AFTER_RETURNING_ELEMENT.equals(elementName)) {return AspectJAfterReturningAdvice.class;}else if (AFTER_THROWING_ELEMENT.equals(elementName)) {return AspectJAfterThrowingAdvice.class;}else if (AROUND.equals(elementName)) {return AspectJAroundAdvice.class;}else {throw new IllegalArgumentException("Unknown advice kind [" + elementName + "].");}}从上面方法可以看出5种通知对应的bean定义分别为
before对应AspectJMethodBeforeAdvice
After对应AspectJAfterAdvice
after-returning对应AspectJAfterReturningAdvice
after-throwing对应AspectJAfterThrowingAdvice
around对应AspectJAroundAdvice
故我们例子中<aop:before>、<aop:after>两个标签的Spring Bean定义都创建完成,具体创建Bean定义跟Spring IOC一样,只不过这里直接指定了Bean实现。
获取通知的BeanDefinition后会会实例化一个
RootBeanDefinition advisorDefinition = new RootBeanDefinition(AspectJPointcutAdvisor.class);并将通知Bean封装起来,这个bean是AspectJPointcutAdvisor。
回到上面节点循环中,其中解析了通知节点后会解析横切点,代码如下:
//获取横切点的元素节点
List<Element> pointcuts = DomUtils.getChildElementsByTagName(aspectElement, POINTCUT);for (Element pointcutElement : pointcuts) {parsePointcut(pointcutElement, parserContext);}
private AbstractBeanDefinition parsePointcut(Element pointcutElement, ParserContext parserContext) {//获取<aop:pointcut id="point" expression="execution(* com.dianping.aop.ShopService.*(..))"/>中id和expression的值String id = pointcutElement.getAttribute(ID);String expression = pointcutElement.getAttribute(EXPRESSION);AbstractBeanDefinition pointcutDefinition = null;try {this.parseState.push(new PointcutEntry(id));//创建切点bean定义pointcutDefinition = createPointcutDefinition(expression);pointcutDefinition.setSource(parserContext.extractSource(pointcutElement));String pointcutBeanName = id;if (StringUtils.hasText(pointcutBeanName)) {parserContext.getRegistry().registerBeanDefinition(pointcutBeanName, pointcutDefinition);}else {pointcutBeanName = parserContext.getReaderContext().registerWithGeneratedName(pointcutDefinition);}parserContext.registerComponent(new PointcutComponentDefinition(pointcutBeanName, pointcutDefinition, expression));}finally {this.parseState.pop();}return pointcutDefinition;}pointcutDefinition = createPointcutDefinition(expression);方法如下:
protected AbstractBeanDefinition createPointcutDefinition(String expression) {RootBeanDefinition beanDefinition = new RootBeanDefinition(AspectJExpressionPointcut.class);beanDefinition.setScope(BeanDefinition.SCOPE_PROTOTYPE);beanDefinition.setSynthetic(true);beanDefinition.getPropertyValues().add(EXPRESSION, expression);return beanDefinition;}即创建了一个AspectJExpressionPointcut Bean定义。
创建完成后无非就是将bean注册到BeanFactory中。
这样整个Spring AOP初始化就基本完成,AOP初始化过程中就是解析各种标签创建Spring IOC中bean定义。
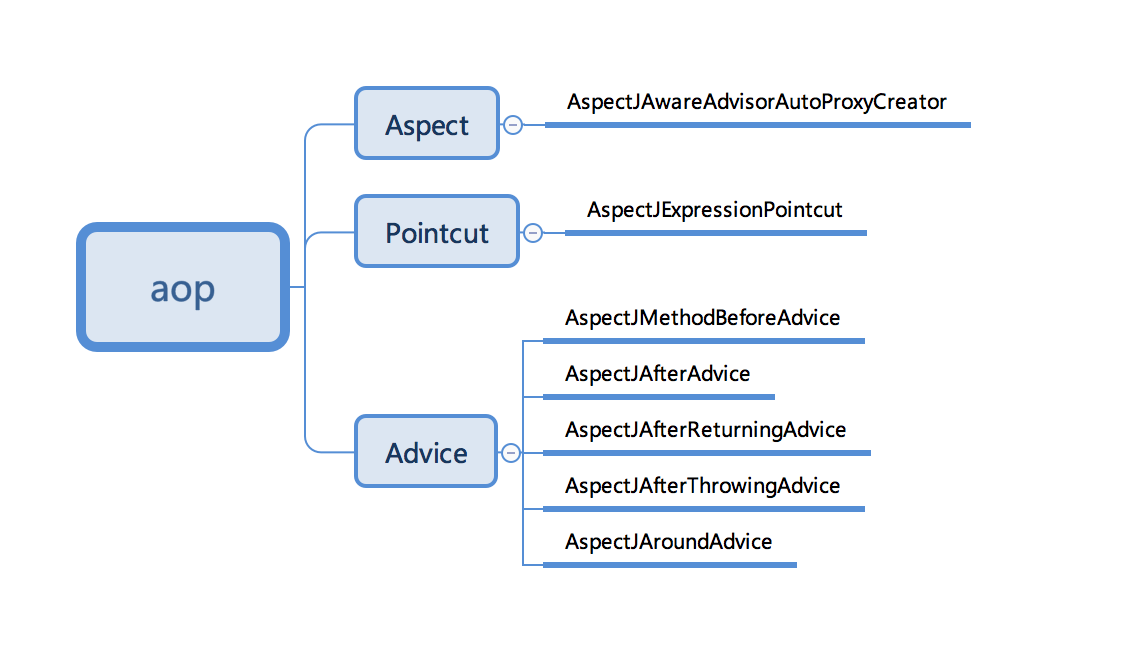
回顾下AOP初始化主要创建了一下Bean
转载于:https://my.oschina.net/wenbo123/blog/1594133
Spring系列之-Spring AOP设计原理(一)相关推荐
- spring源码阅读--aop实现原理分析
aop实现原理简介 首先我们都知道aop的基本原理就是动态代理思想,在设计模式之代理模式中有介绍过这两种动态代理的使用与基本原理,再次不再叙述. 这里分析的是,在spring中是如何基于动态代理的思想 ...
- 【Spring 系列】Spring知识地图
文章目录 Spring IOC 知道 会用 熟练 掌握 专家 Spring AOP 知道 会用 熟练 掌握 专家 Spring MVC 知道 会用 熟练 掌握 专家 Spring WebFlux 知道 ...
- Spring系列之Spring框架和SpringAOP集成过程分析(十)
转载请注明出处:https://blog.csdn.net/zknxx/article/details/80724180 在开始这个系列之前大家先想一下我们是怎么在项目中使用SpringAOP的(这里 ...
- java中的saturn_Saturn分布式调度平台系列:高屋建瓴之设计原理简析
由于业务系统中使用了Saturn作为分布式调度平台并且计划对其作二次开发,因此看了官方文档及源码,简单做了梳理与总结.Saturn是唯品会开源的一款定时任务调度平台,相对于传统的Spring Batc ...
- Spring系列 1.Spring概述及IOP
Spring概述 简介 Spring : 春天 ->给软件行业带来了春天 2002年,Rod Jahnson首次推出了Spring框架雏形interface21框架. 2004年3月24日,Sp ...
- Spring系列之Spring Web MVC-20
目录 Spring Web MVC DispatcherServlet 上下文层次结构 特殊Bean Web MVC 配置 程序配置 工作原理 异常 视图解析 配置 重定向 转发 内容协商 过滤器 F ...
- Spring系列之Spring常用注解总结
参看博客:https://www.cnblogs.com/xiaoxi/p/5935009.html 传统的Spring做法是使用.xml文件来对bean进行注入或者是配置aop.事物,这么做有两个缺 ...
- SOA系列文章(二):服务设计原理:服务模式和反模式
服务设计系列的法则已经发展到最佳通信实践和取样相关编码的程度.本文提供了设计和实现网络服务的基本原理,并且对面向服务的体系结构(SOA)的相关概念做了一个简要的回顾,以及有关于几种模式和反模式的详细讨 ...
- Spring系列之Spring常用注解总结 原文:https://www.cnblogs.com/xiaoxi/p/5935009.html
传统的Spring做法是使用.xml文件来对bean进行注入或者是配置aop.事物,这么做有两个缺点: 1.如果所有的内容都配置在.xml文件中,那么.xml文件将会十分庞大:如果按需求分开.xml文 ...
- Spring 系列:Spring AOP 中@Pointcut的用法(多个Pointcut)
格式: execution(modifiers-pattern? ret-type-pattern declaring-type-pattern? name-pattern(param-pattern ...
最新文章
- 控制信号(单脉冲信号)的跨时钟域传输问题
- python使用opencv_Python使用OpenCV进行标定
- iphone屏幕上的圆圈怎么设置_iphone亮度条不变屏幕变暗怎么回事【解决方法】
- windows下面怎么github ssh 公钥,然后克隆项目
- 2018(上)C高级第0次作业
- python3 selenium安装教程_Mac OS下搭建 python3+pycharm+selenium+Chrome环境
- 4. 创建 bundle
- 地图之美(地图制图)
- java的编译原理_Javac编译原理 - Martiny的个人空间 - OSCHINA - 中文开源技术交流社区...
- 摄像头视频捕捉(IsampleGrabberCB实现)
- m4s格式转换mp3_wma格式怎么转换mp3
- MER:高通量测序应用于病原体和害虫诊断——综述与实用性建议
- 简谈校招新员工培养方案
- Kingdom Rush 国王保卫战图文攻略
- keras 入门教程
- 揭秘HTTP/3优先级
- 男人,你连剃须刀都不知道怎么选,活该你单身!
- 浙江大学计算机系历届系主任,上海交通大学计算机科学与工程系(CSE)
- Win10自动修复错误无法开机
- react16.3官方文档