在 Docker 上搭建 PostGIS 数据库实现空间数据存储及可视化
此文旨在记录与传播在 Docker 上搭建 PostGIS 数据库实现空间数据存储及可视化的知识要点。
PostGIS
已经有PostGIS经验的大佬可以忽略此段了。解释 PostGIS 之前需要介绍 PostgreSQL (简称 postgres ); postgres 是一个数据库服务器软件,由加州大学伯克利分校计算机系开发;部署在服务器上可以由不同数量的客户端连接,进而操作postgres 数据库中的数据。PostGIS 是在 postgres 之上的一款扩展软件,他主要用来存储及操作空间数据(矢量和栅格),还可以对进行空间分析。
Docker
对于一位不熟悉命令行的用户来说可能Docker 是一头野兽;有点吓人吧。 因为他的大部分操作都是基于命令行的;但是它为您提供了一种构建和运行软件的方式,通过构建一种名为LXC容器的技术,以非常一致和可控的方式运行软件。
对于GISer来说,Docker 和 PostGIS 又意味着什么呢? 如果有 Docker 和 PostGIS 技术,GISer或者其他人都能以最小的配置在任何机器上安装软件,而且环境都是一致的,这在开发和运维中至关重要。当然 Docker 这项技术并不限于和 PostGIS 结合。
安装Docker
Docker 是夸平台的可以安装在任何机器上。前面已经有关于 Docker 安装及使用的文章,可以去参考,在这就不去一一解释了,直接给出通过 Vagrant 安装的简略步骤。
环境
| 序号 | 名称 | 版本 | 用途 |
|---|---|---|---|
| 1 | centos | 7 | 系统 |
| 2 | kartoza/postgis | 9.6-2.4 | docker镜像 |
| 3 | Virtual Box | latest | 虚拟机 |
注: 因为我们安装好的 PostGIS 要和我们本机的软件进行通信,所以需要使用 host-only 网络, 且指定IP为192.168.33.10。
Vagrantfile文件内容
注:假定已安装Virtual Box 及 Vagrant.
# -*- mode: ruby -*-
# vi: set ft=ruby :# All Vagrant configuration is done below. The "2" in Vagrant.configure
# configures the configuration version (we support older styles for
# backwards compatibility). Please don't change it unless you know what
# you're doing.
Vagrant.configure("2") do |config|# The most common configuration options are documented and commented below.# For a complete reference, please see the online documentation at# https://docs.vagrantup.com.# Every Vagrant development environment requires a box. You can search for# boxes at https://vagrantcloud.com/search.config.vm.box = "centos/7"# Disable automatic box update checking. If you disable this, then# boxes will only be checked for updates when the user runs# `vagrant box outdated`. This is not recommended.# config.vm.box_check_update = false# Create a forwarded port mapping which allows access to a specific port# within the machine from a port on the host machine. In the example below,# accessing "localhost:8080" will access port 80 on the guest machine.# NOTE: This will enable public access to the opened port# config.vm.network "forwarded_port", guest: 80, host: 8080# Create a forwarded port mapping which allows access to a specific port# within the machine from a port on the host machine and only allow access# via 127.0.0.1 to disable public access# config.vm.network "forwarded_port", guest: 80, host: 8080, host_ip: "127.0.0.1"# Create a private network, which allows host-only access to the machine# using a specific IP.config.vm.network "private_network", ip: "192.168.33.10"# config.vm.network "public_network", ip: "192.168.141.204"# Create a public network, which generally matched to bridged network.# Bridged networks make the machine appear as another physical device on# your network.# config.vm.network "public_network"# Share an additional folder to the guest VM. The first argument is# the path on the host to the actual folder. The second argument is# the path on the guest to mount the folder. And the optional third# argument is a set of non-required options.# config.vm.synced_folder "../data", "/vagrant_data"# Provider-specific configuration so you can fine-tune various# backing providers for Vagrant. These expose provider-specific options.# Example for VirtualBox:## config.vm.provider "virtualbox" do |vb|#   # Display the VirtualBox GUI when booting the machine#   vb.gui = true##   # Customize the amount of memory on the VM:#   vb.memory = "1024"# end## View the documentation for the provider you are using for more# information on available options.# Enable provisioning with a shell script. Additional provisioners such as# Puppet, Chef, Ansible, Salt, and Docker are also available. Please see the# documentation for more information about their specific syntax and use.# config.vm.provision "shell", inline: <<-SHELL#   apt-get update#   apt-get install -y apache2# SHELL
end
安装 centos 系统
$ vagrant up
Bringing machine 'default' up with 'virtualbox' provider...
==> default: Checking if box 'centos/7' is up to date...
==> default: Clearing any previously set forwarded ports...
==> default: Clearing any previously set network interfaces...
==> default: Preparing network interfaces based on configuration...
......
==> default: Rsyncing folder: /cygdrive/c/VM/Vagrant/ => /vagrant
==> default: Machine already provisioned. Run `vagrant provision` or use the `--provision`
==> default: flag to force provisioning. Provisioners marked to run always will still run.
查看虚拟机系统状态
$ vagrant status
Current machine states:default                   running (virtualbox)The VM is running. To stop this VM, you can run `vagrant halt` to
shut it down forcefully, or you can run `vagrant suspend` to simply
suspend the virtual machine. In either case, to restart it again,
simply run `vagrant up`.
连接 centos 虚拟机
$ vagrant ssh
Last login: Wed May  9 07:01:18 2018 from 10.0.2.2
[vagrant@localhost ~]$
安装Docker, 安装参考官网
在刚才连接的虚拟机中执行如下命令
$ sudo yum remove docker \docker-client \docker-client-latest \docker-common \docker-latest \docker-latest-logrotate \docker-logrotate \docker-selinux \docker-engine-selinux \docker-engine
$ sudo yum install -y yum-utils \device-mapper-persistent-data \lvm2
$ sudo yum-config-manager \--add-repo \https://download.docker.com/linux/centos/docker-ce.repo
$ sudo yum install docker-ce
# 安装完成后启动 Docker
$ sudo systemctl start docker
解决权限问题
$ sudo groupadd docker
$ sudo gpasswd -a vagrant docker
$ exit
$ vagrant ssh
$ docker version
Client:Version:      18.03.1-ceAPI version:  1.37Go version:   go1.9.5Git commit:   9ee9f40Built:        Thu Apr 26 07:20:16 2018OS/Arch:      linux/amd64Experimental: falseOrchestrator: swarmServer:Engine:Version:      18.03.1-ceAPI version:  1.37 (minimum version 1.12)Go version:   go1.9.5Git commit:   9ee9f40Built:        Thu Apr 26 07:23:58 2018OS/Arch:      linux/amd64Experimental: false
安装 PostGIS 镜像
$ mdkir postgre_data && cd postgre_data
$ pwd
/home/vagrant/postgre_data
$ docker run --name=postgis -d -e POSTGRES_USER=sde -e POSTGRES_PASS=sde -e POSTGRES_DBNAME=gis -e ALLOW_IP_RANGE=0.0.0.0/0 -p 5432:5432 -v $(pwd):/var/lib/postgresql --restart=always kartoza/postgis:9.6-2.4
d6f14f3e815fbca4d644582c45aca90dff2b16aba58f0b5765409a140930a3bb- docker run --name=postgis 告诉 docker新建一个名为postgis的镜像
- -d 后台运行
- -e POSTGRES_USER=sde 通过 -e 参数向镜像写入POSTGRES_USER=sde的环境变量作为 PostgreSQL的超级用户,你可以在任何地方改变他。
- -e POSTGRES_PASS=sde 通过 -e 参数向镜像写入POSTGRES_PASS=sde的环境变量作为 PostgreSQL的超级用户的密码,你可以在任何地方改变他。
- -e POSTGRES_DBNAME=gis 通过 -e 参数向镜像写入POSTGRES_DBNAME=gis的环境变量作为操作 PostgreSQL 的当前数据库,你可以在任何地方改变他。
- -e ALLOW_IP_RANGE=0.0.0.0/0 通过 -e 参数向镜像写入ALLOW_IP_RANGE=0.0.0.0/0的环境变量,使任何客户端都可以连接当前数据库的配置,你可以在任何地方改变他。
- -p 5432:5432 因为 PostgreSQL 向外暴露5432,我们要使用外面实体机的 pgAdmin 连接Docker中的数据库,故向外映射5432端口,又因为 centos 虚拟机和实体机质检室host-only网络,故在连接。
- -v $(pwd):/var/lib/postgresql 挂载(bind)当前目录与PostgreSQL生产的数据库,这样两边的数据会同步。
- --restart=always 创建一条自动启动的规则,告诉 Docker , 每次启动的时候 postgis 容器自动启动。
- kartoza/postgis:9.6-2.4 指定 postgis的镜像为 kartoza/postgis, 且版本为 PostgreSQL 9.6 和 PostGIS 2.4
查看运行的镜像
$ docker ps
CONTAINER ID        IMAGE                     COMMAND                  CREATED             STATUS              PORTS                    NAMES
d6f14f3e815f        kartoza/postgis:9.6-2.4   "/bin/sh -c /docker-…"   51 seconds ago      Up 50 seconds       0.0.0.0:5432->5432/tcp   postgis
查看运行的 postgis 镜像的日志
$ docker logs postgis
Add rule to pg_hba: 0.0.0.0/0
Add rule to pg_hba: replication user
Setup master database
# ......略
Success. You can now start the database server using:/usr/lib/postgresql/9.6/bin/pg_ctl -D /var/lib/postgresql/9.6/main -l logfile startWARNING: enabling "trust" authentication for local connections
You can change this by editing pg_hba.conf or using the option -A, or
--auth-local and --auth-host, the next time you run initdb.
2018-05-10 07:08:38.015 UTC [51] LOG: database system was shut down at 2018-05-10 07:08:37 UTC
2018-05-10 07:08:38.015 UTC [52] postgres@postgres FATAL: the database system is starting up
psql: FATAL: the database system is starting up
2018-05-10 07:08:38.023 UTC [51] LOG: MultiXact member wraparound protections are now enabled
2018-05-10 07:08:38.026 UTC [39] LOG: database system is ready to accept connections
2018-05-10 07:08:38.026 UTC [57] LOG: autovacuum launcher startedList of databasesName | Owner | Encoding | Collate | Ctype | Access privileges
-----------+----------+-----------+---------+-------+-----------------------postgres | postgres | SQL_ASCII | C | C |template0 | postgres | SQL_ASCII | C | C | =c/postgres +| | | | | postgres=CTc/postgrestemplate1 | postgres | SQL_ASCII | C | C | =c/postgres +| | | | | postgres=CTc/postgres
(3 rows)postgres ready
# .....略
Setup postgres User:Password
CREATE ROLE
Check default db exists
Create default db gisList of databasesName | Owner | Encoding | Collate | Ctype | Access privileges
------------------+----------+-----------+---------+-------+-----------------------gis | sde | UTF8 | C | C |postgres | postgres | SQL_ASCII | C | C |template0 | postgres | SQL_ASCII | C | C | =c/postgres +| | | | | postgres=CTc/postgrestemplate1 | postgres | SQL_ASCII | C | C | =c/postgres +| | | | | postgres=CTc/postgrestemplate_postgis | postgres | UTF8 | C | C |
(5 rows)2018-05-10 07:08:41.291 UTC [39] LOG: received smart shutdown request
2018-05-10 07:08:41.291 UTC [57] LOG: autovacuum launcher shutting down
2018-05-10 07:08:41.293 UTC [54] LOG: shutting down
2018-05-10 07:08:41.300 UTC [39] LOG: database system is shut down/docker-entrypoint.sh: ignoring /docker-entrypoint-initdb.d/*Postgres initialisation process completed .... restarting in foreground
2018-05-10 07:08:41.328 UTC [231] LOG: database system was shut down at 2018-05-10 07:08:41 UTC
2018-05-10 07:08:41.329 UTC [231] LOG: MultiXact member wraparound protections are now enabled
2018-05-10 07:08:41.330 UTC [228] LOG: database system is ready to accept connections
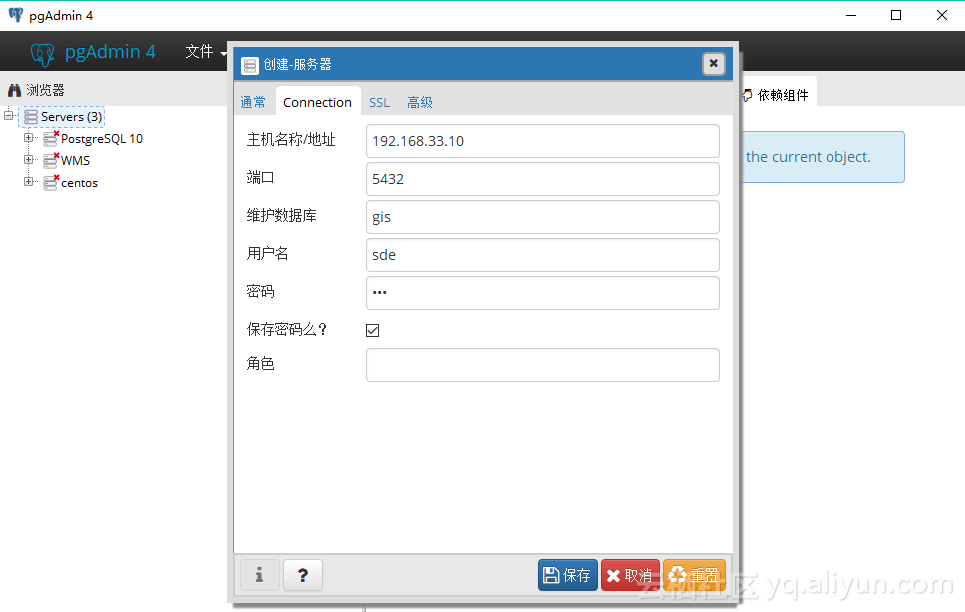
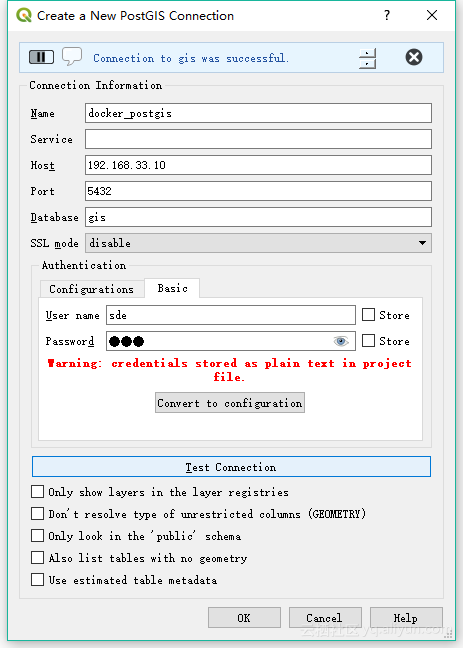
2018-05-10 07:08:41.331 UTC [235] LOG: autovacuum launcher started主机 pgAdmin 连接 postgis 容器
连接信息
| 名称 | 值 |
|---|---|
| 名称 | docker_postgis |
| ip | 192.168.33.10 |
| 端口 | 5432 |
| 维护数据库 | gis |
| 用户名 | sde |
| 密码 | sde |
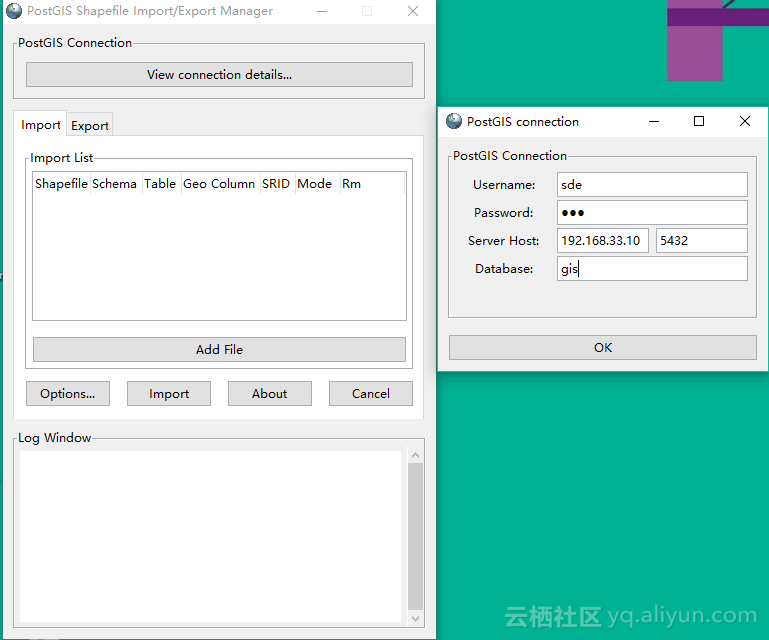
导入 ShapeFile 数据
使用主机上的PostGIS Shapefile Import/Export Manager 连接 Docker 中的 PostgreSql数据库
连接信息
| 名称 | 值 |
|---|---|
| 用户名 | sde |
| 密码 | sde |
| ip | 192.168.33.10 |
| 端口 | 5432 |
| 数据库 | gis |
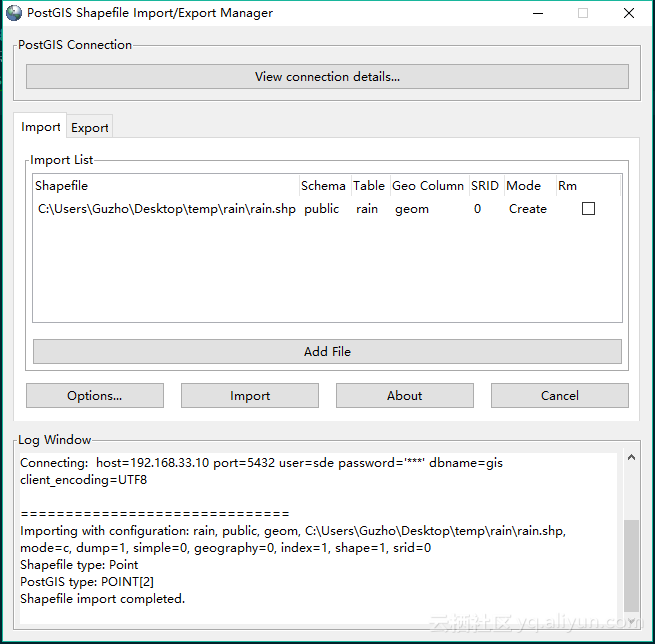
添加文件后点击导入(import)
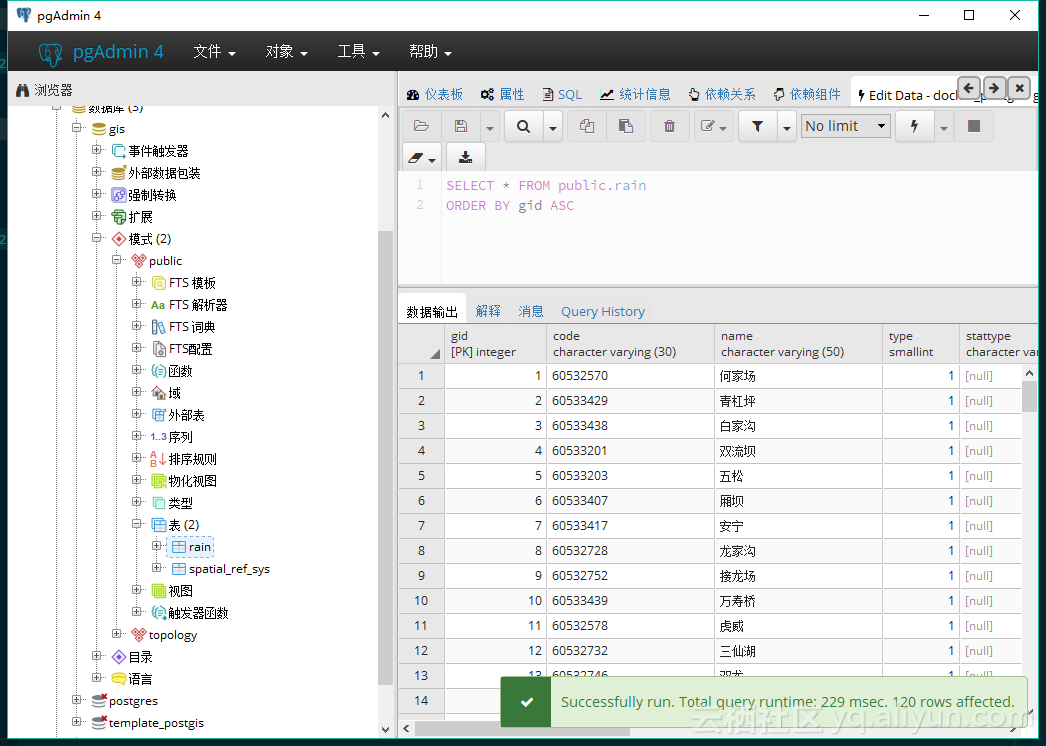
在数据库中查看导入的 shape 数据
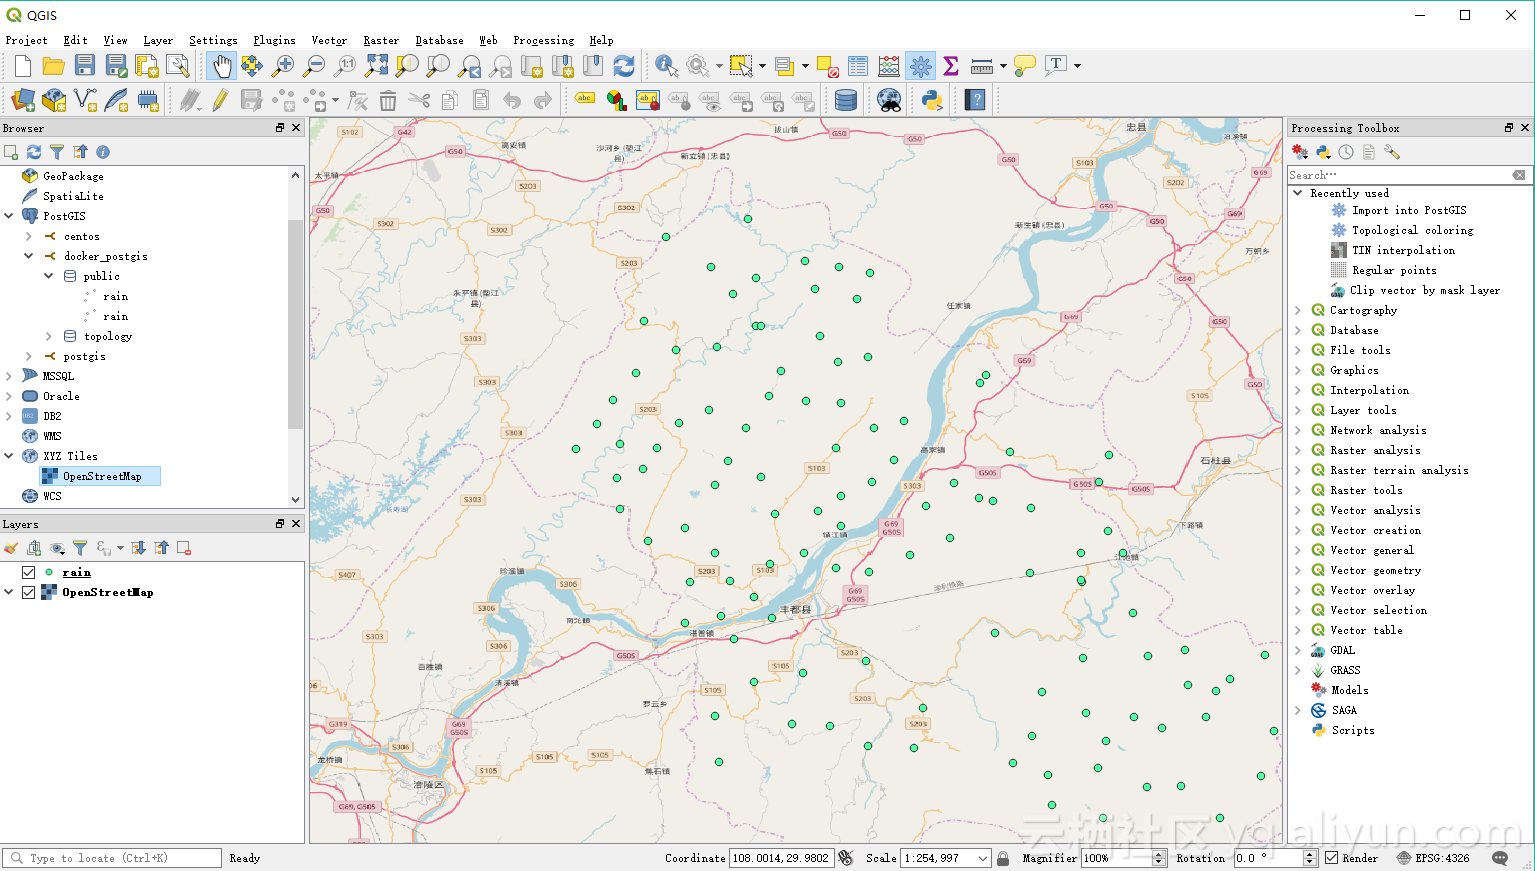
连接QGIS
将数据导入 QGIS 查看
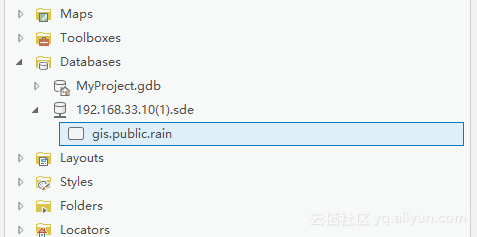
连接 ArcGIS Pro
连接信息
| 名称 | 值 |
|---|---|
| 数据库平台 | PostgreSQL |
| 实例 | 192.168.33.10 |
| 认证类 | 数据库认证 |
| 用户名 | sde |
| 密码 | sde |
| 数据库 | gis |

查看数据记录
注: 通过PostGIS Shapefile Import/Export Manager 导入的数据加载到ArcGIS Pro 中没有空间参考,故添加到地图中没有意义,但可以在 Catalog 中看到。
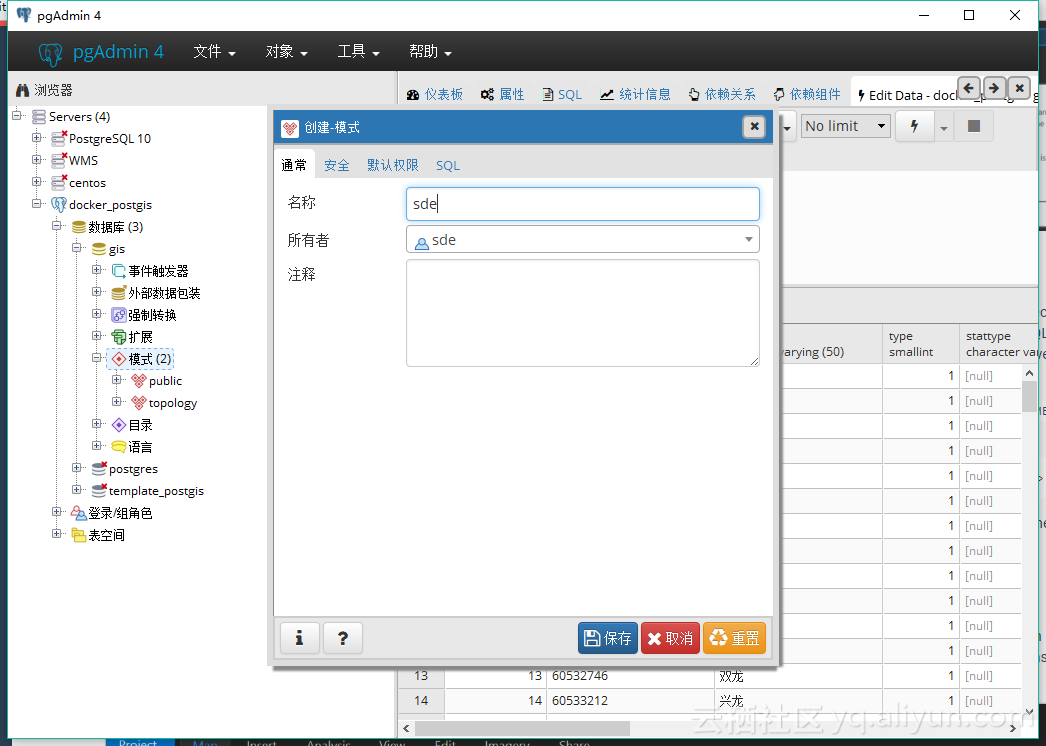
导入新数据到sde中
在导入之前需要在连接的数据库中创建与用户名一致的模式,在这我们是sde。
创建 sde 模式

导入数据

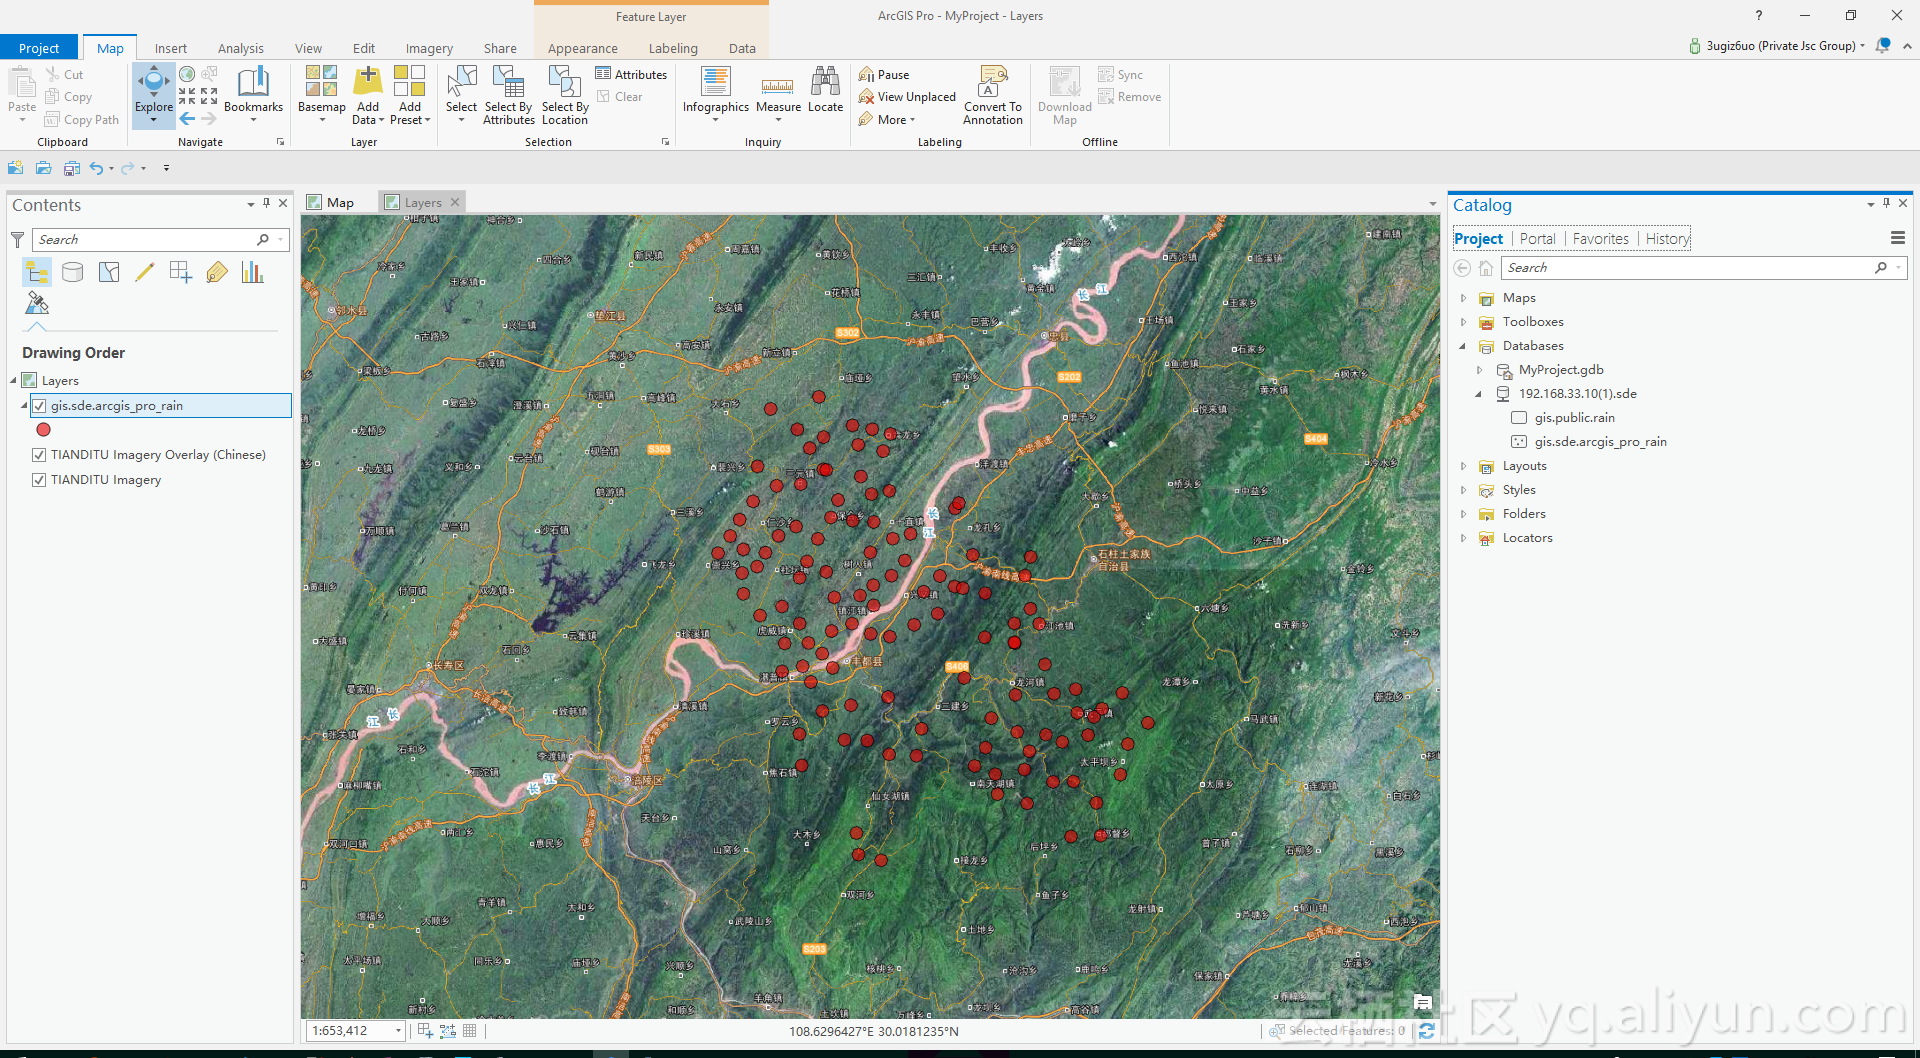
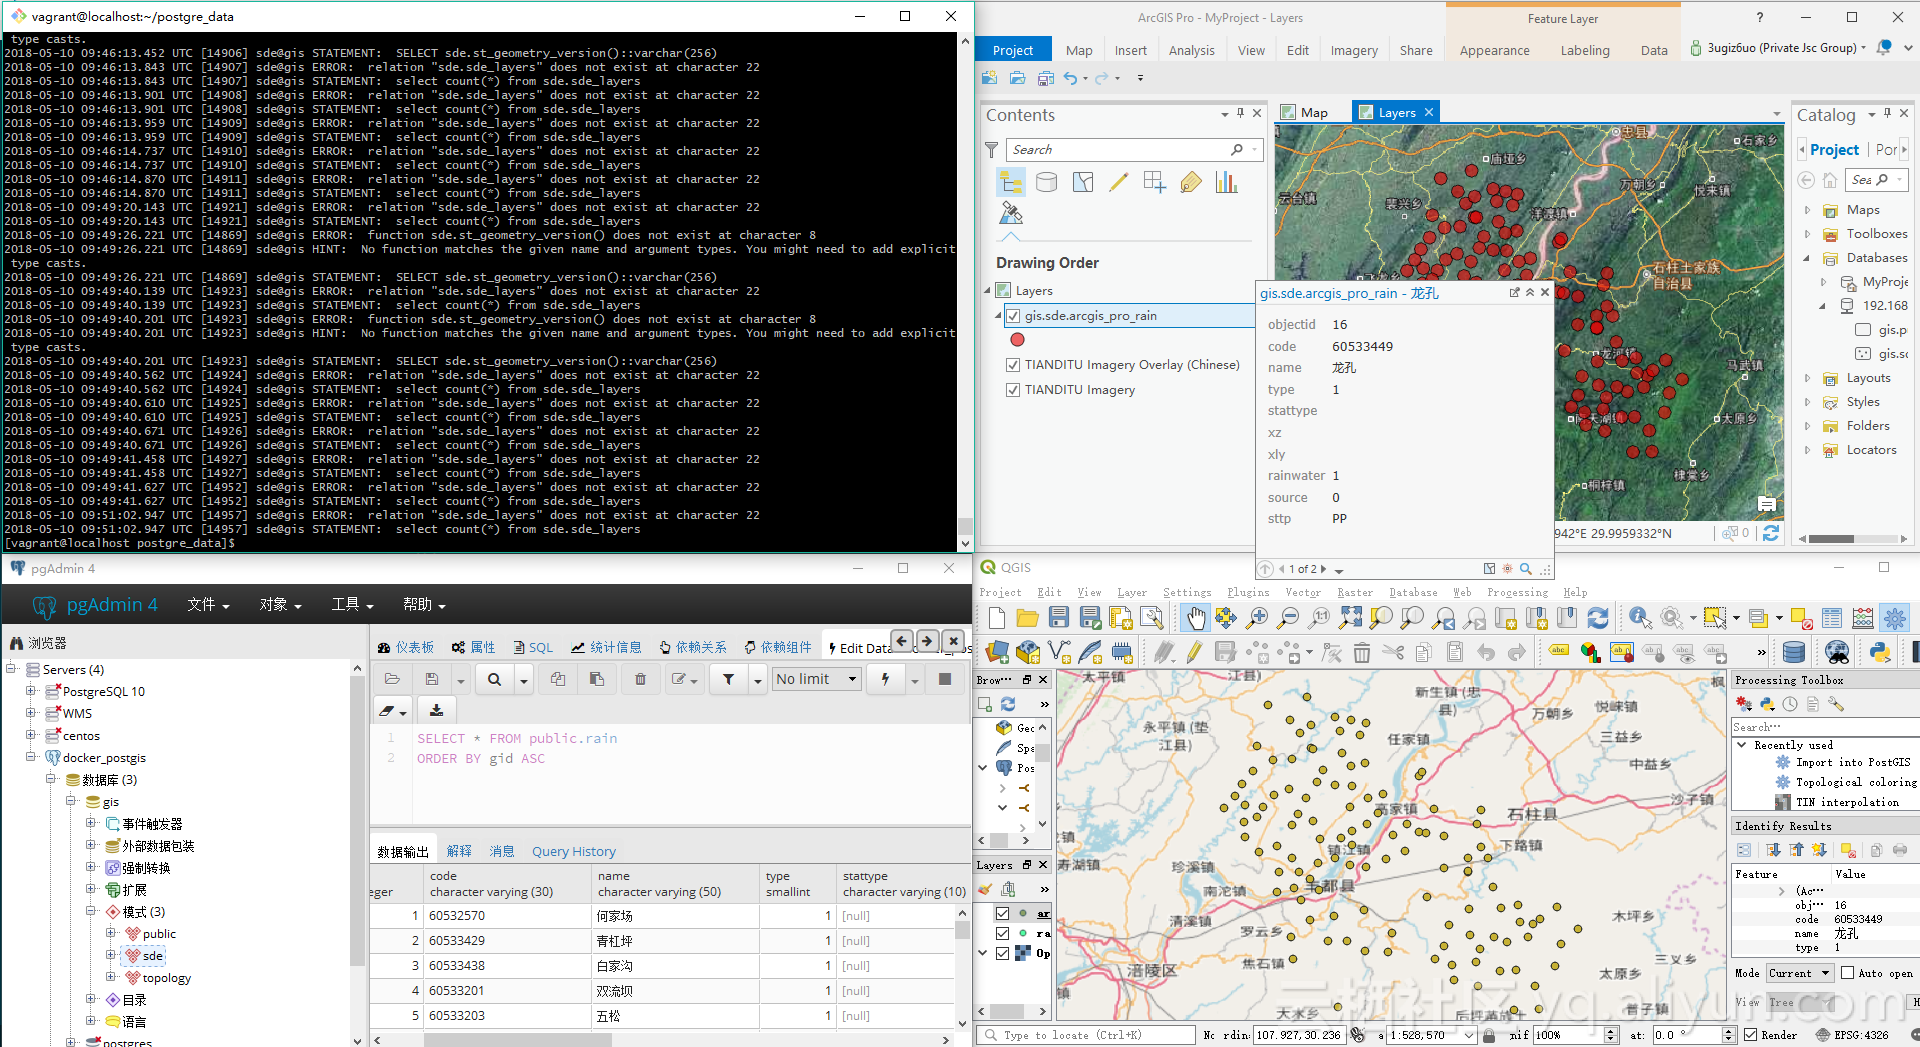
在 ArcGIS Pro 中查看数据
在 QGIS 中查看数据
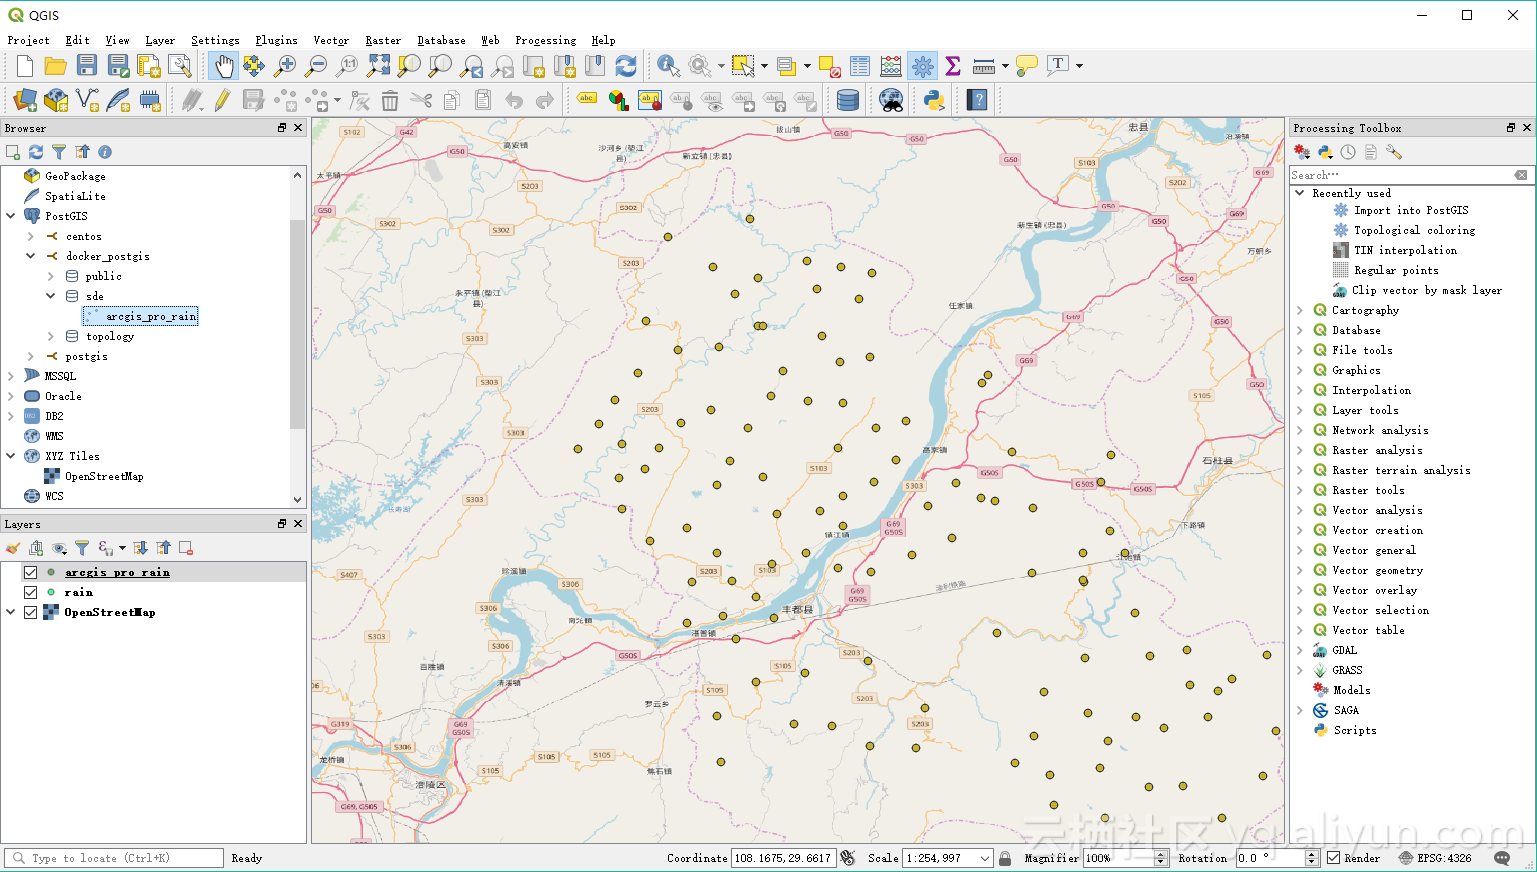
总的效果
总结
整个过程通过使用 Vagrant 创建Centos系统,在创建的系统之上安装 Docker, 然后在Docker的基础上安装整合好的 PostGIS 镜像,并运行容器,接着使用 QGIS 和 ArcGIS Pro 连接PostGIS容器导入各种格式的数据、查看数据等。说了这么多,那这样做究竟有什么好处呢? 个人认为有以下几方面的好处。
- 解决开发和部署环境不一致性的问题;
- 快速安装所需软件,避免一个一个安装,节省时间;
- 数据库数据是存储在Linux上且绑定到容器里面的,保证了数据的安全性,同时可以多次挂载、测试及连接(link),即使是在原有镜像基础上增加了新的功能;
- 跨平台
参考
- Docker
- Vagrant
- vmware
- PostgreSQL
- PostGIS
- kartoza/postgis
- 文章:Set Up a PostGIS Database With Docker
在 Docker 上搭建 PostGIS 数据库实现空间数据存储及可视化相关推荐
- 云服务如何搭建数据库_【MySQL8.0.18】阿里云服务器上搭建MySQL数据库
要想搭建个人博客,云服务器和数据库是少不了的.笔者选择在阿里云服务器上搭建一个MySQL数据库. 系统选用CentOS8.0,MySQL数据库版本8.0.18 一.数据库压缩包选择及下载 登录MySQ ...
- linux开启docker mysql_Linux服务器利用Docker快速搭建MySQL数据库
首先你要有一台Linux服务器 利用Xshell远程软件连接后就可以开始安装docker容器了. 1.第一步在Linux服务器上安装docker 2.第二步利用Docker拉取mysql镜像 Cent ...
- Docker上搭建Mysql8.0服务器
MySQL is a widely used, open-source relational database management system (RDBMS). Mysql是广泛使用的开源关系型数 ...
- 【环境搭建】Docker上搭建sqli-labs漏洞环境
目录 1 sqli-labs简介 2 Docker搭建sqli-labs 3 总结 参考文献 1 sqli-labs简介 sq Ii-labs是一款学习SQL注入的开源平台,共有75种不同类型的注入, ...
- docker 上的mongodb数据库操作命令
先查看docker 是否pull mongodb # docker images //查看docker容器列表 若是没有,可以使用命令进行拉取 # docker pull mongo:latest / ...
- 在Docker中搭建Oracle数据库,并使用PL/SQL Developer链接
原文地址::https://blog.csdn.net/qq_17518433/article/details/72835844?utm_medium=distribute.pc_relevant_t ...
- 如何在windows docker上搭建本地ChatGPT,不需要翻墙
一.安装windows docker 详情请看:安装Windows docker与VSCode docker.Dev Containers和Remote - SSH插件_kexiaohua4393的博 ...
- 在腾讯云轻量云服务器上搭建mysql数据库
一.准备工作 1. 已经购买好的腾讯云轻量应用服务器. 2. 作者本次演示使用的系统是Windows Server 2019,其他windows版本也可以,操作流程大同小异. 3.使用Windows远 ...
- docker hub mysql主从_使用 Docker Compose 搭建 MySQL 数据库主从复制实例
说明 由于是单机同时运行主从实例,仅用于开发环境或学习主从复制配置. 文件结构 env 根目录下的 .env 文件作用域是在 docker-compose.yaml 中,而 env 路径下的文件作用与 ...
最新文章
- 人工智能军事对抗技术发展趋势
- 从指南针到北斗:中国导航系统促进世界互联互通
- mysql b 树删除操作,B-树的删除过程介绍
- 换光纤猫 ZXA10 F420
- leetcode 792. Number of Matching Subsequences | 792. 匹配子序列的单词数(Java)
- android 程序崩溃日记捕捉
- java序列化kr_序列化专用列表
- js 能实现监听F5页面刷新子iframe 而父页面不刷新
- 新人如何聪明的学习计算机网络
- 我是色色 -- 个人站开通 (*^__^*) 嘻嘻……
- 演化博弈与GAN网络
- 分区助手克隆linux,PartAssist 9.1+7.0 AOMEI 分区助手 免安装版 (简/繁/英 PE/Win 通用)...
- 微信小程序注册认证文档
- CDlinux万能无线破解系统iSO中文版 U盘启动版
- 【应用层】“世纪”大案之 我与网络地址的抗争
- PyTorch搭建LSTM实现多变量输入多变量输出时间序列预测(多任务学习)
- 光栅渲染器(六)着色准备和深度缓存实现
- Kubernetes集群安装 gatekeeper
- python 异步协程爬虫-半次元图片
- PMBOK(第六版) 学习笔记 ——《第七章 项目成本管理》