Ubuntu- easyefi 硬盘安装Ubuntu
现在新的电脑都是UEFI的启动方式了,EasyBCD就变得不好用了。在网上找到了easyefi的工具。
安装ubuntu后,我想删除window的启动项
~$ efibootmgr
BootCurrent: 0001
Timeout: 1 seconds
BootOrder: 0001,000E,000C,000D,0000
Boot0000* Windows Boot Manager
Boot0001* ubuntu
Boot000C* UEFI : LAN : IP4 Intel(R) Ethernet Connection (H) I219-LM
Boot000D* UEFI : LAN : IP6 Intel(R) Ethernet Connection (H) I219-LM
Boot000E* UEFI : HP SSD EX900 250GB : PART 4 : OS Bootloader
~$ sudo efibootmgr -b 0 -B
BootCurrent: 0001
Timeout: 1 seconds
BootOrder: 0001,000E,000C,000D
Boot0001* ubuntu
Boot000C* UEFI : LAN : IP4 Intel(R) Ethernet Connection (H) I219-LM
Boot000D* UEFI : LAN : IP6 Intel(R) Ethernet Connection (H) I219-LM
Boot000E* UEFI : HP SSD EX900 250GB : PART 4 : OS Bootloader
------引用文章---------------------------------
用 EasyUEFI 在 Win8/10 中硬盘安装 Ubuntu
作者:TeliuTe 来源:基础教程网
1、准备Ubuntu安装文件
1)下载带amd的64位 Ubuntu 桌面版光盘镜像文件,如 ubuntu-16.04.2-desktop-amd64.iso:http://releases.ubuntu.com/16.04/
其他下载地址可以参阅前面的课程;
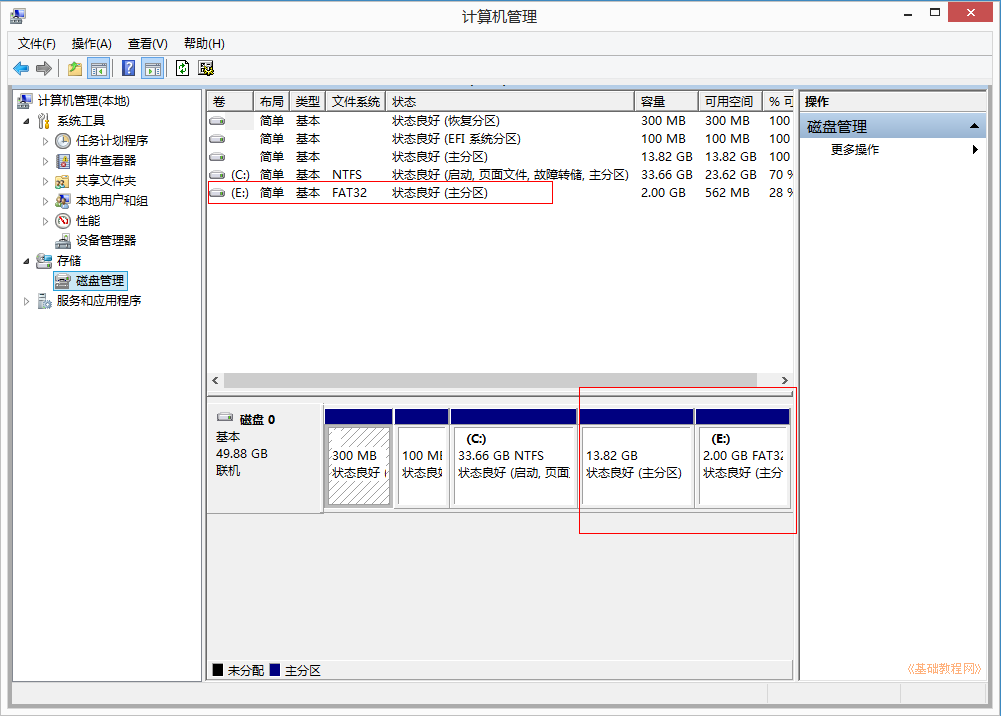
2)分出一个5G左右的分区,格式化为FAT32,将下载的光盘镜像解压到里面;
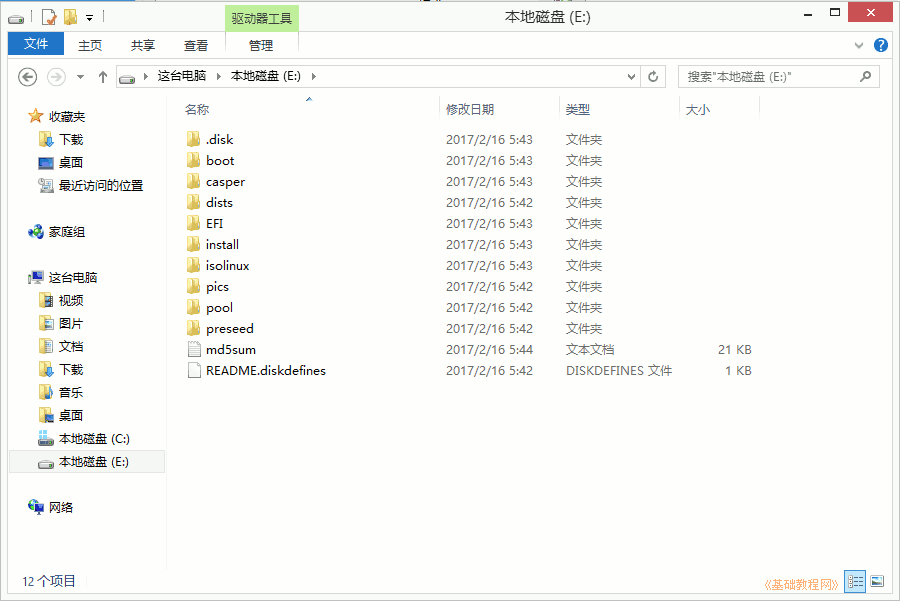
3)再分出40G空间,作为安装Ubuntu系统的空间,不用格式化,记住分区大小和位置;
4)Win8/10要关闭快速启动、关闭安全启动,参考第2条安装常见问题:=http://teliute.org/fw/win8insu2.html
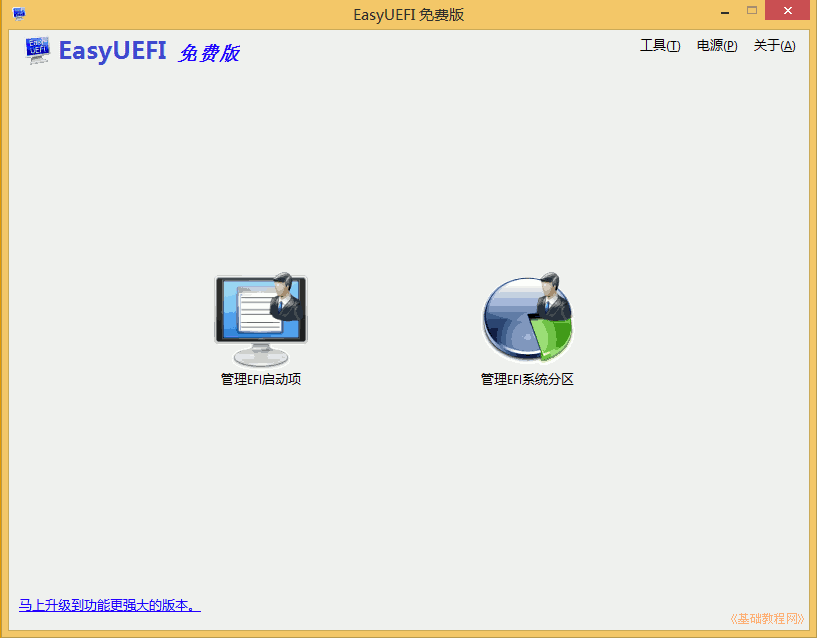
2、安装 EasyUEFI,添加启动项
1)EasyUEFI个人版是免费的,可以在官网或友链下载: http://www.easyuefi.com/index-cn.html,下载完后双击运行安装,
2)在出来的安装对话框中,一路点“继续、确定、完成”,一般默认选中了简体中文;
安装完自动运行,或双击桌面上图标运行,进入主窗口,再点“管理EFI启动项”
3)在出来程序窗口中间栏,点击第二个绿色加号图标的“添加新项目”;
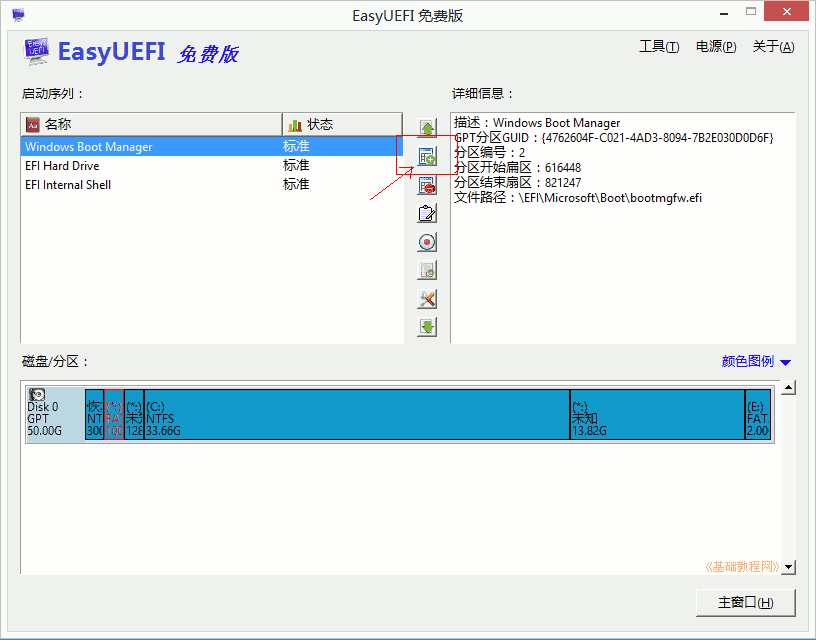
4)在出来的面板上边类型里选择Linux,右边文本框里输入名称“Ubuntu”,然后在中间的分区图表中,选中后边的FAT32分区,上边有个圆点;
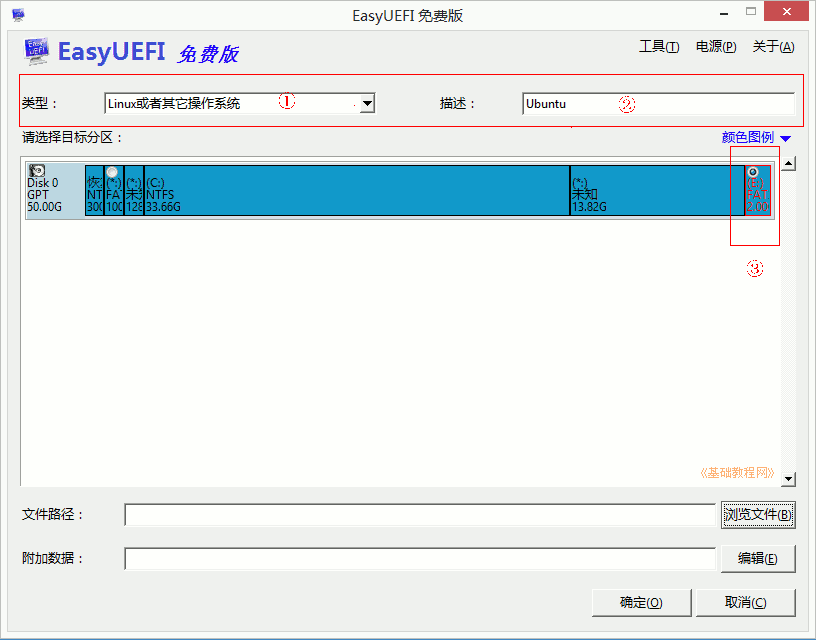
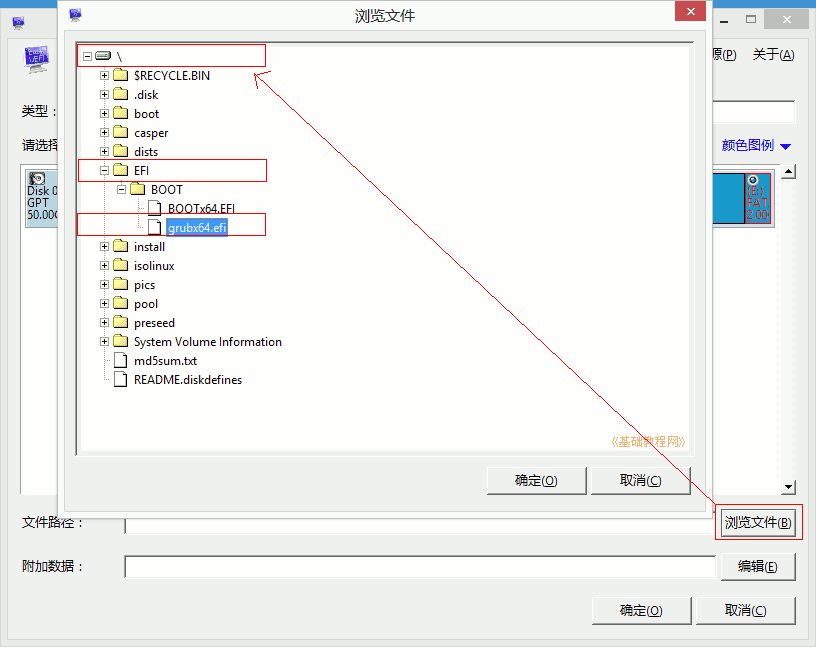
5)再点右下角的“浏览文件”按钮,在面板中依次点开加号,找到“\EFI\BOOT\grubx64.efi”,点“确定”;
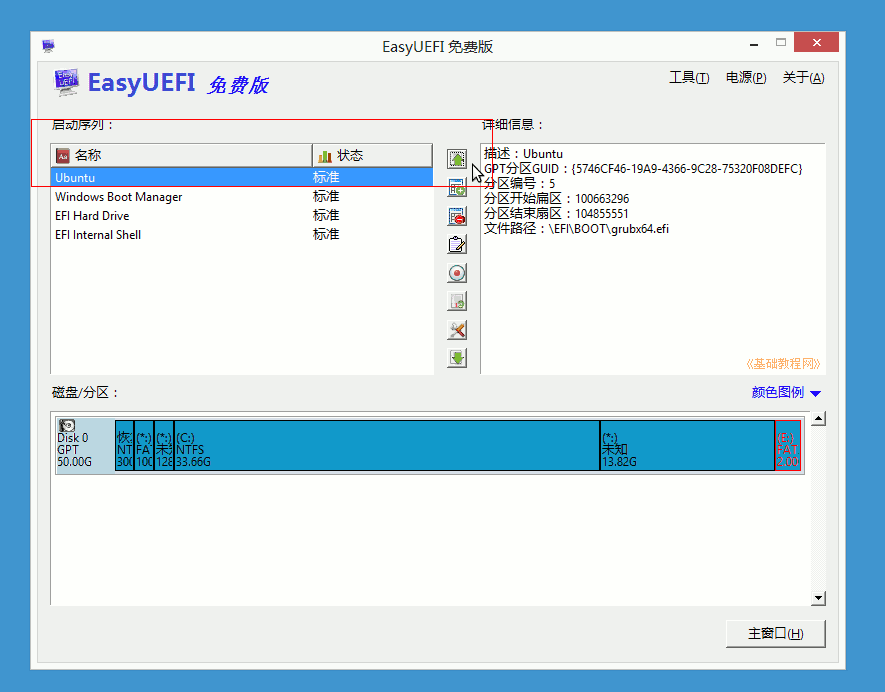
6)点“确定”返回主窗口,在左边的启动列表里,选中“Ubuntu”,点中间第一个绿色向上箭头,调到第一位,点击返回主窗口;
7)关闭所有窗口,重启计算机,可以按“win键+R”调出运行框,输入 shutdown.exe -f -r -t 0
3、安装Ubuntu系统
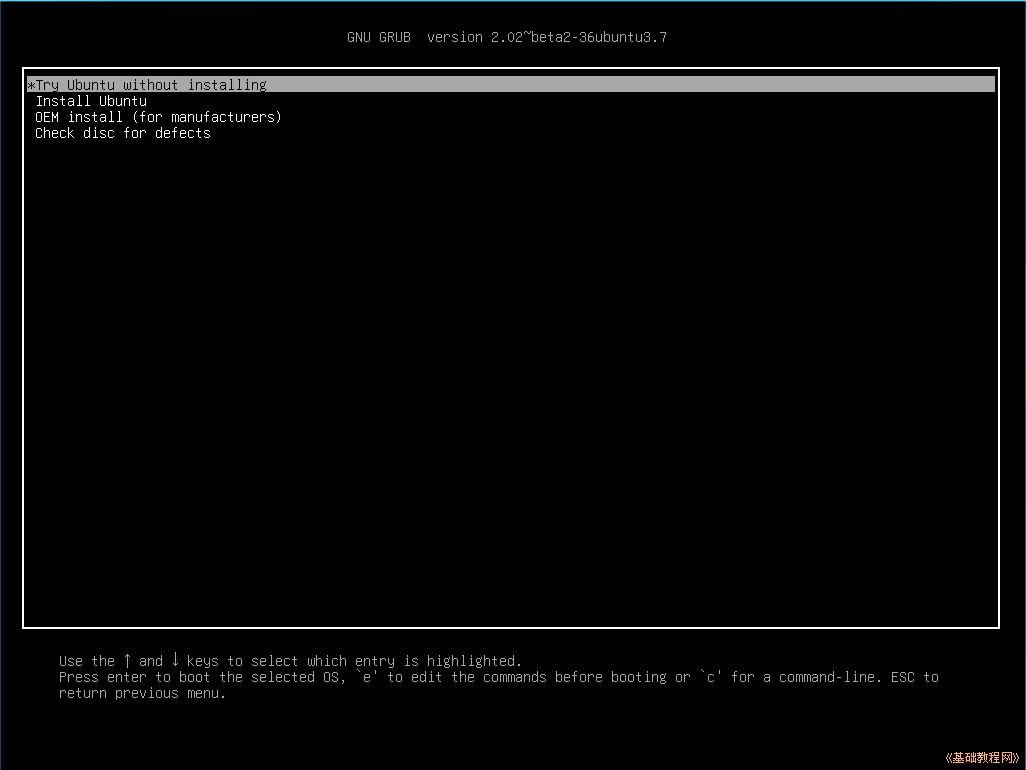
1)重新启动后,出现Ubuntu安装菜单,按回车键进入第一个试用Ubuntu(Try Ubuntu);
This is efibootmgr, a Linux user-space application to modify the Intel
Extensible Firmware Interface (EFI) Boot Manager.  This application
can create and destroy boot entries, change the boot order, change
the next running boot option, and more.Details on the EFI Boot Manager are available from the EFI
Specification, v1.02 or above, available from http://developer.intel.com.Note: efibootmgr requires that the kernel module efivars be loaded
prior to use.  'modprobe efivars' should do the trick.usage: efibootmgr [options]-a | --active         sets bootnum active-A | --inactive       sets bootnum inactive-b | --bootnum XXXX   modify BootXXXX (hex)-B | --delete-bootnum delete bootnum (hex)-c | --create         create new variable bootnum and add to bootorder-d | --disk disk      (defaults to /dev/sda) containing loader-e | --edd [1|3|-1]   force EDD 1.0 or 3.0 creation variables, or guess-E | --device num     EDD 1.0 device number (defaults to 0x80)-g | --gpt            force disk w/ invalid PMBR to be treated as GPT -H | --acpi_hid XXXX  set the ACPI HID (used with -i)-i | --iface name     create a netboot entry for the named interface-l | --loader name    (defaults to \elilo.efi)-L | --label label    Boot manager display label (defaults to "Linux")-n | --bootnext XXXX  set BootNext to XXXX (hex)-N | --delete-bootnext delete BootNext-o | --bootorder XXXX,YYYY,ZZZZ,...     explicitly set BootOrder (hex)-O | --delete-bootorder delete BootOrder-p | --part part       (defaults to 1) containing loader-q | --quiet           be quiet--test filename   don't write to NVRAM, write to filename-t | --timeout seconds   Boot manager timeout-T | --delete-timeout    delete Timeout value-u | --unicode | --UCS-2  pass extra args as UCS-2 (default is ASCII)-U | --acpi_uid XXXX    set the ACPI UID (used with -i)-v | --verbose         print additional information-V | --version         return version and exit-w | --write-signature  write unique sig to MBR if neededTypical usage:
1) Root can use it to display the current Boot Manager settings.[root@localhost ~]# efibootmgrBootCurrent: 0004BootNext: 0003BootOrder: 0004,0000,0001,0002,0003Timeout: 30 secondsBoot0000* Diskette Drive(device:0)Boot0001* CD-ROM Drive(device:FF) Boot0002* Hard Drive(Device:80)/HD(Part1,Sig00112233)   Boot0003* PXE Boot: MAC(00D0B7C15D91)               Boot0004* LinuxThis shows:BootCurrent - the boot entry used to start the currently runningsystem.BootOrder - the boot order as would appear in the boot manager.  Theboot manager tries to boot the first active entry on this list.  Ifunsuccessful, it tries the next entry, and so on.BootNext - the boot entry which is scheduled to be run on next boot.This superceeds BootOrder for one boot only, and is deleted by theboot manager after first use.  This allows you to change the next bootbehavior without changing BootOrder.Timeout - the time in seconds between when the boot manager appearson the screen until when it automatically chooses the startup valuefrom BootNext or BootOrder.Five boot entries (0000 - 0004), the active/inactive flag (* meansactive), and the name displayed on the screen.2) An OS installer would call 'efibootmgr -c'.  This assumes that/boot/efi is your EFI System Partition, and is mounted at /dev/sda1.This creates a new boot option, called "Linux", and puts it at the topof the boot order list.  Options may be passed to modify thedefault behavior.  The default OS Loader is elilo.efi.3) A system administrator wants to change the boot order.  She wouldcall 'efibootmgr -o 3,4' to specify PXE boot first, then Linuxboot.4) A system administrator wants to change the boot order for the nextboot only.  She would call 'efibootmgr -n 4' to specify that theLinux entry be taken on next boot.5) A system administrator wants to delete the Linux boot option fromthe menu.  'efibootmgr -b 4 -B' deletes entry 4 and removes itfrom BootOrder.6) A system administrator wants to create a boot option to networkboot (PXE).  Unfortunately, this requires knowing a little moreinformation about your system than can be easily found byefibootmgr, so you've got to pass additional information - the ACPIHID and UID values.  These can generally be found by using the EFIBoot Manager (in the EFI environment) to create a network bootentry, then using efibootmgr to print it verbosely.  Here's one example:Boot003* Acpi(PNP0A03,0)/PCI(5|0)/Mac(00D0B7F9F510) \ACPI(a0341d0,0)PCI(0,5)MAC(00d0b7f9f510,0)In this case, the ACPI HID is "0A0341d0" and the UID is "0".For the zx2000 gigE, the HID is "222F" and the UID is "500".For the rx2000 gigE, the HID is "0002" and the UID is "100".You create the boot entry with:'efibootmgr -c -i eth0 -H 222F -U 500 -L netboot'Many other uses may be found.Please direct any bugs, features, patches, etc. to Matt Domsch
.
Ubuntu- easyefi 硬盘安装Ubuntu相关推荐
- win7硬盘安装ubuntu双系统——注意项
win7硬盘安装ubuntu双系统--注意项 WIN7 下硬盘安装ubuntu 12.04 博客分类: ubuntu 仅为网络上的资料整理 资料引用:http://www.ctocio.com.cn/ ...
- Windows 7使用wubi硬盘安装Ubuntu (文字版)
Windows 7使用wubi硬盘安装Ubuntu (文字版) 安装方法: 一.下载ubuntu-10.04-desktop-i386.iso后,用winrar打开,提取出wubi.exe这个文件.把 ...
- Windows XP硬盘安装Ubuntu 12.04双系统
Windows XP硬盘安装Ubuntu 12.04双系统 一.下载文件 需要下载的东西有两个,一个是grub4dos,另一个是Ubuntu 12.04 LTS的镜像文件,具体下载地址如下: 1.Gr ...
- windows 7硬盘安装Ubuntu 12.04 后出现grub,无法进入系统解决办法
windows 7 安装在C盘,从硬盘安装Ubuntu 12.04后,重启,出现grub>,无法进入系统. 此时 ls下,发现出现(hd0,msdos*), *为1,2,...,N,为你电脑硬盘 ...
- Windows 7 下直接硬盘安装 Ubuntu 10.04成为双系统的方法
我这只下载Ubuntu10.04的ISO文件,又不想刻盘从光盘安装,麻烦又浪费一张光盘,又没有USB用,做不成LIVEUSB来启动安装,然后又不想用WUBI安装,觉得WUBI安装的方法系统的性能有所下 ...
- Windows XP硬盘安装Ubuntu 11.10双系统全程图解
Ubuntu 11.10正式版出来有段时间了,许多朋友还在用wubi安装,其实,Windows XP下硬盘安装Ubuntu 11.10双系统其实也很简单的,Ubuntu 11.10的安装过程跟11.0 ...
- XP硬盘安装Ubuntu 10.10双系统图解(转)
原文地址: http://www.ylmf.net/ubuntu/guide/201010297968.html http://www.ylmf.net/ubuntu/guide/2010102979 ...
- linux8系统安装总结,硬盘安装Ubuntu 8.04经验总结(图)
成功硬盘安装好Ubuntu 8.04好后并安装MAC OS主题截图 本人电脑的C盘分区NTFS,配置为AMD 4800+.想安装最新的Ubuntu 8.04,光盘安装是最简单的了,一切傻瓜式的,只要认 ...
- xp 硬盘安装linux双系统,WinXP硬盘安装Ubuntu 11.10双系统全程图解
Ubuntu 11.10正式版出来有段时间了,许多朋友还在用wubi安装,其实,Windows XP下硬盘安装Ubuntu 11.10双系统其实也很简单的,Ubuntu 11.10的安装过程跟11.0 ...
最新文章
- 聊聊 Kafka: Kafka 的基础架构
- js实现双向链表互联网机顶盒实战应用
- [gic]-ARM gicv3/gicv4的详细介绍-2020/12
- (luogu4180) [Beijing2010组队]次小生成树Tree
- 生产者消费者的实际使用
- shuffle操作图解以及job-stage-task-partition区别
- 如何查找SAP Fiori launchpad Designer的准确路径即url地址
- Objective-C 反射机制
- matlab实现整数规划/01规划
- 信息学奥赛一本通 1185:单词排序 | OpenJudge NOI 1.10 10:单词排序
- DataGrip使用入门
- FMS3 参数设定档修改
- matlab读取写入图像数据格式uint8,double
- 09-Mysql数据库----外键的变种
- 面试官问你的缺点是什么,应该如何回答?
- 仙人掌圆方树学习笔记
- c# Excel 添加组合Range区域,方便选择Select()删除 Delete()
- 小程序 - 分享功能
- Pycharm学生用户免费激活
- 解决IDEA报错Address localhost:1099 is already in use