您只能在Photoshop CS4中做的3酷技巧
I have to admit it crossed my mind. The new Photoshop arrived and I found myself thinking: "Ah, come on, the old bird must be into her twelfth version by now. That’s like 125 in dog years, isn’t it? Surely after all this time the well has run dry and she has nought but gimmicks and parlor tricks to try to lure me in this time?"
我必须承认这是我的想法。 新的Photoshop到了,我发现自己在想:“啊,来吧,那只老鸟现在必须是她的第十二个鸟了。那是狗年的125岁,不是吗?当然,在这一切之后,那口井已经干ure了她什么都没有,但是头和客厅的诡计试图诱骗我这次?”
While that may have been how I went in, I’m pleased to report she still has the ability to surprise and please.
虽然这可能就是我进去的方式,但我很高兴地向您报告,她仍然具有惊喜和愉悦的能力。
Let’s take a closer look.
让我们仔细看看。
内容感知图像调整大小 (Content Aware Image Resizing)
This is a nice story for Adobe. In August, 2007 there was a ripple of excitement through the graphics community when Shai Avidan and Ariel Shamir demonstrated a new mathematical approach to image resizing – dubbed Content Aware Image Resizing (CAIR). Adobe were quick to recognize the opportunity and immediately added Shai to the Photoshop team. However, finding a good idea and integrating it into a Goliath-like Photoshop are quite different things, and many a "gee whiz, ain’t that cool" idea has been warehoused when it all became too hard to make it work in the big wide world. Thankfully that hasn’t happened with CAIR, and Adobe have shown some commendable adaptability in the smooth integration of CAIR technology into Photoshop CS4.
对于Adobe来说,这是一个好故事。 2007年8月,当Shai Avidan和Ariel Shamir演示了一种新的数学方法来调整图像大小时,在图形界引起了轩然大波。该方法被称为Content Aware Image Resizing(CAIR)。 Adobe很快意识到了这个机会,并立即将Shai加入了Photoshop团队。 但是,找到一个好主意并将其集成到类似Goliath的Photoshop中是完全不同的事情,并且当所有这些都变得太难使它无法在大型环境中工作时,就已经存储了许多“老兄,不是那么酷”的想法广阔的世界。 幸运的是,CAIR并没有发生这种情况,Adobe在将CAIR技术顺利集成到Photoshop CS4中表现出了值得称赞的适应性。
If you missed the initial talk on CAIR, it’s a fascinating concept. Traditional image-scaling methods stretch and compress all parts of the image equally, with scant regard for the image content. As the example below shows, this gives you nasty and very noticeable image distortion in all but the smallest resizes.
如果您错过了有关CAIR的初始讨论,这是一个有趣的概念。 传统的图像缩放方法在不考虑图像内容的情况下,均等地拉伸和压缩图像的所有部分。 如下例所示,除了最小的调整大小外,这给您带来令人讨厌且非常明显的图像失真。
CAIR takes a smarter approach. As the name suggests, Content Aware Image Resizing analyzes the content of your image and then limits all image adjustment to the areas of least visual importance.
CAIR采用了更明智的方法。 顾名思义,Content Aware Image Resizing会分析图像的内容,然后将所有图像调整限制在视觉上最不重要的区域。
For instance, in the example below you can see the application is making its biggest changes to the more nondescript parts of the wall and doors, leaving the important compositional elements (Obama, the switches and bins) virtually untouched.
例如,在下面的示例中,您可以看到该应用程序正在对墙壁和门的较无描述的部分进行最大的更改,而实际上未触及重要的组成元素(奥巴马,开关和垃圾桶)。
Adobe’s implementation of CAIR is very slick. While some early versions relied on the user cutting marks to protect detail, Photoshop CS4 generally gives you a great result by simply switching on the "Protect Skin Tones" option.
Adobe的CAIR实施非常流畅。 虽然某些早期版本依靠用户切割标记来保护细节,但是Photoshop CS4通常只需打开“保护肤色”选项即可为您带来出色的效果。
In short, this is one of those rare occasions where you have a new feature that has a serious wow factor and is seriously useful from day one. It’s a while since I can remember generating a crowd at my desk while demo-ing a new Adobe feature, but CAIR was able to do that. While it’s true that some images will lend themselves to CAIR more than others, I think this is genuinely a killer feature for almost any regular Photoshop user.
简而言之,这是您拥有一项新功能的罕见情况之一,该新功能具有令人震惊的效果,并且从一开始就非常有用。 有一段时间了,因为我记得在演示一个新的Adobe功能时在办公桌前引起了一群人,但是CAIR能够做到这一点。 虽然确实有些图片比其他图片更适合CAIR,但我认为这对几乎所有常规的Photoshop用户来说都是杀手feature。
调整层 (Adjustment Layers)
Adjustments layers are nothing new, but they’ve become more powerful and easier to control in CS4.
调整层并不是什么新鲜事物,但是它们在CS4中变得更强大且更易于控制。
The first thing you’ll notice is that they’ve been given their own dedicated palette, giving you a fast, one-button click method to apply levels, curves, saturations, and color balances, amongst other adjustments. Clicking a button launches a hidden control subpanel for the adjustment, rather than the traditional popup dialog. This felt a bit weird to me. I suspect you adapt to it quickly, but I can’t think of another place where they handle the UI this way (the graphic below illustrates this idea).
您会注意到的第一件事是,它们已经被赋予了自己专用的调色板,从而为您提供了一种快速的一键式单击方法,可以应用色阶,曲线,饱和度和色彩平衡以及其他调整。 单击按钮将启动隐藏的控制子面板进行调整,而不是传统的弹出对话框。 这让我感到有些奇怪。 我怀疑您会很快适应它,但是我无法想到他们以这种方式处理UI的另一个地方(下图说明了这个想法)。
Now, obviously curves have been around forever, but the way they can be applied here is new and, I think, rather cool – the On-screen Adjustment tool. Let’s look at a quick example of it in action.
现在,显然曲线已经永远存在了,但是在这里可以应用它们的方式是新颖的,而且我认为相当酷–屏幕调整工具。 让我们来看一个实际的例子。
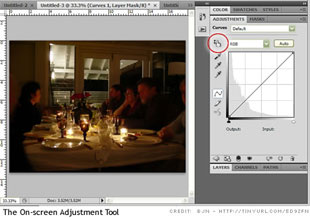
To use the tool, you simply apply a curves adjustment layer and click the small hand button, top left of the Curves palette. As you hover over your image you’ll see the eyedropper cursor, which shows you where that part of the image falls on the curve line.
要使用该工具,只需应用一个曲线调整层,然后单击“曲线”调板左上方的小手按钮。 当您将鼠标悬停在图像上时,您将看到滴管光标,该光标向您显示图像的该部分在曲线线上的位置。
Big deal, right? It’s always done that. But try clicking on a specific part of the image you would like to brighten (in the example, the walls) and drag upwards. You’ll see those tones immediately lighten and your curve line will reflect that adjustment in real time.
没关系吧? 总是做到这一点。 但是,请尝试单击要增亮的图像的特定部分(在本例中为墙壁)并向上拖动。 您会立即看到这些色调变浅,并且曲线会实时反映该调整。
In our example, due to the previous action, the candles have lost some of their brightness. To bring those highlights back, we can target them by simply clicking directly on them and dragging down. Again, the curve reflects your adjustment.
在我们的示例中,由于前面的动作,蜡烛失去了一些亮度。 要使这些重点突出,我们可以通过直接单击它们并向下拖动来定位它们。 同样,曲线反映了您的调整。
Now, if you’re already a whiz with curves, you might not see great appeal in this tool. After all, there are other ways to achieve the same result – as long as you know what you’re doing. However, if you’re a visual thinker who has perhaps found it difficult to equate what’s happening in the graph to what’s happening in your image, this is a great connector. Working directly on the image certainly feels more natural to me.
现在,如果您已经是曲线专家,那么在此工具中可能看不到任何吸引力。 毕竟,只要您知道自己在做什么,就有其他方法可以达到相同的结果。 但是,如果您是视觉思想家,也许很难将图表中的情况等同于图像中的情况,那么这是一个很好的联系方式。 对我而言,直接在图像上工作肯定会更加自然。
3D绘画 (3D Painting)
Okay, yes there was 3D in CS3 but let’s be honest: it wasn’t hugely useful, was it? You jumped out into a separate applet to use a limited set of tools. It was a passable imitation of 3D at best. The new 3D implementation definitely raises the bar significantly.
好的,是的,CS3中有3D,但是老实说:它不是很有用,是吗? 您跳到一个单独的小程序中,以使用一组有限的工具。 充其量是对3D的模仿。 新的3D实施无疑会大大提高标准。
Firstly, there is no jumping out of the application – all 3D manipulations are performed in the main workspace, side-by-side with the 2D tools. You can open a 3D file directly in Photoshop (U3D, 3DS, OBJ, DAE, and KMZ) or add a 3D layer to an existing project.
首先,没有跳出应用程序–所有3D操作都在主工作空间中与2D工具并排执行。 您可以直接在Photoshop中打开3D文件(U3D,3DS,OBJ,DAE和KMZ),或将3D图层添加到现有项目中。
Secondly, the new model controls are a big improvement. While the toolbar now contains 3D Rotate, 3D Move and 3D Scale Tools, Adobe have also added a nice 3D Axis tool that overlays your model, allowing you to orientate it without leaving the workspace.
其次,新的模型控件有了很大的改进。 工具栏现在包含3D旋转,3D移动和3D缩放工具,而Adobe还添加了一个漂亮的3D轴工具,该工具可以覆盖模型,使您无需离开工作区即可对其进行定向。
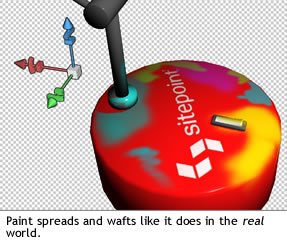
But perhaps most impressive of all is the way Adobe have been able to make their 2D tools operate on 3D surfaces. Grab your Brush Tool, set a color, and start painting. Paint diffusion rates and angles are all controllable.
但是,也许最令人印象深刻的是Adobe使其2D工具在3D表面上运行的方式。 抓住画笔工具,设置颜色,然后开始绘画。 涂料的扩散速率和角度均可控制。
It doesn’t end with flat color either. Switch the Paint Mode and you can paint with Bumps, Glossiness, Opacity, Shininess, Self-illumination, and Reflectivity.
它也不以纯色结尾。 切换绘画模式,即可使用凹凸,光泽度,不透明度,光泽度,自发光和反射率进行绘画。
You can even use the Merge Down option in the Layers palette to apply a 2D image (say, a logo) to your 3D object. That’s pretty nifty in my book.
您甚至可以使用“图层”调板中的“向下合并”选项将2D图像(例如徽标)应用于3D对象。 在我的书里那太漂亮了。
In reality, the new 3D tools in Photoshop probably deserve a dedicated article; however, I think it suffices to say that as of CS4, 3D is a fully-fledged Photoshop citizen, rather than a tacked-on afterthought.
实际上,Photoshop中的新3D工具可能值得写一篇专门的文章。 但是,我认为可以说,从CS4开始,3D才是成熟的Photoshop公民,而不是经过深思熟虑的人。
摘要 (Summary)
It’s always difficult making the call as to when to upgrade an expensive application like Photoshop – especially if you’re shelling it out of your own pocket, rather than your boss’s. No doubt your current version worked yesterday and will continue to do so tomorrow.
在何时升级像Photoshop这样的昂贵应用程序时,总是很难打电话–尤其是如果您要掏腰包而不是老板掏腰包。 毫无疑问,您当前的版本已在昨天使用,明天将继续使用。
However, if the question of upgrading is on your mind, with the addition of features like CAIR, there are probably more compelling reasons to take the plunge this time than there’s been for a any of the past two or three versions.
但是,如果您想到升级的问题,并且添加了诸如CAIR之类的功能,那么这次尝试大跌的原因可能比过去两个或三个版本中的任何一个都有更多令人信服的理由。
翻译自: https://www.sitepoint.com/photoshop-cs4-new-features/
您只能在Photoshop CS4中做的3酷技巧相关推荐
- Photoshop CS4 将图像放大,增加像素,提高清晰度
学习Photoshop CS4 是树木所做的作业,感谢赵国骅老师教导 网上或ppt中卸载的有些图片以及有的照片像素很小,放大了有马赛克,并很模糊.用photoshop cs4 动作做3-4下就可将1 ...
- 《奥多比 PS CS4 官方中文版》(Adobe Photoshop CS4 Extended)繁体中文/简体中文/韩文
<奥多比 PS CS4 官方中文版>(Adobe Photoshop CS4 Extended)繁体中文/简体中文/韩文 发布者: 呂翊翀 发布时间: 11月11日 更新时间: 前天 订阅 ...
- Adobe Photoshop CS4 11.0.1 Extended 简体中文绿色版
Adobe Photoshop CS4 Extended 软件提供 Photoshop CS4 中的所有功能, 以及用于处理 3D 肖像.基于动画的内容和高级图像分析的新增功能. Adobe® Ph ...
- Photoshop CS4 创建调整图层
7.1.2 创建调整图层 "调整"调板是Photoshop CS4中新增加的调板,它将各种调整命令以图标和预设列表的方式集合在了同一调板中,利用该调板可以快捷.有效的为当前图像添 ...
- 《Adobe Photoshop CS4中文版经典教程》—第1课1.4节在Photoshop中还原操作
本节书摘来自异步社区<Adobe Photoshop CS4中文版经典教程>一书中的第1课1.4节在Photoshop中还原操作,作者[美]Adobe公司,更多章节内容可以访问云栖社区&q ...
- 介绍几个photoshop cs4值得一提的新功能
介绍几个photoshop cs4值得一提的新功能,第一次运行Photoshop CS4,就感觉界面更简洁更漂亮了.调板取消了CS3那种看似豪华其实没有实际意义的阴影,改为传统的边界线. 第一次运行P ...
- Photoshop CS 中的“照片滤镜/Photo Filter”命令详解(转)
Photoshop CS 中的"照片滤镜/Photo Filter"命令详解(转)[@more@] 这是一个跟摄影有关的重要图像调整命令. 有关这一命令的教程,现在网上没一个能说得 ...
- Photoshop 课程中项目选择与知识拓展设计
1.构建符合学习者体会的项目情境 由于受到"就业导向"的阻碍,在"项目"的情境设计中比较关 注"职业情境".在某出版社的一本图形图像处置教材 ...
- Adobe Photoshop CS4 官方简体中文版+正版序列号+安装教程
[转自]http://68ps.5d6d.com/thread-12986-1-1.html 一.下载:[Adobe PHOTOSHOP CS4官方简体中文版] 软件大小:1.26G ...
最新文章
- Docker数据卷管理
- 3.6 迁移故障恢复
- LaTex 并集交集等
- 结构指针的坑之(定义结构体指针时并没有分配存储空间,所以要用malloc()申请空间)
- 【深度学习】解决物体检测中的小目标问题
- 读盘写盘计算机里面的意义,什么叫计算机里的写盘
- 【Python CheckiO 题解】Between Markers (simplified)
- 前端中什么是中台开发环境_Web前端开发中需要学习什么?会使用到哪些开发工具?...
- 学习 | Spring Cloud Config 从入门到精通
- C语言课后习题(67)
- [Android疑难杂症]动态设置TextView的width不起作用
- 基于visual Studio2013解决面试题之1401冒泡排序
- 虚化4独立游戏开发第一章:策划案
- 使用segue进行页面跳转
- linux匿名邮件,Linux下用mutt给QQ邮箱发匿名邮件
- 分子动力学(一)-定义与理解
- 为知笔记使用自建docker服务后,如何迁移原有账号数据
- 有趣题目和认知合集(持续更新)
- html中账号绑定怎么做,绑定账号.html
- 详解C# 枚举高级用法之Description