如何使用SSH连接到远程MySQL服务器
This article will explain how to set up a connection from a Windows host OS using a PuTTY client to a remote MySQL server on Linux Ubuntu 18.04.
本文将介绍如何在Linux Ubuntu 18.04上建立从使用PuTTY客户端的Windows主机操作系统到远程MySQL服务器的连接。
Before we start, you must have already:
在我们开始之前,您必须已经:
- Installed Windows 10 OS on a local machine 在本地计算机上安装Windows 10 OS
- Installed Linux Ubuntu 18.04 on a remote machine 安装Linux Ubuntu 18.04
在Linux Ubuntu 18.4上安装MySQL (MySQL installation on Linux Ubuntu 18.4)
First, you must install MySQL on the remote Linux machine.
首先,必须在远程Linux机器上安装MySQL。
On Linux Ubuntu 18.4, open the Terminal, type the sudo apt-get update command and press the Enter key:
在Linux Ubuntu 18.4上,打开Terminal ,输入sudo apt-get update命令,然后按Enter键:

Next, in the Terminal, type the sudo apt-get install mysql-server command to start installing MySQL:
接下来,在终端中,键入sudo apt-get install mysql-server命令以开始安装MySQL:
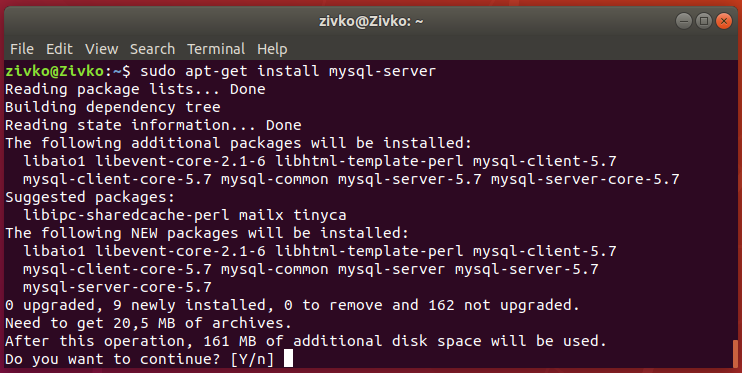
Type Y to proceed with the installation.
键入Y继续安装。
To see which version is installed on the machine, type and run the mysql –version command:
要查看计算机上安装了哪个版本,请键入并运行mysql –version命令:
For detailed information on how to install and configure MySQL, please visit the How To Install MySQL on Ubuntu 18.04 page.
有关如何安装和配置MySQL的详细信息,请访问“ 如何在Ubuntu 18.04上安装MySQL”页面。
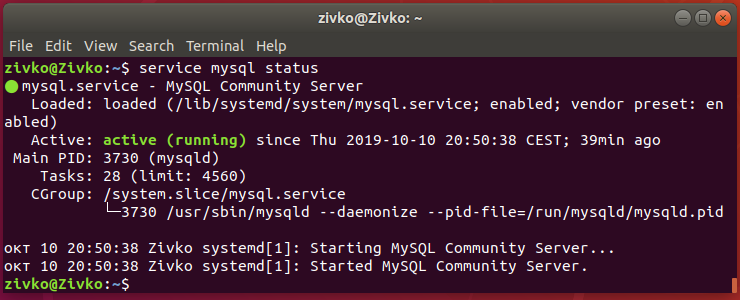
After setting up MySQL, make sure it is active and running. To see the status of MySQL, type and run the service mysql status command:
设置MySQL之后,请确保它是活动的并且正在运行。 要查看MySQL的状态,请键入并运行service mysql status命令:
If MySQL is not running (inactive),
如果MySQL未运行(无效),
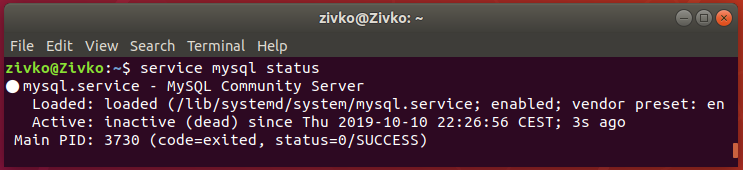
Execute the sudo service mysql start command:
执行sudo service mysql start命令:
在Linux Ubuntu 18.4上安装SSH服务器 (Install SSH server on Linux Ubuntu 18.4)
To install Secure Shell (SSH) on Linux Ubuntu 18.4, from the Terminal type the sudo apt install openssh-server command. Press the Enter key and type user password when prompted. Then press Y and Enter to continue with the installation:
要在Linux Ubuntu 18.4上安装Secure Shell(SSH) ,请从终端输入sudo apt install openssh-server命令。 按Enter键,并在出现提示时键入用户密码。 然后按Y 键和Enter键继续安装:
To verify that the installation was successful and the SSH service is running, type and run the sudo systemctl status ssh command:
要验证安装是否成功并且SSH服务正在运行,请键入并运行sudo systemctl status ssh命令:
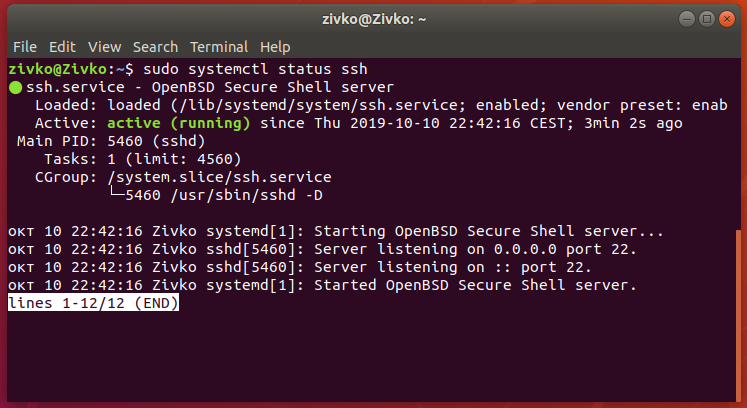
If the SSH server is not running, type and execute the sudo systemctl start ssh command.
如果SSH服务器未运行,请键入并执行sudo systemctl start ssh命令。
在Windows OS上安装SSH客户端 (Installing SSH client on Windows OS)
There are many SSH clients for Windows OS. For the purpose of this article, we’ll use the 64-bit PuTTY client to connect to the remote MySQL server.
Windows操作系统有很多SSH客户端 。 就本文而言,我们将使用64位PuTTY客户端连接到远程MySQL服务器。
Double click on the putty-64bit-<version>-installer.msi installer. The Welcome window will appear. Click the Next button to continue:
双击putty-64bit- <版本> -installer.msi安装程序。 将出现“ 欢迎”窗口。 单击下一步按钮继续:

During the Destination Folder step, choose where the PuTTY client will be installed:
在“ 目标文件夹”步骤中,选择PuTTY客户端的安装位置:
In the Product Features step, select the way you want the features installed. If you plan to use PuTTY frequently, add a PuTTY shortcut to the Desktop. Click the Install button:
在“ 产品功能”步骤中,选择所需功能的安装方式。 如果您打算经常使用PuTTY,请在桌面上添加PuTTY快捷方式。 单击安装按钮:
After the successful installation, click the Finish button to close the PuTTY installer:
成功安装后,单击“ 完成”按钮以关闭PuTTY安装程序:

连接到远程MySQL服务器 (Connect to a remote MySQL server)
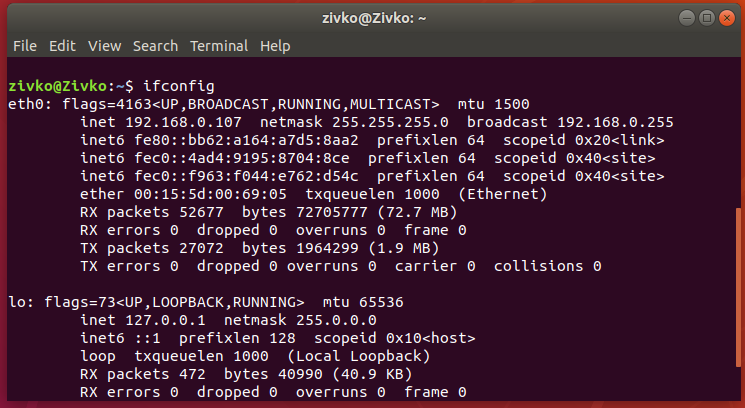
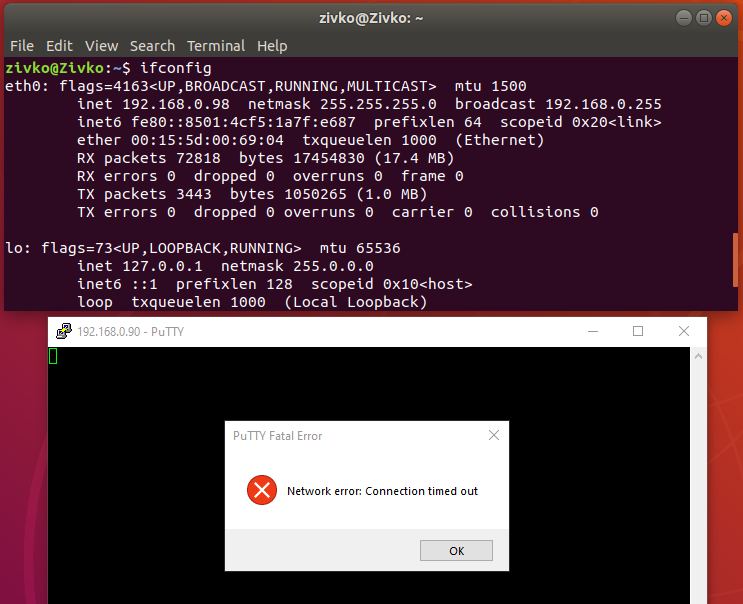
To connect to a remote MySQL server, you’ll need its IP address. Go to Linux Ubuntu 18.04 and in the Terminal, type ifconfig or the IP address command and see information under inet:
要连接到远程MySQL服务器,您需要其IP地址。 转到Linux Ubuntu 18.04,然后在终端中键入ifconfig或IP地址命令,然后在inet下查看信息:
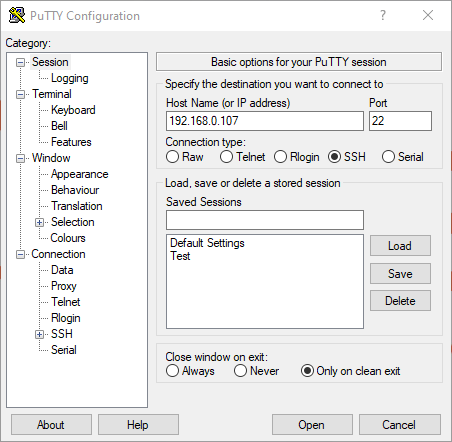
Now, go to the local Windows machine and launch PuTTY. In the Host Name (or IP address) box, under the Session tab, enter the IP address of the remote machine and click the Open button:
现在,转到本地Windows计算机并启动PuTTY。 在“ 主机名”(或“ IP地址”)框中,在“ 会话”选项卡下,输入远程计算机的IP地址,然后单击“ 打开”按钮:
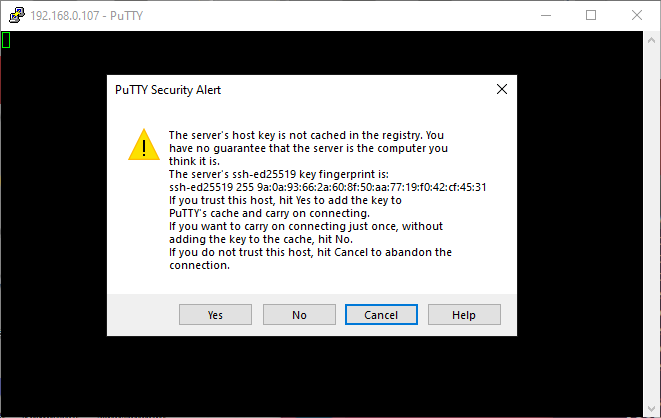
The PuTTY Security Alert warning dialog appears the first time you connect. Click the Yes button to continue:
首次连接时,将显示“ PuTTY安全警报”警告对话框。 单击是按钮继续:
In the login as, type the username that will be used to connect to the remote machine. Press Enter and type a password for that user:
在登录身份中,键入将用于连接到远程计算机的用户名。 按Enter键并输入该用户的密码 :
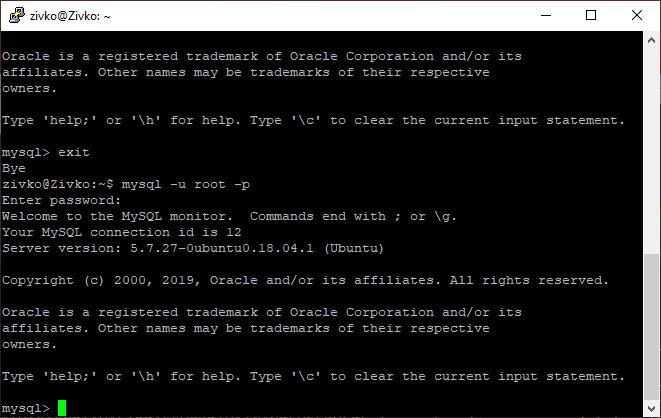
When logged in, the terminal should look like this:
登录后,终端应如下所示:
To check the connection, execute some commands, for example, ls -l:
要检查连接,请执行一些命令,例如ls -l :
Now, type and run the mysql -u root -p command for a root user or for a user who has permission to connect to a remote MySQL server:
现在,为root用户或有权连接到远程MySQL服务器的用户键入并运行mysql -u root -p命令:
If the ERROR 1698 (28000): Access denied for user ‘root’@’localhost’ appears when trying to connect to the remote MySQL server when using the root user, the authentication method from auth_socket to mysql_native_password needs to be changed. To change this, open the MySQL prompt from a terminal:
如果在使用root用户尝试连接到远程MySQL服务器时出现错误1698(28000):用户'root'@'localhost'的访问被拒绝 ,则需要更改从auth_socket到mysql_native_password的身份验证方法。 要更改此设置,请从终端打开MySQL提示符:
sudo mysql
须藤MySQL
Now, check the authentication methods of MySQL user accounts and type the following code:
现在,检查MySQL用户帐户的身份验证方法并键入以下代码:
SELECT user, authentication_string, plugin, host FROM mysql.user;
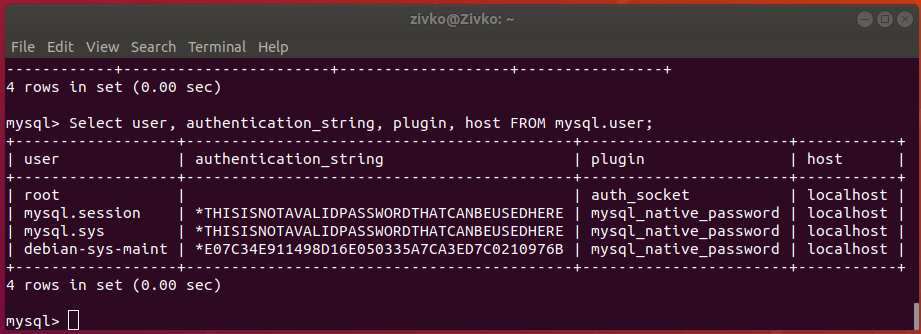
As shown in the example, the root user uses the auth_socket authentication method (plugin).
如示例中所示,root用户使用auth_socket身份验证方法(插件)。
To configure the root user, use the mysql_native_password authentication method. Execute the following code:
要配置root用户,请使用mysql_native_password身份验证方法。 执行以下代码:
ALTER USER 'root'@'localhost' IDENTIFIED WITH mysql_native_password BY 'password';
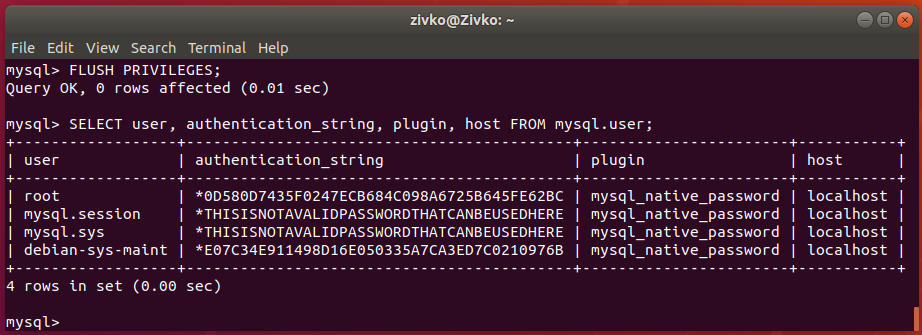
Then, execute the FLUSH PRIVILEGES code which tells the server to reload the grant tables and put your new changes into effect:
然后,执行FLUSH PRIVILEGES代码,该代码告诉服务器重新加载授权表并使新的更改生效:
FLUSH PRIVILEGES;
Now, when checking the authentication methods for the MySQL users, it can be seen that the authentication method for the root user is changed from auth_socket to mysql_native_password:
现在,当检查MySQL用户的身份验证方法时,可以看到root用户的身份验证方法从auth_socket更改为mysql_native_password:
SELECT user, authentication_string, plugin, host FROM mysql.user;
Another common problem that can occur when trying to connect to a remote MySQL server is when Uncomplicated Firewall (UFW) is active, and traffic on port 22 is not allowed. In a situation like this, the error Network error: Connection timed out may appear:
尝试连接到远程MySQL服务器时可能发生的另一个常见问题是未复杂防火墙(UFW)处于活动状态,并且不允许端口22上的通信。 在这种情况下,可能会出现错误网络错误:连接超时 :
To resolve this, make sure that the firewall is either down, or the rules are correct to allow you to connect to the remote MySQL server.
要解决此问题,请确保防火墙已关闭,或者规则正确,以允许您连接到远程MySQL服务器。
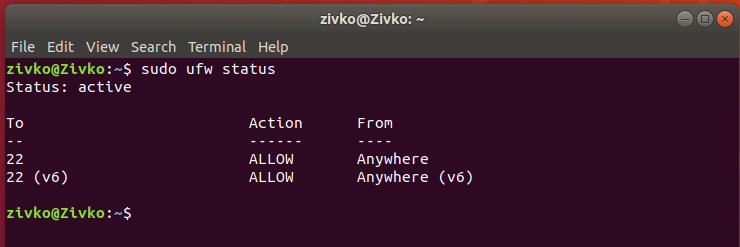
Check the status of the firewall by using the following command:
使用以下命令检查防火墙的状态:
sudo ufw status
sudo ufw状态

As shown above, the firewall is active. To disable it, type and execute the following command:
如上所示,防火墙处于活动状态。 要禁用它,请键入并执行以下命令:
sudo ufw disable
sudo ufw禁用
To allow traffic over port 22 without disabling the firewall, type and run the following command:
要在不禁用防火墙的情况下允许通过端口22的通信,请键入并运行以下命令:
sudo ufw allow 22
sudo ufw允许22
Now, when checking ufw status, it can be seen that port 22 is set/enabled in the firewall:
现在,当检查ufw状态时,可以看到防火墙中已设置/启用了端口22:
Also, in ufw, you can set a rule to allow ssh service traffic instead of a port, by typing the following command:
另外,在ufw中,您可以通过键入以下命令来设置规则以允许ssh服务流量而不是端口:
sudo ufw allow ssh
须藤UFW允许SSH
The same Network error: Connection timed out error message may appear if, in the Host Name box of the PuTTY Configuration dialog, you type a wrong IP address:
如果在“ PuTTY配置”对话框的“ 主机名”框中键入错误的IP地址,则可能会出现相同的网络错误:连接超时错误消息:
If you are using SQL Server Management Studio and want to connect to a MySQL server and query data, you can look at articles that show how to configure and use MySQL linked servers:
如果您使用的是SQL Server Management Studio,并且想连接到MySQL服务器并查询数据,则可以查看显示如何配置和使用MySQL链接服务器的文章:
- How to create and configure a linked server to connect to MySQL in SQL Server Management Studio 如何在SQL Server Management Studio中创建和配置链接服务器以连接到MySQL
- MySQL Query (T-SQL) Tutorial for SQL Server SQL ServerMySQL查询(T-SQL)教程
翻译自: https://www.sqlshack.com/how-to-connect-to-a-remote-mysql-server-using-ssh/
如何使用SSH连接到远程MySQL服务器相关推荐
- 远程mysql用ssh连接_使用SSH密钥连接到远程MySQL服务器
远程mysql用ssh连接 In this article, it will be described how to connect to remote MySQL Server on Linux O ...
- odbc远程连接mysql_无法使用unixodbc,libmyodbc连接到远程mysql服务器
我在这方面有点绿,我希望我遇到的问题很简单--编辑:底部的新信息 我需要连接到远程mysql(Amazon RDS)数据库. 在完成一些教程之后,我在客户端上安装并配置了unixodbc和libmyo ...
- ssh 隧道 mysql_利用SSH隧道方式连接远程MySQL服务器
1.简介: 大多数人知道SSH是用来替代R命令集,用于加密的远程登录,文件传输,甚至加密的FTP(SSH2内置),因此SSH成为使用极广的服务之一,不仅如 此,SSH还有另一项非常有用的功能,就是它的 ...
- ssh隧道远程mysql_利用SSH隧道方式连接远程MySQL服务器
1.简介: 大多数人知道SSH是用来替代R命令集,用于加密的远程登录,文件传输,甚至加密的FTP(SSH2内置),因此SSH成为使用极广的服务之一,不仅如 此,SSH还有另一项非常有用的功能,就是它的 ...
- python利用paramiko实现ssh连接及远程执行命令
python3.6, windows下 1,安装paramiko模块 依赖cryptography:使用命令easy_install安装该模块时,如果报错"...microsoft visu ...
- 张宴 vip mysql_修改phpMyAdmin使其能够管理多台远程MySQL服务器[原创] - 回忆未来[张宴]......
[文章作者:张宴 本文版本:v1.0 最后修改:2007.04.06 转载请注明出处:http://blog.s135.com] 需求背景: phpMyAdmin是一款不错的MySQL在线管理工具,但 ...
- Ubuntu SSH连接、远程上传下载文件
Ubuntu SSH连接.远程上传下载文件 目录 SSH 概念 安装 SSH(Secure Shell) 服务以提供远程管理服务 将文件/文件夹从远程 Ubuntu 机拷至本地(scp) 将文件/文件 ...
- mysql.sock 111,错误2002(HY000):无法通过套接字’/var/run/mysqld/mysqld.sock’连接到本地MySQL服务器(111)...
在Ubuntu计算机上获取关于问题" mysql"命令的错误: 错误2002(HY000):无法通过套接字'/var/run/mysqld/mysqld.sock'连接到本地MyS ...
- 如何连接到远程windows服务器(纯学习笔记,不作为教程)
如何连接到远程windows服务器 先利用快捷键win+r打开运行,或者在搜索框搜索"运行",然后在运行框输入mstsc,点击确定进入下一步. 然后进入远程连接界面,输入被连接的服 ...
最新文章
- EOS能不能囤?一篇文章搞懂EOS优缺点
- ×××的各种协议介绍
- Notepad++ 搜索功能学习总结
- Codeforces Round #351 (VK Cup 2016 Round 3, Div. 2 Edition) A. Bear and Game 水题
- 【c++】 类与对象
- 音视频技术开发周刊 54期
- 学三极管能遇到这篇巧文,我太幸福了!
- WPF 实现调用本机摄像头~
- 前端学习(1963)vue之电商管理系统电商系统之控制级联选择框的选择范围
- ios swift 实现饼状图进度条,swift环形进度条
- 《PHP和MySQL Web开发从新手到高手(第5版)》一一1.7 万事俱备,摩拳擦掌
- java版b2b2c社交电商spring cloud分布式微服务-服务提供与调用
- PS替换图片图标操作
- MLPlatform project的统一结构-----------Model层代码编写--------业务逻辑子层:编程思路...
- 机器人关节伺服电机PID串级控制
- 实践出真知:全网最强秒杀系统架构解密,不是所有的秒杀都是秒杀!!
- 图片表格如何转换成excel表格
- 线性代数笔记【特征值】
- Windows10开机自动登录账号,设置指定账户自动登录系统
- 缺失值填充的几种方法