将youtube播放列表变成网站
From Scratch: using Next.js (React), Bulma & Zeit Now
从头开始:立即使用Next.js(React),布尔玛和Zeit
(written in April, posted in august, some stuff might be out of date)
(写于四月,八月发布,有些东西可能已经过时了)
I’m new to front-end. Part of the fun is figuring out small projects to discover new tricks. The later fun comes from showing what I found out in case anyone else wanted to try the same things. This guide uses Next.js (it’s basically react) to build the frontend & backend, we’ll style the app with Bulma, and host it with Zeit Now (hiding our API key so no one hacks us).
我是前端新手。 有趣的部分是找出小型项目以发现新的技巧。 以后的乐趣来自展示我发现的结果,以防其他人想尝试相同的东西。 本指南使用Next.js(基本上是在React)来构建前端和后端,我们将使用Bulma样式化应用程序,并使用Zeit Now托管它(隐藏我们的API密钥,因此没有人会入侵我们)。
For this project, I’m turning my youtube playlist of drone videos to render a gallery on my website dean.red.
对于这个项目,我将我的YouTube无人机视频播放列表转为在dean.red网站上渲染一个图库。
View Demo — Github Repo
查看演示 — Github回购
先决条件 (Pre-requisites)
- Node.jsNode.js
Signup with Zeit Now and download their CLI
立即注册Zeit并下载其CLI
入门 (Getting Started)
Let’s get the installation & configuration out of the way first. Let’s start by creating the next.js skeleton.
让我们首先进行安装和配置。 让我们从创建next.js框架开始。
npx create-next-appNow let’s install the node_modules we’ll be using:
现在,让我们安装将要使用的node_modules:
npm i node-sass bulma dotenv axios安装样式(布尔玛) (Installing Styling (Bulma))
Let’s setup the styling with node-sass & bulma. Open your package.json configuration file and copy/paste the scripts for css:build & css:watch:
让我们使用node-sass和bulma设置样式。 打开您的package.json配置文件,然后复制/粘贴css:build和css:watch的脚本:
// package.json"scripts": {"dev": "next dev","build": "next build","start": "next start","css:build": "node-sass --omit-source-map-url assets/sass/styles.scss static/css/styles.css","css:watch": "npm run css:build -- --watch"}This script will turn a .SCSS file into a static CSS file. To do this, we need to create the .SCSS file.
该脚本会将.SCSS文件转换为静态CSS文件。 为此,我们需要创建.SCSS文件。
In the folder root, create a new folder called assets, then create a sub-folder called sass, then inside this folder create a file called styles.scss
在文件夹根目录中,创建一个名为asset的新文件夹,然后创建一个名为sass的子文件夹,然后在此文件夹中创建一个名为styles.scss的文件。
Now we can load bulma into styles.scss with the following code:
现在,我们可以使用以下代码将bulma加载到styles.scss中:
// assets/styles/styles.scss@charset "utf-8";@import '../../node_modules/bulma/bulma.sass';Next, we’ll build the static .CSS file with styles.scss. In the terminal:
接下来,我们将使用styles.scss构建静态.CSS文件。 在终端中:
npm run css:build
This creates a folder called static with the styles.css nested inside.
这将创建一个名为static的文件夹,其中嵌套了styles.css。
Now we can use this styling inside our app. To do so, let’s create a Head component that we can use inside all our pages consistently. Create the file TheHead.js inside the components folder:
现在,我们可以在应用程序内部使用此样式。 为此,我们创建一个Head组件,可以在所有页面中一致地使用它。 在components文件夹内创建文件TheHead.js :
// components/TheHead.jsimport Head from 'next/head'export default () => ( <Head> <meta name="viewport" content="width=device-width, initial-scale=1" /> <meta charSet="utf-8" /> <title>youtube playlist</title><link rel="stylesheet" type="text/css" href="/static/css/styles.css" /> </Head>)Let’s now update pages/index.js by replacing everything with the following code. Notice the import and use of <TheHead /> component.
现在,通过将所有内容替换为以下代码来更新pages / index.js 。 注意<TheHead />组件的导入和使用。
// pages/index.jsimport React, { Component } from 'react'import TheHead from '../components/TheHead'export default class index extends Component { render() { return ( <div><TheHead /> <section className="section"> <div className="columns"> <div className="column is-8 is-offset-2"> <h1 className="title"> Bulma is installed! </h1> <a className="button is-primary">Button Test</a> </div> </div> </section> </div> ) }}Now let’s see how this looks.
现在,让我们看看它的外观。
npm run css:buildnpm run dev
创建后端 (Creating the Backend)
To use the Youtube API v3, you need to have an API Key. If we used this within the frontend/client, anyone could see the key and hack into our google account. Luckily, Next.js & Zeit Now makes it easy to deploy a backend that can fetch the playlist information without exposing our API Key.
要使用Youtube API v3,您需要具有API密钥。 如果我们在前端/客户端中使用此功能,则任何人都可以看到密钥并入侵我们的Google帐户。 幸运的是,Next.js和Zeit Now使得部署后端很容易,该后端无需公开我们的API密钥即可获取播放列表信息。
设置环境变量 (Setting up the Environment Variables)
Let’s start by configuring our .env files, which allows us to work locally and on production without exposing our keys.
让我们从配置.env文件开始,该文件使我们能够在本地和生产环境中工作而无需公开密钥。
Create a new file in root called next.config.js.
在根目录中创建一个名为next.config.js的新文件。
// next.config.jsrequire('dotenv').config()module.exports = { env: { // Reference a variable that was defined in the .env file and make it available at Build Time APIKEY: process.env.APIKEY, PLAYLIST: process.env.PLAYLIST, },}Then create a new file in root called .env
然后在名为.env的根目录中创建一个新文件
APIKEY=keyABCPLAYLIST=appABCThen create two new files in root called .nowignore & .gitignore
然后在根目录中创建两个新文件,名为.nowignore和.gitignore
// .nowignore.envnode_modules// .gitignore.envnode_modules设置API (Setting up the API)
Next.js makes it easy to setup APIs out of the box (we don’t need express).
Next.js使开箱即用地设置API变得容易(我们不需要express)。

Create a new file pages/api/server.js (create a new folder called api inside of pages).
创建一个新文件pages / api / server.js (在页面内部创建一个名为api的新文件夹)。
// pages/api/server.jsimport fetch from 'axios'import getConfig from 'next/config'const key = process.env.APIKEYconst playlist = process.env.PLAYLISTconst maxResults = 3const apiURL = `https://www.googleapis.com/youtube/v3/playlistItems?part=snippet&type=video&order=date&maxResults=${maxResults}&playlistId=${playlist}&key=${key}`module.exports = async (req, res) => { try { // const result = await fetch(apiURL) // res.status(200).json(result.data) res.status(200).json(apiURL) } catch (err) { res.status(500).json('Whoops, something went wrong') }}Save the file, then restart your server (ctrl-c & npm run dev). Then visit localhost:3000/api/server. You should get the following response.
保存文件,然后重新启动服务器(ctrl-c和npm run dev)。 然后访问localhost:3000 / api / server 。 您应该得到以下答复。
https://www.googleapis.com/youtube/v3/playlistItems?part=snippet&type=video&order=date&maxResults=3&playlistId=appABC&key=keyABCIf you see appABC & keyABC, then your environment variables are working!
如果看到appABC和keyABC ,那么您的环境变量正在运行!
设置API密钥和播放列表 (Setup the API Key & Playlist)
Head over and sign-in to: https://console.developers.google.com/ and create a new project
前往并登录: https : //console.developers.google.com/并创建一个新项目


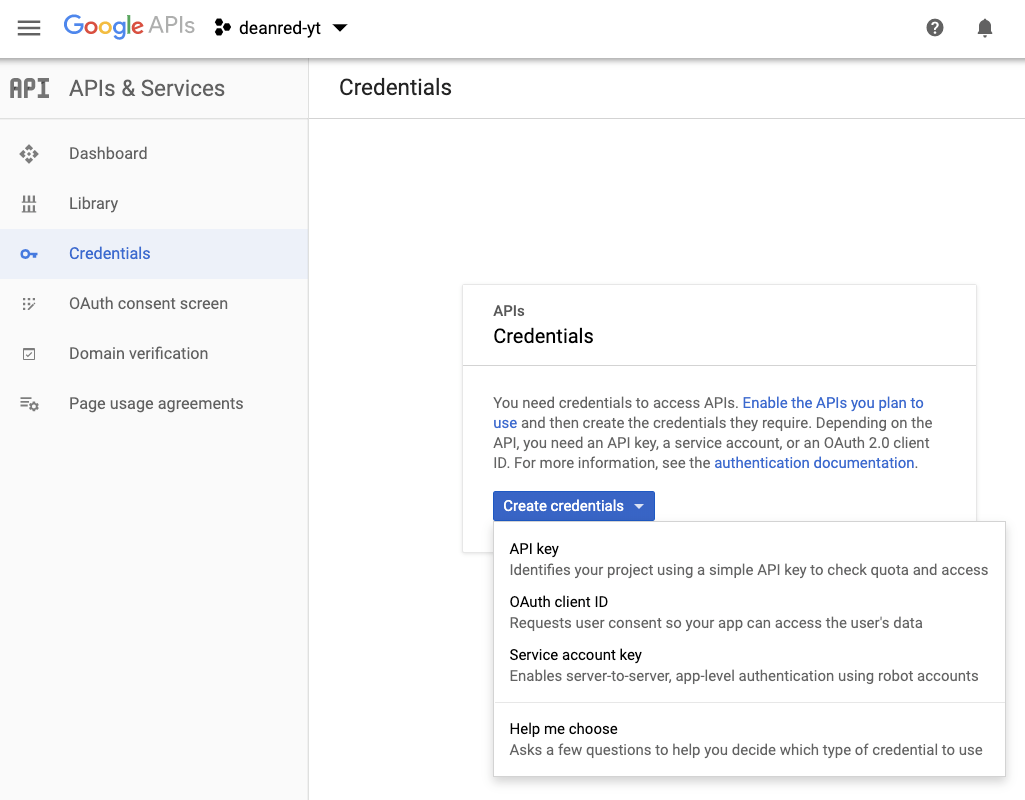
Select & create credentials (API key)
选择并创建凭据(API密钥)
Take the newly generated API key and paste it into your .env file. This will then be available throughout our app.
使用新生成的API密钥并将其粘贴到您的.env文件中。 然后,它将在整个应用程序中可用。
// .envAPIKEY=PasteYourKeyHerePLAYLIST=appABCOn your Google Console, navigate to your dashboard and enable API & Services.
在您的Google控制台上,导航到您的仪表板并启用API和服务。

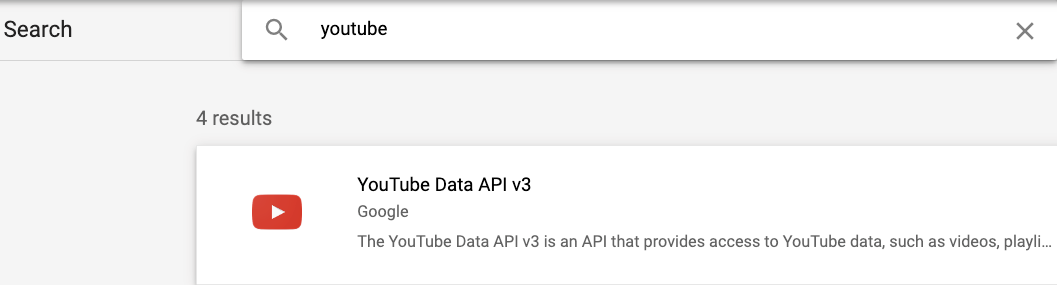
Search for “Youtube” and then select & enable Youtube Data API v3
搜索“ Youtube”,然后选择并启用Youtube Data API v3
Now let’s grab the playlist ID. Navigate to your youtube playlists. Copy the URL and then paste the ID into your .env file:
现在,让我们获取播放列表ID。 导航到您的youtube播放列表。 复制URL,然后将ID粘贴到您的.env文件中:
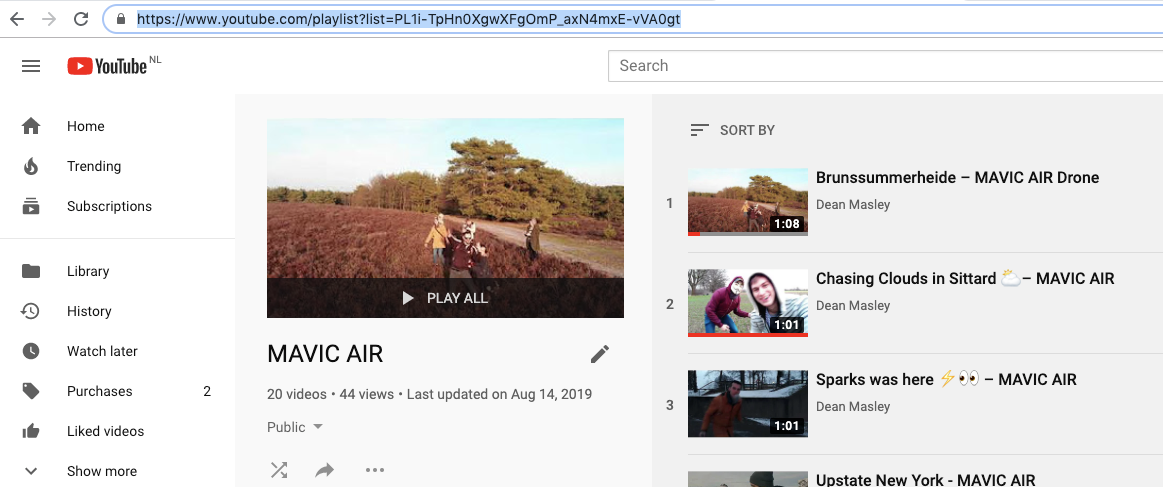
// url of the youtube playlisthttps://www.youtube.com/playlist?list=PL1i-TpHn0XgwXFgOmP_axN4mxE-vVA0gt// .envAPIKEY=PasteYourKeyHerePLAYLIST=PL1i-TpHn0XgwXFgOmP_axN4mxE-vVA0gtOpen up your /api/server.js file and uncomment the code we hid earlier. We can comment out res.status(200).json(apiURL) so that we can use it for debugging later if needed.
打开/api/server.js文件,然后取消注释我们之前隐藏的代码。 我们可以注释掉res.status(200).json(apiURL),以便以后在需要时将其用于调试。
// pages/api/server.jsimport fetch from 'axios'import getConfig from 'next/config'const key = process.env.APIKEYconst playlist = process.env.PLAYLISTconst maxResults = 3const apiURL = `https://www.googleapis.com/youtube/v3/playlistItems?part=snippet&type=video&order=date&maxResults=${maxResults}&playlistId=${playlist}&key=${key}`module.exports = async (req, res) => { try { const result = await fetch(apiURL) res.status(200).json(result.data) // res.status(200).json(apiURL)} catch (err) { res.status(500).json('Whoops, something went wrong') }}Save everything & restart your server (Ctrl-C and then npm run dev). Once compiled, visit localhost:3000/api/server and you should get a json like the following:
保存所有内容并重新启动服务器(Ctrl-C,然后npm run dev)。 编译后,访问localhost:3000 / api / server,您应该得到一个类似于以下内容的json:
{"kind":"youtube#playlistItemListResponse","etag":"\"p4VTdlkQv3HQeTEaXgvLePAydmU/ONj3fEgwTdkCNzYy4qEjt_a2i_A\"","nextPageToken":"CAMQAA","pageInfo":{"totalResults":20,"resultsPerPage":3},"items":[{"kind":"youtube#playlistItem","etag":"\"p4VTdlkQv3HQeTEaXgvLePAydmU/BaaKN-5F21x53nw6GEnHSwaNtDw\"","id":"UEwxaS1UcEhuMFhnd1hGZ09tUF9heE40bXhFLXZWQTBndC5ENDU4Q0M4RDExNzM1Mjcy","snippet":{"publishedAt":"2019-02-17T00:57:40.000Z","channelId":"UCNLJ9gzT_wVT8wbX8OVuaCA","title":"Brunssummerheide – MAVIC AIR Drone","description":"
将youtube播放列表变成网站相关推荐
- 建立自定义的YouTube播放列表播放器
学到更多. 开发更多. 连接更多. 新的developerWorks Premium会员计划可通过Safari图书在线访问强大的开发工具和资源,包括500项顶级技术标题(数十种专门针对Web开发人员) ...
- 3个类似于Youtube的视频网站开源程序
3个类似于Youtube的视频网站开源程序 Thttp://www.ostube.de/; y3 m# h& i1 F http://www.phpmotion.com/0 t# e3 Z5 ...
- youtube 播放列表
先是css <style type="text/css"> /* 缩略图 css */ #thumb{float:right;margin-right:24px; }. ...
- 美国YouTube网站经营模式分析
网络视频化将成为互联网的第二次革命,而播客则成为这一革命的代表,是目前最热门的网络媒体之一.国内PSP(播客服务提供商,全称是Podcasting Service Provider)网站的发展,由于带 ...
- YouTube iframe嵌入式播放器及播放器参数 自动播放,循环播放,播放列表,不显示 YouTube 徽标
YouTube 嵌入式播放器及播放器参数 概览 本文档介绍如何在应用中嵌入 YouTube 播放器,并定义了 YouTube 嵌入式播放器可以使用的参数. 通过将参数附加到 iframe 网址末尾,您 ...
- 喜马拉雅 xm文件转m4a_4K YouTube to MP3 Mac(YouTube转mp3软件)
4K YouTube to MP3 for Mac是一款可以帮助用户将YouTube格式转换为mp3的转换软件.4k youtube to mp3 mac特别版以各种各样的形式获取了YouTube的播 ...
- 推荐几个2023年比较好用的youtube转换器
YouTube 是观看次数最多的视频流媒体网站.该在线视频平台于2005 年推出,内容丰富,包括电视剪辑.教育视频.音乐和游戏视频.娱乐内容等等. 在本教程中,我们将回顾最好的视频下载器应用程序及其优 ...
- 什么是YouTube高级版,值得吗?
YouTube Premium is a monthly subscription service that promises to improve your viewing experience o ...
- 如何使用Google Analytics(分析)设置和跟踪YouTube频道的效果
Managing a YouTube channel is a lot of work. It includes content experimentation which can make or b ...
最新文章
- 利用cre2进行分组模式匹配的实例
- 微软拼音输入法2007状态栏无法显示!
- python实现文件下载-Python实现HTTP协议下的文件下载方法总结
- 【Java代码】Java版本的NGender根据中文姓名猜测其性别及男性化/女性化程度(Python版本地址+Java版本源码+基础数据)
- layui 数据表格下拉框_layui-table-column-select(layui数据表格可搜索下拉框select)
- poj3683 Priest John's Busiest Day
- python写入数据库_Python pymysql写入数据库报错
- window.Event参数详解
- oracle共享服务器模式的图,Oracle 11g笔记——专有服务器、共享服务器模式
- python如何给一组数据打标签_给数据集打标签python代码实现(1)
- mysql5.7 gtid问题_MySQL 5.7.5: 新语法WAIT_FOR_EXECUTED_GTID_SET 及存在的问题-阿里云开发者社区...
- 汇编 LED驱动 烧写bin文件到SD卡
- 自己做量化交易软件(9通通量化框架的雏形建立
- ipv6dns服务器无法响应,ipv6获取不到网关和dns服务器
- What is modularity And how to achieve modularity
- MFC错误0xc000007b 应用程序无法正常启动 的一种原因
- [源码解析] NVIDIA HugeCTR,GPU版本参数服务器--- (5) 嵌入式hash表
- 华为服务器进入系统怎么退出安全模式,华为手机安全模式怎么解除 华为手机安全模式解除办法...
- 一步带你了解C语言中++、--的使用方法!
- 通信专业英语系列(一)
热门文章