ProtocolBuffer for Objective-C 运行环境配置(真正测试过的)
2019独角兽企业重金招聘Python工程师标准>>> 
1、下载ProtocolBuffer包(2.5版本与下面的object-c插件不兼容,建议下载2.4.1版本的):
http://code.google.com/intl/zh-CN/apis/protocolbuffers/
编译安装(生成的编译器protoc在/usr/local/bin目录下):
cd protobuf-2.4.1
./configure
make
make install
2、下载Objective-C compiler for ProtocolBuffer(目前有两种类型的实现)。
(1)、针对ProtocolBuffer2.2做修改,使最后生成的.proto文件编译器(protoc)支持Objective-C类型的文件输出。
http://code.google.com/p/metasyntactic/wiki/ProtocolBuffers
(2)、针对ProtocolBuffer2.3推出的plugin模式编写插件,以插件方式支持Objective-C类型的文件输出。
https://github.com/booyah/protobuf-objc
我选用第(1)种方式,这也是Google推荐的方式。
http://code.google.com/p/metasyntactic/wiki/ProtocolBuffers,下载源码压缩包后解压到相关目录
进入该目录,并执行:
cd ProtocolBuffers-2.2.0-Source
./configure
make
make install
没有这么顺利
google/protobuf/message.cc:130:60: error: implicit instantiation of undefined
template 'std::__1::basic_istream<char, std::__1::char_traits<char> >'
return ParseFromZeroCopyStream(&zero_copy_input) && input->eof();
^
/Applications/Xcode.app/Contents/Developer/Toolchains/XcodeDefault.xctoolchain/usr/bin/../include/c++/v1/iosfwd:109:33: note:
template is declared here
class _LIBCPP_TYPE_VIS_ONLY basic_istream;
^
google/protobuf/message.cc:135:67: error: implicit instantiation of undefined
template 'std::__1::basic_istream<char, std::__1::char_traits<char> >'
return ParsePartialFromZeroCopyStream(&zero_copy_input) && input->eof();
^
/Applications/Xcode.app/Contents/Developer/Toolchains/XcodeDefault.xctoolchain/usr/bin/../include/c++/v1/iosfwd:109:33: note:
template is declared here
class _LIBCPP_TYPE_VIS_ONLY basic_istream;
^
2 warnings and 2 errors generated.
make[2]: *** [message.lo] Error 1
make[1]: *** [all-recursive] Error 1
make: *** [all] Error 2
解决方法如下:
找到文件src/google/protobuf/message.cc 在文件的第一个#include之上的一行,加入
#include <istream>
继续运行make ,即成功通过。
3、测试.proto文件编译
写一个person.proto文件:
[cpp] view plaincopy
message Person {
required string name = 1;
required int32 id = 2;
optional string email = 3;
enum PhoneType {
MOBILE = 0;
HOME = 1;
WORK = 2;
}
message PhoneNumber {
required string number = 1;
optional PhoneType type = 2 [default = HOME];
}
repeated PhoneNumber phone = 4;
}
编译该文件:
protoc person.proto --objc_out=/Output/Directory/
protoc会使用该插件编译.proto文件,最终生成两个文件:Person.pb.h 、Person.pb.m(不支持ARC)
如果工程中使用了ARC ,所以需要使用-fno-objc-arc来标识相关的文件不使用ARC机制:

这个步骤通过后,说明ProtocoBuffer Compiler for Objective-C可以正常工作了。
4、在Xcode中使用ProtocolBuffer
将步骤2中protobuf-obj/src/runtime/Classes目录导入到Xcode项目中,导入时,选中”Copy items into destination group‘s folder(if needed)“。
导入位置选择项目根目录。导入完毕后,项目根目录下将会出现Classes目录,将该目录改名为ProtocolBuffers(注意最后的s): mv Classes ProtocolBuffers
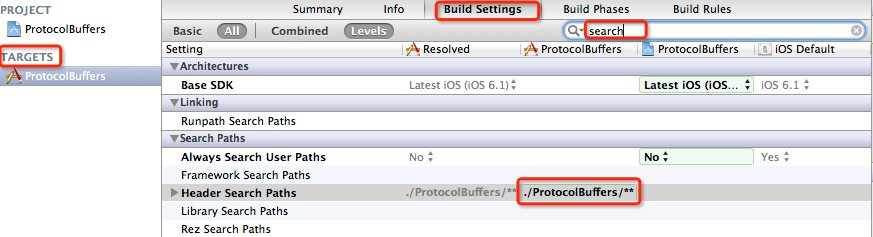
修改项目属性中”Build Settings-->Search Paths-->Header Search Paths”,将项目根目录“.”添加到头文件搜索路径中去。
这样ProtocolBuffer for Objective-C的工作环境就配置好了。
5、使用
1)、将步骤3中编译输出的Person.pb.h 和Person.pb.m添加到项目中
2)、将Person.pb.h 中的 #import <ProtocolBuffers/ProtocolBuffers.h> 改为#import"ProtocolBuffers/ProtocolBuffers.h"
3)、在需要使用的地方引入头文件:#import "Person.pb.h"
[cpp] view plaincopy
- (void)viewDidLoad
{
[super viewDidLoad];
// Do any additional setup after loading the view, typically from a nib.
[self writeAndReadProtobuf];
}
- (void)writeAndReadProtobuf{
Person *person = [[[[[Person builder] setName:@"极致"]
setId:1]
setEmail:@"abc@163.com"] build];
NSData *data = [person data];
NSString *docPath = [self applicationDocumentsDirectory];
NSString *path = [docPath stringByAppendingFormat:@"/person.data"];
if ([data writeToFile:path atomically:YES]) {
[self readFileWithPath:path];
}
}
- (NSString *)applicationDocumentsDirectory {
NSArray *paths = NSSearchPathForDirectoriesInDomains(NSDocumentDirectory, NSUserDomainMask, YES);
NSString *basePath = ([paths count] > 0) ? [paths objectAtIndex:0] : nil;
return basePath;
}
- (void)readFileWithPath:(NSString *)path {
NSData *data = [NSData dataWithContentsOfFile:path];
Person *person = [Person parseFromData:data];
if (person) {
NSLog(@"\n id %d \n name: %@ \n email: %@ \n",person.id, person.name, person.email);
}
}
输出打印的结果如下:

遇到的问题:
在执行 ./autogen.sh时出现错误: ./autogen.sh: line 10: autoreconf: command not found
解决办法:需要安装automake和autoconf:
brew install automake
brew install autoconf
转载于:https://my.oschina.net/u/1244672/blog/508126
ProtocolBuffer for Objective-C 运行环境配置(真正测试过的)相关推荐
- Node-RED使用指南:6:配置与设定总结:运行环境配置
在前一篇文章中通过设定settings.js文件,配置出了Node-RED的管理员登录页面,这篇文章将就Node-RED的配置和设定的运行环境配置部分进行总结. 配置文件 配置文件从哪里读出来,实际上 ...
- SAR成像处理软件运行环境配置(AGX平台)
1. AGX简介 本文档重点介绍在AGX开发平台上,部署SAR成像处理相关的软件.AGX的相关信息可以参考下面的文档. AI 助力的大批自主机器 | NVIDIA Jetson AGX Xavier具 ...
- java安装及运行环境配置
本文将讲解java的安装以及相关运行环境的配置. 安装 安装包可以去官网下载.版本尾号为偶数一般为测试版本,所以推荐下载奇数尾数安装包. 安装界面,一直下一步即可. 安装路径设置,如果为节省c ...
- Asymptote 的编译安装与运行环境配置
简介 Asymptote 是一种支持二维与三维绘图并且对 TeX 非常友好的科学绘图编程语言. 从 Asymptote svn 仓库迁出源码 $ svn co http://asymptote.svn ...
- USRP环境配置及测试
USRP环境配置及测试 文章目录 **USRP环境配置及测试** **安装Ubuntu18.04(非虚拟机)** **安装UHD** **安装GNU Radio** **USRP B210测试** * ...
- 【转载】VINS-Mono环境配置与测试笔记
VINS-Mono环境配置与测试笔记 标签: SLAM VINS-mono 本文转载自: VINS-Mono环境配置与测试笔记 error:cv_bridge---opencv和ros连接起来的桥 1 ...
- VINS-Mono环境配置与测试笔记
VINS-Mono环境配置与测试笔记 标签: 旭 linux SLAM 1.简介 VINS-Mono和VINS-Mobile是香港科技大学沈劭劼团队开源的单目视觉惯导SLAM方案.是基于优化和滑动窗口 ...
- YOLOv4 资源环境配置和测试样例效果
YOLOv4 资源环境配置和测试样例效果 基本环境:cuda=10.0,cudnn>=7.0, opencv>=2.4 一.下载yolov4 git clone https://githu ...
- ASP.NET运行环境配置
转自http://www.cnblogs.com/koeltp/archive/2012/02/08/2343394.html Win7旗舰版中的IIS配置asp.net的运行环境 以前弄过好多次,都 ...
最新文章
- fatal error lnk1561: 必须定义入口点_链表中是否有环以及找环的入口问题总结
- ftp java listfiles_Java FTPClient.listFiles()不能获取目录里的文件
- Centos7安装go-1.9.2
- Leetcode 344. 反转字符串 (每日一题 20210812)
- 第三次spring冲刺1
- 【Linux】Makefile文件
- .net持续集成sonarqube篇之sonarqube安装与基本配置
- Linux的分区类型
- 耐人寻味的 8 幅Java技术图
- 计算机word设置信纸,怎么用Word文字DIY一份信纸?
- 【工具类】数据脱敏工具类
- C语言枚举类型和联合体
- 数学建模入门-python实现单目标模糊综合评价法
- Windows 技术篇-资源管理器文件默认排序设置,通用文件夹排序设置
- android背景置灰,android view置灰(哀悼日)
- 树莓派笔记12:通过SPI操作OLED显示屏
- Deep Knowledge Tracing
- alios things开发板_AliOS Things图形界面开发指南
- 云测 Testing 兼职众测平台题目及答案
- win10怎么设置护眼背景