Android底部菜单栏的两种实现方式 附完整源码
原创:http://www.haolizi.net/example/view_447.html
【实例简介】
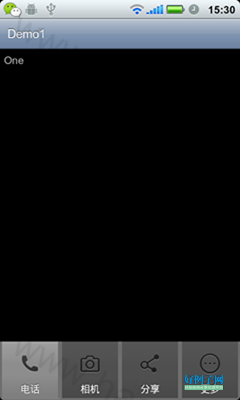
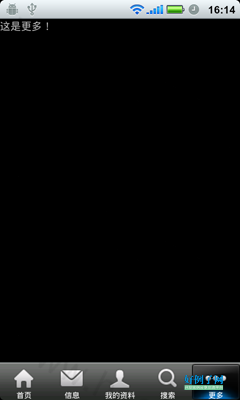
【实例截图】
通过TabWidget实现
实现方式二:隐藏TabWidget,通过RadioGroup和RadioButton实现底部菜单栏
【核心代码】
实现方式一:通过TabWidget实现
这种方式主要是在布局中将TabWidget标签嵌套在RelativeLayout中,并且在TabWidget标签中中设置 android:layout_alignParentBottom="true"
另外,下划线和选项卡之间的线去除的方法时在TabWidget标签中设置属性android:tabStripEnabled="false"
xml:
|
1
2
3
4
5
6
7
8
9
10
11
12
13
14
15
16
17
18
19
20
21
22
23
24
25
26
27
28
29
30
|
<?xml version="1.0" encoding="utf-8"?>
<TabHost xmlns:android="http://schemas.android.com/apk/res/android"
android:id="@android:id/tabhost"
android:layout_width="fill_parent"
android:layout_height="fill_parent"
android:orientation="vertical" >
<FrameLayout
android:id="@android:id/tabcontent"
android:layout_width="fill_parent"
android:layout_height="fill_parent"
android:padding="5dp"
></FrameLayout>
<RelativeLayout
android:layout_width="fill_parent"
android:layout_height="fill_parent">
<!-- tabStripEnabled属性去掉底部下划线与选项卡间的下划线 -->
<!-- layout_alignParentBottom属性即可将其放在底部菜单栏,注意,必须在RelativeLayout里 -->
<TabWidget
android:id="@android:id/tabs"
android:tabStripEnabled="false"
android:background="#6E6E6E"
android:layout_width="fill_parent"
android:layout_height="wrap_content"
android:layout_alignParentBottom="true"
></TabWidget>
</RelativeLayout>
</TabHost>
|
实现代码如下
|
1
2
3
4
5
6
7
8
9
10
11
12
13
14
15
16
17
18
19
20
21
22
23
24
25
26
27
28
29
30
31
32
33
34
35
36
37
38
|
package com.loulijun.demo1;
import android.app.TabActivity;
import android.content.Intent;
import android.os.Bundle;
import android.widget.TabHost;
public class Demo1Activity extends TabActivity {
/** Called when the activity is first created. */
private TabHost tabhost;
private Intent intent1, intent2, intent3, intent4;
@Override
public void onCreate(Bundle savedInstanceState) {
super.onCreate(savedInstanceState);
setContentView(R.layout.main);
tabhost = getTabHost();
intent1 = new Intent(Demo1Activity.this, One.class);
tabhost.addTab(tabhost.newTabSpec("one")
.setIndicator("电话",getResources().getDrawable(android.R.drawable.ic_menu_call))
.setContent(intent1));
intent2 = new Intent(Demo1Activity.this, Two.class);
tabhost.addTab(tabhost.newTabSpec("two")
.setIndicator("相机",getResources().getDrawable(android.R.drawable.ic_menu_camera))
.setContent(intent2));
intent3 = new Intent(Demo1Activity.this, Three.class);
tabhost.addTab(tabhost.newTabSpec("three")
.setIndicator("分享",getResources().getDrawable(android.R.drawable.ic_menu_share))
.setContent(intent3));
intent4 = new Intent(Demo1Activity.this, Four.class);
tabhost.addTab(tabhost.newTabSpec("four")
.setIndicator("更多",getResources().getDrawable(android.R.drawable.ic_menu_more))
.setContent(intent4));
}
}
|
实现方式二:隐藏TabWidget,通过RadioGroup和RadioButton实现底部菜单栏
这种方式更漂亮,也更灵活,网上基本用的是这种方式,通过setCurrentTabByTag来切换不同的选项卡
main.xml:
|
1
2
3
4
5
6
7
8
9
10
11
12
13
14
15
16
17
18
19
20
21
22
23
24
25
26
27
28
29
30
31
32
33
34
35
36
37
38
39
40
41
42
43
44
45
46
47
48
49
50
51
52
53
54
55
56
57
58
59
60
61
62
|
<?xml version="1.0" encoding="utf-8"?>
<TabHost xmlns:android="http://schemas.android.com/apk/res/android"
android:id="@android:id/tabhost"
android:layout_width="fill_parent"
android:layout_height="fill_parent"
>
<LinearLayout
android:orientation="vertical"
android:layout_width="fill_parent"
android:layout_height="fill_parent">
<FrameLayout
android:id="@android:id/tabcontent"
android:layout_width="fill_parent"
android:layout_height="0.0dip"
android:layout_weight="1.0"/>
<TabWidget
android:id="@android:id/tabs"
android:layout_width="fill_parent"
android:layout_height="wrap_content"
android:layout_weight="0.0"
android:visibility="gone"/>
<RadioGroup
android:id="@ id/main_tab"
android:background="@drawable/maintab_toolbar_bg"
android:orientation="horizontal"
android:layout_width="fill_parent"
android:layout_height="wrap_content"
android:gravity="center_vertical"
android:layout_gravity="bottom">
<RadioButton
android:layout_marginTop="2.0dip"
android:text="@string/main_home"
android:drawableTop="@drawable/icon_1_n"
android:id="@ id/radio_button0"
style="@style/main_tab_bottom"/>
<RadioButton
android:layout_marginTop="2.0dip"
android:text="@string/main_news"
android:drawableTop="@drawable/icon_2_n"
android:id="@ id/radio_button1"
style="@style/main_tab_bottom"/>
<RadioButton
android:layout_marginTop="2.0dip"
android:text="@string/main_my_info"
android:drawableTop="@drawable/icon_3_n"
android:id="@ id/radio_button2"
style="@style/main_tab_bottom"/>
<RadioButton
android:layout_marginTop="2.0dip"
android:text="@string/menu_search"
android:drawableTop="@drawable/icon_4_n"
android:id="@ id/radio_button3"
style="@style/main_tab_bottom"/>
<RadioButton
android:layout_marginTop="2.0dip"
android:text="@string/more"
android:drawableTop="@drawable/icon_5_n"
android:id="@ id/radio_button4"
style="@style/main_tab_bottom"/>
</RadioGroup>
</LinearLayout>
</TabHost>
|
drawable/home_btn_bg.xml:切换时的效果:
|
1
2
3
4
5
6
7
8
9
10
11
12
13
14
15
16
17
18
19
20
21
22
23
24
25
26
27
28
29
30
31
32
33
34
35
36
37
38
39
40
41
42
43
44
|
<?xml version="1.0" encoding="UTF-8"?>
<selector
xmlns:android="http://schemas.android.com/apk/res/android">
<item android:state_focused="true" android:state_enabled="true" android:state_pressed="false" android:drawable="@drawable/home_btn_bg_s" />
<item android:state_enabled="true" android:state_pressed="true" android:drawable="@drawable/home_btn_bg_s" />
<item android:state_enabled="true" android:state_checked="true" android:drawable="@drawable/home_btn_bg_d" />
<item android:drawable="@drawable/transparent" />
</selector>
string/dimens.xml 尺寸文件:
<?xml version="1.0" encoding="utf-8"?>
<resources>
<dimen name="bottom_tab_padding_drawable">2.0dip</dimen>
<dimen name="bottom_tab_padding_up">5.0dip</dimen>
<dimen name="bottom_tab_font_size">10.0dip</dimen>
</resources>
string/drawables.xml 设置为透明:
<?xml version="1.0" encoding="utf-8"?>
<resources>
<item type="drawable" name="transparent">#00000000</item>
</resources>
string/styles.xml 样式文件:
<?xml version="1.0" encoding="utf-8"?>
<resources>
<style name="main_tab_bottom">
<item name="android:textSize">@dimen/bottom_tab_font_size</item>
<item name="android:textColor">#ffffffff</item>
<item name="android:ellipsize">marquee</item>
<item name="android:gravity">center_horizontal</item>
<item name="android:background">@drawable/home_btn_bg</item>
<item name="android:paddingTop">@dimen/bottom_tab_padding_up</item>
<item name="android:layout_width">fill_parent</item>
<item name="android:layout_height">wrap_content</item>
<item name="android:button">@null</item>
<item name="android:singleLine">true</item>
<item name="android:drawablePadding">@dimen/bottom_tab_padding_drawable</item>
<item name="android:layout_weight">1.0</item>
</style>
</resources>
|
代码实现:
|
1
2
3
4
5
6
7
8
9
10
11
12
13
14
15
16
17
18
19
20
21
22
23
24
25
26
27
28
29
30
31
32
33
34
35
36
37
38
39
40
41
42
43
44
45
46
47
48
49
50
51
52
53
54
55
56
57
58
59
60
61
62
63
64
65
66
67
68
69
70
71
72
73
|
import android.app.TabActivity;
import android.content.Intent;
import android.os.Bundle;
import android.view.Window;
import android.widget.RadioGroup;
import android.widget.TabHost;
import android.widget.RadioGroup.OnCheckedChangeListener;
public class MainTabActivity extends TabActivity implements OnCheckedChangeListener{
private RadioGroup mainTab;
private TabHost tabhost;
private Intent iHome;
private Intent iNews;
private Intent iInfo;
private Intent iSearch;
private Intent iMore;
@Override
public void onCreate(Bundle savedInstanceState) {
super.onCreate(savedInstanceState);
requestWindowFeature(Window.FEATURE_NO_TITLE);
setContentView(R.layout.main);
mainTab=(RadioGroup)findViewById(R.id.main_tab);
mainTab.setOnCheckedChangeListener(this);
tabhost = getTabHost();
iHome = new Intent(this, HomeActivity.class);
tabhost.addTab(tabhost.newTabSpec("iHome")
.setIndicator(getResources().getString(R.string.main_home), getResources().getDrawable(R.drawable.icon_1_n))
.setContent(iHome));
iNews = new Intent(this, NewsActivity.class);
tabhost.addTab(tabhost.newTabSpec("iNews")
.setIndicator(getResources().getString(R.string.main_news), getResources().getDrawable(R.drawable.icon_2_n))
.setContent(iNews));
iInfo = new Intent(this, MyInfoActivity.class);
tabhost.addTab(tabhost.newTabSpec("iInfo")
.setIndicator(getResources().getString(R.string.main_my_info), getResources().getDrawable(R.drawable.icon_3_n))
.setContent(iInfo));
iSearch = new Intent(this,SearchActivity.class);
tabhost.addTab(tabhost.newTabSpec("iSearch")
.setIndicator(getResources().getString(R.string.menu_search), getResources().getDrawable(R.drawable.icon_4_n))
.setContent(iSearch));
iMore = new Intent(this, MoreActivity.class);
tabhost.addTab(tabhost.newTabSpec("iMore")
.setIndicator(getResources().getString(R.string.more), getResources().getDrawable(R.drawable.icon_5_n))
.setContent(iMore));
}
@Override
public void onCheckedChanged(RadioGroup group, int checkedId) {
switch(checkedId){
case R.id.radio_button0:
this.tabhost.setCurrentTabByTag("iHome");
break;
case R.id.radio_button1:
this.tabhost.setCurrentTabByTag("iNews");
break;
case R.id.radio_button2:
this.tabhost.setCurrentTabByTag("iInfo");
break;
case R.id.radio_button3:
this.tabhost.setCurrentTabByTag("iSearch");
break;
case R.id.radio_button4:
this.tabhost.setCurrentTabByTag("iMore");
break;
}
}
}
|
Android底部菜单栏的两种实现方式 附完整源码
- 点此下载实例
转载于:https://www.cnblogs.com/tonglingqijie/p/4742123.html
Android底部菜单栏的两种实现方式 附完整源码相关推荐
- *现在感觉librealsense和realsense-ros的安装挺简单的(普通X86平台)(现在发现都有两种安装方式,下载源码编译或者二进制安装)
下面说的就是在普通X86平台上,不是在ARM平台,不在树莓派,TX2这些平台上. 之前潜意识里似乎还觉得会比较麻烦,实际我现在真正再看一下,回看一下,不是这样的.可能就像装双系统一样,实际并不麻烦,跟 ...
- C++在不使用任何算术运算符的情况下将两个数字相加(附完整源码)
C++在不使用任何算术运算符的情况下将两个数字相加 C++在不使用任何算术运算符的情况下将两个数字相加完整源码(定义,实现,main函数测试) C++在不使用任何算术运算符的情况下将两个数字相加完整源 ...
- Java:实现一种遗传算法(附完整源码)
Java:实现一种遗传算法 package com.williamfiset.algorithms.ai;import java.util.*;public class GeneticAlgorith ...
- Android 圆形头像的两种实现方式
Android 圆形头像的两种实现方式 前言 这篇博客只是为了做一个记录而已,方便而后查询,核心代码都是直接采用鸿洋博客里面的代码的. 圆形头像在实际开发中实际很常见,一般来说,主要有两种实现方式: ...
- 线程的3种实现方式并深入源码简单分析实现原理
前言 本文介绍下线程的3种实现方式并深入源码简单的阐述下原理 三种实现方式 Thread Runnable Callable&Future 深入源码简单刨析 Thread Thread类实现了 ...
- 【Android数据存储】ContentProvider详细介绍(附实例源码)
1.ContentProvider是什么? ContentProvider--内容提供者.它是一个类,这个类主要是对Android系统中进行共享的数据进行包装,并提供了一组统一的访问接口供其他程序调用 ...
- android 静态图片自动切换,Android静态图片人脸识别的完整demo(附完整源码)
Android静态图片人脸识别的完整demo(附完整源码) 来源:互联网 作者:佚名 时间:2015-03-24 20:07 本文介绍了android静态识别人脸并进行标记人眼位置及人脸框的完整dem ...
- JavaScript实现使用二元运算符将两个数字相加fullAdder算法(附完整源码)
JavaScript实现使用二元运算符将两个数字相加fullAdder算法(附完整源码) getBit.js完整源代码 fullAdder.js完整源代码 getBit.js完整源代码 export ...
- android旋转动画的两种实现方式
在android开发,我们会常常使用到旋转动画,普通情况下旋转动画有两种实现方式,一种是直接通过java代码去实现,第二种是通过配置文件实现动画.以下是两种动画的基本是用法: 纯Java代码实现: / ...
- android中资源文件的两种访问方式,Android_Android学习笔记-保存文件(Saving Files),Android设备有两种文件存储区域 - phpStudy...
Android学习笔记-保存文件(Saving Files) Android设备有两种文件存储区域: 内部存储和外部存储 ("internal" and "externa ...
最新文章
- hdu 2155(dp)
- 【笔记】JAVA中的泛型和反射
- hexo的yelee主题本地搜索故障
- php 获取相反值,php – 以相反的顺序从单向数组中获取数据
- 使用PostgREST的RestAPI操作之相关软件生态系统
- Oracle or Question Solve(二)
- php开发Hive Web查询
- 阿里云服务器端口请求失败(在控制台把端口添加到服务器的安全组)
- Stata:机制检验,如何判断是不是遮掩效应?
- SAR、PAR和DAR
- 全面解析 UI/UE/交互设计
- 基于Linux的智能聊天与控制设计(毕业设计总结)
- Apache Ranger安全区介绍
- 如何理解数学公式中出现的极大极小minmax含义
- wx2540h配置教程_H3C wx3000系列配置
- 如何成为一个优秀的数据分析师?
- 【网络通信 -- SIP 电话】项目实战记录 -- SIP 服务器 OPENSIPS 搭建测试与 SIP 客户端 PJSIP 编译安装测试
- 关于组队学习的一点想法
- 俄罗斯钓鱼服务器位置,俄罗斯钓鱼4《RussianFishing4》钓鱼地点攻略
- Android 动画详解-思维导图版