令牌环访问控制的原理_通过Keycloak进行访问控制的级别,第1部分:令牌认证
令牌环访问控制的原理
A few years ago when I was introduced to the world of microservices for the purpose of looking into token authentication, I stumbled across Keycloak. Keycloak is an open-source identity and access management service maintained by JBoss, a division of Red Hat. Keycloak comes with a plethora of features that do take some time to get familiar with. Some of these features, such as OpenID Connect, RBAC, and Authorization services are very useful for the security needs of modern microservices. This 4-part series is for those who want to rapidly ramp-up their know-how of these crucial features. We’d be covering token-based authentication, authorization flow, access control, and authorization services through Keycloak with example use cases. I’m going to use python for rapid prototypes and proof of concepts.
几年前,当我被引入微服务领域以研究令牌认证时,偶然发现了Keycloak。 Keycloak是由Red Hat的JBoss维护的一种开源身份和访问管理服务。 Keycloak附带了许多功能,这些功能确实需要一些时间来熟悉。 其中一些功能(例如OpenID Connect,RBAC和授权服务)对于现代微服务的安全需求非常有用。 本系列文章分为4部分,适用于那些希望快速掌握这些关键功能的知识的人。 我们将通过带有示例用例的Keycloak涵盖基于令牌的身份验证,授权流程,访问控制和授权服务。 我将使用python进行快速原型设计和概念验证。
设置 (The Setup)
You’d need a running Keycloak instance. The easiest way to bring it up is by running its docker container. To do so, first install docker and then run the following:
您需要一个正在运行的Keycloak实例。 启动它的最简单方法是运行其docker容器。 为此,请先安装docker ,然后运行以下命令:
docker run -d -p 8080:8080 -e KEYCLOAK_USER=admin -e KEYCLOAK_PASSWORD=password — name keycloak jboss/keycloak:10.0.2This runs the Keycloak version 10.0.2 in a docker container and binds it to port 8080 of your machine. Once the Keycloak service has fully booted up, it will be available at http://localhost:8080/auth/. Open up this URL in a browser and you’d see the Keycloak homepage. Click on Administration Console and use the following credentials to log in:
这将在docker容器中运行Keycloak版本10.0.2,并将其绑定到计算机的端口8080。 一旦Keycloak服务完全启动,它将可以从http:// localhost:8080 / auth /获得。 在浏览器中打开此URL,您将看到Keycloak主页。 单击Administration Console然后使用以下凭据登录:
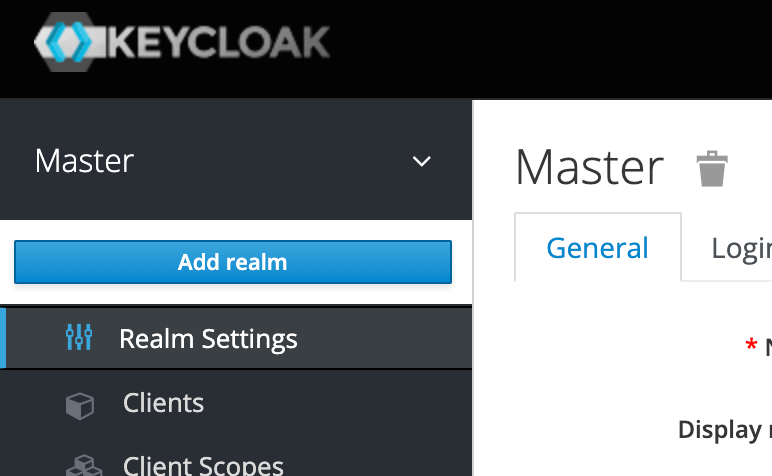
Username: adminPassword: passwordWe specified these credentials above as environment variables to the docker container when we ran it. Once you log in, you’re redirected to the realm administration console. A realm is like a context, a tenancy, or a container. It can represent an organization and any user, groups, or roles related to an organization can reside in a realm. A better way to explain it would be to say that normally, one realm must have users with unique usernames but two users with the same username can exist in different realms. They would be two different users. When you log in with the credentials above, you’re redirected to the administration console of the master realm. This is the central realm that manages all the other realms. You can create a new realm by hovering on the Master in the navigation panel on the left and click on Add Realm
运行它们时,我们在上面将这些凭据指定为Docker容器的环境变量。 登录后,您将被重定向到领域管理控制台。 领域就像上下文,租约或容器。 它可以代表组织,并且与组织相关的任何用户,组或角色都可以驻留在领域中。 一种更好的解释方式是,通常,一个领域必须具有具有唯一用户名的用户,但是两个具有相同用户名的用户可以存在于不同的领域中。 他们将是两个不同的用户。 使用上面的凭据登录时,您将被重定向到master领域的管理控制台。 这是管理所有其他领域的中心领域。 您可以通过将鼠标悬停在左侧导航面板中的Master上,然后单击Add Realm来创建一个新领域。
I’ll be working on a new realm called test.
我将致力于一个名为test的新领域。
Keycloak stores its configuration data in a JDBC supported database and when no external database is specified, runs with an embedded H2 instance which is sufficient for our use case. The H2 database is destroyed when the Keycloak docker container is deleted.
Keycloak将其配置数据存储在JDBC支持的数据库中,并且在未指定外部数据库的情况下,将使用嵌入式H2实例运行,这足以满足我们的使用情况。 删除Keycloak泊坞窗容器后,H2数据库将被破坏。
基于令牌的身份验证 (Token-Based Authentication)
I’m going to start with building a REST server in python using falcon. We want the REST API to be only accessible to authenticated users from Keycloak. To achieve this, we need to create a client entity in Keycloak. We can do this by clicking on Clients and then clicking on Create button:
我将从使用falcon在python中构建REST服务器开始。 我们希望REST API仅对Keycloak身份验证的用户可用。 为此,我们需要在Keycloak中创建一个客户端实体。 我们可以通过单击“ Clients ,然后单击“ Create按钮来做到这一点:

In the Add Client view, you just need to provide the Client Id. Let's name this client my-test-client. Click on Save
在“ Add Client视图中,您只需要提供客户端ID。 让我们将此客户端命名为my-test-client 。 点击Save

What we have created so far is an OAuth2 client
到目前为止,我们创建的是一个OAuth2客户端
We’d also need to create a new test user with which we can log in. For that, click on Users from the left panel, then click on Add User.
我们还需要创建一个可以登录的新测试用户。为此,请从左侧面板中单击“ Users ”,然后单击“ Add User 。
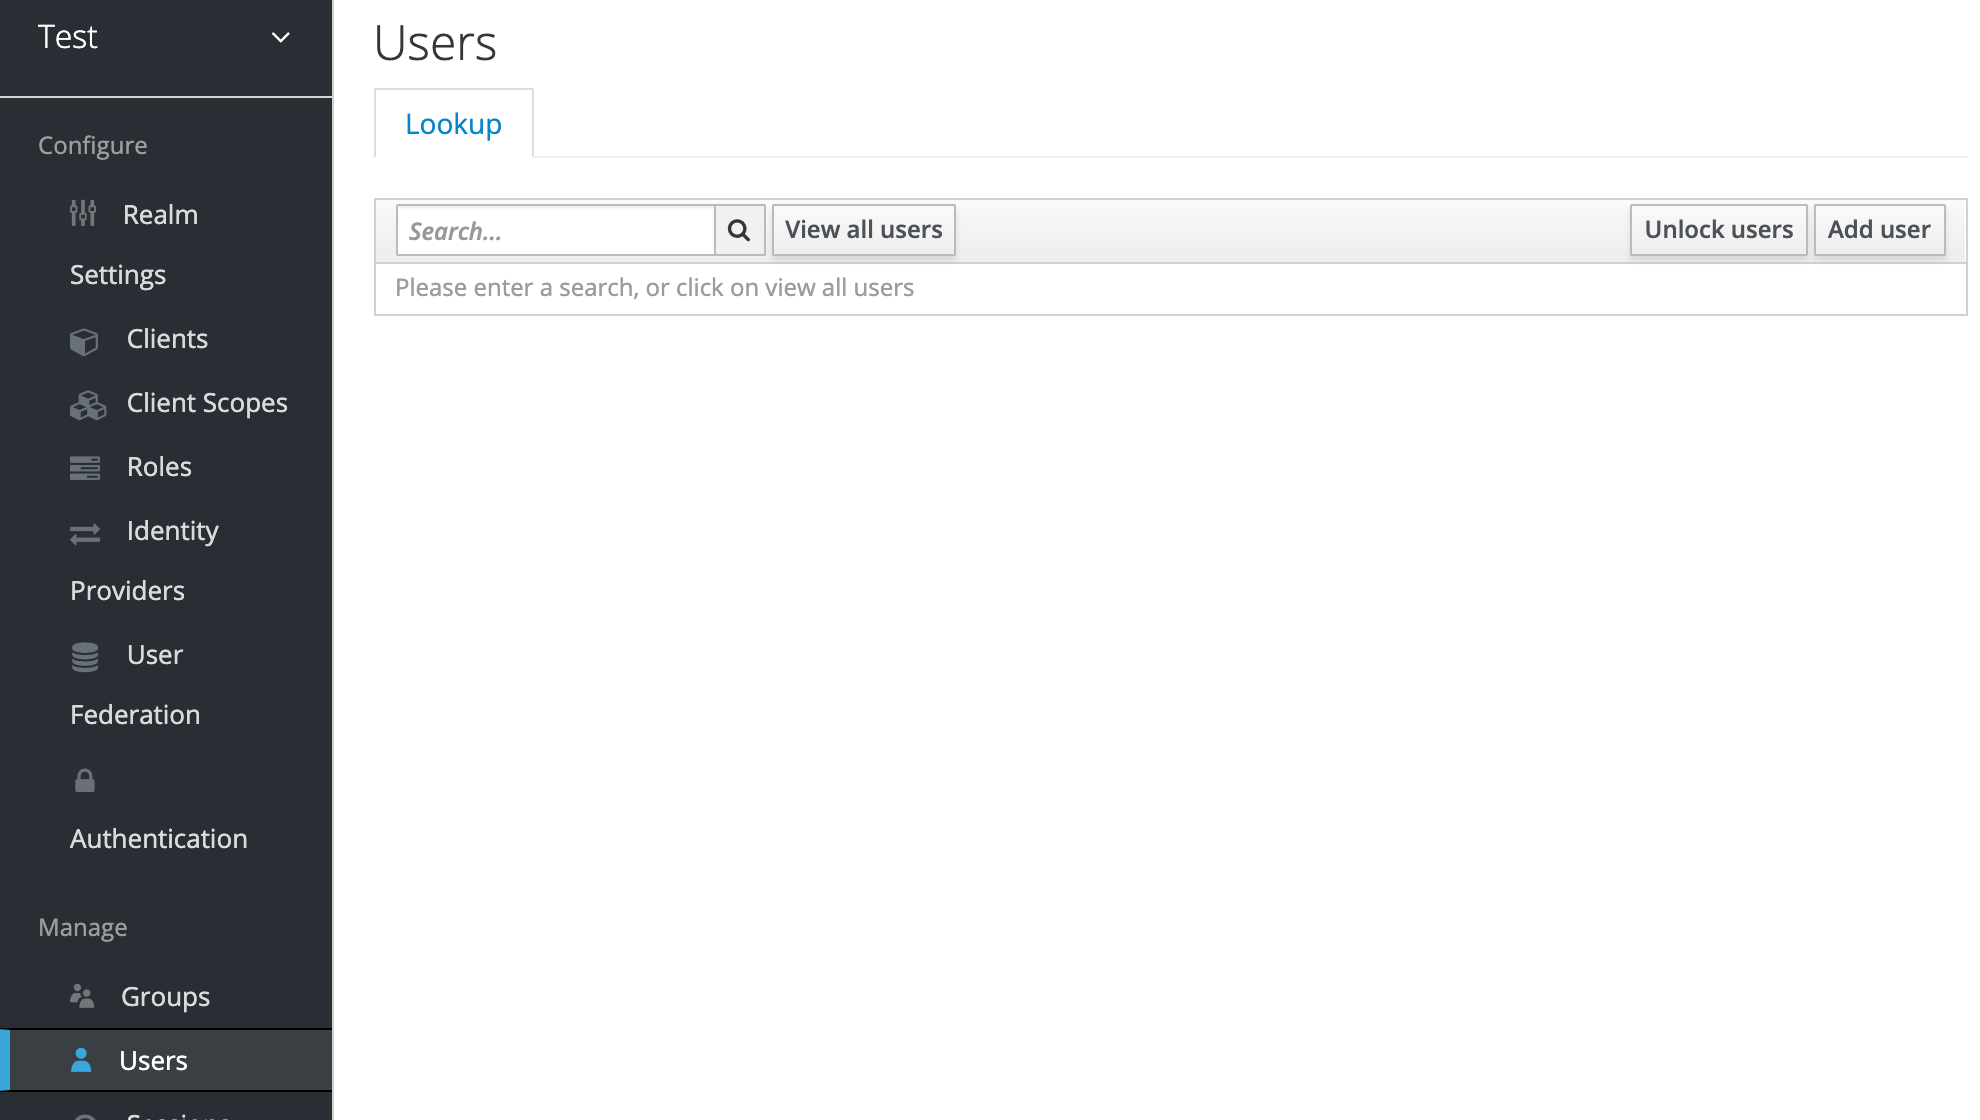
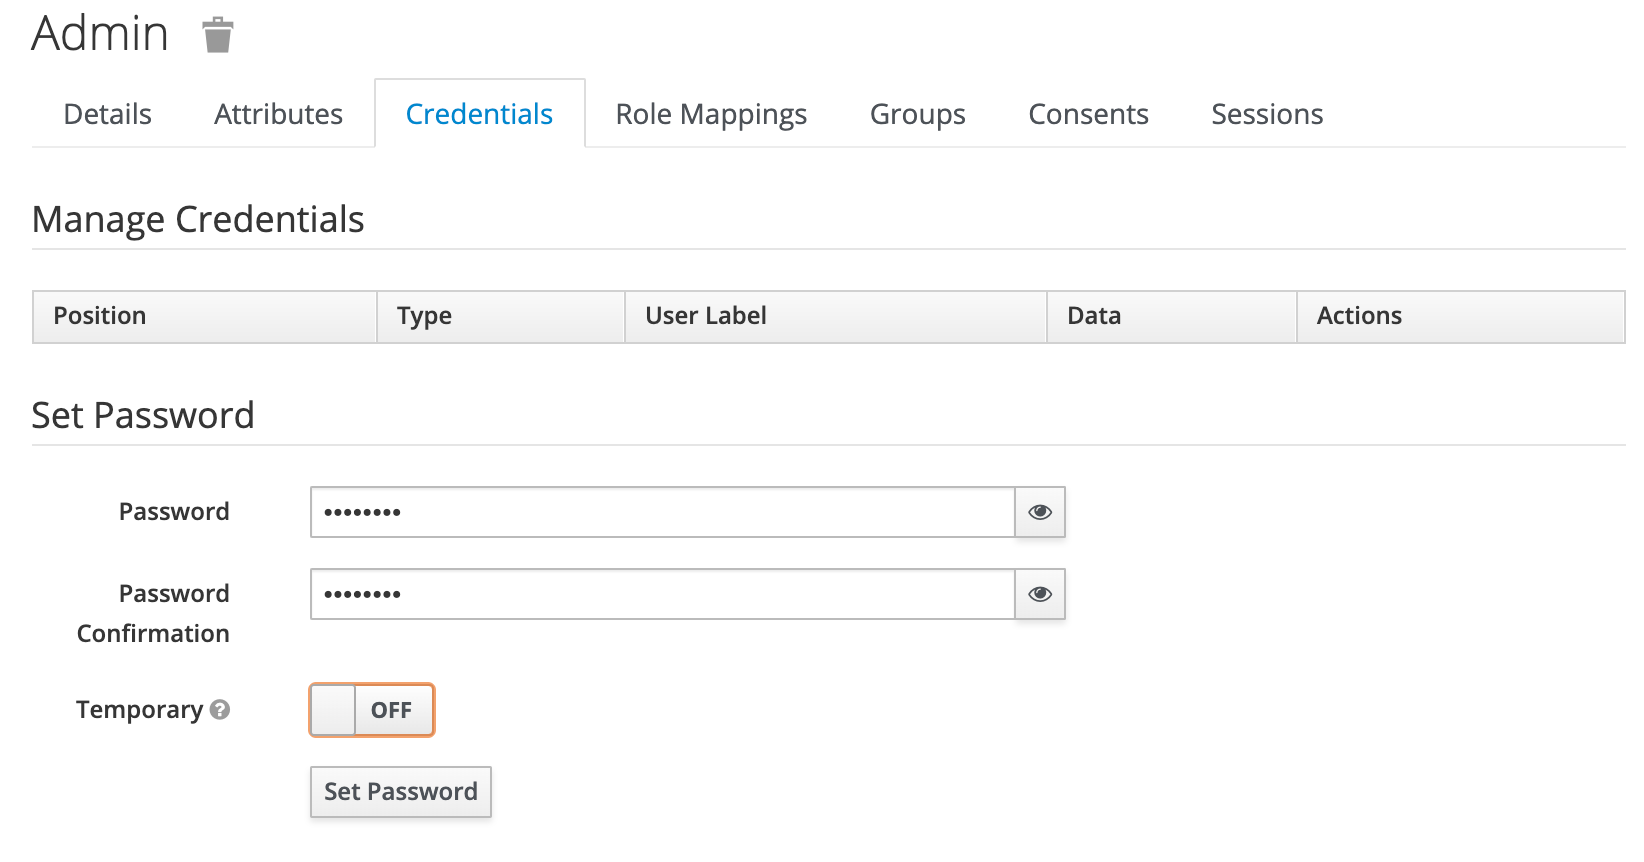
Only a username is required to create a user. Let’s name this user admin and click on Save. Once saved, click on Credentials, put in a password which you can remember, and turn off the Temporary button before clicking on Set Password button.
创建用户只需要一个用户名。 让我们将此用户命名为admin ,然后单击Save 。 保存后,单击“ Credentials ,输入一个您可以记住的密码,然后在单击“ Set Password按钮之前关闭“ Temporary按钮。
Once the client and the user has been configured, you can perform the following POST request using curl to get an access token:
一旦配置了客户端和用户,就可以使用curl执行以下POST请求以获取访问令牌:
curl -X POST http://localhost:8080/auth/realms/test/protocol/openid-connect/token \ --data "username=admin" \ --data "password=password" \ --data "client_id=my-test-client" \ --data "grant_type=password"The response of this request would be something similar to the payload below:
该请求的响应类似于以下有效负载:
{ "access_token": "eyJhbGciOiJSUzI1NiIsInR5cCIgOiAiSldUIiwia2lkIiA6ICJHS2pCb3lMV0lsYlNNVW1IMXhhZHFPNllaY0hvalhqZlBmMnluZ0hhajN3In0.eyJleHAiOjE1OTY1MTcwNDMsImlhdCI6MTU5NjQ4MTA0MywianRpIjoiMjQ2OTBmZDMtYmYwMC00NTBmLTg5MzctMTg5M2NlYThiZjhhIiwiaXNzIjoiaHR0cDovL2xvY2FsaG9zdDo4MDgwL2F1dGgvcmVhbG1zL3Rlc3QiLCJhdWQiOiJhY2NvdW50Iiwic3ViIjoiZjMzZDc0ZDQtYTVlZC00ZGEwLTgxN2MtNTAzZTc1YTgxNDY1IiwidHlwIjoiQmVhcmVyIiwiYXpwIjoibXktdGVzdC1jbGllbnQiLCJzZXNzaW9uX3N0YXRlIjoiZjg1MzAzNTItMjliMy00N2YwLWJmYjUtOTE0YmM4YjY1MzZlIiwiYWNyIjoiMSIsImFsbG93ZWQtb3JpZ2lucyI6WyIvKiJdLCJyZWFsbV9hY2Nlc3MiOnsicm9sZXMiOlsib2ZmbGluZV9hY2Nlc3MiLCJ1bWFfYXV0aG9yaXphdGlvbiJdfSwicmVzb3VyY2VfYWNjZXNzIjp7ImFjY291bnQiOnsicm9sZXMiOlsibWFuYWdlLWFjY291bnQiLCJtYW5hZ2UtYWNjb3VudC1saW5rcyIsInZpZXctcHJvZmlsZSJdfX0sInNjb3BlIjoiZW1haWwgcHJvZmlsZSIsImVtYWlsX3ZlcmlmaWVkIjpmYWxzZSwicHJlZmVycmVkX3VzZXJuYW1lIjoiYWRtaW4ifQ.BxmcDQKHcis3DQAJE-APpGsKRn3PkIvF1JhefVWqw4IkuQBwhFvDfVZMt27CC8cZdQEE5v5R_8wvIw4Ju69EQZVw2oqeN9JOvo5Sg9TxFw7dBrmMlPddIDSvbB8L7b4GklT3M75pUjIe2rTG91ZsSCFtFVP3Qj6V5iLPNBlVQWS9sMdVHPRM_fgltTSRetf-iKWox13DXz4cn3P5ARHMAJkj5tr8CNRp5cKJzCct0bQgIULlIhzx_tNdOlr39GwFqx_vjuOdGL-x_yy1uyMFMv-yZQn8KqsbJ5E7MIGQEVGKA31l5jFTYev2kgj8ZTFFeXwxReFcEqmVgVQTxNa2BQ", "expires_in": 36000, "refresh_expires_in": 98000, "refresh_token": "eyJhbGciOiJIUzI1NiIsInR5cCIgOiAiSldUIiwia2lkIiA6ICI0NDM1MDllMi1kZTRhLTQ3ZDEtYTgzYi1lOTI3ZGFlNzJjMWUifQ.eyJleHAiOjE1OTY0ODI4NDMsImlhdCI6MTU5NjQ4MTA0MywianRpIjoiYTBhZjc0OWUtYThiYy00NTQ3LWIyODYtNzAxYjQ1NTBjNjA5IiwiaXNzIjoiaHR0cDovL2xvY2FsaG9zdDo4MDgwL2F1dGgvcmVhbG1zL3Rlc3QiLCJhdWQiOiJodHRwOi8vbG9jYWxob3N0OjgwODAvYXV0aC9yZWFsbXMvdGVzdCIsInN1YiI6ImYzM2Q3NGQ0LWE1ZWQtNGRhMC04MTdjLTUwM2U3NWE4MTQ2NSIsInR5cCI6IlJlZnJlc2giLCJhenAiOiJteS10ZXN0LWNsaWVudCIsInNlc3Npb25fc3RhdGUiOiJmODUzMDM1Mi0yOWIzLTQ3ZjAtYmZiNS05MTRiYzhiNjUzNmUiLCJzY29wZSI6ImVtYWlsIHByb2ZpbGUifQ.Olm0EjyvY5b-T6_eAr9zwTzYZsegrOsuWueO_cQLtYQ", "token_type": "bearer", "not-before-policy": 0, "session_state": "f8530352-29b3-47f0-bfb5-914bc8b6536e", "scope": "email profile"}The token you need is the value of access_token from above. If you focus on this value, it's actually 3 base64 encoded strings joined together through dots (.). Such a token is called a JSON Web Token or JWT in short. The part between the two dots is the payload which contains information about the user that we just used to generate the token. We can decode it as follows:
您需要的令牌是上面的access_token的值。 如果您关注此值,则实际上是3个通过点( . )连接在一起的base64编码的字符串。 此类令牌简称为JSON Web Token或JWT 。 两个点之间的部分是payload ,其中包含我们刚刚用来生成令牌的有关用户的信息。 我们可以将其解码如下:
echo 'eyJleHAiOjE1OTY1MTcwNDMsImlhdCI6MTU5NjQ4MTA0MywianRpIjoiMjQ2OTBmZDMtYmYwMC00NTBmLTg5MzctMTg5M2NlYThiZjhhIiwiaXNzIjoiaHR0cDovL2xvY2FsaG9zdDo4MDgwL2F1dGgvcmVhbG1zL3Rlc3QiLCJhdWQiOiJhY2NvdW50Iiwic3ViIjoiZjMzZDc0ZDQtYTVlZC00ZGEwLTgxN2MtNTAzZTc1YTgxNDY1IiwidHlwIjoiQmVhcmVyIiwiYXpwIjoibXktdGVzdC1jbGllbnQiLCJzZXNzaW9uX3N0YXRlIjoiZjg1MzAzNTItMjliMy00N2YwLWJmYjUtOTE0YmM4YjY1MzZlIiwiYWNyIjoiMSIsImFsbG93ZWQtb3JpZ2lucyI6WyIvKiJdLCJyZWFsbV9hY2Nlc3MiOnsicm9sZXMiOlsib2ZmbGluZV9hY2Nlc3MiLCJ1bWFfYXV0aG9yaXphdGlvbiJdfSwicmVzb3VyY2VfYWNjZXNzIjp7ImFjY291bnQiOnsicm9sZXMiOlsibWFuYWdlLWFjY291bnQiLCJtYW5hZ2UtYWNjb3VudC1saW5rcyIsInZpZXctcHJvZmlsZSJdfX0sInNjb3BlIjoiZW1haWwgcHJvZmlsZSIsImVtYWlsX3ZlcmlmaWVkIjpmYWxzZSwicHJlZmVycmVkX3VzZXJuYW1lIjoiYWRtaW4ifQ' | base64 -DWhich yields:
产生:
{ "exp": 1596517043, "iat": 1596481043, "jti": "24690fd3-bf00-450f-8937-1893cea8bf8a", "iss": "http://localhost:8080/auth/realms/test", "aud": "account", "sub": "f33d74d4-a5ed-4da0-817c-503e75a81465", "typ": "Bearer", "azp": "my-test-client", "session_state": "f8530352-29b3-47f0-bfb5-914bc8b6536e", "acr": "1", "allowed-origins": [ "/*" ], "realm_access": { "roles": [ "offline_access", "uma_authorization" ] }, "resource_access": { "account": { "roles": [ "manage-account", "manage-account-links", "view-profile" ] } }, "scope": "email profile", "email_verified": false, "preferred_username": "admin"}As you can see, the value of preferred_username is admin and the value of azp (authorization party) is my-test-client. Normally, a JWT can have any key-value pairs, but the ones returned in this one by Keycloak are special. The keys iss, sub, aud, exp, iat, acr, and azp are part of a standard called OpenID Connect. The exp value is an attached expiration with the token after which it should be considered invalid.
如您所见, preferred_username值为admin , azp (授权方)的值为my-test-client 。 通常,JWT可以具有任何键值对,但是Keycloak在该键值对中返回的是特殊的。 密钥iss , sub , aud , exp , iat , acr和azp是称为OpenID Connect的标准的一部分。 exp值是带有令牌的附加到期,在此之后应将其视为无效。
Respectively, the parts at either ends of the payload are header and the signature. The signature is literally the digital signature of the whole payload generated through a private key and an algorithm. The name of the algorithm and the identifier for the key-pair used to sign the payload are specified in the header.
payload两端的部分分别是header和signature 。 signature实际上是通过私钥和算法生成的整个有效负载的数字签名。 header中指定了算法的名称和用于对有效负载进行签名的密钥对的标识符。
The main advantage of a signed JWT is that if you have the public key and the algorithm information, you can simply verify the signature and once the signature is verified, you can trust the information in the payload to have come from a valid source (Keycloak Server). If you can trust the payload which contains information about the logged-in user, you can establish that the holder of this token is in-fact the user who's logged in.
签名的JWT的主要优点是,如果您具有公钥和算法信息,则只需验证签名即可,一旦签名被验证,您就可以信任有效负载中的信息来自有效来源(Keycloak服务器)。 如果您可以信任包含有关已登录用户信息的有效负载,则可以确定此令牌的持有者实际上是已登录用户。
So, in our demo REST API, all we have to do is expect the request to contain the token. If the token is there, validate its signature. Once the signature has been validated, we can establish the identity of the user who performed the request through preferred_username field.
因此,在演示REST API中,我们要做的就是期望请求包含令牌。 如果令牌存在,请验证其签名。 签名经过验证后,我们可以通过preferred_username字段建立执行请求的用户的身份。
Let's implement a REST endpoint /v1/self that returns the info of the logged-in user. You'd need to install the following pip packages:
让我们实现一个REST端点/v1/self ,该端点返回已登录用户的信息。 您需要安装以下pip软件包:
pip install openidcpy==0.8 falcon==2.0.0 bjoern==3.1.0You'd also need something called a Discovery URL, which can be found from the Keycloak Administration Console as the hyperlink value of OpenID Endpoint Configuration:
您还需要一个称为Discovery URL东西,可以从Keycloak管理控制台中找到它作为OpenID Endpoint Configuration的超链接值:
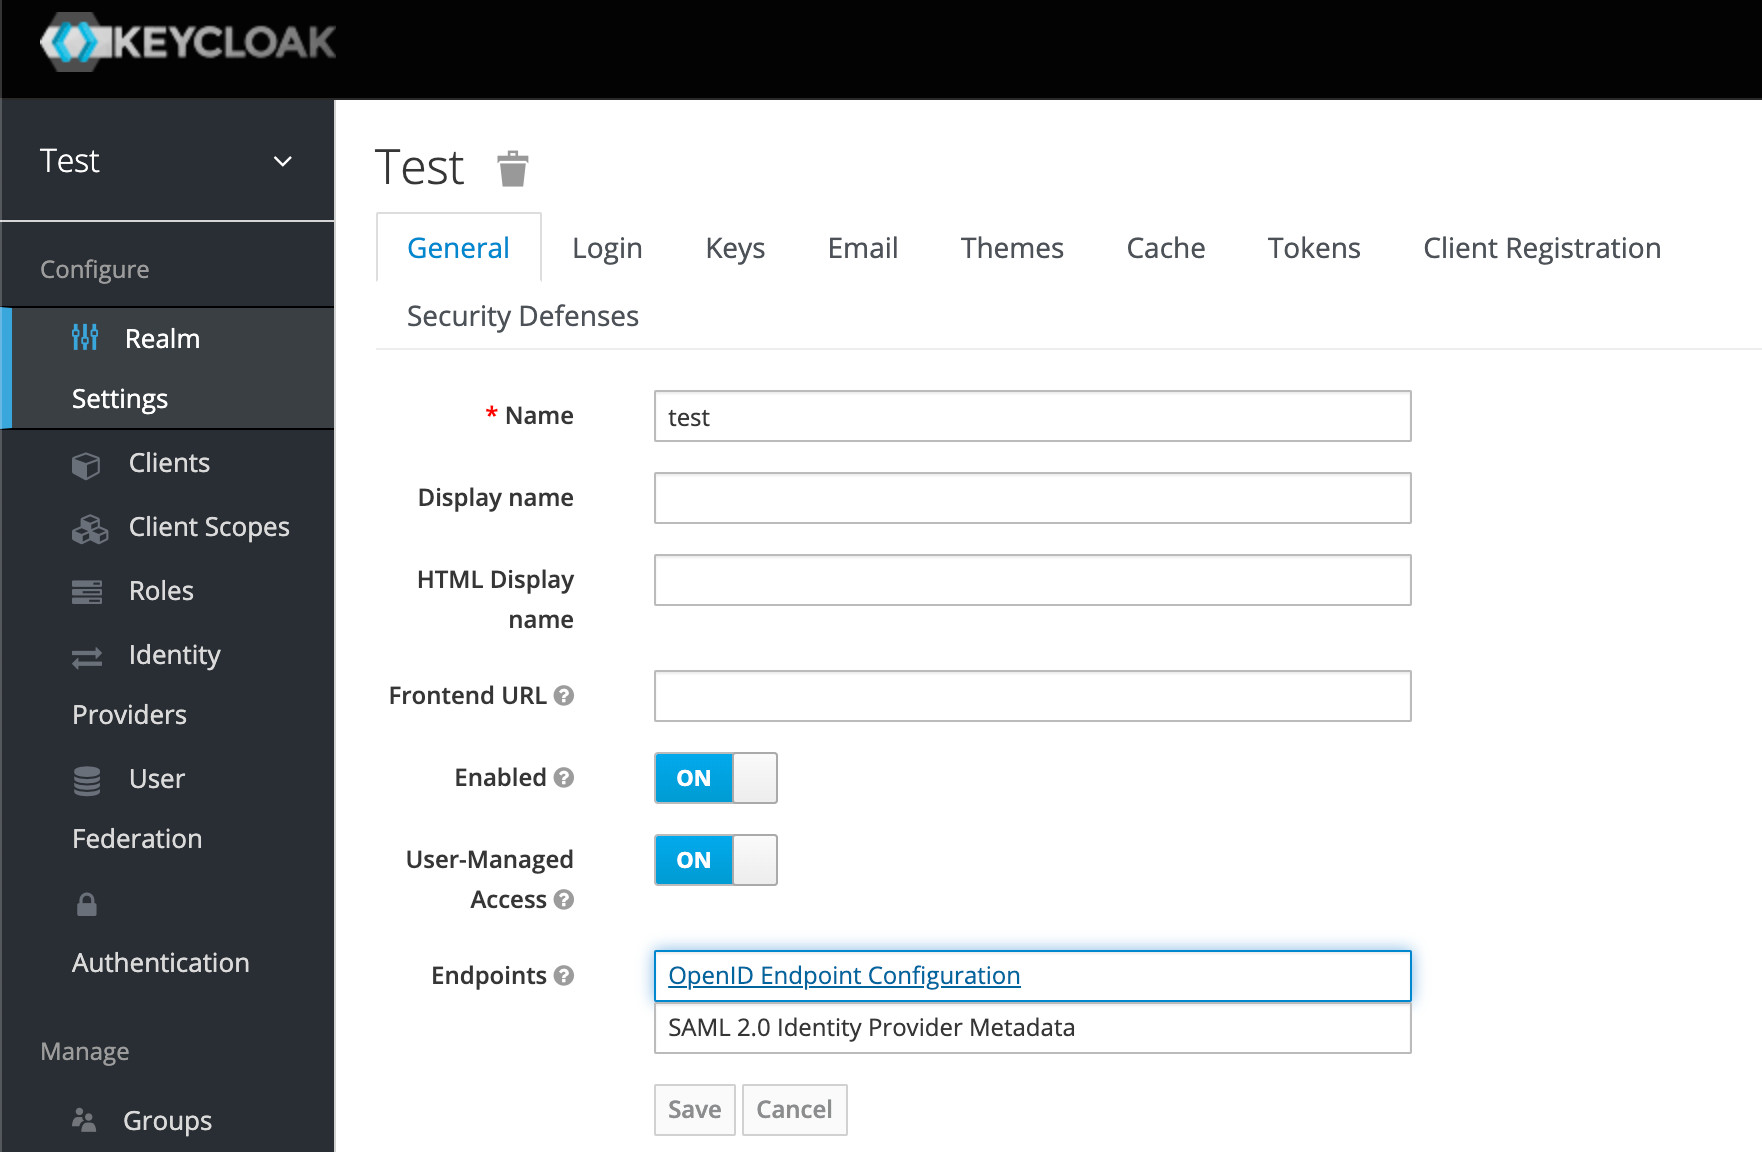
This URL would be something like http://localhost:8080/auth/realms/test/.well-known/openid-configuration and is used to discover metadata about the Keycloak server. Incidentally, this URL can also lead us to the public key required to verify the signature. When you open this URL in the browser, you’ll see something like:
该URL类似于http:// localhost:8080 / auth / realms / test / .well-known / openid-configuration ,用于发现有关Keycloak服务器的元数据。 顺便说一句,此URL还可将我们引向验证签名所需的公钥。 在浏览器中打开此URL时,您将看到类似以下内容的内容:
{ . . . http://localhost:8080/auth/realms/test/protocol/openid-connect/auth", "token_endpoint": "http://localhost:8080/auth/realms/test/protocol/openid-connect/token", http://localhost:8080/auth/realms/test/protocol/openid-connect/certs", http://localhost:8080/auth/realms/test/protocol/openid-connect/userinfo", . . .}Opening the URL specified against jwks_uri will give you all the public keys that this server has one of which will have the same id as specified in the header of the JWT. Other important endpoints specified here are authorization_endpoint and token_endpoint . We’ll use these endpoints later on to generate tokens.
打开针对jwks_uri指定的URL,将为您提供该服务器具有的所有公共密钥,其中一个公共id与JWT header中指定的id相同。 此处指定的其他重要端点是authorization_endpoint和token_endpoint 。 稍后我们将使用这些端点来生成令牌。
For now, we’ll need to specify this URL as an argument to the client from openidcpy. Our implementation is as follows:
现在,我们需要将此URL指定为openidcpy的客户端参数。 我们的实现如下:
import falconfrom openidcpy import OidcClientfrom json import dumpsimport bjoerndiscovery_url = 'http://localhost:8080/auth/realms/test/.well-known/openid-configuration'client_id = 'my-test-client'# Initialize the openidcpy client, this is going to validate the token signatureclient = OidcClient(discovery_uri=discovery_url, client_id=client_id)# A function to extract out the user informationdef get_user(claims): user = {'id': claims['sub']} if 'email' in claims: user['email'] = claims['email'] if 'given_name' in claims: user['firstname'] = claims['given_name'] if 'family_name' in claims: user['lastname'] = claims['family_name'] if 'preferred_username' in claims: user['username'] = claims['preferred_username'] return userclass SelfApi(object): def on_get(self, req, resp): # If a token isn't sent, we need to unauthorize the request if req.auth is None: raise falcon.HTTPUnauthorized('Unauthorized', 'Bearer token not provided') try: # Tokens are usually sent as 'Bearer tokens' i.e. in the format # 'Bearer <token>' against the 'Authorization' header token = req.auth.split(' ')[1] # We need to skip the verification of 'aud' for now claims = client.validate_jwt(token, options={'verify_aud': False}) resp.body = dumps(get_user(claims)) resp.status = falcon.HTTP_200 except Exception as e: raise falcon.HTTPUnauthorized('Unauthorized', e.args[0])if __name__ == '__main__': api = falcon.API() api.add_route('/v1/self', SelfApi()) bjoern.run(api, '0.0.0.0', 1234)Pasting this code in a file and running it will expose this endpoint on http://localhost:1234/v1/self. Once this is done, we need to perform a GET request on this endpoint:
将此代码粘贴到文件中并运行它将在http:// localhost:1234 / v1 / self上公开此终结点。 完成此操作后,我们需要在此端点上执行GET请求:
curl -H "Authorization: Bearer <PUT JWT TOKEN HERE>" http://localhost:1234/v1/selfSubstitute the JWT token in the above call (without the <>) and press enter. This would yield:
将JWT令牌替换为上述调用(不带<> ),然后按Enter键。 这将产生:
{ "id": "f33d74d4-a5ed-4da0-817c-503e75a81465", "username": "admin"}结论 (Conclusion)
Keycloak comes with a full-fledged OpenID Connect Authorization server implementation which may require a steep learning curve which I hope you’ve been able to cover with this story. In the next part, we’d look into the way apps and services automatically generate tokens using the standard flows of OAuth2/OpenID Connect. You can check it out by clicking here.
Keycloak附带了完整的OpenID Connect授权服务器实现,这可能需要陡峭的学习曲线,我希望您能够涵盖这个故事。 在下一部分中,我们将研究应用程序和服务使用OAuth2 / OpenID Connect的标准流程自动生成令牌的方式。 您可以通过单击此处进行检查。
翻译自: https://medium.com/@usmanshahid/levels-of-access-control-through-keycloak-part-1-d29e24b0ddad
令牌环访问控制的原理
相关文章:
- 令牌环桶算法的使用案例
- 令牌环(Token-Ring)
- 令牌环(Token Ring)
- 令牌环的工作原理
- 附件文件超过了服务器的大小,Exchange 2010修改附件大小限制
- Exchange 2010 用户邮箱使用空间统计
- Exchange2010升级至Exchange2016
- 邮箱发大文件服务器怎么删除,Exchange 2010如何删除系统默认邮箱数据库
- 部署Exchange 2010
- Exchange2010安装配置
- 内外网共存环境迁移Exchange 2010至Exchange 2016
- exchange创建邮箱组_exchange2010批量添加用户并创建邮箱并加入部门并添加到通讯组...
- Exchange2010重装注意事项
- Exchange 2010升级到Exchange 2016汇总
- 完全卸载exchange2010
- 基于exchange 2010迁移exchange 2016搭建共存环境
- 附件文件超过了服务器的大小,Exchange 2010设置附件大小
- exchange 2010部署之五
- Exchange 2010 证书续期
- exchange2010安装
- exchange 2010部署之一
- exchange创建邮箱组_Exchange 2010 如何创建通讯组
- 修改 exchange服务器,升级Exchange2010-新服务器更改IP
- 微软enchange服务器安装,Exchange 2010 图文安装详解
- Exchange 2010输入序列号方式
- Exchange2010删除指定账户指定主题邮件
- 修改 exchange服务器,修改或删除 Exchange 2010
- 初识Exchange2010
- exchange 2010高可用平台的搭建和配置
- Exchange 2010安装先决条件及注意事项
令牌环访问控制的原理_通过Keycloak进行访问控制的级别,第1部分:令牌认证相关推荐
- grpc通信原理_容器原理架构详解(全)
目录 1 容器原理架构 1.1 容器与虚拟化 1.2 容器应用架构 1.3 容器引擎架构 1.4 Namespace与Cgroups 1.5 容器镜像原理 2 K8S原理架构 2.1 K8S主要功能 ...
- serverlet 原理_容器原理架构详解(全)
目录 1 容器原理架构:容器与虚拟化.容器应用/引擎架构.Namespace与Cgroups.镜像原理 2 K8S原理架构:K8S主要功能.K8S 系统架构.Pod原理与调度 3 K8S存储方案:容器 ...
- 计算机控制原理中雷达天线,什么是相控阵雷达_相控阵雷达原理_相控阵雷达原理图...
什么是相控阵雷达 相控阵雷达又称作相位阵列雷达,是一种以改变雷达波相位来改变波束方向的雷达,因为是以电子方式控制波束而非传统的机械转动天线面方式,故又称电子扫描雷达. 相控阵雷达有相当密集的天线阵列, ...
- python卡方检验筛选特征原理_基于Python的遥感特征筛选—递归特征消除(RFE)与极限树(Extra-Trees)...
引言 基于前几篇文章关于筛选方法的介绍,本篇同样给大家介绍两种python封装的经典特征降维方法,递归特征消除(RFE)与极限树(Extra-Trees, ET).其中,RFE整合了两种不同的超参数, ...
- 万能充电器工作原理_百度知道
万能充电器工作原理_百度知道 万能充电器工作原理_百度知道 万能充电器工作原理 2008-08-29 21:27 457070320 | 分类:社会民生 | 浏览4372次 | 该问题已经合并 ...
- 高级架构师_Docker_第2章_ Docker核心原理_ 第1节_Docker相关的虚拟化技术
高级架构师_Docker_第2章_ Docker核心原理_ 第1节_Docker相关的虚拟化技术 文章目录 高级架构师_Docker_第2章_ Docker核心原理_ 第1节_Docker相关的虚拟化 ...
- 高级架构师_Docker_第2章_ Docker核心原理_ 第2节_Docker网络
高级架构师_Docker_第2章_ Docker核心原理_ 第2节_Docker网络 文章目录 高级架构师_Docker_第2章_ Docker核心原理_ 第2节_Docker网络 Docker网络 ...
- 高级架构师_Docker_第2章_ Docker核心原理_ 第7节IDEA集成Docker
高级架构师_Docker_第2章_ Docker核心原理_ 第7节IDEA集成Docker 文章目录 高级架构师_Docker_第2章_ Docker核心原理_ 第7节IDEA集成Docker IDE ...
- 高级架构师_Docker_第2章_ Docker核心原理_ 第5节 Dockerfile简介
高级架构师_Docker_第2章_ Docker核心原理_ 第5节 Dockerfile简介 文章目录 高级架构师_Docker_第2章_ Docker核心原理_ 第5节 Dockerfile简介 D ...
- ssrs 基于表达式显示_基于表达式的访问控制
ssrs 基于表达式显示 1.概述 今天,我们将回顾基于表达式的访问控制(EBAC),基于角色的访问控制(RBAC)和基于属性的访问控制(ABAC)之间的区别,并将重点放在EBAC上. 2.什么是基于 ...
最新文章
- 【ES6新特性】一行代码解决:搜索对象数组,匹配具体字段属性值的返回值和索引的问题
- 刻意练习:LeetCode实战 -- Task17. 最长回文子串
- leetcode102 二叉树的层次遍历
- 怎么去控制浏览器对资源文件的处理行为
- 对频率论(Frequentist)方法和贝叶斯方法(Bayesian Methods)的一个总结
- python 栈和队列_Python实现栈和队列的简单操作方法示例
- excel 打开csv中文乱码
- keil uvision2 c语言调试,keil uvision2
- 怎样在半个月内迅速提升技能,搞定面试进 大厂?
- vs设置编码格式_轻松编辑PDF文档的贝茨编码
- 解决新用户注册Kaggle无法显示验证码的问题
- java解析bt协议详解_bt协议详解 基础篇(下)
- JSP基础教程-初时index首页
- 行人重识别论文阅读7-基于图卷积的行人骨架识别
- 计算机软件服务票可以抵扣吗,航天的软件技术维护费是否可以全额抵扣?
- Android6.0运行时权限处理
- LiDAR点云处理软件
- Python爬虫实战 | (22)爬取开放服务器的文件
- 信噪比(SNR)计算公式的推导
- 从产物追溯研发合成路线?自建化合物数据库溯源不再成难题