Eclipse插件开发_学习_02_GEF入门实例
一、前言
这一节,我们将会创建一个GEF入门实例
二、新建RCP项目
1. New 一个 Plug-in Project
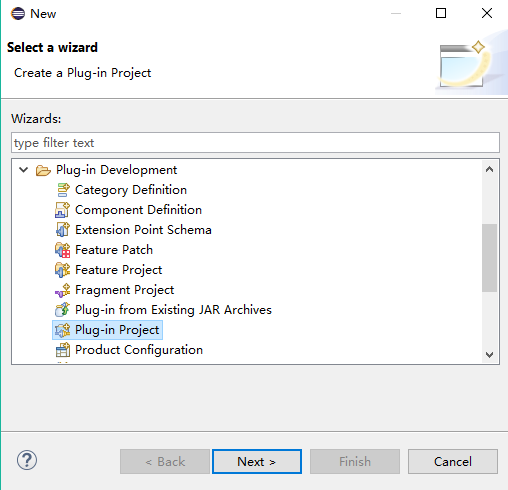
2.输入项目名
项目名:com.ray.gef.helloworld

3.Content页
勾选下面三处
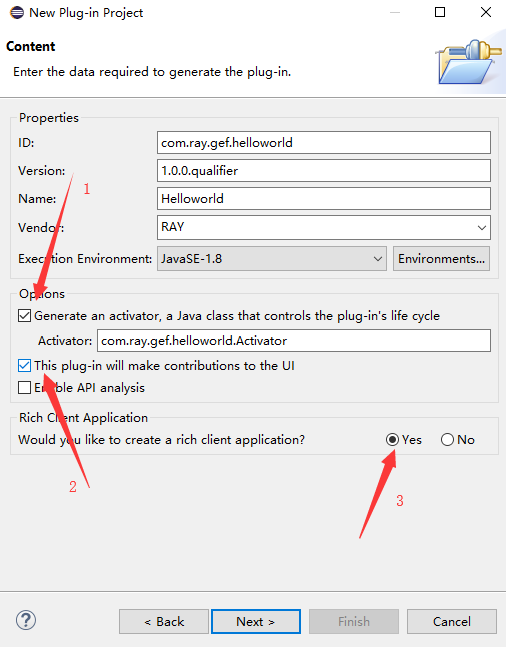
说明:
1处:生成一个Activator,用于管理插件的生命周期
3处:是否想要创建一个RCP程序,选择是
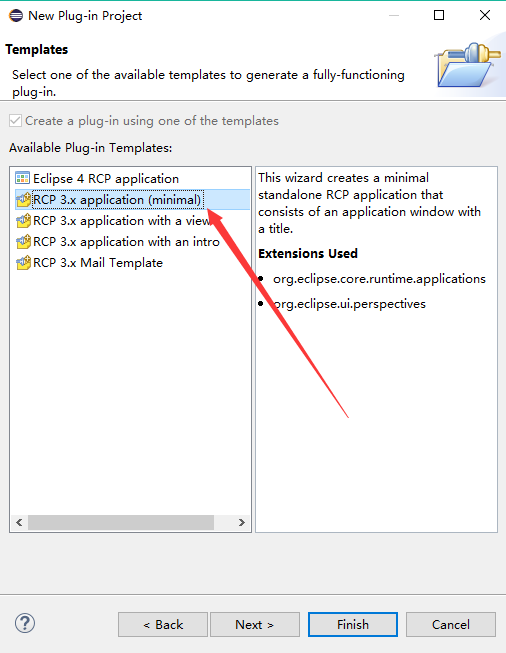
4.模板
选择最小的模板
5.添加依赖
到这一步,项目已经创建好了,不过我们还需要引入GEF相关依赖

打开 plugin.xml ,选择 Dependencies,添加如下GEF依赖

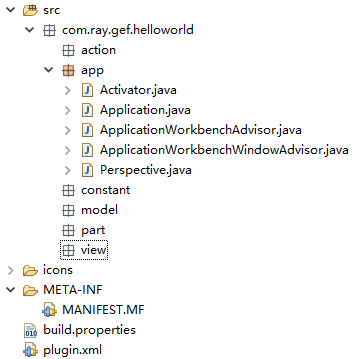
6.修改工程目录结构
将目录修改成如下结构:
三、创建Editor
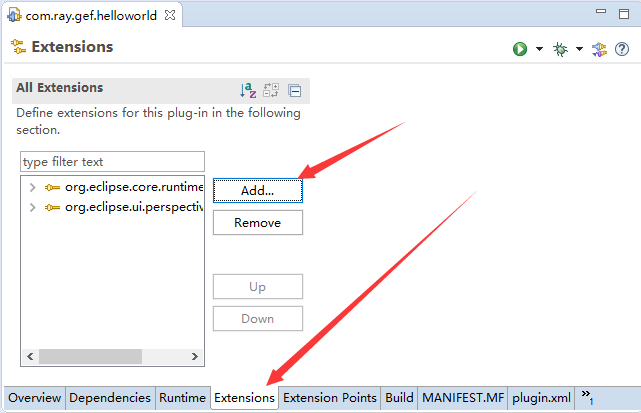
1.添加editor扩展
(1)双击plugin.xml,在extensions页中,点击Add...,
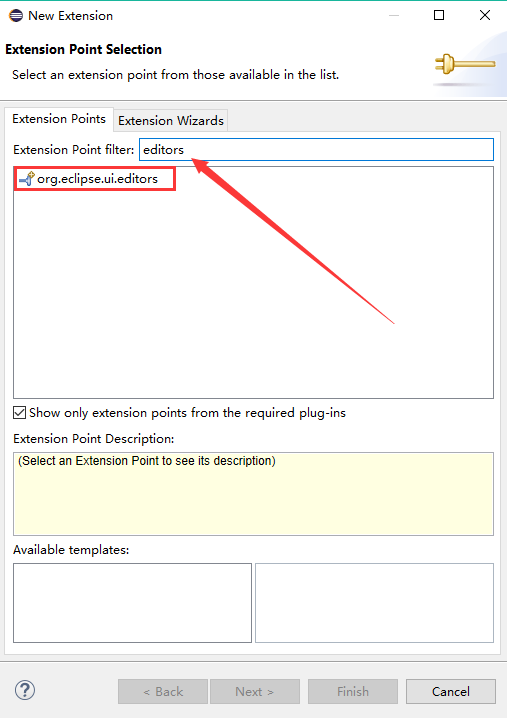
(2)搜索 editors,选择 org.eclipse.ui.editors 扩展点,finish
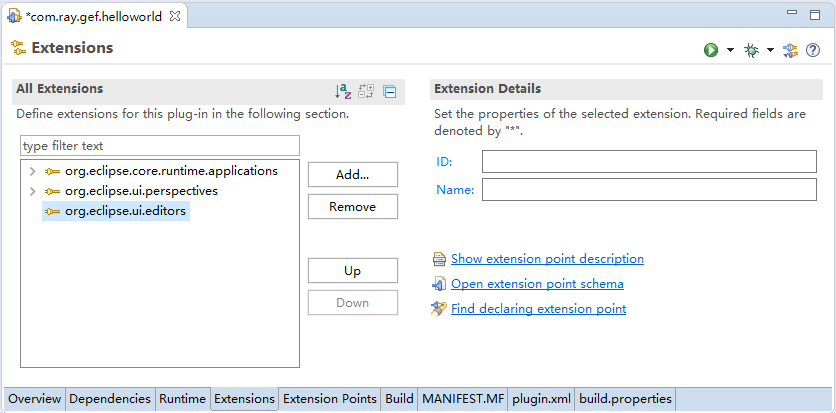
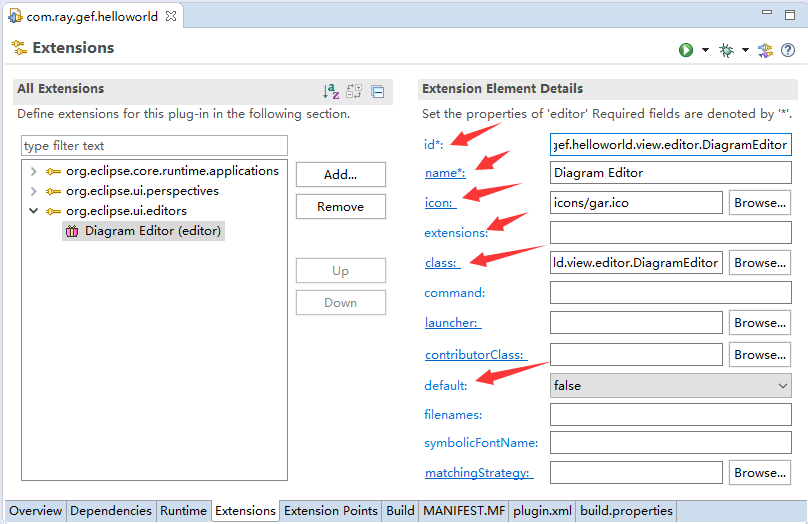
(3) 在新添加的 org.eclipse.ui.editors 扩展点上右键 -> New -> editor,出现下图
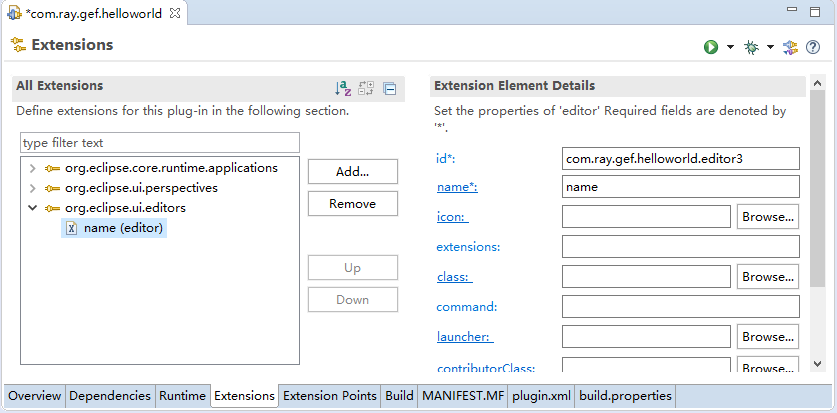
(4)填写扩展节点的详情
id : com.ray.gef.helloworld.view.editor.DiagramEditor
name : Diagram Editor
icon : icons/gar.ico
class : com.ray.gef.helloworld.view.editor.DiagramEditor
default : false
(5) 如下图,点击class ,会出现一个创建class的对话框。修改集成的基类为:org.eclipse.gef.ui.parts.GraphicalEditor,
然后点击finish。
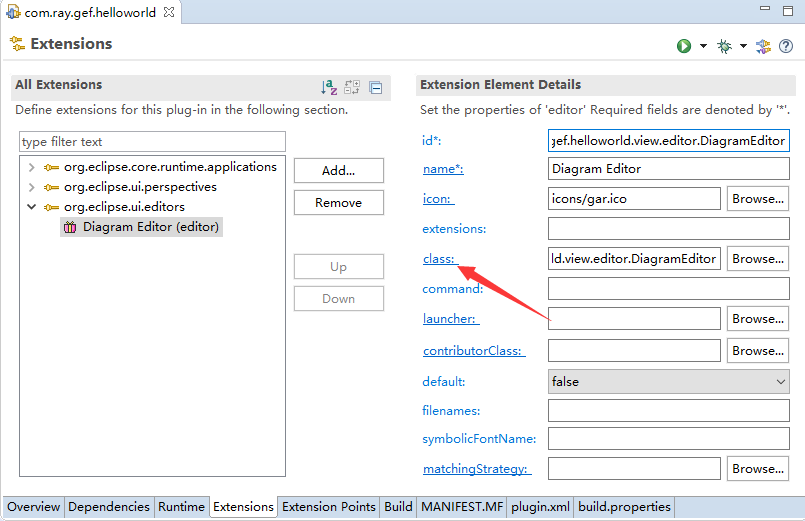
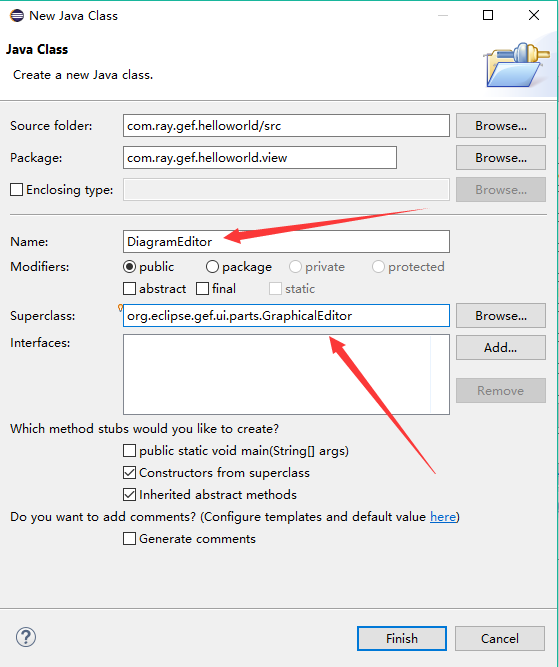
即可创建Editor
2.修改 DiagramEditor 类
添加 Editor_ID,记得与plugin.xml中设置的Editor ID一致。为了避免出现问题,我们所有地方的ID,均设置成全类名的形式。


package com.ray.gef.helloworld.view.editor;import org.eclipse.core.runtime.IProgressMonitor;
import org.eclipse.gef.DefaultEditDomain;
import org.eclipse.gef.ui.parts.GraphicalEditor;public class DiagramEditor extends GraphicalEditor {public static final String EDITOR_ID = "com.ray.gef.helloworld.view.editor.DiagramEditor";public DiagramEditor() {setEditDomain(new DefaultEditDomain(this));}@Overrideprotected void initializeGraphicalViewer() {// TODO Auto-generated method stub
}@Overridepublic void doSave(IProgressMonitor monitor) {// TODO Auto-generated method stub
}}
View Code
四、创建Action
现在编辑器editor已经创建好了,我们得想办法让editor显示出来。
下面我们将创建一个菜单,点击菜单按钮将会创建一个空白的Editor页面。
1.创建常量类 IImageConstant
package com.ray.gef.helloworld.constant;public interface IImageConstant {public static final String EDITORTITLE = "icons/example.gif";public static final String NEWHELLOMODEL = "icons/newModel.gif";public static final String NEWCONNECTION = "icons/newConnection.gif";public static final String ARROWCONNECTION = "icons/arrowConnection.gif";}View Code
2.创建编辑器输入 DiagramEditorInput
package com.ray.gef.helloworld.view.editor.input;import org.eclipse.core.runtime.IPath;
import org.eclipse.jface.resource.ImageDescriptor;
import org.eclipse.ui.IPathEditorInput;
import org.eclipse.ui.IPersistableElement;public class DiagramEditorInput implements IPathEditorInput {private IPath path;public DiagramEditorInput(IPath path) {this.path = path;}public IPath getPath() {return path;}public boolean exists() {return path.toFile().exists();}public ImageDescriptor getImageDescriptor() {// TODO Auto-generated method stubreturn null;}public String getName() {return path.toString();}public IPersistableElement getPersistable() {return null;}public String getToolTipText() {return path.toString();}public Object getAdapter(Class adapter) {// TODO Auto-generated method stubreturn null;}//add by Bin Wupublic int hashCode() {return path.hashCode();}}
View Code
3.创建action DiagramAction
package com.ray.gef.helloworld.action;import org.eclipse.core.runtime.Path;
import org.eclipse.jface.action.Action;
import org.eclipse.jface.viewers.ISelection;
import org.eclipse.jface.viewers.IStructuredSelection;
import org.eclipse.swt.SWT;
import org.eclipse.swt.widgets.FileDialog;
import org.eclipse.ui.IEditorInput;
import org.eclipse.ui.ISelectionListener;
import org.eclipse.ui.IWorkbenchPage;
import org.eclipse.ui.IWorkbenchPart;
import org.eclipse.ui.IWorkbenchWindow;
import org.eclipse.ui.PartInitException;
import org.eclipse.ui.actions.ActionFactory.IWorkbenchAction;
import org.eclipse.ui.plugin.AbstractUIPlugin;import com.ray.gef.helloworld.app.Application;
import com.ray.gef.helloworld.constant.IImageConstant;
import com.ray.gef.helloworld.view.editor.DiagramEditor;
import com.ray.gef.helloworld.view.editor.input.DiagramEditorInput;public class DiagramAction extends Action implements ISelectionListener,IWorkbenchAction {private final IWorkbenchWindow window;public final static String ID = "com.ray.gef.helloworld.action.DiagramAction";private IStructuredSelection selection;public DiagramAction(IWorkbenchWindow window) {this.window = window;setId(ID);setText("&Diagram");setToolTipText("Draw the GEF diagram.");setImageDescriptor(AbstractUIPlugin.imageDescriptorFromPlugin(Application.PLUGIN_ID, IImageConstant.EDITORTITLE));window.getSelectionService().addSelectionListener(this);}public void dispose() {window.getSelectionService().removeSelectionListener(this);}public void selectionChanged(IWorkbenchPart part, ISelection selection) {// TODO Auto-generated method stub
        }public void run() {String path = openFileDialog();if (path != null) {IEditorInput input = new DiagramEditorInput(new Path(path));IWorkbenchPage page = window.getActivePage();try {page.openEditor(input,DiagramEditor.EDITOR_ID,true);} catch (PartInitException e) {// handle error
            }}}private String openFileDialog() {FileDialog dialog = new FileDialog(window.getShell(), SWT.OPEN);dialog.setText("??");dialog.setFilterExtensions(new String[] { ".diagram" });return dialog.open();}
}
View Code
4.Application.java
在Application.java中加入插件ID
package com.ray.gef.helloworld.app;import org.eclipse.equinox.app.IApplication;
import org.eclipse.equinox.app.IApplicationContext;
import org.eclipse.swt.widgets.Display;
import org.eclipse.ui.IWorkbench;
import org.eclipse.ui.PlatformUI;/*** This class controls all aspects of the application's execution*/
public class Application implements IApplication {public static final String PLUGIN_ID = "com.ray.gef.helloworld";@Overridepublic Object start(IApplicationContext context) throws Exception {Display display = PlatformUI.createDisplay();try {int returnCode = PlatformUI.createAndRunWorkbench(display, new ApplicationWorkbenchAdvisor());if (returnCode == PlatformUI.RETURN_RESTART)return IApplication.EXIT_RESTART;elsereturn IApplication.EXIT_OK;} finally {display.dispose();}}@Overridepublic void stop() {if (!PlatformUI.isWorkbenchRunning())return;final IWorkbench workbench = PlatformUI.getWorkbench();final Display display = workbench.getDisplay();display.syncExec(new Runnable() {public void run() {if (!display.isDisposed())workbench.close();}});}
}
View Code
5.ApplicationActionBarAdvisor
在 ApplicationActionBarAdvisor.java 中添加Action,并生成菜单
package com.ray.gef.helloworld.app;import org.eclipse.jface.action.ICoolBarManager;
import org.eclipse.jface.action.IMenuManager;
import org.eclipse.jface.action.IToolBarManager;
import org.eclipse.jface.action.MenuManager;
import org.eclipse.jface.action.Separator;
import org.eclipse.jface.action.ToolBarManager;
import org.eclipse.ui.IWorkbenchWindow;
import org.eclipse.ui.actions.ActionFactory;
import org.eclipse.ui.actions.ActionFactory.IWorkbenchAction;
import org.eclipse.ui.application.ActionBarAdvisor;
import org.eclipse.ui.application.IActionBarConfigurer;import com.ray.gef.helloworld.action.DiagramAction;/*** An action bar advisor is responsible for creating, adding, and disposing of* the actions added to a workbench window. Each window will be populated with* new actions.*/
public class ApplicationActionBarAdvisor extends ActionBarAdvisor {// Actions - important to allocate these only in makeActions, and then use// them// in the fill methods. This ensures that the actions aren't recreated// when fillActionBars is called with FILL_PROXY.private IWorkbenchAction exitAction;private IWorkbenchAction aboutAction;private DiagramAction diagramAction;public ApplicationActionBarAdvisor(IActionBarConfigurer configurer) {super(configurer);}protected void makeActions(IWorkbenchWindow window) {exitAction = ActionFactory.QUIT.create(window);register(exitAction);aboutAction = ActionFactory.ABOUT.create(window);register(aboutAction);diagramAction = new DiagramAction(window);register(diagramAction);}protected void fillMenuBar(IMenuManager menuBar) {MenuManager fileMenu = new MenuManager("&File", "File");fileMenu.add(diagramAction);fileMenu.add(new Separator());fileMenu.add(exitAction);MenuManager helpMenu = new MenuManager("&Help", "help");helpMenu.add(aboutAction);menuBar.add(fileMenu);menuBar.add(helpMenu);}protected void fillCoolBar(ICoolBarManager coolBar) {IToolBarManager toolbar = new ToolBarManager(coolBar.getStyle());coolBar.add(toolbar);}}
View Code
6. ApplicationWorkbenchWindowAdvisor
在ApplicationWorkbenchWindowAdvisor 中修改创建的 ActionBarAdvisor 为其自子类 ApplicationActionBarAdvisor
package com.ray.gef.helloworld.app;import org.eclipse.swt.graphics.Point;
import org.eclipse.ui.application.ActionBarAdvisor;
import org.eclipse.ui.application.IActionBarConfigurer;
import org.eclipse.ui.application.IWorkbenchWindowConfigurer;
import org.eclipse.ui.application.WorkbenchWindowAdvisor;public class ApplicationWorkbenchWindowAdvisor extends WorkbenchWindowAdvisor {public ApplicationWorkbenchWindowAdvisor(IWorkbenchWindowConfigurer configurer) {super(configurer);}@Overridepublic ActionBarAdvisor createActionBarAdvisor(IActionBarConfigurer configurer) { return new ApplicationActionBarAdvisor(configurer);}@Overridepublic void preWindowOpen() {IWorkbenchWindowConfigurer configurer = getWindowConfigurer();configurer.setInitialSize(new Point(400, 300));configurer.setShowCoolBar(false);configurer.setShowStatusLine(false);configurer.setTitle("Hello RCP"); //$NON-NLS-1$
    }
}
View Code
7.Perspective
加入 代表此透视图的常量 PERSPECTIVE_ID,并设置显示编辑器区域
package gef.tutorial.step;import org.eclipse.ui.IPageLayout;
import org.eclipse.ui.IPerspectiveFactory;public class Perspective implements IPerspectiveFactory {public static final String PERSPECTIVE_ID = "gef.tutorial.step.perspective";@Overridepublic void createInitialLayout(IPageLayout layout) {layout.setEditorAreaVisible(true);layout.setFixed(true);}}
View Code
8.ApplicationWorkbenchAdvisor
设置要一开始要打开的透视图
package gef.tutorial.step;import org.eclipse.ui.application.IWorkbenchWindowConfigurer;
import org.eclipse.ui.application.WorkbenchAdvisor;
import org.eclipse.ui.application.WorkbenchWindowAdvisor;public class ApplicationWorkbenchAdvisor extends WorkbenchAdvisor {@Overridepublic WorkbenchWindowAdvisor createWorkbenchWindowAdvisor(IWorkbenchWindowConfigurer configurer) {return new ApplicationWorkbenchWindowAdvisor(configurer);}@Overridepublic String getInitialWindowPerspectiveId() {return Perspective.PERSPECTIVE_ID;}}
View Code
9.运行插件
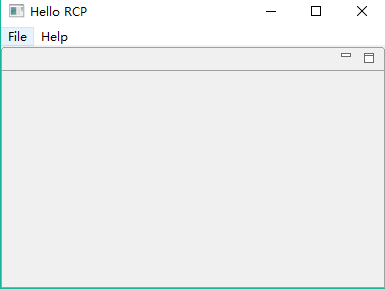
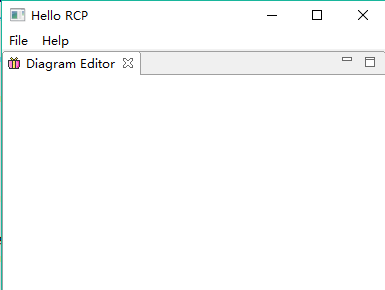
这时我们点击plugin.xml 的OverView页中的 launch an Eclipse application 来运行插件,发现有两个菜单。
点击File子菜单Diagram,将弹出一个文件对话框,就是让你选择新建的文件。
然后Finish,将打开DiagramEditor 。

五、为Editor添加内容
下面我们将为这个Editor (View)添加内容。首先创建一个模型
1.创建model
HelloModel
package com.ray.gef.helloworld.model;public class HelloModel {private String text = "Hello World";public String getText() {return text;}public void setText(String text) {this.text = text;}}View Code
2.创建控制器
创建一个连接视图和模型的控制器
(1)EditorPart
HelloEditorPart
package com.ray.gef.helloworld.part;import org.eclipse.draw2d.ColorConstants;
import org.eclipse.draw2d.CompoundBorder;
import org.eclipse.draw2d.IFigure;
import org.eclipse.draw2d.Label;
import org.eclipse.draw2d.LineBorder;
import org.eclipse.draw2d.MarginBorder;
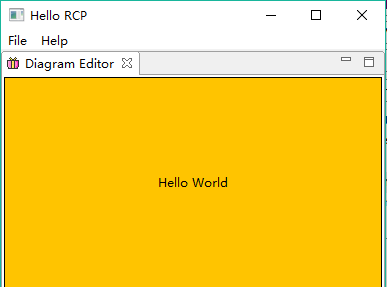
import org.eclipse.gef.editparts.AbstractGraphicalEditPart;import com.ray.gef.helloworld.model.HelloModel;public class HelloEditorPart extends AbstractGraphicalEditPart {@Overrideprotected IFigure createFigure() {HelloModel model = (HelloModel)getModel();Label label = new Label();label.setText(model.getText());label.setBorder(new CompoundBorder(new LineBorder(), new MarginBorder(3)));//设置背景颜色
label.setBackgroundColor(ColorConstants.orange);label.setOpaque(true);return label;}@Overrideprotected void createEditPolicies() {// TODO Auto-generated method stub
}}View Code
(2) EditorPartFactory
连接模型与控制器
PartFactory
package com.ray.gef.helloworld.part;import org.eclipse.gef.EditPart;
import org.eclipse.gef.EditPartFactory;import com.ray.gef.helloworld.model.HelloModel;public class PartFactory implements EditPartFactory {//------------------------------------------------------------------------// Abstract methods from EditPartFactorypublic EditPart createEditPart(EditPart context, Object model) {//get EditPart for model elementEditPart part = getPartForElement(model);//store model element in EditPart
        part.setModel(model); return part;}/*** Maps an object to an EditPart. * @throws RuntimeException if no match was found (programming error)*/private EditPart getPartForElement(Object modelElement) {//根据模型类创建其控制器if (modelElement instanceof HelloModel)return new HelloEditorPart();throw new RuntimeException("Can't create part for model element: "+ ((modelElement != null) ? modelElement.getClass().getName() : "null"));}}
View Code
3.创建视图View
在 DiagramEditor 中创建view,我们这里创建一个 GraphicalViewer,
DiagramEditor
package com.ray.gef.helloworld.view.editor;import org.eclipse.core.runtime.IProgressMonitor;
import org.eclipse.gef.DefaultEditDomain;
import org.eclipse.gef.GraphicalViewer;
import org.eclipse.gef.ui.parts.GraphicalEditor;import com.ray.gef.helloworld.model.HelloModel;
import com.ray.gef.helloworld.part.PartFactory;public class DiagramEditor extends GraphicalEditor {public static final String EDITOR_ID = "com.ray.gef.helloworld.view.editor.DiagramEditor";GraphicalViewer viewer;public DiagramEditor() {setEditDomain(new DefaultEditDomain(this));}@Overrideprotected void initializeGraphicalViewer() {// TODO Auto-generated method stubviewer.setContents(new HelloModel());}@Overrideprotected void configureGraphicalViewer(){super.configureGraphicalViewer();viewer = getGraphicalViewer();viewer.setEditPartFactory(new PartFactory());}@Overridepublic void doSave(IProgressMonitor monitor) {// TODO Auto-generated method stub
}
}
View Code
4.运行项目
这时我们运行项目,点击File->diagrame,设置新文件名称,Finish,会出现下图。
Eclipse插件开发_学习_02_GEF入门实例相关推荐
- Vue学习(入门实例、常用指令)-学习笔记
文章目录 Vue学习(入门实例.常用指令)-学习笔记 实例 常用指令 v-on v-bind v-for v-html v-if event v-model 双向数据绑定实现 - defineProp ...
- JUnit学习摘要+入门实例 (junit4)
http://www.cnblogs.com/xwdreamer/archive/2012/03/29/2423136.html 1.学习摘要 看<重构-改善既有代码的设计>这本书的时候, ...
- eclipse插件开发_开发Eclipse插件
eclipse插件开发 最近,我开始与一个团队合作开发Eclipse插件. 团队开发了一个很棒的插件,可以实现预期的目的. 因此,我检查了源并尝试构建它. 项目源包含所有必需的库,并且只能在Eclip ...
- eclipse插件开发_开发Eclipse插件的最佳实践
在为IDE Eclipse环境开发插件时,您有几个设计注意事项. 这些注意事项可确保您: 不要锁定用户界面线程. 在不影响性能的情况下装饰用户界面. 在后台处理数据. 本教程讨论了如何利用这些设计注意 ...
- 不同语言编程能整合到一起吗_学习编程入门指南
每天都看到很多对编程感兴趣的人在问是不是可以自学软件开发,或者应该怎么自学编程才能入门.在这篇文章里,我将尝试重现一个初学者在学习计算机编程时可能会碰到的问题,并尽量提供相应的解决思路,希望对初学者有 ...
- Eclipse环境下 spring MVC 入门实例
实现一个spring 的登陆事例 1.在eclipse下新建动态网页工程springmvc 2.需要导入jar包. aopalliance.jar;commons-beanutils.jar ...
- MonoRail学习-入门实例篇
1.到官方网站下载安装文件,地址如下: http://www.castleproject.org/index.php/Castle:Download 目前最新版本Beta5 (您也可以不需要下载,直接 ...
- GEF入门实例_总结_04_Eclipse插件启动流程分析
一.前言 本文承接上一节:GEF入门实例_总结_03_显示菜单和工具栏 注意到app目录下的6个类文件. 这6个文件对RCP应用程序而言非常重要,可能我们现在对这几个文件的理解还是云里雾里,这一节我们 ...
- 学习笔记:Java 并发编程①_基础知识入门
若文章内容或图片失效,请留言反馈. 部分素材来自网络,若不小心影响到您的利益,请联系博主删除. 视频链接:https://www.bilibili.com/video/av81461839 视频下载: ...
最新文章
- 洛谷—— P3807 【模板】卢卡斯定理
- 雇水军刷分有效吗?虚假评论的影响研究分析
- gcc undefined reference to 问题解决方法(使用库)
- 安装和配置VNC服务器的法则
- 调整Tomcat上的参数提高性能[转]
- Java-java.util.concurrent.LinkedBlockingQueue
- 硬纪元AI峰会前瞻:线下大数据驱动下的新零售,目标是精准营销
- 对外暴露Id异或加密解密
- 微博签到打卡点数据集—北上广深杭
- [ 物联网篇 ] ESP32 开发板测试亚马逊语音助手Alexa
- 用Gson解析json
- 微信小程序云数据库增删改查
- 微信朋友圈装x代码_微信朋友圈超强装X,电影台词长截图,一键搞定
- UE4 相对坐标转世界坐标
- python写身份证_python 关于身份证号码的相关操作
- 美国之行---领略真正的美国文化--牛排
- 360怎样修改wifi服务器,360路由器怎么重新设置? | 192路由网
- 软件测试的16种测试类型
- 【docker系列】docker API管理接口增加CA安全认证
- TP+UC+DZ同步登陆问题汇总
热门文章
- 如何使用python批量压缩图片_使用python脚本批量压缩图片大小
- js:进制转换、保留指定位数小数、RGB/Hex颜色色值转换
- 看名言后的心得体会学会融会贯通
- 【新手上路常见问答】关于知识工程
- [YNOI2017]由乃的商场之旅 莫队
- MDClub一个漂亮轻量的开源论坛系统
- 数据仓库应用篇(一)需求文档模板和需求评审
- 巡店系统如何应用于连锁加盟店管理
- Java实现 LeetCode 513 找树左下角的值
- docker: Error response from daemon: Conflict. The container name “/mysql“ is already in use by conta