系统怎么设计usb启动_在启动中启动设计系统
系统怎么设计usb启动
重点 (Top highlight)
Design systems are all the rage now and you’ve probably seen this term being thrown around ever so frequently. I was first introduced to the world of *design systems* when we started on our web design system back in January 2019. Working in 99.co with only one other product designer, we had limited resources to dedicate to starting a new project. Still, we deemed a design system important to eliminate existing design inconsistencies and improve future workflows for both designers and developers as the company scales up. That being said, there was a lot we had to work around and get our hands dirty in order to push it forward.
设计系统现在风靡一时,您可能已经看到过这个术语被如此频繁地使用。 当我们于2019年1月开始使用我们的Web设计系统时,我首先被带到了*设计系统*的世界。在99.co中仅与另一位产品设计师一起工作,我们有限的资源专用于启动一个新项目。 不过,我们认为,随着公司规模的扩大,设计系统对于消除现有的设计不一致并改善设计人员和开发人员的未来工作流程非常重要。 话虽这么说,我们不得不努力工作,弄脏双手,才能将其推向前进。
Just so you know what you’re getting yourself into, I’ll define what we mean by a design system — a repository of reusable components with clear usage guidelines, shared among designers and developers. It should showcase all existing components with guidelines as to when and how to use each component including ready-to-use code.
为使您知道自己要投入的工作,我将定义设计系统的含义- 具有清晰使用指南的可重用组件的存储库,在设计人员和开发人员之间共享。 它应该展示所有现有组件以及有关何时以及如何使用每个组件的指南,包括现成的代码。
Our design system is still a work-in-progress but by documenting this journey, I hope to share our process as well as some useful tips and tools. :-)
我们的设计系统仍在开发中,但是通过记录此旅程,我希望分享我们的过程以及一些有用的技巧和工具。 :-)
脚步 (Steps)
- Audit existing components审核现有组件
- Research on other design systems研究其他设计系统
- List out components列出组件
- Plan a timeline计划时间表
- Research and discuss components研究和讨论组件
- Create design symbols创建设计符号
- “Design” design system“设计”设计系统
- Implement design system实施设计系统
步骤1:审核现有组件 (Step 1: Audit existing components)
In order to get a bird’s eye view of all the use cases we need to cater to, it is important to audit existing components in our product. Yes, every single component on every page. This is a crucial step albeit a tedious one. For this, we took screenshots and used Trello to organise them.
为了全面了解我们需要满足的所有用例,对产品中的现有组件进行审核非常重要。 是的,每个页面上的每个组件。 这是一个至关重要的步骤,尽管这是一个乏味的步骤。 为此,我们拍摄了屏幕截图,并使用Trello对其进行了组织。

Each list (top to bottom) represents a page on our website, e.g. Home page. Within each list, different sections of a page are captured as screenshots and organised into cards. Each card is tagged with labels (panel on the right) that represent each component present within the section of the page. The labels are colour coded based on the type of component, e.g. checkboxes, radio buttons etc are forms of data input, hence they are colour-coded green.
每个列表(从上到下)代表我们网站上的一个页面,例如主页。 在每个列表中,页面的不同部分被捕获为屏幕截图并组织成卡片。 每张卡都标有标签(右边的面板),这些标签代表页面部分中存在的每个组件。 标签根据组件的类型进行颜色编码,例如复选框,单选按钮等是数据输入形式,因此它们以绿色进行颜色编码。

By organising in this manner, we can easily search for specific pages or filter by components using the right panel and see all its current use cases across all pages. It also helps in identifying where there are design inconsistencies.
通过这种方式进行组织,我们可以轻松地搜索特定页面或使用右侧面板按组件进行过滤,并查看所有页面上所有当前用例。 它还有助于确定哪里存在设计不一致之处。
步骤2:研究其他设计系统 (Step 2: Research on other design systems)
Here are some of the design systems we used as a guide to shape what we wanted in our design system:
以下是一些设计系统,我们将其用作指导以塑造我们在设计系统中的需求:
Atlassian
Atlassian
Ant Design
蚂蚁设计
IBM
IBM公司
Zendesk
Zendesk
Workday
工作日
HubSpot
HubSpot
Salesforce
销售队伍
Shopify
Shopify
Bootstrap
引导程序
QuickBooks
QuickBooks
We wanted to take the best practices out of these great design systems and see how they organised and displayed their content. I’ll go through a couple of my personal favourites — Atlassian and Ant Design.
我们希望从这些出色的设计系统中汲取最佳实践,并了解它们如何组织和展示其内容。 我将介绍几个我个人的最爱-Atlassian和Ant Design。

Atlassian categorises their design system into Brand, Marketing and Product. As different aspects of design require different guidelines, catering to the requirements of each design aspect ensures that the design language across the entire company is kept consistent. For instance, Marketing may need more colours when designing beautiful collaterals, as compared to Product where we generally only need a fixed set of colours to showcase different component states. Atlassian also provides extremely clear guidelines for each component, from its different styles and variations to its use cases and best practices.
Atlassian将其设计系统分为品牌,营销和产品。 由于设计的不同方面需要不同的指导原则,因此满足每个设计方面的要求可确保整个公司的设计语言保持一致。 例如,与产品相比,市场营销在设计漂亮的抵押品时可能需要更多颜色,而我们通常只需要一组固定的颜色即可展示不同的组件状态。 Atlassian还为每个组件提供了非常清晰的指南,从其不同的样式和变体到其用例和最佳实践。

Ant Design categorises their components into different sections such as Data Display, Data Input, Navigation etc. This really helps in organising and finding components. They display anchors on the top right corner so users know what to expect on each page without having to scroll all the way to the bottom. Every component style and variation is showcased upfront and each component is interactive. Code is displayed and there are quick actions for developers to copy code or open in various environments. KUDOS to a great user experience!
Ant Design将其组件分为不同的部分,例如数据显示,数据输入,导航等。这确实有助于组织和查找组件。 它们在右上角显示锚点,因此用户无需滚动到底部即可知道每个页面的期望。 每个组件的样式和变体都预先展示,并且每个组件都是交互式的。 将显示代码,并且开发人员可以在各种环境中快速采取措施来复制代码或打开代码。 KUDOS带来了绝佳的用户体验!
步骤3:列出组件 (Step 3: List out components)
After researching on other design systems, I circled back to list down patterns and components we would need based on our research and filter labels we had on Trello. This gives an overview of what needed to be reviewed so we can keep track and plan time accordingly.
在研究了其他设计系统之后,我回过头来列出了根据我们在Trello上的研究和过滤器标签所需的模式和组件。 这概述了需要审查的内容,因此我们可以相应地跟踪和计划时间。

I organised components into the following sections based on their functions —Buttons, Data Input, Data Display, Feedback and Navigation. The list gets revised continuously and ticked off whenever we finish discussing a component.
我根据组件的功能将组件分为以下几部分:按钮,数据输入,数据显示,反馈和导航。 该列表会不断修订,并且每当我们讨论完组件时都会打勾。
步骤4:规划时间表 (Step 4: Plan a timeline)
Next, we made a weekly timeline based on what needed to be done and by who. This helps to keep stakeholders and everyone involved in the design system updated on progress, as well as facilitate resource allocation. We planned out which components to discuss, starting with those that are most commonly used from the use cases on Trello. Patterns such as Typography, Colours and Layout were important to discuss first as they laid the foundations on which subsequent components would be based on.
接下来,我们根据需要完成的工作和由谁来制定每周时间表。 这有助于使利益相关者和设计系统中涉及的每个人保持最新状态,并促进资源分配。 我们从Trello的用例中最常用的组件开始,计划了要讨论的组件。 诸如印刷术,颜色和布局之类的模式首先要讨论,因为它们为后续组件的基础奠定了基础。

With limited time aside from our day to day responsibilities, we strove to have two to three design system discussions weekly, each session about two hours long. Of course, this is an ideal situation. There were often times both product designers were swamped with work and unable to take time out. On extremely rare occasions, we were able to dedicate more time to discussions and would try to make up for lost time.
除了日常工作的时间有限之外,我们力争每周进行两到三个设计系统讨论,每次讨论约两个小时。 当然,这是一个理想的情况。 通常,两位产品设计师都被工作淹没,无法抽出时间。 在极少数情况下,我们能够花更多的时间进行讨论,并试图弥补浪费的时间。
On top of weekly discussions, we also planned for the following steps — creating components as symbols on Sketch, designing pages for the design system, and for our frontend engineer to build these pages. We would update the timeline continuously week on week based on our progress.
除了每周讨论之外,我们还计划了以下步骤-在Sketch上将组件创建为符号,为设计系统设计页面,以及由前端工程师构建这些页面。 我们会根据进度不断更新每周的时间表。
步骤5:研究和讨论组件 (Step 5: Research and discuss components)
The end goal of the discussions was to design each component with its properties and states, as well as establish its usage guidelines. For each component discussion, we reviewed its use cases on Trello and researched on best practices. These include reading articles and looking at how other companies are using that component etc.
讨论的最终目的是设计每个组件及其属性和状态,并建立其使用准则。 对于每个组件讨论,我们都在Trello上回顾了其用例,并研究了最佳实践。 这些内容包括阅读文章以及查看其他公司如何使用该组件等。
Initially, we did our component research during the discussion session. But what we realised subsequently was that research did not require both designers to be present and it would be a better use of time to do research beforehand each in our own time in order to reserve the full session for discussion alone.
最初,我们在讨论期间进行了组件研究。 但是我们随后意识到,研究并不需要两个设计者都在场,因此最好在我们自己的时间里利用每个时间事先进行研究,以便保留整个会议时间供单独讨论。

We penned down our discussions on Google Docs in order to keep track of decisions as well as how we reached these decisions. This was really helpful at times when we had to revisit components that were discussed previously. Having these notes reminded us of past thought processes and decision making in order to better facilitate subsequent ones.
我们记下了关于Google文档的讨论,以便跟踪决策以及如何做出这些决策。 在我们不得不重新访问之前讨论的组件时,这确实很有帮助。 拥有这些注释使我们想起了过去的思想过程和决策,以便更好地促进后续过程。
步骤6:创建设计符号 (Step 6: Create design symbols)
As the discussions progressed, we started building our styleguide. I created text and layer style libraries, and symbolised each component on Sketch while catering to its states and variations.
随着讨论的进行,我们开始构建样式指南。 我创建了文本和图层样式库,并在满足其状态和变体的同时对Sketch上的每个组件进行了符号化。

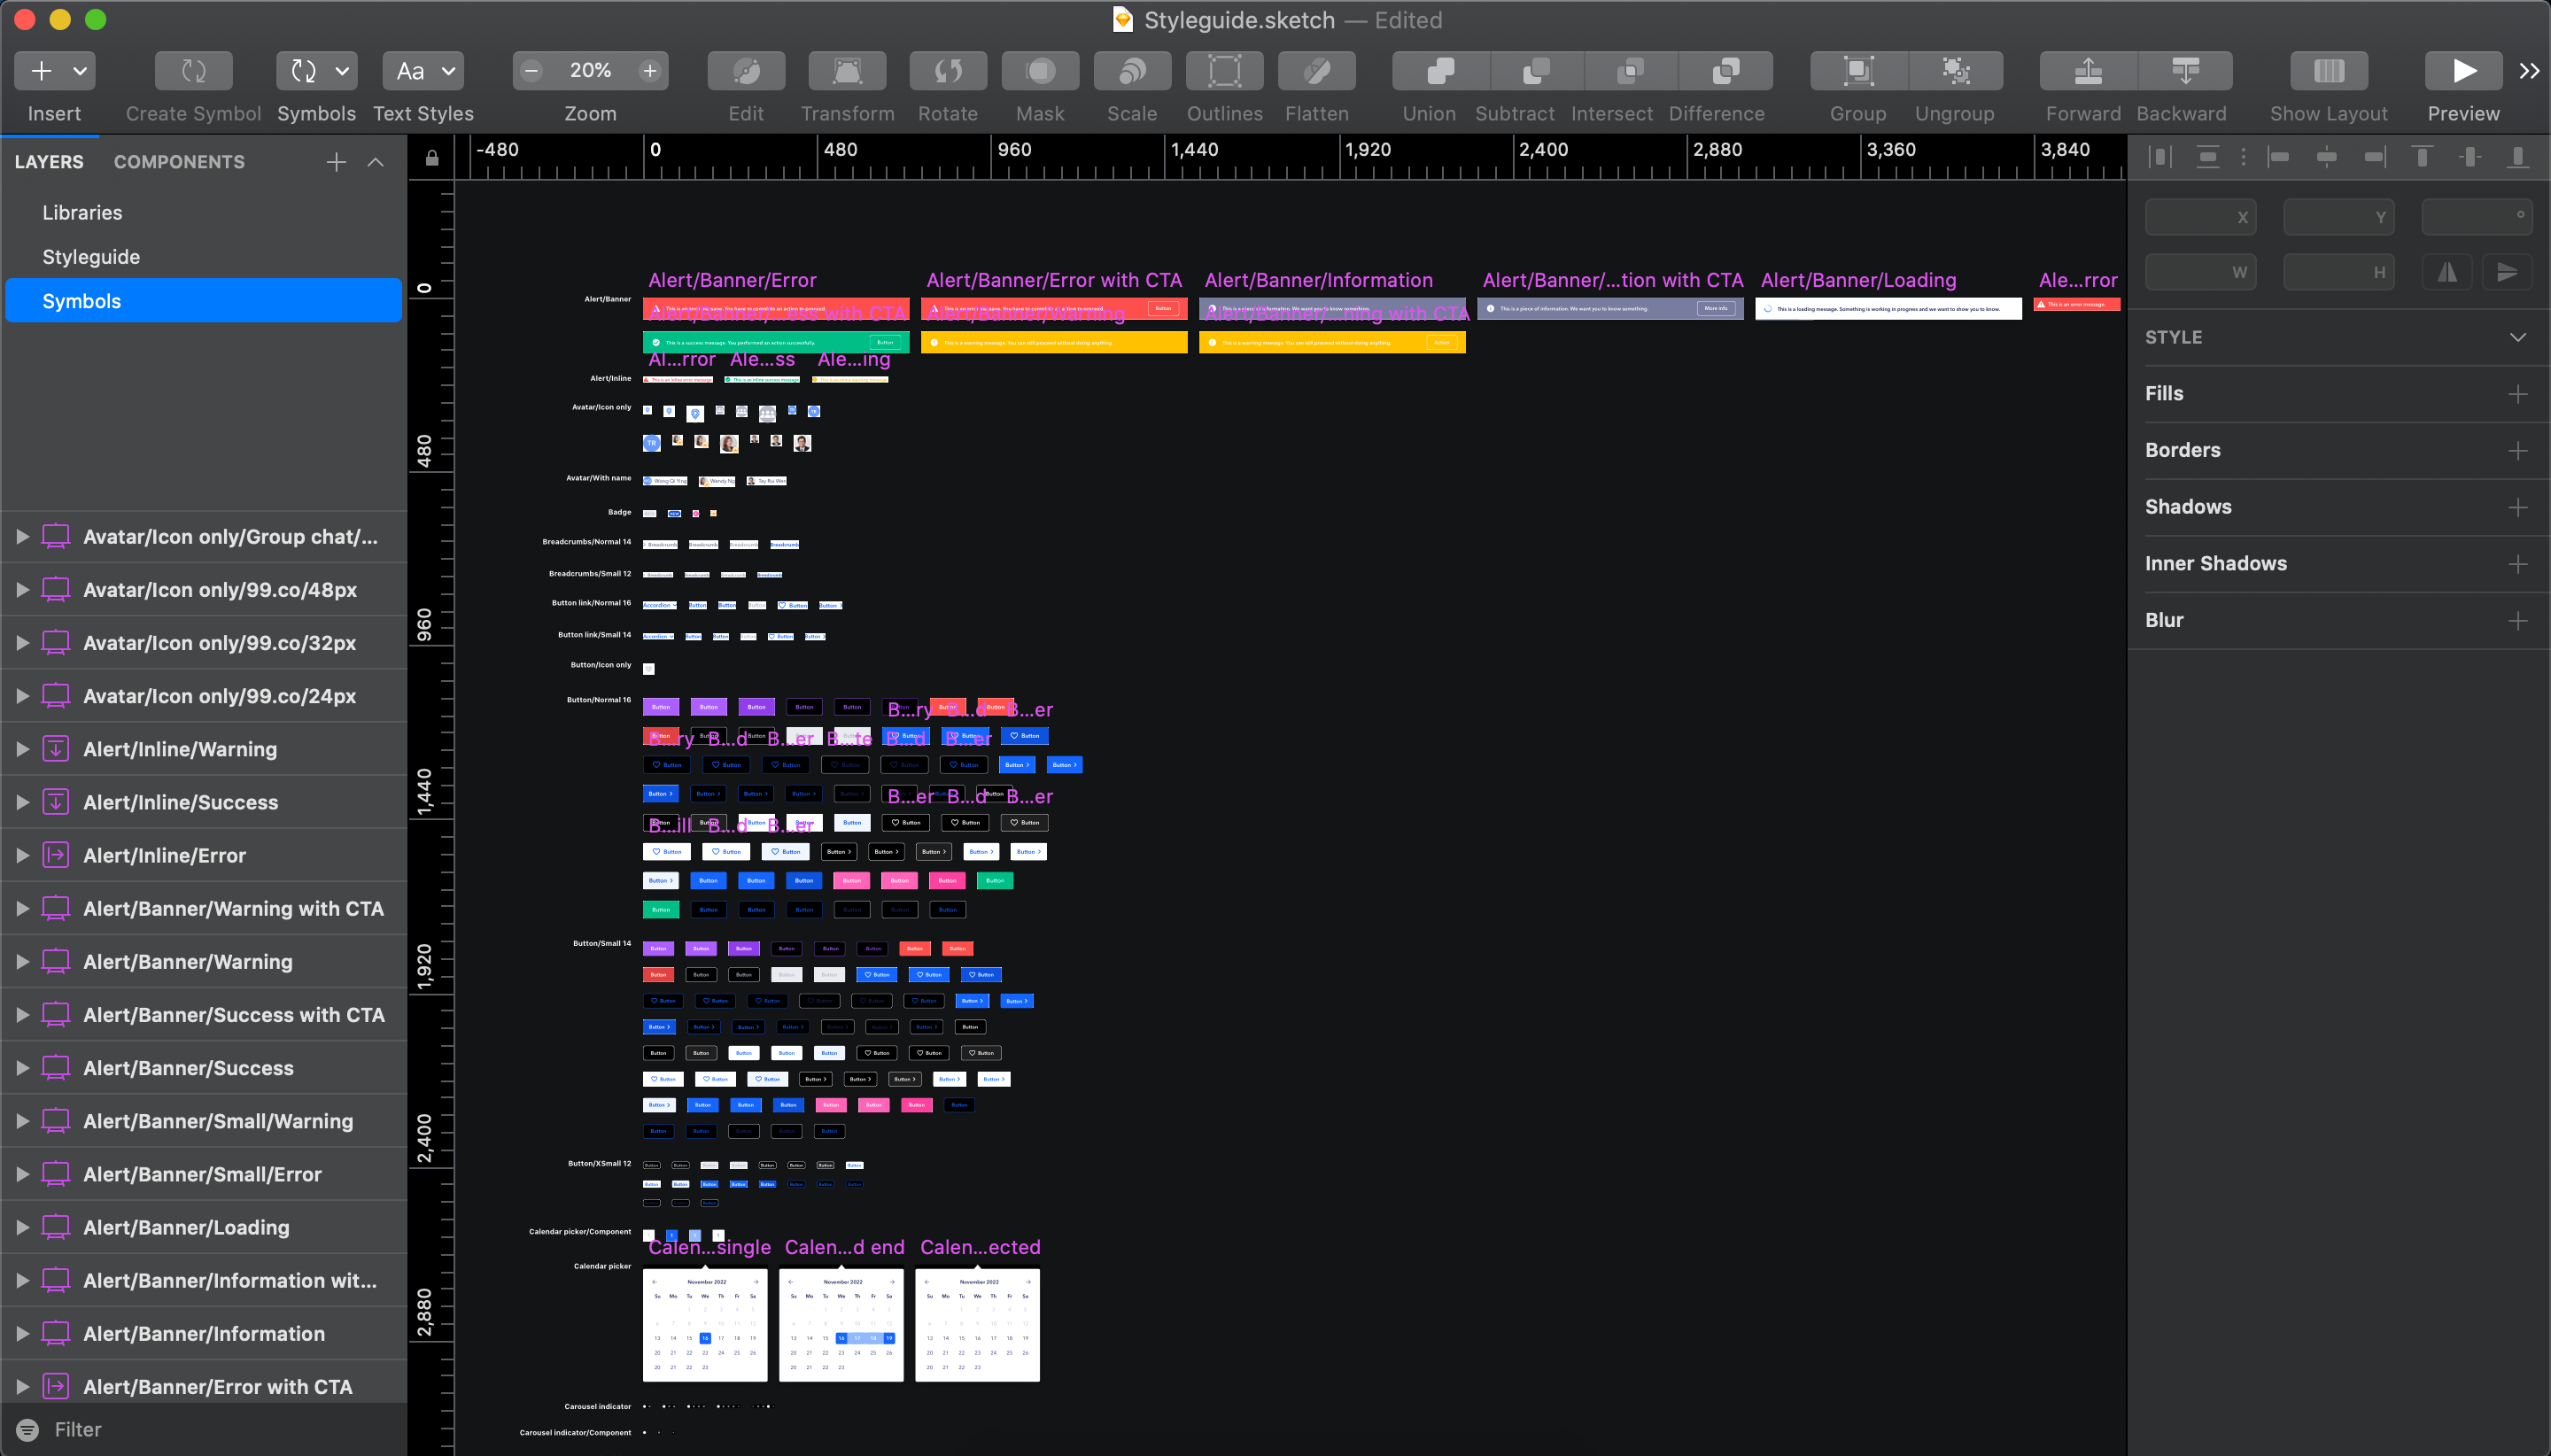
Again, we combed through articles and looked at other UI design kits to compare naming conventions as well as how they created nested symbols etc. What I realised was that there really is no best way of organisation for everyone, just one that best fits our current workflow. Chances are that as tools get updated along the way, we will need to adjust our workflows accordingly to optimise the usage of these tools.
再次,我们梳理了文章,并查看了其他UI设计工具包,以比较命名约定以及它们如何创建嵌套符号等。我意识到,确实没有针对每个人的最佳组织方式,只有一种最适合我们当前的方式工作流程。 很有可能随着工具的更新,我们将需要相应地调整工作流程以优化这些工具的使用。
An example will be the recent Sketch 60 update with the new Components Panel and Popover. The previous naming convention for our Style libraries had multiple layers segmented by size, weight, colour, alignment and line height. With the new Search (or more like Filter) function in the Popover, we had to scroll and click through multiple folders just to find a particular style.
一个示例是最近的Sketch 60更新,其中包含新的“组件面板”和“弹出框”。 我们样式库的先前命名约定具有多个按大小,重量,颜色,对齐方式和行高细分的图层。 借助Popover中新的“搜索”(或更像“过滤器”)功能,我们不得不滚动并单击多个文件夹才能找到特定样式。

To cater to this new update, I flattened the naming structure such that we can now search either via [Size][Weight] to see all font colours with or without the default line height, or by [Colour] to see all fonts in this colour sorted by size and weight. Naming for our neutrals palette was also shortened from Dark, Mid and Light Neutrals to D, M and L Neutrals respectively, due to limited horizontal space within the popover especially when font sizes are large. Moving forward, I will expect more changes to come but overall our efficiency has definitely improved with these updates.
为了适应此新更新,我拉平了命名结构,以便我们现在可以通过[Size] [Weight]搜索以查看具有或不具有默认行高的所有字体颜色,或通过[Colour]来搜索此字体。颜色按大小和重量排序。 由于弹出框内的水平空间有限,尤其是当字体较大时,我们的中性调色板的命名也分别从暗,中和浅中性缩短为D,M和L中性。 展望未来,我希望还会有更多变化,但是总体而言,这些更新肯定会提高我们的效率。
Some useful articles:
一些有用的文章:
Unleashing The Full Potential Of Symbols In Sketch
释放素描中符号的全部潜能
The Sketch Update We’ve All Been Waiting For
我们都在等待的草图更新
Sketch 58 — Smart Layout!
草图58-智能布局!
Using smart layout in Sketch
在Sketch中使用智能布局
Sketch 60 & New Components Panel — How to Use It?
Sketch 60和“新组件”面板-如何使用它?
How to work with Styles & Symbols in Sketch Components Panel
如何在“草图组件”面板中使用样式和符号
…and Sketch plugins:
…以及Sketch插件:
Find and Replace: Change text within layers and symbol overrides
查找和替换 :在图层和符号替代中更改文本
Shared Style Finder: Find instances of a shared layer or text style
共享样式查找器 :查找共享图层或文本样式的实例
Sketch Runner: Perform quick Sketch actions quicker with your keyboard
Sketch Runner :使用键盘更快地执行快速Sketch动作
Symbol Organizer: Organise symbols alphabetically and into groups as determined by symbol names
符号组织器 :按符号名称的字母顺序将符号组织成组
步骤7:“设计”设计系统 (Step 7: “Design” design system)
As mentioned above, we wanted to incorporate best practices from other design systems into our design system. I designed mockups for each page after its components are symbolised, before passing it on to our frontend engineer to build these pages.
如上所述,我们希望将其他设计系统的最佳实践纳入我们的设计系统。 在将每个页面的组件符号化之后,我为每个页面设计了模型,然后将其传递给前端工程师来构建这些页面。

We soon realised that this was not an ideal workflow. As much as we could customise the pages as we deemed fit, it was taking up resources that were already limited just to build these pages. Hence, we sought out tools that would help reduce the workload so resources could be better allocated to what is necessary, i.e. building components and implementing them across the product.
我们很快意识到这不是理想的工作流程。 我们尽其所能定制页面,但占用的资源却仅限于构建这些页面。 因此,我们寻求了有助于减少工作量的工具,以便可以将资源更好地分配给必要的东西,即构建组件并在整个产品中实现它们。
It was crucial to find a tool that we can integrate into our existing workflow while features such as version control, branding customisation were also good to have. We found a table created by uxtools.co comparing across different design system tools and their capabilities. I tried out different design system tools such as brand.ai (now Invision DSM), Lingo and Zeroheight so we can make a decision on one that best suits our needs. While each tool had its merits, we settled on using Zeroheight.
找到一个可以集成到现有工作流程中的工具至关重要,而版本控制,品牌定制等功能也很不错。 我们找到了由uxtools.co创建的表格,将不同设计系统工具及其功能进行了比较。 我尝试了各种设计系统工具,例如brand.ai(现为Invision DSM ), Lingo和Zeroheight,因此我们可以做出最适合我们需求的决定。 尽管每种工具都有其优点,但我们还是决定使用Zeroheight。

I created pages and sections within each page for different components and their variations. Usage guidelines are stated clearly for each use case and Sketch symbols from the styleguide are imported directly into Zeroheight via a plugin. Live component examples can be displayed to viewers using interactive HTML snippets and Storybook components. Developers can easily stay in sync with designs with their design token API as well.
我在每个页面中为不同的组件及其变体创建了页面和部分。 每种使用案例均清楚地说明了使用指南,并且通过插件将样式指南中的Sketch符号直接导入Zeroheight。 可以使用交互式HTML代码段和Storybook组件向观看者显示实时组件示例。 开发人员还可以使用其设计令牌API轻松与设计保持同步。
步骤8:实施设计系统 (Step 8: Implement design system)
Communication with engineers, product managers and other stakeholders is important throughout the entire process, and especially this step. In order to implement the design system, we would need to build the new components, link them to Zeroheight and replace the existing old components in our product as well as design files.
在整个过程中,尤其是在此步骤中,与工程师,产品经理和其他利益相关者的沟通非常重要。 为了实施设计系统,我们需要构建新组件,将它们链接到Zeroheight,并替换产品和设计文件中现有的旧组件。
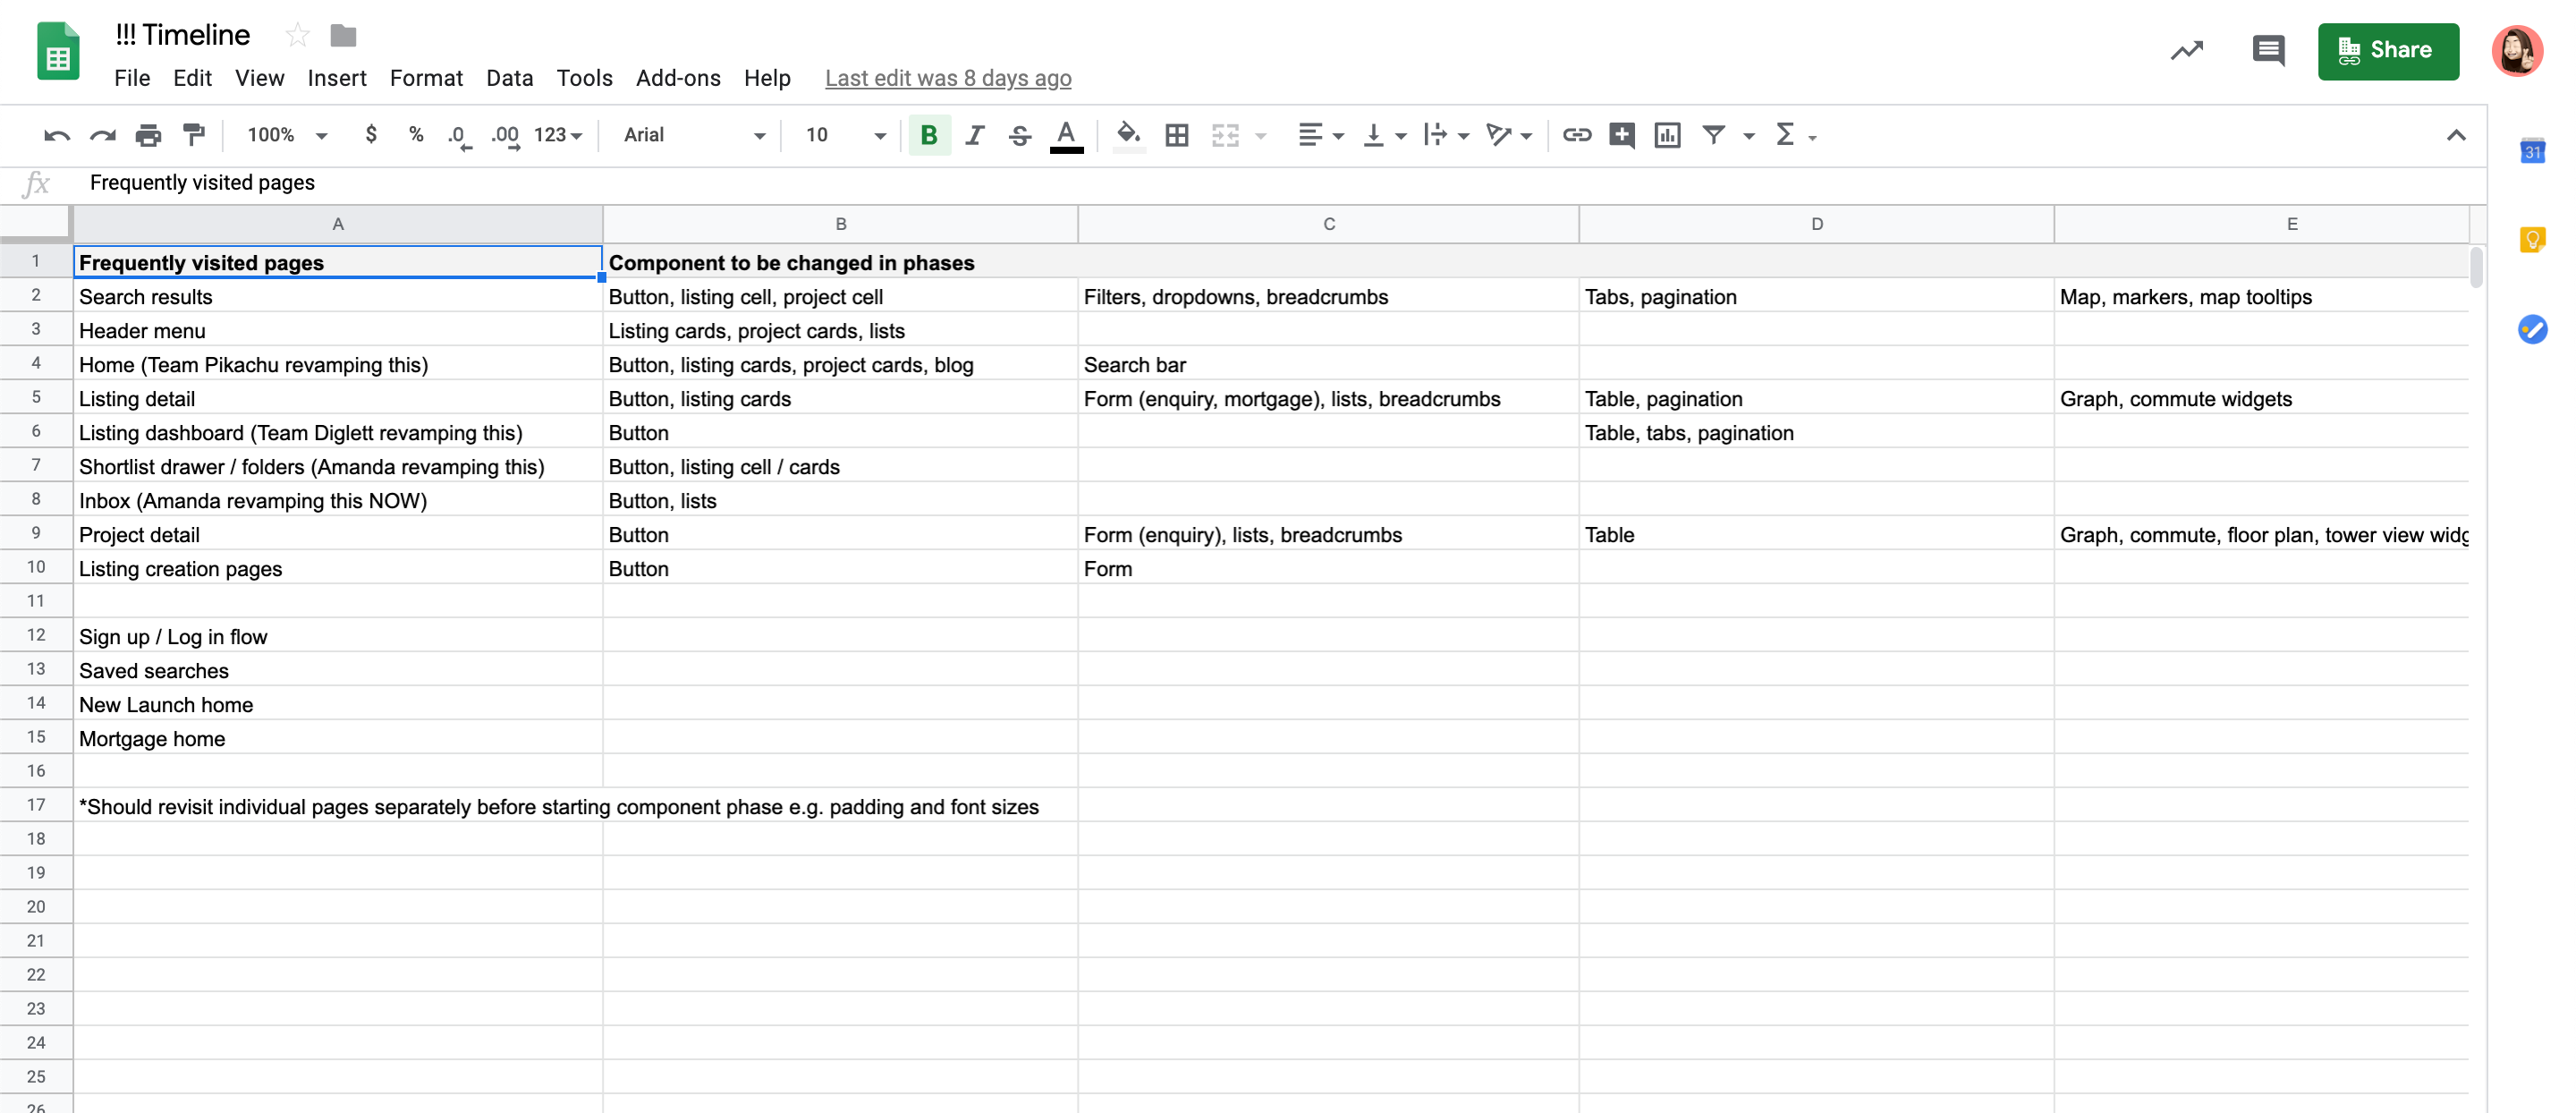
I checked with our data analyst for a breakdown of the most frequently visited pages. With these pages ranked by highest traffic, we decided on components to update across these pages in different phases. The initial plan was to take a couple of sprint points in each 2-week sprint for designers and engineers to work on the implementation.
我与我们的数据分析师核对了最常访问的页面的细分。 根据这些页面的最高访问量排名,我们决定在不同阶段跨这些页面更新组件。 最初的计划是在每两周的冲刺中获取几个冲刺点,以供设计人员和工程师进行实施。
However as a start up, priority has to be given to doing feature work and we were unable to stick to the schedule as planned. Instead of taking time out to work on specific pages, we came to a compromise such that pages involved in the feature work we are working on will be designed and built with the new components.
但是,作为开始,必须优先进行功能工作,而我们无法按计划执行时间表。 我们没有花时间在特定页面上工作,而是做出了妥协,以便使用新组件设计和构建涉及我们正在从事的功能工作的页面。


An additional tool we used to improve collaboration between designers and engineers in implementing the design system is Zeplin, with its Global Styleguides and Connected Components. We uploaded all new component symbols directly into our Styleguide as shown above, and developers were able to link their codebase and documentation sources (such as Storybook or Github) to these components. Once this was done, whenever a developer inspects a design on Zeplin, they would be able to see an overview on the component linked to our Styleguide and reuse the components.
Zeplin是我们用于改善设计人员与工程师之间在实现设计系统方面的协作的另一种工具,它具有Global Styleguides和Connected Components 。 我们将所有新的组件符号直接上传到我们的样式指南中,如上所示,开发人员能够将其代码库和文档来源(例如Storybook或Github)链接到这些组件。 完成此操作后,每当开发人员在Zeplin上检查设计时,他们都可以查看链接到我们的Styleguide的组件的概述并重新使用这些组件。
All in all, this is how we started our design system from scratch. There is still much work to be done, but slow progress is better than no progress at all. Building a design system is a never-ending challenge as we continue to update and adapt it in order to better suit our organisational needs. It might seem daunting at first but taking a small step at a time will make it a lot more achievable. Baby steps!
总而言之,这就是我们从头开始设计系统的方式。 仍有许多工作要做,但是缓慢的进步总比没有进步要好。 建立设计系统是一项永无止境的挑战,因为我们会不断更新和适应它,以便更好地适应我们的组织需求。 乍一看似乎令人望而生畏,但一次走一小步将使它更容易实现。 宝贝的步骤!
Thank you for reading. If you‘ll like to chat more, feel free to reach out or leave a comment below!
感谢您的阅读。 如果您想聊天更多,请随时与我们联系或在下面发表评论!
Special thanks to Wendy Ng, Wong Qi Ying, Lindie Botes, Jason Chan, Amanda Ng and Andrew Thian for your help in one way or another. :-)
特别感谢伍迪(Wendy Ng),王启英(Wong Qi Ying),琳迪·博特(Lindie Botes),陈冠希(Jason Chan),伍咏梅(Namanda Ng)和安德鲁·蒂安(Andrew Thian)的帮助。 :-)
翻译自: https://uxdesign.cc/starting-a-design-system-in-a-start-up-3359f2d4784b
系统怎么设计usb启动
http://www.taodudu.cc/news/show-4618356.html
相关文章:
- vue源码分析-响应式系统(二)
- springcloud项目读取不到application.properties
- SpringCloud动态获取yml文件中的配置
- SpringCloud Gateway 构建全局缓存 Request 解决 body 不可重复读问题
- spring cloud alibaba整合sentinel
- springcloud项目读取本地文件失败
- SpringBoot、SpringCloud读取bootstrap.yml或者application.properties配置文件中的参数
- SpringCloud项目无法读取bootstrap.yml配置文件的解决办法
- SpringCloud项目中无法识别bootstrap.yml的问题
- SpringCloud无法读取bootstrap配置文件
- SpringCloud使用Nacos实现配置管理
- spring cloud--微服务
- SpringCloud之分布式配置中心组件Config从远程Git仓库读取配置文件
- Spring Cloud Alibaba之Nacos
- springcloud gateway 请求执行流程分析
- SpringCloud的@Value注解及GitLab配置使用
- Spring Cloud Gateway 概述 《重新定义Spring Cloud实战》读书笔记
- springCloud集成nacos
- springcloud gateway
- Cloud foundry基础
- Spring Cloud Netflix Hystrix
- SpringCloud无法获取Nacos中的配置文件信息
- 《Spring Cloud 微服务架构进阶》读书笔记
- spring cloud读取配置文件
- springcloud适配mysql和oracle数据库
- 使用Java实现上传图片到七牛云
- html5 canvas+js实现ps钢笔抠图(速抠图 www.sukoutu.com)
- ps中用钢笔进行抠图
- PS学习记录6--html5 canvas+js实现ps钢笔抠图
- 如何利用PS中的钢笔抠图
系统怎么设计usb启动_在启动中启动设计系统相关推荐
- 升鲜宝V2.0_生鲜配送行业,对生鲜配送行业的思考及对系统流程开发的反思_升鲜宝生鲜配送系统_15382353715_余东升...
升鲜宝V2.0_生鲜配送行业,对生鲜配送行业的思考及对系统流程开发的反思_升鲜宝生鲜配送系统_15382353715_余东升 -----生鲜配送行业现状及存在问题----- 1. 从业者整体素质偏低 ...
- mtk一键usb驱动_微星b460主板装win7系统及bios设置教程(支持十代usb驱动)
[文章导读]我们知道自从b460主板发布后,有很多使用微星主板的网友问,微星b460主板其搭载intel 酷睿10代i5-10400处理器可以安装安装win7吗?微星b460主板预装的是win10系统 ...
- centos7无盘启动_从无盘启动看Linux启动原理
作者:bobyzhang,腾讯 IEG 运营开发工程师 0. 故事的开始 0.1 为什么和做什么 最近家里买了对音响,我需要一个数字播放器.一凡研究后我看上了volumio( 我打算让volumio运 ...
- python房屋租赁系统的设计与实现_房屋租赁管理系统数据库的设计与实现
目:房屋租赁管理系统数据库的设计与实现 目录 1 系统概况 ...................................................................... ...
- 系统架构图怎么画_基于ROS的移动机器人上层系统架构分析
看过网上不少博客,介绍ROS系统架构的,基本上都是在介绍ROS自身系统架构,很少有介绍特定机器人的系统架构的.个人觉得,入门一个系统,首先需要从整体开始把握,而不必在意细节,整体把握好了,细节自然水到 ...
- Android程序暂停sh,init进程 解析Android启动脚本init.rc 修改它使不启动android init.rc中启动一个sh文件...
Android启动后,系统执行的第一个进程是一个名称为init 的可执行程序.提供了以下的功能:设备管理.解析启动脚本.执行基本的功能.启动各种服务.代码的路径: system/core/init,编 ...
- 嵌入式linux系统移植的四大步骤_嵌入式 Linux 产品技术评估之系统裁剪与启动速度...
作者简介:吴章金,十年 Linux 研发经验,Linux Committer,前魅族内核团队技术总监.热门开源书<C 语言编程透视>作者. 版权声明:本文最先发表于 "泰晓科技& ...
- 在linux中启动mysql,在linux中启动mysql服务的命令
用reboot命令重启linux服务器之后会导致mysql服务终止,也就是mysql服务没有启动.必须要重启mysql服务,否则启动jboss时会 报有关数据库mysql方面的错误. 命令如下: 第一 ...
- 电子产品设计emc风险评估_书籍介绍:EMC设计方法与风险评估技术
<EMC设计方法与风险评估技术>预计于2020年3月由电子工业出版社出版.它是一本全面解读EMC风险评估技术的书籍. 前言与介绍: 本书是基于作者2008年出版的<电子产品EMC设计 ...
- 民用建筑工程给水排水设计深度图样_给水排水工程中几种设计流量的取值
Plumbing 上善若水 天下至柔,莫过于水, 而攻坚者,莫之能胜 文 / 编 排:朱云鹏 引言 给排水各种类型的设计流量很多,本文囊括了大部分的流量选择. 给水排水总共3大领域: 建筑给排水及消防 ...
最新文章
- client-go入门之2:Job相关操作
- git 提交命令_工作总结:Git的学习和使用,最详细的Git教程,从入门到精通
- 密码技术--国密证书及go语言生成自签国密证书
- Java IO流之【缓冲流和文件流复制文件对比】
- 动态表单实现客户端二次过滤及字段汇总统计
- 天梯赛模拟 链表去重 (25 分)
- 手写 Promise.race
- qiniu rs.php,七牛API操作类 - suconghou的个人空间 - OSCHINA - 中文开源技术交流社区...
- 关于C++编写com和调用com组件的小例子以及个人所犯错误见解
- IOUtils工具类的依赖maven
- 利用SSR修正的RTKLIB PPP测试
- fly.io ruby on rails
- 联想拯救者wif开不了_联想拯救者为什么连不上wifi
- 《大数据可视化》课后习题答案-何光威版
- 青提WiFi微信小程序安装教程常见错误解析
- 在debian7.8安装wcp知识库
- java 时间判断大小_java判断时间大小
- 第06周 预习:接口与多态
- 4.12leetcode468. 验证IP地址
- java毕业设计高校体育场馆预约管理系统设计与实现mybatis+源码+调试部署+系统+数据库+lw
热门文章
- uniapp 抖音短视频
- 3D 霍尔效应位置传感器原理解析
- java源文件的编写与保存_1.编写源代码编写源文件:CardLayoutDemo.java并保存,例如:I:myAppCardLayoutDemo.java。程序结构如下:p...
- 新书上市 | Python办公自动化(好友新书,值得一看,文末有福利)
- 实木工程转计算机专业方法,现代实木椅的设计方法及计算机辅助设计探析
- 细说新中式实木家具的完美逆袭之路
- android 寺库trytry_人民日报中秋福利 寺库trytry红包刷爆朋友圈背后的秘密
- alpha冲刺(6/10)
- Sql Server 常用系统存储过程大全
- C++—航班查询系统