Scott Mitchell 的ASP.NET 2.0数据教程之四十五::DataList和Repeater数据排序
原文 | 下载本教程中的编码例子 | 下载本教程的PDF版
(以后比较长的部分我都会分几次贴出来)
导言
DataList和Repeater数据分页里我们学习了如何在DataList里添加分页功能。我们在ProductsBLL类里创建了一个名为GetProductsAsPagedDataSource的方法,它返回一个PagedDataSource对象。当绑定到DataList或Repeater时,他们将只显示请求页的数据。这个技术和GridView,DetailsView,FormView的内置分页功能原理差不多。
除了分页外,GridView还提供了内置的排序功能,而DataList和Repeater都没有。然而排序功能可以通过一点点代码就实现。本章我们将学习如何在DataList和Repeater里实现排序功能,我们还将创建一个同时支持分页和排序的DataList或Repeater。
回顾一下排序
如我们在分页和排序报表数据里看到的,GridView提供了排序的支持。每个GridView的字段可以有一个关联的SortExpression,它指明了对数据进行排序依据的字段。当GridView的AllowSorting属性设为true时,每个包含SortExpression 属性的GridView的字段的header都表现为一个LinkButton。当点一个header时,页面postback,数据会根据被点字段的SortExpression进行排序。另外,SortDirection属性指明了数据是升序或降序。
当将GridView绑定到数据源控件时,它会将SortExpression和SortDirection传给数据源控件。数据源控件获取数据并根据SortExpression和SortDirection进行排序。然后将数据返回给GridView。
在DataList或Repeater里实现这个功能,我们需要:
- 创建一个排序界面
- 将排序的字段和方向(升序或降序)记下
- 指导ObjectDataSource根据特定字段排序
我们将在第三和四步来处理上面三个步骤。然后我们将看看如何让DataList或Repeater同时支持这两个功能(分页和排序)。
第二步: 在 Repeater里显示 Products
在实现排序功能前,首先创建一个列出所有product的Repeater。打开PagingSortingDataListRepeater文件夹里的Sorting.aspx页。添加一个Repeater,将ID设为SortableProducts。从智能标签里创建一个名为ProductsDataSource的ObjectDataSource。用ProductsBLL类的GetProducts()方法配置它。在INSERT, UPDATE, DELETE标签的下拉列表里选择“(None)”。

图 1: 创建 ObjectDataSource
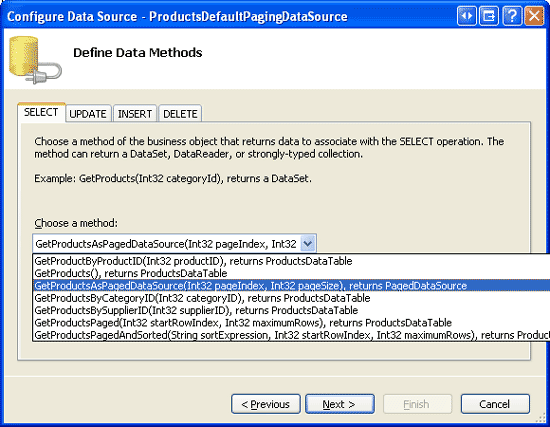
图 2: 在 UPDATE, INSERT, DELETE 标签的下拉列表里选择 “(None)”
在绑定到数据源后,Visual Studio没有自动为Repeater创建ItemTemplate,这点和DataList不一样。而且由于Repeater控件的智能标签里没有象DataList里那样的“Edit Templates”选项,因此我们需要直接添加声明代码。我们使用和前一章一样的ItemTemplate,它显示product的 name, supplier, category。
现在你的Repeater和ObjectDataSource的声明标记看起来应该和下面差不多:
|
ASP.NET |
|
|
1 2 3 4 5 6 7 8 9 10 11 12 13 14 15 16 17 18 19 20 |
<asp:Repeater ID="SortableProducts" DataSourceID="ProductsDataSource" EnableViewState="False" runat="server"> <ItemTemplate> <h4><asp:Label ID="ProductNameLabel" runat="server" Text='<%# Eval("ProductName") %>'></asp:Label></h4> Category: <asp:Label ID="CategoryNameLabel" runat="server" Text='<%# Eval("CategoryName") %>'></asp:Label><br /> Supplier: <asp:Label ID="SupplierNameLabel" runat="server" Text='<%# Eval("SupplierName") %>'></asp:Label><br /> <br /> <br /> </ItemTemplate> </asp:Repeater> <asp:ObjectDataSource ID="ProductsDataSource" runat="server" OldValuesParameterFormatString="original_{0}" TypeName="ProductsBLL" SelectMethod="GetProducts"> </asp:ObjectDataSource> |
图 3 是现在浏览该页的样子。
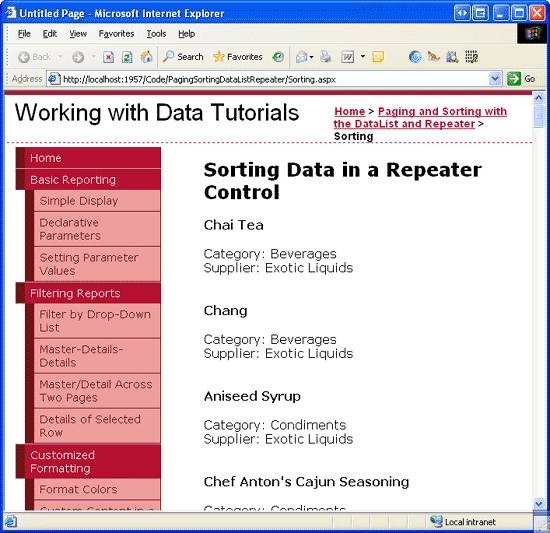
图 3: 显示 Product的 Name, Supplier, Category
第三步: 指导 ObjectDataSource 对数据进行排序
为了让Repeater里显示的数据排序,我们需要将数据排序的sort expression告诉ObjectDataSource。在ObjectDataSource获取数据前,首先激发的是Selecting event,它给我们提供了一个指定sort expression的机会。Selecting event handler 有一个ObjectDataSourceSelectingEventArgs 类型的参数,它有一个名为Arguments的 DataSourceSelectArguments类型的属性.。DataSourceSelectArguments类被设计用来将数据相关的请求从数据的消费者传给数据源控件,它有一个SortExpression property。
创建一个Selecting event handler,用以下代码将排序的信息从ASP.NET页传给ObjectDataSource:
|
C# |
|
|
1 2 3 4 5 |
protected void ProductsDataSource_Selecting (object sender, ObjectDataSourceSelectingEventArgs e) { e.Arguments.SortExpression = sortExpression; } |
sortExpression 需要赋值为排序字段的名字(例如“ProductName”)。它没有排序方向相关的属性,因此如果需要以降序来排序,将“DESC”附加在sortExpression 的值后面(比如“ProductName DESC”)。
继续试一下硬编码将sortExpression 赋为不同的值,并浏览页面 。如图4,当使用“ProductName DESC”作为sortExpression时,product会根据name的字母顺序反向排序。
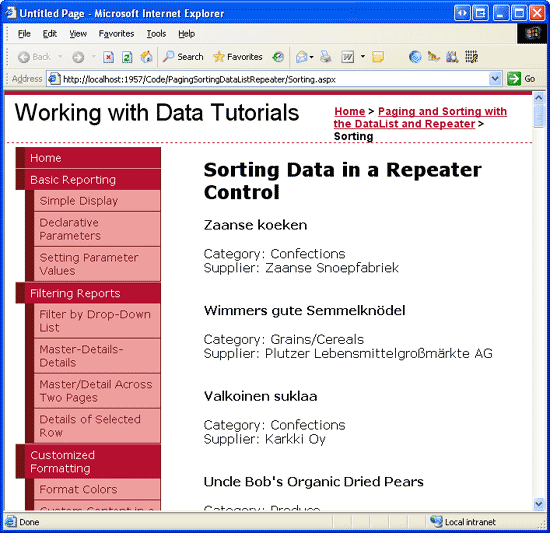
图 4: Product 根据Name 的字母顺序反向排序
第四步: 创建排序界面并记下Sort Expression 和 Direction
开启GridView的排序支持会将每个可排序的字段的header text转换为一个LinkButton,当被点击时,会进行相对应的排序。这样的排序对GridView来说是很合理的,因为它的数据是以列的形式整齐的展示。而对DataList和Repeater来说,需要不同的排序界面。一个常见的数据列表(相对于数据网格)的排序界面是使用一个提供排序字段的下拉列表。我们本章将完成这样的界面。
在SortableProducts Repeater上方添加一个DropDownList,将ID设为SortBy。在属性窗口里点Items属性打开ListItem集合编辑器。添加ListItems,让数据根据ProductName, CategoryName, SupplierName 字段排序。同时添加ListItem让product根据反向的name的顺序排序。
ListItem的Text属性可以设为任何值(比如“Name”),但是Value必须设为数据字段的名字(比如“ProductName”)。添加字符串“DESC”到数据字段名字后面,来让结果以降序排序,比如“ProductName DESC”。
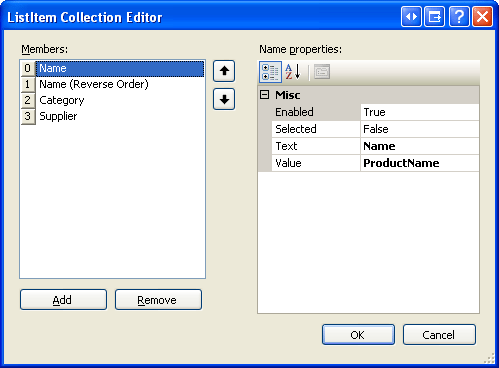
图 5:为每个可排序的字段添加 ListItem
最后在DropDownList的右边添加一个Button。将ID设为RefreshRepeater,Text设为“Refresh”。
完成这些后,DropDownList和Button的声明语法看起来应该和下面差不多:
|
ASP.NET |
|
|
1 2 3 4 5 6 7 8 9 |
<asp:DropDownList ID="SortBy" runat="server"> <asp:ListItem Value="ProductName">Name</asp:ListItem> <asp:ListItem Value="ProductName DESC">Name (Reverse Order) </asp:ListItem> <asp:ListItem Value="CategoryName">Category</asp:ListItem> <asp:ListItem Value="SupplierName">Supplier</asp:ListItem> </asp:DropDownList> <asp:Button runat="server" ID="RefreshRepeater" Text="Refresh" /> |
完成DropDownList后,我们需要更新ObjectDataSource的Selecting event handler,来让它使用选择的SortBy ListItem的Value作为sort expression,代替前面的硬编码。
|
C# |
|
|
1 2 3 4 5 6 7 |
protected void ProductsDataSource_Selecting (object sender, ObjectDataSourceSelectingEventArgs e) { // Have the ObjectDataSource sort the results by the selected // sort expression e.Arguments.SortExpression = SortBy.SelectedValue; } |
现在第一次浏览页的时候,由于默认的SortBy ListItem 的值为ProductName,因此product会根据ProductName字段来排序。见图6。选择一个其它的项–比如“Category”–然后点Refresh,这时会postback,数据会根据category name来重新排序,见图7。
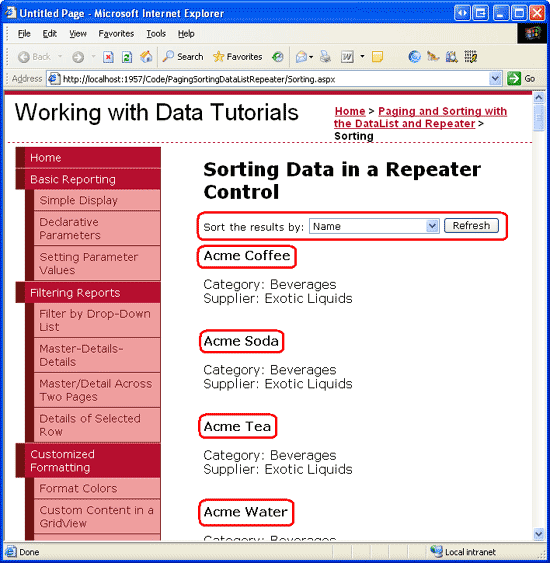
图 6: 第一次 Products 根据 Name 排序

图 7: 现在 Products 根据 Category 来排序
注意:点Refresh button会让数据重新排序是因为Repeater的view state被禁用了,因此Repeater在每次postback时重新绑定到数据源。如果你开启Repeater的view state,这时改变drop-down list不会对排序有任何影响。为了修复这个问题,你可以为Refresh Button的 Click event创建一个event handler,来重新绑定Repeater到数据源(调用Repeater的DataBind()方法)。
记下Sort Expression 和 Direction(排序表达式和排序方向)
如果包含可排序的DataList或Repeater的页可能有其它和排序无关的postback发生,那么我们需要在postback过程中记下sort expression 和 direction。比如,我们将本章的Repeater修改成为每个product包含一个Delete button。当用户点Delete button时我们会执行一些代码来删除选择的product,然后将数据绑定到Repeater。如果排序的信息在postback过程中没有被保存下来,那么显示的数据会回复到最初的排序状态。
本章里,DropDownList隐式的为我们将sort expression 和 direction保存在它的view state里。如果我们使用不同的排序界面–LinkButton提供不同的排序选项–我们就需要在postback过程中记下排序的信息。这个可以通过将排序的参数记在page的view state里,或者记在querystring里,或者通过一些其它状态保存机制来实现。
本章后面的例子会探讨如何将排序信息保存在page的view state里。
第五步: 为使用默认分页的DataList添加排序的支持
在前面一章里我们学习了如何使用DataList的默认分页。现在我们来扩展它,让它可以对分页的数据进行排序。打开PagingSortingDataListRepeater文件夹里的SortingWithDefaultPaging.aspx和Paging.aspx 页。在Paging.aspx 页里查看源文件。将图8里选择的文本复制下来,然后粘贴到SortingWithDefaultPaging.aspx 页里的<asp:Content> 标签内。
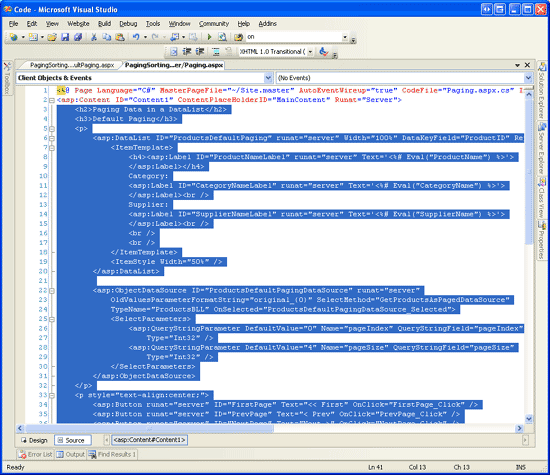
图 8: 复制粘贴代码
然后将Paging.aspx页后台代码里的属性和方法也粘贴到SortingWithDefaultPaging.aspx页后台代码里。现在浏览SortingWithDefaultPaging.aspx页,它现在应该有和Paging.aspx页一样的外观和功能。
在ProductsBLL 里添加默认的分页和排序方法
前面一章里我们在ProductsBLL类里创建了一个GetProductsAsPagedDataSource(pageIndex, pageSize)方法,它返回一个PagedDataSource对象。这个对象通过BLL的GetProducts()方法获取所有的product,然而绑定到DataList的只是那些和输入参数pageIndex 和 pageSize 相关的记录。
本章前面我们已经通过在ObjectDataSource的 Selecting event handler里指定sort expression来添加了排序功能。当ObjectDataSource返回可排序对象时这个方法运转的很好,比如GetProducts()方法返回的ProductsDataTable。然而GetProductsAsPagedDataSource方法返回的PagedDataSource对象并不支持对它内部数据的排序,因此我们需要在将数据放入PagedDataSource前对GetProducts()方法返回的记录进行排序。
在ProductsBLL类里建一个GetProductsSortedAsPagedDataSource(sortExpression, pageIndex, pageSize)方法。指定GetProducts() 方法返回的ProductsDataTable的default DataTableView的排序属性。
|
C# |
|
|
[System.ComponentModel.DataObjectMethodAttribute (System.ComponentModel.DataObjectMethodType.Select, false)] public PagedDataSource GetProductsSortedAsPagedDataSource (string sortExpression, int pageIndex, int pageSize) { // Get ALL of the products Northwind.ProductsDataTable products = GetProducts(); // Sort the products products.DefaultView.Sort = sortExpression; // Limit the results through a PagedDataSource PagedDataSource pagedData = new PagedDataSource(); pagedData.DataSource = products.DefaultView; pagedData.AllowPaging = true; pagedData.CurrentPageIndex = pageIndex; pagedData.PageSize = pageSize; return pagedData; } |
|
GetProductsSortedAsPagedDataSource方法和前面一章里的GetProductsAsPagedDataSource方法有一点不一样。GetProductsSortedAsPagedDataSource多了一个sortExpression参数,将它的值赋给ProductDataTable的 DefaultView的Sort属性。并将ProductDataTable的DefaultView赋给PagedDataSource对象的DataSource。
调用 GetProductsSortedAsPagedDataSource 方法并指定输入参数SortExpression的值
完成这些后,下一步需要提供参数值。SortingWithDefaultPaging.aspx页的ObjectDataSource现在被配置用来调用GetProductsAsPagedDataSource方法并通过两个QueryStringParameters来传递参数,这些参数在SelectParameters集合里已经指定了。这两个QueryStringParameters参数表示GetProductsAsPagedDataSource方法的pageIndex 和 pageSize 参数从querystring里获取。
修改ObjectDataSource的SelectMethod属性,让它调用GetProductsSortedAsPagedDataSource方法。然后添加一个新的QueryStringParameter来让sortExpression 参数通过querystring的sortExpression字段获取。将QueryStringParameter的默认值设为“ProductName”。
现在ObjectDataSource的声明标记语言看起来应该和下面差不多:
|
ASP.NET |
|
|
<asp:ObjectDataSource ID="ProductsDefaultPagingDataSource" OldValuesParameterFormatString="original_{0}" TypeName="ProductsBLL" SelectMethod="GetProductsSortedAsPagedDataSource" OnSelected="ProductsDefaultPagingDataSource_Selected" runat="server"> <SelectParameters> <asp:QueryStringParameter DefaultValue="ProductName" Name="sortExpression" QueryStringField="sortExpression" Type="String" /> <asp:QueryStringParameter DefaultValue="0" Name="pageIndex" QueryStringField="pageIndex" Type="Int32" /> <asp:QueryStringParameter DefaultValue="4" Name="pageSize" QueryStringField="pageSize" Type="Int32" /> </SelectParameters> </asp:ObjectDataSource> |
|
现在SortingWithDefaultPaging.aspx页会按照product name的字母顺序排序。见图9。这是因为GetProductsSortedAsPagedDataSource方法的sortExpression 参数的默认值为“ProductName”。
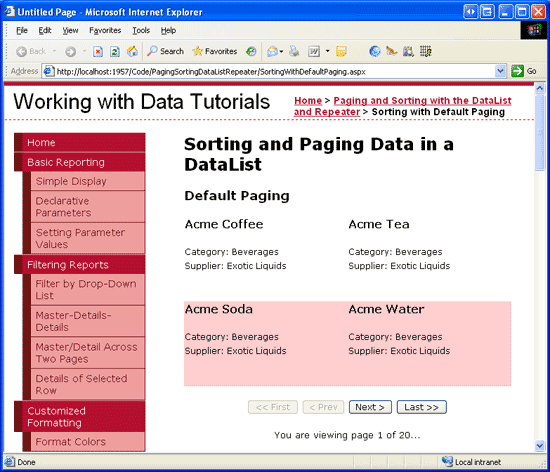
图 9: 默认的按照 ProductName 排序
如果你手动添加一个sortExpression querystring字段–比如SortingWithDefaultPaging.aspx?sortExpression=CategoryName –那么结果会以指定的sortExpression来排序。然而在转到另外一个页时这个sortExpression参数并没有包含在querystring里。实际上当点上或者下一页时我们会返回Paging.aspx。而且当前并没有排序界面。用户可以改变数据排序的唯一方法是直接操作querystring。
创建排序界面
我们首先要修改RedirectUser方法来将用户重定向到SortingWithDefaultPaging.aspx页(而不是Paging.aspx),并将sortExpression的值包含到querystring里。我们还应该添加一个只读的SortExpression属性。这个属性和前面一章里创建的PageIndex 和 PageSize属性相似,在sortExpression querystring字段存在时返回它的值,否则的话使用默认值“ProductName”。
现在的RedirectUser方法只接收一个参数–显示的页的index。然而可能有些时候我们需要使用排序表达式将用户重定向到特定数据的页。我们将马上来为这个页创建排序界面,它将包含一些button来为指定的列排序。当其中一个button被点击时,我们需要传入合适的排序表达式的值来重定向用户。为了提供这个功能,创建两个RedirectUser方法。第一个接收page的index,第二个接收page index和sort expression(排序表达式)。
|
C# |
|
|
private string SortExpression { get { if (!string.IsNullOrEmpty(Request.QueryString["sortExpression"])) return Request.QueryString["sortExpression"]; else return "ProductName"; } } private void RedirectUser(int sendUserToPageIndex) { // Use the SortExpression property to get the sort expression // from the querystring RedirectUser(sendUserToPageIndex, SortExpression); } private void RedirectUser(int sendUserToPageIndex, string sendUserSortingBy) { // Send the user to the requested page with the requested sort expression Response.Redirect(string.Format( "SortingWithDefaultPaging.aspx?pageIndex={0}&pageSize={1}&sortExpression={2}", sendUserToPageIndex, PageSize, sendUserSortingBy)); } |
|
本章的第一个例子里,我们使用DropDownList来创建了一个排序界面。我们将在这个例子里使用3个button(它们位于DataList上方)–一个表示为ProductName排序,一个为CategoryName,一个为SupplierName。添加三个button并设置它们的ID和Text。
|
ASP.NET |
|
|
<p style="text-align:center;"> <asp:Button runat="server" id="SortByProductName" Text="Sort by Product Name" /> <asp:Button runat="server" id="SortByCategoryName" Text="Sort by Category" /> <asp:Button runat="server" id="SortBySupplierName" Text="Sort by Supplier" /> </p> |
|
然后为每个button创建一个Click event handler。这个事件处理将调用RedirectUser方法,并使用合适的排序表达式将用户返回到第一页。
|
C# |
|
|
protected void SortByProductName_Click(object sender, EventArgs e) { // Sort by ProductName RedirectUser(0, "ProductName"); } protected void SortByCategoryName_Click(object sender, EventArgs e) { // Sort by CategoryName RedirectUser(0, "CategoryName"); } protected void SortBySupplierName_Click(object sender, EventArgs e) { // Sort by SupplierName RedirectUser(0, "SupplierName"); } |
|
第一次浏览该页时,数据将按照product name的字母顺序排序(见图9)。点Next button来浏览第二页,然后点“Sort by Category” button。这样将让页返回到第一页,并按照category name来排序,见图10。同样的,点“Sort by Supplier” button会将数据按照supplier排序,并返回到第一页。当数据分页时排序的选择会被记下来。图11是按照category排序并浏览第十三页的样子。

图 10: Products 按照Category排序

图 11: 分页时会记下Sort Expression
第六步: Repeater的自定义分页
第五步里的DataList示例使用默认的分页技术。当大数据量时,我们需要使用自定义分页。回到Efficiently Paging Through Large Amounts of Data 和 Sorting Custom Paged Data 里,我们学习了默认和自定义这两种分页方式的不同,并在BLL里为自定义分页和对自定义分页数据的排序创建了方法。在这两章里我们在ProductsBLL里添加了下面三个方法:
- GetProductsPaged(startRowIndex, maximumRows) – 返回从startRowIndex开始并不超过maximumRows 的特定记录集。
- GetProductsPagedAndSorted(sortExpression, startRowIndex, maximumRows) – 根据指定的sortExpression 返回特定记录集。
- TotalNumberOfProducts() – 提供Products 表的总记录数。
这些方法可以用来在DataList或Repeater进行高效的分页并排序。我们首先创建一个支持自定义分页的Repeater。然后再添加排序支持。打开PagingSortingDataListRepeater文件夹下的SortingWithCustomPaging.aspx页,添加一个Repeater,将ID设为Products。从智能标签里创建一个名为ProductsDataSource的ObjectDataSource。使用ProductsBLL类的GetProductsPaged方法来配置它的select标签。
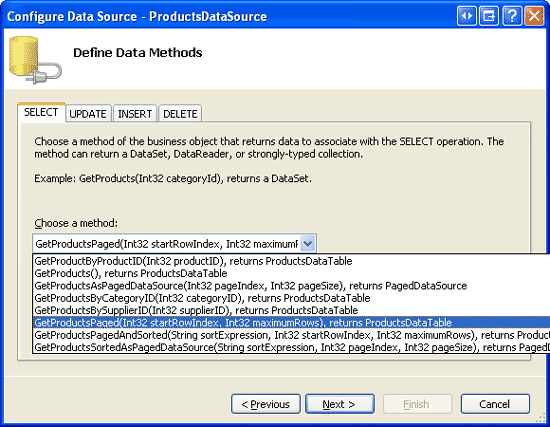
图 12: 配置 ObjectDataSource
在UPDATE, INSERT, DELETE标签里选择“(None)”,点下一步。现在我们需要为GetProductsPaged方法的startRowIndex 和 maximumRows 参数选择源。实际上这里不需要配置。这两个参数的值会在ObjectDataSource的Selecting event handler里通过Arguments属性来指定,就好象我们在本章的第一个例子里指定sortExpression 一样。因此,在参数源的下拉列表里选择“None”。
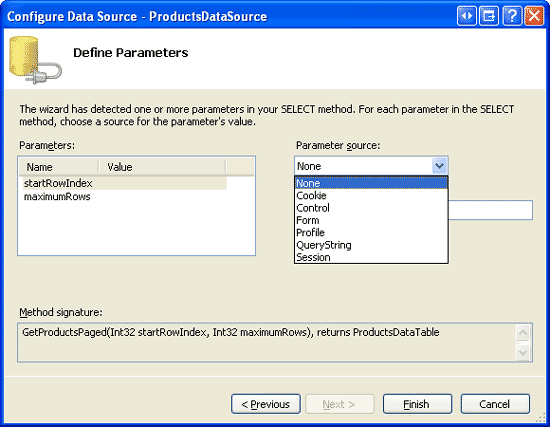
图 13:将参数源设为 “None”
注意:不要将ObjectDataSource的EnablePaging属性设为true。这样会让ObjectDataSource自动的将它的startRowIndex 和 maximumRows 参数包含在SelectMethod的已经存在的参数列表里。EnablePaging属性在将自定义分页数据绑定到GridView, DetailsView, FormView时才有用。由于我们是为DataList 和Repeater手动添加分页支持,因此将它们设为false(默认的),我们将在ASP.NET页里直接实现这些功能。
最后,定义Repeater的ItemTemplate,让它只显示product’的name, category, supplier。完成这些后,Repeater和ObjectDataSource的声明语言看起来应该和下面差不多:
|
ASP.NET |
|
|
<asp:Repeater ID="Products" runat="server" DataSourceID="ProductsDataSource" EnableViewState="False"> <ItemTemplate> <h4><asp:Label ID="ProductNameLabel" runat="server" Text='<%# Eval("ProductName") %>'></asp:Label></h4> Category: <asp:Label ID="CategoryNameLabel" runat="server" Text='<%# Eval("CategoryName") %>'></asp:Label><br /> Supplier: <asp:Label ID="SupplierNameLabel" runat="server" Text='<%# Eval("SupplierName") %>'></asp:Label><br /> <br /> <br /> </ItemTemplate> </asp:Repeater> <asp:ObjectDataSource ID="ProductsDataSource" runat="server" OldValuesParameterFormatString="original_{0}" SelectMethod="GetProductsPaged" TypeName="ProductsBLL"> <SelectParameters> <asp:Parameter Name="startRowIndex" Type="Int32" /> <asp:Parameter Name="maximumRows" Type="Int32" /> </SelectParameters> </asp:ObjectDataSource> |
|
现在浏览该页,注意没有返回任何记录。这是因为我们还没有指定startRowIndex 和 maximumRows 参数的值。为了指定这些值,为ObjectDataSource的Selecting event创建一个event handler,并将参数值硬编码的设置为0和5。
|
C# |
|
|
protected void ProductsDataSource_Selecting (object sender, ObjectDataSourceSelectingEventArgs e) { e.InputParameters["startRowIndex"] = 0; e.InputParameters["maximumRows"] = 5; } |
|
现在浏览页面时会显示前5条product记录。
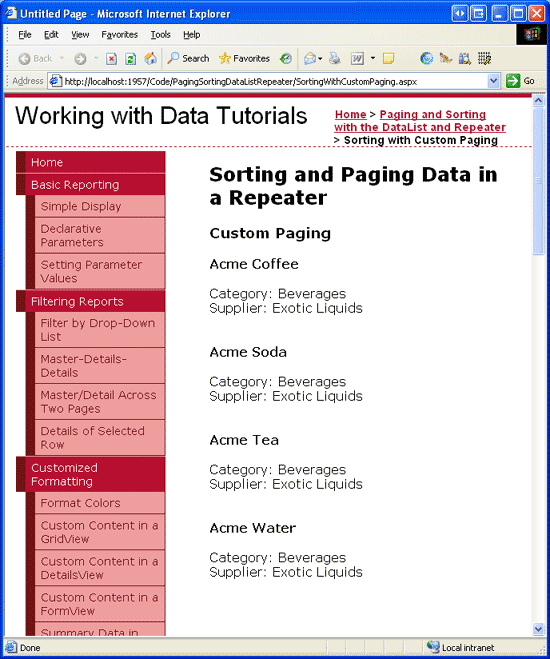
图 14: 显示前5条product
注意:图14列出的products以product name排序是因为自定义分页使用的GetProductsPaged存储过程返回的结果是以ProductName排序。
为了让用户可以翻页,我们需要在postback过程中记下start row index 和 maximum rows。在默认分页的例子里我们用querystring来保存这些值。这个例子里我们将使用view state。创建下面两个属性:
|
C# |
|
|
private int StartRowIndex { get { object o = ViewState["StartRowIndex"]; if (o == null) return 0; else return (int)o; } set { ViewState["StartRowIndex"] = value; } } private int MaximumRows { get { object o = ViewState["MaximumRows"]; if (o == null) return 5; else return (int)o; } set { ViewState["MaximumRows"] = value; } } |
|
然后更新Selecting event handler的代码,使用StartRowIndex 和 MaximumRows属性代替硬编码的0和5。
|
C# |
|
|
e.InputParameters["startRowIndex"] = StartRowIndex; e.InputParameters["maximumRows"] = MaximumRows; |
|
现在我们的页仍然只显示5条记录。然而完成这些属性后,我们已经可以创建分页界面了。
添加分页界面
我们还是使用和默认分页例子里一样的First, Previous, Next, Last分页界面,并包含显示当前是哪页和总页数的label。在Repeater下面添加4个button和1一个label。
|
ASP.NET |
|
|
<p style="text-align:center;"> <asp:Button runat="server" ID="FirstPage" Text="<< First" /> <asp:Button runat="server" ID="PrevPage" Text="< Prev" /> <asp:Button runat="server" ID="NextPage" Text="Next >" /> <asp:Button runat="server" ID="LastPage" Text="Last >>" /> </p> <p style="text-align:center;"> <asp:Label runat="server" ID="CurrentPageNumber"></asp:Label> </p> |
|
然后为4个button创建Click event handlers。当其中一个button被点时,我们需要修改StartRowIndex并将数据重新绑定到Repeater。First, Previous, 和 Next button的代码都非常简单,但是对Last button来说,我们如何判断最后一页数据的start row index?为了计算出这个index–和判断Next 和 Last button是否应该enabled一样–我们需要知道分页数据的总数。我们可以调用ProductsBLL类的TotalNumberOfProducts()方法来获取这个总数。我们来创建一个只读的属性,名为TotalRowCount,它返回TotalNumberOfProducts()方法的结果。
|
C# |
|
|
private int TotalRowCount { get { // Return the value from the TotalNumberOfProducts() method ProductsBLL productsAPI = new ProductsBLL(); return productsAPI.TotalNumberOfProducts(); } } |
|
有了这个属性后我们现在可以获取最后一页的start row index。它可以通过TotalRowCount除以MaximumRows的结果的整数部分然后乘以MaximumRows来得到。我们现在可以为4个分页界面的button来写Click event handlers。
|
C# |
|
|
protected void FirstPage_Click(object sender, EventArgs e) { // Return to StartRowIndex of 0 and rebind data StartRowIndex = 0; Products.DataBind(); } protected void PrevPage_Click(object sender, EventArgs e) { // Subtract MaximumRows from StartRowIndex and rebind data StartRowIndex -= MaximumRows; Products.DataBind(); } protected void NextPage_Click(object sender, EventArgs e) { // Add MaximumRows to StartRowIndex and rebind data StartRowIndex += MaximumRows; Products.DataBind(); } protected void LastPage_Click(object sender, EventArgs e) { // Set StartRowIndex = TotalRowCount / MaximumRows and rebind data StartRowIndex = (TotalRowCount / MaximumRows) * MaximumRows; Products.DataBind(); } |
|
最后,在浏览第一页时需要禁用First 和 Previous buttons,在浏览最后一页时要禁用Next 和 Last buttons。在ObjectDataSource的Selecting event handler里添加以下代码:
|
C# |
|
|
// Disable the paging interface buttons, if needed FirstPage.Enabled = StartRowIndex != 0; PrevPage.Enabled = StartRowIndex != 0; int LastPageStartRowIndex = (TotalRowCount / MaximumRows) * MaximumRows; NextPage.Enabled = StartRowIndex < LastPageStartRowIndex; LastPage.Enabled = StartRowIndex < LastPageStartRowIndex; |
|
完成这些后,浏览该页。见图15。当第一次浏览该页时,First 和 Previous buttons被禁用。点Next会显示第二页的数据。点Last会显示最后一页的数据(见图16和17)。当浏览最后一页时,Next 和 Last buttons被禁用。
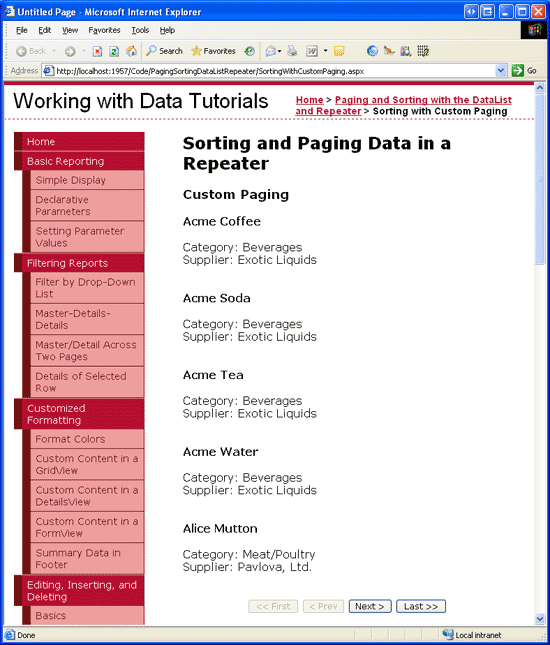
图 15: 浏览第一页时 Previous 和 Last Buttons 被禁用
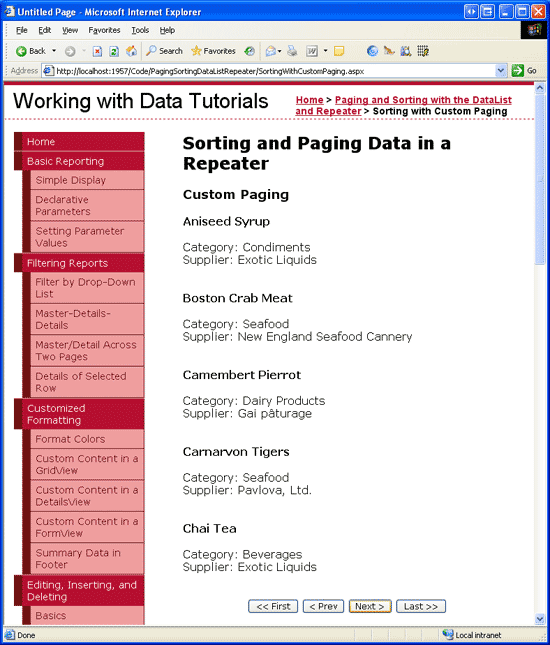
图 16: 第二页数据
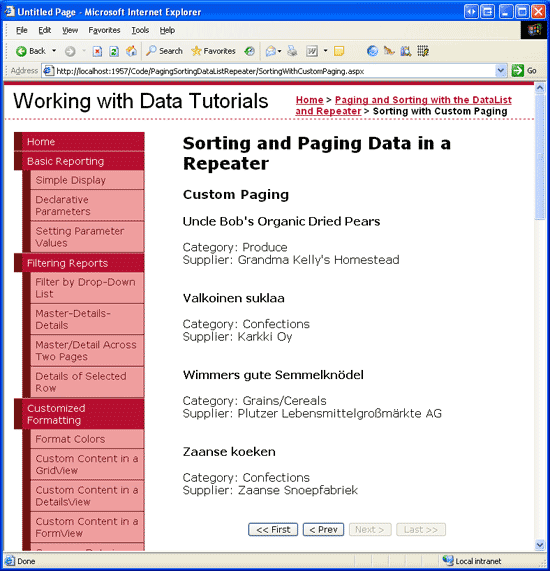
图 17: 最后一页
第七步: 在自定义分页的Repeater 里添加排序功能
现在已经完成了自定义分页,我们再来添加排序功能。ProductsBLL类的GetProductsPagedAndSorted方法和GetProductsPaged一样有startRowIndex 和 maximumRows 参数,不一样的是它还多了一个sortExpression 参数。在SortingWithCustomPaging.aspx里使用GetProductsPagedAndSorted方法我们需要:
- 将ObjectDataSource的SelectMethod属性从GetProductsPaged改为GetProductsPagedAndSorted。
- 为ObjectDataSource的SelectParameters参数集合增加一个sortExpression Parameter。
- 创建一个私有的属性用来在postback过程中通过view state存储SortExpression。
- 修改ObjectDataSource的Selecting event handler将ObjectDataSource的sortExpression 参数值赋为SortExpression 属性(3中创建的)。
- 创建排序界面。
首先修改ObjectDataSource的SelectMethod属性并添加sortExpression 参数。确定sortExpression 的类型是String。完成这些后ObjectDataSource的声明标记看起来应该和下面差不多:
|
ASP.NET |
|
|
<asp:ObjectDataSource ID="ProductsDataSource" runat="server" OldValuesParameterFormatString="original_{0}" TypeName="ProductsBLL" SelectMethod="GetProductsPagedAndSorted" OnSelecting="ProductsDataSource_Selecting"> <SelectParameters> <asp:Parameter Name="sortExpression" Type="String" /> <asp:Parameter Name="startRowIndex" Type="Int32" /> <asp:Parameter Name="maximumRows" Type="Int32" /> </SelectParameters> </asp:ObjectDataSource> |
|
Next, we need a page-level SortExpression property whose value is serialized to view state. If no sort expression value has been set, use “ProductName” as the default:
然后添加一个SortExpression属性,它的值为view state。在没有设任何sort expression的值时候,使用“ProductName”作为默认值。
|
C# |
|
|
private string SortExpression { get { object o = ViewState["SortExpression"]; if (o == null) return "ProductName"; else return o.ToString(); } set { ViewState["SortExpression"] = value; } } |
|
在ObjectDataSource调用GetProductsPagedAndSorted方法前,我们需要将sortExpression 参数设为SortExpression属性的值。在Selecting event handler里添加以下代码:
|
C# |
|
|
e.InputParameters["sortExpression"] = SortExpression; |
|
现在只需要完成排序界面就可以了。和我们上一个例子一样,我们使用3个button来实现排序功能,允许用户根据product name, category, supplier来排序。
|
ASP.NET |
|
|
<asp:Button runat="server" id="SortByProductName" Text="Sort by Product Name" /> <asp:Button runat="server" id="SortByCategoryName" Text="Sort by Category" /> <asp:Button runat="server" id="SortBySupplierName" Text="Sort by Supplier" /> |
|
为这三个button都创建Click event handler。在其中将StartRowIndex设为0,SortExpression设为相应的值,并将数据重新绑定到Repeater。
|
C# |
|
|
protected void SortByProductName_Click(object sender, EventArgs e) { StartRowIndex = 0; SortExpression = "ProductName"; Products.DataBind(); } protected void SortByCategoryName_Click(object sender, EventArgs e) { StartRowIndex = 0; SortExpression = "CategoryName"; Products.DataBind(); } protected void SortBySupplierName_Click(object sender, EventArgs e) { StartRowIndex = 0; SortExpression = "CompanyName"; Products.DataBind(); } |
|
现在所有工作都完成了!实现自定义分页和排序的一些步骤和默认分页差不多。图18显示的当按照category排序时的最后一页数据。

注意:在前面的例子里,当按照supplier排序时排序表达式为” SupplierName”。然而执行自定义分页时我们需要使用” CompanyName”。这是因为自定义分页的存储过程–GetProductsPagedAndSorted–将sort expression传给ROW_NUMBER(),ROW_NUMBER()需要一个实际的列名,而不是别名。因此我们必须使用CompanyName(Suppliers表的一个列名),而不是使用SupplierName (SELECT语句里的别名)作为expression。
总结
无论是DataList还是Repeater都没有提供内置的排序支持,但是通过自定义界面和一点点代码,我们可以实现这样的功能。当仅仅只实现排序时(不包含分页),sort expression可以通过DataSourceSelectArguments对象传给ObjectDataSource的Select方法。DataSourceSelectArguments对象的SortExpression属性可以在ObjectDataSource的electing event handler里赋值。
为已经有排序功能的DataList或Repeater添加排序功能,最简单的方法是在BLL里添加一个接收sort expression的方法。然后这个信息可以通过ObjectDataSource的SelectParameters参数传进去。
本章完成了DataList和Repeater的分页和排序。下一章,也就是最后一章,我们将学习如何在DataList和Repeater的templates(模板)里添加Button,用来提供一些自定义的基于但个item(项)的功能。
祝编程愉快!
Scott Mitchell 的ASP.NET 2.0数据教程之四十五::DataList和Repeater数据排序相关推荐
- Scott Mitchell 的ASP.NET 2.0数据教程之四十五::DataList和Repeater数据排序(三)
第七步: 在自定义分页的Repeater 里添加排序功能 现在已经完成了自定义分页,我们再来添加排序功能.ProductsBLL类的GetProductsPagedAndSorted方法和GetPro ...
- Scott Mitchell 的ASP.NET 2.0数据教程之四十四::DataList和Repeater数据分页
原文 | 下载本教程中的编码例子 | 下载本教程的PDF版 导言 分页和排序是显示数据时经常用到的功能.比如,在一个在线书店里搜索关于ASP.NET 的书的时候,可能结果会是成百上千,而每页只列出十条 ...
- [翻译]Scott Mitchell 的ASP.NET 2.0数据教程之十三:在DetailsView控件中使用TemplateField...
导言 比起BoundField.CheckBoxField.HyperLinkField以及其他的那些数据字段控件(data field controls)来说,TemplateField提供了一种高 ...
- Scott Mitchell 的ASP.NET 2.0数据教程之一: 创建一个数据访问层
原文 | 下载本教程中的编码例子 | 下载本教程的英文PDF版 导言 作为web开发人员,我们的生活围绕着数据操作.我们建立数据库来存储数据,写编码来访问和修改数据,设计网页来采集和汇总数据.本文是研 ...
- Scott Mitchell 的ASP.NET 2.0数据教程之十一: 基于数据的自定义格式化
介绍 我们可以通过控制HeaderStyle, RowStyle, AlternatingRowStyle和其他一些属性来改变GridView, DetailsView, 和 FormView的样式, ...
- Scott Mitchell 的ASP.NET 2.0数据教程之二十一:: 实现开放式并发
在ASP.NET 2.0中操作数据:实现开放式并发 下载本教程中的编码例子 | 下载本教程的PDF版 导言 对于那些仅仅允许用户查看数据,或者仅有一个用户可以修改数据的web应用软件,不存在多用户并发 ...
- Scott Mitchell 的ASP.NET 2.0数据教程之五:: 声明参数
导言 在上一章的教程中,我们看了GridView.DetailsView和FormView绑定到OjbectDataSource控件显示数据,ObjectDataSource调用了类ProductsB ...
- [翻译]Scott Mitchell 的ASP.NET 2.0数据教程之十二:在GridView控件中使用TemplateField
在ASP.NET 2.0中操作数据:在GridView控件中使用TemplateField 英文原版 | 本教程的代码(C#) | 翻译目录 | 原文目录 导言 GridView ...
- Scott Mitchell 的ASP.NET 2.0数据教程之十七:: 研究插入、更新和删除的关联事件
在ASP.NET 2.0中操作数据::研究插入.更新和删除的关联事件 导言 当使用GridView.DetailsView或FormView控件的内建插入.编辑或删除特征时,在用户添加一条新记录或更新 ...
最新文章
- Mysql元数据分析
- 团队作业8----第二次项目冲刺(Beta阶段) 第六天
- co11n——生产订单确认的BAPI
- [:zh]给机械课程设计的一封信[:] 2017-12-23
- quartz工程容器启动与 Service注入
- Skin Demo优化之一
- Sprint Application bootstrap的研究和调试
- avatar.php uid,phpcms函数库中获取会员头像方法get_memberavatar()有时无效问题
- pytorch——计算图与动态图机制
- SharePoint 2013 文档库中PPT转换PDF
- Windows域策略设置 禁止客户端上网【全域策略生效】
- python暂停命令_命令行-Python中的暂停
- 无盘Linux详解:硬盘启动Knoppix的前前后后
- kafka接口操作topic
- 【LG-P5072 [Ynoi2015]】盼君勿忘
- Cannot format given Object as a Number
- 人工智能期末考试复习(贲可荣 张彦铎)
- svg图片在vue项目中的应用
- 【JZOJ 杂题选讲】【UER #8】打雪仗
- Spring in Action 3 -The four kinds of autowiring