puppeteer执行js_使用Node.js和Puppeteer与表单和网页进行交互– 2
puppeteer执行js
Hi guys! Today let's look at another powerful function of the puppeteer API using Node.js part 2.
嗨,大家好! 今天,让我们看看使用Node.js第2部分的puppeteer API的另一个强大功能。
In the first part of this section, was talking about commands for keystroke control and typing as we'll normally do with an opened browser.
在本节的第一部分中,我们将讨论键盘控制和键入的命令,就像我们通常在打开的浏览器中所做的那样。
Here's the link to part 1: INTERACTING WITH FORMS AND WEB PAGES USING NODE-JS AND PUPPETEER- 1
这是第1部分的链接: 使用NODE-JS和PUPPETEER-1与表单和网页进行交互
Imagine for a moment if it's possible to open a website, log in and take a screenshot of your dashboard.
想象一下,如果有可能打开一个网站,登录并为您的仪表板截屏。
?????
??????
Take Note! You should have Node-js and puppeteer installed in your PC.
做记录! 您应该在PC中安装Node-js和puppeteer。
With Node-js and puppeteer already up and running, let's get started.
在Node-js和puppeteer已启动并运行的情况下,让我们开始吧。
*NB: If you don't yet have Node-js/ puppeteer installed in your PC, read the article NODE & GOOGLE PUPPETEER API SERIES
*注意:如果您的PC尚未安装Node-js / puppeteer,请阅读文章NODE&GOOGLE PUPPETEER API SERIES
Today, let's continue from our last part where we saw how to type o fill the form.
今天,让我们从最后一部分继续,在那里我们看到了如何键入o填写表格。
Now let's see how to submit..
现在让我们看看如何提交。
But there's a problem!!!! Most often, the submit button has no id or class.
但是有一个问题! 通常,提交按钮没有ID或类。
Indeed, the puppeteer has made work easy for you and me.
的确,木偶使您和我的工作变得轻松。
Let's see how this can be done.
让我们看看如何做到这一点。
Now, let's get started.
现在,让我们开始吧。
Since we can't get the id or class of the submit button from inspecting, we will use a command on the web browser's console which will return what we'll use at the place of id/class.
由于无法通过检查获取提交按钮的ID或类,因此我们将在Web浏览器的控制台上使用命令,该命令将返回我们将在ID /类位置使用的命令。
Open your browser, move to the console and type
打开浏览器,移至控制台并输入
document.querySelectorAll('input[type="submit"]') [0]
It's going to output the input type and value of your own submit button.
将输出您自己的提交按钮的输入类型和值。
Use the input type at the await.page.click parameter as seen in the code below.
使用await.page.click参数中的输入类型,如下面的代码所示。
Open a text editor and type the following code and save it with the file name app.js:
打开一个文本编辑器,输入以下代码,并将其保存为文件名app.js :
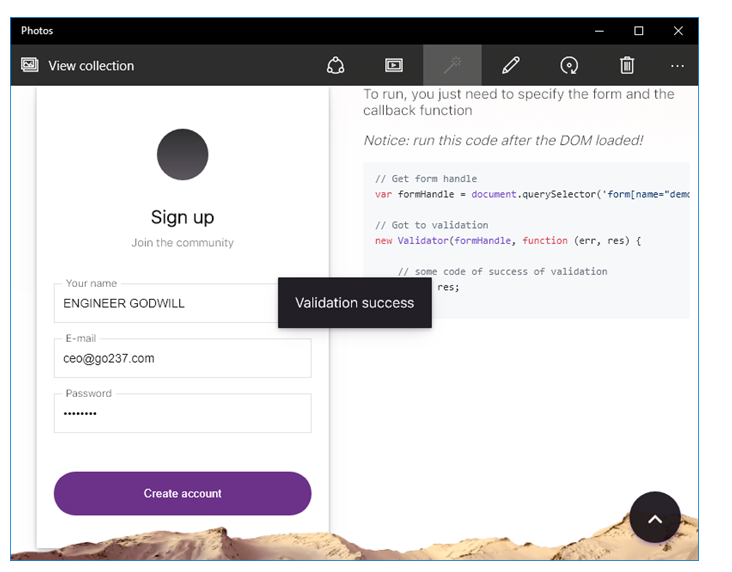
The code below fills the form and submits and takes a screenshot of action after submitting.
下面的代码填写了表单,然后提交并在提交后对操作进行了截图。
const puppeteer = require('puppeteer');
(async () => {const browser = await puppeteer.launch()
const page = await browser.newPage()
await page.goto('file:///H:/js-form-validator-master/index.html')
// focus on the element with id  specified in bracket
await page.focus('#example-1-name')
// types the sentence in bracket
await page.keyboard.type('ENGINEER GODWILL')
await page.focus('#example-1-email')
await page.keyboard.type('[email protected]')
await page.focus('#example-1-password')
await page.keyboard.type('admin123')
// clicks on the submit button of the form
await page.click ('input[type="submit"]')
// captures a screenshot
await page.screenshot({ path: 'keyboard.png' })
console.log ('done');
await browser.close()
})()
NB: You can use any URL of your choice,
注意:您可以使用任何选择的URL,
I this example, I used a webpage that was already downloaded to facilitate the tutorial but if it concerns a URL on the www, internet connection is required to navigate to the website/web page.
在本示例中,我使用已经下载的网页来简化本教程,但是如果它涉及www上的URL,则需要互联网连接才能导航到该网站/网页。
The file should be saved in your default Node-js directory.
该文件应保存在默认的Node-js目录中。
Run the code by initiating the file at the command prompt like a regular Node-js file.
通过在命令提示符处启动文件(如常规Node-js文件)来运行代码。
The Screenshot ( image file) is then stored in the default Node-js directory with name keyboard.png
屏幕快照(图像文件)然后存储在名称为keyboard.png的默认Node-js目录中。
Output image file:
输出图像文件:
翻译自: https://www.includehelp.com/node-js/interacting-with-forms-and-web-pages-using-node-js-and-puppeteer-2.aspx
puppeteer执行js
puppeteer执行js_使用Node.js和Puppeteer与表单和网页进行交互– 2相关推荐
- puppeteer执行js_使用Node.js和Puppeteer与表单和网页进行交互– 1
puppeteer执行js Hi guys! Today let's look at another powerful function of the puppeteer API using Node ...
- puppeteer api_使用Node.js和puppeteer API从URL创建PDF文件
puppeteer api We will continue using Node.js and puppeteer which is a node library. As we saw in our ...
- js检测、控制表单输入必须为中文
js检测.控制表单输入必须为中文 <html> <head> <meta http-equiv="content-Type" content=&quo ...
- form表单 无法提交js动态添加的表单元素问题。。
第一种情况, 这种情况js动态添加的表单元素是不能提交到服务器端的 <table> <form method="post" action=" url ...
- js jquery 清空form表单
js jquery 清空form表单 //js document.getElementById("formId").reset(); //jquery $("#formI ...
- JS动态模拟Form表单提交数据
分享知识 传递快乐 JS动态模拟Form表单提交数据 <!DOCTYPE html> <html lang="en"> <head><m ...
- Puppeteer -headless Chrome 的 Node.js API
Puppeteer 是一个控制 headless Chrome 的 Node.js API .它是一个 Node.js 库,通过 DevTools 协议提供了一个高级的 API 来控制 headles ...
- node.js使用puppeteer来html生成pdf
文章目录 一,环境: 二,目录结构 1, index.js 2,package.json 3,package-lock.json 4,.gitignore 三,windows10使用 可以重复生成 四 ...
- puppeteer api_使用Node.js和Puppeteer API生成PDF文件
puppeteer api Puppeteer is a Node library developed by Google and provides a high-level API for deve ...
最新文章
- 新技术不断涌现,下一代云计算的突破口在哪里?
- SpringMVC 之拦截器和异常处理
- License for package Android SDK Build-Tools 28.0.2 not accepted.(MAC)
- 微软的平板电脑_Microsoft 微软 Surface Go 2 10.5英寸二合一平板电脑(m3-8100Y、8GB、128GB、LTE) 5788元...
- gridview 简单的分页
- 那些牛逼的数据分析师,SQL用的到底有多溜
- 完美实现Crysis道路系统,发图纪念一下
- 2013年测试工作总结
- 【转】单例模式(Singleton)
- 去除Xcode6创建工程时自带的storyboard
- matlab得到小波参数,matlab小波分析去噪详解
- 带你走进CoDeSys
- 时间序列分析|LSTM多变量时间序列预测
- error: You must be logged in to the server (Unauthorized)报错处理
- 易语言 设置屏幕刷新率 源码_下任安卓机皇曝光,领先iPhone 12屏幕一年!
- XLA编译器用于JIT加速
- Error response from daemon: Container 2c6d35b44a9862c63a6caf11a5622a33fe27979e12e51f9bd96f8dad98521c
- 2021年4月品牌精选海报合集
- C语言入门基础_验证哥德巴赫猜想
- 三极管放大电路参数计算