使用TextInputLayout分分钟构造一个酷炫登录框架
Google在2015的IO大会上,给我们带来了更加详细的Material Design设计规范,同时,也给我们带来了全新的Android Design Support Library,Android Design Support Library的兼容性更广,直接可以向下兼容到Android 2.2
下面我们用TextInputLayout构造一个酷炫的登录框架
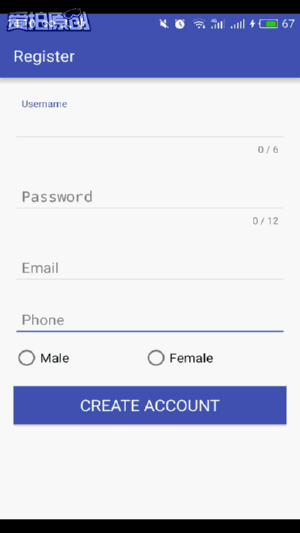
先上效果图:
要使用Design Support Library现在gradle中加入
compile 'com.android.support:design:23.4.0'
<?xml version="1.0" encoding="utf-8"?>
<LinearLayout xmlns:android="http://schemas.android.com/apk/res/android"  xmlns:tools="http://schemas.android.com/tools"  android:layout_width="match_parent"  android:layout_height="match_parent"  android:orientation="vertical"  android:paddingBottom="@dimen/activity_vertical_margin"  android:paddingLeft="@dimen/activity_horizontal_margin"  android:paddingRight="@dimen/activity_horizontal_margin"  android:paddingTop="@dimen/activity_vertical_margin"  tools:context="com.lg.logindemo.MainActivity">  <TextView  android:layout_width="match_parent"  android:layout_height="200dp"  android:gravity="center"  android:text="Welcome"  android:textColor="@color/colorPrimary"  android:textSize="30dp" />  <android.support.design.widget.TextInputLayout  android:layout_width="match_parent"  android:layout_height="wrap_content"  android:layout_marginTop="10dp">  <EditText  android:layout_width="match_parent"  android:layout_height="wrap_content"  android:hint="Username"  android:paddingLeft="10dp"  android:paddingRight="10dp"  android:singleLine="true" />  </android.support.design.widget.TextInputLayout>  <android.support.design.widget.TextInputLayout  android:layout_width="match_parent"  android:layout_height="wrap_content"  android:layout_marginTop="10dp">  <EditText  android:layout_width="match_parent"  android:layout_height="wrap_content"  android:hint="Password"  android:inputType="textPassword"  android:paddingLeft="10dp"  android:paddingRight="10dp"  android:singleLine="true" />  </android.support.design.widget.TextInputLayout>  <android.support.v7.widget.AppCompatButton  android:id="@+id/login"  android:layout_width="match_parent"  android:layout_height="wrap_content"  android:layout_marginTop="20dp"  android:background="@color/colorPrimary"  android:onClick="onLogin"  android:text="LOGIN"  android:textColor="@android:color/white"  android:textSize="20sp"  android:textStyle="bold" />  <TextView  android:layout_width="match_parent"  android:layout_height="wrap_content"  android:layout_marginTop="10dp"  android:gravity="center"  android:onClick="register"  android:text="No account yet?Create one"  android:textSize="16sp"  android:textStyle="bold" />
</LinearLayout>
public class MainActivity extends AppCompatActivity {  private Button button;  @Override  protected void onCreate(Bundle savedInstanceState) {  super.onCreate(savedInstanceState);  setContentView(R.layout.activity_main);  setTitle("Login");  button=(Button)findViewById(R.id.login);  button.setOnClickListener(new View.OnClickListener() {  @Override  public void onClick(View v) {  Toast.makeText(MainActivity.this,"Login Successful",Toast.LENGTH_SHORT).show();  }  });  }  //注册public void register(View view){  startActivity(new Intent(this,RegisterAcitvity.class));  }
}
很简单,只是为了画个框架,可以根据需求自己完善
下面是注册页面的布局:
<?xml version="1.0" encoding="utf-8"?>
<LinearLayout xmlns:android="http://schemas.android.com/apk/res/android"  xmlns:app="http://schemas.android.com/apk/res-auto"  xmlns:tools="http://schemas.android.com/tools"  android:layout_width="match_parent"  android:layout_height="match_parent"  android:orientation="vertical"  android:paddingBottom="@dimen/activity_vertical_margin"  android:paddingLeft="@dimen/activity_horizontal_margin"  android:paddingRight="@dimen/activity_horizontal_margin"  android:paddingTop="@dimen/activity_vertical_margin"  tools:context="com.lg.logindemo.RegisterAcitvity">  <android.support.design.widget.TextInputLayout  android:layout_width="match_parent"  android:layout_height="wrap_content"  app:counterEnabled="true"  app:counterMaxLength="6"  app:counterOverflowTextAppearance="@style/ErrorStyle"  android:layout_marginTop="10dp"  >  <EditText  android:layout_width="match_parent"  android:layout_height="wrap_content"  android:hint="Username"  android:paddingLeft="10dp"  android:paddingRight="10dp"  android:singleLine="true" />  </android.support.design.widget.TextInputLayout>  <android.support.design.widget.TextInputLayout  android:layout_width="match_parent"  android:layout_height="wrap_content"  app:counterEnabled="true"  app:counterMaxLength="12"  app:counterOverflowTextAppearance="@style/ErrorStyle"  android:layout_marginTop="10dp">  <EditText  android:layout_width="match_parent"  android:layout_height="wrap_content"  android:hint="Password"  android:inputType="textPassword"  android:paddingLeft="10dp"  android:paddingRight="10dp"  android:singleLine="true" />  </android.support.design.widget.TextInputLayout>  <android.support.design.widget.TextInputLayout  android:layout_width="match_parent"  android:layout_height="wrap_content"  android:layout_marginTop="10dp">  <EditText  android:layout_width="match_parent"  android:layout_height="wrap_content"  android:hint="Email"  android:inputType="textEmailAddress"  android:paddingLeft="10dp"  android:paddingRight="10dp"  android:singleLine="true" />  </android.support.design.widget.TextInputLayout>  <android.support.design.widget.TextInputLayout  android:layout_width="match_parent"  android:layout_height="wrap_content"  android:layout_marginTop="10dp">  <EditText  android:layout_width="match_parent"  android:layout_height="wrap_content"  android:hint="Phone"  android:inputType="phone"  android:paddingLeft="10dp"  android:paddingRight="10dp"  android:singleLine="true" />  </android.support.design.widget.TextInputLayout>  <RadioGroup  android:layout_width="match_parent"  android:layout_height="wrap_content"  android:layout_marginTop="10dp"  android:orientation="horizontal">  <android.support.v7.widget.AppCompatRadioButton  android:layout_width="wrap_content"  android:layout_height="wrap_content"  android:layout_weight="1"  android:text="Male"  android:textSize="16sp" />  <android.support.v7.widget.AppCompatRadioButton  android:layout_width="wrap_content"  android:layout_height="wrap_content"  android:layout_weight="1"  android:text="Female"  android:textSize="16sp" />  </RadioGroup>  <android.support.v7.widget.AppCompatButton  android:id="@+id/register"  android:layout_width="match_parent"  android:layout_height="wrap_content"  android:layout_marginTop="20dp"  android:background="@color/colorPrimary"  android:text="CREATE ACCOUNT"  android:textColor="@android:color/white"  android:textSize="20sp" />
</LinearLayout>
android:singleLine="true"属性设置单行显示
设置app:counterEnabled="true" 打开Edittext右下角字数统计,app:counterMaxLength="6"设置它的长度
但要谨记,使用这个功能的时候必须加上 app:counterOverflowTextAppearance属性,不然程序很报错
自定义ErrorStyle样式:
<style name="ErrorStyle">  <item name="android:textColor">@color/colorAccent</item>
</style>
当然,如果想要修改Edittext框的选中颜色可以修改AppTheme中的colorAccent属性
<style name="AppTheme" parent="Theme.AppCompat.Light.DarkActionBar">  <!-- Customize your theme here. -->  <item name="colorPrimary">@color/colorPrimary</item>  <item name="colorPrimaryDark">@color/colorPrimaryDark</item>  <item name="colorAccent">@color/colorPrimary</item>
</style>
源码地址:http://down.51cto.com/data/2222023
转载于:https://blog.51cto.com/liuyvhao/1786929
使用TextInputLayout分分钟构造一个酷炫登录框架相关推荐
- 利用GitHub搭建一个酷炫免费的个人博客
转载自公众号:python_shequ 由于公众号的文章不易后续整理阅读,于是小吴昨天上午花了半个小时使用 GitHub + Hexo 搭建了一下个人博客,打算将公众号的文章搬过去,支持关键字搜索.分 ...
- python随手记自动记账_菜鸟也疯狂!8分钟用Python做一个酷炫的家庭随手记
原标题:菜鸟也疯狂!8分钟用Python做一个酷炫的家庭随手记 每个月都有各种各样的开销,不当家不知道柴米贵呀!柴米油盐酱醋茶样样都要开销,吃的穿的,各种开销,每个月都没有啥结余,小编月初是富人,月底 ...
- 分享给你一个酷炫的前端组件库,还不用起来?
fancy-components 一个酷炫的前端组件库 大伙前端都是用什么组件库的呢? 我最近刚发现前端一个很好看.很炫酷的组件库.那就是fancy-components ,简直是"酷炫&q ...
- 超详细——手把手教你用threejs实现一个酷炫的模型发光扫描效果(一)
前言 模型特效是大家在3d可视化项目所追求的,但很多人苦于无法实现一个好的模型效果,本次就手把手一步一步教你实现一个酷炫的模型发光扫描特效,帮让你的项目提升一个逼格.话不多说,先上效果: 本文所使用的 ...
- 如何开发一个酷炫的mdx
使用mdx开发一个酷炫的ppt 效果展示:mdx-deck-slide-decks MDX 是一种书写格式,允许你在 Markdown 文档中无缝地插入 JSX 代码. 你还可以导入(import ...
- 【有了可图网】PS实战系列64:用PS的3D功能设计制作一个酷炫的彩色立体字体
本篇教大家如何巧用PS的3D功能设计制作一个酷炫的彩色立体字体!教程讲解过程超详细,主要用到了PS的滤镜.调整层以及图层样式来完成效果,需转学起来! 彩色立体文字纹理素材链接链接:https://pa ...
- 用HTML、CSS写一个酷炫的动态搜索框
用HTML.CSS写一个酷炫的动态搜索框 可伸展的动态搜索框! 复制粘贴即可用! HTML部分: <!DOCTYPE html> <html lang="en"& ...
- 【有利可图网】PS实战教程52:巧用PS设计打造一个酷炫的喷溅海报特效!
本篇教大家如何巧用PS设计打造一个酷炫的喷溅海报特效教学!教程主要是运用到了蒙版和笔刷技巧,学习掌握,可以灵活运用到其它设计中,感兴趣的童鞋赶快收走试试看,需转学起来吧!
- 一个精美的跳动小球—手把手教你用贝塞尔曲线实现一个酷炫跳动动画。
一个精美的跳动小球-手把手教你用贝塞尔曲线实现一个酷炫跳动动画. 2017-08-07 BraveJoy 终端研发部 前言介绍 手把手教你用贝塞尔曲线实现一个精美的跳动的小球. 正文 效果展示: 说点 ...
最新文章
- python函数结构_Python函数基础
- android Q gradle配置,【Android】Android Studio启动配置gradle
- 更改apk安装包对android系统等级要求
- 09-03-06 FreeEIM 姗姗来迟
- 面试官:什么是JDK什么是JRE?服务器可以只安装JRE吗?
- tomcat日志输出控制
- 沫沫金::jqGrid插件-弹窗返回值
- 机械--NX2007(UG)有限元分析教程2--装配体
- 《Spring Cloud微服务实战》翟永超(著)
- 中国数据中心改造市场趋势报告、技术动态创新及市场预测
- C与C++中的符号隐藏
- 新浪微博用户兴趣建模系统架构
- 分发自动化_使用bitrise自动化应用分发
- 不知道如何压缩PDF?教你3个压缩PDF文件方法
- Kotlin协程核心库分析-5 Job异常处理器注意点
- 微信公众号开发——基础认识
- 使用java计算数组方差和标准差
- 25-36.产品经理入门到精通(三)
- SQLServer中常用的分页查询语句
- 《微服务设计》(二)---- 演变式架构师
热门文章
- P1516 青蛙的约会 [exgcd]
- 如何使用Nexus搭建Maven私服
- 1.spring boot要求最低jdk1.8,平安默认1.6问题,-》安装JDK1.8 2.maven 3.3.3要求最低jdk1.7-安装jdk 1.8...
- vivo U1正式亮相
- Confluence 6 创建一个空间
- AI大事件 | OpenAI员工离职创立机器人新公司,spaCy v2.0.0发布
- (zhuan) Recurrent Neural Network
- ExecutorService线程池
- PHP删除数组(array一维)中指定的某个值 (转)
- Silverlight开发历程—(绘制矢量图之Polyline 和 Polygon)