iOS开发8:使用Tool Bar切换视图
之前讨论的都是单视图应用程序,而在实际应用中,我们可能要多个视图,并根据用户的需要切换视图。
iOS中几种典型的多视图程序:
(1)Tab Bar Application:程序的底部有一排按钮,轻触其中一个按钮,相应的视图被激活并显示出来;
(2)Navigation-Based Application:其特点是使用navigation controller,而navigation controller使用navigation bar来控制多级视图;
(3)Tool Bar Application:程序的底部有一个工具条,利用工具条中的按钮来切换视图,经常与Tab Bar Application混淆。
这次要做的例子就是使用了Tool Bar,只是简单了实现了视图切换功能,并添加一些视图切换时的效果。在做例子之前,首先要了解一下视图的切换原理。
一般来说,一个多视图的程序要至少三个View Controller,其中一个作为Root Controller。所谓Root Controller,是指用户看到的第一个Controller,并且在程序加载时这个Controller就加载了。
Root Controller通常是UINavigationController或者UITabBarController的子类,也可以是UIViewController的一个子类。
在多视图程序中,Root Controller的工作获得两个或者更多的其他视图,并根据用户输入显示不用的视图。
除Root Controller之外,其他视图就作为Content Controller,可以理解为可能会显示出来的各种视图。
为了更好地理解多视图程序的结构,我们从Empty Application开始创建我们的程序。
1、创建工程:
运行Xcode 4.2,新建一个Empty Application,名称为MultiView,其他设置如下图:

2、创建3个View Controller:
依次选择File — New — New File,打开如下窗口:
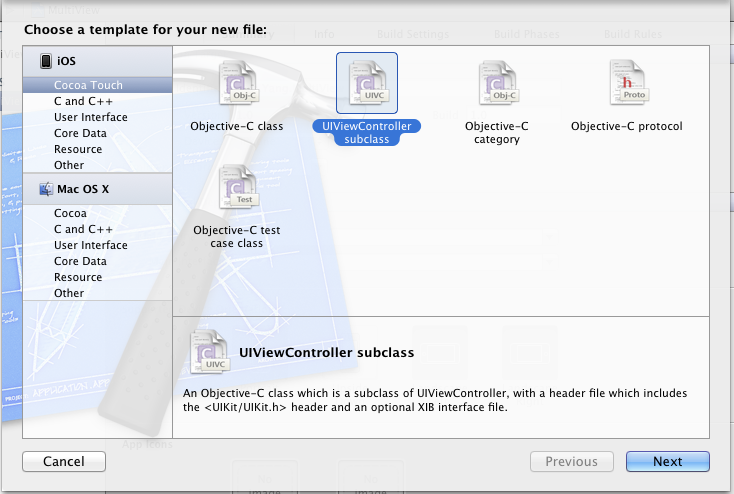
找到UIViewController subclass并单击Next,打开下面的窗口:

输入名称RootViewController,并且保证Subclass of选择UIViewController,下面的两个选框都不选;按照同样的步骤新建两个View Controller,名称分别是FirstViewController和SecondViewController。建好后,在Project Navigation中显示文件如下:

3、为三个View Controller创建.xib文件:
依次选择File — New — New File,打开如下窗口:

在左边选User Interface,右边选View,单击Next,在新窗口中的Device Family中选择iPhone,单击Next,打开如下窗口:

输入名称RootView,单击Create,创建了一个.xib文件。用同样的方法再创建两个.xib,名称分别是FirstView和SecondView。
4、修改App Delegate:
4.1 单击AppDelegate.h,在其中添加代码,在@interface之前添加@class RootViewController;在@end之前添加@property (strong, nonatomic) RootViewController *rootViewController;添加之后的代码如下:
#import <UIKit/UIKit.h>
@class RootViewController;
@interface AppDelegate : UIResponder <UIApplicationDelegate>
@property (strong, nonatomic) UIWindow *window;
@property (strong, nonatomic) RootViewController *rootViewController;
@end
4.2 单击AppDelegate.m,修改其代码。在@implementation之前添加#import "RootViewController.h",在@implementation之后添加@synthesize rootViewController;然后修改didFinishLaunchingWithOptions方法如下:
- (BOOL)application:(UIApplication *)application didFinishLaunchingWithOptions:(NSDictionary *)launchOptions
{self.window = [[UIWindow alloc] initWithFrame:[[UIScreen mainScreen] bounds]];// Override point for customization after application launch.self.rootViewController = [[RootViewController alloc] initWithNibName:@"RootView" bundle:nil]; UIView *rootView = self.rootViewController.view; CGRect rootViewFrame = rootView.frame; rootViewFrame.origin.y += [UIApplication sharedApplication].statusBarFrame.size.height; rootView.frame = rootViewFrame; [self.window addSubview:rootView]; self.window.backgroundColor = [UIColor whiteColor];[self.window makeKeyAndVisible];return YES;
}
① self.rootViewController = [[RootViewController alloc] initWithNibName:@"RootView" bundle:nil];
这行代码用于从RootView.xib文件中初始化rootViewController,注意initWithNibName:@"RootView"中不要后缀名.xib
② rootViewFrame.origin.y += [UIApplication sharedApplication].statusBarFrame.size.height;
使得RootViewController的视图不会被状态栏挡住
5、修改RootViewController.h:
单击RootViewController.h,在其中添加两个属性和一个方法,如下:
#import <UIKit/UIKit.h>
@class FirstViewController;
@class SecondViewController;@interface RootViewController : UIViewController@property (strong, nonatomic) FirstViewController *firstViewController;
@property (strong, nonatomic) SecondViewController *secondViewController;
- (IBAction)switchViews:(id)sender;@end
6、打开RootView.xib,在坐边选择File’s Owner,在右边打开Identity Inspector,在Class下拉菜单选择RootViewController:

这样,我们就可以从RootView.xib文件向RootViewController创建Outlet和Action了。
7、为RootView.xib添加工具栏:打开RootView.xib,拖一个Tool Bar到视图上,双击Tool Bar上的按钮,修改其名称为Switch Views:

8、添加Action映射:
选中Switch Views按钮,按住Control,拖到File’s Owner,松开鼠标后选择switchViews方法:

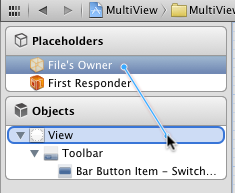
9、选择File’s Owner,按住Control键,拖到View,松开鼠标,选择view:
10、修改RootViewController.m:
打开RootViewController.m文件,在@implementation之前添加代码:
#import "FirstViewController.h"
#import "SecondViewController.h"
在@implementation之后添加代码:
@synthesize firstViewController;
@synthesize secondViewController;
接下来修改viewDidLoad方法,这个方法默认是被注释掉的,先去掉其周围的注释符,然后修改其代码如下:
- (void)viewDidLoad
{self.firstViewController = [[FirstViewController alloc] initWithNibName:@"FirstView" bundle:nil];[self.view insertSubview: firstViewController.view atIndex:0];[super viewDidLoad];
}
添加switchViews方法:
- (IBAction)switchViews:(id)sender {if (self.secondViewController.view.superview == nil) {if (self.secondViewController == nil) { self.secondViewController = [[SecondViewController alloc] initWithNibName:@"SecondView" bundle:nil]; } [firstViewController.view removeFromSuperview]; [self.view insertSubview:self.secondViewController.view atIndex:0]; } else {if (self.firstViewController == nil) { self.firstViewController = [[FirstViewController alloc] initWithNibName:@"FirstView" bundle:nil]; } [secondViewController.view removeFromSuperview]; [self.view insertSubview:self.firstViewController.view atIndex:0]; }
}
修改didReceiveMemoryWarning方法:
- (void)didReceiveMemoryWarning
{[super didReceiveMemoryWarning];if (self.firstViewController.view.superview == nil) { self.firstViewController = nil; } else { self.secondViewController = nil; }
}
11、打开FirstView.xib文件,选择左边的File’s Owner,然后在Identity Inspector中选择Class为FirstViewController;然后按住Control键从File’s Owner图标拖到View,在弹出的菜单选择view。为SecondView.xib进行同样的操作,不过Class选择为SecondViewController。
12、打开FirstView.xib文件,选择View,打开Attribute Inspector,进行如下设置:

对SecondView.xib进行同样设置,不过背景颜色设成红色。
13、此时运行程序,你会看见刚启动的时候,程序显示的绿色背景,轻触Switch Views按钮后,背景变成了红色。不断轻触按钮,背景不断变换。
14、添加切换背景的动画效果:
打开RootViewController.m,修改其中的switchViews方法如下:
- (IBAction)switchViews:(id)sender { [UIView beginAnimations:@"View Flip" context:nil]; [UIView setAnimationDuration:1.25]; [UIView setAnimationCurve:UIViewAnimationCurveEaseInOut];if (self.secondViewController.view.superview == nil) { if (self.secondViewController == nil) { self.secondViewController = [[SecondViewController alloc] initWithNibName:@"SecondView" bundle:nil]; } [UIView setAnimationTransition: UIViewAnimationTransitionFlipFromRight forView:self.view cache:YES]; [self.firstViewController.view removeFromSuperview]; [self.view insertSubview:self.secondViewController.view atIndex:0]; } else { if (self.firstViewController == nil) { self.firstViewController = [[FirstViewController alloc] initWithNibName:@"FirstView" bundle:nil]; } [UIView setAnimationTransition: UIViewAnimationTransitionCurlUp forView:self.view cache:YES]; [self.secondViewController.view removeFromSuperview]; [self.view insertSubview:self.firstViewController.view atIndex:0]; } [UIView commitAnimations];
}
注意四个表示切换效果的常量:
UIViewAnimationTransitionFlipFromLeft
UIViewAnimationTransitionFlipFromRight
UIViewAnimationTransitionCurlDown
UIViewAnimationTransitionCurlUp
分别表示从左翻转、从右翻转、向下卷、向上卷。
运行后翻页效果如下:


最终代码:http://www.oschina.net/code/snippet_164134_10918
转载于:https://www.cnblogs.com/I-am-fine/archive/2012/08/31/2664989.html
iOS开发8:使用Tool Bar切换视图相关推荐
- 使用Tool Bar切换视图
之前讨论的都是单视图应用程序,而在实际应用中,我们可能要多个视图,并根据用户的需要切换视图. iOS中几种典型的多视图程序: (1)Tab Bar Application:程序的底部有一排按钮,轻触其 ...
- 使用Tab Bar切换视图
上一篇文章提到了多视图程序中各个视图之间的切换,用的Tool Bar,说白了还是根据触发事件使用代码改变Root View Controller中的Content View.这次,我们还是讲一讲切换视 ...
- IOS开发中UIBarButtonItem上按钮切换或隐藏实现案例
IOS开发中UIBarButtonItem上按钮切换或隐藏案例实现案例是本文要介绍的内容,这个代码例子的背景是:导航条右侧有个 edit button,左侧是 back button 和 add bu ...
- iOS开发-iPad侧边栏Tab选项卡切换
Android中习惯了叫侧边栏,iOS中如果不习惯侧边栏称呼的话可以叫dock,侧边栏的切换,类似于Android中的底部导航栏的切换,iPad尺寸大了一些,导航的栏目放在侧边会显示的更好耐看一些.选 ...
- 设置视图IOS开发(97)之自定义视图之使用XIB自定义一个UIView
本文纯属个人见解,是对前面学习的总结,如有描述不正确的地方还请高手指正~ 1 前言 Xcode中集成的BI中的控件非常丰富,但有时候不免不能满足我们的需求,今天我们来学习一下如何使用XIB自定义一个U ...
- iOS开发指南:从零基础到App Store上架(第2版 )
第一部分 基础篇 第1章 开篇综述 2 1.1 iOS概述 2 1.1.1 iOS介绍 2 1.1.2 iOS 6新特性 2 1.2 开发环境及开发工具 3 1.3 本书中的约定 4 1.3.1 案例 ...
- iOS资源帖-优秀博客、iOS开发技术文、学习网站
原链接:https://www.jianshu.com/p/619c61d9c8fb 一些博客 王巍 Objc中国发起人.Line工程师 ibireme YYKit作者 bang JSPatch作者 ...
- iOS开发 剖析网易新闻标签栏视图切换(addChildViewController属性介绍)
iOS开发 剖析网易新闻标签栏视图切换(addChildViewController属性介绍) 本来仅仅是打算介绍一下addChildViewController这种方法的,正好今天朋友去换工作面试问 ...
- iOS开发 : Navigation Bar的简单设置
前面的一篇文章<iOS开发16:使用Navigation Controller切换视图>中的小例子在运行时,屏幕上方出现的工具栏就是Navigation Bar,而所谓UINavigati ...
最新文章
- Windows禁止启动某个程序!偷偷禁止,别人就打不开。。。比如,微信 LOL 吃鸡 爱奇艺
- 读了这篇文字,做年薪百万的NLP工程师
- android有用的知识
- [译] 在 Facebook 发一张登机牌,你就有可能被盗号了
- 数据结构与算法——树与二叉树详细分享
- 采购订单建立增加客户数据增强示例
- [攻防世界 pwn]——string(内涵peak小知识)
- 二叉树的遍历—广度优先(BFS)和深度优先(DFS)python实现
- C++中virtual关键字的用法
- 系统设计:github上学习如何设计大型系统的项目
- Python学习之路——Python基础之运算符
- vsftpd 创建虚拟用户
- IBM Bluemix计划于2017年下半年在云资源中引入英特尔3D XPoint
- 自绘GroupBox控件
- Spring学习-入门
- 高淇java300适合_高淇java300集JAVA面向对象的进阶作业
- 三星S9微信和服务器怎么连接,三星s9 微信在后台为什么收不到消息 | 手游网游页游攻略大全...
- 一文看懂任务挖掘和流程挖掘的区别是什么?
- Dockerfile构建Nginx镜像、镜像优化(多阶段构建,最小化镜像构建)
- node启动之后内存占用过高解决方案