spring boot2 整合(一)Mybatis (特别完整!)
大概介绍下流程:
- 借助idea实现mybatis逆向工程
- 用xml配置实现整合
- 用cmd命令行实现mybatis逆向工程
- 用mapping.xml配置实现数据交互
- 用注解的方式实现数据交互
首先我的开发环境:
jdk1.8+maven3+IDEA
1. mybatis逆向攻城
逆向工程方式很多,我目前接触到的就两种,一种是借助于ide开发工具,一种是在cmd中执行命令。(其实二者原理都一样,都是执行maven的generator命令,具体请看下文)。
1. 完善pom文件


<?xml version="1.0" encoding="UTF-8"?>
<project xmlns="http://maven.apache.org/POM/4.0.0" xmlns:xsi="http://www.w3.org/2001/XMLSchema-instance"xsi:schemaLocation="http://maven.apache.org/POM/4.0.0 http://maven.apache.org/xsd/maven-4.0.0.xsd"><modelVersion>4.0.0</modelVersion><groupId>springboot-mybatis</groupId><artifactId>springboot-mybatis</artifactId><version>0.0.1-SNAPSHOT</version><packaging>jar</packaging><name>springboot-mybatis</name><description>Demo project for Spring Boot</description><parent><groupId>springboot-integration</groupId><artifactId>springboot-integration</artifactId><version>1.0-SNAPSHOT</version></parent> <!-- Add typical dependencies for a web application --><dependencies><dependency><groupId>org.springframework.boot</groupId><artifactId>spring-boot-starter-jdbc</artifactId></dependency><dependency><groupId>org.mybatis.spring.boot</groupId><artifactId>mybatis-spring-boot-starter</artifactId><version>1.3.0</version></dependency><dependency><groupId>org.springframework.boot</groupId><artifactId>spring-boot-starter-thymeleaf</artifactId></dependency><dependency><groupId>org.springframework.boot</groupId><artifactId>spring-boot-starter-web</artifactId></dependency><dependency><groupId>org.springframework.boot</groupId><artifactId>spring-boot-starter-test</artifactId><scope>test</scope></dependency><dependency><groupId>mysql</groupId><artifactId>mysql-connector-java</artifactId><version>5.1.35</version></dependency> <!-- alibaba的druid数据库连接池 --><dependency><groupId>com.alibaba</groupId><artifactId>druid</artifactId><version>1.0.11</version></dependency> <!-- alibaba的druid数据库连接池 --><dependency><groupId>com.alibaba</groupId><artifactId>druid-spring-boot-starter</artifactId><version>1.1.0</version></dependency><dependency><groupId>junit</groupId><artifactId>junit</artifactId><scope>test</scope></dependency> <!-- 分页插件 --><dependency><groupId>com.github.pagehelper</groupId><artifactId>pagehelper</artifactId><version>5.0.4</version></dependency></dependencies> <!-- Package as an executable jar --><build><finalName>springboot-mybatis</finalName><plugins><plugin><groupId>org.apache.maven.plugins</groupId><artifactId>maven-surefire-plugin</artifactId><configuration><testFailureIgnore>true</testFailureIgnore></configuration></plugin><plugin><groupId>org.mybatis.generator</groupId><artifactId>mybatis-generator-maven-plugin</artifactId><version>1.3.2</version><configuration><verbose>true</verbose><overwrite>true</overwrite></configuration></plugin></plugins></build>
</project>
pom.xml
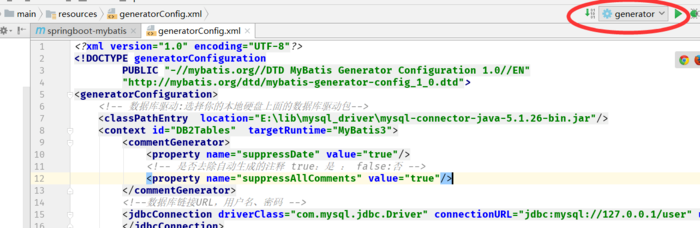
2. 逆向所需配置文件generatorConfig.xml
<?xml version="1.0" encoding="UTF-8"?> <!DOCTYPE generatorConfiguration PUBLIC"-//mybatis.org//DTD MyBatis Generator Configuration 1.0//EN""http://mybatis.org/dtd/mybatis-generator-config_1_0.dtd">
<generatorConfiguration> <!-- 数据库驱动:选择你的本地硬盘上面的数据库驱动包--><classPathEntry location="E:\lib\mysql_driver\mysql-connector-java-5.1.26-bin.jar"/><context id="DB2Tables" targetRuntime="MyBatis3"><commentGenerator><property name="suppressDate" value="true"/> <!-- 是否去除自动生成的注释 true:是 : false:否 --><property name="suppressAllComments" value="true"/></commentGenerator> <!--数据库链接URL,用户名、密码 --><jdbcConnection driverClass="com.mysql.jdbc.Driver" connectionURL="jdbc:mysql://127.0.0.1/user" userId="root"password="root"></jdbcConnection><javaTypeResolver><property name="forceBigDecimals" value="false"/></javaTypeResolver> <!-- 生成模型的包名和位置--><javaModelGenerator targetPackage="com.fantj.sbmybatis.model" targetProject="src/main/java"><property name="enableSubPackages" value="true"/><property name="trimStrings" value="true"/></javaModelGenerator> <!-- 生成映射文件的包名和位置--><sqlMapGenerator targetPackage="mapping" targetProject="src/main/resources"><property name="enableSubPackages" value="true"/></sqlMapGenerator> <!-- 生成DAO的包名和位置--><javaClientGenerator type="XMLMAPPER" targetPackage="com.fantj.sbmybatis.mapper" targetProject="src/main/java"><property name="enableSubPackages" value="true"/></javaClientGenerator> <!-- 要生成的表 tableName是数据库中的表名或视图名 domainObjectName是实体类名--><table tableName="user" domainObjectName="User" enableCountByExample="false" enableUpdateByExample="false"enableDeleteByExample="false" enableSelectByExample="false" selectByExampleQueryId="false"></table></context>
</generatorConfiguration>
generatorConfig.xml
3. 利用IDE创建逆向工程启动类
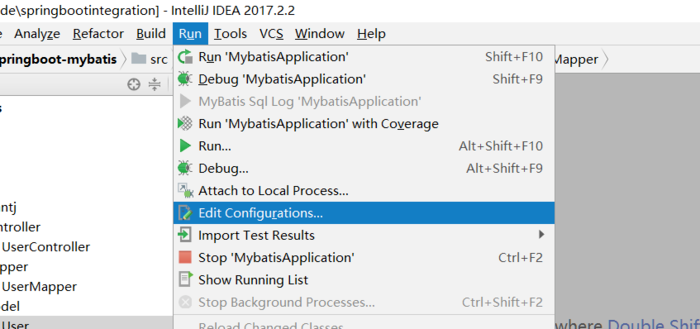
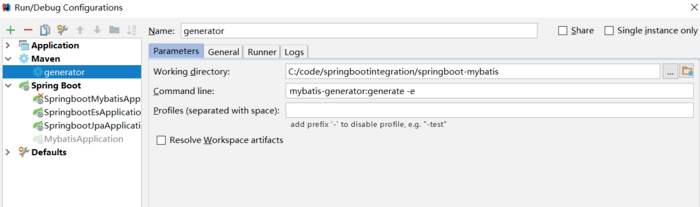
4. add一个Maven configuration
5. 我的数据库和表结构

6. application配置文件
server:port: 8080
spring:datasource:name: test url: jdbc:mysql://127.0.0.1:3306/user username: rootpassword: root # druid 连接池type: com.alibaba.druid.pool.DruidDataSource driver-class-name: com.mysql.jdbc.Driver filters: stat maxActive: 20 initialSize: 1 maxWait: 60000 minIdle: 1 timeBetweenEvictionRunsMillis: 60000 minEvictableIdleTimeMillis: 300000 validationQuery: select 'x' testWhileIdle: true testOnBorrow: false testOnReturn: false poolPreparedStatements: true maxOpenPreparedStatements: 20
mybatis:mapper-locations: classpath:mapping/*.xml type-aliases-package: com.fant.model #pagehelper分页插件
pagehelper: helperDialect: mysql reasonable: true supportMethodsArguments: true params: count=countSql
application.yml
运行generator工程 自动生成代码
生成的文件
User.java
package com.fantj.model;import java.util.Date;public class User {private Integer id;private String username;private Date birthday;private String sex;private String address;public Integer getId() {return id;}public void setId(Integer id) {this.id = id;}public String getUsername() {return username;}public void setUsername(String username) {this.username = username == null ? null : username.trim();}public Date getBirthday() {return birthday;}public void setBirthday(Date birthday) {this.birthday = birthday;}public String getSex() {return sex;}public void setSex(String sex) {this.sex = sex == null ? null : sex.trim();}public String getAddress() {return address;}public void setAddress(String address) {this.address = address == null ? null : address.trim();}
}
User.java
UserMapper .java
package com.fantj.mapper;import com.fantj.model.User;import java.util.List;public interface UserMapper {int deleteByPrimaryKey(Integer id);int insert(User record);int insertSelective(User record);User selectByPrimaryKey(Integer id);int updateByPrimaryKeySelective(User record);int updateByPrimaryKey(User record);List<User> selectAll();
}
userMapper.java
UserMapper.xml
<?xml version="1.0" encoding="UTF-8" ?> <!DOCTYPE mapper PUBLIC "-//mybatis.org//DTD Mapper 3.0//EN""http://mybatis.org/dtd/mybatis-3-mapper.dtd" >
<mapper namespace="com.fantj.mapper.UserMapper"><resultMap id="BaseResultMap" type="com.fantj.model.User"><id column="id" property="id" jdbcType="INTEGER"/><result column="username" property="username" jdbcType="VARCHAR"/><result column="birthday" property="birthday" jdbcType="DATE"/><result column="sex" property="sex" jdbcType="CHAR"/><result column="address" property="address" jdbcType="VARCHAR"/></resultMap><sql id="Base_Column_List"> id, username, birthday, sex, address </sql><select id="selectAll" resultMap="BaseResultMap">select<include refid="Base_Column_List"/>from user</select><select id="selectByPrimaryKey" resultMap="BaseResultMap" parameterType="java.lang.Integer">select<include refid="Base_Column_List"/>from user where id = #{id,jdbcType=INTEGER}</select><delete id="deleteByPrimaryKey"parameterType="java.lang.Integer"> delete from user where id = #{id,jdbcType=INTEGER} </delete><insert id="insert"parameterType="com.fantj.model.User"> insert into user (id, username, birthday, sex, address) values (#{id,jdbcType=INTEGER}, #{username,jdbcType=VARCHAR}, #{birthday,jdbcType=DATE}, #{sex,jdbcType=CHAR}, #{address,jdbcType=VARCHAR}) </insert><insert id="insertSelective" parameterType="com.fantj.model.User">insert into user<trim prefix="(" suffix=")" suffixOverrides=","><if test="id != null">id,</if><if test="username != null">username,</if><if test="birthday != null">birthday,</if><if test="sex != null">sex,</if><if test="address != null">address,</if></trim><trim prefix="values (" suffix=")" suffixOverrides=","><if test="id != null">#{id,jdbcType=INTEGER},</if><if test="username != null">#{username,jdbcType=VARCHAR},</if><if test="birthday != null">#{birthday,jdbcType=DATE},</if><if test="sex != null">#{sex,jdbcType=CHAR},</if><if test="address != null">#{address,jdbcType=VARCHAR},</if></trim></insert><update id="updateByPrimaryKeySelective" parameterType="com.fantj.model.User">update user<set><if test="username != null">username = #{username,jdbcType=VARCHAR},</if><if test="birthday != null">birthday = #{birthday,jdbcType=DATE},</if><if test="sex != null">sex = #{sex,jdbcType=CHAR},</if><if test="address != null">address = #{address,jdbcType=VARCHAR},</if></set>where id = #{id,jdbcType=INTEGER}</update><update id="updateByPrimaryKey"parameterType="com.fantj.model.User"> update user set username = #{username,jdbcType=VARCHAR}, birthday = #{birthday,jdbcType=DATE}, sex = #{sex,jdbcType=CHAR}, address = #{address,jdbcType=VARCHAR} where id = #{id,jdbcType=INTEGER} </update>
</mapper>
userMapper.xml
修改启动类
逆向生成代码后,我们还需要在启动类上添加一个@MapperScan("com.fantj.mapper")注解,告诉我们的Mapper需要扫描的包,这样就不用每个Mapper上都添加@Mapper注解了
package com.fantj;import com.fantj.util.Params;
import org.mybatis.spring.annotation.MapperScan;
import org.springframework.boot.SpringApplication;
import org.springframework.boot.autoconfigure.EnableAutoConfiguration;
import org.springframework.boot.autoconfigure.SpringBootApplication;
import org.springframework.context.annotation.Configuration;
import org.springframework.web.bind.annotation.RequestMapping;
import org.springframework.web.bind.annotation.RestController;import java.util.List;@SpringBootApplication
@MapperScan("com.fantj.mapper")
public class MybatisApplication {public static void main(String[] args) {SpringApplication.run(MybatisApplication.class, args);}
}
App.java
完善controller和service
UserController.java
package com.fantj.controller;import com.fantj.model.User;
import com.fantj.service.UserService;
import org.springframework.beans.factory.annotation.Autowired;
import org.springframework.web.bind.annotation.*;import javax.jws.soap.SOAPBinding;
import java.util.Date;
import java.util.List;@RestController
@RequestMapping("/user")
public class UserController {@Autowiredprivate UserService userService;@RequestMapping(method = RequestMethod.GET, value = "/delete/{id}")public void delete(@PathVariable("id") int id) {userService.delete(id);}@RequestMapping(method = RequestMethod.POST, value = "/insert")public void insert(User user) {userService.insert(user);}@RequestMapping(method = RequestMethod.POST, value = "/update/{id}")public void update(@RequestParam User user) {userService.update(user);}@RequestMapping(method = RequestMethod.GET, value = "/{id}/select")public User select(@PathVariable("id") int id) {return userService.selectById(id);}@RequestMapping(method = RequestMethod.GET, value = "/selectAll/{pageNum}/{pageSize}")public List<User> selectAll(@PathVariable("pageNum") int pageNum, @PathVariable("pageSize") int pageSize) {return userService.selectAll(pageNum, pageSize);}
}
UserController.java
UserService.java
package com.fantj.service;import com.fantj.model.User;import java.util.List;public interface UserService {/*** 删除*/public void delete(int id);/*** 增加*/public void insert(User user);/*** 更新*/public int update(User user);/*** 查询单个*/public User selectById(int id);/*** 查询全部列表*/public List<User> selectAll(int pageNum, int pageSize);
}
UserService.java
UserServiceImpl .java
package com.fantj.service.impl;import com.fantj.mapper.UserMapper;
import com.fantj.model.User;
import com.fantj.service.UserService;
import com.github.pagehelper.PageHelper;
import org.springframework.beans.factory.annotation.Autowired;
import org.springframework.stereotype.Service;import java.util.List;@Service
public class UserServiceImpl implements UserService {@Autowiredprivate UserMapper userMapper;/*** 删除 * * @param id*/@Overridepublic void delete(int id) {userMapper.deleteByPrimaryKey(id);}/*** 增加 * * @param user*/@Overridepublic void insert(User user) {userMapper.insert(user);}/*** 更新 * * @param user*/@Overridepublic int update(User user) {return userMapper.updateByPrimaryKey(user);}/*** 查询单个 * * @param id*/@Overridepublic User selectById(int id) {return userMapper.selectByPrimaryKey(id);}/*** 查询全部列表,并做分页 * * @param pageNum 开始页数 * @param pageSize 每页显示的数据条数*/@Overridepublic List<User> selectAll(int pageNum, int pageSize) { //将参数传给这个方法就可以实现物理分页了,非常简单。 PageHelper.startPage(pageNum,pageSize); return userMapper.selectAll(); } }
UserServiceImpl.java
原文地址
spring boot2 整合(一)Mybatis (特别完整!)相关推荐
- Spring Boot2整合Shiro(1):身份认证
Spring Boot2整合Shiro(1):身份认证 前言 本文主要介绍了在Spring Boot2项目中整合Shiro实现登录认证.本文假设读者已经对Shiro和基于RBAC的权限控制系统有了基本 ...
- Spring Boot2 整合 MyBatis 多数据源
pom.xml <?xml version="1.0" encoding="UTF-8"?> <project xmlns="htt ...
- Spring Boot2 整合 Shiro ,两种方式全总结!
前言:在 Spring Boot 中做权限管理,一般来说,主流的方案是 Spring Security ,但是,仅仅从技术角度来说,也可以使用 Shiro. 文章目录 一.Spring Securit ...
- spring mysql整合_springboot mybatis mysql 整合
1.pom文件配置 mysql mysql-connector-java runtime org.springframework.boot spring-boot-starter-test test ...
- Spring Boot2 整合 Ehcache
用惯了 Redis ,很多人已经忘记了还有另一个缓存方案 Ehcache ,是的,在 Redis 一统江湖的时代,Ehcache 渐渐有点没落了,不过,我们还是有必要了解下 Ehcache ,在有的场 ...
- spring boot2 整合(二)JPA(特别完整!)
JPA全称Java Persistence API.JPA通过JDK 5.0注解或XML描述对象-关系表的映射关系,并将运行期的实体对象持久化到数据库中. JPA 的目标之一是制定一个可以由很多供应商 ...
- spring boot2 整合(三)JOOQ工具
###先来介绍下jooq jOOQ是一个基于Java编写SQL的工具包,具有:简单.轻量.函数式编程写SQL等独特优势,非常适合敏捷快速迭代开发. SQL语句: SELECT AUTHOR.FIRST ...
- Spring Boot 整合 Mybatis Annotation 注解的完整 Web 案例
摘要: 原创出处 www.bysocket.com 「泥瓦匠BYSocket 」欢迎转载,保留摘要,谢谢! 『 公司需要人.产品.业务和方向,方向又要人.产品.业务和方向,方向- 循环』 本文提纲 一 ...
- Spring Boot2.x-08Spring Boot2.1.2 整合 Mybatis1.3.2 + 通用Mapper2.1.4 + PageHelper1.2.10 + Druid 1.1.10
文章目录 概述 整合 MyBatis 整合 通用Mapper2.1.4及 PageHelper1.2.10 添加依赖 通用mapper 编写 application.yml增加配置 集成验证测试 整合 ...
最新文章
- python selenium 进入新标签页_Python 爬虫 | 用selenium实现批改网的自动翻译
- 【FPGA】ROM/EPROM的设计(使用加载文件的方式初始化)
- Flex4之与后台服务器通信方式:URLRequest+URLLoader【JAVA方式】
- 有线网卡和无线网卡同时上网 优先级切换的设置方法
- 【HDU 2507】【ACM-ICPC算法基础训练教程 题1-6】迷瘴(贪心)
- java 基础知识总结
- ae导出json_关于AE转json动画开发避坑指南
- 【必懂】C语言水仙花数题解
- openlayers之EPSG3857
- 从后台servlet中,获取jsp页面输入的值,来删除用户一行信息
- python pyquery 解析html数据
- C语言编写万年历程序
- atm机用visio画工作流程图_VISIO画职能流程图规范性培训文档(内附模版).ppt
- Thunderbolt3 方案介绍及应用案例介绍
- wx_xcx_api.php,GitHub - biangbiang/wxpay-php: php项目基于微信支付JS SDK和JS API的接入开发...
- tomcat 配置 数据库连接池
- 谈谈51单片机延时子程序
- 【智能制造】全球人工智能与制造业融合的现状及思考
- 拓扑图节点拖动的实现(学习笔记)
- scanf 中 的应用本质 | C语言
热门文章
- java和python的比较-java和python的比较
- python小项目实例流程-公司内项目对接钉钉审批流程(python)
- 记事本写python怎么运行-python入门之一个简单记事本
- python版本越高越好吗-python一般用什么版本
- Opengl-光照-基本光照-材质(有了材质一个物体才算是完整了)
- LeetCode Number of Boomerangs
- AlarmManager与PendingIntent的联合使用(二)
- 2018 ACM-ICPC 中国大学生程序设计竞赛线上赛 H题 Rock Paper Scissors Lizard Spock.(FFT字符串匹配)...
- Linux中文件上传使用rz
- VS2005的Command Window 调试命令的总结(转载)