Open***异地机房互连以及负载均衡高可用解决方案
架构方案如下:
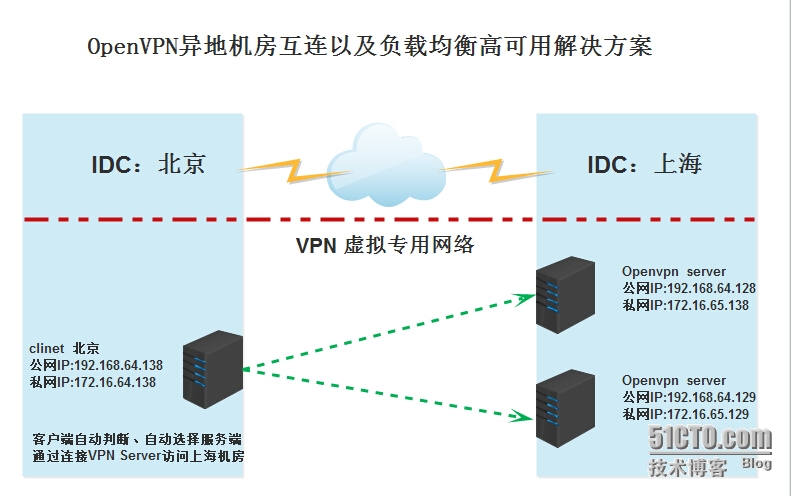
---Open××× server 搭建部署
1、在Open×××-1 server上安装流程
(1.添加epel源
[root@ShangHai-×××-1 ~]# yum install epel-release
(2.安装Open×××
[root@ShangHai-×××-1 ~]# yum install open*** lzo-devel easy-rsa -y
(3.复制server示例文件
[root@ShangHai-×××-1 ~]# cp /usr/share/doc/open***-*/sample/sample-config-files/server.conf /etc/open***
(4.使用easy-rsa生成服务器证书以及密钥
[root@ShangHai-×××-1 ~]# cp -R /usr/share/easy-rsa/ /etc/open***
[root@ShangHai-×××-1 ~]# cd /etc/open***/easy-rsa/2.0/
#vars文件修改如下
[root@ShangHai-×××-1 2.0]# egrep -v '^$|^#' vars
export EASY_RSA="`pwd`"
export OPENSSL="openssl"
export PKCS11TOOL="pkcs11-tool"
export GREP="grep"
export KEY_CONFIG=`$EASY_RSA/whichopensslcnf $EASY_RSA`
export KEY_DIR="$EASY_RSA/keys"
echo NOTE: If you run ./clean-all, I will be doing a rm -rf on $KEY_DIR
export PKCS11_MODULE_PATH="dummy"
export PKCS11_PIN="dummy"
export KEY_SIZE=2048
export CA_EXPIRE=3650
export KEY_EXPIRE=3650
export KEY_COUNTRY="CN"
export KEY_PROVINCE="BJ"
export KEY_CITY="BeiJing"
export KEY_ORG="example.com"
export KEY_EMAIL="my@example.com"
export KEY_OU="www.example.com"
export KEY_NAME="EasyRSA"
#初始化配置
[root@ShangHai-×××-1 2.0]# source vars
[root@ShangHai-×××-1 2.0]# ./clean-all
#生成CA证书
[root@oShangHai-×××-1 2.0]# ./build-ca
Generating a 2048 bit RSA private key
..............................+++
................................+++
writing new private key to 'ca.key'
-----
You are about to be asked to enter information that will be incorporated
into your certificate request.
What you are about to enter is what is called a Distinguished Name or a DN.
There are quite a few fields but you can leave some blank
For some fields there will be a default value,
If you enter '.', the field will be left blank.
-----
Country Name (2 letter code) [CN]:
State or Province Name (full name) [BJ]:
Locality Name (eg, city) [BeiJing]:
Organization Name (eg, company) [example.com]:
Organizational Unit Name (eg, section) [www.example.com]:
Common Name (eg, your name or your server's hostname) [example.com CA]:
Name [EasyRSA]:
Email Address [my@example.com]:
#生成服务器证书
[root@oShangHai-×××-1 2.0]# ./build-key-server server
Generating a 2048 bit RSA private key
....................+++
....................................................................................+++
writing new private key to 'server.key'
-----
You are about to be asked to enter information that will be incorporated
into your certificate request.
What you are about to enter is what is called a Distinguished Name or a DN.
There are quite a few fields but you can leave some blank
For some fields there will be a default value,
If you enter '.', the field will be left blank.
-----
Country Name (2 letter code) [CN]: [直接回车]
State or Province Name (full name) [BJ]:[直接回车]
Locality Name (eg, city) [BeiJing]:[直接回车]
Organization Name (eg, company) [example.com]:[直接回车]
Organizational Unit Name (eg, section) [www.example.com]:[直接回车]
Common Name (eg, your name or your server's hostname) [server]:[直接回车]
Name [EasyRSA]:[直接回车]
Email Address [my@example.com]:[直接回车]Please enter the following 'extra' attributes
to be sent with your certificate request
A challenge password []:[直接回车]
An optional company name []:[直接回车]
Using configuration from /etc/open***/easy-rsa/2.0/openssl-1.0.0.cnf
Check that the request matches the signature
Signature ok
The Subject's Distinguished Name is as follows
countryName           :PRINTABLE:'CN'
stateOrProvinceName   :PRINTABLE:'BJ'
localityName          :PRINTABLE:'BeiJing'
organizationName      :PRINTABLE:'example.com'
organizationalUnitName:PRINTABLE:'www.example.com'
commonName            :PRINTABLE:'server'
name                  :PRINTABLE:'EasyRSA'
emailAddress          :IA5STRING:'my@example.com'
Certificate is to be certified until Jul 18 03:07:04 2025 GMT (3650 days)
Sign the certificate? [y/n]:y1 out of 1 certificate requests certified, commit? [y/n]y
Write out database with 1 new entries
Data Base Updated
#生成服务器密钥
[root@oShangHai-×××-1 2.0]# ./build-dh
Generating DH parameters, 2048 bit long safe prime, generator 2
This is going to take a long time
.....
(5.生成客户端证书和密钥
[root@ShangHai-×××-1 2.0]# ./build-key client
Generating a 2048 bit RSA private key
......+++
.......................+++
writing new private key to 'client.key'
-----
You are about to be asked to enter information that will be incorporated
into your certificate request.
What you are about to enter is what is called a Distinguished Name or a DN.
There are quite a few fields but you can leave some blank
For some fields there will be a default value,
If you enter '.', the field will be left blank.
-----
Country Name (2 letter code) [CN]:[直接回车]
State or Province Name (full name) [BJ]:[直接回车]
Locality Name (eg, city) [BeiJing]:[直接回车]
Organization Name (eg, company) [example.com]:[直接回车]
Organizational Unit Name (eg, section) [www.example.com]:[直接回车]
Common Name (eg, your name or your server's hostname) [client]:[直接回车]
Name [EasyRSA]:[直接回车]
Email Address [my@example.com]:[直接回车]Please enter the following 'extra' attributes
to be sent with your certificate request
A challenge password []:[直接回车]
An optional company name []:[直接回车]
Using configuration from /etc/open***/easy-rsa/2.0/openssl-1.0.0.cnf
Check that th
e request matches the signature
Signature ok
The Subject's Distinguished Name is as follows
countryName           :PRINTABLE:'CN'
stateOrProvinceName   :PRINTABLE:'BJ'
localityName          :PRINTABLE:'BeiJing'
organizationName      :PRINTABLE:'example.com'
organizationalUnitName:PRINTABLE:'www.example.com'
commonName            :PRINTABLE:'client'
name                  :PRINTABLE:'EasyRSA'
emailAddress          :IA5STRING:'my@example.com'
Certificate is to be certified until Jul 18 03:09:14 2025 GMT (3650 days)
Sign the certificate? [y/n]:y1 out of 1 certificate requests certified, commit? [y/n]y
Write out database with 1 new entries
Data Base Updated
(6.将四个所需文件复制到Open×××配置目录
[root@ShangHai-×××-1 2.0]# [root@oShangHai-×××-1 2.0]# cp keys/{dh2048.pem,ca.crt,server.crt,server.key} /etc/open***/
(7.修改server配置文件
[root@ShangHai-×××-1 2.0 ~]# egrep -v '^;|^#|^$' /etc/open***/server.conf
#公网IP
local 192.168.64.129
port 11194
proto tcp
dev tun
ca ca.crt
cert server.crt
key server.key  # This file should be kept secret
dh dh2048.pem
#×××获取的IP网段
server 10.10.10.0 255.255.255.0
ifconfig-pool-persist ipp.txt
#允许×××访问的本地私网网段
push "route 172.16.65.0 255.255.255.0"
push "dhcp-option DNS 8.8.8.8"
push "dhcp-option DNS 8.8.4.4"
client-to-client
duplicate-cn
keepalive 10 120
comp-lzo
max-clients 300
user nobody
group nobody
persist-key
persist-tun
status /var/log/open***-status.log
log-append  /var/log/open***.log
verb 3
mute 10
(8.配置路由转发
[root@oShangHai-×××-1 2.0]# sed -i s'/net.ipv4.ip_forward = 0/net.ipv4.ip_forward = 1/' /etc/sysctl.conf
(9.配置防火墙开启端口并做NAT
[root@oShangHai-×××-1 2.0]# iptables -t nat -A POSTROUTING -s 10.10.10.0/24 -j SNAT --to-source 172.16.65.128
[root@oShangHai-×××-1 2.0]# iptables -A INPUT -m state --state NEW -m tcp -p tcp --dport 11194 -j ACCEPT
[root@oShangHai-×××-1 2.0]# /etc/init.d/iptables save
iptables:将防火墙规则保存到 /etc/sysconfig/iptables:     [确定]
[root@oShangHai-×××-1 2.0]# /etc/init.d/iptables restart
iptables:将链设置为政策 ACCEPT:filter nat                [确定]
iptables:清除防火墙规则:                                 [确定]
iptables:正在卸载模块:                                   [确定]
iptables:应用防火墙规则:                                 [确定]
(10.启动Open××× [如果启动失败,请查看日志]
[root@oShangHai-×××-1 2.0]# /etc/init.d/open*** start
正在启动 open***:                                         [确定]
[root@oShangHai-×××-1 2.0]# netstat -antup |grep open***
tcp        0      0 192.168.64.128:11194        0.0.0.0:*                   LISTEN      2419/open***
2、在Open×××-2 server上安装流程
(1.添加epel源
[root@ShangHai-×××-2 ~]# yum install epel-release
(2.安装Open×××
[root@ShangHai-×××-2 ~]# yum install open*** lzo-devel easy-rsa -y
(3.从Open×××-1 server上拷贝配置文件和证书密钥
[root@ShangHai-×××-2 ~]# scp -r 192.168.64.128:/etc/open***/* /etc/open***/
(4.修改server配置文件
[root@ShangHai-×××-1 2.0 ~]# egrep -v '^;|^#|^$' /etc/open***/server.conf
#本机公网IP [和Open×××-1 server 有区别]
local 192.168.64.129
port 11194
proto tcp
dev tun
ca ca.crt
cert server.crt
key server.key  # This file should be kept secret
dh dh2048.pem
#×××获取的IP网段 [和Open×××-1 server 有区别]
server 10.10.11.0 255.255.255.0
ifconfig-pool-persist ipp.txt
#允许×××访问的本地私网网段
push "route 172.16.65.0 255.255.255.0"
push "dhcp-option DNS 8.8.8.8"
push "dhcp-option DNS 8.8.4.4"
client-to-client
duplicate-cn
keepalive 10 120
comp-lzo
max-clients 300
user nobody
group nobody
persist-key
persist-tun
status /var/log/open***-status.log
log-append  /var/log/open***.log
verb 3
mute 10
(5.配置路由转发
[root@oShangHai-×××-2 ~]# sed -i s'/net.ipv4.ip_forward = 0/net.ipv4.ip_forward = 1/' /etc/sysctl.conf
(6.配置防火墙开启端口并做NAT [和Open×××-1 server 有区别]
[root@oShangHai-×××-2 ~]# iptables -t nat -A POSTROUTING -s 10.10.11.0/24 -j SNAT --to-source 172.16.65.129
[root@oShangHai-×××-2 ~]# iptables -A INPUT -m state --state NEW -m tcp -p tcp --dport 11194 -j ACCEPT
[root@oShangHai-×××-2 ~]# /etc/init.d/iptables save
iptables:将防火墙规则保存到 /etc/sysconfig/iptables:     [确定]
[root@oShangHai-×××-2 2.0]# /etc/init.d/iptables restart
iptables:将链设置为政策 ACCEPT:filter nat                [确定]
iptables:清除防火墙规则:                                 [确定]
iptables:正在卸载模块:                                   [确定]
iptables:应用防火墙规则:                                 [确定]
(7.启动Open××× [如果启动失败,请查看日志]
[root@ShangHai-×××-2 ~]# /etc/init.d/open*** start
正在启动 open***:                                         [确定]
[root@ShangHai-×××-2 ~]# netstat -antup |grep open***
tcp        0      0 192.168.64.129:11194        0.0.0.0:*                   LISTEN      2419/open***
3、安装Open××× client端
(1.添加epel源
[root@BeiJing-Client ~]# yum install epel-release
(2.安装Open×××
[root@BeiJing-Client ~]# yum install open*** lzo-devel easy-rsa -y
(3.复制client示例文件
[root@BeiJing-Client ~]# cp /usr/share/doc/open***-*/sample/sample-config-files/client.conf /etc/open***
(4.修改client配置文件
[root@BeiJing-Client ~]# egrep -v '^;|^#|^$' /etc/open***/client.conf
client
dev tun
proto tcp
#Open×××-1 server
remote 192.168.64.128 11194
#Open×××-2 server
remote 192.168.64.129 11194
resolv-retry infinite
nobind
persist-key
persist-tun
comp-lzo
verb 3
ca ca.crt
cert client.crt
key client.key
(5.从Open××× server端拷贝client证书
[root@BeiJing-Client ~]# scp 192.168.64.128:/etc/open***/easy-rsa/2.0/keys/{ca.crt,client.crt,client.key} /etc/open***/
(6.启动Open××× Client
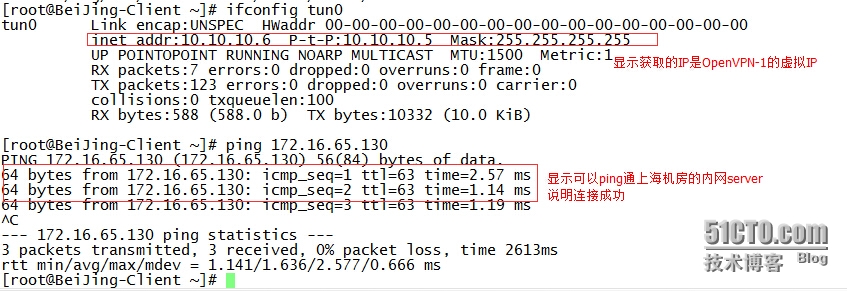
[root@ShangHai-×××-2 ~]# /etc/init.d/open*** start
正在启动 open***:                                         [确定]
#查看是否获取到IP [获取到的是Open×××-1 server的虚拟IP段]
[root@BeiJing-Client ~]# ifconfig tun0
tun0      Link encap:UNSPEC  HWaddr 00-00-00-00-00-00-00-00-00-00-00-00-00-00-00-00  inet addr:10.10.10.6  P-t-P:10.10.10.5  Mask:255.255.255.255UP POINTOPOINT RUNNING NOARP MULTICAST  MTU:1500  Metric:1RX packets:0 errors:0 dropped:0 overruns:0 frame:0TX packets:0 errors:0 dropped:0 overruns:0 carrier:0collisions:0 txqueuelen:100 RX bytes:0 (0.0 b)  TX bytes:0 (0.0 b)
(7.登录 Open×××-1 server 查看Open×××日志信息
[root@ShangHai-×××-1 network-scripts]# tail -f /var/log/open***.log
Tue Jul 21 15:55:41 2015 192.168.64.138:52258 Data Channel Decrypt: Cipher 'BF-CBC' initialized with 128 bit key
Tue Jul 21 15:55:41 2015 192.168.64.138:52258 Data Channel Decrypt: Using 160 bit message hash 'SHA1' for HMAC authentication
Tue Jul 21 15:55:41 2015 192.168.64.138:52258 Control Channel: TLSv1.2, cipher TLSv1/SSLv3 DHE-RSA-AES256-GCM-SHA384, 2048 bit RSA
Tue Jul 21 15:55:41 2015 192.168.64.138:52258 [client] Peer Connection Initiated with [AF_INET]192.168.64.138:52258
Tue Jul 21 15:55:41 2015 client/192.168.64.138:52258 MULTI_sva: pool returned IPv4=10.10.10.6, IPv6=(Not enabled)
Tue Jul 21 15:55:41 2015 client/192.168.64.138:52258 MULTI: Learn: 10.10.10.6 -> client/192.168.64.138:52258 #显示将10.10.10.6分配给192.168.64.138 client
Tue Jul 21 15:55:41 2015 client/192.168.64.138:52258 MULTI: primary virtual IP for client/192.168.64.138:52258: 10.10.10.6
Tue Jul 21 15:55:43 2015 client/192.168.64.138:52258 PUSH: Received control message: 'PUSH_REQUEST'
Tue Jul 21 15:55:43 2015 client/192.168.64.138:52258 send_push_reply(): safe_cap=940
Tue Jul 21 15:55:43 2015 client/192.168.64.138:52258 SENT CONTROL [client]: 'PUSH_REPLY,route 172.16.64.0 255.255.255.0,dhcp-option DNS 8.8.8.8,dhcp-option DNS 8.8.4.4,route 10.10.10.0 255.255.255.0,topology net30,ping 10,ping-restart 120,ifconfig 10.10.10.6 10.10.10.5' (status=1)
4、测试Open×××的连通性和Open×××的fuzaijun高可用性能
(1.获取到虚拟IP后,测试ping上海机房的内部server
![]()
(2.关闭Open×××-1 server
[root@ShangHai-×××-1 ~]# /etc/init.d/open*** stop
正在关闭open***:                                          [确定]
[root@ShangHai-×××-1 ~]# netstat -antup |grep open***
(3.查看Open×××-2 server Open×××日志信息
[root@ShangHai-×××-2 ~]# tail -f /var/log/open***.log
Tue Jul 21 16:29:07 2015 192.168.64.138:40636 Data Channel Decrypt: Cipher 'BF-CBC' initialized with 128 bit key
Tue Jul 21 16:29:07 2015 192.168.64.138:40636 Data Channel Decrypt: Using 160 bit message hash 'SHA1' for HMAC authentication
Tue Jul 21 16:29:07 2015 192.168.64.138:40636 Control Channel: TLSv1.2, cipher TLSv1/SSLv3 DHE-RSA-AES256-GCM-SHA384, 2048 bit RSA
Tue Jul 21 16:29:07 2015 192.168.64.138:40636 [client] Peer Connection Initiated with [AF_INET]192.168.64.138:40636
Tue Jul 21 16:29:07 2015 client/192.168.64.138:40636 MULTI_sva: pool returned IPv4=10.10.11.6, IPv6=(Not enabled)
Tue Jul 21 16:29:07 2015 client/192.168.64.138:40636 MULTI: Learn: 10.10.11.6 -> client/192.168.64.138:40636 #显示将10.10.11.6分配给192.168.64.138 client
Tue Jul 21 16:29:07 2015 client/192.168.64.138:40636 MULTI: primary virtual IP for client/192.168.64.138:40636: 10.10.11.6
Tue Jul 21 16:29:09 2015 client/192.168.64.138:40636 PUSH: Received control message: 'PUSH_REQUEST'
Tue Jul 21 16:29:09 2015 client/192.168.64.138:40636 send_push_reply(): safe_cap=940
Tue Jul 21 16:29:09 2015 client/192.168.64.138:40636 SENT CONTROL [client]: 'PUSH_REPLY,dhcp-option DNS 8.8.8.8,dhcp-option DNS 8.8.4.4,route 10.10.11.0 255.255.255.0,topology net30,ping 10,ping-restart 120,ifconfig 10.10.11.6 10.10.11.5' (status=1)
(4.查看是否获取新的IP,再次测试ping上海机房的内部server

至此,Open×××异地跨机房以及负载均衡高可用方案以构建完成,不足至此请大家指出,相互学习,共同进步。
转载于:https://blog.51cto.com/bobbie/1677042
Open***异地机房互连以及负载均衡高可用解决方案相关推荐
- Lvs+keepAlived实现负载均衡高可用集群(DR实现)
第1章 LVS 简介 1.1 LVS介绍 LVS是Linux Virtual Server的简写,意为Linux虚拟服务器,是虚拟的服务器集群系统,可在UNIX/LINUX平台下实现负载均衡集群功能. ...
- linux系统下对网站实施负载均衡+高可用集群需要考虑的几点
随着linux系统的成熟和广泛普及,linux运维技术越来越受到企业的关注和追捧.在一些中小企业,尤其是牵涉到电子商务和电子广告类的网站,通常会要求作负载均衡和高可用的Linux集群方案. 那么如何实 ...
- saltstack实现haproxy+keepalived负载均衡+高可用(二)
一键部署haproxy+keepalived实现负载均衡+高可用 实验环境: !!!! 特别注意: www.westos.org为test1的minion名字 test1: 172.25.1.1 ...
- Nginx+keepalived负载均衡高可用篇第③版
Nginx+keepalived负载均衡高可用篇第③版 对付中.小型企业,假如没有资金去购买昂贵的四/七层负载均衡交换机,那么Nginx是不错的七层负载均衡选择,并且可以通过Nginx + Keepa ...
- LVS+Keepalived-DR模式负载均衡高可用集群
LVS+Keepalived DR模式负载均衡+高可用集群架构图 工作原理: Keepalived采用VRRP热备份协议实现Linux服务器的多机热备功能. VRRP,虚拟路由冗余协议,是针对路由器的 ...
- nginx负载均衡高可用
1.1 什么是负载均衡高可用 nginx作为负载均衡器,所有请求都到了nginx,可见nginx处于非常重点的位置,如果nginx服务器宕机后端web服务将无法提供服务,影响严重. 为了屏蔽负载均 ...
- LVS原理详解及部署之五:LVS+keepalived实现负载均衡高可用
本文我们主要讲解的是LVS通过keepalived来实现负载均衡和高可用,而不是我们第三篇文章介绍的通过手动的方式来进行配置.通过脚本的方式来显示RS节点的健康检查和LVS的故障切换.此文会通过一个实 ...
- 双网卡绑定之负载均衡高可用(bond)
一.bond的工作原理 所谓的bond就是将两块或两块以上网卡绑定同一个IP地址对外提供服务,从而实现负载均衡高可用.当然,直接给两块网卡设置同一IP地址 是不可能的.通过bonding,虚拟一块网卡 ...
- LVS+Keepalived实现负载均衡高可用
使用脚本实现LVS负载均衡 环境: 3台主机 DS:192.168.100.1 RS1:192.168.100.11 RS2:192.168.100.12 VIP:192.168.100.100 安装 ...
最新文章
- R语言使用for循环嵌套ggplot2可视化输出多个可视化结果实战
- 华为nova5iotg功能使用_如果你的手机存在NFC功能,一定要尝试一下这些操作,体验超级棒...
- 线上学python哪家好-0基础学python,打算找培训机构,是线上好还是线下好?
- C++,那些可爱的小陷阱(二)
- HDU 5821 Ball
- php 查看文件锁定状态_PHP flock 文件锁详细介绍
- HDU 1690 Bus System
- Codeforces Round #215 (Div. 2) D. Sereja ans Anagrams
- 京东华为 Java开发历年经典题汇总
- yum list失败
- Unity3D下Linux平台播放RTSP或RTMP流
- 2020快手K12教育培训行业数据价值报告
- Centos7.4系统下安装httpd,mariadb,php7.1环境运行禅道
- 在线健身悄然升温,千亿市场潜力正在释放
- 腾讯封杀linux/mac QQ
- Android源码刷机步骤
- 最适合十二星座的那些表白方式!
- Web前端大作业——基于HTML+CSS+JavaScript仿英雄联盟LOL游戏网站
- 软件对硬盘性能测试,硬盘性能检测详细图文教程
- 2019年组装的一台计算机
热门文章
- 中国石油大学 c语言程序设计 复习题,中国石油大学《C语言程序的设计》期末复习试题与答案...
- win10 php mysql,Windows10本地搭建IIS+PHP+MYSQL+phpMyAdmin运行环境图文教程(也可用于服务器)...
- IC基础知识(1)集成电路(IC)简介
- 对如何使用WaveDrom画波形图的研究(案例分解分析)
- 企业级 SpringBoot 教程 (二十三)异步方法
- Linux常用命令——hostname
- vue组件中的样式属性:scoped,解决在父组件中无法修改子组件样式问题
- [C#基础知识系列]专题十:全面解析可空类型
- sql语句数据行操作-虽然一般不用
- android 两种设置全屏的activity方式