# Writing your-first Django-app-part 4-simple-form
- 简单的表单
- 处理表单提交-跳转/错误信息
- 处理表单提交--结果显示
- 通用view (generic view) 设计:越少代码越好?
- 1.修改DemoAppPoll/urls.py
- 2.修改DemoAppPoll/views.py
简单的表单
DemoAppPoll/templates/details.html
<h1>{{ question.question_text }}</h1>{% if error_message %}<p><strong>{{ error_message }}</strong></p>{% endif %}<form action="{% url 'DemoAppPoll:vote' question.id %}" method="post">{% csrf_token %}{% for choice in question.choice_set.all %}<input type="radio" name="choice" id="choice{{ forloop.counter }}" value="{{ choice.id }}" /><label for="choice{{ forloop.counter }}">{{ choice.choice_text }}</label><br />{% endfor %}<input type="submit" value="Vote" />
</form>
转换成源码文件是:
<h1>what time is it?</h1><form action="/DemoAppPoll/2/vote/" method="post">
<input type='hidden' name='csrfmiddlewaretoken' value='nEUM2klSzxP2tZFq9oFnVai2MqqUt2z2' /><input type="radio" name="choice" id="choice1" value="4" /><label for="choice1">q2 win</label><br /><input type="radio" name="choice" id="choice2" value="5" /><label for="choice2">who win</label><br /><input type="submit" value="Vote" />
</form>
这里有几个要关注的地方:
1> 表单的提交地址,我们写的是{% url 'DemoAppPoll:vote' question.id %},在DemoAppPoll/urls.py里,我们使用
url(r'^(?P<question_id>\d+)/vote/$', views.vote, name='vote'
名称为vote来处理这个url匹配,全称需要加上命名空间,就成了DemoAppPoll:vote(http://localhost:8080/DemoAppPoll/2/vote/)
2>forloop.counter,用来显示循环的次数.
3>跨域保护CSRF, {% csrf_token %},自动生成一个隐藏的input.作为校验,保护.
处理表单提交-跳转/错误信息
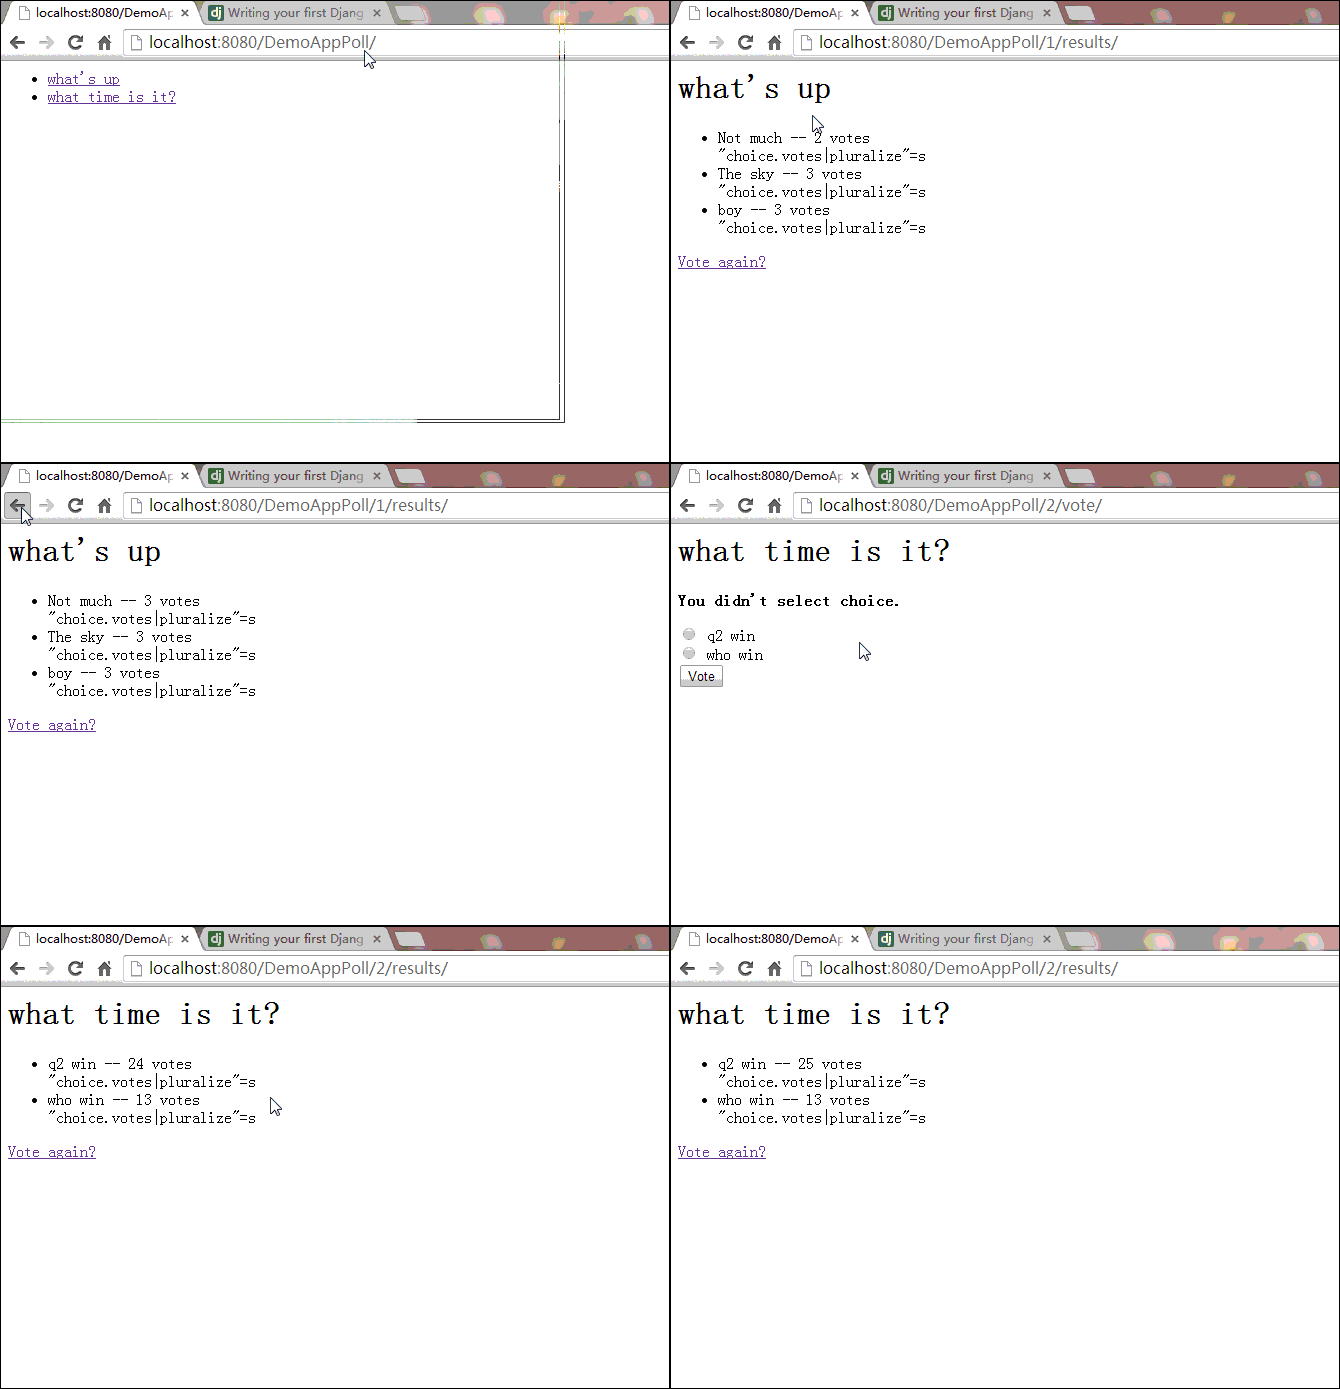
上面的表单提交后,并没有做有效的处理.
DemoAppPoll/views.py
from django.shortcuts import render,get_object_or_404
from django.http import HttpResponse,HttpResponseRedirect
from django.core.urlresolvers import reverse
from DemoAppPoll.models import Question,Choicedef vote(request, question_id):#return HttpResponse("You're voting on question %s." % question_id)q = get_object_or_404(Question,pk=question_id)try:selected_choice=q.choice_set.get(pk=request.POST['choice'])except(KeyError,Choice.DoesNotExist):return render(request,'DemoAppPoll/detail.html',{'question':q,'error_message':"You didn't select choice.",})else:selected_choice.votes+=1selected_choice.save()print "question.id=",q.idprint "question_text=",q.question_textprint "selected_choice.id=",selected_choice.idprint "selected_choice.votes=",selected_choice.votesprint "url-redirect=",reverse('DemoAppPoll:results',args=(q.id,))   return HttpResponseRedirect(reverse('DemoAppPoll:results',args=(q.id,)))
首先,根据问题ID,查找问题,确认为有效问题.
然后,根据post信息,判断是哪个选项.
投票的票数增加1之后,网页跳转.
有几个要点:
1>reqest.POST,类字典型数据(key-value).value总是Strngs
2>同理reqest.GET可以从GET方法中获取数据.
3>HttpResponseRedirect(url-to-redirect),网页跳转,仅带一个参数,那就是要跳转到的网页.
这里
4>需要跳转的url,使用了reverse()方法,返回:
"/DemoAppPoll/2/results/" 处理表单提交--结果显示
提交表单后,跳转到"/DemoAppPoll/2/results/",这个页面还没有显示什么实际的内容.
首先需要确认问题,然后指定模版来处理url:
DemoAppPoll/views.py/[fun]results
def results(request, question_id):#response = "You're looking at the results of question %s."#return HttpResponse(response % question_id)question = get_object_or_404(Question, pk=question_id)return render(request, 'DemoAppPoll/results.html', {'question': question})下面就需要编写结果显示的界面:
DemoAppPoll/templates/results.html
<h1>{{ question.question_text }}</h1><ul>
{% for choice in question.choice_set.all %}<li>{{ choice.choice_text }} -- {{ choice.votes }} vote{{ choice.votes|pluralize }}</li>"choice.votes|pluralize"={{ choice.votes|pluralize }}
{% endfor %}
</ul><a href="{% url 'DemoAppPoll:detail' question.id %}">Vote again?</a>
"choice.votes|pluralize"=s ,单词加复数的方法.
通用viw设计:越少代码越好?
detail(),results(),index(),这三个views里方法,都代表了一个通用的网页开发过程:
根据URL参数,从数据库得到数据
加载模版,返回渲染后数据.
更为便捷的方法是,使用"generic views":
- 转换URLconf
- 删除冗余代码
- 使用"generic views."
1.修改DemoAppPoll/urls.py
from django.conf.urls import patterns,urlfrom DemoAppPoll import viewsurlpatterns = patterns('',url(r'^$',views.IndexView.as_view(),name='index'),url(r'^(?P<pk>\d+)/$',views.DetailView.as_view(),name='detail'),url(r'^(?P<pk>\d+)/results/$',views.ResultsView.as_view(),name='results'),url(r'^(?P<question_id>\d+)/vote/$',views.vote,name='vote'),
)
和之前比较一下:
url(r'^$', views.index, name='index'),url(r'^(?P<question_id>\d+)/$', views.detail, name='detail'),url(r'^(?P<question_id>\d+)/results/$', views.results, name='results'),url(r'^(?P<question_id>\d+)/vote/$', views.vote, name='vote'),使用<pk>代替了<question_id>
2.修改DemoAppPoll/views.py
from django.views import genericclass IndexView(generic.ListView):template_name='DemoAppPoll/index.html'context_object_name='latest_question_list'def get_queryset(self):return Question.objects.order_by('-pub_date')[:5]class DetailView(generic.DetailView):model = Questiontemplate_name="DemoAppPoll/detail.html"class ResultsView(generic.DetailView):model = Questiontemplate_name="DemoAppPoll/results.html" 新导入了包,传入参数也有了变化.
之前是:
def index(request):latest_question_list = Question.objects.order_by('-pub_date')[:5]context = {'latest_question_list': latest_question_list}return render(request, 'DemoAppPoll/index.html', context)def detail(request, question_id):question = get_object_or_404(Question, pk=question_id)return render(request, 'DemoAppPoll/detail.html', {'question': question})def results(request, question_id):#response = "You're looking at the results of question %s."#return HttpResponse(response % question_id)question = get_object_or_404(Question, pk=question_id)return render(request, 'DemoAppPoll/results.html', {'question': question})这里我们使用了2个view:
- ListView
- DetailView
1>每一个"geneic view"需要知道所作用的model.
2>DetailView需要一个 primary key,(pk,关键字).
3>ListView的默认模版是:"app name>/_list.html"
4>DetailView的默认模版是"app name>/_detail.html."
为了指定模版而不是默认的模版,给变量template_name赋值.
5>传递变量: quesiton对象,由于使用了modle:Question,需要另外再次传递.
但是,默认提供的的 question_list,我们需要使用的是latest_question_list变量,所以通过
context_object_name='latest_question_list'这段代码,达到我们的目的.
# Writing your-first Django-app-part 4-simple-form相关推荐
- Writing your first Django app--Django 第一步
主页链接:https://docs.djangoproject.com/en/1.6/intro/tutorial01/ Let's learn by example.使用例子进行学习. Throug ...
- [Django]APP级别的静态文件处理
2019独角兽企业重金招聘Python工程师标准>>> 转载自 limodou的学习记录 [Django]APP级别的静态文件处理 静态文件在 django 中并不是非常简单的事情. ...
- First Django APP
个人学习笔记,参考django官方文档:https://docs.djangoproject.com/zh-hans/3.2/ 本文同步发表在我的个人博客上:https://sunguoqi.com/ ...
- django app注册过程
django app注册过程 相关知识 sys.modules[__name__]获取本模块 collections是Python内建的一个集合模块,提供了许多有用的集合类. namedtuple n ...
- 基于Pycharm的Django学习 —— 项目实战(Form和ModelForm)
项目实战 项目开发流程 项目准备工作 项目部门管理 UI设计 depart_list 模板继承 depart_add depart_delete depart_edit 项目用户管理 user_lis ...
- SAP UI5 Simple Form 属性 columnsL,columnsM,columnsXL 的属性深入剖析试读版
一套适合 SAP UI5 初学者循序渐进的学习教程 本专栏计划的文章数在 300 篇左右,到 2022年9月22日为止,目前已经更新了 133 篇,专栏完成度为 44.3%. 作者简介 Jerry W ...
- Django|编写第一个Django程序|Writting your first Django app|Windows环境
目录 1.Django官网:The web framework for perfectionists with deadlines | Django 2.django的安装 一.未安装 二.已安装dj ...
- Django - app
1.app目录 migrations:数据库操作的记录(只记录修改表结构的记录); __init__文件:python2中必须填加,python3中无要求,可以不添加: admin:django为我们 ...
- django app中扩展users表
app models中编写新的User 1 # _*_ coding:utf-8 _*_2 from __future__ import unicode_literals34 from django. ...
- django app服务器搭建
首先是在ubuntu 16.04下进行搭建的,开发工具选用aptana,python选用python3.5,django选用最新的版本进行搭建,最后搭建完毕后发现数据库配置一直有问题,所以最后直接在w ...
最新文章
- linux 远程挂载摄像头_基于Linux的嵌入式网络摄像机设计
- python中调用函数时必须有实参_Python之函数(一)定义函数以及传参
- ubuntu装机必备
- Javascript进阶篇——浏览器对象—Location、Navigator、userAgent、screen对象Script
- 学习Python编程的最好的几本书
- 【渝粤题库】国家开放大学2021春2108刑法学(2)答案
- eslint 设置全局 变量
- 1949:【10NOIP普及组】数字统计
- RewriteCond 和RewriteRule
- python 机器人开发库,如何为机器人框架创建自定义Python代码库
- UVA347 LA5455 Run【迭代+打表】
- 总结篇——从零搭建maven多模块springboot+mybatis项目
- linux chmod -r,linux chmod -R 777 / 的危害
- 中年,就是1个人演1部西游记
- 被static修饰的map、list GC问题
- 华为路由与交换 eSight基本概述学习笔记
- (二)Easyexcel 的使用(读取数据到map集合中)
- progress的高级过程调用以及全局变量
- 2018年最新黑马前端视频教程视频与源码全集
- 了解标量、向量和点积
热门文章
- linux 5.8 yum源,Centos5.8 |linux yum源不能用报404错误
- php access 插入,如何使用PHP將附件插入Access數據庫?
- 国赛来咯!智能车竞赛-百度赛道开始报名啦!
- 第十六届全国大学生智能车竞赛竞速组-室内视觉组补充说明
- 高频信号对LM386直流偏置的影响
- mysql大表修改表名原理_MySQL修改大表工具pt-online-schema-change原理
- python turtle库画七彩蟒蛇_Python实现七彩蟒蛇绘制实例代码
- npm install 报错 汇总_R包安装报错的日常
- oracle上浮下浮分析函数_Oracle SQL高级编程——分析函数(窗口函数)全面讲解...
- vscode 这是一个好同志

