Linux 安装Resin4.0.40
一、Resin简介
Resin官网地址:http://caucho.com/
Resin源码包下载地址:http://caucho.com/products/resin/download
Resin是CAUCHO公司的产品,是一个非常流行的支持servlets和jsp的引擎,速度非常快。
Resin本身包含了一个支持HTTP/1.1的WEB服务器。虽然它可以显示动态内容,但是它显示静态内容的能力也非常强,速度直逼APACHESERVER。许多站点都是使用该WEB服务器构建的
Resin也可以和许多其他的WEB服务器一起工作,比如Apache server和IIS等。Resin支持Servlets 2.3标准和JSP 1.2标准。熟悉ASP和PHP的用户可以发现用Resin来进行JSP编程是件很容易的事情
Resin支持负载平衡(Load balancing),可以增加WEB站点的可靠性。方法是增加服务器的数量。比如一台SERVER的错误率是1%的话,那么支持负载平衡的两个Resin服务器就可以使错误率降到0.01%
版本区别
resin 普通版本和pro版本主要区别是 pro支持缓存和负载均衡。pro因为有强大的cache功能,独立作为web服务器处理静态页面性能都可以和apache有一比。但普通版本独立作为web服务器性能就要差一些。当然可以使用apache+resin的方案借助apache的缓存功能提高性能。 但负载均衡就是普通版不能比的了。
二、部署的平台
|
1
2
3
4
5
6
7
8
9
10
|
[root@Resin src]# uname -r
2.6.32-358.el6.x86_64
[root@Resin src]# cat /etc/centos-release
CentOS release 6.4 (Final)
[root@Resin src]# uname -r
2.6.32-358.el6.x86_64
[root@Resin src]# service iptables status
iptables:未运行防火墙。
[root@Resin src]# getenforce
Disabled
|
三、Resin的源码安装
1、安装依赖环境JDK
|
1
2
3
4
5
6
7
8
9
10
11
12
|
[root@Resin src]# tar xf jdk-7u60-bin-linux-x64-16.tar.gz -C /usr/local/
[root@Resin src]# cat > /etc/profile.d/jdk.sh << EOF
> JAVA_HOME=/usr/local/jdk1.7.0_60
> CLASSPATH=\$JAVA_HOME/lib:\$JAVA_HOME/jre/lib
> PATH=\$PATH:\$JAVA_HOME/bin
> export PATH JAVA_HOME CLASSPATH
> EOF
[root@Resin src]# source /etc/profile
[root@Resin src]# java -version
java version "1.7.0_60-ea"
Java(TM) SE Runtime Environment (build 1.7.0_60-ea-b15)
Java HotSpot(TM) 64-Bit Server VM (build 24.60-b09, mixed mode)
|
2、编译Resin
|
1
2
3
4
5
|
[root@Resin src]# yum -y install gcc gcc-c++ make
[root@Resin src]# tar xf resin-pro-4.0.40.tar.gz
[root@Resin src]# cd resin-pro-4.0.40
[root@Resin resin-pro-4.0.40]# ./configure --prefix=/usr/local/resion --with-java-home=/usr/local/jdk1.7.0_60 --enable-64bit
[root@Resin resin-pro-4.0.40]# make && make install
|
|
1
2
3
4
5
6
7
8
9
10
11
12
13
14
15
16
17
18
19
20
21
22
23
|
Resin Configuration Summary:
RESIN : 4.0.40
home : /usr/local/resion
root : /usr/local/resion
conf : /usr/local/resion/conf
log : /usr/local/resion/log
plugins : common resin_os resin
init : /etc/init.d/resin
JAVA_HOME : /usr/local/jdk1.7.0_60
JNI : 64-bit
include : -I/usr/local/jdk1.7.0_60/include -I/usr/local/jdk1.7.0_60/include/linux
CFLAGS :
cflags_shlib : -fpic
ld_shlib : gcc
ldflags_shlib : -shared -fPIC -m64
libs_shlib :
epoll() for keepalives
OPENSSL : No OpenSSL has been found
*** OpenSSL libraries cannot be compiled ***
|
3、启动Resin服务
|
1
2
3
4
5
6
7
|
#第一种方法启动
[root@Resin ~]# /usr/local/resion/bin/resin.sh start
Resin/4.0.40 launching watchdog at 127.0.0.1:6600
Resin/4.0.40 started -server 'app-0' with watchdog at 127.0.0.1:6600
第二种方法启动
[root@Resin ~]# service resin start
|
4、验证Resin
|
1
2
3
4
|
[root@Resin ~]# netstat -tnlp |grep java
tcp 0 0 127.0.0.1:6800 0.0.0.0:* LISTEN 4338/java
tcp 0 0 127.0.0.1:6600 0.0.0.0:* LISTEN 4292/java
tcp 0 0 :::8080 :::* LISTEN 4338/java
|
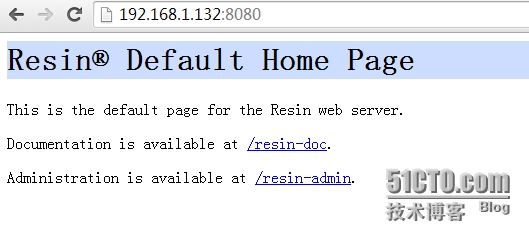
5、浏览器访问Resin
http://resin-ip:port
5.2 点击【/resin-admin】进入登陆、注册页面;如下图所示
5.3 由于首次登陆Resin还没有用户,所以先注册一个管理员账号;如下图所示
5.4 点击【Create Configuration File】;如若用户创建成功,提示如下图所示
5.5 注册用户创建成功后会在/usr/local/resion/conf目录下生成一个admin-users.xml.generated的模板文件,这个模板不能直接使用,我们需要将其改成为admin-users.xml文件
|
1
2
|
[root@Resin ~]# cd /usr/local/resion/conf/
[root@Resin conf]# cp admin-users.xml.generated admin-users.xml
|
注释:如果部署到无GUI界面的系统上如:CentOS Solaris Ubuntu-Server等,无法通过浏览器访问本地resin-admin,则需要修改resin.properties文件爱你,开启远程访问权限,然后再次登录
|
1
|
[root@Resin conf]# vim resin.properties
|

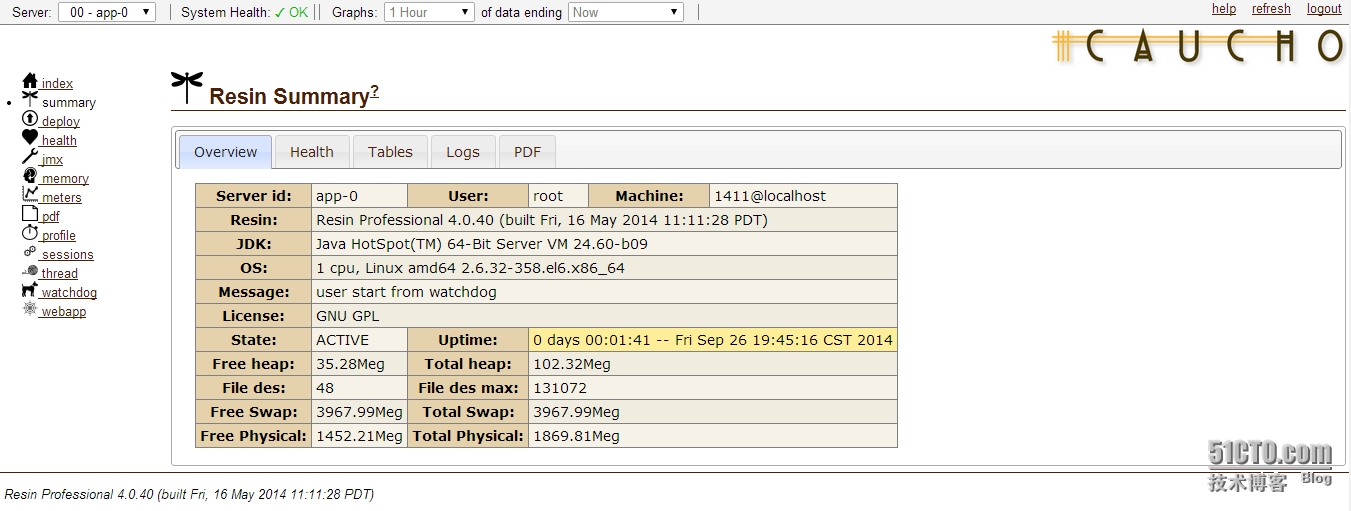
5.6 首次登陆后的界面如下:
四、简单的Resin部署web测试环境
1、拷贝自已的项目到Resin的webapps目录下
|
1
2
3
4
5
6
7
8
9
10
11
12
13
14
15
16
17
18
19
20
|
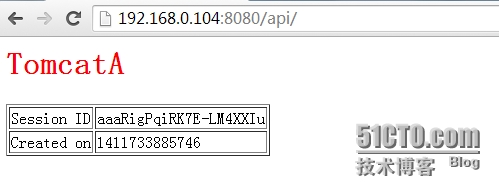
[root@Resin ~]# mkdir /usr/local/resion/webapps/api
[root@Resin ~]# cat /usr/local/resion/webapps/api/index.jsp
<%@ page language="java" %>
<html>
<head><title>TomcatA</title></head>
<body>
<h1><font color="red">TomcatA </font></h1>
<table align="centre" border="1">
<tr>
<td>Session ID</td>
<% session.setAttribute("abc","abc"); %>
<td><%= session.getId() %></td>
</tr>
<tr>
<td>Created on</td>
<td><%= session.getCreationTime() %></td>
</tr>
</table>
</body>
</html>
|
2、修改Resin配置文件
|
1
2
3
4
5
6
7
8
|
<host id="" root-directory=".">
<!--
- webapps can be overridden/extended in the resin.xml
-->
<web-app id="/" root-directory="webapps/ROOT"/>
<web-app id="/api" root-directory="webapps/api"/>
</host>
|
3、测试
五、Resin4基于目录和域名的部署
1、同一个域名下多个子app,根据url层级来指向
http://www.allentuns.com/
http://www.allentuns.com/api1
http://www.allentuns.com/api2
2、多个域名对应指定的host,根据域名来指定
http://www.allentuns.com/
http://www.zhengyansheng.com/
【第一种配置方法】
|
1
2
3
4
5
6
7
8
9
10
11
|
<!-- the default host, matching any host name -->
<host id="" root-directory=".">
<!--
- webapps can be overridden/extended in the resin.xml
-->
<web-app id="/" root-directory="webapps/ROOT"/>
<web-app id="/api" root-directory="webapps/api"/>
<web-app id="/cms1" root-directory="/www/cms1.cdvcloud.com"/>
<web-app id="/cms2" root-directory="/www/cms2.cdvcloud.com"/>
</host>
|
【第二种配置方法】
|
1
2
3
4
5
6
7
8
9
10
11
12
13
14
15
16
|
#第一个appserver
<host id="www.allentuns.com" root-directory=".">
<!--
- webapps can be overridden/extended in the resin.xml
-->
<web-app id="/" root-directory="webapps/tset1/ROOT"/>
</host>
#第二个appserver
<host id="www.zhengyansheng.com" root-directory=".">
<!--
- webapps can be overridden/extended in the resin.xml
-->
<web-app id="/" root-directory="webapps/test2/ROOT"/>
</host>
|
六、Resin4基于不同端口的部署
|
1
2
3
4
5
6
7
8
9
10
11
12
13
14
15
16
17
18
19
20
21
22
23
24
25
26
27
28
29
30
31
|
[root@Resin ~]# cd /usr/local/resion/conf/
[root@Resin conf]# vim resin.xml
#只展示重点部分
#注释:Resin默认端口是8080;添加如下代码,在本机配置两个实例端口为8081、8082
<cluster id="app1">
<!-- define the servers in the cluster -->
<server-multi id-prefix="app1" address-list="${app1_servers}" port="6801"/>
<!-- the default host, matching any host name -->
<host id="" root-directory=".">
<!--
- webapps can be overridden/extended in the resin.xml
-->
<web-app id="/" root-directory="/var/www/html/app1/ROOT"/>
</host>
</cluster>
<cluster id="app2">
<!-- define the servers in the cluster -->
<server-multi id-prefix="app2" address-list="${app2_servers}" port="6802"/>
<!-- the default host, matching any host name -->
<host id="" root-directory=".">
<!--
- webapps can be overridden/extended in the resin.xml
-->
<web-app id="/" root-directory="/var/www/html/app2/ROOT"/>
</host>
</cluster>
|
修改当前目录vim resin.properties 修改如下内容:
|
1
2
3
4
5
6
7
8
9
|
# app-tier Triad servers: app-0 app-1 app-2
app_servers : 127.0.0.1:6800
app1_servers : 127.0.0.1:6801
app2_servers : 127.0.0.1:6802
# Use overrides for individual server control, for example: app-0.http : 8081
app.http : 8080
app1.http : 8081
app2.http : 8082
|
重新启动Resin服务使其重新加载Resin配置文件
|
1
2
3
|
[root@Resin conf]# service resin restart
Stopping resin: .
Starting resin: .
|
查看多端口Resin服务是否启动
|
1
2
3
4
5
6
7
8
|
[root@Resin ~]# netstat -tnlp |grep java
tcp 0 0 127.0.0.1:6800 0.0.0.0:* LISTEN 2418/java
tcp 0 0 127.0.0.1:6801 0.0.0.0:* LISTEN 2431/java
tcp 0 0 127.0.0.1:6802 0.0.0.0:* LISTEN 2439/java
tcp 0 0 127.0.0.1:6600 0.0.0.0:* LISTEN 2371/java
tcp 0 0 :::8080 :::* LISTEN 2418/java
tcp 0 0 :::8081 :::* LISTEN 2431/java
tcp 0 0 :::8082 :::* LISTEN 2439/java
|
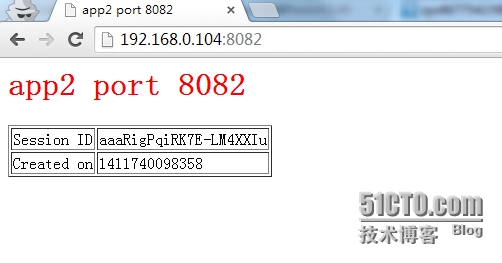
建立Resin测试页面并访问页面
|
1
2
3
4
5
6
7
8
9
10
11
12
13
14
15
16
17
18
19
|
[root@Resin ~]# cat /var/www/html/app1/ROOT/index.jsp
<%@ page language="java" %>
<html>
<head><title>app1 port 8081</title></head>
<body>
<h1><font color="red">app1 port 8081 </font></h1>
<table align="centre" border="1">
<tr>
<td>Session ID</td>
<% session.setAttribute("abc","abc"); %>
<td><%= session.getId() %></td>
</tr>
<tr>
<td>Created on</td>
<td><%= session.getCreationTime() %></td>
</tr>
</table>
</body>
</html>
|
|
1
2
3
4
5
6
7
8
9
10
11
12
13
14
15
16
17
18
19
|
[root@Resin ~]# cat /var/www/html/app2/ROOT/index.jsp
<%@ page language="java" %>
<html>
<head><title>app2 port 8082</title></head>
<body>
<h1><font color="red">app2 port 8082 </font></h1>
<table align="centre" border="1">
<tr>
<td>Session ID</td>
<% session.setAttribute("abc","abc"); %>
<td><%= session.getId() %></td>
</tr>
<tr>
<td>Created on</td>
<td><%= session.getCreationTime() %></td>
</tr>
</table>
</body>
</html>
|

本文转自zys467754239 51CTO博客,原文链接:http://blog.51cto.com/467754239/1558435,如需转载请自行联系原作者
Linux 安装Resin4.0.40相关推荐
- linux查看resin 信息,Linux安装resin4.0.40
Linux安装resin4.0.40 1 安装jdk,具体目录是/usr/local/jdk1.7.0_45,并设好环境变量 2 解压resin-4.0.40.tar.gz(位于/home/softw ...
- Linux 安装Zabbix5.0超详细教程
linux 安装Zabbix5.0教程 一.安装环境准备 1.操作系统Centos7.9 2.机器准备 3.关闭防火墙(两台): 4.zabbix数据流向 二.zabbix-server安装(服务端) ...
- linux安装mysql8.0.18_Linux安装MySQL8.0
Linux安装MySQL8.0 rpm -qa|grep mysql rpm -qa|grep mariadb mariadb-libs-5.5.60-1.el7_5.x86_64 rpm -e -- ...
- Linux安装php-7.0.16,完成php和apache的配置
Linux安装php-7.0.16,完成php和apache的配置 版本:php-7.0.16.tar.gz,libxml2-2.9.2.tar.gz(php需要它的支持,首先安装它) 说明 ...
- (resin-4.0.40\resin-data\app-0\tmp\temp_file' failed)
resin-4.0.40\resin-data\app-0\tmp\temp_file' failed 记录我的错误:resin服务抽风 记录我的错误:resin服务抽风 1. 打开很久没有用的mav ...
- Linux安装MySql8.0.30
Linux安装MySql8.0.30 1.MySql官网 www.mysql.com 2.下载官网安装文件 2.1进入官网,点击downloads 2.2点击下载社区版 2.3选择操作系统,以Cent ...
- Linux安装mysql8.0.26版本
Linux安装mysql8.0.26版本 1.下载Linux版Mysql安装包 下载链接: https://downloads.mysql.com/archives/community/ 2.上传My ...
- Linux安装Redis6.0.10步骤
Linux安装Redis6.0.10步骤 1. 将安装包放到/opt目录下 2. 解压包文件 3. 查看文件 4. 进入解压后的文件夹 5. 安装gcc和c++环境 6. 查看gcc版本 7. 升级g ...
- linux安装redis-4.0.2
linux安装redis-4.0.2 一.下载redis cd /usr/local/src wget http://download.redis.io/releases/redis-4.0.2.ta ...
最新文章
- 使用计算机的缺点英文作文,网络与计算机的好处与坏处英文作文
- 天津财经计算机专业研究生分数线,天津财经大学各专业2015—2020年硕士研究生复试分数线汇总...
- python爬虫post请求_Python爬虫之GET和POST请求
- prototype极速应用1
- emq数据储存到mysql_EMQ X 规则引擎系列(三)存储消息到 InfluxDB 时序数据库
- cobar mysql cluster_Cobar使用文档(可用作MySQL大型集群解决方案)
- Mac OS 查看系统版本信息/硬件信息的命令
- axure选中后横线切换_3、开关状态切换 —— Axure实用交互
- Redis-ha(sentinel)搭建
- 部门级服务器一般支持几个cpu,部门级服务器简介
- WMPLib.WindowsMediaPlayer 的用法
- nginx启动报错 :Failed to start The nginx HTTP and reverse prox...er.
- linux内核分支,新闻|Linux 内核分支 2.4 版结束生命周期
- 管理感悟:减少代码量的好办法
- 使用npm-check-updates模块升级插件
- php 真太阳时间修正,真太阳时查询表(建议收藏)
- dflow入门2——Slices
- SAP——ABAP报表的一般格式
- 什么是低代码平台 low-code?
- 【机器人学、机器人控视觉与控制】四足机器人MATLAB仿真