创建交互式shell脚本对话框
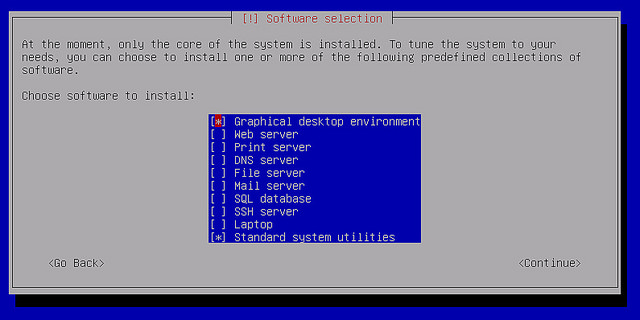
当你在终端环境下安装新的软件时,你可以经常看到信息对话框弹出,需要你的输入,比如:RHEL/CentOS自带的setup,对话框的类型有密码箱、检查表、菜单等等。他们可以引导你以一种直观的方式输入必要的信息,使用这样的用户友好的对话框的好处是显而易见的。如下图所示:
当你写一个交互式shell脚本,你可以使用这样的对话框来接受用户的输入。whiptail可以在shell脚本中创建基于终端的对话框,消息框的过程,类似于Zenity或xdialog GUI脚本代码。whiptail预先安装在所有的Linux发布版本中。
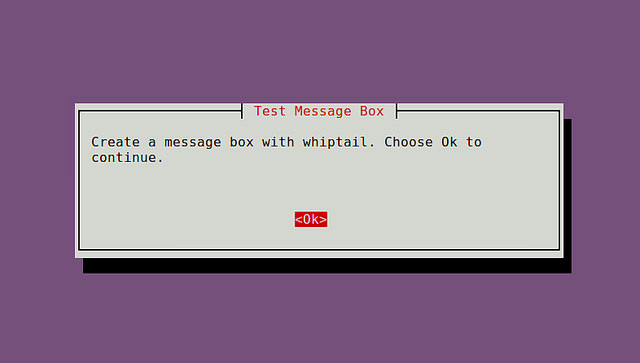
语法:
whiptail --title "<message box title>" --msgbox "<text to show>" <height> <width>
实例:
#!/bin/bash
whiptail --title "Test Message Box" --msgbox "Create a message box with whiptail. Choose Ok to continue." 10 60
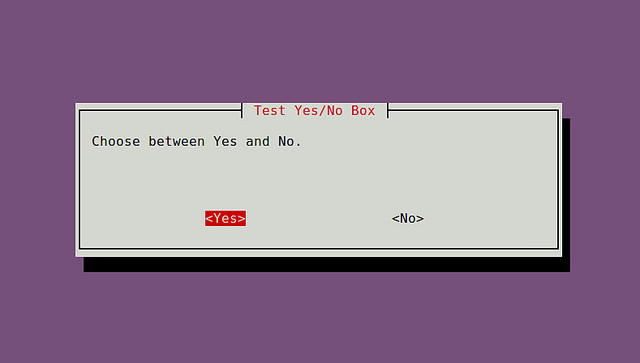
语法:
whiptail --title "<dialog box title>" --yesno "<text to show>" <height> <width>
实例:
#!/bin/bash
if (whiptail --title "Test Yes/No Box" --yesno "Choose between Yes and No." 10 60) thenecho "You chose Yes. Exit status was $?."
elseecho "You chose No. Exit status was $?."
fi
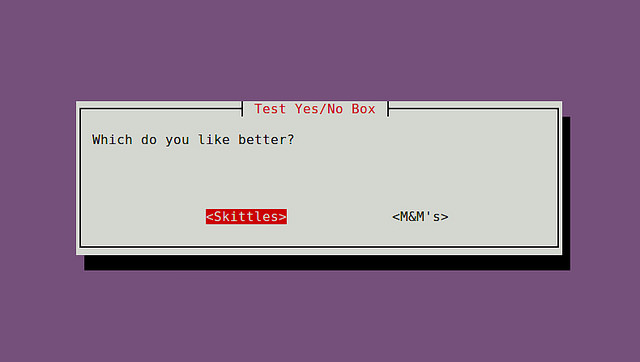
或者,你可以是“--yes-button” ,"--no-button"选项。
#!/bin/bash
if (whiptail --title "Test Yes/No Box" --yes-button "Skittles" --no-button "M&M's"  --yesno "Which do you like better?" 10 60) thenecho "You chose Skittles Exit status was $?."
elseecho "You chose M&M's. Exit status was $?."
fi
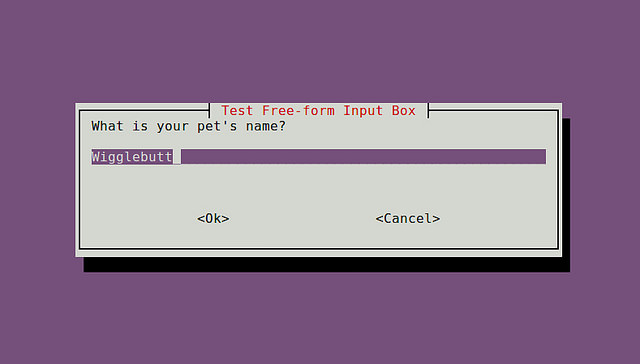
语法:
whiptail --title "<input box title>" --inputbox "<text to show>" <height> <width> <default-text>
实例:
#!/bin/bash
PET=$(whiptail --title "Test Free-form Input Box" --inputbox "What is your pet's name?" 10 60 Wigglebutt 3>&1 1>&2 2>&3)exitstatus=$?
if [ $exitstatus = 0 ]; thenecho "Your pet name is:" $PET
elseecho "You chose Cancel."
fi
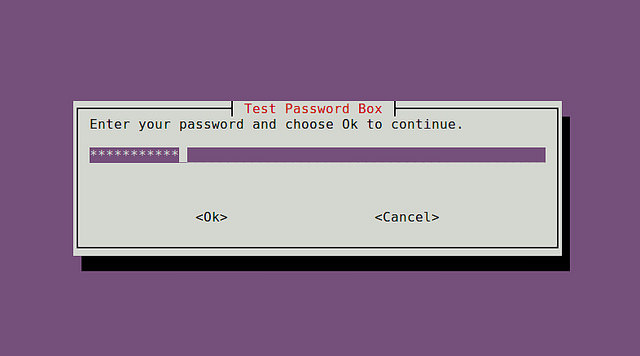
语法:
whiptail --title "<password box title>" --passwordbox "<text to show>" <height> <width>
实例:
#!/bin/bash
PASSWORD=$(whiptail --title "Test Password Box" --passwordbox "Enter your password and choose Ok to continue." 10 60 3>&1 1>&2 2>&3)exitstatus=$?
if [ $exitstatus = 0 ]; thenecho "Your password is:" $PASSWORD
elseecho "You chose Cancel."
fi
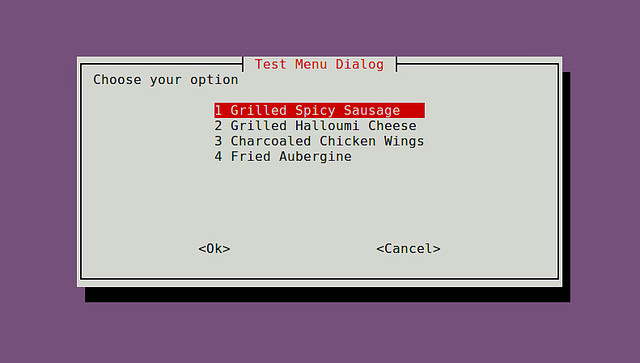
语法:
whiptail --title "<menu title>" --menu "<text to show>" <height> <width> <menu height> [ <tag> <item> ] . . .
实例:
#!/bin/bash
OPTION=$(whiptail --title "Test Menu Dialog" --menu "Choose your option" 15 60 4 \
"1" "Grilled Spicy Sausage" \
"2" "Grilled Halloumi Cheese" \
"3" "Charcoaled Chicken Wings" \
"4" "Fried Aubergine"  3>&1 1>&2 2>&3)exitstatus=$?
if [ $exitstatus = 0 ]; thenecho "Your chosen option:" $OPTION
elseecho "You chose Cancel."
fi
语法:
whiptail --title "<radiolist title>" --radiolist "<text to show>" <height> <width> <list height> [ <tag> <item> <status> ] . . .
实例:
#!/bin/bash
DISTROS=$(whiptail --title "Test Checklist Dialog" --radiolist \
"What is the Linux distro of your choice?" 15 60 4 \
"debian" "Venerable Debian" ON \
"ubuntu" "Popular Ubuntu" OFF \
"centos" "Stable CentOS" OFF \
"mint" "Rising Star Mint" OFF 3>&1 1>&2 2>&3)exitstatus=$?
if [ $exitstatus = 0 ]; thenecho "The chosen distro is:" $DISTROS
elseecho "You chose Cancel."
fi

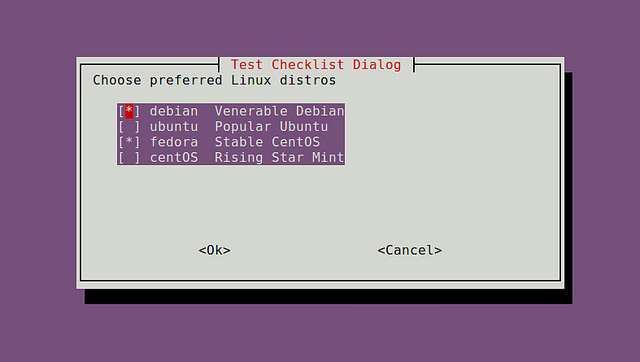
语法:
whiptail --title "<checklist title>" --checklist "<text to show>" <height> <width> <list height> [ <tag> <item> <status> ] . . .
实例:
#!/bin/bash
DISTROS=$(whiptail --title "Test Checklist Dialog" --checklist \
"Choose preferred Linux distros" 15 60 4 \
"debian" "Venerable Debian" ON \
"ubuntu" "Popular Ubuntu" OFF \
"centos" "Stable CentOS" ON \
"mint" "Rising Star Mint" OFF 3>&1 1>&2 2>&3)exitstatus=$?
if [ $exitstatus = 0 ]; thenecho "Your favorite distros are:" $DISTROS
elseecho "You chose Cancel."
fi
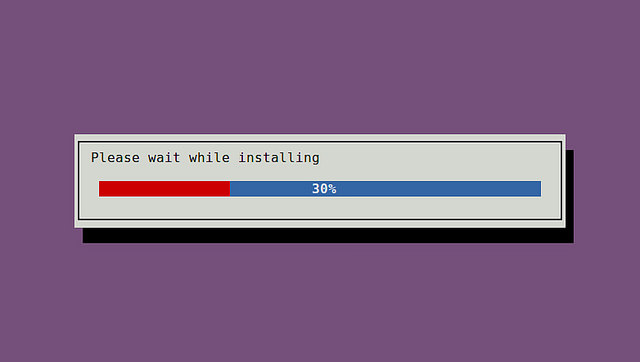
语法:
whiptail --gauge "<test to show>" <height> <width> <inital percent>
实例:
#!/bin/bash
{for ((i = 0 ; i <= 100 ; i+=20)); dosleep 1echo $idone
} | whiptail --gauge "Please wait while installing" 6 60 0
本文转载自:https://www.linuxprobe.com/create-interactive-shell-script.html
转载于:https://www.cnblogs.com/linuxprobe/p/5371594.html
创建交互式shell脚本对话框相关推荐
- 2021-10-26 linux 交互式shell脚本对话框----whiptail指令
一.编译Android kernel的时候弹出一个选择对话框,比较好奇,就认真分析了一下这个脚本对话框怎么来的. 1.编译的时候会调用mkimg文件. 2.mkimg文件里面会调用whiptail指令 ...
- 交互式SHELL脚本对话框(whiptail)
推荐阅读 Helm3(K8S 资源对象管理工具)视频教程:https://edu.csdn.net/course/detail/32506 Helm3(K8S 资源对象管理工具)博客专栏:https: ...
- 详解Linux交互式shell脚本中创建对话框实例教程
详解Linux交互式shell脚本中创建对话框实例教程 本教程我们通过实现来讲讲Linux交互式shell脚本中创建各种各样对话框,对话框在Linux中可以友好的提示操作者,感兴趣的朋友可以参考学习一 ...
- 详解Linux交互式shell脚本中创建对话框实例教程_linux服务器
本教程我们通过实现来讲讲Linux交互式shell脚本中创建各种各样对话框,对话框在Linux中可以友好的提示操作者,感兴趣的朋友可以参考学习一下. 当你在终端环境下安装新的软件时,你可以经常看到信息 ...
- 交互式shell脚本实操
在Linux 编程中有时我们会用到shell脚本来帮我们做一些事情,但涉及到交互中需要人为交互的部分如果想自动化运行就比较麻烦,但shell操作中其实是考虑到这点的.下面我以一个例子来简要的说明,当然 ...
- shell 创建文件_如何在shell脚本中创建与shell脚本同目录或者同相对路径的文件夹或者文件?...
https://codingstandards.iteye.com/blog/800028codingstandards.iteye.com linux 下 `dirname $0`www.cnb ...
- 【Linux】《Linux命令行与shell脚本编程大全 (第4版) 》笔记-汇总 ( Chapter17-ChapterB )
十七.创建函数 bash shell 提供了用户自定义函数功能,可以将 shell 脚本代码放入函数中封装起来. 函数是一个脚本代码块,你可以为其命名并在脚本中的任何位置重用它.每当需要在脚本中使用该 ...
- 图形化桌面环境中的shell脚本编程
图形化桌面环境中的脚本编程 2.1 创建文本菜单 创建交互式 shell 脚本最常用的方法是使用菜单.提供各种选项可以帮助脚本用户了解脚本能做什么和不能做什么. 通常菜单脚本会清空显示区域,然后显示可 ...
- Linux_《Linux命令行与shell脚本编程大全》第十八章学习总结
时间:2017年12月04日星期一 说明:本文部分内容均摘取自书籍<Linux命令行与shell脚本编程大全>,版权归原作者所有.<Linux命令行与shell脚本编程大全>( ...
最新文章
- c语言随机浮点数,C随机浮点数生成
- 第二课.C++基础语法
- activity使用dialog主题
- QT学习笔记(1)----- QT简介
- 基于tensorflow2.0实现猫狗大战(搭建网络迁移学习)
- 探索性数据分析(EDA)-不要问如何,不要问什么
- android组合控件 重叠,Android 组合控件实现布局的复用的方法
- Excel导入导出帮助类
- 手把手教你用R语言制作网络爬虫机器人(二)
- 网站常用组件收集整理
- hd获取硬盘序列号_获取硬盘序列号
- c++ time_t和tm
- Java学习笔记【2】:抛出异常
- 面向接口编程与面向实现编程
- C#导出数据—使用Word模板
- python 时间格式处理
- 1068 万绿丛中一点红(JAVA)
- 微信小程序Token登录验证
- 解析人类的四次工业革命
- jfinal的简单使用(一)
热门文章
- ALTER TABLE causes auto_increment resequencing, resulting in duplicate entry ’1′ for key
- 【转/TCP协议编程】 基于TCP的Socket 编程
- css中margin-top/margin-bottom失效
- snort inline模式和passive模式区别
- 电脑温度测试软件_网购电脑够便宜?坑连着坑真的不好躲
- cnetos6.2搭建mysql_CentOS 6.2安装配置LAMP服务器(Apache+PHP5+MySQL)
- IBM 340 亿美元收购 RedHat(红帽)
- centos下部署启动elasticsearch错误集合与解决方案
- Java 内存区域和GC机制
- monkey测试===ios-monkey测试工具