基于pt100温度计仿真_基于8pt网格的设计系统
基于pt100温度计仿真
重点 (Top highlight)
This article is the 2nd in a two part series — to the previous chapter in which I demonstrate how to establish an 8pt grid.
本文是该系列文章的第二部分 ,这是上一章 的第二部分 ,在上一章中,我演示了如何建立8pt网格 。
设计系统有什么用? (What are Design Systems for?)
If you and your team aren’t using a Design System (DS), please open the latest project in your favorite design software, and count the myriad of shades of your primary color and grays, the number of fonts you’ve used and the different sizes your primary button appears in.
如果您和您的团队没有使用设计系统(DS),请在您喜欢的设计软件中打开最新的项目,并计算无数的原色和灰色阴影,已使用的字体数量以及您的主按钮显示的大小不同。
Go on, I can wait.
继续,我可以等。
Most probably, you can shave off about %30 of the redundant styles and consolidate your design to be more consistent, lean and reusable.
最有可能的是,您可以省掉大约30%的冗余样式,并将您的设计合并为更一致,更精简和可重复使用的样式。
When we create reusable styles and components, we essentially create a consistent visual language that we can rely upon when the product we’re working on inevitably scales.
当我们创建可重用的样式和组件时,实质上是创建了一致的视觉语言,当我们正在开发的产品不可避免地扩展时,我们可以依靠它。
A design system is a collection of reusable components, guided by clear standards, that can be assembled together to build any number of applications.
设计系统是在明确的标准指导下的可重复使用组件的集合,这些组件可以组装在一起以构建任何数量的应用程序。
— From the Design Systems Handbook, Design Better
—从《设计系统手册》中可以更好地设计
You can read all about the value of Design Systems, in Invision’s excellent eBook — Design Systems Handbook. The first two chapters will help you understand better the need of a DS and who should be involved in the process (hint: not only designers).
您可以在Invision的出色电子书-Design Systems Handbook中阅读有关Design Systems价值的所有信息。 前两章将帮助您更好地了解DS的需求以及流程中应该涉及的人(提示:不仅是设计人员)。
设计我们的设计系统 (Designing our Design System)
In the previous article, we’ve established our basic unit — 8pt. We’ll use that unit in our smallest components as well as in our largest and more complex components. We also defined Typography, Iconography and Layout; so apart from Layout, I won’t be delving too deep on these two issues here. Here’s what we’ll be going going over:
在 上一篇文章中 ,我们建立了基本单元8pt。 我们将在最小的组件以及最大和更复杂的组件中使用该单元。 我们还定义了版式,图标和布局。 因此,除了Layout之外,在这里我不会深入研究这两个问题。 这是我们要进行的工作:
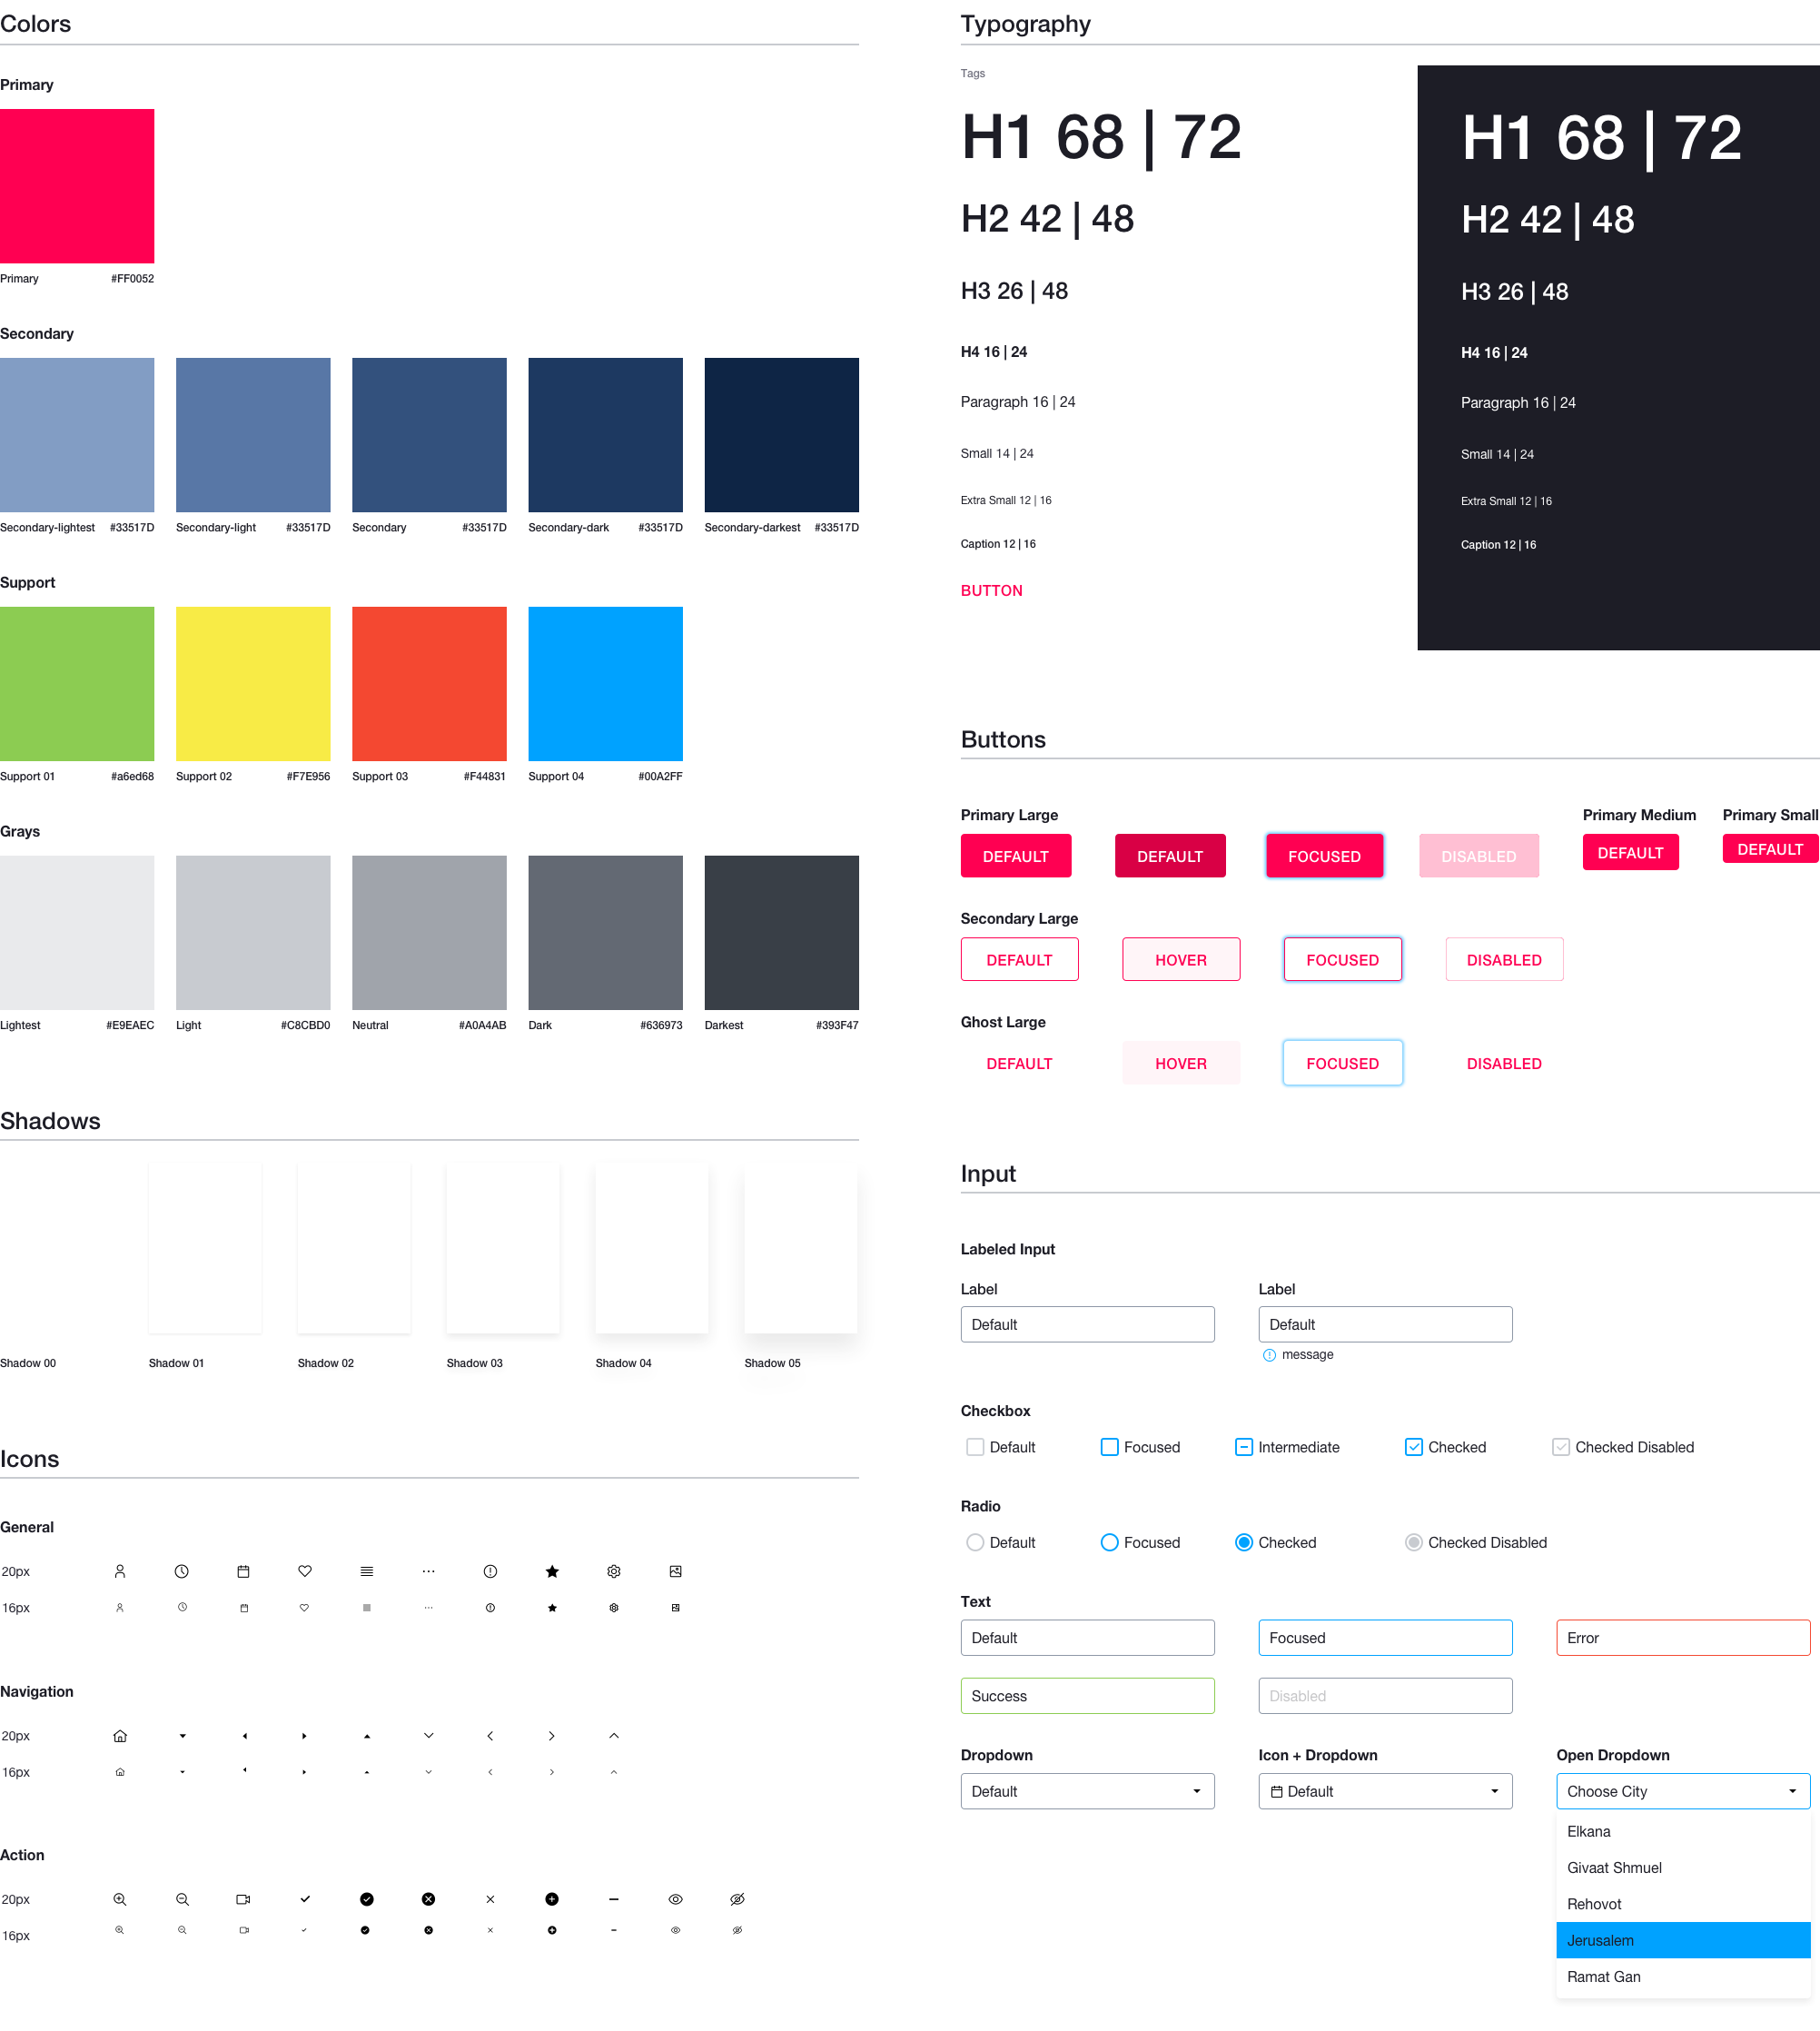
- Color颜色
- Typography版式
- Iconography影像学
- Shadow阴影
- Border Radius边界半径
- Components组件
- Grid & Layout网格布局
颜色 (Color)
Colors are going to be our first building block. When designing digital products, we’re going to need the following colors as a minimum:
颜色将成为我们的第一个基石。 设计数字产品时,我们至少需要以下颜色:
Primary: Usually the brand color.
原色 :通常是品牌颜色。
Secondary (Optional): Should complement the primary and not compete for attention, it’s purpose is to signal elements with a secondary importance.
次要的 (可选的):应该补充主要的而不是争夺注意力,其目的是表示具有次要重要性的元素。
Grays: Approximately 4–5 shades.
灰色 :大约4–5个阴影。
Support: Success (Green), Warning (Yellow), Error (Red), and Information (Blue).
支持 :成功(绿色),警告(黄色),错误(红色)和信息(蓝色)。
创建调色板 (Creating the palette)
To create more shades of any color, simply use a a technique of manipulating Saturation (S) and Brightness (B):
要创建更多颜色的阴影,只需使用一种操作饱和度(S)和亮度(B)的技术即可:
Darker tones: add saturation and reduce blackness.
较暗的色调 :增加饱和度并减少黑度。
Lighter tones: reduce saturation and add blackness.
较浅的色调 :降低饱和度并增加黑色度。

Duolingo is a great example of using several shades of the same color:
Duolingo是使用相同颜色的多种阴影的一个很好的例子:
When creating the Grays palette, it’s crucial to assign a use for each one — otherwise you find yourself wondering what shade to use in which case. The Grays are:
创建Grays调色板时,至关重要的是为每个调色板分配用途-否则您会发现自己想知道在这种情况下应使用哪种阴影。 灰色是:
Lightest: used to distinct white elements on top of a gray background.
最轻 :用于区分灰色背景上的白色元素。
Light: should allow dark text over it to be accessibly read.
浅色 :应允许其上的深色文本易于阅读。
Base: neutral gray.
基数 :中性灰色。
Dark: used to allow white text over to be accessibly read.
深色 :用于允许白色文本易于阅读。
Darkest: used to signify secondary areas, like sidebars. Should allow white text over to be accessibly read.
最暗 :用于表示次要区域,例如侧边栏。 应该允许白色文本易于访问。
Choosing the grays can be totally technical, or we can add some tint from our primary color to the mix.
选择灰色可能完全是技术性的,或者我们可以在原色中添加一些色彩。
Until Sketch adds this feature natively, use the Stark plugin to check if your text styles adhere to the accessibility rules:
在Sketch本地添加此功能之前,请使用Stark插件检查您的文本样式是否符合辅助功能规则:
定义样式 (Defining the styles)
Sketch allows us to name our styles and organize them into groups, saying goodbye to confusing randomly scattered color swatches.
Sketch允许我们命名样式并将其分组,从而告别混淆随机分散的色板。
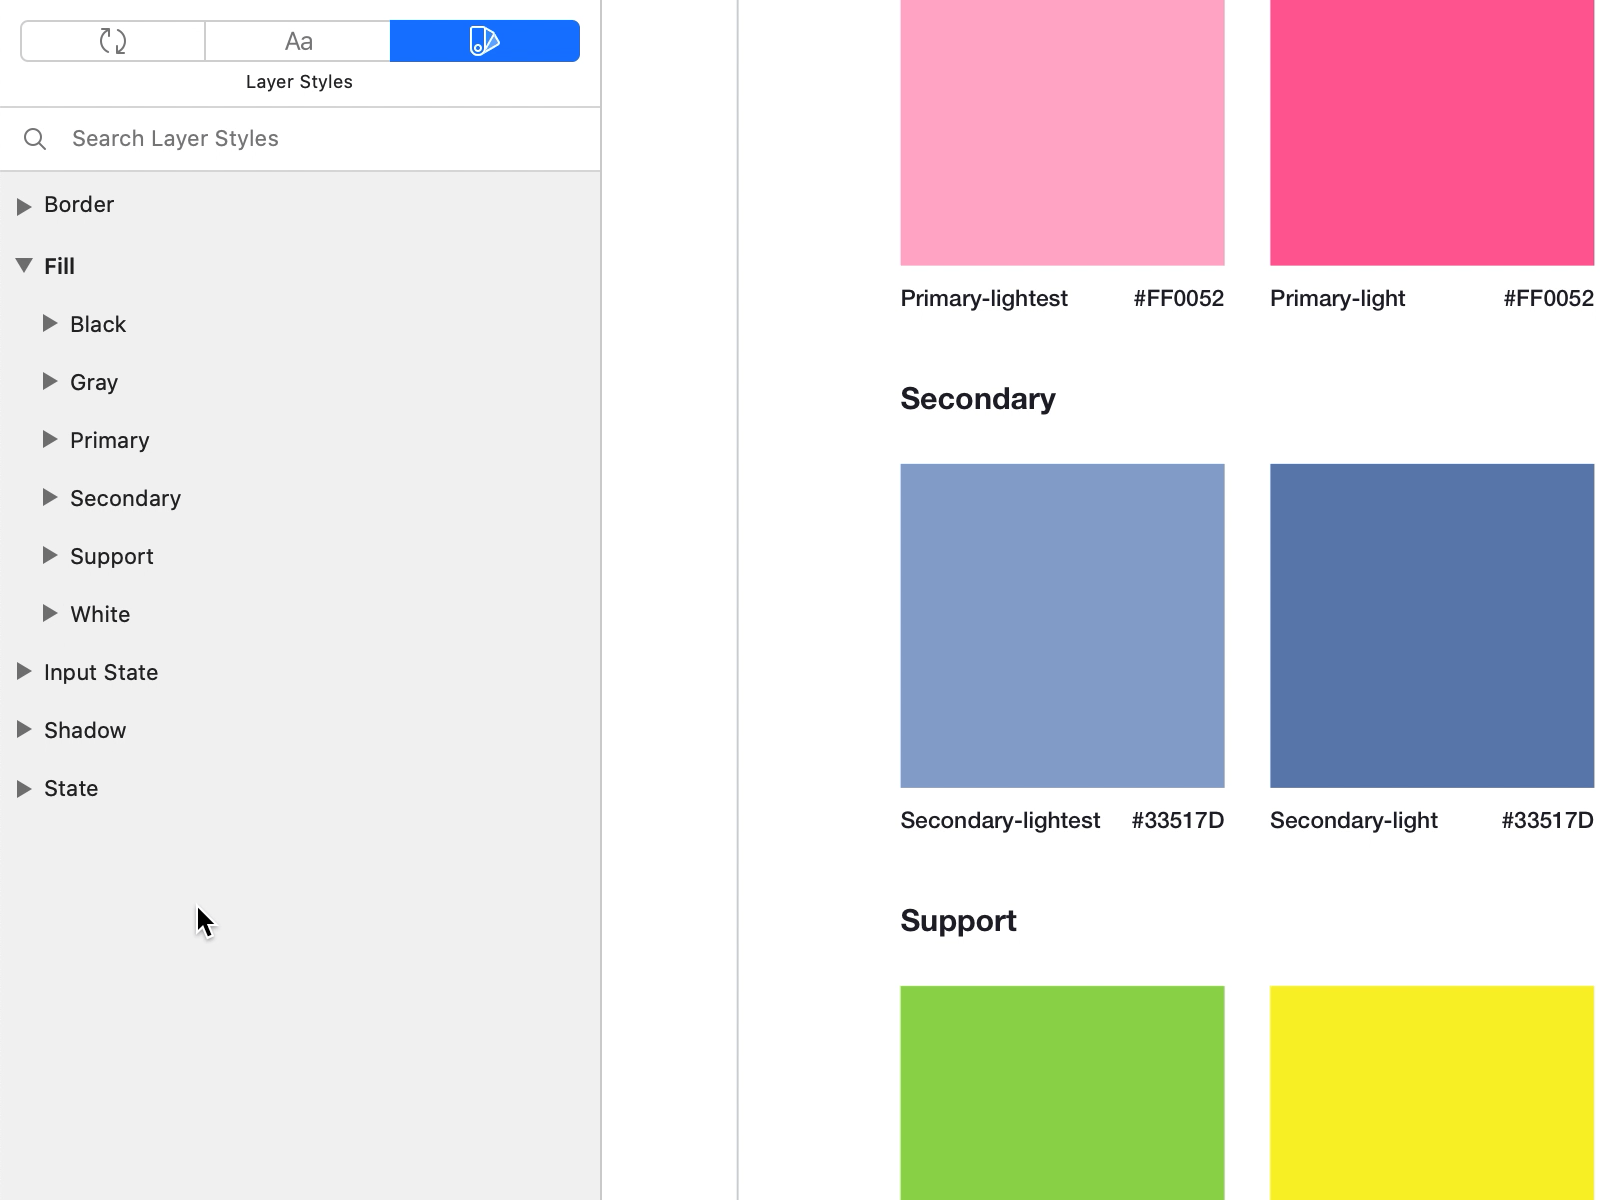
Don’t forget to get creative, within accessibility and usability constraints of course. It’s easy to get totally technical here, but adding your twist will give the color palette more character.
当然,在可访问性和可用性约束内,不要忘了发挥创造力。 在这里很容易获得完全技术性的信息,但是增加扭曲感将使调色板更具特色。
版式 (Typography)
选择字体 (Choose your fonts)
I’m going to assume your brand or client already have fonts they use. If the task of choosing the fonts has been given to you, give it the proper attention it deserves and read some articles on this topic.
我将假设您的品牌或客户已经拥有他们使用的字体。 如果已经完成了选择字体的任务,请给予应有的注意,并阅读有关此主题的一些文章。
模块化缩放 (Modular Scaling)
I’ve covered modular scaling in the previous article, however it’s worth it to go over it here as well.
我已经在上一篇文章中介绍了模块化缩放,但是值得在这里进行介绍。
Modular scaling is basically a method that helps you create a consistent typography system fast. It removes the guesswork from choosing the next font size and line height. All that remains for you to do is choose a base font size (I usually opt for 16px or 18px), and a modular scale to go by:
模块化缩放基本上是一种可帮助您快速创建一致的排版系统的方法。 它消除了选择下一个字体大小和行高的猜测。 剩下要做的就是选择基本字体大小(我通常选择16px或18px),以及模块化的缩放比例:
There’s one school of thought nor one solution for all the typographic needs out there. You’ll have to analyze and understand your project’s typographic needs either beforehand or as you go along.
对于所有的印刷需求,这里只有一种思想流派,也没有一种解决方案。 您必须事先或在进行过程中分析并了解项目的印刷需求。
A few pointers on typographic systems:
有关印刷系统的一些提示:
1–2 font families: Use 2 font families at the most, one for headings and another for body and small text. There’s rarely a need for a 3rd font family.
1-2个字体系列 :最多使用2个字体系列,一个用于标题,另一个用于正文和小文本。 很少需要第三字体家族。
2–3 font weights: Its easy to lose track and focus with robust font families like Helvetica or Inter, however more than 3 font weights are too much for the anyone to discern meaning from. If you feel like it, maybe go for the black font weight for your topmost heading.
2–3字体粗细 :它容易失去诸如Helvetica或Inter之类的强大字体系列的跟踪和聚焦,但是任何人都无法识别其含义,而超过3种字体粗细就太过分了。 如果您愿意,可以将黑色字体粗细用作最顶部的标题。
4–12 typographic styles: Digital products tend to need less styles, usually 2–3 headings, body (2–3 weights), and a caption style, while blogs and robust websites tend to need several more headings and smaller font styles.
4–12印刷样式 :数字产品通常需要较少的样式,通常为2–3标题,正文(2–3权重)和标题样式,而博客和健壮的网站往往需要更多的标题和较小的字体样式。
3 font colors: Prepare your typographic system beforehand for any occasion and create styles for Dark, Gray and Light at least.
3种字体颜色 :事先准备好任何情况下的印刷系统,并至少创建深色,灰色和浅色的样式。
If your project is more branding than product related, I would urge you to be more creative than that. The main difference here is in the constraints. The content in a branding centered project, is controlled and curated and thus allows more creative freedom; while the content in a digital product, is user generated and needs to fit within tight constraints — which are up to you, the designer, to decide upon.
如果您的项目比产品相关的品牌更多,我敦促您更具创造力。 这里的主要区别在于约束。 以品牌为中心的项目中的内容受到控制和策划,因此具有更大的创作自由; 而数字产品中的内容是用户生成的,需要适应严格的限制-设计师(您)可以自行决定。
定义文字样式 (Define text styles)
Sketch allows us to define text styles in an organized fashion, which helps us in turn to create a clear and concise typographic inventory.
Sketch允许我们以有组织的方式定义文本样式,这有助于我们依次创建清晰简洁的印刷清单。
I define my styles like this:
我定义我的样式是这样的:
{Style name} / {Alignment} / {Color}This way the result is a series of nested groups, all neatly organized and quickly exchangeable.
这样,结果就是一系列嵌套的组,所有的组都整齐地组织并且可以快速交换。
Only recently did Sketch allowed us to redefine multiple styles at once. This major improvement made managing our typographic system so much easier — all we need is a visual repository :
直到最近,Sketch才允许我们一次重新定义多种样式。 这项重大改进使我们的印刷系统的管理变得非常容易-我们需要的是一个可视存储库:
影像学 (Iconography)
As mentioned above, icons designed on an 8pt based grid will scale perfectly:
如上所述,在基于8pt的网格上设计的图标将完美缩放:
Exporting a 16×16 pixels icon for iOS will result in perfectly rendered icons in 16, 32 and 48 pixels.
为iOS导出16×16像素的图标将得到16、32和48像素的完美呈现的图标。
If you intend on using icons in a different size, I would recommend designing your icon on 16×16 pixels grid, and another version on a 20×20 pixels grid. This way you’re covered for any size: 16, 20, 24 (16×1.5), 32, 40 and so forth.
如果打算使用其他尺寸的图标,建议您在16×16像素的网格上设计图标,并在20×20像素的网格上设计另一个版本。 这样,您就可以覆盖任何大小:16、20、24(16×1.5),32、40等。
Undertow (Shadows)
Shadows are used to signify elevation — how much an element is off surface.
阴影用于表示高程-元素离表面有多少。
A few pointers on shadows:
关于阴影的一些提示:
Use one light source: Imagine there is a single light source illuminating your interface, casting shadows from a single angle, resulting in one x value for all of your shadows horizontal position.
使用一个光源:想象有一个光源照亮您的界面,从单个角度投射阴影,因此所有阴影水平位置的值都是一个x。
More than one shadow: Multiple shadow styles can result in a more realistic and unique shadow.
一个以上的阴影:多种阴影样式可以产生更真实和独特的阴影。
You can apply shadows to Groups: Avoid shadows overlaying one another, and apply you shadow to the group, instead of layers within. However, you can’t apply more than one shadow to a group.
您可以将阴影应用于组:避免阴影相互重叠,并将阴影应用于组,而不是内部的层。 但是,您不能对一个组应用多个阴影。
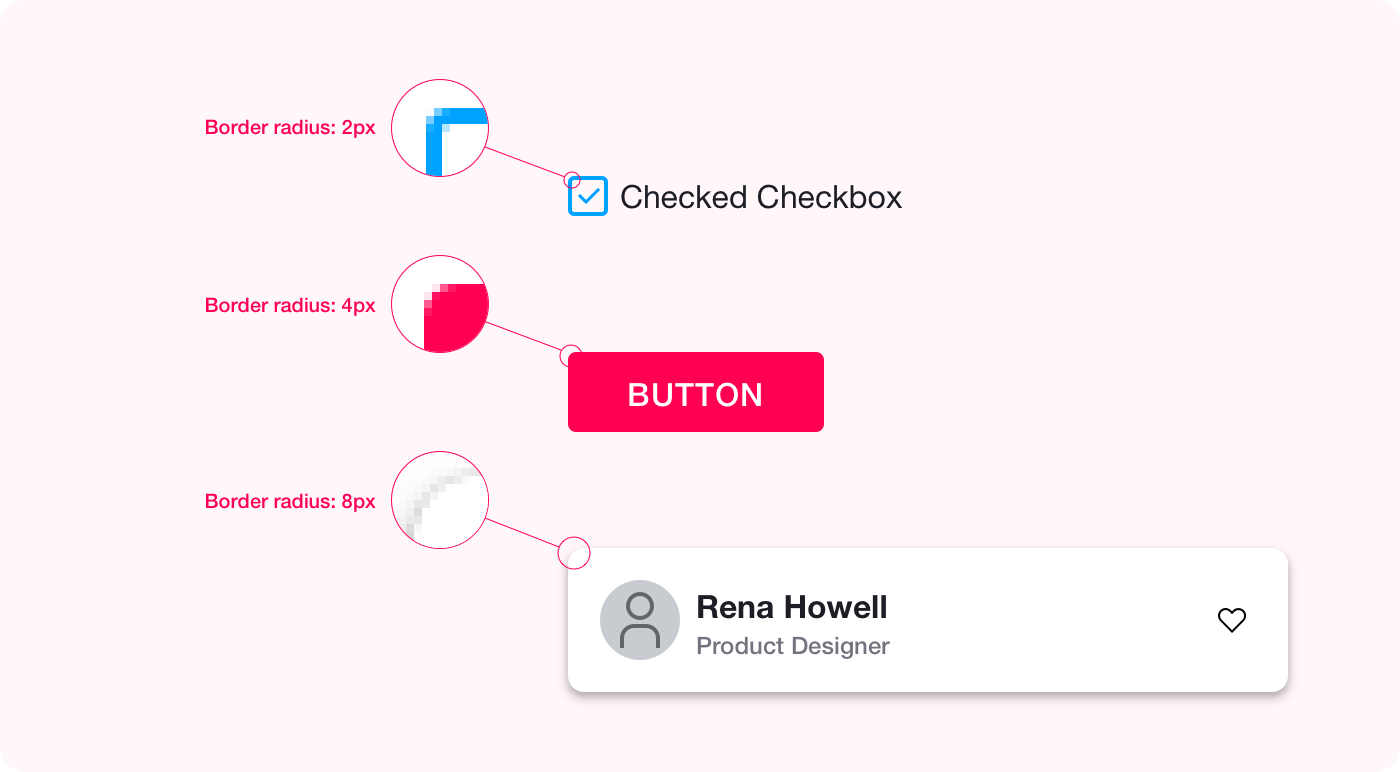
边界半径 (Border Radius)
Most likely you employ border radius in your design, alternating between different radii for different elements. However, I haven’t found the use in having more than 3 border radii settings (maybe 4, but that’s a stretch):
最有可能在设计中采用边界半径,在不同元素的不同半径之间交替。 但是,我还没有发现在超过3个边界半径设置(也许是4个,但这很麻烦)中的用途:
- 2px border radius for UI components such as checkboxes, tags and the likeUI组件(例如复选框,标签等)的边框半径为2px
- 4px border radius for buttons and the like按钮等的4px边框半径
- 8px border radius for cards, modals and the like卡,模态等的8px边框半径
组件 (Components)
Components are all the reusable items you have lying around: buttons, inputs, labels, cards, video players and so forth. Our goal here is to have a readily available component for most occasions, but without ending up with an endless list of components.
组件是您可以使用的所有可重复使用的项目:按钮,输入,标签,卡片,视频播放器等。 我们的目标是在大多数情况下提供一个随时可用的组件,但最终不会产生无穷无尽的组件列表。
I’ll take the basic button as an opportunity to explain the whole spiel.
我将把基本按钮作为一个机会来解释整个主题。
设计模块化按钮 (Designing a modular button)
The primary button is probably the most reused component in any DS. It’s function is to indicate the user that the function it suggests is the main function in this screen. It will usually be the safest action the user can take, and the one that we, the designers, want him to perform.
主按钮可能是所有DS中最常用的组件。 它的功能是向用户指示其建议的功能是此屏幕中的主要功能。 通常这将是用户可以采取的最安全的操作,而我们(设计师)希望他执行此操作。
The primary button can arrive in set sizes:
主按钮可以到达设置的大小:
Should have a minimal size, while adapting to it’s content:
在适应其内容的同时,应具有最小的尺寸:
And have several states:
并有几种状态:
Voila! Our first building block is now efficient, reusable, flexible and up to standards!
瞧! 现在,我们的第一个构建块是高效,可重复使用,灵活且符合标准!
And since we’re talking about building blocks..
由于我们正在谈论积木。
模块化积木 (Modular Building Blocks)
The most efficient method out there for organizing your DS that I’m familiar with is the Atomic Design method. The method was introduced to us all by Brad Frost — I urge you to read all about it here:
目前,最有效的组织DS的方法是Atomic Design方法。 布拉德·弗罗斯特(Brad Frost)向所有人介绍了该方法-我敦促您在此处阅读有关此方法的所有信息:
In a nutshell, all of our components are organized to one of the following: Atoms, Molecules, Organisms, Templates and Pages.
简而言之,我们所有的组件都按以下其中之一进行组织:原子,分子,生物,模板和页面。
I myself haven’t found much use of Templates and Pages. If we’ll compare the Atomic design to Lego, then Atoms, Molecules and Organisms are the basic bricks, groups of different bricks and compositions of groups respectively.
我本人并没有发现模板和页面的大量使用。 如果我们将原子设计与乐高进行比较,则原子,分子和生物分别是基本的砖块,不同砖块的组和组的组成。
While Templates and Pages are more like the Millennium Falcon Lego set — fun and all but not very practical, and a nightmare to build.
尽管“模板和页面”更像是“ 千年猎鹰”乐高套装 ,但乐趣却不尽如人意,而且是梦night。
If that sounds to you like Symbols and Nested Symbols, you’ve hit the nail on it’s head. The button we’ve just built is an Atom, if we’ll add this button to at the end of a card or in the websites navbar, it’s now a part of a Molecule:
如果您觉得这像符号和嵌套符号,那您就大功告成。 我们刚刚构建的按钮是Atom,如果我们将其添加到卡片的末尾或网站导航栏中,则它现在是分子的一部分:
If we’ll keep this up, adhering to the 8pt Grid rules when designing each of our components, sooner than later we’ll have a whole DS based on the 8pt Grid.
如果我们坚持下去,在设计每个组件时都遵循8pt Grid规则,那么我们很快就会有一个基于8pt Grid的完整DS。
In the previous article, I went over layout (columns, rows and spacing), so if anything in the next sections won’t be quite clear, you’re more than welcome to pause here and read all about it.
在上一篇文章中 ,我介绍了布局(列,行和间距),因此,如果下一节中的内容不清楚,欢迎您在这里停下来阅读所有内容。
网格布局 (Grid & Layout)
The jury is still out on whether designers should code. As a designer that codes, I can say that there is a shallow layer of coding that designers should be familiar with, one of which is the Box Model.
设计师是否应该编码尚无定论。 作为编码设计师,我可以说设计师应该熟悉一个浅层次的编码,其中之一就是Box Model。
盒子模型 (The Box model)
The box model is a box that envelopes every element on the screen — everything essentially lives in a rectangle. The box model consists of: margins, borders, padding, and the content itself.
盒子模型是一个包围屏幕上每个元素的盒子-基本上所有内容都生活在一个矩形中。 盒子模型包括:边距,边框,填充和内容本身。
Increasing the padding will increase the box size, while increasing margins will increase the space around the box, pushing other elements away (element — any entity in the webpage, in this case the text ‘Box’).
增加填充将增加框的大小,而增加边距则将增加框周围的空间,从而将其他元素推开(元素-网页中的任何实体,在这种情况下为文本“框”)。
Notice that padding and margins don’t have to be the same for all sides; in fact, they can be different for each side. Also, the box’s height is affected by the element’s line height, while it’s width is affected by the font size.
注意,边距和边距不必都相同; 实际上,它们的每一方都可以不同。 此外,框的高度受元素的线高影响,而框的宽度受字体大小影响。
This distinction is crucial for us designers to understand. An element’s size and position, it’s presence in the layout, is determined by several factors:
这种区别对我们的设计师来说至关重要。 元素的大小和位置( 在布局中是否存在 )取决于几个因素:
Margins: the space an element keeps away from other elements.Padding: the space an element clears around the content.Content: the content inside the box
边距 :元素与其他元素保持间隔的空间。 填充 :元素清除内容周围的空间。 内容 :盒子内的内容
Frustratingly enough, there are two very confusing modes for rendering elements on the screen concerning the box model:
令人沮丧的是,有两种非常令人困惑的模式,用于在屏幕上渲染与Box模型有关的元素:
/* The default and confusing settings */.red-box { width: 200px; height: 200px; padding: 40px; border: solid red 2px; /*default box sizing (bad for designers)*/ box-sizing: content-box;}/* The easy to understand settings */.blue-box { width: 200px; height: 200px; padding: 40px; border: solid blue 2px; /*the box sizing (making sense for designers)*/ box-sizing: border-box;}The two methods differ in calculating the elements size; the first method (default), takes the assigned height and width (200px), and adds on top of that padding (40px*4 sides), and border (2px*4 sides), resulting in a 288*288px box. Any change to padding and border width will alter the box’s final size.
两种方法在计算元素大小方面有所不同; 第一种方法(默认方法),采用指定的高度和宽度(200像素),并在该填充(40像素* 4面)和边框(2像素* 4面)的顶部添加,得到一个288 * 288像素的框。 填充和边框宽度的任何更改都会改变盒子的最终尺寸。
The second mode includes padding and border in the final assigned size, resulting in a 200*200px box no matter what the padding and border values are— much neater and easier to understand.
第二种模式包括最终分配大小的填充和边框,无论填充和边框值是什么,都将产生200 * 200px的框-更加整洁和易于理解。
Of course, the element’s size and position can be affected by many other factors (such as width, height and explicit/implicit positioning and the like), but these are the basics for each element on the screen.
当然,元素的大小和位置可能会受到许多其他因素的影响(例如宽度,高度和显式/隐式定位等),但这是屏幕上每个元素的基础。
间距 (Spacing)
When deciding on the position of an element, we’re essentially deciding upon its’ spacing from another element. Repeat this decision hundreds of times without a system, and you have about a hundred different spacing definitions.
在确定一个元素的位置时,我们实质上是在确定它与另一个元素的间距 。 在没有系统的情况下重复执行此决定数百次,您将获得大约一百种不同的间距定义。
Taking in mind the fact that we have spacing within an element and outside an element, it may be to our advantage to have 2 spacing scales: Element spacing and Layout spacing.
考虑到我们在一个元素内和一个元素外都有间隔的事实,拥有两个间隔比例可能对我们有利:元素间隔和布局间隔。
This is in fact a variation on IBM’s Carbon DS, so kudos IBM design team!
实际上,这是IBM Carbon DS的一个变体,因此请IBM设计团队赞誉!
The layout scale is used to space elements from one another; within an encompassing element or between sections:
布局比例用于将元素彼此隔开。 在包含元素之内或在各节之间:
This is how it looks in action in an encompassing element:
这就是它在包含元素中的实际效果:
And this is how it looks in action in a webpage:
这就是它在网页中的实际效果:
水平布局 (Horizontal Layout)
I covered this specific topic in detail in the previous article, check it out.
我在上一篇文章中详细介绍了这个特定主题, 请查看 。
For horizontal layout, I use either a 12 column grid with a 24px gutter and 72px column, or a fluid 12 column grid with a 24px/32px gutter and varying column width (obviously).
对于水平布局,我使用带有24px装订线和72px列的12列网格,或者使用带有24px / 32px装订线和可变列宽的可变12列网格(显然)。
Each product or website require a certain grid, simply use the 8pt unit in a way that makes sense.
每个产品或网站都需要一定的网格,只需以有意义的方式使用8pt单元即可。
最后的话 (Last words)
Design systems should live on and evolve, not freeze in time. Try and treat them as a living document, rather than words set in stone.
设计系统应该持续存在并不断发展,而不是停滞不前。 尝试将它们视为有生命的文件,而不是刻在石头上的文字。
Keep in mind that the basic the component/style you’re about to change, the more complicated the consequences will be. Altering the button or body text style will affect the DS much more than altering the card layout. So experiment with the basic building blocks before venturing much further.
请记住,您将要更改的基本组件/样式,后果将更加复杂。 更改按钮或主体文本样式对DS的影响远比更改卡片的布局大。 因此,在进一步尝试之前,请尝试基本的构建块。
Good luck and have fun!
祝好运并玩得开心点!
翻译自: https://medium.com/swlh/design-system-based-on-the-8pt-grid-2473ca5f0ae1
基于pt100温度计仿真
http://www.taodudu.cc/news/show-893834.html
相关文章:
- 利用 k8s 建立软件商店_为企业建立应用商店
- 苹果复兴_类型复兴的故事:来自Type West的经验教训
- 浪潮世科和浪潮软件什么关系_社交图形浪潮
- ui项目答辩中学到了什么_我在UI设计9年中学到的12件事
- ux的重要性_UX中清晰的重要性
- 可靠消息最终一致性设计_如何最终启动您的设计产品组合
- 游戏用户体验指标_电子游戏如何超越游戏化的用户体验
- 什么字体字母和数字大小一样_字母和字体如何适应我们的屏幕
- 效果图底图 线框图_5分钟的线框图教程
- 怎么让qt发声_第3部分:添加网络字体-让我们的单词发声
- 饥饿的盛世读后感_满足任何设计师饥饿感的原型制作工具
- figma 安装插件_我制作Figma插件的经验
- 术语解释_术语
- mac photoshop_我讨厌Photoshop…
- 做事用人 用人做事_做事:构建我的第一个Web应用程序的经验教训
- vista下载_Vista和视图在游戏设计中的功能
- keynote使用手册_如何使用Keynote和智能手机为AR创建原型
- 远程控制工具_不要让您的工具控制您
- 模态和非模态代码_我们如何使模态可用和可访问?
- 软件项目开发 学校自行开发_自行开发游戏
- 优衣库不雅_Uniqlo主页-用户体验案例研究
- shields 徽标_到处都有平面徽标
- 登录,注册,登录,登录..?
- ux设计_UX设计101:
- idea重要插件代码颜色_颜色在您的网站上的重要性和品牌形象
- 软件设计师中级 百度知道_设计师应该知道什么
- 信息保真度准则_设计保真度的新的非科学公式
- 产品设计的Kawaiization
- 陌生人社会_陌生人之旅
- ux设计师薪水_公司与 设计机构:UX设计师的津贴和陷阱
基于pt100温度计仿真_基于8pt网格的设计系统相关推荐
- 一种基于UE4平台多人交互3D家装设计系统及使用方法与流程
本发明涉及一种基于UE4平台多人交互3D家装设计系统及使用方法,属虚拟现实技术领域. 背景技术: 目前随着虚拟现实技术的飞速发展,当前在进行家装实际工作中,为了提高设计方案对用户展示的便捷性和准确性, ...
- python 机器人运动仿真_基于ros平台的移动机器人的设计与运动仿真-创新创业训练计划.pdf...
基于ros平台的移动机器人的设计与运动仿真-创新创业训练计划 基于ROS 平台的移动机器人的设计与运动仿真 陈勇林 朱应钦 杜政恒 张玉林 (重庆大学城市科技学院电气信息学院,重庆 永川 402 ...
- 基于正点原子触摸屏ui设计_基于黄金比例ui%C9%B8的设计系统
基于正点原子触摸屏ui设计 定义ɸ (Defining ɸ) The golden number, or "phi" in reference to the sculptor Ph ...
- 【微机课设分享】基于8086和LCD12864液晶显示仿真设计-基于8086直流电机调速控制系统设计-基于8086计数器仿真系统设计-基于8086计算器系统仿真设计-基于8086家具房间灯光控制设计
1184基于8086和LCD12864液晶显示仿真设计-设计全套资料 本设计完整的实现基于8086红外报警仿真设计,protues仿真中, 红外传感用按键模拟(红外原理也是通过高低电平来检测感知的), ...
- 基于javafx的五子棋_基于JavaFX的SimpleDateFormat演示程序
基于javafx的五子棋 对于使用Java Date进行格式化的新手,甚至对于使用Java Date进行格式化的新手,对于有经验的Java开发人员来说,可能都会有些棘手,其中之一就是使用SimpleD ...
- 基于python的管理系统_基于ssm的管理系统_基于python管理系统
基于SSM+MYSQL的一个小型商城网站后台管 650x301 - 120KB - PNG 基于SSM框架的百顺物流管理系统的设计和实 993x1404 - 110KB - PNG 基于SSM实现的简 ...
- 利用Quartz设计采集系统并实现系统双活机制_在SpringCloud中自己设计系统双活---SpringCloud工作笔记178
因为项目仅仅是不停的抓数据,没有弄成分布式的,但依然需要系统双活来保证系统稳定. 这个时候,我的思路是:这个在另一篇博文中有些的详细思路(在Timer定时任务中_基于Redis自己实现一套双机互备_双 ...
- ios设计组件_在ios上实现设计系统组件
ios设计组件 As a native iOS developer, I've been jealous of web developers who can use design systems in ...
- 现代永磁同步电机控制原理及matlab仿真_基于Matlab的PMSM模型初探
本文首发自微信公众号"汽车技术馆"! 随着新能源车辆的普及,电机的控制技术逐渐成为了热门的话题,尤其是目前在电机上普遍使用的永磁同步PMSM技术,其实不止是新能源的电机驱动使用了这 ...
最新文章
- 【2018-01-22】HTML-表单及表单元素
- 关于 Oracle分页数据重复的问题
- 判断坐标位置C语言,〓求助〓谁能帮忙编个程序:输入N个点坐标,判断能否构成多边形....
- HTML5新API记录
- AES-128\192\256加密算法及其安全脆弱分析
- Ext.js4 的Store携带参数加载中文,后台出现乱码解决办法
- 计算机操作系统详细学习笔记(三):存储管理
- 软件运行 计算机硬件环境,软件运行环境该怎么写
- 人脸识别技术已成考勤门禁行业发展趋势
- EVEREST - 测试软硬件系统信息的工具
- 计算机网络实验|DNS 域名服务协议
- linux中使用rpm命令详解
- HDR高动态范围成像
- 干货分享!软考中高项案例分析10大管理领域理论背诵要点
- 苹果、微软、谷歌三巨头联手,“杀死”密码
- C#操作TMPOS58串口打印机一些心得
- pool win10提示bad_大师讲解win10蓝屏重启代码BAD,POOL,CALLER修复方法
- QQ能上网,网页不行总解决办法
- easyui图片放大功能(取巧)
- 国产rtos系统RT-Thread基础学习总结
热门文章
- java资源分配算法,java - 资源分配与动态规划算法 - 堆栈内存溢出
- linux 如何查看终端格式,你应该还不知道,Linux终端下的 Markdown 文档查看器
- Servlet体系结构
- [LeetCode] Palindrome Linked List
- “ddl”有一个无效 SelectedValue,因为它不在项目列表中。
- Android中用GridView实现九宫格的两种方法(转)
- ASP.NET 文件上传于下载
- 简易拨号器iCall
- 2013计算机系统导论,【精选】2013计算机系统导论-期末考卷-发布.pdf
- mysql周报内容范文_Mysql各种报表查询含实例,日报,周报,月报,时间差自动计算...