如何用Baas快速在腾讯云上开发小程序-系列3 :实现腾讯云COS API调用
版权声明:本文由贺嘉 原创文章,转载请注明出处:
文章原文链接:https://www.qcloud.com/community/article/640268001487425627
来源:腾云阁 https://www.qcloud.com/community
一、实验简介
本实验通过调用腾讯云对象存储(COS)接口,实现将图片上传到指定的 Bucket 功能;同时封装图片上传接口,用于上传商品图片。
二、实验目标
- 掌握 RESTFul API 接口调用和调试方法
- 掌握 RESTFul API 封装方法
三、实验步骤
3.1 添加云应用
第一步: clone xqcloud 项目
1. cd <your project path>
2. git clone https://git.oschina.net/xpmjs/xqcloud.git xqcloud
第二步: 修改远程仓库地址,提交到远程仓库
1. git remote remove origin
2. git remote add origin ssh://git@dev.appcook.cn:2222/source/xqcloud.git 3. git push origin master
3.2 调用 COS API,实现文件上传功能
第一步: 编写 Cos Model vi xqcloud/model/Cos.php
1. <?php
2. use \Tuanduimao\Mem as Mem; 3. use \Tuanduimao\Excp as Excp; 4. use \Tuanduimao\Err as Err; 5. use \Tuanduimao\Conf as Conf; 6. use \Tuanduimao\Model as Model; 7. use \Tuanduimao\Utils as Utils; 8. use \Tuanduimao\Loader\App as App; 9. /** 10. * cos对象存储11. */ 12. class CosModel { 13. function __construct( $opt=[] ) { 14. $this->appid = isset($opt['appid']) ? $opt['appid'] : ""; 15. $this->bucket = isset($opt['bucket']) ? $opt['bucket'] : ""; 16. $this->SecretID = isset($opt['SecretID']) ? $opt['SecretID'] : ""; 17. $this->SecretKey = isset($opt['SecretKey']) ? $opt['SecretKey'] : ""; 18. } 19. /** 20. * 签名 21. * @param array $opt [description] 22. * @return [type] [description] 23. */ 24. function sign( $opt=[] ) { 25. $randstr= $this->generateId(10); 26. $t = isset($opt['e']) ? time()+86400 : 0; 27. $a = isset($opt['appid']) ? $opt['appid'] : $this->appid; 28. $b = isset($opt['bucket']) ? $opt['bucket'] : $this->bucket; 29. $k = isset($opt['SecretID']) ? $opt['SecretID'] : $this->SecretID; 30. $e = isset($opt['e']) ? $opt['e'] : time()+3600; 31. $SecretKey = isset($opt['SecretKey']) ? $opt['SecretKey'] : $this->SecretKey; 32. $s = [ 33. "a" => $a, 34. "b" => $b, 35. "k" => $k, 36. "e" => $e, 37. "t" => time(), 38. "r" => $randstr, 39. "f" =>$opt['file'], 40. ]; 41. // 拼接字符串 42. $orignal = "a={$s['a']}&k={$s['k']}&e={$s['e']}&t={$s['t']}&r={$s['r']}&f={$s['f']}&b={$s['b']}"; 43. $signTmp = hash_hmac( 'SHA1', $orignal, $SecretKey , true ); 44. $sign = base64_encode($signTmp.$orignal); 45. return $sign; 46. } 47. 48. /** 49. * 文件转.字符串 50. * @param [type] $imageUrl [description] 51. * @param array $opt [description] 52. * @return [type] [description] 53. */ 54. function uploadByUrl( $imageUrl, $opt=[] ) { 55. $imageData = file_get_contents( $imageUrl ); 56. return $this->upload( $imageData, $opt ); 57. } 58. 59. /** 60. * 文件上传61. * @param [type] $imageData [description] 62. * @param array $opt [description] 63. * @return [type] [description]S 64. */ 65. function upload( $imageData, $opt=[] ){ 66. // 生成随机数
第二步: 编写测试用控制器 vi xqcloud/controller/Cos.php
1. <?php
2. use \Tuanduimao\Loader\App as App; 3. use \Tuanduimao\Utils as Utils; 4. use \Tuanduimao\Tuan as Tuan; 5. use \Tuanduimao\Excp as Excp; 6. use \Tuanduimao\Conf as Conf; 7. 8. class CosController extends \Tuanduimao\Loader\Controller { 9. 10. function __construct() { 11. } 12. 13. function tryit() { 14. 15. $config = [ 16. 'region'=>'<tj/sh/gd>', 17. 'appid'=>'<your appid>', 18. 'bucket'=>'<your bucket>', 19. 'SecretID'=>"<your SecretID>", 20. 'SecretKey'=>"<your SecretKey>" 21. ]; 22. $cos = App::M('Cos',$config); 23. $content =file_get_contents("http://7xleg1.com1.z0.glb.clouddn.com/x1/2/lab/uploadit.jpg"); 24. $resp = $cos->upload( $content, ['region'=>$config['region'], ' filetype'=>'jpg'] ); 25. Utils::out($resp); 26. } 27. 28. }
第三步: 提交代码并更新线上
1. git add *
2. git commit -m '+COS Tryit {{pull}}' # {{pull}} feed 指令更新线上代码 3. git push
第四步: 安装 XQCloud 应用
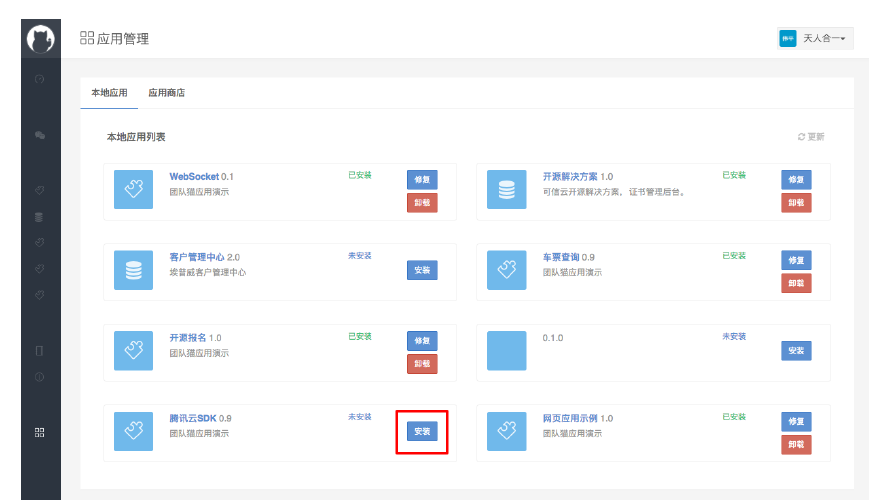
访问 https://dev.appcook.cn/core-system/appmanager/index , 安装应用
第五步: 登录云主机,运行测试
1. docker exec -it xpmjs-server /bin/bash # 进入容器
2. tdm app run /apps/xqcloud/controller/Cos.php tryit # 运行测试

3.3 封装图片上传接口
第一步: 创建配置文件 vi xqcloud/config.php
1. <?php
2. $GLOBALS['_QC'] = [
3. 'cos'=>[ 4. 'region'=>'<tj/sh/gd>', 5. 'appid'=>'<your appid>', 6. 'bucket'=>'<your bucket>', 7. 'SecretID'=>"<your SecretID>", 8. 'SecretKey'=>"<your SecretKey>" 9. ] 10. ];
第二步: 修改控制器 vi xqcloud/controller/Cos.php
1. <?php
2. require_once(__DIR__ . '/../config.php'); 3. use \Tuanduimao\Loader\App as App; 4. use \Tuanduimao\Utils as Utils; 5. use \Tuanduimao\Tuan as Tuan; 6. use \Tuanduimao\Excp as Excp; 7. use \Tuanduimao\Conf as Conf; 8. 9. class CosController extends \Tuanduimao\Loader\Controller { 10. 11. function __construct() { 12. } 13. 14. /** 15. * 上传文件接口 16. * @return [type] [description] 17. */ 18. function upload() { 19. 20. $file = !empty($_FILES['wxfile']) ? $_FILES['wxfile'] : []; 21. $content = !empty($file['content']) ?base64_decode($file['content']) : NULL; 22. $filetype = Utils::mimes()->getExtension($file['type']); 23. 24. if ( $content == null ) { 25. echo (new Excp("未接收到文件", 502, ['_FILES'=>$_FILES]))->toJSON(); 26. return; 27. } 28. 29. $config = $GLOBALS['_QC']['cos']; 30. $cos = App::M('Cos',$config); 31. try { 32. $resp = $cos->upload( $content, ['region'=>$config['region' ], 'filetype'=>$filetype] ); 33. } catch( Excp $e ){ 34. $extra = $e->getExtra(); 35. echo (new Excp("COS API 错误", 502, ['resp'=>$resp, 'e'=>$extra]))->toJSON(); 36. return; 37. } 38. if ( $resp['code'] == 0) { 39. Utils::out($resp['data']); 40. return; 41. } 42. echo (new Excp("COS API 错误", 502, ['resp'=>$resp]))->toJSON(); 43. return; 44. 45. } 46. }
第三步: 提交代码更新
1. git add *
2. git commit -m '+COS Upload {{pull}}' # {{pull}} feed 指令更新线上代码 3. git push
第四步: 登录云主机,运行测试
1. docker exec -it xpmjs-server /bin/bash # 进入容器
2. cd ~
3. wget http://wxapp-1252011659.file.myqcloud.com/4883017283.jpg 4. tdm app run /apps/xqcloud/controller/Cos.php upload --f='''{"wxfile":"4883017283.jpg"}''' --vv 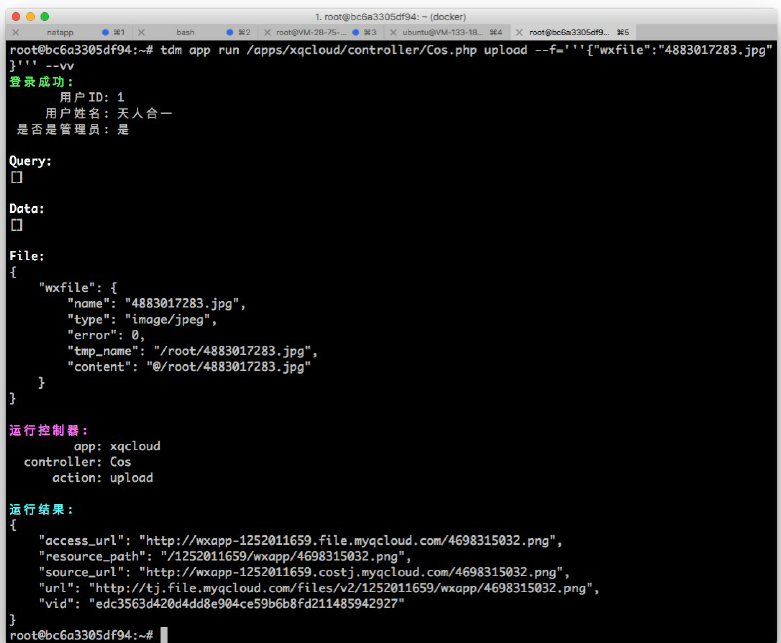
四、实验结果
通过调用 COS 接口,掌握 RESTFul API 调用和调试的方法;通过封装图片上传接口,掌握
RESTFul API 的封装方法。
如果你看了以上的文章觉得不过瘾。想要系统性学习如何在腾讯云上开发微信小程序,建议报名参加我们的TCCE微信开发课程培训:https://www.qcloud.com/training/courses/wx-dev
转载于:https://www.cnblogs.com/purpleraintear/p/6486163.html
如何用Baas快速在腾讯云上开发小程序-系列3 :实现腾讯云COS API调用相关推荐
- uni-app 结合云函数开发小程序博客(二):云函数实现登录注册
我们研发开源了一款基于 Git 进行技术实战教程写作的工具,我们图雀社区的所有教程都是用这款工具写作而成,欢迎 Star 哦 如果你想快速了解如何使用,欢迎阅读我们的 教程文档哦 本文由图雀社区认证作 ...
- uni-app 结合云函数开发小程序博客(三):接入云函数,实现完善的列表刷新机制
我们研发开源了一款基于 Git 进行技术实战教程写作的工具,我们图雀社区的所有教程都是用这款工具写作而成,欢迎 Star 哦 如果你想快速了解如何使用,欢迎阅读我们的 教程文档哦 本文由图雀社区认证作 ...
- 小程序如何租用云服务器,开发小程序怎样租用云服务器
开发小程序怎样租用云服务器 内容精选 换一换 华为云帮助中心,为用户提供产品简介.价格说明.购买指南.用户指南.API参考.最佳实践.常见问题.视频帮助等技术文档,帮助您快速上手使用华为云服务. 按照 ...
- 腾讯升级视频号小程序直播功能,腾讯持续推广直播的底气是这项叫视立方(MLVB)的技术
微信作为腾讯集团中两大私域流量池的其中一个,近期又再一次升级,或者说完善了视频号的功能,让直播功能渗透进更多的观众中.这项更新的具体内容就是允许主播在直播间中直接向观众推送5类链接气泡,包括:直播预告 ...
- 云闪付小程序开发1.1---(@像极了人生、有喜有悲....)
经过上一节云闪付1.0的铺垫,这里说明一个道理,生活嘛,还是要多去发现身边的东西,万一奇迹再现了呢!是吧! 看了<云闪付小程序的官方>开发文档之后,我受益匪浅,有一个好消息跟一个坏消息.. ...
- 3 天开发物联网应用!腾讯云 IoT 超级小程序来了
腾讯在物联网的故事要从 6 年前开始说起. 作者 | 唐小引 出品 | CSDN(ID:CSDNnews) 在腾讯复盘起过去的 20 年里有哪些标志性的事件时,马化腾提出腾讯要「连接一切」和「腾讯云正 ...
- 腾讯小程序服务器忙,使用腾讯云助手小程序管理腾讯云服务器
一般我们运维腾讯云服务器都是通过电脑端网页登录腾讯云后台进行管理维护,其实除了在电脑端管理腾讯云服务器等资源外,可以在手机微信端运维操作腾讯云服务器,简单方便,常用的腾讯云服务器关机.重启.续费.重置 ...
- 微信小程序详细图文教程-10分钟完成微信小程序开发部署发布(3元获取腾讯云服务器带小程序支持系统)...
很多朋友都认为微信小程序申请.部署.发布很难,需要很长时间. 实际上,微信和腾讯云同是腾讯产品,已经提供了10分钟(根据准备资源情况,已完成小程序申请认证)完成小程序开发.部署.发布的方式.当然,实现 ...
- 基于腾讯云的艺术展小程序
第一章 项目背景 1.1 项目简介和应用现状 基于腾讯云的艺术展小程序:打造集美术鉴赏.艺术科普.当代优秀艺术品交流多功能融艺术性.知识性.趣味性.便利性于一体的一站式平台,为广大艺术爱好者提供优质服 ...
最新文章
- Intellij IDEA中开启Run Dashboard模式
- makefile与stm32工程皮毛了解
- 庖丁解牛|图解 MySQL 8.0 优化器查询转换篇
- Win11将沿用Win10升级模式 并会有LTSC版本
- linux命令wget下载jdk(完整解决诸多异常)
- [C++ Primer] 第2章: 变量
- python 去掉转义字符_python前期准备
- 算法完成了如何开发服务端API?
- cluster oracle修改,Oracle 修改集群的资源属性(依赖关系)
- Delphi中TStringList类常用属性方法详解
- 如何重装win 10 系统
- mysql如何查看使用的配置_mysql 配置文件如何查询?
- 网站备案 应该找域名商还是空间商备案
- 关于iexplore.exe占用CPU100%的问题
- Infor SyteLine ERP 安装后中文语言设置
- 储存卡数据丢失恢复方法
- html的浮动跟标准流,网页布局的 标准流 浮动流 与 定位流
- unity 阻挡射线未生效_Unity社区在E3生效
- java设计游戏_用java设计实现一个简单的动作冒险类游戏
- Chrome+SwitchySharp+SSH 或者 Firefox+AutoProxy+SSH
热门文章
- 【实习之T100开发】T100程序功能代码积累
- 【C++】智能指针(auto_ptr,shared_ptr,unique_ptr)及 shared_ptr 强引用原理
- 【Tensorflow深度学习】Tensorflow2.0GPU版极简安装
- 520晚上,我用python破解了前女友的加密文件,结果却发现。。。
- arcgis 4.x graphicslayer点击事件_ArcGis中X、Y值的巧用方法小记
- 学会这个大屏神器,低代码开发高端可视化大屏不在话下
- 互联网产品总监的经验总结:从0-1为你讲明白BI与数据可视化
- 腾讯智慧校园 php,河南省电化教育馆召开全省“腾讯智慧校园”试点工作推进会...
- 安卓10侧边返回_Android 之路 (10) - 集成滑动返回(SwipeBackLayout)
- 蓝桥杯java龟兔赛跑_蓝桥杯 1476: [蓝桥杯][基础练习VIP]龟兔赛跑预测