wordpress安装教程_如何安装WordPress –完整的WordPress安装教程
wordpress安装教程
WordPress is known as the most popular website builder in the world. It powers over 33% of all websites on the internet. The main reason for that is because WordPress is easy to install which makes it easy for anyone to create a website.
WordPress被称为世界上最受欢迎的网站构建器 。 它为互联网上所有网站的33%以上提供动力。 这样做的主要原因是因为WordPress易于安装,这使任何人都可以轻松创建网站。
All best WordPress web hosting companies allow you to install WordPress with just few clicks. In most circumstances, installing WordPress is a simple process that takes less than five minutes to complete.
所有最好的WordPress网络托管公司都允许您单击几下安装WordPress。 在大多数情况下,安装WordPress是一个简单的过程,只需不到五分钟即可完成。
In this tutorial, our goal is to offer a complete WordPress installation tutorial for beginners and advanced users alike.
在本教程中,我们的目标是为初学者和高级用户提供完整的WordPress安装教程。
For beginners, we will show you how to install WordPress on all top hosting platforms by using 1-click install scripts like Fantastico, Softaculous, and QuickInstall.
对于初学者,我们将向您展示如何使用一键式安装脚本(如Fantastico,Softaculous和QuickInstall)在所有顶级托管平台上安装WordPress。
We will also explain how to install WordPress manually using FTP for our intermediate users.
我们还将为中级用户介绍如何使用FTP手动安装WordPress。
Lastly, for our beginner developer and designers, we will show you how to install WordPress on a local computer (Windows, Mac, and Linux).
最后,对于我们的初学者开发人员和设计师,我们将向您展示如何在本地计算机(Windows,Mac和Linux)上安装WordPress。
Apart from showing you how to install WordPress, we will also give you tips on things to do after you install WordPress.
除了向您展示如何安装WordPress之外,我们还将为您提供安装WordPress之后的操作提示。
安装WordPress之前需要的东西 (Things You Need Before Installing WordPress)
Before you install WordPress, first you will need a domain name and a good web hosting company that knows WordPress.
在安装WordPress之前,首先需要一个域名和一家了解WordPress的优秀网络托管公司 。
We highly recommend that you use Bluehost because they will give you a free domain and 60% off their hosting plan (special for WPBeginner users).
我们强烈建议您使用Bluehost,因为它们会为您提供一个免费域,并为其托管计划提供60%的折扣(特别适用于WPBeginner用户)。
The reason we recommend Bluehost is because they are one of the largest hosting companies in the world. They are also an officially recommended WordPress hosting provider.
我们之所以推荐Bluehost,是因为它们是世界上最大的托管公司之一。 他们还是官方推荐的WordPress托管提供商。
Since this is a very long and detailed tutorial, please use the navigation below to get to the appropriate section.
由于这是一个非常详尽的教程,因此请使用下面的导航进入相应的部分。
- How to Install WordPress on Bluehost如何在Bluehost上安装WordPress
- How to Install WordPress on HostGator如何在HostGator上安装WordPress
- How to Install WordPress on SiteGround如何在SiteGround上安装WordPress
- How to Install WordPress on WP Engine如何在WP Engine上安装WordPress
- How to Install WordPress from cPanel如何从cPanel安装WordPress
- How to Install WordPress using Softaculous如何使用Softaculous安装WordPress
- How to Install WordPress using QuickInstall如何使用QuickInstall安装WordPress
- How to Install WordPress using Fantastico如何使用Fantastico安装WordPress
- How to Install WordPress using FTP如何使用FTP安装WordPress
- How to Install WordPress in your Computer如何在您的计算机上安装WordPress
- How to Install WordPress in your Language如何以您的语言安装WordPress
- How to Install a WordPress Multisite Network如何安装WordPress多站点网络
- Things to do After Installing WordPress安装WordPress之后要做的事情
如何在Bluehost上安装WordPress (How to Install WordPress on Bluehost)
Bluehost is an officially recommended WordPress hosting provider and one of the largest hosting companies in the world. They know WordPress inside out and have the most beginner friendly WordPress installation process.
Bluehost是官方推荐的WordPress托管提供商,也是世界上最大的托管公司之一。 他们完全了解WordPress,并且具有最适合初学者的WordPress安装过程。
Bluehost automatically installs WordPress on your domain name when you sign up. Once you login to your Bluehost account, you’ll find your WordPress site under ‘My Sites’ tab.
注册时,Bluehost会在您的域名上自动安装WordPress。 登录到Bluehost帐户后,您将在“我的网站”标签下找到您的WordPress网站。
You can simply click on ‘Log into WordPress’ button, and it will take you directly to the WordPress admin area.
您只需单击“登录到WordPress”按钮,即可将您直接带到WordPress管理区域。
Except for their ‘Basic’ plan, Bluehost also allows you to install WordPress on unlimited sites with all their hosting plans.
除了“基本”计划外, Bluehost还允许您使用其所有托管计划在无限制的站点上安装WordPress。
Simply click on the ‘Create Site’ button under ‘My Sites’ tab to get started.
只需单击“我的网站”标签下的“创建网站”按钮即可开始使用。
This will launch the Bluehost guided WordPress installation wizard. First, it will ask you to provide a site title and optionally a tagline.
这将启动Bluehost指导的WordPress安装向导。 首先,它将要求您提供网站标题和可选的标语。
Click on the ‘Next’ button to continue.
单击“下一步”按钮继续。
After which, you will be asked to select a domain name and path for your website. If you have already purchased a domain name, then you can select it from the dropdown menu. You can always purchase and add new domain names to your account by visiting the ‘Domains’ page from the hosting dashboard.
之后,系统会要求您选择网站的域名和路径。 如果您已经购买了域名,则可以从下拉菜单中选择它。 您随时可以通过托管控制台访问“域”页面来购买新域名并将其添加到您的帐户。
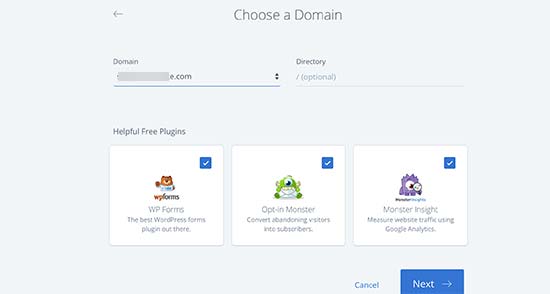
After selecting your domain name, you can leave the directory path blank and let Bluehost choose it for you. The installer will also show a few essential plugins that you can install.
选择域名后,您可以将目录路径保留为空白,然后让Bluehost为您选择它。 安装程序还将显示一些可以安装的基本插件。
You can now click on the ‘Next’ button to continue.
现在,您可以单击“下一步”按钮继续。
The installer will set up your WordPress site, which may take a few moments. After that, you will see a success message with your WordPress site details.
安装程序将设置您的WordPress网站,这可能需要一些时间。 之后,您将看到一条成功消息,其中包含您的WordPress网站详细信息。
You will also receive these details via email. You can now click on the login to WordPress button to enter your new site’s admin area.
您还将通过电子邮件收到这些详细信息。 现在,您可以单击“登录到WordPress”按钮以进入新站点的管理区域。
Congratulations, you have installed WordPress on your Bluehost hosting account. That wasn’t too bad right.
恭喜,您已经在Bluehost托管帐户上安装了WordPress。 那还不错。
如何在HostGator上安装WordPress (How to Install WordPress on HostGator)
HostGator is another popular shared WordPress hosting provider among beginners. They also make it super easy to install WordPress with just a few clicks.
HostGator是初学者中另一个流行的共享WordPress托管提供商。 只需单击几下,它们也使安装WordPress非常容易。
First, you need to login to your HostGator hosting account’s dashboard. From here, you need to click on the ‘QuickInstall’ icon under the ‘Software’ section.
首先,您需要登录到HostGator托管帐户的仪表板。 在这里,您需要单击“软件”部分下的“ QuickInstall”图标。
On the next screen, you need to click on ‘WordPress’ to launch the installer wizard.
在下一个屏幕上,您需要单击“ WordPress”以启动安装程序向导。
Now, you will be asked to select the domain name where you want to install WordPress and enter a directory path.
现在,将要求您选择要在其中安装WordPress的域名,然后输入目录路径。
Most beginners want to install WordPress in the root of their domain name (for example, wpbeginner.com). In that case, you need to leave the directory field blank.
大多数初学者都希望在其域名的根目录中安装WordPress(例如wpbeginner.com)。 在这种情况下,您需要将目录字段保留为空白。
Click on the next button to continue.
单击下一步按钮继续。
The installer will now ask you to enter WordPress site details. You will need to provide a site title, admin username, first and last name, and an admin email address. Make sure that you have access to that email address because this is where you will get your WordPress password reset email.
安装程序现在将要求您输入WordPress网站详细信息。 您将需要提供网站标题,管理员用户名,名字和姓氏以及管理员电子邮件地址。 确保您有权访问该电子邮件地址,因为这是您获取WordPress密码重置电子邮件的位置。
After entering all the information, click on the ‘Install’ button to continue.
输入所有信息后,单击“安装”按钮继续。
The installer will now run in the background to install WordPress for you. Once finished, you will see a success message with your admin user name and password.
现在,安装程序将在后台运行,为您安装WordPress。 完成后,您将看到一条成功消息,其中包含您的管理员用户名和密码。
You can now click on the ‘Login’ button to access the WordPress admin area.
现在,您可以单击“登录”按钮以访问WordPress管理区域。
Congratulations, you have successfully installed WordPress on your HostGator account.
恭喜,您已在HostGator帐户上成功安装了WordPress。
如何在SiteGround上安装WordPress (How to Install WordPress on SiteGround)
SiteGround is a popular choice among WordPress beginners. They are known for their excellent support and highly optimized WordPress hosting plans.
SiteGround是WordPress初学者中的热门选择。 他们以出色的支持和高度优化的WordPress托管计划而闻名。
SiteGround offers quick and pain-free WordPress installers with all their plans. You can install WordPress directly from your hosting dashboard.
SiteGround提供了所有计划的快速, 轻松的 WordPress安装程序。 您可以直接从托管仪表板安装WordPress。
We will show you two different methods for installing WordPress on SiteGround. You can choose one that works for you.
我们将向您展示两种在SiteGround上安装WordPress的不同方法。 您可以选择一种适合您的产品。
1. Installing WordPress on SiteGround as a New User
1.以新用户身份在SiteGround上安装WordPress
If you just signed up with SiteGround, then you will be greeted by a welcome popup upon your first login. It will ask if you would want to set up your website now.
如果您刚刚注册了SiteGround,则在您首次登录时会受到欢迎弹出窗口的欢迎。 它将询问您是否要立即设置您的网站。
You need to select ‘Start a new website’ and then click on WordPress.
您需要选择“启动新网站”,然后单击WordPress。
The installer wizard will now ask for WordPress installation details. You need to provide an email address, an admin username, and password for your new WordPress site.
现在,安装程序向导将询问WordPress安装详细信息。 您需要为新的WordPress网站提供电子邮件地址,管理员用户名和密码。
Click on the ‘Confirm’ button to continue.
点击“确认”按钮继续。
On the next screen, you will see details of your selection. You can also select additional website enhancements but we will skip them for now, you can add them later if needed.
在下一个屏幕上,您将看到选择的详细信息。 您还可以选择其他网站增强功能,但我们暂时将其略过,如果需要,可以稍后添加。
Go ahead and click on the complete setup button. The installer will now install WordPress for you in the background and you will see a success message when it is finished.
继续并单击完整的设置按钮。 安装程序现在将在后台为您安装WordPress,完成后您将看到一条成功消息。
You can now click on the ‘proceed to the customer area’ button. From here, you’ll find your new website under the ‘My Accounts’ tab.
现在,您可以单击“进入客户区域”按钮。 在这里,您可以在“我的帐户”标签下找到新网站。
You can click on ‘Visit admin panel’ to enter WordPress admin area.
您可以单击“访问管理面板”以进入WordPress管理区域。
Congratulations! You have successfully installed WordPress on your new SiteGround account.
恭喜你! 您已经在新的SiteGround帐户上成功安装了WordPress。
2. Installing WordPress on SiteGround as Existing Customer
2.以现有客户的身份在SiteGround上安装WordPress
SiteGround makes it extremely easy to install WordPress from your hosting account at anytime. Simply login to your hosting account and visit the cPanel dashboard.
SiteGround使您随时可以从您的托管帐户轻松安装WordPress。 只需登录到您的托管帐户并访问cPanel仪表板。
This will load the cPanel dashboard, which is basically a web-based interface to manage your hosting account.
这将加载cPanel仪表板,该仪表板基本上是基于Web的界面,用于管理您的托管帐户。
From here you need to scroll down to the ‘Auto Installers’ section and click on WordPress.
从这里,您需要向下滚动到“自动安装程序”部分,然后单击WordPress。
This will launch the auto-installer script with WordPress pre-selected. You need to click on the install button and then select a website protocol http or https and domain name.
这将启动预选WordPress的自动安装程序脚本。 您需要单击安装按钮,然后选择网站协议http或https和域名。
Now if you have enabled SSL Certificate on the domain name, then you can select https as your protocol, otherwise select http. You can later switch WordPress to HTTPS/SSL.
现在,如果您在域名上启用了SSL证书,则可以选择https作为协议,否则选择http。 您稍后可以将WordPress切换为HTTPS / SSL 。
Below that, you need to enter your site title, admin username, password, and email address.
在此之下,您需要输入网站标题,管理员用户名,密码和电子邮件地址。
You will also see other options to select language, install plugins, and more. You can change these options or leave them unchecked.
您还将看到其他选项来选择语言,安装插件等。 您可以更改这些选项或不选中它们。
Lastly, you will see the WordPress Starter option. You need to keep it checked as it will walk you through post-installation steps to set up your site.
最后,您将看到WordPress Starter选项。 您需要对其进行检查,因为它将引导您完成安装后的步骤来设置您的网站。
Now, click on the ‘Install’ button to continue.
现在,单击“安装”按钮继续。
The installer will now run in the background and set up a WordPress install. Once finished, you will see a success message with a link to your WordPress site’s admin area.
现在,安装程序将在后台运行并设置WordPress安装。 完成后,您将看到一条成功消息,其中包含指向您的WordPress网站的管理区域的链接。
Clicking on the admin area link will take you to your website and launch the site set up wizard. This step by step wizard will help you get started with WordPress. Click on the ‘Start Now’ button to continue.
单击管理区域链接将带您到您的网站并启动网站设置向导。 此逐步向导将帮助您开始使用WordPress。 单击“立即开始”按钮继续。
First, the starter wizard will ask you to choose a design for your WordPress site. It will show you hand-picked design templates organized in various categories.
首先,启动向导将要求您为WordPress网站选择一种设计。 它将向您展示按类别分类的精选设计模板。
We recommend choosing a simple design that resembles what you have in mind. Remember each theme comes with customization options and you can change how it looks to your own taste.
我们建议您选择一个与您的想法相似的简单设计。 请记住,每个主题都带有自定义选项,您可以根据自己的喜好更改外观。
Next, you will be asked to select functionalities you want to add to your website. It will automatically select ‘Contact Form’ for you because every website needs a contact form.
接下来,将要求您选择要添加到网站的功能。 因为每个网站都需要联系表格,所以它将自动为您选择“联系表格”。
Optionally, you can choose Shop (to create an online store), calendar, or JetPack.
(可选)您可以选择商店(以创建在线商店 ),日历或JetPack。
Click on the next button to continue.
单击下一步按钮继续。
Now you will be asked to select marketing options to promote your new website. It will show you MonsterInsights for Google Analytics, Yoast SEO, and OptinMonster for lead generation.
现在,系统将要求您选择营销方式以推广您的新网站。 它会告诉你MonsterInsights为谷歌Analytics(分析), Yoast搜索引擎优化 ,并OptinMonster铅一代。
We recommend selecting all three of them as they will help you grow your website.
我们建议同时选择三个选项,因为它们将帮助您发展网站。
After that, click on the complete button and the starter wizard will complete the installation for you. You will now see a success message with a link to enter the WordPress dashboard.
之后,单击完成按钮,启动向导将为您完成安装。 现在,您将看到一条成功消息,其中包含进入WordPress仪表板的链接。
You will now see the WordPress admin dashboard with custom shortcuts to create content, customize design, and start working on your website.
现在,您将看到带有自定义快捷方式的WordPress管理仪表板,以创建内容,自定义设计并开始在您的网站上工作。
That’s all. You have successfully installed WordPress on your SiteGround hosting account.
就这样。 您已在SiteGround托管帐户上成功安装了WordPress。
如何在WP Engine上安装WordPress (How to Install WordPress on WP Engine)
WP Engine is the best managed WordPress hosting provider. A managed hosting account is basically a concierge service for your WordPress website.
WP Engine是最佳托管的WordPress托管提供商。 托管托管帐户基本上是WordPress网站的礼宾服务。
They take care of managing your WordPress site updates, installation, and performance optimization while you focus on growing your business.
当您专注于发展业务时,他们会负责管理WordPress网站更新,安装和性能优化。
As a managed WordPress hosting company, WP Engine automatically installs WordPress when you sign up. Depending on your hosting plan, you can also create additional websites whenever you need them.
作为托管的WordPress托管公司,WP Engine在您注册时自动安装WordPress。 根据您的托管计划,您还可以在需要时创建其他网站。
Simply, login to your WP Engine dashboard and visit the ‘Sites’ page. You will see a list of all your WordPress sites. Click on the ‘Create Site’ button to add a new WordPress install.
只需登录到WP Engine仪表板,然后访问“站点”页面。 您将看到所有WordPress网站的列表。 单击“创建站点”按钮以添加新的WordPress安装。

On the next screen, you will be asked to provide a name for your production environment. Enter a name that helps you easily identify this website and then click on ‘Create Environment’ button.
在下一个屏幕上,将要求您提供生产环境的名称。 输入有助于您轻松识别该网站的名称,然后单击“创建环境”按钮。
WP Engine will now install your WordPress environment. It will take some time for DNS changes to propagate.
WP Engine现在将安装您的WordPress环境。 DNS更改要花费一些时间。
After that you will be able to access the WordPress admin area by clicking on the link in the sidebar. You will also be able to see your login credentials on the same page.
之后,您可以通过单击侧边栏中的链接来访问WordPress管理区域。 您还可以在同一页面上查看您的登录凭据。
To add a domain to your website, you need to click on the add domain link. Since WP Engine is not a domain registrar, you will need to point your domain’s DNS settings to WP Engine.
要将域添加到您的网站,您需要单击添加域链接。 由于WP Engine不是域注册商 ,因此您需要将域的DNS设置指向WP Engine。
To do this, you will need your site’s IP Address and CNAME. You can find this information on the overview page of your site.
为此,您将需要站点的IP地址和CNAME。 您可以在网站的概述页面上找到此信息。
Now we will show you how to enter this information in Domain.com. The basic settings are the same for all domain registrars, you just need to find the DNS settings.
现在,我们将向您展示如何在Domain.com中输入此信息。 所有域注册商的基本设置都相同,您只需要查找DNS设置即可。
Login to your Domain.com account dashboard and click on DNS and Nameserver settings for your domain name.
登录到Domain.com帐户仪表板,然后单击域名的DNS和名称服务器设置。
On the next screen, first, you need to change the A record with the @ sign as its name. Click on the Edit button to change its settings.
在下一个屏幕上,首先,您需要更改以@符号为名称的A记录。 单击编辑按钮以更改其设置。
After that, you need to enter the IP address provided by WP Engine as this record’s value and then click on Update DNS button.
之后,您需要输入WP Engine提供的IP地址作为该记录的值,然后单击“更新DNS”按钮。
Next, you need to see if you have a CNAME record with www as its name. If you do, then you will need to edit that CNAME record. Otherwise, go ahead and click on the ‘Add DNS Record’ button.
接下来,您需要查看是否有一个以www为名称的CNAME记录。 如果这样做,则需要编辑该CNAME记录。 否则,请继续并单击“添加DNS记录”按钮。
Add the CNAME subdomain provided by WPEngine in the Value field and then click on the Add DNS button.
在“值”字段中添加WPEngine提供的CNAME子域,然后单击“添加DNS”按钮。
That’s all you have successfully pointed your domain name to your WordPress site hosted on WP Engine.
这就是您成功将域名指向WP Engine上托管的WordPress网站的全部内容。
如何从cPanel安装WordPress (How to Install WordPress from cPanel)
Cpanel is a popular software used by many web hosting companies. It provides website owners with a simple web-based interface to manage their hosting account.
Cpanel是许多网络托管公司使用的流行软件。 它为网站所有者提供了一个简单的基于Web的界面来管理其托管帐户。
It is a one-stop access to several useful utilities including auto-installer scripts that help you install WordPress.
一站式访问几个有用的实用程序,包括可帮助您安装WordPress的自动安装程序脚本。
Hosting companies select which auto-installer script they want to use. Generally, Softaculous, QuickInstall, and Fantastico are the most popular options.
托管公司选择要使用的自动安装程序脚本。 通常,Softaculous,QuickInstall和Fantastico是最受欢迎的选项。
We will show you how to install WordPress using all three auto-installers. You can follow the instructions, based on the installer you see on your cPanel dashboard.
我们将向您展示如何使用所有三个自动安装程序来安装WordPress。 您可以根据在cPanel仪表板上看到的安装程序,按照说明进行操作。
如何使用Softaculous安装WordPress (How to Install WordPress using Softaculous)
Softaculous is a popular auto-installer script. It allows you to easily install popular web applications like WordPress with just a few clicks. Hosting companies like SiteGround and InMotion Hosting use Softaculous in their control panel.
Softaculous是一种流行的自动安装程序脚本。 它使您只需单击几下即可轻松安装流行的Web应用程序(如WordPress)。 诸如SiteGround和InMotion Hosting之类的托管公司在其控制面板中使用Softaculous。
Simply login to your cPanel account and look for Softaculous or WordPress installer icon. You will find them under Auto Installers section.
只需登录到您的cPanel帐户,然后查找Softaculous或WordPress安装程序图标。 您将在“自动安装程序”部分下找到它们。
Clicking on any of these icons will launch Softaculous auto-installer for WordPress. First, you will see an overview of WordPress. You need to click on the Install tab to continue.
单击任何这些图标将启动WordPress的Softaculous自动安装程序。 首先,您将看到WordPress的概述。 您需要单击“安装”选项卡以继续。
Softaculous will now ask you where you want to install WordPress. You need to choose http:// or http://www. as protocol.
Softaculous现在将询问您要在哪里安装WordPress。 您需要选择http://或http://www. 作为协议。
If your site has SSL and HTTPS, then you can select https:// or https://www. as protocol.
如果您的站点具有SSL和HTTPS ,则可以选择https://或https://www. 作为协议。
After that, you need to choose the domain name where you want to install WordPress. Most users want to install WordPress in their domain’s root directory, like example.com. In that case, you need to make sure that the ‘In Directory’ field is blank.
之后,您需要选择要在其中安装WordPress的域名。 大多数用户都希望将WordPress安装在其域的根目录中,例如example.com。 在这种情况下,您需要确保“在目录中”字段为空。
Scroll down a little, and you will see the site settings section.
向下滚动一点,您将看到“站点设置”部分。
Under this section, first you need to provide a title and description for your WordPress site. Don’t worry you can easily change them from your WordPress admin area after installation.
在此部分下,首先,您需要为WordPress网站提供标题和描述。 不用担心,安装后可以轻松地从WordPress 管理区域更改它们。
Next, you need to choose an admin username, password, and email address. Softaculous will automatically fill in the username and password fields for you. It will use a non-dictionary word for username and a strong password.
接下来,您需要选择一个管理员用户名,密码和电子邮件地址。 Softaculous将自动为您填写用户名和密码字段。 它将使用非词典词作为用户名和强密码。
You can change them if you want so that they are easy to remember for you. However, we strongly urge you to always use a strong password. See our guide on the best way to manage passwords for WordPress beginners to learn how you can manage strong passwords easily.
您可以根据需要更改它们,以便为您轻松记住它们。 但是,我们强烈建议您始终使用强密码。 有关为WordPress初学者管理密码的最佳方法,请参阅我们的指南,以了解如何轻松管理强密码。
Make sure that you enter correct email address in the admin email field. This is where WordPress will send notifications and password reset link if you ever forgot your password.
确保在管理员电子邮件字段中输入正确的电子邮件地址。 如果您忘记密码,WordPress将在此处发送通知和密码重置链接。
Rest of the options on the screen are optional. You can now click on the install button to run the installer.
屏幕上的其余选项是可选的。 现在,您可以单击安装按钮以运行安装程序。
Softaculous will run the installer using the settings you provided. You will see a progress bar with installation status. It will take a couple of minutes. Do not close the window until the progress bar reaches 100% otherwise, this may affect your WordPress installation.
Softaculous将使用您提供的设置来运行安装程序。 您将看到带有安装状态的进度条。 这将需要几分钟。 在进度栏达到100%之前,请不要关闭窗口,否则可能会影响WordPress的安装。
You will see a success message after the installation is finished. It will also show you links to your website and to your WordPress admin area.
安装完成后,您将看到一条成功消息。 它还将显示指向您的网站和WordPress管理区域的链接。
如何使用QuickInstall安装WordPress (How to Install WordPress using QuickInstall)
QuickInstall is another popular auto-installer used by many hosting companies like HostGator and others. We will be using HostGator’s cPanel dashboard in the screenshots here, but it wouldn’t be much different if you are using some other host that has QuickInstall.
QuickInstall是许多托管公司(例如HostGator等)使用的另一种流行的自动安装程序。 我们将在此处的屏幕截图中使用HostGator的cPanel仪表板,但是如果您使用的是具有QuickInstall的其他主机,则没有什么不同。
First, you need to login to your hosting account’s cPanel dashboard. Scroll down to the Software section and then click on the QuickInstall icon.
首先,您需要登录到托管帐户的cPanel仪表板。 向下滚动到“软件”部分,然后单击“快速安装”图标。
This will take you to the 1-Click Installers page on QuickInstall. You will see that it offers installations for most popular web applications including WordPress. You need to click on WordPress to launch the WordPress installer.
这将带您进入QuickInstall的“一键安装程序”页面。 您将看到它为包括WordPress在内的大多数流行的Web应用程序提供安装。 您需要单击WordPress以启动WordPress安装程序。
The installer will now show you the WordPress overview. You will be asked to select your domain name from the drop-down menu.
安装程序现在将向您显示WordPress概述。 系统将要求您从下拉菜单中选择您的域名。
Most beginners want to install WordPress on the root of their website, for example, wpbeginner.com. In that case, you need to leave the directory field blank.
大多数初学者都希望在其网站的根目录上安装WordPress,例如wpbeginner.com。 在这种情况下,您需要将目录字段保留为空白。
Now click on the next button to continue. The installer will now ask you to enter WordPress details like username, email address, and site title.
现在单击下一步按钮继续。 安装程序现在将要求您输入WordPress详细信息,例如用户名,电子邮件地址和网站标题。
After filling in all the information, click on the Install button.
填写所有信息后,单击“安装”按钮。
QuickInstall will now install WordPress for you. After that, you will see a success message with your login details like username and password.
QuickInstall现在将为您安装WordPress。 之后,您将看到一条成功消息,其中包含您的登录详细信息,例如用户名和密码。
You can now click on the ‘Login’ button to enter the WordPress admin area.
现在,您可以单击“登录”按钮以进入WordPress管理区域。
That’s all, you have successfully installed WordPress using QuickInstall.
就是这样,您已经使用QuickInstall成功安装了WordPress。
如何使用Fantastico安装WordPress (How to Install WordPress using Fantastico)
Fantastico is an auto-installer script used by several WordPress hosting providers. It is similar to the other installer scripts in this guide and offers an easier way to quickly install WordPress.
Fantastico是几个WordPress托管提供商使用的自动安装脚本。 它与本指南中的其他安装程序脚本相似,并提供了一种更简便的方法来快速安装WordPress。
First, you need to login to your cPanel dashboard and scroll down to software and services section, and there you will find the Fantastico icon.
首先,您需要登录到cPanel仪表板并向下滚动到“软件和服务”部分,然后在其中找到Fantastico图标。
Clicking on Fantastico icon will launch the auto-installer script.
单击Fantastico图标将启动自动安装程序脚本。
Some hosting providers are still using an older version of Fantastico. In this tutorial we will be showing you screenshots from Fantastico F3 version.
一些托管服务提供商仍在使用旧版本的Fantastico。 在本教程中,我们将向您展示Fantastico F3版本的屏幕截图。
If Fantastico on your host looks different, then don’t worry. Basic installation steps are the same, and you should be able to easily follow them.
如果您主机上的Fantastico看上去与众不同,请不用担心。 基本安装步骤相同,并且您应该可以轻松地遵循它们。
On the main Fantastico screen, you will see a list of web applications on your left. You need to click on Blogs, and there you will find WordPress listed among many other applications.
在Fantastico主屏幕上,您会在左侧看到一个Web应用程序列表。 您需要单击Blogs,然后您会在其中找到其他许多应用程序中列出的WordPress。
Clicking on WordPress will show you an overview of the application with the ‘Install’ button.
单击WordPress将显示带有“安装”按钮的应用程序概述。
Simply click on the ‘Click here to install WordPress’ button to continue.
只需单击“单击此处安装WordPress”按钮即可继续。
Fantastico auto-installer for WordPress will now ask you to fill in your installation settings. First, you need to choose the domain where you want to install WordPress.
WordPress的Fantastico自动安装程序现在将要求您填写安装设置。 首先,您需要选择要在其中安装WordPress的域。
If you want to install WordPress in a sub-directory then you can enter the sub-directory name in the field below. Otherwise, make sure that this field is empty.
如果要将WordPress安装在子目录中,则可以在下面的字段中输入子目录名称。 否则,请确保此字段为空。
Under ‘Administrator Details’ section, you need to provide admin user account information. Enter a username, password, and email address for your WordPress admin account.
在“管理员详细信息”部分下,您需要提供管理员用户帐户信息。 输入您的WordPress管理员帐户的用户名,密码和电子邮件地址。
Click on the Submit button to continue.
单击提交按钮继续。
Fantastico will now install WordPress for you. Once it has finished installing WordPress you will see a success message.
Fantastico现在将为您安装WordPress。 完成安装WordPress后,您将看到成功消息。
如何使用FTP安装WordPress (How to Install WordPress using FTP)
Manually installing WordPress is also known as the famous 5 minute install. It requires few added steps, and you will need an FTP client to manually install WordPress.
手动安装WordPress也被称为著名的5分钟安装。 它仅需几个步骤,您将需要一个FTP客户端来手动安装WordPress。
Take a look at our beginner’s guide on how to use FTP to upload WordPress files.
查看有关如何使用FTP上传WordPress文件的初学者指南。
First thing you need to do is download the latest version of WordPress.
您需要做的第一件事是下载最新版本的WordPress 。
WordPress package comes as a Zip file. You need to unzip the file and inside it, you will find a WordPress folder. This folder contains all the WordPress files you need to upload to your web server.
WordPress软件包是一个Zip文件。 您需要解压缩文件,然后在其中找到一个WordPress文件夹。 此文件夹包含您需要上载到Web服务器的所有WordPress文件。
Now go ahead and connect the FTP client to your hosting server. Once connected, use the FTP client to upload the WordPress files from your computer to your website server.
现在,继续将FTP客户端连接到您的托管服务器。 连接后,使用FTP客户端将WordPress文件从您的计算机上传到您的网站服务器。
If you want to install WordPress on your root domain name (like example.com), then you need to upload WordPress files to your website’s root directory. Usually this directory is called /public_html/.
如果要在根域名(例如example.com)上安装WordPress,则需要将WordPress文件上传到网站的根目录。 通常,此目录称为/ public_html /。
On the other hand, If you want to install WordPress in a subfolder (like example.com/blog), then upload it in a folder /public_html/blog/.
另一方面,如果要将WordPress安装在子文件夹中(例如example.com/blog),则将其上载到文件夹/ public_html / blog /中。
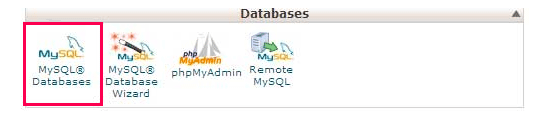
Once you are done uploading WordPress, go to your hosting control panel to create a database. We will be showing you how to do that using the cPanel. If your hosting provider has a different control panel then you just need to look for MySQL databases. Rest of the settings will be quite similar.
完成WordPress的上传后,转到托管控制面板创建数据库。 我们将向您展示如何使用cPanel。 如果您的托管服务提供商具有其他控制面板,则只需查找MySQL数据库。 其余设置将非常相似。
From your cPanel dashboard, click on the ‘MySQL Databases’ icon.
在cPanel仪表板中,单击“ MySQL数据库”图标。
You will see a field to create a new database. Enter a name for your database, and click ‘Create Database’.
您将看到一个用于创建新数据库的字段。 输入数据库的名称,然后单击“创建数据库”。
Now that you have created your database, MySQL still needs a username. This username will have access to perform actions on the database.
现在您已经创建了数据库,MySQL仍然需要一个用户名。 该用户名将有权在数据库上执行操作。
On the MySQL Databases page in your cPanel account, scroll down to MySQL Users section. Simply provide a username and password for your new user and click on the ‘Create a user’ button.
在cPanel帐户的“ MySQL数据库”页面上,向下滚动至“ MySQL用户”部分。 只需为新用户提供用户名和密码,然后单击“创建用户”按钮即可。
This new user still does not have access to the database you created earlier. For that, you will need to add the user to the database and give them permissions to perform all actions.
该新用户仍然无权访问您先前创建的数据库。 为此,您需要将用户添加到数据库中,并授予他们执行所有操作的权限。
On the same MySQL Databases page in your cPanel account, scroll down to ‘Add User to a Database’ section. Select the database user you created from the dropdown menu next to user, then select the database, and click on the add button.
在cPanel帐户的同一MySQL数据库页面上,向下滚动到“将用户添加到数据库”部分。 从用户旁边的下拉菜单中选择您创建的数据库用户,然后选择数据库,然后单击添加按钮。
You will be now asked for the privileges you want to allow this user. Select all privileges and click on the Make changes button.
现在将询问您要允许该用户的特权。 选择所有特权,然后单击“进行更改”按钮。
Your MySQL database and user are now ready, note down your database name and MySQL username and password. You will need that information later.
现在,您MySQL数据库和用户已准备就绪,记下您的数据库名称以及MySQL用户名和密码。 您稍后将需要该信息。
Simply go to to the URL where you uploaded WordPress. If it is in the main domain, then enter your domain name in the browser window, like yoursite.com or www.yoursite.com.
只需转到您上传WordPress的URL。 如果它在主域中,则在浏览器窗口中输入您的域名,例如yoursite.com或www.yoursite.com。
You will see the language selection page. You can choose a language here so that the rest of the installation is displayed in your own language. You can also use English for now and then later change the language.
您将看到语言选择页面。 您可以在此处选择一种语言,以便其余安装以您自己的语言显示。 您还可以暂时使用英语,然后再更改语言。
Click on the continue button to proceed.
单击继续按钮继续。
You will now see some installation instructions. Basically, WordPress will now tell you that it will need your database name, password, and MySQL host information.
现在,您将看到一些安装说明。 基本上,WordPress现在会告诉您它将需要您的数据库名称,密码和MySQL主机信息。
Click on the ‘Let’s go’ button to continue.
点击“放手”按钮继续。
WordPress will now show you a form. You need to enter the database information you created earlier.
WordPress现在将向您显示一个表单。 您需要输入您先前创建的数据库信息。
Fill in the information and then click on the ‘Submit’ button. WordPress will connect to your database and show you a success message.
填写信息,然后单击“提交”按钮。 WordPress将连接到您的数据库并显示成功消息。
Click on ‘Run the Install’ button to continue.
单击“运行安装”按钮继续。
WordPress will now create tables in your database and then send you to the next step of the installation.
WordPress现在将在您的数据库中创建表,然后将您发送到安装的下一步。
Now you need to provide some information for WordPress to set up your site. This includes site title, username, password, and admin email address.
现在,您需要为WordPress提供一些信息来设置您的网站。 这包括网站标题,用户名,密码和管理员电子邮件地址。
If you do not want your website to be visible to search engines, then you can check the box next to search engine visibility. Later when you are ready you can change this from WordPress settings. If you are unsure about what to do, then simply leave it unchecked.
如果您不想让搜索引擎看到您的网站,则可以选中搜索引擎可见性旁边的框。 稍后,当您准备就绪时,可以从WordPress设置中更改此设置。 如果您不确定该怎么做,则只需取消选中即可。
Click on the Install WordPress button to continue. WordPress will set up your website and finish the installation.
单击“安装WordPress”按钮继续。 WordPress将设置您的网站并完成安装。
You will see a success message showing your username. You can now click on the Log in button to sign in to your WordPress site.
您将看到一条成功消息,显示您的用户名。 现在,您可以单击“登录”按钮登录WordPress网站。
如何在您的计算机上安装WordPress (How to Install WordPress in your Computer)
Many of our beginner level users often ask us if they could try WordPress on their computer? The answer is yes, but most beginners should not do that.
我们的许多初学者用户经常问我们是否可以在计算机上尝试WordPress? 答案是肯定的,但是大多数初学者不应该这样做。
The reason why some folks install WordPress in a local server environment is to build themes, plugins, or to test things out.
有些人在本地服务器环境中安装WordPress的原因是构建主题,插件或进行测试。
If you want to run a blog for other people to see, then you do not need to install WordPress on your computer. If you install WordPress locally on your computer, then the only person who can see the site is you.
如果要运行一个博客以供其他人查看,则无需在计算机上安装WordPress。 如果您在计算机上本地安装WordPress,则唯一可以看到该站点的人就是您。
If you want to make your WordPress site available to the internet (rest of the world), then you need to get a web hosting account and install WordPress by using one of the methods we showed above.
如果要使WordPress网站可用于Internet(世界其他地区),则需要获得一个虚拟主机帐户并使用上面显示的方法之一安装WordPress。
Having that said, if you are really interested in installing WordPress locally on your computer to learn more about theme development, test plugins etc, then we highly encourage you to do so.
话虽如此,如果您真的有兴趣在计算机上本地安装WordPress,以了解有关主题开发,测试插件等的更多信息,那么我们强烈建议您这样做。
If you are using a Windows computer, then we recommend that you download and setup WAMP. If you are using a Mac, then you need to download and setup Mamp.
如果您使用的是Windows计算机,则建议您下载并设置WAMP 。 如果您使用的是Mac,则需要下载并设置Mamp 。
After you have played around with WordPress on your computer you may want to move your local install to an actual live website. We have a step by step tutorial on how to move WordPress from local server to a live site.
在计算机上使用WordPress之后,您可能需要将本地安装移动到实际的在线网站。 我们有一个逐步教程,介绍如何将WordPress从本地服务器移动到实时站点 。
如何以您的语言安装WordPress (How to Install WordPress in your Language)
Just like Windows, Mac, iPhone, and Android, you can use WordPress in your own language.
就像Windows,Mac,iPhone和Android一样,您可以使用自己的语言来使用WordPress。
WordPress is available in many languages including English, Spanish, French, Arabic, Korean, German, Hebrew, Hindi, Japanese, Vietnamese, Chinese (Han), Portuguese, and many others.
WordPress支持多种语言,包括英语,西班牙语,法语,阿拉伯语,韩语,德语,希伯来语,北印度语,日语,越南语,中文(韩语),葡萄牙语以及许多其他语言。
You can choose a language during the WordPress installation or change it by visiting Settings » General page in the WordPress admin area.
您可以在WordPress安装期间选择一种语言,也可以通过访问WordPress管理区域中的“设置”»“常规”页面来进行更改。
For more details, see our article on how to install WordPress in other languages.
有关更多详细信息,请参阅有关如何以其他语言安装WordPress的文章。
WordPress is also used widely to create bilingual and multilingual websites. See our tutorial on how to easily create a multilingual WordPress site with TranslatePress.
WordPress还广泛用于创建双语和多语言网站。 请参阅有关如何使用TranslatePress轻松创建多语言WordPress网站的教程。
如何安装WordPress多站点网络 (How to Install a WordPress Multisite Network)
WordPress comes with multisite functionality built-in. The multisite network allows you to create multiple WordPress sites using the same WordPress install. It can automatically create new sites on sub-domains or in sub-folders.
WordPress内置了多站点功能。 多站点网络允许您使用同一WordPress安装创建多个WordPress网站。 它可以在子域或子文件夹中自动创建新站点。
This makes sense for businesses, non-profits, governments with sub-sites for different locations or regions. Many educational institutes also use WordPress multisite network to allow students to create their own blogs.
对于企业,非营利组织,在不同地点或地区设有子站点的政府来说,这是有意义的。 许多教育机构还使用WordPress多站点网络来允许学生创建自己的博客。
The setup for a multisite is a bit complex, but we have created a complete step-by-step tutorial on how to install and setup WordPress multisite network.
多站点的设置有点复杂,但是我们创建了完整的分步教程, 介绍如何安装和设置WordPress多站点网络 。
安装WordPress之后要做的事情 (Things to do After Installing WordPress)
Now that you have successfully installed WordPress, here are a few things to get started with your new WordPress site.
既然您已经成功安装了WordPress,那么以下是新WordPress网站的入门指南。
Choosing a Theme
选择主题
The visual appearance of your WordPress powered website is controlled by Themes. There are thousands of WordPress themes available for you to choose from. With so many choices, it can become a little confusing for beginners. This is why we have put together a guide on selecting the perfect theme for WordPress.
WordPress驱动的网站的外观由主题控制。 有成千上万个WordPress主题供您选择。 有这么多选择,对于初学者来说可能会有些混乱。 这就是为什么我们汇总了有关选择WordPress最佳主题的指南的原因。
We regularly publish lists of WordPress themes that we like in our Showcase section. Following are some of our popular theme showcases.
我们会定期在“ 展示”部分中发布我们喜欢的WordPress主题列表。 以下是一些我们受欢迎的主题展示。
- Best free WordPress blog themes最佳免费WordPress博客主题
- Best WordPress Business themes最佳WordPress商业主题
- Best minimalist WordPress themes for writers作家的最佳简约WordPress主题
- Best WordPress themes for photographers摄影师的最佳WordPress主题
Installing and Using WordPress Plugins
安装和使用WordPress插件
The real power of WordPress comes from the massive collection of plugins. They are like apps for your WordPress site, allowing you to extend functionality and add new features to your site.
WordPress的真正功能来自大量的插件。 它们就像您的WordPress网站的应用程序一样,允许您扩展功能并向网站添加新功能。
There are more than 54,000 free plugins available in the WordPress plugin directory alone. More plugins are available from third party websites as paid plugins.
仅WordPress插件目录中就有超过54,000个免费插件。 您可以从第三方网站获得更多插件作为付费插件。
If you are wondering which plugins to install, then take a look at our expert pick of the essential WordPress plugins for all websites. You may also want to check out the plugins we are using on this site by looking at our WPBeginner’s blueprint.
如果您想安装哪个插件,请查看我们为所有网站提供的必要WordPress插件的专家精选 。 您可能还需要查看WPBeginner的蓝图,以查看我们在此站点上使用的插件。
We have a beginner’s step by step guide on how to install WordPress plugins.
我们提供了有关如何安装WordPress插件的入门指南。
Start Learning WordPress
开始学习WordPress
WordPress is the easiest to use CMS in the market. Millions of people from all over the world use it every day. However, from time to time you may need a little help.
WordPress是市场上最容易使用的CMS。 每天都有来自世界各地的数百万人在使用它。 但是,您可能会不时需要一些帮助。
This is where WPBeginner can help. We are the largest free WordPress resource site in the world, regularly publishing tutorials and guides written specifically for bloggers and small businesses.
这是WPBeginner可以提供帮助的地方。 我们是世界上最大的免费WordPress资源网站,会定期发布专门为博客作者和小型企业编写的教程和指南。
Here are some of the useful resources that you will find on WPBeginner (all of them are totally free).
这里是您可以在WPBeginner上找到的一些有用的资源(它们都是完全免费的)。
- WPBeginner Blog – The central place for all our WordPress tutorials and guides.WPBeginner博客 –我们所有WordPress教程和指南的中心位置。
- WPBeginner Dictionary – Our WordPress glossary is the best place to familiarize yourself with the WordPress lingoWPBeginner词典 –我们的WordPress词汇表是熟悉WordPress术语的最佳场所
- WPBeginner Videos – New WordPress users can start with these 23 videos to master WordPress.WPBeginner视频 –新的WordPress用户可以从这23个视频开始来掌握WordPress。
- WPBeginner on YouTube – Need more video instructions? Subscribe to our YouTube channel with more than 128,000 subscribers and 12 Million+ views.YouTube上的WPBeginner –需要更多视频说明吗? 订阅我们的YouTube频道,拥有超过128,000名订阅者和1200万以上的观看次数。
- WPBeginner Blueprint – Check out plugins, tools, and services we use on WPBeginner.WPBeginner蓝图 –查看我们在WPBeginner上使用的插件,工具和服务。
- WPBeginner Deals – Exclusive discounts on WordPress products and services for WPBeginner users.WPBeginner Deals –为WPBeginner用户提供WordPress产品和服务的独家折扣。
结论 (Conclusion)
We hope this WordPress installation tutorial helped you learn how to easily install WordPress. You may want to check out our list of these 40 useful tools to help you manage and grow your WordPress site.
我们希望本WordPress安装教程能够帮助您学习如何轻松安装WordPress。 您可能想查看我们列出的这40个有用的工具,以帮助您管理和发展WordPress网站 。
If you liked this article, then please subscribe to our YouTube Channel for WordPress video tutorials. You can also find us on Twitter and Facebook.
如果您喜欢这篇文章,请订阅我们的YouTube频道 WordPress视频教程。 您也可以在Twitter和Facebook上找到我们。
翻译自: https://www.wpbeginner.com/how-to-install-wordpress/
wordpress安装教程
wordpress安装教程_如何安装WordPress –完整的WordPress安装教程相关推荐
- Acer 4750 安装黑苹果_黑苹果 MacOS 10.15 Catalina 最新安装教程
原创教程地址:黑苹果 MacOS 10.15 Catalina安装教程(店铺远程安装收集+定期维护更新) B站视频教程:https://www.bilibili.com/video/av5824875 ...
- fossid安装教程_源代码怎么使用,源代码生成app教程
Linux 发行版的一个最大的优点就是它的包管理器和相关的软件库.通过它们提供的资源和工具,你才能够以完全自动化的方式在你的计算机上下载和安装软件. 但是,尽管付出了很多的努力,包维护者仍然没法照顾好 ...
- wordpress面包屑_面包店的24个最佳WordPress主题
wordpress面包屑 Looking for the perfect WordPress theme to give your bakery an online presence? 寻找完美的Wo ...
- wordpress最佳架构_金融网站的25个最佳WordPress主题
wordpress最佳架构 Are you a financial planner or business consultant who's looking to make a website wit ...
- wordpress修复插件_自动修复的20个最佳WordPress主题
wordpress修复插件 Are you looking for the best WordPress themes for auto repair or car dealership busine ...
- linux安装步骤_图解 Debian 10(Buster)安装步骤 | Linux 中国
在这篇文章中,我们将演示如何在你的笔记本电脑和台式电脑上安装 Debian 10 "Buster" 工作站.-- Pradeep Kumar Debian 项目发布了它的最新稳定版 ...
- git安装 苹果笔记本_个人博客第5篇——安装node.js和Hexo
废话不多说,开始! 1. 安装nodejs 下载地址:node.js官网 如上图,直接点击下载,完成后双击安装,安装直接默认 next 就好,很简单,需要改的也就是安装位置改一下,我是在D盘新建了一个 ...
- mysql 数据库安装命令_教你MySQL数据库的编译安装以及命令详解(5.7版本)
一.安装MySQL所需的环境依赖包 [root@localhost opt]# yum -y install gcc gcc-c++ make ncurses ncurses-devel bison ...
- python中pandas安装视频教程_详解Python中pandas的安装操作说明(傻瓜版)
很多人来问我pandas的安装(python数据分析里面的必修课) 步骤如下: 安装python的时候,把路径加到系统里,这样,随时可以用pip 路径添加方法: 查找路径: 路径1: 2.例如: 即: ...
- mysql安装无效安装源_(0.2.4)Mysql安装——yum源安装
转自:https://www.cnblogs.com/jimboi/p/6405560.html 1.下载好对应版本的yum源文件 2.安装用来配置mysql的yum源的rpm包 可以用: yum r ...
最新文章
- 该文件 linux命令,Linux网络系统,如果执行行命令#chmod 746 file.txt,那么该文件的权限是?...
- android广播过滤器.*,android – BroadcastReceiver与多个过滤器或多个BroadcastReceivers?...
- composer 完整路径才能访问_一份完整的运营方案策划思路,拿走不谢(精华版)
- PyTorch-模型
- 递归方式-全排列生成算法
- linux 提示符 异常,linux终端提示符异常 bash-4.1$
- jQuery使用ajax跨域请求获取数据
- (3)vue.js安装
- arcmap 影像坐标批处理 python_ArcMap怎么把坐标系转换成投影坐标系?
- oracle分析函数结构,oracle之分析函数解析及其应用场景
- 云计算机是对什么技术的发展,云计算是对什么技术的发展与运用
- C#贪吃蛇游戏(全代码)
- MIT6.824-lab3AB-2022(万字推导思路及代码构建)
- 触摸屏的技术类型有那些?
- linux6.5安装中文字体,Linux(CentOS6.5)系统安装Windows字体
- 【陈工笔记】# 如何用WPS演示给PPT加水印 #
- 进军IT与安全行业:推荐学习路线图
- iOS15 切换上架App图标的最新方案
- MySQL时间戳转换
- 基于STM32和阿里云的环境检测系统设计
热门文章
- C语言程序——梅花易数年月日时起卦法
- 数据处理第3部分:选择行的基本和高级的方法
- mysql workbench安装配置_Mysql WorkBench安装配置图文教程
- 【Spring Security】Spring Boot + Spring Security 实现自动登录功能
- Why the MonthCalendar.MinDate is 01/01/1753?
- java 地图渲染_MapXtreme for java 地图渲染
- 【小区物业管理系统——开题报告 分享(仅供参考呀)】
- 【cs231n学习笔记(2017)】—— 神经网络激活函数
- creo扫描选择多条链作为轨迹_跟阿铭学Creo产品设计,乌比莫斯之环框架模型设计你掌握了吗?...
- ESP32 LVGL8.1 ——event 事件 (event 17)