--以触摸屏驱动为例
第一章、了解linux input子系统
Linux输入设备总类繁杂,常见的包括有按键、键盘、触摸屏、鼠标、摇杆等等,他们本身就是字符设备,而linux内核将这些设备的共同性抽象出来,简化驱动开发建立了一个input子系统。子系统共分为三层,如图1所示。

|
|
图1 input输入子系统
|
驱动层和硬件相关,直接捕捉和获取硬件设备的数据信息等(包括触摸屏被按下、按下位置、鼠标移动、键盘按下等等),然后将数据信息报告到核心层。核心层负责连接驱动层和事件处理层,设备驱动(device driver)和处理程序(handler)的注册需要通过核心层来完成,核心层接收来自驱动层的数据信息,并将数据信息选择对应的handler去处理,最终handler将数据复制到用户空间。
先了解三个定义在/linux/input.h下重要的结构体input_dev、input_handler、input_handle。
struct input_dev {
void *private;
const char *name;
const char *phys;
const char *uniq;
struct input_id id; //与input_handler匹配用的id
unsigned long evbit[NBITS(EV_MAX)]; //设备支持的事件类型
unsigned long keybit[NBITS(KEY_MAX)]; //按键事件支持的子事件类型
unsigned long relbit[NBITS(REL_MAX)];
unsigned long absbit[NBITS(ABS_MAX)]; //绝对坐标事件支持的子事件类型
unsigned long mscbit[NBITS(MSC_MAX)];
unsigned long ledbit[NBITS(LED_MAX)];
unsigned long sndbit[NBITS(SND_MAX)];
unsigned long ffbit[NBITS(FF_MAX)];
unsigned long swbit[NBITS(SW_MAX)];
int ff_effects_max;
unsigned int keycodemax;
unsigned int keycodesize;
void *keycode;
unsigned int repeat_key;
struct timer_list timer;
struct pt_regs *regs;
int state;
int sync;
int abs[ABS_MAX + 1];
int rep[REP_MAX + 1];
unsigned long key[NBITS(KEY_MAX)];
unsigned long led[NBITS(LED_MAX)];
unsigned long snd[NBITS(SND_MAX)];
unsigned long sw[NBITS(SW_MAX)];
int absmax[ABS_MAX + 1]; //绝对坐标事件的最大键值
int absmin[ABS_MAX + 1]; //绝对坐标事件的最小键值
int absfuzz[ABS_MAX + 1];
int absflat[ABS_MAX + 1];
int (*open)(struct input_dev *dev);
void (*close)(struct input_dev *dev);
int (*accept)(struct input_dev *dev, struct file *file);
int (*flush)(struct input_dev *dev, struct file *file);
int (*event)(struct input_dev *dev, unsigned int type, unsigned int code, int value);
int (*upload_effect)(struct input_dev *dev, struct ff_effect *effect);
int (*erase_effect)(struct input_dev *dev, int effect_id);
struct input_handle *grab; //当前占有该设备的handle
struct mutex mutex; /* serializes open and close operations */
unsigned int users; //打开该设备的用户量
struct class_device cdev;
struct device *dev; /* will be removed soon */
int dynalloc; /* temporarily */
struct list_head h_list; //该链表头用于链接该设备所关联的input_handle
struct list_head node; //该链表头用于将设备链接到input_dev_list
};
Input_dev是一个很强大的结构体,它把所有的input设备(触摸屏、键盘、鼠标等)的信息都考虑到了,对于触摸屏来说只用到它里面的一部分而已,尤其是加粗的部分,注意该结构体中最后两行定义的两个list_head结构体,list_head在/linux/list.h中有定义,深入跟踪
struct list_head {
struct list_head *next, *prev;
};
该结构体内部并没有定义数据而只定义了两个指向本身结构体的指针,预先说明一下,所有的input device在注册后会加入一个input_dev_list(输入设备链表),所有的eventhandler在注册后会加入一个input_handler_list(输入处理程序链表),这里的list_head主要的作用是作为input_dev_list和input_handler_list的一个节点来保存地址。Input_dev_list和input_handler_list之间的对应关系由input_handle结构体桥接,具体后面说明。
struct input_handler {
void *private;
void (*event)(struct input_handle *handle, unsigned int type, unsigned int code, int value);
struct input_handle* (*connect)(struct input_handler *handler, struct input_dev *dev, struct input_device_id *id);
void (*disconnect)(struct input_handle *handle);
const struct file_operations *fops; //提供给用户对设备操作的函数指针
int minor;
char *name;
struct input_device_id *id_table; //与input_dev匹配用的id
struct input_device_id *blacklist; //标记的黑名单
struct list_head h_list; //用于链接和该handler相关的handle
struct list_head node; //用于将该handler链入input_handler_list
};
input_handler顾名思义,它是用来处理input_dev的一个结构体,相关的处理函数在结构里内部都有定义,最后两行定义的list_head结构体作用同input_dev所定义的一样,这里不再说明。
注:input_device_id结构体在/linux/mod_devicetable.h中有定义
struct input_handle {
void *private;
int open; //记录设备打开次数
char *name;
struct input_dev *dev; //指向所属的input_dev
struct input_handler *handler; //指向所属的input_handler
struct list_head d_node; //用于链入所指向的input_dev的handle链表
struct list_head h_node; //用于链入所指向的input_handler的handle链表
};
可以看到input_handle中拥有指向input_dev和input_handler的指针,即input_handle是用来关联input_dev和input_handler。为什么用input_handle来关联input_dev和input_handler而不将input_dev和input_handler直接对应呢?因为一个device可以对应多个handler,而一个handler也可处理多个device。就如一个触摸屏设备可以对应event handler也可以对应tseve handler。
input_dev、input_handler、input_handle的关系如下图2所示。

|
|
图2 input_dev,input_handler,input_handle关系图
|
第二章、input device的注册
Input device的注册实际上仅仅只有几行代码,因为在input.c中已经将大量的代码封装好了,主需要调用几个关键的函数就能完成对input device的注册。
在xxx_ts.c中预先定义全局变量struct input_dev tsdev;然后进入到初始化函数
static int __init xxx_probe(struct platform_device *pdev)
{
…
if (!(tsdev = input_allocate_device()))
{
printk(KERN_ERR "tsdev: not enough memory\n");
err = -ENOMEM;
goto fail;
}
…
tsdev->name = "xxx TouchScreen"; //xxx为芯片型号
tsdev ->phys = "xxx/event0";
tsdev ->id.bustype = BUS_HOST; //设备id,用于匹配handler的id
tsdev ->id.vendor = 0x0005;
tsdev ->id.product = 0x0001;
tsdev ->id.version = 0x0100;
tsdev ->open = xxx_open;
tsdev ->close =xxx_close;
tsdev ->evbit[0] = BIT(EV_KEY) | BIT(EV_ABS) | BIT(EV_SYN); //设置支持的事件类型
tsdev ->keybit[LONG(BTN_TOUCH)] = BIT(BTN_TOUCH);
input_set_abs_params(tsdev, ABS_X, 0, 0x400, 0, 0); //限定绝对坐标X的取值范围
input_set_abs_params(tsdev, ABS_Y, 0, 0x400, 0, 0); //同上
input_set_abs_params(tsdev, ABS_PRESSURE, 0, 1000, 0, 0); //触摸屏压力值范围
…
If(input_register_device(tsdev) == error) //注册设备
goto fail;
…
fail:
input_free_device(tsdev);
printk(“ts probe failed\n”);
return err;
}
先看该函数中的tsdev = input_allocate_device(),深入最终,该函数在input.c中有定义
struct input_dev *input_allocate_device(void)
{
struct input_dev *dev;
dev = kzalloc(sizeof(struct input_dev), GFP_KERNEL);
if (dev) {
dev->dynalloc = 1;
dev->cdev.class = &input_class;
class_device_initialize(&dev->cdev);
INIT_LIST_HEAD(&dev->h_list);
INIT_LIST_HEAD(&dev->node);
}
return dev;
}
学过C语言应该都知道malloc函数(开辟内存空间),而这里的kzalloc也类似于C语言中的malloc一样,是linux内核空间分配内存函数,后面的GFP_KERNEL标志意为常规的内存分配,更多的分配标志可参阅先关资料(我也不懂)。再回到前面的函数中来,接着后面的代码为对tsdev结构体中的成员进行赋值初始化,赋值完成后就要开始进入主题:注册设备了,进入到函数input_register_device(tsdev),该函数在input.c中有定义。
int input_register_device(struct input_dev *dev)
{
static atomic_t input_no = ATOMIC_INIT(0); //定义原子变量,禁止线程并发访问
struct input_handle *handle; //定义一些变量备后文使用
struct input_handler *handler;
struct input_device_id *id;
const char *path;
int error;
if (!dev->dynalloc) {
printk(KERN_WARNING "input: device %s is statically allocated, will not register\n"
"Please convert to input_allocate_device() or contact dtor_core@ameritech.net\n",
dev->name ? dev->name : "<Unknown>");
return -EINVAL;
}
mutex_init(&dev->mutex); //互斥锁初始化,防止临界区代码被并发访问
set_bit(EV_SYN, dev->evbit); //设置支持同步事件,input设备全部默认支持同步事件
/*
* If delay and period are pre-set by the driver, then autorepeating
* is handled by the driver itself and we don't do it in input.c.
*/
init_timer(&dev->timer);
if (!dev->rep[REP_DELAY] && !dev->rep[REP_PERIOD]) {
dev->timer.data = (long) dev;
dev->timer.function = input_repeat_key;
dev->rep[REP_DELAY] = 250;
dev->rep[REP_PERIOD] = 33;
}
INIT_LIST_HEAD(&dev->h_list); //初始化需要关联的handle链表头
list_add_tail(&dev->node, &input_dev_list); //将设备添加到input_dev_list中
dev->cdev.class = &input_class;
snprintf(dev->cdev.class_id, sizeof(dev->cdev.class_id),
"input%ld", (unsigned long) atomic_inc_return(&input_no) - 1);
error = class_device_add(&dev->cdev);
if (error)
return error;
error = sysfs_create_group(&dev->cdev.kobj, &input_dev_attr_group);
if (error)
goto fail1;
error = sysfs_create_group(&dev->cdev.kobj, &input_dev_id_attr_group);
if (error)
goto fail2;
error = sysfs_create_group(&dev->cdev.kobj, &input_dev_caps_attr_group);
if (error)
goto fail3;
__module_get(THIS_MODULE);
path = kobject_get_path(&dev->cdev.kobj, GFP_KERNEL);
printk(KERN_INFO "input: %s as %s\n",
dev->name ? dev->name : "Unspecified device", path ? path : "N/A");
kfree(path);
/*** 遍历input_handler_list上全部的handler,寻找与该设备匹配的handler ***/
list_for_each_entry(handler, &input_handler_list, node)
if (!handler->blacklist || !input_match_device(handler->blacklist, dev))
if ((id = input_match_device(handler->id_table, dev)))
if ((handle = handler->connect(handler, dev, id)))
input_link_handle(handle);
input_wakeup_procfs_readers();
return 0;
fail3: sysfs_remove_group(&dev->cdev.kobj, &input_dev_id_attr_group);
fail2: sysfs_remove_group(&dev->cdev.kobj, &input_dev_attr_group);
fail1: class_device_del(&dev->cdev);
return error;
}
先看函数中前面代码加粗的部分mutex_init(&dev->mutex),与互斥锁相关的东西(我也不太懂),set_bit(EV_SYN, dev->evbit)设置支持同步事件,linux的input子系统默认要支持同步事件。
接着看中间代码加粗的部分,有关list操作的在/linux/list.h中有定义
static inline void INIT_LIST_HEAD(struct list_head *list)
{
list->next = list;
list->prev = list;
}
static inline void list_add_tail(struct list_head *new, struct list_head *head)
{
__list_add(new, head->prev, head);
}
static inline void __list_add(struct list_head *new,
struct list_head *prev,
struct list_head *next)
{
next->prev = new;
new->next = next;
new->prev = prev;
prev->next = new;
}
可以看得出INIT_LIST_HEAD(struct list_head *list)就是让list指向结构体的成员再指向其本身完成初始化操作,list_add_tail(struct list_head *new, struct list_head *head)是将new所指向的结构体作为一节点插入到head所指向链表节点之前。因此函数中的list_add_tail(&dev->node, &input_dev_list)就是将该设备添加到input_dev_list中。而input_dev_list这个双向链表在什么时候被定义了呢,且看input.c源代码开始部分全局部分有定义:
static LIST_HEAD(input_dev_list);
static LIST_HEAD(input_handler_list);
而LIST_HEAD的宏定义:
#define LIST_HEAD_INIT(name) { &(name), &(name) }
#define LIST_HEAD(name) \
struct list_head name = LIST_HEAD_INIT(name)
显然这在最开始就已经定义了input_dev_list和input_handler_list这两个链表,且这两个链表都只有一个节点,而在device和handler注册的时候会在这两条链表中加入节点,list_add_tail(&dev->node, &input_dev_list)就是将该设备添加到input_dev_list中。
注意最后代码加粗的部分,该部分完成了input_dev和input_handler的桥接。先看list_for_each_entry(handler, &input_handler_list, node),list_for_each_entry在list.h中有定义,其作用相当于一个for循环。其约等价于:(个人理解)
for(handler = input_handler_list表头所属的input_handler结构体地址;
handler != input_handler_list表尾所属的input_handler结构体地址;
handler++)
即handler第一次指向input_handler_list的头部所在的input_handler地址。每循环一次handler就沿着input_handler_list移动到下一个节点,得到下一节点所属的handler地址,直到input_handler_list的结尾。而每次的循环需要做什么呢?要做的就是遍历input_handler_list上的每一个handler,看有哪些handler能与该设备匹配的上。匹配过程:
if (!handler->blacklist || !input_match_device(handler->blacklist, dev))//判断该handler没有被列入黑名单或者黑名单匹配不成功的话则继续
if ((id = input_match_device(handler->id_table, dev))) //将设备id与handler的id进行匹配,成功则继续往下
if ((handle = handler->connect(handler, dev, id))) //链接device与handler,成功则继续往下
input_link_handle(handle); //将handle链入input_handler_list和input_dev_list
继续跟踪进这些函数
static struct input_device_id *input_match_device(struct input_device_id *id, struct input_dev *dev)
{
int i;
for (; id->flags || id->driver_info; id++) {
if (id->flags & INPUT_DEVICE_ID_MATCH_BUS) //匹配handler和device id的flag标志位
if (id->bustype != dev->id.bustype)
continue;
if (id->flags & INPUT_DEVICE_ID_MATCH_VENDOR)
if (id->vendor != dev->id.vendor)
continue;
if (id->flags & INPUT_DEVICE_ID_MATCH_PRODUCT)
if (id->product != dev->id.product)
continue;
if (id->flags & INPUT_DEVICE_ID_MATCH_VERSION)
if (id->version != dev->id.version)
continue;
MATCH_BIT(evbit, EV_MAX); //匹配id相关标志位
MATCH_BIT(keybit, KEY_MAX);
MATCH_BIT(relbit, REL_MAX);
MATCH_BIT(absbit, ABS_MAX);
MATCH_BIT(mscbit, MSC_MAX);
MATCH_BIT(ledbit, LED_MAX);
MATCH_BIT(sndbit, SND_MAX);
MATCH_BIT(ffbit, FF_MAX);
MATCH_BIT(swbit, SW_MAX);
return id;
}
return NULL;
}
该函数用于匹配input_dev结构体和input_handler结构体里面定义的input_device_id,若两者里面有任何相关变量不一样则匹配失败(条件真苛刻)。
再看handle = handler->connect(handler, dev, id),connect函数即为static struct input_handle *evdev_connect(struct input_handler *handler, struct input_dev *dev, struct input_device_id *id),为什么呢会是这个呢,我们先看evdev.c中的input_handler结构体定义:
static struct input_handler evdev_handler = {
.event = evdev_event,
.connect = evdev_connect,
.disconnect = evdev_disconnect,
.fops = &evdev_fops,
.minor = EVDEV_MINOR_BASE,
.name = "evdev",
.id_table = evdev_ids,
};
可只这里input_handler结构体里边的connect函数即为evdev_connect函数
static struct input_handle *evdev_connect(struct input_handler *handler, struct input_dev *dev, struct input_device_id *id)
{
1 struct evdev *evdev; //定义一个evdev结构体指针
struct class_device *cdev;
int minor;
2 for (minor = 0; minor < EVDEV_MINORS && evdev_table[minor]; minor++);
if (minor == EVDEV_MINORS) {
printk(KERN_ERR "evdev: no more free evdev devices\n");
return NULL;
}
3 if (!(evdev = kzalloc(sizeof(struct evdev), GFP_KERNEL)))
return NULL;
INIT_LIST_HEAD(&evdev->list);
init_waitqueue_head(&evdev->wait);
evdev->exist = 1;
evdev->minor = minor;
evdev->handle.dev = dev;
evdev->handle.name = evdev->name;
evdev->handle.handler = handler;
evdev->handle.private = evdev;
sprintf(evdev->name, "event%d", minor);
evdev_table[minor] = evdev;
cdev = class_device_create(&input_class, &dev->cdev,
MKDEV(INPUT_MAJOR, EVDEV_MINOR_BASE + minor),
dev->cdev.dev, evdev->name);
/* temporary symlink to keep userspace happy */
sysfs_create_link(&input_class.subsys.kset.kobj, &cdev->kobj,
evdev->name);
return &evdev->handle;
}
先看1处,这里有个定义在evdev.c里边的新面孔
struct evdev {
int exist;
int open;
int minor;
char name[16];
struct input_handle handle; //关联input_handler和input_dev的input_handle
wait_queue_head_t wait;
struct evdev_list *grab;
struct list_head list;
};
evdev这个结构体就是拿来应用开发操作的,在这里就是触摸屏对应的设备文件实体,结构体前边定义了记录设备的一些信息(设备号,打开状态、设备名字等),这里还定义了一个input_handle的实体handle,没错这个handle就是要用来关联input_dev和input_handler的,后面还有一行加粗的部分后面再做介绍。
再看2处,evdev_table[]是一个全局变量的数组,在evdev.c中有定义
#define EVDEV_MINORS 32
static struct evdev *evdev_table[EVDEV_MINORS];
在前面已经说明了,一个device可以对应多个handler,而一个handler也可处理多个device,这里体现出了后者。既然evdev这个结构体是对应的设备文件实体,因为这个handler可能会处理多个device,因此该handler要处理n个device就会应该有n个evdev实体,而这些实体的地址存放在evdev_table[]这个指针数组中,也就是说该handler最多只能处理EVDEV_MINORS个device,而2处的这几句代码就是要遍历evdev_table[]这个数组看还有没有空着的位置,有的话才会继续进行下面的程序。
再看3处,开辟一个evdev结构体的内存空间,前面有说明过kzalloc函数,这里不再说明。
后面的代码就是为evdev结构体变量赋初始值了,其中init_waitqueue_head(&evdev->wait)初始化等待队列,具体介绍结合/linux/wait.h和查看相关资料(本人不懂)。
函数最后得到evdev结构体内的hanlde地址并返回,此时返回到我们的int input_register_device(struct input_dev *dev)函数里面,最后一句
input_link_handle(handle),进入到该函数中发现
static void input_link_handle(struct input_handle *handle)
{
list_add_tail(&handle->d_node, &handle->dev->h_list);
list_add_tail(&handle->h_node, &handle->handler->h_list);
}
在该函数中也只是将handle中的d_node和h_node分别接入到input_dev和input_handler的h_list中,此时input_dev、input_handler、input_handle三者形成了如图2所示的关系。
至此设备注册过程算是全部完成了,但是貌似还有点乱。在整个设备的注册过程中函数的嵌套一个接着一个,不仅函数嵌套,结构体也使用了结构体和函数嵌套等,在各个函数内也用了大量的结构体指针等等。但是在整个过程中input_dev、input_handler、input_handle这三个结构体变量的实体也都只有一个。其中input_dev结构体实体在xxx_ts.c中直接定义了一个input_dev的指针全局变量:
struct input_dev *tsdev;
并在初始化函数中开辟了一个input_dev的内存空间并让tsdev指针指向它:
w55fa95_dev = input_allocate_device();
input_handler结构体在evdev.c中也直接被定义了并初始化了
static struct input_handler evdev_handler = {
.event = evdev_event,
.connect = evdev_connect,
.disconnect = evdev_disconnect,
.fops = &evdev_fops,
.minor = EVDEV_MINOR_BASE,
.name = "evdev",
.id_table = evdev_ids,
};
而关联input_dev和input_handler的input_handle则是在调用链接连接函数static struct input_handle *evdev_connect(struct input_handler *handler, struct input_dev *dev, struct input_device_id *id)的时候,在该函数的内部调用evdev = kzalloc(sizeof(struct evdev), GFP_KERNEL)开辟了一个evdev结构体的内存空间时创建了,input_handle就是使用了evdev结构体内部定义的input_handle。
一个完整input设备系统不仅要有设备,还需要有处理程序input_handler,而上文中主要介绍的是设备注册、生成、以及和handler搭配的一个过程,而handler在何时生成的?
第三章、input_handler的注册。
Input_handler是要和用户层打交道的,在evdev.c中直接定义了一个input_handler结构体并初始化了一些内部成员变量。
static struct input_handler evdev_handler = {
.event = evdev_event,
.connect = evdev_connect,
.disconnect = evdev_disconnect,
.fops = &evdev_fops, //用户对设备操作的函数指针
.minor = EVDEV_MINOR_BASE,
.name = "evdev",
.id_table = evdev_ids, //指向一个evedev的指针数组
};
先看第一行加粗的代码,evedev_fops结构体的定义如下
static struct file_operations evdev_fops = {
.owner = THIS_MODULE,
.read = evdev_read,
.write = evdev_write,
.poll = evdev_poll,
.open = evdev_open,
.release = evdev_release,
.unlocked_ioctl = evdev_ioctl,
#ifdef CONFIG_COMPAT
.compat_ioctl = evdev_ioctl_compat,
#endif
.fasync = evdev_fasync,
.flush = evdev_flush
};
相信做过linux设备驱动编程的对这都很熟悉了,就是一大堆的用户接口函数,包括对设备的open、close、read、write、ioctl等函数。
再看第二行代码加粗的部分.id_table = evdev_ids, id.table就是前面所说过要和input_dev的id匹配的这么一个结构体,这里让它初始化为evdev_ids,在看evdev_ids的定义:
static struct input_device_id evdev_ids[] = {
{ .driver_info = 1 }, /* Matches all devices */
{ }, /* Terminating zero entry */
};
MODULE_DEVICE_TABLE(input, evdev_ids);
这里是一个结构体数组,令数组中第一个结构体的该成员变量driver_info的值为1,其他成员变量均未定义,说明这个handler对所有device的id都能匹配得上。数组中的第二个结构体为空表示结束,用来标识结束配合下面的MODULE_DEVICE_TABLE(input, evdev_ids)使用,关于MODULE_DEVICE_TABLE宏定义介绍自行查看相关文献(我也不懂)。
接下来进入正题,input_handler的注册!
Input_handler的注册和input_dev的注册很相似,大同小异罢了,在evdev.c源码中显示定义并初始化了一个input_handler结构体并直接给相关的成员变量赋值了,就是本章开始所将的部分,然后再初始化函数中注册一个input_handler:
static int __init evdev_init(void)
{
input_register_handler(&evdev_handler);
return 0;
}
这里只调用了一个input_register_handler()函数,看起来应该是很简单的样子(相比input_dev的注册),继续跟踪进入到该函数中:
void input_register_handler(struct input_handler *handler)
{
struct input_dev *dev;
struct input_handle *handle;
struct input_device_id *id;
if (!handler) return;
INIT_LIST_HEAD(&handler->h_list);
if (handler->fops != NULL)
input_table[handler->minor >> 5] = handler;
list_add_tail(&handler->node, &input_handler_list);
list_for_each_entry(dev, &input_dev_list, node)
if (!handler->blacklist || !input_match_device(handler->blacklist, dev))
if ((id = input_match_device(handler->id_table, dev)))
if ((handle = handler->connect(handler, dev, id)))
input_link_handle(handle);
input_wakeup_procfs_readers();
}
该函数中代码加粗的部分,与input_register_device()函数里的如出一辙,这里不再做说明。
至此input_handler的注册已经结束。
第四章、input子系统数据结构
下图3是以触摸屏设备为例子的input子系统数据结构图。
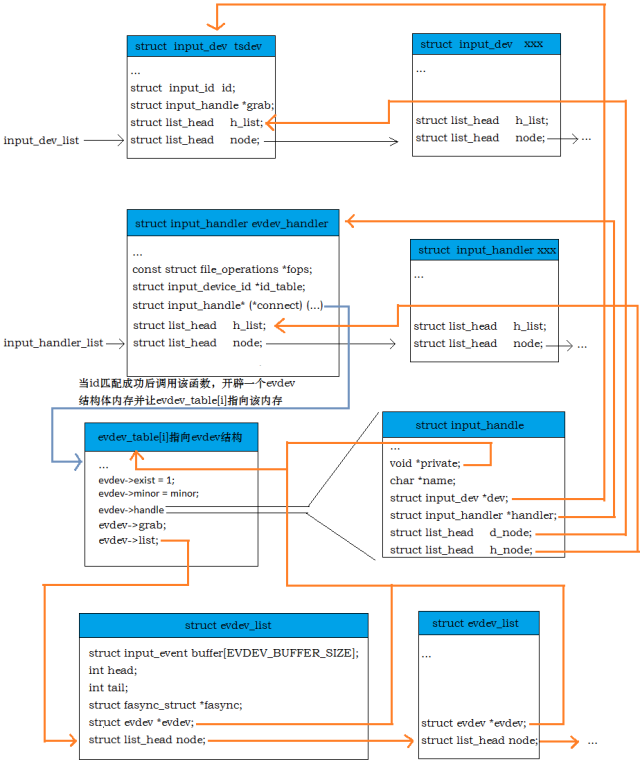
|
|
图3 input子系统数据结构图
|
进行到这里,又多冒出来了一个struct evdev_list的结构体,这在之前并没有提到过,因为在注册input_dev和input_handler过程中并没有用到过,查看该结构体:
struct evdev_list {
struct input_event buffer[EVDEV_BUFFER_SIZE]; //存放设备数据信息
int head; //buffer的下标,标识从设备中过来要存放到buffer的数据的位置
int tail; //buffer的下标,标识用户读取buffer中数据的下标位置
struct fasync_struct *fasync;
struct evdev *evdev;
struct list_head node;
};
注意里面的input_event结构体,在/linux/input.h中有定义:
struct input_event {
struct timeval time;
__u16 type;
__u16 code;
__s32 value;
};
该input_event结构体就是存放着用户层所需的数据信息,这里想必我们都明白,则在struct evdev_list结构体中的struct input_event buffer[EVDEV_BUFFER_SIZE];就是存放着用户所需的数据信息,从硬件设备(触摸屏)获取得到的数据信息最终会存放到该数组中,而struct evdev_list结构体是在什么时候定义的呢?
当然是在被open的时候,查看open函数:
static int evdev_open(struct inode * inode, struct file * file)
{
struct evdev_list *list; //定义一个evdev_list结构体
int i = iminor(inode) - EVDEV_MINOR_BASE;
int accept_err;
if (i >= EVDEV_MINORS || !evdev_table[ i] || !evdev_table[ i]->exist)
return -ENODEV;
if ((accept_err = input_accept_process(&(evdev_table[ i]->handle), file)))
return accept_err;
if (!(list = kzalloc(sizeof(struct evdev_list), GFP_KERNEL))) //开辟evdev_list结构体内存空间
return -ENOMEM;
list->evdev = evdev_table[ i]; //令结构体中的evdev指针指向evdec_table[ i]
list_add_tail(&list->node, &evdev_table[ i]->list); //加入链表
file->private_data = list;
if (!list->evdev->open++) //如果设备没有被open,则继续if操作
if (list->evdev->exist)
input_open_device(&list->evdev->handle); //打开设备
return 0;
}
注意函数中代码加粗的部分,都有注释说明,在最后以一个操作input_open_device(&list->evdev->handle);继续跟踪进入该函数
int input_open_device(struct input_handle *handle)
{
struct input_dev *dev = handle->dev;
int err;
err = mutex_lock_interruptible(&dev->mutex);
if (err)
return err;
handle->open++; //handle的内部成员open++
if (!dev->users++ && dev->open)
err = dev->open(dev);
if (err)
handle->open--;
mutex_unlock(&dev->mutex);
return err;
}
函数中加粗的部分,为什么要让open++呢?因为数据要从device传到handler过程中有一个环节需要判断handle->open是否为真,为真表示设备已经打开数据可以传递,这点在下一章将会介绍到。
第四章、数据传递过程
正如图1所示,从硬件设备(触摸屏)中获得的数据需要经过input.c选择相应的handler进行处理,最后上报到用户空间。如何从硬件设备(触摸屏)中获得数据,那就得看xxx_ts.c中的代码了,在xxx_ts.c中的源代码是直接和硬件设备相关的。在xxx_ts.c中我们一方面要完成触摸屏设备相关的寄存器配置,另一方面要完成将获得的数据上报。
至于设备初始化配置方面,根据每个人使用的ARM芯片的Datasheet去初始化配置寄存器,这里也不需要多说了。不管是通过查询法还是中断法(我没见过用查询的),当触摸屏按下时候我们会得到触摸屏被按下的相关数据(主要是被按下的X和Y坐标值),然后需要将数据信息上报,在触摸屏被按下的时候需要上报:
input_report_key(tsdev, BTN_TOUCH, 1); //报告按键被按下事件
input_report_abs(tsdev, ABS_X, x); //报告触摸屏被按下的x坐标值
input_report_abs(tsdev, ABS_Y, y); //报告触摸屏被按下的y坐标值
input_report_abs(tsdev, ABS_PRESSURE, 1); //报告触摸屏被按下的压力值(0或者1)
input_sync(tsdev); //报告同步事件,表示一次事件结束
当触笔从触摸屏上抬起时需要上报:
input_report_key(tsdev, BTN_TOUCH, 0); //报告按键被松开事件
input_report_abs(tsdev, ABS_PRESSURE, 0); //报告触摸屏被按下的压力值(0或者1)
input_sync(tsdev); //报告同步事件,表示一次事件结束
先不管input_sync()函数,先来看input_report_key()和input_report_abs(),这两个函数在/linux/input.h中有定义:
static inline void input_report_key(struct input_dev *dev, unsigned int code, int value)
{
input_event(dev, EV_KEY, code, !!value);
}
static inline void input_report_abs(struct input_dev *dev, unsigned int code, int value)
{
input_event(dev, EV_ABS, code, value);
}
太坑爹了,这两个函数里面也就值调用了一个函数(我也不明白linux内核开发者为什么要这么做),继续跟踪查看input_event()函数,在input.c中有定义:
void input_event(struct input_dev *dev, unsigned int type, unsigned int code, int value)
{
struct input_handle *handle;
if (type > EV_MAX || !test_bit(type, dev->evbit))
return;
add_input_randomness(type, code, value);
switch (type) {
…
case EV_KEY: //判断为按键事件
if (code > KEY_MAX || !test_bit(code, dev->keybit) || !!test_bit(code, dev->key) == value)
return;
if (value == 2)
break;
change_bit(code, dev->key);
if (test_bit(EV_REP, dev->evbit) && dev->rep[REP_PERIOD] && dev->rep[REP_DELAY] && dev->timer.data && value) {
dev->repeat_key = code;
mod_timer(&dev->timer, jiffies + msecs_to_jiffies(dev->rep[REP_DELAY]));
}
case EV_ABS: //判断为绝对坐标事件
if (code > ABS_MAX || !test_bit(code, dev->absbit))
return;
if (dev->absfuzz[code]) {
if ((value > dev->abs[code] - (dev->absfuzz[code] >> 1)) &&
(value < dev->abs[code] + (dev->absfuzz[code] >> 1)))
return;
if ((value > dev->abs[code] - dev->absfuzz[code]) &&
(value < dev->abs[code] + dev->absfuzz[code]))
value = (dev->abs[code] * 3 + value) >> 2;
if ((value > dev->abs[code] - (dev->absfuzz[code] << 1)) &&
(value < dev->abs[code] + (dev->absfuzz[code] << 1)))
value = (dev->abs[code] + value) >> 1;
}
if (dev->abs[code] == value)
return;
dev->abs[code] = value;
break;
…
}
if (type != EV_SYN)
dev->sync = 0;
if (dev->grab) //判断有没有声明自定义的处理函数(初始化过程中显然没有定义)
dev->grab->handler->event(dev->grab, type, code, value);
else
list_for_each_entry(handle, &dev->h_list, d_node) //遍历handle链表
if (handle->open) //如果某节点上的处理程序被打开了
handle->handler->event(handle, type, code, value); //调用处理函数
}
先看该函数中的一个switch结构,这里只列出了EV_KEY和EV_ABS两个事件的处理,经过switch选择处理后看最后代码加粗的部分。list_for_each_entry(handle, &dev->h_list, d_node) 这句类似的前面已经介绍过,这里不再说明,接下来if (handle->open),判断处理程序是否被打开,还记得是什么时候打开的吗?前面有介绍过在evdev.c中的open函数里面调用了input_open_device(&list->evdev->handle),而在input_open_device()中有这么一句handle->open++;没有错,只有在经过evdev_open之后才能这里的条件才能为真,接着看下面的handle->handler->event(handle, type, code, value);继续深入跟踪:
static void evdev_event(struct input_handle *handle, unsigned int type, unsigned int code, int value)
{
struct evdev *evdev = handle->private;
struct evdev_list *list;
if (evdev->grab) { //显然grab并没有被设置,该条件为假
list = evdev->grab;
do_gettimeofday(&list->buffer[list->head].time);
list->buffer[list->head].type = type;
list->buffer[list->head].code = code;
list->buffer[list->head].value = value;
list->head = (list->head + 1) & (EVDEV_BUFFER_SIZE - 1);
kill_fasync(&list->fasync, SIGIO, POLL_IN);
} else
list_for_each_entry(list, &evdev->list, node) {
do_gettimeofday(&list->buffer[list->head].time); //给buffer成员赋值
list->buffer[list->head].type = type;
list->buffer[list->head].code = code;
list->buffer[list->head].value = value;
list->head = (list->head + 1) & (EVDEV_BUFFER_SIZE - 1);
kill_fasync(&list->fasync, SIGIO, POLL_IN);
}
wake_up_interruptible(&evdev->wait); //用来唤醒一个等待队列(我也不懂)
}
先看前面的struct evdev *evdev = handle->private,还记得handler->private吗,在input_handle结构体中它是一个空指针,在前面有讲到在执行static struct input_handle *evdev_connect(struct input_handler *handler, struct input_dev *dev, struct input_device_id *id)函数的时候就被赋值了(evdev->handle.private = evdev;)。
再看最后代码加粗的部分,显然是给evdev_list结构体中的buffer成员赋上从设备中传过来的数据,当数据存放好了之后,head加1,当head的值达到EVDEV_BUFFER_SIZE时又回到0;
至此数据的传递就算是结束了,接下来就是等着被读走,只要在用户空间进行read操作即可。
第五章、数据读取过程
读取就变得很简单了,做过linux编程的都能知道,只要在应用中定义了个input_event结构体,通过open打开设备,然后进行read即可,再来看该设备的read函数:
static ssize_t evdev_read(struct file * file, char __user * buffer, size_t count, loff_t *ppos)
{
struct evdev_list *list = file->private_data;
int retval;
if (count < evdev_event_size())//每次读取的字节数至少是input_event的大小
return -EINVAL;
if (list->head == list->tail && list->evdev->exist && (file->f_flags & O_NONBLOCK)) //是否满足读取条件
return -EAGAIN;
retval = wait_event_interruptible(list->evdev->wait,
list->head != list->tail || (!list->evdev->exist)); //等待唤醒,和前面说的等待队列对应(我也不懂)
if (retval)
return retval;
if (!list->evdev->exist)
return -ENODEV;
while (list->head != list->tail && retval + evdev_event_size() <= count) {
struct input_event *event = (struct input_event *) list->buffer + list->tail;
if (evdev_event_to_user(buffer + retval, event)) //复制数据到用户空间
return -EFAULT;
list->tail = (list->tail + 1) & (EVDEV_BUFFER_SIZE - 1);
retval += evdev_event_size();
}
return retval;
}
函数前面基本上都是在做一系列的条件判断,判断是否符合读取的条件,evdev_event_to_user(buffer + retval, event)这句是真正的把数据复制到用户空间,进入查看:
static int evdev_event_to_user(char __user *buffer, const struct input_event *event)
{
if (copy_to_user(buffer, event, sizeof(struct input_event)))
return -EFAULT;
return 0;
}
该函里面也只是调用了copy_to_user()函数而已,该函数相比我们都不会陌生了,就是把event所指向地址空间的数据复制到buffer所指向的地址空间中而已。
再回到read函数中来,函数在末尾返回读取到的字节数,至于要把这些数据拿去干什么用,那就是应用层的事情了。
可以看到接口函数中除了read以外还有write、ioctl等函数,因为对于触摸屏来说我们主要就是要获取触笔在触摸屏上点击的坐标位置而已,所以write、ioctl等函数会很少用到,这里就不再做介绍。
注:本文只在一定的层面(本人的理解)上对linux下的input子系统的介绍,里边还有很多要点没有办法去涉及,只是一个入门级的学习过程,紧限于在在完善的input子系统下进行做驱动修改,而不具备做驱动开发的能力。--以触摸屏驱动为例
第一章、了解linux input子系统
Linux输入设备总类繁杂,常见的包括有按键、键盘、触摸屏、鼠标、摇杆等等,他们本身就是字符设备,而linux内核将这些设备的共同性抽象出来,简化驱动开发建立了一个input子系统。子系统共分为三层,如图1所示。
|
|
|
图1 input输入子系统
|
驱动层和硬件相关,直接捕捉和获取硬件设备的数据信息等(包括触摸屏被按下、按下位置、鼠标移动、键盘按下等等),然后将数据信息报告到核心层。核心层负责连接驱动层和事件处理层,设备驱动(device driver)和处理程序(handler)的注册需要通过核心层来完成,核心层接收来自驱动层的数据信息,并将数据信息选择对应的handler去处理,最终handler将数据复制到用户空间。
先了解三个定义在/linux/input.h下重要的结构体input_dev、input_handler、input_handle。
struct input_dev {
void *private;
const char *name;
const char *phys;
const char *uniq;
struct input_id id; //与input_handler匹配用的id
unsigned long evbit[NBITS(EV_MAX)]; //设备支持的事件类型
unsigned long keybit[NBITS(KEY_MAX)]; //按键事件支持的子事件类型
unsigned long relbit[NBITS(REL_MAX)];
unsigned long absbit[NBITS(ABS_MAX)]; //绝对坐标事件支持的子事件类型
unsigned long mscbit[NBITS(MSC_MAX)];
unsigned long ledbit[NBITS(LED_MAX)];
unsigned long sndbit[NBITS(SND_MAX)];
unsigned long ffbit[NBITS(FF_MAX)];
unsigned long swbit[NBITS(SW_MAX)];
int ff_effects_max;
unsigned int keycodemax;
unsigned int keycodesize;
void *keycode;
unsigned int repeat_key;
struct timer_list timer;
struct pt_regs *regs;
int state;
int sync;
int abs[ABS_MAX + 1];
int rep[REP_MAX + 1];
unsigned long key[NBITS(KEY_MAX)];
unsigned long led[NBITS(LED_MAX)];
unsigned long snd[NBITS(SND_MAX)];
unsigned long sw[NBITS(SW_MAX)];
int absmax[ABS_MAX + 1]; //绝对坐标事件的最大键值
int absmin[ABS_MAX + 1]; //绝对坐标事件的最小键值
int absfuzz[ABS_MAX + 1];
int absflat[ABS_MAX + 1];
int (*open)(struct input_dev *dev);
void (*close)(struct input_dev *dev);
int (*accept)(struct input_dev *dev, struct file *file);
int (*flush)(struct input_dev *dev, struct file *file);
int (*event)(struct input_dev *dev, unsigned int type, unsigned int code, int value);
int (*upload_effect)(struct input_dev *dev, struct ff_effect *effect);
int (*erase_effect)(struct input_dev *dev, int effect_id);
struct input_handle *grab; //当前占有该设备的handle
struct mutex mutex; /* serializes open and close operations */
unsigned int users; //打开该设备的用户量
struct class_device cdev;
struct device *dev; /* will be removed soon */
int dynalloc; /* temporarily */
struct list_head h_list; //该链表头用于链接该设备所关联的input_handle
struct list_head node; //该链表头用于将设备链接到input_dev_list
};
Input_dev是一个很强大的结构体,它把所有的input设备(触摸屏、键盘、鼠标等)的信息都考虑到了,对于触摸屏来说只用到它里面的一部分而已,尤其是加粗的部分,注意该结构体中最后两行定义的两个list_head结构体,list_head在/linux/list.h中有定义,深入跟踪
struct list_head {
struct list_head *next, *prev;
};
该结构体内部并没有定义数据而只定义了两个指向本身结构体的指针,预先说明一下,所有的input device在注册后会加入一个input_dev_list(输入设备链表),所有的eventhandler在注册后会加入一个input_handler_list(输入处理程序链表),这里的list_head主要的作用是作为input_dev_list和input_handler_list的一个节点来保存地址。Input_dev_list和input_handler_list之间的对应关系由input_handle结构体桥接,具体后面说明。
struct input_handler {
void *private;
void (*event)(struct input_handle *handle, unsigned int type, unsigned int code, int value);
struct input_handle* (*connect)(struct input_handler *handler, struct input_dev *dev, struct input_device_id *id);
void (*disconnect)(struct input_handle *handle);
const struct file_operations *fops; //提供给用户对设备操作的函数指针
int minor;
char *name;
struct input_device_id *id_table; //与input_dev匹配用的id
struct input_device_id *blacklist; //标记的黑名单
struct list_head h_list; //用于链接和该handler相关的handle
struct list_head node; //用于将该handler链入input_handler_list
};
input_handler顾名思义,它是用来处理input_dev的一个结构体,相关的处理函数在结构里内部都有定义,最后两行定义的list_head结构体作用同input_dev所定义的一样,这里不再说明。
注:input_device_id结构体在/linux/mod_devicetable.h中有定义
struct input_handle {
void *private;
int open; //记录设备打开次数
char *name;
struct input_dev *dev; //指向所属的input_dev
struct input_handler *handler; //指向所属的input_handler
struct list_head d_node; //用于链入所指向的input_dev的handle链表
struct list_head h_node; //用于链入所指向的input_handler的handle链表
};
可以看到input_handle中拥有指向input_dev和input_handler的指针,即input_handle是用来关联input_dev和input_handler。为什么用input_handle来关联input_dev和input_handler而不将input_dev和input_handler直接对应呢?因为一个device可以对应多个handler,而一个handler也可处理多个device。就如一个触摸屏设备可以对应event handler也可以对应tseve handler。
input_dev、input_handler、input_handle的关系如下图2所示。
|
|
|
图2 input_dev,input_handler,input_handle关系图
|
第二章、input device的注册
Input device的注册实际上仅仅只有几行代码,因为在input.c中已经将大量的代码封装好了,主需要调用几个关键的函数就能完成对input device的注册。
在xxx_ts.c中预先定义全局变量struct input_dev tsdev;然后进入到初始化函数
static int __init xxx_probe(struct platform_device *pdev)
{
…
if (!(tsdev = input_allocate_device()))
{
printk(KERN_ERR "tsdev: not enough memory\n");
err = -ENOMEM;
goto fail;
}
…
tsdev->name = "xxx TouchScreen"; //xxx为芯片型号
tsdev ->phys = "xxx/event0";
tsdev ->id.bustype = BUS_HOST; //设备id,用于匹配handler的id
tsdev ->id.vendor = 0x0005;
tsdev ->id.product = 0x0001;
tsdev ->id.version = 0x0100;
tsdev ->open = xxx_open;
tsdev ->close =xxx_close;
tsdev ->evbit[0] = BIT(EV_KEY) | BIT(EV_ABS) | BIT(EV_SYN); //设置支持的事件类型
tsdev ->keybit[LONG(BTN_TOUCH)] = BIT(BTN_TOUCH);
input_set_abs_params(tsdev, ABS_X, 0, 0x400, 0, 0); //限定绝对坐标X的取值范围
input_set_abs_params(tsdev, ABS_Y, 0, 0x400, 0, 0); //同上
input_set_abs_params(tsdev, ABS_PRESSURE, 0, 1000, 0, 0); //触摸屏压力值范围
…
If(input_register_device(tsdev) == error) //注册设备
goto fail;
…
fail:
input_free_device(tsdev);
printk(“ts probe failed\n”);
return err;
}
先看该函数中的tsdev = input_allocate_device(),深入最终,该函数在input.c中有定义
struct input_dev *input_allocate_device(void)
{
struct input_dev *dev;
dev = kzalloc(sizeof(struct input_dev), GFP_KERNEL);
if (dev) {
dev->dynalloc = 1;
dev->cdev.class = &input_class;
class_device_initialize(&dev->cdev);
INIT_LIST_HEAD(&dev->h_list);
INIT_LIST_HEAD(&dev->node);
}
return dev;
}
学过C语言应该都知道malloc函数(开辟内存空间),而这里的kzalloc也类似于C语言中的malloc一样,是linux内核空间分配内存函数,后面的GFP_KERNEL标志意为常规的内存分配,更多的分配标志可参阅先关资料(我也不懂)。再回到前面的函数中来,接着后面的代码为对tsdev结构体中的成员进行赋值初始化,赋值完成后就要开始进入主题:注册设备了,进入到函数input_register_device(tsdev),该函数在input.c中有定义。
int input_register_device(struct input_dev *dev)
{
static atomic_t input_no = ATOMIC_INIT(0); //定义原子变量,禁止线程并发访问
struct input_handle *handle; //定义一些变量备后文使用
struct input_handler *handler;
struct input_device_id *id;
const char *path;
int error;
if (!dev->dynalloc) {
printk(KERN_WARNING "input: device %s is statically allocated, will not register\n"
"Please convert to input_allocate_device() or contact dtor_core@ameritech.net\n",
dev->name ? dev->name : "<Unknown>");
return -EINVAL;
}
mutex_init(&dev->mutex); //互斥锁初始化,防止临界区代码被并发访问
set_bit(EV_SYN, dev->evbit); //设置支持同步事件,input设备全部默认支持同步事件
/*
* If delay and period are pre-set by the driver, then autorepeating
* is handled by the driver itself and we don't do it in input.c.
*/
init_timer(&dev->timer);
if (!dev->rep[REP_DELAY] && !dev->rep[REP_PERIOD]) {
dev->timer.data = (long) dev;
dev->timer.function = input_repeat_key;
dev->rep[REP_DELAY] = 250;
dev->rep[REP_PERIOD] = 33;
}
INIT_LIST_HEAD(&dev->h_list); //初始化需要关联的handle链表头
list_add_tail(&dev->node, &input_dev_list); //将设备添加到input_dev_list中
dev->cdev.class = &input_class;
snprintf(dev->cdev.class_id, sizeof(dev->cdev.class_id),
"input%ld", (unsigned long) atomic_inc_return(&input_no) - 1);
error = class_device_add(&dev->cdev);
if (error)
return error;
error = sysfs_create_group(&dev->cdev.kobj, &input_dev_attr_group);
if (error)
goto fail1;
error = sysfs_create_group(&dev->cdev.kobj, &input_dev_id_attr_group);
if (error)
goto fail2;
error = sysfs_create_group(&dev->cdev.kobj, &input_dev_caps_attr_group);
if (error)
goto fail3;
__module_get(THIS_MODULE);
path = kobject_get_path(&dev->cdev.kobj, GFP_KERNEL);
printk(KERN_INFO "input: %s as %s\n",
dev->name ? dev->name : "Unspecified device", path ? path : "N/A");
kfree(path);
/*** 遍历input_handler_list上全部的handler,寻找与该设备匹配的handler ***/
list_for_each_entry(handler, &input_handler_list, node)
if (!handler->blacklist || !input_match_device(handler->blacklist, dev))
if ((id = input_match_device(handler->id_table, dev)))
if ((handle = handler->connect(handler, dev, id)))
input_link_handle(handle);
input_wakeup_procfs_readers();
return 0;
fail3: sysfs_remove_group(&dev->cdev.kobj, &input_dev_id_attr_group);
fail2: sysfs_remove_group(&dev->cdev.kobj, &input_dev_attr_group);
fail1: class_device_del(&dev->cdev);
return error;
}
先看函数中前面代码加粗的部分mutex_init(&dev->mutex),与互斥锁相关的东西(我也不太懂),set_bit(EV_SYN, dev->evbit)设置支持同步事件,linux的input子系统默认要支持同步事件。
接着看中间代码加粗的部分,有关list操作的在/linux/list.h中有定义
static inline void INIT_LIST_HEAD(struct list_head *list)
{
list->next = list;
list->prev = list;
}
static inline void list_add_tail(struct list_head *new, struct list_head *head)
{
__list_add(new, head->prev, head);
}
static inline void __list_add(struct list_head *new,
struct list_head *prev,
struct list_head *next)
{
next->prev = new;
new->next = next;
new->prev = prev;
prev->next = new;
}
可以看得出INIT_LIST_HEAD(struct list_head *list)就是让list指向结构体的成员再指向其本身完成初始化操作,list_add_tail(struct list_head *new, struct list_head *head)是将new所指向的结构体作为一节点插入到head所指向链表节点之前。因此函数中的list_add_tail(&dev->node, &input_dev_list)就是将该设备添加到input_dev_list中。而input_dev_list这个双向链表在什么时候被定义了呢,且看input.c源代码开始部分全局部分有定义:
static LIST_HEAD(input_dev_list);
static LIST_HEAD(input_handler_list);
而LIST_HEAD的宏定义:
#define LIST_HEAD_INIT(name) { &(name), &(name) }
#define LIST_HEAD(name) \
struct list_head name = LIST_HEAD_INIT(name)
显然这在最开始就已经定义了input_dev_list和input_handler_list这两个链表,且这两个链表都只有一个节点,而在device和handler注册的时候会在这两条链表中加入节点,list_add_tail(&dev->node, &input_dev_list)就是将该设备添加到input_dev_list中。
注意最后代码加粗的部分,该部分完成了input_dev和input_handler的桥接。先看list_for_each_entry(handler, &input_handler_list, node),list_for_each_entry在list.h中有定义,其作用相当于一个for循环。其约等价于:(个人理解)
for(handler = input_handler_list表头所属的input_handler结构体地址;
handler != input_handler_list表尾所属的input_handler结构体地址;
handler++)
即handler第一次指向input_handler_list的头部所在的input_handler地址。每循环一次handler就沿着input_handler_list移动到下一个节点,得到下一节点所属的handler地址,直到input_handler_list的结尾。而每次的循环需要做什么呢?要做的就是遍历input_handler_list上的每一个handler,看有哪些handler能与该设备匹配的上。匹配过程:
if (!handler->blacklist || !input_match_device(handler->blacklist, dev))//判断该handler没有被列入黑名单或者黑名单匹配不成功的话则继续
if ((id = input_match_device(handler->id_table, dev))) //将设备id与handler的id进行匹配,成功则继续往下
if ((handle = handler->connect(handler, dev, id))) //链接device与handler,成功则继续往下
input_link_handle(handle); //将handle链入input_handler_list和input_dev_list
继续跟踪进这些函数
static struct input_device_id *input_match_device(struct input_device_id *id, struct input_dev *dev)
{
int i;
for (; id->flags || id->driver_info; id++) {
if (id->flags & INPUT_DEVICE_ID_MATCH_BUS) //匹配handler和device id的flag标志位
if (id->bustype != dev->id.bustype)
continue;
if (id->flags & INPUT_DEVICE_ID_MATCH_VENDOR)
if (id->vendor != dev->id.vendor)
continue;
if (id->flags & INPUT_DEVICE_ID_MATCH_PRODUCT)
if (id->product != dev->id.product)
continue;
if (id->flags & INPUT_DEVICE_ID_MATCH_VERSION)
if (id->version != dev->id.version)
continue;
MATCH_BIT(evbit, EV_MAX); //匹配id相关标志位
MATCH_BIT(keybit, KEY_MAX);
MATCH_BIT(relbit, REL_MAX);
MATCH_BIT(absbit, ABS_MAX);
MATCH_BIT(mscbit, MSC_MAX);
MATCH_BIT(ledbit, LED_MAX);
MATCH_BIT(sndbit, SND_MAX);
MATCH_BIT(ffbit, FF_MAX);
MATCH_BIT(swbit, SW_MAX);
return id;
}
return NULL;
}
该函数用于匹配input_dev结构体和input_handler结构体里面定义的input_device_id,若两者里面有任何相关变量不一样则匹配失败(条件真苛刻)。
再看handle = handler->connect(handler, dev, id),connect函数即为static struct input_handle *evdev_connect(struct input_handler *handler, struct input_dev *dev, struct input_device_id *id),为什么呢会是这个呢,我们先看evdev.c中的input_handler结构体定义:
static struct input_handler evdev_handler = {
.event = evdev_event,
.connect = evdev_connect,
.disconnect = evdev_disconnect,
.fops = &evdev_fops,
.minor = EVDEV_MINOR_BASE,
.name = "evdev",
.id_table = evdev_ids,
};
可只这里input_handler结构体里边的connect函数即为evdev_connect函数
static struct input_handle *evdev_connect(struct input_handler *handler, struct input_dev *dev, struct input_device_id *id)
{
1 struct evdev *evdev; //定义一个evdev结构体指针
struct class_device *cdev;
int minor;
2 for (minor = 0; minor < EVDEV_MINORS && evdev_table[minor]; minor++);
if (minor == EVDEV_MINORS) {
printk(KERN_ERR "evdev: no more free evdev devices\n");
return NULL;
}
3 if (!(evdev = kzalloc(sizeof(struct evdev), GFP_KERNEL)))
return NULL;
INIT_LIST_HEAD(&evdev->list);
init_waitqueue_head(&evdev->wait);
evdev->exist = 1;
evdev->minor = minor;
evdev->handle.dev = dev;
evdev->handle.name = evdev->name;
evdev->handle.handler = handler;
evdev->handle.private = evdev;
sprintf(evdev->name, "event%d", minor);
evdev_table[minor] = evdev;
cdev = class_device_create(&input_class, &dev->cdev,
MKDEV(INPUT_MAJOR, EVDEV_MINOR_BASE + minor),
dev->cdev.dev, evdev->name);
/* temporary symlink to keep userspace happy */
sysfs_create_link(&input_class.subsys.kset.kobj, &cdev->kobj,
evdev->name);
return &evdev->handle;
}
先看1处,这里有个定义在evdev.c里边的新面孔
struct evdev {
int exist;
int open;
int minor;
char name[16];
struct input_handle handle; //关联input_handler和input_dev的input_handle
wait_queue_head_t wait;
struct evdev_list *grab;
struct list_head list;
};
evdev这个结构体就是拿来应用开发操作的,在这里就是触摸屏对应的设备文件实体,结构体前边定义了记录设备的一些信息(设备号,打开状态、设备名字等),这里还定义了一个input_handle的实体handle,没错这个handle就是要用来关联input_dev和input_handler的,后面还有一行加粗的部分后面再做介绍。
再看2处,evdev_table[]是一个全局变量的数组,在evdev.c中有定义
#define EVDEV_MINORS 32
static struct evdev *evdev_table[EVDEV_MINORS];
在前面已经说明了,一个device可以对应多个handler,而一个handler也可处理多个device,这里体现出了后者。既然evdev这个结构体是对应的设备文件实体,因为这个handler可能会处理多个device,因此该handler要处理n个device就会应该有n个evdev实体,而这些实体的地址存放在evdev_table[]这个指针数组中,也就是说该handler最多只能处理EVDEV_MINORS个device,而2处的这几句代码就是要遍历evdev_table[]这个数组看还有没有空着的位置,有的话才会继续进行下面的程序。
再看3处,开辟一个evdev结构体的内存空间,前面有说明过kzalloc函数,这里不再说明。
后面的代码就是为evdev结构体变量赋初始值了,其中init_waitqueue_head(&evdev->wait)初始化等待队列,具体介绍结合/linux/wait.h和查看相关资料(本人不懂)。
函数最后得到evdev结构体内的hanlde地址并返回,此时返回到我们的int input_register_device(struct input_dev *dev)函数里面,最后一句
input_link_handle(handle),进入到该函数中发现
static void input_link_handle(struct input_handle *handle)
{
list_add_tail(&handle->d_node, &handle->dev->h_list);
list_add_tail(&handle->h_node, &handle->handler->h_list);
}
在该函数中也只是将handle中的d_node和h_node分别接入到input_dev和input_handler的h_list中,此时input_dev、input_handler、input_handle三者形成了如图2所示的关系。
至此设备注册过程算是全部完成了,但是貌似还有点乱。在整个设备的注册过程中函数的嵌套一个接着一个,不仅函数嵌套,结构体也使用了结构体和函数嵌套等,在各个函数内也用了大量的结构体指针等等。但是在整个过程中input_dev、input_handler、input_handle这三个结构体变量的实体也都只有一个。其中input_dev结构体实体在xxx_ts.c中直接定义了一个input_dev的指针全局变量:
struct input_dev *tsdev;
并在初始化函数中开辟了一个input_dev的内存空间并让tsdev指针指向它:
w55fa95_dev = input_allocate_device();
input_handler结构体在evdev.c中也直接被定义了并初始化了
static struct input_handler evdev_handler = {
.event = evdev_event,
.connect = evdev_connect,
.disconnect = evdev_disconnect,
.fops = &evdev_fops,
.minor = EVDEV_MINOR_BASE,
.name = "evdev",
.id_table = evdev_ids,
};
而关联input_dev和input_handler的input_handle则是在调用链接连接函数static struct input_handle *evdev_connect(struct input_handler *handler, struct input_dev *dev, struct input_device_id *id)的时候,在该函数的内部调用evdev = kzalloc(sizeof(struct evdev), GFP_KERNEL)开辟了一个evdev结构体的内存空间时创建了,input_handle就是使用了evdev结构体内部定义的input_handle。
一个完整input设备系统不仅要有设备,还需要有处理程序input_handler,而上文中主要介绍的是设备注册、生成、以及和handler搭配的一个过程,而handler在何时生成的?
第三章、input_handler的注册。
Input_handler是要和用户层打交道的,在evdev.c中直接定义了一个input_handler结构体并初始化了一些内部成员变量。
static struct input_handler evdev_handler = {
.event = evdev_event,
.connect = evdev_connect,
.disconnect = evdev_disconnect,
.fops = &evdev_fops, //用户对设备操作的函数指针
.minor = EVDEV_MINOR_BASE,
.name = "evdev",
.id_table = evdev_ids, //指向一个evedev的指针数组
};
先看第一行加粗的代码,evedev_fops结构体的定义如下
static struct file_operations evdev_fops = {
.owner = THIS_MODULE,
.read = evdev_read,
.write = evdev_write,
.poll = evdev_poll,
.open = evdev_open,
.release = evdev_release,
.unlocked_ioctl = evdev_ioctl,
#ifdef CONFIG_COMPAT
.compat_ioctl = evdev_ioctl_compat,
#endif
.fasync = evdev_fasync,
.flush = evdev_flush
};
相信做过linux设备驱动编程的对这都很熟悉了,就是一大堆的用户接口函数,包括对设备的open、close、read、write、ioctl等函数。
再看第二行代码加粗的部分.id_table = evdev_ids, id.table就是前面所说过要和input_dev的id匹配的这么一个结构体,这里让它初始化为evdev_ids,在看evdev_ids的定义:
static struct input_device_id evdev_ids[] = {
{ .driver_info = 1 }, /* Matches all devices */
{ }, /* Terminating zero entry */
};
MODULE_DEVICE_TABLE(input, evdev_ids);
这里是一个结构体数组,令数组中第一个结构体的该成员变量driver_info的值为1,其他成员变量均未定义,说明这个handler对所有device的id都能匹配得上。数组中的第二个结构体为空表示结束,用来标识结束配合下面的MODULE_DEVICE_TABLE(input, evdev_ids)使用,关于MODULE_DEVICE_TABLE宏定义介绍自行查看相关文献(我也不懂)。
接下来进入正题,input_handler的注册!
Input_handler的注册和input_dev的注册很相似,大同小异罢了,在evdev.c源码中显示定义并初始化了一个input_handler结构体并直接给相关的成员变量赋值了,就是本章开始所将的部分,然后再初始化函数中注册一个input_handler:
static int __init evdev_init(void)
{
input_register_handler(&evdev_handler);
return 0;
}
这里只调用了一个input_register_handler()函数,看起来应该是很简单的样子(相比input_dev的注册),继续跟踪进入到该函数中:
void input_register_handler(struct input_handler *handler)
{
struct input_dev *dev;
struct input_handle *handle;
struct input_device_id *id;
if (!handler) return;
INIT_LIST_HEAD(&handler->h_list);
if (handler->fops != NULL)
input_table[handler->minor >> 5] = handler;
list_add_tail(&handler->node, &input_handler_list);
list_for_each_entry(dev, &input_dev_list, node)
if (!handler->blacklist || !input_match_device(handler->blacklist, dev))
if ((id = input_match_device(handler->id_table, dev)))
if ((handle = handler->connect(handler, dev, id)))
input_link_handle(handle);
input_wakeup_procfs_readers();
}
该函数中代码加粗的部分,与input_register_device()函数里的如出一辙,这里不再做说明。
至此input_handler的注册已经结束。
第四章、input子系统数据结构
下图3是以触摸屏设备为例子的input子系统数据结构图。
|
|
|
图3 input子系统数据结构图
|
进行到这里,又多冒出来了一个struct evdev_list的结构体,这在之前并没有提到过,因为在注册input_dev和input_handler过程中并没有用到过,查看该结构体:
struct evdev_list {
struct input_event buffer[EVDEV_BUFFER_SIZE]; //存放设备数据信息
int head; //buffer的下标,标识从设备中过来要存放到buffer的数据的位置
int tail; //buffer的下标,标识用户读取buffer中数据的下标位置
struct fasync_struct *fasync;
struct evdev *evdev;
struct list_head node;
};
注意里面的input_event结构体,在/linux/input.h中有定义:
struct input_event {
struct timeval time;
__u16 type;
__u16 code;
__s32 value;
};
该input_event结构体就是存放着用户层所需的数据信息,这里想必我们都明白,则在struct evdev_list结构体中的struct input_event buffer[EVDEV_BUFFER_SIZE];就是存放着用户所需的数据信息,从硬件设备(触摸屏)获取得到的数据信息最终会存放到该数组中,而struct evdev_list结构体是在什么时候定义的呢?
当然是在被open的时候,查看open函数:
static int evdev_open(struct inode * inode, struct file * file)
{
struct evdev_list *list; //定义一个evdev_list结构体
int i = iminor(inode) - EVDEV_MINOR_BASE;
int accept_err;
if (i >= EVDEV_MINORS || !evdev_table || !evdev_table->exist)
return -ENODEV;
if ((accept_err = input_accept_process(&(evdev_table->handle), file)))
return accept_err;
if (!(list = kzalloc(sizeof(struct evdev_list), GFP_KERNEL))) //开辟evdev_list结构体内存空间
return -ENOMEM;
list->evdev = evdev_table; //令结构体中的evdev指针指向evdec_table
list_add_tail(&list->node, &evdev_table->list); //加入链表
file->private_data = list;
if (!list->evdev->open++) //如果设备没有被open,则继续if操作
if (list->evdev->exist)
input_open_device(&list->evdev->handle); //打开设备
return 0;
}
注意函数中代码加粗的部分,都有注释说明,在最后以一个操作input_open_device(&list->evdev->handle);继续跟踪进入该函数
int input_open_device(struct input_handle *handle)
{
struct input_dev *dev = handle->dev;
int err;
err = mutex_lock_interruptible(&dev->mutex);
if (err)
return err;
handle->open++; //handle的内部成员open++
if (!dev->users++ && dev->open)
err = dev->open(dev);
if (err)
handle->open--;
mutex_unlock(&dev->mutex);
return err;
}
函数中加粗的部分,为什么要让open++呢?因为数据要从device传到handler过程中有一个环节需要判断handle->open是否为真,为真表示设备已经打开数据可以传递,这点在下一章将会介绍到。
第四章、数据传递过程
正如图1所示,从硬件设备(触摸屏)中获得的数据需要经过input.c选择相应的handler进行处理,最后上报到用户空间。如何从硬件设备(触摸屏)中获得数据,那就得看xxx_ts.c中的代码了,在xxx_ts.c中的源代码是直接和硬件设备相关的。在xxx_ts.c中我们一方面要完成触摸屏设备相关的寄存器配置,另一方面要完成将获得的数据上报。
至于设备初始化配置方面,根据每个人使用的ARM芯片的Datasheet去初始化配置寄存器,这里也不需要多说了。不管是通过查询法还是中断法(我没见过用查询的),当触摸屏按下时候我们会得到触摸屏被按下的相关数据(主要是被按下的X和Y坐标值),然后需要将数据信息上报,在触摸屏被按下的时候需要上报:
input_report_key(tsdev, BTN_TOUCH, 1); //报告按键被按下事件
input_report_abs(tsdev, ABS_X, x); //报告触摸屏被按下的x坐标值
input_report_abs(tsdev, ABS_Y, y); //报告触摸屏被按下的y坐标值
input_report_abs(tsdev, ABS_PRESSURE, 1); //报告触摸屏被按下的压力值(0或者1)
input_sync(tsdev); //报告同步事件,表示一次事件结束
当触笔从触摸屏上抬起时需要上报:
input_report_key(tsdev, BTN_TOUCH, 0); //报告按键被松开事件
input_report_abs(tsdev, ABS_PRESSURE, 0); //报告触摸屏被按下的压力值(0或者1)
input_sync(tsdev); //报告同步事件,表示一次事件结束
先不管input_sync()函数,先来看input_report_key()和input_report_abs(),这两个函数在/linux/input.h中有定义:
static inline void input_report_key(struct input_dev *dev, unsigned int code, int value)
{
input_event(dev, EV_KEY, code, !!value);
}
static inline void input_report_abs(struct input_dev *dev, unsigned int code, int value)
{
input_event(dev, EV_ABS, code, value);
}
太坑爹了,这两个函数里面也就值调用了一个函数(我也不明白linux内核开发者为什么要这么做),继续跟踪查看input_event()函数,在input.c中有定义:
void input_event(struct input_dev *dev, unsigned int type, unsigned int code, int value)
{
struct input_handle *handle;
if (type > EV_MAX || !test_bit(type, dev->evbit))
return;
add_input_randomness(type, code, value);
switch (type) {
…
case EV_KEY: //判断为按键事件
if (code > KEY_MAX || !test_bit(code, dev->keybit) || !!test_bit(code, dev->key) == value)
return;
if (value == 2)
break;
change_bit(code, dev->key);
if (test_bit(EV_REP, dev->evbit) && dev->rep[REP_PERIOD] && dev->rep[REP_DELAY] && dev->timer.data && value) {
dev->repeat_key = code;
mod_timer(&dev->timer, jiffies + msecs_to_jiffies(dev->rep[REP_DELAY]));
}
case EV_ABS: //判断为绝对坐标事件
if (code > ABS_MAX || !test_bit(code, dev->absbit))
return;
if (dev->absfuzz[code]) {
if ((value > dev->abs[code] - (dev->absfuzz[code] >> 1)) &&
(value < dev->abs[code] + (dev->absfuzz[code] >> 1)))
return;
if ((value > dev->abs[code] - dev->absfuzz[code]) &&
(value < dev->abs[code] + dev->absfuzz[code]))
value = (dev->abs[code] * 3 + value) >> 2;
if ((value > dev->abs[code] - (dev->absfuzz[code] << 1)) &&
(value < dev->abs[code] + (dev->absfuzz[code] << 1)))
value = (dev->abs[code] + value) >> 1;
}
if (dev->abs[code] == value)
return;
dev->abs[code] = value;
break;
…
}
if (type != EV_SYN)
dev->sync = 0;
if (dev->grab) //判断有没有声明自定义的处理函数(初始化过程中显然没有定义)
dev->grab->handler->event(dev->grab, type, code, value);
else
list_for_each_entry(handle, &dev->h_list, d_node) //遍历handle链表
if (handle->open) //如果某节点上的处理程序被打开了
handle->handler->event(handle, type, code, value); //调用处理函数
}
先看该函数中的一个switch结构,这里只列出了EV_KEY和EV_ABS两个事件的处理,经过switch选择处理后看最后代码加粗的部分。list_for_each_entry(handle, &dev->h_list, d_node) 这句类似的前面已经介绍过,这里不再说明,接下来if (handle->open),判断处理程序是否被打开,还记得是什么时候打开的吗?前面有介绍过在evdev.c中的open函数里面调用了input_open_device(&list->evdev->handle),而在input_open_device()中有这么一句handle->open++;没有错,只有在经过evdev_open之后才能这里的条件才能为真,接着看下面的handle->handler->event(handle, type, code, value);继续深入跟踪:
static void evdev_event(struct input_handle *handle, unsigned int type, unsigned int code, int value)
{
struct evdev *evdev = handle->private;
struct evdev_list *list;
if (evdev->grab) { //显然grab并没有被设置,该条件为假
list = evdev->grab;
do_gettimeofday(&list->buffer[list->head].time);
list->buffer[list->head].type = type;
list->buffer[list->head].code = code;
list->buffer[list->head].value = value;
list->head = (list->head + 1) & (EVDEV_BUFFER_SIZE - 1);
kill_fasync(&list->fasync, SIGIO, POLL_IN);
} else
list_for_each_entry(list, &evdev->list, node) {
do_gettimeofday(&list->buffer[list->head].time); //给buffer成员赋值
list->buffer[list->head].type = type;
list->buffer[list->head].code = code;
list->buffer[list->head].value = value;
list->head = (list->head + 1) & (EVDEV_BUFFER_SIZE - 1);
kill_fasync(&list->fasync, SIGIO, POLL_IN);
}
wake_up_interruptible(&evdev->wait); //用来唤醒一个等待队列(我也不懂)
}
先看前面的struct evdev *evdev = handle->private,还记得handler->private吗,在input_handle结构体中它是一个空指针,在前面有讲到在执行static struct input_handle *evdev_connect(struct input_handler *handler, struct input_dev *dev, struct input_device_id *id)函数的时候就被赋值了(evdev->handle.private = evdev;)。
再看最后代码加粗的部分,显然是给evdev_list结构体中的buffer成员赋上从设备中传过来的数据,当数据存放好了之后,head加1,当head的值达到EVDEV_BUFFER_SIZE时又回到0;
至此数据的传递就算是结束了,接下来就是等着被读走,只要在用户空间进行read操作即可。
第五章、数据读取过程
读取就变得很简单了,做过linux编程的都能知道,只要在应用中定义了个input_event结构体,通过open打开设备,然后进行read即可,再来看该设备的read函数:
static ssize_t evdev_read(struct file * file, char __user * buffer, size_t count, loff_t *ppos)
{
struct evdev_list *list = file->private_data;
int retval;
if (count < evdev_event_size())//每次读取的字节数至少是input_event的大小
return -EINVAL;
if (list->head == list->tail && list->evdev->exist && (file->f_flags & O_NONBLOCK)) //是否满足读取条件
return -EAGAIN;
retval = wait_event_interruptible(list->evdev->wait,
list->head != list->tail || (!list->evdev->exist)); //等待唤醒,和前面说的等待队列对应(我也不懂)
if (retval)
return retval;
if (!list->evdev->exist)
return -ENODEV;
while (list->head != list->tail && retval + evdev_event_size() <= count) {
struct input_event *event = (struct input_event *) list->buffer + list->tail;
if (evdev_event_to_user(buffer + retval, event)) //复制数据到用户空间
return -EFAULT;
list->tail = (list->tail + 1) & (EVDEV_BUFFER_SIZE - 1);
retval += evdev_event_size();
}
return retval;
}
函数前面基本上都是在做一系列的条件判断,判断是否符合读取的条件,evdev_event_to_user(buffer + retval, event)这句是真正的把数据复制到用户空间,进入查看:
static int evdev_event_to_user(char __user *buffer, const struct input_event *event)
{
if (copy_to_user(buffer, event, sizeof(struct input_event)))
return -EFAULT;
return 0;
}
该函里面也只是调用了copy_to_user()函数而已,该函数相比我们都不会陌生了,就是把event所指向地址空间的数据复制到buffer所指向的地址空间中而已。
再回到read函数中来,函数在末尾返回读取到的字节数,至于要把这些数据拿去干什么用,那就是应用层的事情了。
可以看到接口函数中除了read以外还有write、ioctl等函数,因为对于触摸屏来说我们主要就是要获取触笔在触摸屏上点击的坐标位置而已,所以write、ioctl等函数会很少用到,这里就不再做介绍。
注:本文只在一定的层面(本人的理解)上对linux下的input子系统的介绍,里边还有很多要点没有办法去涉及,只是一个入门级的学习过程,紧限于在在完善的input子系统下进行做驱动修改,而不具备做驱动开发的能力。
ARM Linux内核Input输入子系统浅解相关推荐
- linux内核input子系统解析,ARM Linux内核Input输入子系统浅解
struct list_head node; //该链表头用于将设备链接到input_dev_list }; Input_dev是一个很强大的结构体,它把所有的input设备(触摸 ...
- Linux输入事件类型EV_SW,Linux的input输入子系统:总体框架
一.input输入子系统总体框架 Linux输入子系统将输入驱动抽象为三层:设备驱动层.核心层.事件处理层. 设备驱动层:将底层的硬件输入事件转化为统一事件形式,向输入核心(Input Core)汇报 ...
- Linux的input输入子系统:设备驱动之按键驱动
环境:kernel-2.6.30.4,arm-linux-gcc-4.3.3,目标板TQ2440 一.设备层驱动程序: #include <linux/module.h> #include ...
- linux内核的I2C子系统详解1——I2C总线概览、驱动框架概览
以下内容源于朱有鹏<物联网大讲堂>课程的学习,如有侵权,请告知删除. 1.I2C总线汇总概览 (1)三根通信线:SCL.SDA.GND: (2)同步.串行.电平.低速(几百k).近距离: ...
- linux内核的I2C子系统详解2——关键结构体、关键文件
以下内容源于朱有鹏<物联网大讲堂>课程的学习,如有侵权,请告知删除. 3.I2C子系统的4个关键结构体 (1)struct i2c_adapter :I2C适配器 用来描述I2C控制器的, ...
- linux内核的I2C子系统详解5——i2c_driver的注册、i2c_client的来源
以下内容源于朱有鹏<物联网大讲堂>课程的学习,如有侵权,请告知删除. 11.i2c_driver的注册 (1)以gslX680的驱动为例 (2)将驱动添加到内核SI项目中 (3)i2c_d ...
- linux内核的I2C子系统详解4——i2c-s3c2410.c文件中的adapter、algorithm
以下内容源于朱有鹏<物联网大讲堂>课程的学习,如有侵权,请告知删除. 主要分析i2c-s3c2410.c文件. 8.adapter模块的注册 (1)平台总线方式注册 因为I2C控制器属于内 ...
- linux内核的I2C子系统详解3——i2c-core.c初步分析、I2C总线的匹配机制
以下内容源于朱有鹏<物联网大讲堂>课程的学习,如有侵权,请告知删除. 5.i2c-core.c初步分析 (1)smbus代码略过:smbus是基于I2C总线发展出来的. (2)模块加载和卸 ...
- linux input输入子系统分析《三》:S3C2440的触摸屏驱动实例
1.1 本节阅读前提 本节的说明建立在前两节的基础之上,需要先阅读如下两篇章: linux input输入子系统分析<一>:初识input输入子系统 linux input输入子系统 ...
最新文章
- android原生跳转到外网
- Python网络爬虫与信息提取(一)(入门篇)
- Yii框架特点及测试考虑
- 小马哥的 Java 项目实战学习笔记
- ITK:创建高斯导数内核
- 动态规划—最小路径和
- Servlet和JSP之间的区别
- 怎么用class覆盖style样式
- PSPad 免费文本编辑器推荐
- 分类问题的评价及matrix , precision, recall
- Android自动化测试在多种屏幕下的注意事项
- python opencv 摄像头截图_python opencv捕获摄像头并显示内容
- 运筹说 第4期|掌握运筹学软件,走遍天下都不怕
- springboot配置错误页面
- 怎么有效提高淘宝店铺的转化率方法步骤
- 38、nginx的upstream目前支持的5种方式的分配
- 嵌入式学习代码总结(二)
- 加密就像玩魔方----图文详解对称加密(DES、AES)
- [DP]hdu5234
- flyingsaucer转换多个html,Flying Saucer实现html转pdf(一些有关问题,持续更新)
热门文章
- php mescroll,mescroll下拉刷新和上拉加载js框架
- 030_自己实现一个HashSet
- php写一个轻量级的容器,PHP写的一个轻量级的DI容器类
- Visual Studio 2013软件安装教程
- vc2010中开始执行不调试灰的_反编译动态调试smali全过程
- matlab安装_走进数模(三)MATLAB安装
- python 模型交叉验证法_python – 交叉验证和模型选择
- l298n电机哪一端为正_L298N控制直流电机正反转_张天鹏
- php3d按钮,CSS实现3D按钮效果
- androidstudio返回之前界面_charles 如何修改服务器返回内容 - Breakpoints