点云配准(PCL+ICP)
点云配准
1 点云概述
定义:点云是某个坐标系下的点的数据集。点包含了丰富的信息,包括三维坐标X,Y,Z、颜色、分类值、强度值、时间等等。
来源:
- 三维激光扫描仪采集,RGB-D相机采集
- 二维影像三维重建
- 三维模型计算生成
作用:三维重建,…
2 点云配准
点云配准旨在将多个点云正确配准到同一个坐标系下,形成更完整的点云。点云配准要应对点云非结构化、不均匀和噪声等干扰,要以更短的时间消耗达到更高的精度,时间消耗和精度往往是矛盾的,但在一定程度上优化是有可能的。点云配准广泛应用于3维重建、参数评估、定位和姿态估计等领域,在自动驾驶、机器人和增强现实等新兴应用上也有点云配准技术的参与。现有方法归纳为非学习方法和基于学习的方法进行分析。非学习方法分为经典方法和基于特征的方法;基于学习的方法分为结合了非学习方法的部分学习方法和直接的端到端学习方法[1]。
点云配准可分为两步,先粗后精:
- 粗配准(Coarse Global Registeration):基于局部几何特征
- 精配准(Fine Local Registeration):需要初始位姿(initial alignment)
相关算法:
- ICP(iterative closest point)是一种最经典的点云配准算法(Besl和Mckay,1992),通过迭代对应点搜寻和最小化点对整体距离以估计变换矩阵。因为是非凸的,所以容易陷入局部极小值。当点云配准需要较大的旋转平移时,ICP往往无法得到正确的结果。
- NDT(normal distributions transform)是另一种经典的精配准方法,通过最大化源点在目标点体素化后计算出的正态分布的概率密度上的得分进行配准。
ICP和NDT都属于非学习的配准方法,随着深度学习技术和计算能力的提高,逐步出现了基于学习的点云配准方法,其具有速度上的优势,特别是在粗配准方面有很大优势。
[1]李建微,占家旺.三维点云配准方法研究进展[J].中国图象图形学报,2022,27(02):349-367.
ICP(Iterative Closest Point,迭代最近邻点)
point-to-point ICP
算法流程:
- 得到源点云与目标点云之间的对应关系;
- 通过最小二乘法构建目标函数,迭代最小化点对整体距离。最终得到变换矩阵。
优缺点:
精度高,无需提取特征点;
使用前需完成粗配准,否则易陷入局部最优;
只适用于刚性配准;
刚性配准主要解决的是简单的图像整体移动(如平移、旋转等)问题;非刚性配准主要解决的是图像的柔性变换问题,它容许变换过程中任意两个像素点之间对应位置关系发生变动。
不适用于部分重叠点云的配准。
算法原理
假设点云{Q}\{Q\}{Q}为目标点云(参考点云),{P}\{P\}{P}为源点云(待配准的点云), pi(i∈1,2,...N)p_i(i\in1,2,...N)pi(i∈1,2,...N)是{P}\{P\}{P}中的一个点,qiq_iqi是{Q}\{Q\}{Q}中与pip_ipi距离最近的点,组成点对(qi,pi)(q_i,p_i)(qi,pi)
我们需要计算从{P}\{P\}{P}到{Q}\{Q\}{Q}的RTRTRT变换矩阵,即旋转矩阵RRR和平移矩阵TTT。如果变换参数是准确的,那么点云{P}\{P\}{P}中的每一个点pip_ipi,经过变换后应该与点云{Q}\{Q\}{Q}中的点qiq_iqi完全重合,定义误差函数如下:
![]()
[外链图片转存失败,源站可能有防盗链机制,建议将图片保存下来直接上传(img-pcgTLv8u-1658737706113)(http://zhihu.com/equation?tex=||\textbf{x}||2+%3D\sqrt{\sum{i%3D1}Nx_i2})]
Euclid范数(欧几里得范数,常用计算向量长度),即向量元素绝对值的平方和再开方。
其中n为两点云之间的点对个数,pip_ipi为源点云中的一点,qiq_iqi为目标点云中与pip_ipi对应的最近邻点,R、t分别为旋转矩阵和平移矩阵。
因此,ICP问题可以描述为,寻找使得E(R,t)E(R,t)E(R,t)最小时的R和t的值。
ICP的求解分为两种方式:利用线性代数进行求解(SVD),利用非线性优化进行求解。
SVD求解流程
计算两组匹配点的质心:
[外链图片转存失败,源站可能有防盗链机制,建议将图片保存下来直接上传(img-AZrlDHel-1658737706115)(https://s2.loli.net/2022/07/25/sIuxCtpgeXMS7Bv.png)]
得到去质心的点集:
xi:=pi−p‾,yi:=qi−q‾,i=1,2...n\mathbf{x}_i := \mathbf{p}_{i} -\overline{\mathbf{p}}, \mathbf{y}_i := \mathbf{q}_{i} -\overline{\mathbf{q}}, i = 1,2...n xi:=pi−p,yi:=qi−q,i=1,2...n计算3x3矩阵 H:
H=XYTH=XY^T H=XYTX和Y分别为去质心的源点云和目标点云矩阵,大小均为3xn。
对H进行SVD分解H=UΣVTH = U\Sigma V^TH=UΣVT,得到最优旋转矩阵:
R∗=VUTR^*=VU^T R∗=VUT关于SVD分解的细节参考:奇异值分解(SVD) - 知乎 (zhihu.com)
计算最优平移向量:
t=q‾−Rp‾\mathbf{t} = \overline{\mathbf{q}} - R\overline{\mathbf{p}} t=q−Rp
ICP的优缺点及改进
![]()
上图原文链接:三维点云配准 – ICP 算法原理及推导 - 知乎 (zhihu.com)
PCL库中ICP接口使用
参考文章链接:PCL|ICP|Interactive Iterative Closest Point|代码实践 - 知乎 (zhihu.com)
PCL 库中 ICP 的接口及其变种:
- 点到点:pcl::IterativeClosestPoint< PointSource, PointTarget, Scalar >
- 点到面:pcl::IterativeClosestPointWithNormals< PointSource, PointTarget, Scalar >
- 面到面:pcl::GeneralizedIterativeClosestPoint< PointSource, PointTarget >
其中,IterativeClosestPoint 模板类是 ICP 算法的一个基本实现,其优化求解方法基于 Singular Value Decomposition (SVD),算法迭代结束条件包括:
- 最大迭代次数:Number of iterations has reached the maximum user imposed number of iterations (via setMaximumIterations)
- 两次变换矩阵之间的差值:The epsilon (difference) between the previous transformation and the current estimated transformation is smaller than an user imposed value (via setTransformationEpsilon)
- 均方误差:The sum of Euclidean squared errors is smaller than a user defined threshold (via setEuclideanFitnessEpsilon)
基本用法:
IterativeClosestPoint<PointXYZ, PointXYZ> icp;// Set the input source and target
icp.setInputCloud (cloud_source);
icp.setInputTarget (cloud_target);// Set the max correspondence distance to 5cm (e.g., correspondences with higher distances will be ignored)
icp.setMaxCorrespondenceDistance (0.05);
// Set the maximum number of iterations (criterion 1)
icp.setMaximumIterations (50);
// Set the transformation epsilon (criterion 2)
icp.setTransformationEpsilon (1e-8);
// Set the euclidean distance difference epsilon (criterion 3)
icp.setEuclideanFitnessEpsilon (1);// Perform the alignment
icp.align (cloud_source_registered);
// Obtain the transformation that aligned cloud_source to cloud_source_registered
Eigen::Matrix4f transformation = icp.getFinalTransformation ();
官方demo:
#include <iostream>
#include <string>
#include <pcl/io/ply_io.h>
#include <pcl/point_types.h>
#include <pcl/registration/icp.h>
#include <pcl/visualization/pcl_visualizer.h>
#include <pcl/console/time.h>   // TicToc/*** The bool will help us know when the user asks for the next iteration of ICP*/
bool next_iteration = false;/*** This function takes the reference of a 4x4 matrix and prints the rigid transformation (刚体变换)in an human readable (可读的) way.* %6.3f 是指:要输出的浮点数总位数(包括小数点)大于6位的话,按全宽输出,小于 6 位时,小数点后输出3位小数,右对齐,左边不足的位用空格填充*/
void print4x4Matrix(const Eigen::Matrix4d &matrix) {printf("Rotation matrix :\n");printf("    | %6.3f %6.3f %6.3f | \n", matrix(0, 0), matrix(0, 1), matrix(0, 2));printf("R = | %6.3f %6.3f %6.3f | \n", matrix(1, 0), matrix(1, 1), matrix(1, 2));printf("    | %6.3f %6.3f %6.3f | \n", matrix(2, 0), matrix(2, 1), matrix(2, 2));printf("Translation vector :\n");printf("t = < %6.3f, %6.3f, %6.3f >\n\n", matrix(0, 3), matrix(1, 3), matrix(2, 3));
}/*** This function is the callback for the viewer.* This function will be called whenever a key is pressed when the viewer window is on top.* If “space” is hit; set the bool(next_iteration) to true.*/
void keyboardEventOccurred(const pcl::visualization::KeyboardEvent &event, void *) {if (event.getKeySym() == "space" && event.keyDown())next_iteration = true;
}int main(int argc, char *argv[]) {// The point clouds we will be using. The 3 point clouds we will use to store the data.pcl::PointCloud<pcl::PointXYZ>::Ptr cloud_in(new pcl::PointCloud<pcl::PointXYZ>);  // Original point cloudpcl::PointCloud<pcl::PointXYZ>::Ptr cloud_tr(new pcl::PointCloud<pcl::PointXYZ>);  // Transformed point cloudpcl::PointCloud<pcl::PointXYZ>::Ptr cloud_icp(new pcl::PointCloud<pcl::PointXYZ>);  // ICP output point cloud// Checking program argumentsif (argc < 2) {printf("Usage : ");printf("%s file.ply number_of_ICP_iterations\n", argv[0]);PCL_ERROR ("Provide one ply file.\n");return (-1);}int iterations = 1;  // Default number of ICP iterationsif (argc > 2) {// If the user passed the number of iteration as an argumentiterations = atoi(argv[2]);if (iterations < 1) {PCL_ERROR ("Number of initial iterations must be >= 1\n");return (-1);}}pcl::console::TicToc time;time.tic();if (pcl::io::loadPLYFile(argv[1], *cloud_in) < 0) {PCL_ERROR ("Error loading cloud %s.\n", argv[1]);return (-1);}std::cout << "\nLoaded file " << argv[1] << " (" << cloud_in->size() << " points) in " << time.toc() << " ms\n" << std::endl;// Defining a rotation matrix and translation vector.// We check the arguments of the program, set the number of initial ICP iterations and try to load the PLY file.Eigen::Matrix4d transformation_matrix = Eigen::Matrix4d::Identity();// A rotation matrix (see https://en.wikipedia.org/wiki/Rotation_matrix)double theta = M_PI / 8;  // The angle of rotation in radianstransformation_matrix(0, 0) = std::cos(theta);transformation_matrix(0, 1) = -sin(theta);transformation_matrix(1, 0) = sin(theta);transformation_matrix(1, 1) = std::cos(theta);// A translation on Z axis (0.4 meters) Z 方向平移 0.4 米transformation_matrix(2, 3) = 0.4;// Display in terminal the transformation matrixstd::cout << "Applying this rigid transformation to: cloud_in -> cloud_icp" << std::endl;print4x4Matrix(transformation_matrix);cout << "transformation_matrix\n" << transformation_matrix << endl;// Executing the transformationpcl::transformPointCloud(*cloud_in, *cloud_icp, transformation_matrix);// We backup cloud_icp into cloud_tr for later use*cloud_tr = *cloud_icp;/*** The Icp(Iterative Closest Point algorithm)* We transform the original point cloud using a rigid matrix transformation.* cloud_in contains the original point cloud.* cloud_tr and cloud_icp contains the translated/rotated point cloud.* cloud_tr is a backup we will use for display (green point cloud).* This is the creation of the ICP object. We set the parameters of the ICP algorithm.* setMaximumIterations(iterations) sets the number of initial iterations to do (1 is the default value).* We then transform the point cloud into cloud_icp.* After the first alignment we set ICP max iterations to 1 for all the next times this ICP object will be used (when the user presses “space”).*/time.tic();pcl::IterativeClosestPoint<pcl::PointXYZ, pcl::PointXYZ> icp;icp.setMaximumIterations(iterations);icp.setInputSource(cloud_icp);icp.setInputTarget(cloud_in);// 输出配准后点云icp.align(*cloud_icp);// We set this variable to 1 for the next time we will call .align () functionicp.setMaximumIterations(1);std::cout << "Applied " << iterations << " ICP iteration(s) in " << time.toc() << " ms" << std::endl;/*** Check if the ICP algorithm converged(收敛 ); otherwise exit the program.* In case of success we store the transformation matrix in a 4x4 matrix and then print the rigid matrix transformation.* The reason why we store this matrix is explained later.*/if (icp.hasConverged()) {std::cout << "\nICP has converged, score is " << icp.getFitnessScore() << std::endl;std::cout << "\nICP transformation " << iterations << " : cloud_icp -> cloud_in" << std::endl;transformation_matrix = icp.getFinalTransformation().cast<double>();print4x4Matrix(transformation_matrix);cout << "transformation_matrix\n" << transformation_matrix << endl;} else {PCL_ERROR ("\nICP has not converged.\n");return (-1);}/*** For the visualization we create two viewports in the visualizer vertically separated(垂直分离的可视化器 ).* bckgr_gray_level and txt_gray_lvl are variables to easily switch* from white background & black text/point cloud to black background & white text/point cloud.*/pcl::visualization::PCLVisualizer viewer("ICP demo");// Create two vertically separated viewportsint v1(0);int v2(1);// 零点在左下角,x轴向右,y轴向上。viewer.createViewPort(0.0, 0.0, 0.5, 1.0, v1);viewer.createViewPort(0.5, 0.0, 1.0, 1.0, v2);// The color we will be using -> 背景颜色float bckgr_gray_level = 0.0;  // Blackfloat txt_gray_lvl = 1.0 - bckgr_gray_level;/*** We add the original point cloud in the 2 viewports and display it the same color as txt_gray_lvl.* We add the point cloud we transformed using the matrix in the left viewport in green and the point cloud aligned with ICP in red (right viewport).*/// Original point cloud is white -> 原始点云是白色的,旋转45°的绿色的,红色的是icp每一步运行运行的结果。// 这里的txt_gray_lvl,是上面定义的显示界面的文字的颜色,这个颜色和背景颜色相加的和是“1“pcl::visualization::PointCloudColorHandlerCustom<pcl::PointXYZ> cloud_in_color_h(cloud_in,(int) 255 * txt_gray_lvl,(int) 255 * txt_gray_lvl,(int) 255 * txt_gray_lvl);viewer.addPointCloud(cloud_in, cloud_in_color_h, "cloud_in_v1", v1);viewer.addPointCloud(cloud_in, cloud_in_color_h, "cloud_in_v2", v2);// Transformed point cloud is greenpcl::visualization::PointCloudColorHandlerCustom<pcl::PointXYZ> cloud_tr_color_h(cloud_tr, 20, 180, 20);viewer.addPointCloud(cloud_tr, cloud_tr_color_h, "cloud_tr_v1", v1);// ICP aligned point cloud is redpcl::visualization::PointCloudColorHandlerCustom<pcl::PointXYZ> cloud_icp_color_h(cloud_icp, 180, 20, 20);viewer.addPointCloud(cloud_icp, cloud_icp_color_h, "cloud_icp_v2", v2);/*** Adding text descriptions in each viewport* We add descriptions for the point clouds in each viewport so the user knows what is what.* The string stream ss is needed to transform the integer iterations into a string.*/viewer.addText("White: Original point cloud\nGreen: Matrix transformed point cloud", 10, 15, 16, txt_gray_lvl,txt_gray_lvl, txt_gray_lvl, "icp_info_1", v1);viewer.addText("White: Original point cloud\nRed: ICP aligned point cloud", 10, 15, 16, txt_gray_lvl, txt_gray_lvl,txt_gray_lvl, "icp_info_2", v2);std::stringstream ss;ss << iterations;std::string iterations_cnt = "ICP iterations = " + ss.str();viewer.addText(iterations_cnt, 10, 60, 16, txt_gray_lvl, txt_gray_lvl, txt_gray_lvl, "iterations_cnt", v2);/*** We set the two viewports background color according to bckgr_gray_level.* To get the camera parameters I simply pressed “C” in the viewer.* Then I copied the parameters into this function to save the camera position / orientation / focal point.* The function registerKeyboardCallback allows us to call a function whenever the users pressed a keyboard key when viewer windows is on top.*/// Set background colorviewer.setBackgroundColor(bckgr_gray_level, bckgr_gray_level, bckgr_gray_level, v1);viewer.setBackgroundColor(bckgr_gray_level, bckgr_gray_level, bckgr_gray_level, v2);// Set camera position and orientationviewer.setCameraPosition(-3.68332, 2.94092, 5.71266, 0.289847, 0.921947, -0.256907, 0);viewer.setSize(1280, 1024);  // Visualiser window size// Register keyboard callback :viewer.registerKeyboardCallback(&keyboardEventOccurred, (void *) NULL);// Display the visualiser// This is the normal behaviour if no key is pressed. The viewer waits to exit.while (!viewer.wasStopped()) {viewer.spinOnce();/*** If the user press any key of the keyboard, the function keyboardEventOccurred is called;* this function checks if the key is “space” or not. If yes the global bool next_iteration is set to true,* allowing the viewer loop to enter the next part of the code: the ICP object is called to align the meshes.* Remember we already configured this object input/output clouds and we set max iterations to 1 in lines 90-93.** As before we check if ICP as converged, if not we exit the program. printf(“033[11A”);* is a little trick to go up 11 lines in the terminal to write over the last matrix displayed.* In short it allows to replace text instead of writing new lines; making the output more readable.* We increment iterations to update the text value in the visualizer.* Now we want to display the rigid transformation from the original transformed point cloud to the current alignment made by ICP.* The function getFinalTransformation() returns the rigid matrix transformation done during the iterations (here: 1 iteration).* This means that if you have already done 10 iterations this function returns the matrix to transform the point cloud from the iteration 10 to 11.* This is not what we want.* If we multiply the last matrix with the new one the result is the transformation matrix from the start to the current iteration.* This is basically how it works** While this is mathematically true, you will easily notice that this is not true in this program due to roundings.* This is why I introduced the initial ICP iteration parameters.* Try to launch the program with 20 initial iterations and save the matrix in a text file.* Launch the same program with 1 initial iteration and press space till you go to 20 iterations.* You will a notice a slight difference.* The matrix with 20 initial iterations is much more accurate than the one multiplied 19 times.*/// The user pressed "space" :if (next_iteration) {// The Iterative Closest Point algorithmtime.tic();icp.align(*cloud_icp);std::cout << "Applied 1 ICP iteration in " << time.toc() << " ms" << std::endl;if (icp.hasConverged()) {printf("\033[11A");  // Go up 11 lines in terminal output.printf("\nICP has converged, score is %+.0e\n", icp.getFitnessScore());std::cout << "\nICP transformation " << ++iterations << " : cloud_icp -> cloud_in" << std::endl;transformation_matrix *= icp.getFinalTransformation().cast<double>();  // WARNING /!\ This is not accurate! For "educational" purpose only!print4x4Matrix(transformation_matrix);  // Print the transformation between original pose and current posess.str("");ss << iterations;std::string iterations_cnt = "ICP iterations = " + ss.str();viewer.updateText(iterations_cnt, 10, 60, 16, txt_gray_lvl, txt_gray_lvl, txt_gray_lvl,"iterations_cnt");viewer.updatePointCloud(cloud_icp, cloud_icp_color_h, "cloud_icp_v2");} else {PCL_ERROR ("\nICP has not converged.\n");return (-1);}}// We set the bool to false and the rest is the ending of the program.next_iteration = false;}return (0);
}
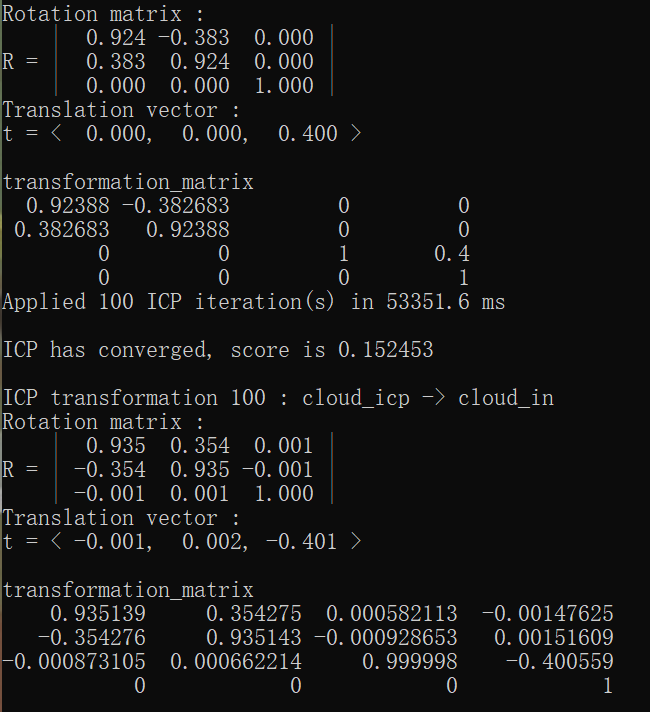
使用teapot.ply(41472 points)迭代100次结果:
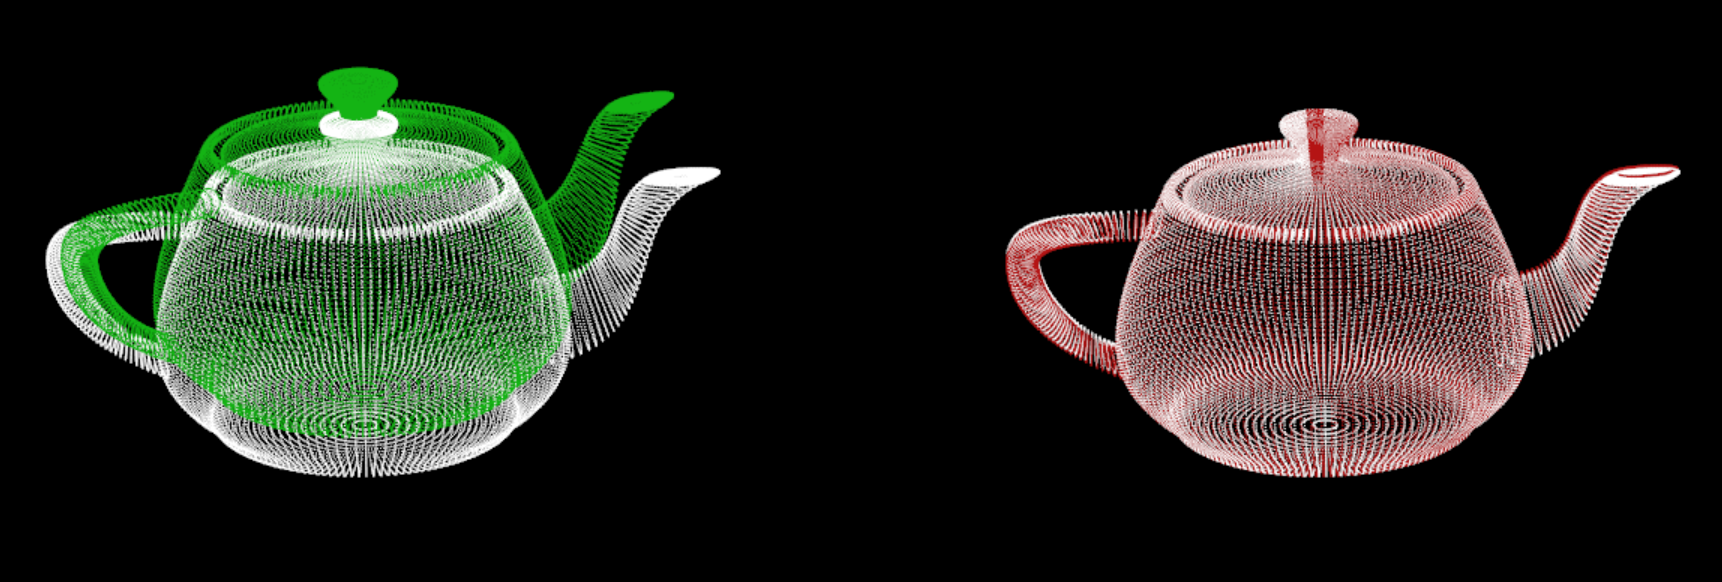
图中白色点云为目标点云,绿色为配准前源点云,红色为配准后点云。
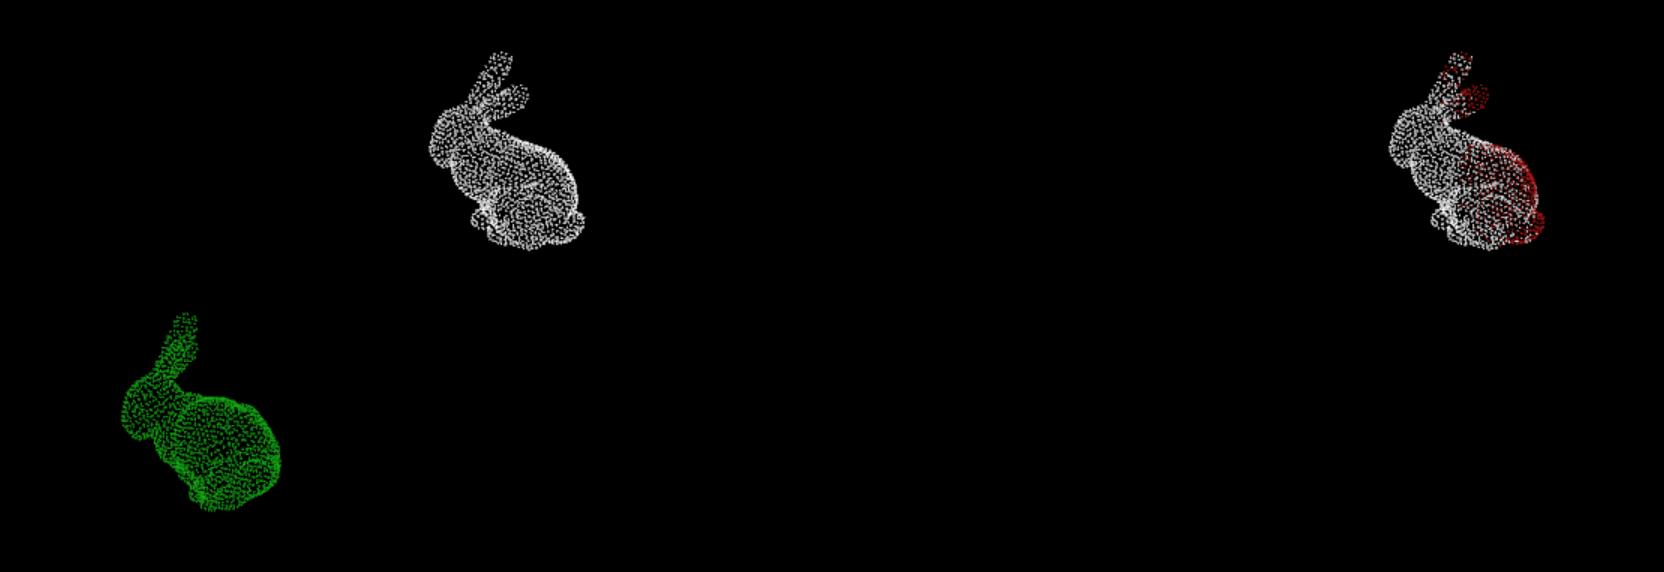
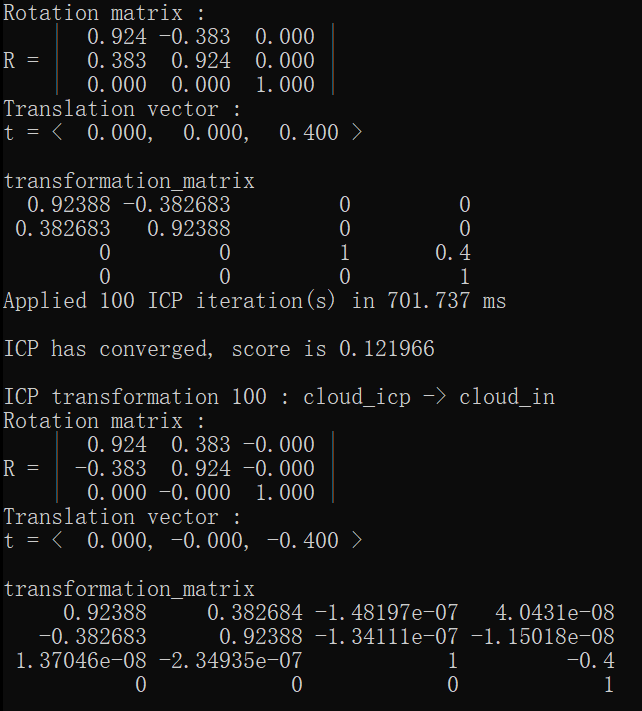
使用bunny.ply(1889 points)迭代100次结果:
点云配准(PCL+ICP)相关推荐
- 点云配准NDT+ICP
点云配准NDT+ICP #include <iostream> #include <pcl/io/pcd_io.h> #include <pcl/point_types. ...
- 点云配准之icp的简单实现
C++实现经典的点云配准算法--ICP,根据高博视觉14讲的推导(具体过程看书,还是很好理解的),ICP的计算过程如下所示: 具体的C++代码实现如下: void pose_estimation_3d ...
- PCL点云配准(ICP)
/*********************************** 点云配准 *****************************************/ #include <pc ...
- 点云配准算法ICP及其各种变体
点击上方"3D视觉工坊",选择"星标" 干货第一时间送达 作者丨流川峰 来源丨深蓝AI 介绍 点云配准(Point Cloud Registration)算法指 ...
- 干货 | 三维点云配准:ICP 算法原理及推导
编者荐语 点云配准可以分为粗配准(Coarse Registration)和精配准(Fine Registration)两步.粗配准指的是在两幅点云之间的变换完全未知的情况下进行较为粗糙的配准,目的主 ...
- 点云配准(二)— python open3d ICP方法
上一节中介绍了点云配准的基础知识.本节将采用python open3d来进行点云配准. open3d安装和点云配准介绍,请参考: Open3d读写ply点云文件_Coding的叶子的博客-CSDN博客 ...
- 简述3D点云配准算法
蝶恋花·槛菊愁烟兰泣露 槛菊愁烟兰泣露,罗幕轻寒,燕子双飞去. 明月不谙离恨苦,斜光到晓穿朱户. 昨夜西风凋碧树,独上高楼,望尽天涯路. 欲寄彩笺兼尺素.山长水阔知何处? --晏殊 导读: 3D点 ...
- GICP:基于体素泛化ICP方式的准确快速点云配准方法
点击上方"3D视觉工坊",选择"星标" 干货第一时间送达 标题: Voxelized GICP for Fast and Accurate 3D Point C ...
- 一分钟详解点云配准ICP方法
点击上方"3D视觉工坊",选择"星标" 干货第一时间送达 作者:丁洪凯 链接:https://zhuanlan.zhihu.com/p/107218828 本文 ...
- python 点云配准_点云配准(Registration)算法——以PCL为例
本文为PCL官方教程的Registration模块的中文简介版. An Overview of Pairwise Registration 点云配准包括以下步骤: from a set of poin ...
最新文章
- 使用JDBC进行MySQL 5.1的数据连接、查询、修改等操作练习。
- attention的query、key和value的理解
- 【机器学习】朴素贝叶斯代码练习
- MFC项目实战(1)文件管理器--准备篇
- 作者:熊赟,博士,复旦大学计算机科学技术学院副教授。
- 环境搭建:Windows系统下Nacos集群搭建
- 04-----赋值运算符
- abb变频器dp适配器说明书_ABB变频器使用说明书
- 企业微信怎么填写服务器,勤哲Excel服务器软件做企业微信管理系统
- python中ttk和tkinter_Python Tkinter ttk组件及用法(附带实例)
- 大型超市计算机管理系统论文,大型超市进销存管理系统的设计与实现
- quic client的数据发送流程
- idea重置插件的使用
- flex effect
- re:从零开始的Qt世界冒险生活
- 中国大学慕课公开课-《视听语言》-学习笔记-4
- 网上人才招聘系统(php+mysql)
- JS / JQ 学习记录
- 中国车用尿素市场规模调研与发展趋势分析报告2022-2028年
- 大一学生《Web编程基础》期末网页制作 HTML+CSS+JavaScript 企业网页设计实例