vim-snipmate编写snippet的语法
vim-snipmate真的很好用,以前好多编写代码的问题得到完美的解决。还附带提升我对vim的理解和信心,在这里感谢一下作者。thank you。
1、现说一下我浓缩的重要语法。
1、定义是下面这样,注意中间必须是一个制表符<TAB>不能用空格代替。
snippet<TAB>关键字代码片段2、变量。${#},#代表变量数值,从1开始。还可以添加默认值。例如:${1:true},${2:/*condition*/},${3},${4:data},${5}等等。每按一次<TAB>键,光标会跳想下一个变量,如果没有变量了,则调到括号外。${0}有特殊意义,代表最后一跳的意思,${0}之后<TAB>键恢复正常。
3、${0}的难点。for(${1:true}){ ${2}}和for(${1:true}){${0}}的区别,表达是1的变量${2}内不可按<TAB>键,否则会直接跳转的大括号外面。而表达式2可以按<TAB>键,因为,${0}代表最后一跳,所以在按<TAB>就可以进行其他的snippet了,而表达1里第一个snippet还没有执行完,这是按<TAB>就会跳到大括号外面。
4、设置代码片段要综合考虑所有情况,并结合实践应用。例如: printf("${1:%s}"${2}); ,如果我只是打印一个字符串,那么在输入完${1:%s}后,我按 <ESC>o ,如果需要输入变量,那么我在按<TAB>跳转到下一个变量${2},这样就可以一举两得了。
5、镜像,或者叫变量的引用。例如: printf("${1:test}=%d",$1); ,后面的$1会根据前面的${1:test}自动输入。
2、vim-snippet的主要语法是根据textmate来的,所以,snippet没找到,textmate的找到就可以喽,呵呵。
Snippets
A snippet is a piece of text that you would like to insert in your document. It can include code to run at insertion time, variables (like selected text), tab stops/placeholders for missing information (which you can tab through after insertion) and perform transformations on the data which you enter in the placeholders.
7.1 Plain Text
In the simplest case, you can use snippets to insert text that you do not want to type again and again, either because you type it a lot, or because the actual text to insert is hard to remember (like your bank account details or the HTML entities for the Apple modifier keys).
If you use snippets to insert plain text there is only one thing you should be aware of: $ and ` are reserved characters. So if you want to insert one of these, prefix it with an escape (i.e. \$). An escape not followed by one of these two characters (or followed by another escape) will be inserted as a literal character.
7.2 Variables
You can insert the value of a variable by prefixing the name of the variable with $. All the normal dynamic variables are supported, the most useful probably being TM_SELECTED_TEXT. If for example we want to create a snippet which wraps the selection in a LaTeX \textbf command, we can make a snippet which is:
\textbf{$TM_SELECTED_TEXT}
If no text is selected the variable will not be set, so nothing will be inserted in its place. We can provide a default value by using this syntax: ${«variable»:«default value»}. For example:
\textbf{${TM_SELECTED_TEXT:no text was selected}}
The default value can itself contain variables or shell code. If you want the default text to contain a }, you need to escape it. But all other characters are used verbatim.
Variables also support regular expression replacements using this syntax: ${«variable»/«regexp»/«format»/«options»}. If the variable is not set the replacement will be performed on the empty string. For example, to prepend a bullet to each non-empty line in the selection (and insert that) we can do:
${TM_SELECTED_TEXT/^.+$/• $0/g}
7.3 Interpolated Shell Code
You can use backticks to have shell code executed when the snippet is inserted. The result from running the code gets inserted into the snippet, though with the last newline in the result removed (if present). So for example to create a snippet that wraps the selection in an HTML link, where the URL of that link comes from the clipboard, we can do:
<a href="`pbpaste`.html">$TM_SELECTED_TEXT</a>
Since this is normal bash code, we can write a small program. For example we can let it verify that the clipboard contains only a single line of text like this:
<a href="`if [[ $(pbpaste|wc -l) -eq 0 ]]then pbpasteelse echo http://example.com/fi
`">$TM_SELECTED_TEXT</a>
Inside shell code, the only character you need to escape is the backtick.
7.4 Tab Stops
After insertion, the caret will be placed after the last character of the snippet. This is not always desirable and we can change that by using $0 to mark where we want the caret to be. So if for example we make an HTML div-snippet and want the caret to end between the opening and closing tags, we could make it like this:
<div>$0
</div>
Often though we want to fill in text in several places in the snippet. Multiple tab stops can be provided by inserting $1-$n. The caret will start at $1, then when pressing tab it will move to $2 and $3 on next tab etc. until there are no more tab stops. If you do not explicitly set $0, the caret will be at the end of the snippet.
So we could for example change the above to:
<div$1>$0
</div>
This allows us to fill in an argument and then tab on to $0.
7.5 Placeholders
Like variables, tab stops can also have default values (and are generally referred to as placeholders when they do). The syntax is the same: ${«tab stop»:«default value»}. And the default value can contain both text, shell code and other placeholders. So we can refine the previous example further:
<div${1: id="${2:some_id}"}>$0
</div>
Inserting this snippet will insert a div tag with the id argument selected and we can then decide either to overtype the argument (i.e. delete it) and press tab again to reach $0, or we can press tab immediately to get to the second tab stop (the value part of the argument) and edit that.
When you edit the placeholder text, any embedded tab stops will be removed.
7.6 Mirrors
There are times when you need to provide the same value several places in the inserted text and in these situations you can re-use the tab stop to signal that you want it mirrored at that location. So for example to create a LaTeX environment with a snippet, we can use:
\begin{${1:enumerate}}$0
\end{$1}
After inserting this snippet, enumerate will be selected and if we edit it, the changes will be reflected in the \end part as well.
7.7 Transformations
There are situations where we want our placeholder text mirrored but with slight changes or where we want some text to appear depending on the value/presence of a placeholder.
We can accomplish this by doing a regular expression substitution on the placeholder text (when mirroring it). The syntax for this is: ${«tab stop»/«regexp»/«format»/«options»}.
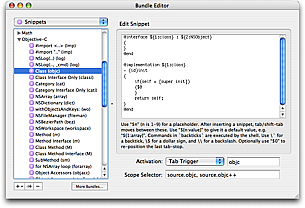
As an example, the Objective-C getter/setter methods (prior to the @property keyword) often look like this (in the thread-unsafe form):
- (id)foo
{return foo;
}- (void)setFoo:(id)aValue
{[foo autorelease];foo = [aValue retain];
}
In the format string we can use \u to uppercase the next character, so a snippet that only asks for the name of the instance variable once could look like this:
- (${1:id})${2:foo}
{return $2;
}- (void)set${2/./\u$0/}:($1)aValue
{[$2 autorelease];$2 = [aValue retain];
}
We can also use conditional insertions in the format string to make decisions. For example if we create a snippet for a method we can let the return type decide whether or not the method should include a return statement like this:
- (${1:void})${2:methodName}
{${1/void$|(.+)/(?1:\n\treturn nil;)/}
}
Here we match placeholder 1 against void or anything (.+) and put the latter match in capture register 1. Then only if we did match something (other than void) will we insert a newline, tab and the return nil; text.
vim-snipmate编写snippet的语法相关推荐
- ubuntu20.04下vim+vimtex编写latex的利器
ubuntu20.04下vim+vimtex编写latex的利器 安装中文环境的latex套件 vimtex的安装与配置 安装vimtex PDF阅读器 zathura vimtex 与 zathur ...
- Linux系统里让vim支持markdown格式的语法高亮
Markdown是深受程序员喜爱的一个文件格式. 然而Linux里默认的vim设置,并不支持markdown格式的语法高亮显示. 下面就来介绍如何设置使得markdown格式的文件在vim里也能享有语 ...
- Vim案列掌握vim的基本操作——案例一:vim创建编写txt文件
案例一:vim创建编写txt文件 1.vim创建test.txt文件 vim test.txt 2.输入i,I,a,A,o,O,r,R均可(这里以i为例) 3.保存文件并退出vim. a.先返回到一般 ...
- Vim的行号、语法显示等设置(.vimrc文件的配置)以及乱码解决
在终端下使用vim进行编辑时,默认情况下,编辑的界面上是没有显示行号.语法高亮度显示.智能缩进 等功能的.为了更好的在vim下进行工作,需要手动设置一个配置文件:.vimrc. 在启动vim时,当前用 ...
- 更适合程序员使用的Vim配置 显示行号 语法高亮 智能缩进
在终端下使用vim进行编辑时,默认情况下,编辑的界面上是没有显示行号.语法高亮度显示.智能缩进等功能的. 为了更好的在vim下进行工作,需要手动设置一个配置文件:.vimrc. 在启动vim时,当前用 ...
- vim显示行号、语法高亮、自动缩进的设置
在UBUNTU中vim的配置文件存放在/etc/vim目录中,配置文件名为vimrc 在Fedora中vim的配置文件存放在/etc目录中,配置文件名为vimrc 在Red Hat Linux 中v ...
- 编写递归下降语法分析器_Python3知识点流程控制、迭代器、生成器快速入门
流程控制 if 控制 if 表达式1: 语句if 表达式2: 语句elif 表达式3: 语句else: 语句elif 表达式4: 语句else: 语句 1.每个条件后面要使用冒号 :,表示接下来是满足 ...
- vi新建一个shell脚本_Linux Vim 编辑器编写 Shell 脚本
Vim 编译器 Vim 文件编译器是编写文件的好工具,它包括以下 3 种模式: 命令模式:移动光标,对文本进行增删查改等操作: 输入模式:向文件中输入文本: 末行模式:保存或退出文档,设置编辑环境. ...
- 编写递归下降语法分析器_面试BAT必问的JVM,今天我们来说一说它类加载器的底层原理...
类加载器的关系 类加载器的分类 JVM支持两种类加载器,一种为引导类加载器(Bootstrap ClassLoader),另外一种是自定义类加载器(User Defined ClassLoader) ...
最新文章
- 自然语言模型算法太杂乱?国产统一 AI 开源框架来了
- salt上编写了备份日志的脚本
- 成功解决PermissionError: [WinError 5] 拒绝访问 \lib\\site-packages\\h5py\\_errors.cp38-win_amd64.pyd‘
- 边缘计算用java_物联网技术和边缘计算
- 开始食用grpc(之一)
- 存储过程传入可以为空的参数
- Dynamics CRM 2013 初体验(1):系统的安装
- 操作系统之进程管理:2、进程的状态以及状态转化
- QT5之修改程序图标
- android java service_[Java教程]Android四大组件之Service浅见
- 设计模式(3)--SimpleFactory( [1] 简单工厂模式)--创建型
- mongodb排序_MongoDB排序
- java class 文件
- 易会满重磅发声!新证券法将给资本市场带来哪些新变化?证监会职责定位有何新要求?...
- VS编译器 :LNK链接错误汇总:LNK2001 / LNK2005 / LNK2019 / LNK1120
- hihocoder1251Uvalive7263 Today Is a Rainy Day 2015北京赛区C
- 解决斜杠符号被转义的问题
- CPU 型号后所代表的字母的意思
- 【历史上的今天】12 月 7 日:历史上第一次直播回放;唱片协会起诉 Napster;最大的梅森素数被发现
- 三维目标检测之ROS可视化