iOS SDK: Send E-mail In-App
2019独角兽企业重金招聘Python工程师标准>>> 
In this iOS SDK tutorial, I'll demonstrate how to allow your users to send e-mail without leaving your application using the MFMailComposeViewController class. We will setup an e-mail template with recipients, a subject, body text, and even an image attachment.
The iOS SDK provides an easy to use, standard interface to allow your users to send and edit e-mail from within your own application. To do so, you will need to use theMFMailComposeViewController class. This view controller displays a standard mail interface and also provides the functionality to respond to user events performed on that interface. For instance, you the class will notify you if the user hit "send" or "cancel".
Note: MFMailComposeViewController is only available on iOS 3.0 or later.
So, how does it work? Follow the steps in this tutorial to find out.
Step 1: Create a New Xcode Project
Open Xcode and select “Create a new Xcode project”. Select View-based Application and then click Next. Enter a name for your project. I called mine @”Mail”. Enter your Company Identifier and make sure you selected "iPhone" forDevice Family, because we are going to make an iPhone app. If you are done, clickNext. Choose a place to save your project and click Create.
Step 2: Add the Mail Button
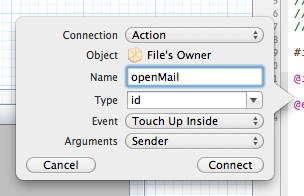
Open the "MailViewController.xib" file and drag a button into the view. Set the title of the button to "Mail". Now select the middle button of the Editor to show the “Assistant editor”, so we can add an action to the button we just created.
Select the button and CTRL-drag to the “MailViewController.h”. In the pop-up that is displayed, enter “openMail” for name and make sure to set the connection type to “Action”, because we want to make an action and not an outlet.
Step 3: Import the MessageUI Framework
In the navigator area of Xcode 4, select the project name. Next, select the current target (“Mail” in this case), and then select the “Build Phases” tab. Expand the “Link Binary With Libraries” option, and then click the “+” button to add a new framework. Type “message″ into the search box, and select the MessageUI.framework option that appears in the list. Click “Add” to include this framework in the linking phase of your project.
Now that you have added the MessageUI framework into your project, you need to import that framework into the view controller that will use theMFMailComposeViewController, so, in our case, MailViewController.h.
Go to this file and modify the code to read as follows:
#import <UIKit/UIKit.h>
#import <MessageUI/MessageUI.h>@interface MailViewController : UIViewController <MFMailComposeViewControllerDelegate>- (IBAction)openMail:(id)sender;@end
As you can see, we also declared the MFMaileComposeViewControllerDelegate in the above code. We will use this delegate to see the result of the mail.
Step 4: Add Project Resources
Drag the following image to the “Supporting Files” folder in your project. Make sure “Copy items into destination group’s folder (if needed)” is checked before clickingfinish.

Step 5: Check if Device is Able to Send E-mail
Open the “MailViewController.m” file and scroll down to the openMail: action and modify the code to read as follows:
- (IBAction)openMail:(id)sender
{if ([MFMailComposeViewController canSendMail]){}else{UIAlertView *alert = [[UIAlertView alloc] initWithTitle:@"Failure"message:@"Your device doesn't support the composer sheet"delegate:nilcancelButtonTitle:@"OK"otherButtonTitles:nil];[alert show];[alert release];}}
Here we check if the current device is able to send e-mail with the canSendMailclass method of MFMailComposeViewController. You should always call this method before you open the mail interface. If the device is not able to send e-mail, you should notify the user (I've used a UIAlertView for this).
Step 6: Show the Mail Interface
If the device is able to send e-mail, we display the mail interface. Go to theopenMail: action and modify the code to read as follows:
- (IBAction)openMail:(id)sender
{if ([MFMailComposeViewController canSendMail]){MFMailComposeViewController *mailer = [[MFMailComposeViewController alloc] init];mailer.mailComposeDelegate = self;[mailer setSubject:@"A Message from MobileTuts+"];NSArray *toRecipients = [NSArray arrayWithObjects:@"fisrtMail@example.com", @"secondMail@example.com", nil];[mailer setToRecipients:toRecipients];UIImage *myImage = [UIImage imageNamed:@"mobiletuts-logo.png"];NSData *imageData = UIImagePNGRepresentation(myImage);[mailer addAttachmentData:imageData mimeType:@"image/png" fileName:@"mobiletutsImage"]; NSString *emailBody = @"Have you seen the MobileTuts+ web site?";[mailer setMessageBody:emailBody isHTML:NO];[self presentModalViewController:mailer animated:YES];[mailer release];}else{UIAlertView *alert = [[UIAlertView alloc] initWithTitle:@"Failure"message:@"Your device doesn't support the composer sheet"delegate:nilcancelButtonTitle:@"OK"otherButtonTitles: nil];[alert show];[alert release];}}
First we create a MFMaileComposeViewController and call it “mailer”. We set themailComposeDelegate to self, so we can see the result of the mail. The subject is set to “A Message from MobileTuts+”. As you can see, the toRecipients is of the type NSArray. This is because you can add multiple recipients. I added two fake email addresses, but of course you can put any address you like. After that, we store an image as an NSData object, because we cant send a UIImage directly. Then we add the NSData object as an attachment to our e-mail. We set the type to a png image and the fileName to “mobiletutsImage”. This means that when the receiver saves the image, it will be saved under the name "mobiletutsImage". The last thing we do is show the mailer before releasing the mailer object.
Step 7: Check the Result and Dismiss the View
You need to manually dismiss the mail interface in response to a delegate method call. Add the following code under the openMail: action:
- (void)mailComposeController:(MFMailComposeViewController*)controller didFinishWithResult:(MFMailComposeResult)result error:(NSError*)error
{   switch (result){case MFMailComposeResultCancelled:NSLog(@"Mail cancelled: you cancelled the operation and no email message was queued.");break;case MFMailComposeResultSaved:NSLog(@"Mail saved: you saved the email message in the drafts folder.");break;case MFMailComposeResultSent:NSLog(@"Mail send: the email message is queued in the outbox. It is ready to send.");break;case MFMailComposeResultFailed:NSLog(@"Mail failed: the email message was not saved or queued, possibly due to an error.");break;default:NSLog(@"Mail not sent.");break;}// Remove the mail view[self dismissModalViewControllerAnimated:YES];
}
In this delegate method, we check the result of having displayed the mail view controller with a switch statement and then dismiss the view controller with an animation. In the above code, I've simply printed an NSLog message with the results, but the point is that you could respond dynamically to the user's action.
BONUS: Make it Work for iPad
On an iPad it looks nice to show the mail interface in a page sheet presentation. You can do that by adding the following line of code just above [self presentModalViewController:mailer animated:YES];:
mailer.modalPresentationStyle = UIModalPresentationPageSheet;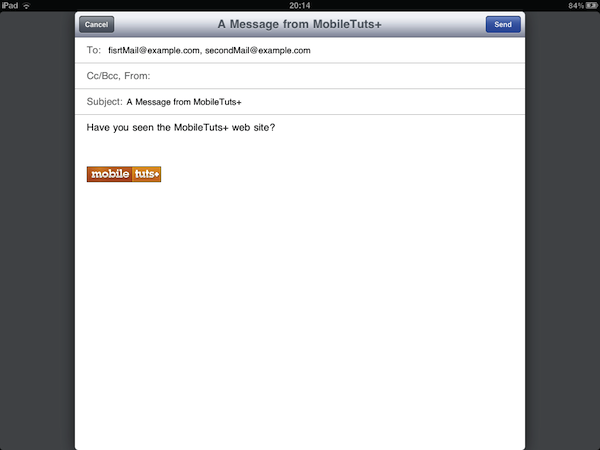
Wrap Up
I hope you enjoyed this tutorial. If you have any feedback or requests for additional iOS content from me, please leave a comment below!
http://code.tutsplus.com/tutorials/mfmailcomposeviewcontroller--mobile-7982
转载于:https://my.oschina.net/mickelfeng/blog/289300
iOS SDK: Send E-mail In-App相关推荐
- 【转】使用Xcode中的iOS SDK给iphone开发出第一个App程序
之前已经折腾过用Xcode开发OS X的程序了,现在继续折腾,用iOS SDK开发移动设备(iphone/ipad/ipod touch)的程序. 1.从iOS Developer Library中找 ...
- 京东开普勒php接口,IOS菜鸟初学第十五篇:接入京东开普勒sdk,呼起京东app打开任意京东的链接-Go语言中文社区...
我之前写了一篇关于接入京东联盟sdk的文章,但是最近,由于这个原因,如下图 导致需要重新集成京东的sdk,但是由于某种原因,因为android和ios端不统一,android接入的是京东开普勒的SDK ...
- 环信即时通讯SDK集成——如何使用Swift快速集成环信IM iOS SDK并实现单聊
本文介绍如何使用swift快速集成环信即时通讯 IM iOS SDK 实现单聊. 前提条件 • Xcode (推荐最新版本). • 安装 iOS 10.0 或更高版本的 iOS 模拟器或 Apple ...
- 封装了一套WeCenter的IOS SDK
度过了忙碌且迷茫的2015年,迎来了的郁闷且彷徨的2016年. 与哥们商量做些什么,谈不上创业也不是项目,只是想让2016年不必如2015年一样迷茫,也慰藉一下2016年的彷徨. 方向么,考察了几个行 ...
- 集成支付宝钱包支付iOS SDK的方法与经验
没想到,支付宝的SDK是我目前用过的所有第三方SDK中最难用的一个了. 下载 首先,你要想找到这个SDK,都得费点功夫.现在的SDK改名叫移动支付集成开发包了,下载页面在 这里 的 "请点此 ...
- 支付宝钱包支付iOS SDK的方法
为什么80%的码农都做不了架构师?>>> 文档 压缩包里有两个相关文档 : <支付宝钱包支付接口开发包2.0标准版.pdf> <支付宝钱包支付接口开发包2.0 ...
- Beginning IOS 7 Development Exploring the IOS SDK - Handling Basic Interface Fun
Beginning IOS 7 Development Exploring the IOS SDK 目前使用的是Objective-C,用这本书,简单记录一下 第一章,图书简介 第二章,简要介绍使用x ...
- 急速收藏:4套iOS SDK的H5打通方案
在介绍 iOS SDK 的 H5 打通方案之前,我们先了解一下什么是 App 与 H5 打通. 所谓 "打通",是指 H5 集成 JavaScript 数据采集 SDK 后,H5 ...
- ios使用支付宝进行支付,注意事项 集成支付宝钱包支付iOS SDK的方法与经验。...
下载 首先,你要想找到这个SDK,都得费点功夫.现在的SDK改名叫移动支付集成开发包了,下载页面在 这里 的 "请点此下载集成开发包" Baidu和Googlep排在前面的支付宝开 ...
最新文章
- 习题:codevs 2822 爱在心中 解题报告
- 理解ffmpeg中的pts,dts,time_base
- CSS篇 《图解CSS3》笔记 Flex
- ICCV 2017 《Towards End-to-End Text Spotting with Convolutional Recurrent Neural Network》论文笔记
- bat for循环_bat教程[279] reg import命令的用法
- 2021HDU多校8 - 7059 Counting Stars(线段树)
- 获取【请求体】数据的3种方式 request.getInputStream() request.getInputStream() request.getReader()
- 泛型lua的for循环以及lua的特殊的dowhile循环
- Freezer - 备份云硬盘实现
- nginx优化配置选项
- endwith php,辅助函数 | 进阶系列 | Laravel 7 中文文档
- Intel 64/x86_64/IA-32/x86处理器 - 通用指令(4) - 比特位设置指令/字节设置指令
- linux下好用软件全记录
- go fyne 跨平台开发框架 gui 编程 抖音下载 去水印编程 学习交流
- Android OpenGL ES(七)----理解纹理与纹理过滤
- win10 internet 信息服务器,Win10无internet访问权限怎么解决?Win10无网络解决方法
- 如何积累人生的第一桶金
- 移植openharmony添加组件ace编译报错文件解决
- 项目应当经历的四种开发环境
- Win10(Win7)通过注册表(regedit)添加、修改、删除系统环境变量、或系统服务(services.msc)
热门文章
- 配置Linux—LVS (DR)
- 使用微软的 ilasm 和 ildasm 对. net程序进行编译和反编译
- Android简单调用相机Camera功能,实现打开照相功能
- 小程序图片在安卓上拉伸的问题导航返回首页
- mysql安装后无法启动和连接问题
- Spring+SpringMVC+MyBatis+SpringSecurity+EhCache+JCaptcha 完整Web基础框架(前言)
- 解决MWPhotoBrowser中的SDWebImage加载大图导致的内存警告问题
- EJS脚本中AES应用
- window.atob()与window.btoa()方法实现编码与解码
- 使用net start mysql命令后出现“MySQL 服务正在启动 . MySQL 服务无法启动。 服务没有报告任何错误。”问题的解决办法