Spring Security 参考手册(一)
Spring Security 参考手册
前言
Spring Security 为基于javaEE的企业应用程序提供一个全面的解决方案。正如你将从这个参考指南发现的,我们试图为你提供一个有用的并且高度可配置的安全系统。
安全是一个不断移动的目标,采取一个全面的全系统的方法很重要。在安全领域,我们鼓励你采取"layers of security"(安全层),这样每一层尽可能的在自己范围内诶保证安全,连续的层提供额外的安全性。安全层更密集你的程序将更加健壮更加安全。在最底层,你需要处理传输安全和系统识别这些问题,以减少中间人攻击。接下来,你讲通常利用防火墙,或许使用VPN或者IP担保以确保只有授权的系统能够尝试连接。在企业环境中你可以部署一个DMZ将面向公众的服务器和数据库以及应用服务器分隔开来。你的操作系统也将扮演重要的部分,解决问题,类似,使用非特权用户运行进程和提高文件系统安全性。操作系统通常会配置自己的防火墙。但愿在某处前进的道路上,你会试图阻止拒绝服务和暴力攻击。一个入侵检测系统将在监视和相应攻击时非常有用,这种系统能采取保护动作,比如实时阻断违规的TCP/IP地址。在更高的层,你的java虚拟机希望被配置为尽量减少不同的java类型授予的权限,然后将你的应用程序增加到器自身的制定域特定的安全配置。Spring Security 使后者 ,应用程序将更加安全更加容易。
当然你需要妥善处理上面提到的所有安全层,连同各层的管理因素。这样的管理因素答题包括安全公告监测、补丁、人员审查、审计、变更控制、工程管理系统、数据备份、灾难恢复、性能基准测试、负载监控、集中式日志记录、事件相应程序等。
Spring Secruity 致力于在企业应用程序安全层对你进行帮助,你会发现这里有如此不同的需求正如业务问题的领域。一个银行应用程序具有与电子商务应用不同的需求。电子商务应用程序同企业销售自订花工具具有不同的需求。这些定制需求使得应用安全有趣、有挑战性和有回报。
请阅读入门第二部分, 从“入门”开始。 这一章将为你介绍的框架和基于命名空间的配置系统,你可以配置好应用,来了解Spring Security 如何工作和一些你可能 需要使用的类 。你需要阅读 架构与实现。本指南的其余部分是更传统的引用样式结构,设计用于按需进行阅读。我们也建议你尽可能于都完一般的应用安全问题。Spring Secruity 不是万能的,不能解决所有的安全问题。重要的实在应用设计开始之初就考虑到安全性。后期改造不是一个好的主意。特别是,如果你正在构件一个Web应用程序,你应该知道许多潜在的漏洞,比如跨站脚本、请求伪造和会话劫持。这些你一开始就应该考虑。这个网站 (http://www.owasp.org/) 维护了一个大网站应用漏洞列表和一些有用的参考信息。
我希望这个参考手册对你来说比较有用,欢迎你的反馈和建议。 suggestions.
最后欢迎你来到Spring Security 社区。 community.
入门
本指南的稍后张杰会对框架的架构和实现类进行一个深度的讨论,如果你的相对Spring Security进行一个深度定制没这一章节将会包含你需要了解的内容。在本章我们将会介绍Spring Security 3.0 给项目的历史进行简要的概述,简单的讲讲如何开始使用设个框架。尤其是我们将看看命名空间配置,他提供与传统Spring Bean你必须连接所有实现类的途径更简单的方式保护你的应用程序。
我们也会看看实例应用。在你阅读后面的章节之前你指的试着运行体验它。当时你对框架连接更多的时候你还可以汇过来回顾一下。 project website 同时请参阅项目的网站,因为他有创建这个项目的有用的信息,以及文章、视频和教程。
简介
Spring Security是什么?
Spring Security 提供了基于javaEE的企业应有个你软件全面的安全服务。这里特别强调支持使用SPring框架构件的项目,Spring框架是企业软件开发javaEE方案的领导者。如果你还没有使用Spring来开发企业应用程序,我们热忱的鼓励你仔细的看一看。熟悉Spring特别是一来注入原理两帮助你更快更方便的使用Spring Security。
人们使用Spring Secruity的原因有很多,单大部分都发现了javaEE的Servlet规范或EJB规范中的安全功能缺乏典型企业应用场景所需的深度。提到这些规范,重要的是要认识到他们在WAR或EAR级别无法移植。因此如果你更换服务器环境,这里有典型的大量工作去重新配置你的应用程序员安全到新的目标环境。使用Spring Security 解决了这些问题,也为你提供许多其他有用的,可定制的安全功能。
正如你可能知道的两个应用程序的两个主要区域是“认证”和“授权”(或者访问控制)。这两个主要区域是Spring Security 的两个目标。“认证”,是建立一个他声明的主题的过程(一个“主体”一般是指用户,设备或一些可以在你的应用程序中执行动作的其他系统)。“授权”指确定一个主体是否允许在你的应用程序执行一个动作的过程。为了抵达需要授权的店,主体的身份已经有认证过程建立。这个概念是通用的而不只在Spring Security中。
在身份验证层,Spring Security 的支持多种认证模式。这些验证绝大多数都是要么由第三方提供,或由相关的标准组织,如互联网工程任务组开发。另外Spring Security 提供自己的一组认证功能。具体而言,Spring Security 目前支持所有这些技术集成的身份验证:
HTTP BASIC 认证头 (基于 IETF RFC-based 标准)
HTTP Digest 认证头 ( IETF RFC-based 标准)
HTTP X.509 客户端证书交换 ( IETF RFC-based 标准)
LDAP (一个非常常见的方法来跨平台认证需要, 尤其是在大型环境)
Form-based authentication (用于简单的用户界面)
OpenID 认证
Authentication based on pre-established request headers (such as Computer Associates Siteminder) 根据预先建立的请求有进行验证
JA-SIG Central Authentication Service (CAS,一个开源的SSO系统 )
Transparent authentication context propagation for Remote Method Invocation (RMI) and HttpInvoker (Spring远程协议)
Automatic "remember-me" authentication (你可以勾选一个框以避免预定的时间段再认证)
Anonymous authentication (让每一个未经验证的访问自动假设为一个特定的安全标识)
Run-as authentication (在一个访问应该使用不同的安全标识时非常有用)
Java Authentication and Authorization Service (JAAS)
JEE container autentication (所以如果愿你以可以任然使用容器管理的认证)
Kerberos
Java Open Source Single Sign On (JOSSO) *
OpenNMS Network Management Platform *
AppFuse *
AndroMDA *
Mule ESB *
Direct Web Request (DWR) *
Grails *
Tapestry *
JTrac *
Jasypt *
Roller *
Elastic Path *
Atlassian Crowd *
Your own authentication systems (see below)
表示由第三方提供
很多独立软件供应商,因为灵活的身份验证模式二选择Spring Security。这样做允许他们快速的集成到他们的终端客户需求的解决方案而不用进行大量工程或者改变客户的环境。如果上面的验证机制不符合你的需求,Spring Security 是一个开放的平台,要实现你 自己的验证机制检查。Spring Security 的许多企业用户需要与不遵循任何安全标准的“遗留”系统集成,Spring Security可以很好的与这类系统集成。
无论何种身份验证机制,Spring Security提供一套的授权功能。这里有三个主要的热点区域,授权web请求、授权方法是否可以被调用和授权访问单个域对象的实例。为了帮助让你分别了解这些差异,认识在Servlet规范网络模式安全的授权功能,EJB容器管理的安全性和文件系统的安全。Spring Security在这些重要的区域提供授权功能,我们将在手册后面进行介绍。
历史
Spring Security 以“The Acegi Secutity System for Spring” 的名字始于2013年晚些时候。一个问题提交到Spring 开发者的邮件列表,询问是否已经有考虑一个机遇Spring 的安全性社区实现。那时候Spring 的社区相对较小(相对现在)。实际上Spring自己在2013年只是一个存在于ScourseForge的项目,这个问题的回答是一个值得研究的领域,虽然目前时间的缺乏组织了我们对它的探索。
考虑到这一点,一个简单的安全实现建成但是并没有发布。几周后,Spring社区的其他成员询问了安全性,这次这个代码被发送给他们。其他几个请求也跟随而来。到2014年一月大约有20万人使用了这个代码。这些创业者的人提出一个SourceForge项目加入是为了,这是在2004三月正式成立。
在早些时候,这个项目没有任何自己的验证模块,身份验证过程依赖于容器管理的安全性和Acegi安全性。而不是专注于授权。开始的时候这很适合,但是越来越多的用户请求额外的容器支持。容器特定的认证领域接口的基本限制变得清晰。还有一个相关的问题增加新的容器的路径,这是最终用户的困惑和错误配置的常见问题。
Acegi安全特定的认证服务介绍。大约一年后,Acegi安全正式成为了Spring框架的子项目。1.0.0最终版本是出版于2006 -在超过两年半的大量生产的软件项目和数以百计的改进和积极利用社区的贡献。
Acegi安全2007年底正式成为了Spring组合项目,更名为"Spring Security"。
如今Spring Security有一个强大的和积极的开源社区。在支持论坛上有成千上万的关于Spring Security的消息。有一个活跃的核心的开发人员,他们的代码本身和一个活跃的社区,也经常分享补丁和支持他们的同龄人。
发布版本号
了解Spring Security发布版本号如何工作是很有用的,他可以帮助你识别出工作(或缺乏的功能)设计到参与迁移到项目的未来版本,每个发布使用3个整数,MAJOR.MINOR.PATCH(主版本、次要版本、补丁版本).这样做的目的是主版本是不兼容的,API大范围的升级。次要版本应该保留大部分源代码和二进制兼容旧版本的次要版本,认为可能有一些设计变更和不兼容的更新。补丁版本应该向前向后完美兼容。包含一些bug和缺陷修复这些意外的改变。
在某种程度上,你受到变化的影响取决于你的代码是如何紧密集成的。如果你正在做大量定制,你更可能受到比简单的命名空间配置更大的影响。
你应该总是推出一个新版本之前彻底测试你的应用程序。
Getting Spring Security
你可以通过几种方式获取Spring Security。你可以从 Spring Security 页面下载一个分发包。从Maven库下载分离的jar文件。另外你也可以从源代码自己编译。
使用Maven
一个最小的SPring Security Maven 依赖通常和下面的类似:
<dependencies>
<!-- ... other dependency elements ... -->
<dependency><groupId>org.springframework.security</groupId><artifactId>spring-security-web</artifactId><version>{spring-security-version}</version>
</dependency>
<dependency><groupId>org.springframework.security</groupId><artifactId>spring-security-config</artifactId><version>{spring-security-version}</version>
</dependency>
</dependencies>
如果你使用的额外的功能比如LDAP,OpenID,等等,你需要包含适当的模块,查阅Section 1.4.3,"Project Modules" 项目模块.
Maven 仓库
所有GA发布版本(版本号以.RELEASE结尾)都被部署到Maven Central ,所以不需要在你的pom里设置额外的库
如果你使用了一个 SNAPSHOT 版本,你需要确认你设置了Snapshot库,如下:
<repositories>
<!-- ... possibly other repository elements ... -->
<repository><id>spring-snapshot</id><name>Spring Snapshot Repository</name><url>http://repo.spring.io/snapshot</url>
</repository>
</repositories>
如果你正在使用一个里程碑或者发布候选版本,你需要确保你所定义的Spring里程碑库,如下图所示:
<repositories>
<!-- ... possibly other repository elements ... -->
<repository><id>spring-milestone</id><name>Spring Milestone Repository</name><url>http://repo.spring.io/milestone</url>
</repository>
</repositories>
Spring 框架 Bom
Spring Security是针对Spring 框架 4.1.6RELEASE 建立的{spring-version}, 但是快要与4.0.x正常工作。很多用户都会有这个问题,Spring Security 传递依赖解析到Spring框架4.1.6 RELEASE这可能导致奇怪的classpath问题。{spring-version}
规避这个问题的一种方式是在你的pom文件的 <dependencyManagement> 的部分.另一种办法是像下面这样在pom.xml中包含spring-framework-bom <dependencyManagement> :
<dependencyManagement><dependencies><dependency><groupId>org.springframework</groupId><artifactId>spring-framework-bom</artifactId><version>{spring-version}</version><type>pom</type><scope>import</scope></dependency></dependencies>
</dependencyManagement>
这样将确保Spring Security传递的所有依赖都使用 Spring 4.16.RELEASE {spring-version} 模块.
| 这种但是使用了 Maven’s "bill of materials" (BOM) 概念, Maven 2.0.9+可用. 如果想了解Maven如何解析依赖请参考Maven的依赖机制文档的介绍。 Maven’s Introduction to the Dependency Mechanism documentation. |
Gradle
最小的Gradle一组典型的依赖如下:
dependencies {compile 'org.springframework.security:spring-security-web:{spring-security-version}'compile 'org.springframework.security:spring-security-config:{spring-security-version}'
}
如果你使用了 LDAP, OpenID, 等等. 你需要包含相应的模块,请参阅“Project Modules” 项目模块.
Gradle Repositories
所有的GA版本 (以.RELEASE结尾)都部署到了Maven Central库, 所以使用mavenCentral()库就足够了 .
repositories {mavenCentral()
}
如果你正在使用SNAPSHOT版本,你需要确保你使用了Spring的Snapshot库,定义如下:
repositories {maven { url 'https://repo.spring.io/snapshot' }
}
如果你正在使用里程碑或者发布候选版。你需要确认你使用了SPring的里程碑仓库,定义如下:
repositories {maven { url 'https://repo.spring.io/milestone' }
}
使用 Spring 4.0.x 和 Gradle
解析依赖传递是Gradle默认会使用最新的版本。这意为这当在Spring4.1.6RELEASE 下使用Spring Security 4.0.2RELEASE我们不需要做额外的工作。 {spring-security-version} {spring-version} 然而有时出现一些问题,最好适应Gradle的ResolutionStrategy 按照下面这种方式处理 Gradle’s ResolutionStrategy:
configurations.all {resolutionStrategy.eachDependency { DependencyResolveDetails details ->if (details.requested.group == 'org.springframework') {details.useVersion '{spring-version}'}}
}
这样将确保Spring Security 传递的依赖使用Spring 4.1.6.RELEASE {spring-version}模块.
| 这个例子使用 Gradle 1.9,但可能需要在gradle的未来版本中进行修改,因为这是在一个Gradle的孵化功能. |
项目模块
在 Spring Security 3.0, 代码库被分割到单独的jar,这样可以更清楚的分隔不用功能区域和第三方依赖。如果你使用Maven构建你的项目,那么这些都是需要你添加到你的pom.xml中的. 甚至你没有使用Maven,我们建议你请求pom.xml文件来获取第三方依赖和版本。另一个好办法是检查实例应用程序的库。
核心模块 - spring-security-core.jar
包含核心的验证和访问控制类和接口,远程支持和基本的配置API。任何使用Spring Security的应用程序都需要这个模块。支持独立应用程序、远程客户端、服务层方法安全和JDBC用户配置。包含以下顶层包:
org.springframework.security.coreorg.springframework.security.accessorg.springframework.security.authenticationorg.springframework.security.provisioning
远程调用 - spring-security-remoting.jar
提供与Spring Remoting的集成,通常你不需要这个模块,除非你挣使用Spring Remoting编写远程客户端。主要的包是org.springframework.security.remoting.
网页 - spring-security-web.jar
包括锅炉汽和网站安全相关的基础代码。使用Servlet API的任何应用依赖他。如果你需要Spring Security网页验证服务和基于URL的访问控制你需要这个模块。主包名为 org.springframework.security.web.
配置 - spring-security-config.jar
包含安全命令空间的解析代码。如果你使用Spring Security XML命令空间进行配置你需要包含这个模块。 主包名为org.springframework.security.config. 没有类需要被应用程序直接使用.
LDAP - spring-security-ldap.jar
LDAP验证和配置代码,如果你需要使用LDAP验证和管理LDAP用户实体,你需要这个模块。主包名为 org.springframework.security.ldap.
ACL访问控制表 - spring-security-acl.jar
ACL专门的领域对象的实现。用来在你的应用程序中应用安全特定的领域对象实例。主包名为 org.springframework.security.acls.
CAS - spring-security-cas.jar
Spring Security的CAS客户端集成。如果你想用CAS的SSO服务器使用Spring Security网页验证需要该模块。顶层的包是 org.springframework.security.cas.
OpenID - spring-security-openid.jar
OpenID 网页验证支持。使用外部的OpenID服务器验证用户。 org.springframework.security.openid. 需要 OpenID4Java.
Test - spring-security-test.jar
支持Spring Security的测试。
签出源代码
因为Spring Security是一个开源项目,我们强烈建议您使用Git签出源代码。这可以让你完全访问所有势力应用程序,你可以轻松地构建最先进的最新版本的项目。有了项目的源代码对debug有非常大的帮助。异常堆栈跟踪不再是模糊的黑盒问题,你可以沿着他找出到底发生了什么。源代码是中级文档,通常也是最简答的项目实际是如何工作的地方。
要获取项目源代码,请使用一下git命令:
git clone https://github.com/spring-projects/spring-security.git这可以让你在本地机器上访问到整个项目的历史记录(包括所有版本和分支).
Spring Security 4.1新特性
Spring Security 4.1 新特性有关的链接 100+ RC1 issues and 60+ RC2 issues 这里是新特性的列表:
Java 配置提升
Simplified UserDetailsService Java Configuration
Simplified AuthenticationProvider Java Configuration
通过
LogoutConfigurer配置内容谈判LogoutSuccessHandler(s)通过
SessionManagementConfigurer可配置InvalidSessionStrategy使用
HttpSecurity.addFilterAt在链中的特定位置添加一个Filter的能力
Web应用程序安全性提升
MvcRequestMatcher
Content Security Policy (CSP)
HTTP Public Key Pinning (HPKP)
CORS
CookieCsrfTokenRepository 提供简单的 AngularJS 与 CSRF 整合
添加
ForwardAuthenticationFailureHandler和ForwardAuthenticationSuccessHandlerAuthenticationPrincipal 支持表达式属性从而支持转换
Authentication.getPrincipal()对象 (即处理不可变的自定义的User域对象)
授权改进
Path Variables in Web Security Expressions
Method Security Meta Annotations
密码模块的改进
SCrypt 支持
SCryptPasswordEncoderPBKDF2 支持 Pbkdf2PasswordEncoder
BouncyCastle 中新改进的
BytesEncryptor使用 AES/CBC/PKCS5Padding 和 AES/GCM/NoPadding 算法
测试的改进
@WithAnonymousUser
@WithUserDetails 允许指定
UserDetailsServicebean 名称Test Meta Annotations
模拟一个列表的能力
GrantedAuthority使用SecurityMockMvcResultMatchers.withAuthorities
一般的改进
重新组织样本项目
移动到GitHub的问题
样品和指南 (Start Here)
如果您想从Spring Security开始,最好的从我们的示例应用程序开始。
| 源 | 描述 | 指南 |
|---|---|---|
|
{gh-samples-url}/javaconfig/helloworld[Hello Spring Security] |
演示如何整合Spring Security和基于java的配置的现有应用程序。 |
链接:../../guides/html5/helloworld-javaconfig.html[Hello Spring Security Guide] |
|
{gh-samples-url}/boot/helloworld[Hello Spring Security Boot] |
演示如何整合Spring Security和 Spring Boot应用程序。 |
链接:../../guides/html5/helloworld-boot.html[Hello Spring Security Boot Guide] |
|
{gh-samples-url}/xml/helloworld[Hello Spring Security XML] |
演示如何整合Spring Security和基于XML配置使用的现有应用程序。 |
链接:../../guides/html5/helloworld-xml.html[Hello Spring Security XML Guide] |
|
{gh-samples-url}/javaconfig/hellomvc[Hello Spring MVC Security] |
演示如何整合Spring Security和Spring MVC 应用程序。 |
链接:../../guides/html5/hellomvc-javaconfig.html[Hello Spring MVC Security Guide] |
|
{gh-samples-url}/javaconfig/form[Custom Login Form] |
演示如何创建自定义表单。 |
链接:../../guides/html5/form-javaconfig.html[Custom Login Form Guide] |
Java 配置
java配置的支持主要在Spring框架的3.1加入. Java Configuration. Spring Security 从3.2开始加入java配置支持。这让用户不使用任何XML用更简单方式配置Spring Security。
如果你熟悉第四章,安全命名空间配置,安全命名空间配置 你应该找到它和java的安全配置支持之间的相当多的相似之处.
Spring Security 提供大量的示例应用 lots of sample applications 使用-jc参数演示使用java配置Spring Security。
|
基础的网站安全java配置
第一步是创建我们的java配置。这个配置在你的应用程序中创建一个springSecurityFilterChain 的Servlet的过滤器 springSecurityFilterChain负责所有安全(例如 保护应用程序的URL,验证提交的用户名和密码,重定向到登陆的表单等等)。你可以在下面找到大部分java配置项的例子:
import org.springframework.beans.factory.annotation.Autowired;import org.springframework.context.annotation.*;
import org.springframework.security.config.annotation.authentication.builders.*;
import org.springframework.security.config.annotation.web.configuration.*;@EnableWebSecurity
public class WebSecurityConfig extends WebSecurityConfigurerAdapter {@Autowiredpublic void configureGlobal(AuthenticationManagerBuilder auth) throws Exception {auth.inMemoryAuthentication().withUser("user").password("password").roles("USER");}
}
configureGlobal方法的名字不重要,然而,重要的是只在一个被@EnableWebSecurity, @EnableGlobalMethodSecurity,或者@EnableGlobalAuthentication注解的类中配置AuthenticationManagerBuilder,否则会有不可预知的后果。
|
真的是没有太多的配置,但它确实有很多功能,你可以在下面找到功能摘要:
在你的应用程序中对每个URL进行验证
为你生成一个登陆表单
允许使用用户名 Username user 和密码 Password password 使用验证表单进行验证。
允许用户登出
CSRF attack CSPF攻击防范
Session Fixation Session保护
安全 Header 集成
HTTP Strict Transport Security 对安全要求严格的HTTP传输安全
X-Content-Type-Options X-Content-Type-Options集成
缓存控制(稍后可以允许你缓存静态资源)
X-XSS-Protection X-XSS-Protection集成
X-Frame-Options 集成防止点击劫持 Clickjacking
和以下 Servlet API 方法集成
HttpServletRequest#getRemoteUser()
HttpServletRequest.html#getUserPrincipal()
HttpServletRequest.html#isUserInRole(java.lang.String)
HttpServletRequest.html#login(java.lang.String, java.lang.String)
HttpServletRequest.html#logout()
AbstractSecurityWebApplicationInitializer
下一步是在war里注册springSecurityFilterChain。这可以通过Spring在Servlet 3.0+环境中对 Spring’s WebApplicationInitializer supportWebApplicationInitializer的支持进行了java配置,Spring Security提供了基本的抽象类 AbstractSecurityWebApplicationInitializer这可以确保springSecurityFilterChain 已经被注册。我们使用AbstractSecurityWebApplicationInitializer 的不同方式取决于你是已经在使用Spring框架还是只是用了Spring Security。
[abstractsecuritywebapplicationinitializer-without-existing-spring] - 如果你没有使用框架就使用这个说明
[abstractsecuritywebapplicationinitializer-with-spring-mvc] - 如果你正在使用Spring框架使用这个说明
AbstractSecurityWebApplicationInitializer 不与Spring一起使用
如果你没有使用Spring MVC 或Spring,你需要传递 WebSecurityConfig 到超类来确保配置被使用,你可以参考下面的例子:
import org.springframework.security.web.context.*;public class SecurityWebApplicationInitializerextends AbstractSecurityWebApplicationInitializer {public SecurityWebApplicationInitializer() {super(WebSecurityConfig.class);}
}
SecurityWebApplicationInitializer 将会做下面的事情:
自动为你的应用程序的每个URL注册
springSecurityFilterChain过滤器添加一个
ContextLoadListener用来载入 WebSecurityConfig.
AbstractSecurityWebApplicationInitializer 与 Spring MVC一起使用
如果我们在应用程序的其他地方已经使用了Spring,那么我们已经有了一个 WebApplicationInitializer用来载入Spring的配置。如果我们使用上面的配置将会得到一个错误。所以我们应该使用已经存在的 ApplicationContext 注册Spring Security。举个例子,如果我们使用Spring MVC我们的 SecurityWebApplicationInitializer 应该看起来和下面差不多:
import org.springframework.security.web.context.*;public class SecurityWebApplicationInitializerextends AbstractSecurityWebApplicationInitializer {}这回简单的只为你的应用程序的所有URL注册springSecurityChain过滤器。然后我们需要确保这个Security配置被载入到我们已经存在的 WebSecurityConfig。例如,如果你使用Spring MVC 它应该被加入到 getRootConfigClasses()
public class MvcWebApplicationInitializer extendsAbstractAnnotationConfigDispatcherServletInitializer {@Overrideprotected Class<?>[] getRootConfigClasses() {return new Class[] { WebSecurityConfig.class };}// ... other overrides ...
}
HttpSecurity
到目前为止我们的WebSecurityConfig只包含了关于如何验证我们的用户的信息。Spring Security怎么知道我们相对所有的用户进行验证?Spring Securityn怎么知道我们需要支持基于表单的验证?原因是WebSecurityConfigurerAdapter在configure(HttpSecurity http)方法中提供了一个默认的配置,看起来和下面类似:
protected void configure(HttpSecurity http) throws Exception {http.authorizeRequests().anyRequest().authenticated().and().formLogin().and().httpBasic();
}
上面的默认配置:
确保我们应用中的所有请求都需要用户被认证
允许用户进行基于表单的认证
允许用户使用HTTP基于验证进行认证
你可以看到这个配置和下面的XML命名配置相似:
<http><intercept-url pattern="/**" access="authenticated"/><form-login /><http-basic />
</http>java配置使用and()方法相当于XML标签的关闭。 这样允许我们继续配置父类节点。如果你阅读代码很合理,想配置请求验证, 并使用表单和HTTP基本身份验证进行登录。
然而,java配置有不同的默认URL和参数,当你自定义用户登录页是需要牢记这一点。让我们的URL冯家RESTful,另外不要那么明显的观察出我么你在使用Spring Security这样帮助我们避免信息泄露。 information leaks。比如:
Java配置和表单登录
你可能会想知道系统提示您登录表单从哪里来的,因为我们都没有提供任何的HTML或JSP文件。由于Spring Security的默认配置并没有明确设定一个登录页面的URL,Spring Security自动生成一个,基于这个功能被启用,使用默认URL处理登录的提交内容,登录后跳转的URL等等。
自动生成的登录页面可以方便应用的快速启动和运行,大多数应用程序都需要提供自己的登录页面。要做到这一点,我们可以更新我们的配置,如下所示:
protected void configure(HttpSecurity http) throws Exception {http.authorizeRequests().anyRequest().authenticated().and().formLogin().loginPage("/login") .permitAll();
}| 指定登录页的路径 | |
我们必须允许所有用户访问我们的登录页(例如为验证的用户),这个formLogin().permitAll()方法允许基于表单登录的所有的URL的所有用户的访问。
|
一个我么当前配置使用的JSP实现的页面如下:
| 下面这个登陆页是我们的当前配置,如果不符合我们的要求我们可以很容易的更新我们的配置。 |
<c:url value="/login" var="loginUrl"/>
<form action="${loginUrl}" method="post">       <c:if test="${param.error != null}">        <p>Invalid username and password.</p></c:if><c:if test="${param.logout != null}">       <p>You have been logged out.</p></c:if><p><label for="username">Username</label><input type="text" id="username" name="username"/> </p><p><label for="password">Password</label><input type="password" id="password" name="password"/>  </p><input type="hidden"                        name="${_csrf.parameterName}"value="${_csrf.token}"/><button type="submit" class="btn">Log in</button>
</form>
一个POST请求到/login用来验证用户
|
|
如果参数有error, 验证尝试失败
|
|
如果请求蚕食logout存在则登出
|
|
| 登录名参数必须被命名为username | |
| 密码参数必须被命名为password | |
| CSRF参数,了解更多查阅后续 包括CSRF令牌 和Cross Site Request Forgery (CSRF) 相关章节 |
验证请求
我们的例子中要求用户进行身份验证并且在我们应用程序的每个URL这样做。我么你可以通过给http.authorizeRequests()添加多个子节点来指定多个定制需求到我们的URL。例如:
protected void configure(HttpSecurity http) throws Exception {http.authorizeRequests()                                                                .antMatchers("/resources/**", "/signup", "/about").permitAll()                  .antMatchers("/admin/**").hasRole("ADMIN")                                      .antMatchers("/db/**").access("hasRole('ADMIN') and hasRole('DBA')")            .anyRequest().authenticated()                                                   .and()// ....formLogin();
}
http.authorizeRequests()方法有多个子节点,每个macher按照他们的声明顺序执行。
|
|
| 我们指定任何用户都可以通过访问的多个URL模式。任何用户都可以访问URL以"/resources/", equals "/signup", 或者 "/about"开头的URL。 | |
以 "/admin/" 开头的URL只能由拥有 "ROLE_ADMIN"角色的用户访问。请注意我们使用 hasRole 方法,没有使用 "ROLE_" 前缀.
|
|
任何以"/db/" 开头的URL需要用户同时具有 "ROLE_ADMIN" 和 "ROLE_DBA"。和上面一样我们的 hasRole 方法也没有使用 "ROLE_" 前缀.
|
|
| 尚未匹配的任何URL要求用户进行身份验证 |
处理登出
当使用WebSecurityConfigurerAdapter, 注销功能会自动应用。默认是访问URL`/logout`将注销登陆的用户:
使HTTP Session 无效
清楚所有已经配置的 RememberMe 认证
清除
SecurityContextHolder跳转到
/login?logout
和登录功能类似,你也有不同的选项来定制你的注销功能:
protected void configure(HttpSecurity http) throws Exception {http.logout()                                                                .logoutUrl("/my/logout")                                                 .logoutSuccessUrl("/my/index")                                           .logoutSuccessHandler(logoutSuccessHandler)                              .invalidateHttpSession(true)                                             .addLogoutHandler(logoutHandler)                                         .deleteCookies(cookieNamesToClear)                                       .and()...
}
提供注销支持,使用WebSecurityConfigurerAdapter会自动被应用。
|
|
设置触发注销操作的URL (默认是/logout). 如果CSRF内启用(默认是启用的)的话这个请求的方式被限定为POST。 请查阅相关信息 JavaDoc相关信息.
|
|
注销之后跳转的URL。默认是/login?logout。具体查看 the JavaDoc文档.
|
|
让你设置定制的 LogoutSuccessHandler。如果指定了这个选项那么logoutSuccessUrl()的设置会被忽略。请查阅 JavaDoc文档.
|
|
指定是否在注销时让HttpSession无效。 默认设置为 true。 在内部配置SecurityContextLogoutHandler选项。 请查阅 JavaDoc文档.
|
|
添加一个LogoutHandler.默认SecurityContextLogoutHandler会被添加为最后一个LogoutHandler。
|
|
允许指定在注销成功时将移除的cookie。这是一个现实的添加一个CookieClearingLogoutHandler的快捷方式。
|
|
注销也可以通过XML命名空间进行配置,请参阅Spring Security XML命名空间相关文档获取更多细节logout element。 |
一般来说,为了定制注销功能,你可以添加 LogoutHandler和LogoutSuccessHandler的实现。 对于许多常见场景,当使用流食式API时,这些处理器会在幕后进行添加。
LogoutHandler
一般来说,LogoutHandler的实现类可以参阅到注销处理中。他们被用来执行必要的清理,因而他们不应该抛出错误,我们提供您各种实现:
PersistentTokenBasedRememberMeServices
TokenBasedRememberMeServices
CookieClearingLogoutHandler
CsrfLogoutHandler
SecurityContextLogoutHandler
请查看 Remember-Me的接口和实现 获取详情。
流式API提供了调用相应的LogoutHandler 实现的快捷方式, 而不是直接提供LogoutHandler 的实现。例如:deleteCookies() 允许指定注销成功时要删除一个或者多个cookie。这是一个添加 CookieClearingLogoutHandler的快捷方式。
LogoutSuccessHandler
LogoutSuccessHandler被LogoutFilter在成功注销后调用,用来进行重定向或者转发相应的目的地。注意这个借口与LogoutHandler几乎一样,但是可以抛出异常。
下面是提供的一些实现:
SimpleUrlLogoutSuccessHandler
HttpStatusReturningLogoutSuccessHandler
和前面提到的一样,你不需要直接指定SimpleUrlLogoutSuccessHandler。而使用流式API通过设置logoutSuccessUrl()快捷的进行设置SimpleUrlLogoutSuccessHandler。注销成功 后将重定向到设置的URL地址。默认的地址是 /login?logout.
在REST API场景中HttpStatusReturningLogoutSuccessHandler会进行一些有趣的改变。LogoutSuccessHandler允许你设置一个返回给客户端的HTTP状态码(默认返回200)来替换重定向到URL这个动作。
进一步的注销相关的参考(TODO)
处理注销
测试注销
HttpServletRequest.logout()
章节"Remember-Me接口和实现"
注销的CSRF说明
点点注销(CAS协议)
注销的XML命名空间章节
验证
到现在为止我们只看了一下基本的验证配置,让我们看看一些稍微高级点的身份验证配置选项。
内存中的身份验证
我们已经看到了一个单用户配置到内存验证的示例,下面是配置多个用户的例子:
@Autowired
public void configureGlobal(AuthenticationManagerBuilder auth) throws Exception {auth.inMemoryAuthentication().withUser("user").password("password").roles("USER").and().withUser("admin").password("password").roles("USER", "ADMIN");
}
JDBC 验证
你可以找一些更新来支持JDBC的验证。下面的例子假设你已经在应用程序中定义好了DataSource, jdbc-javaconfig 示例提供了一个完整的基于JDBC的验证。
@Autowired
private DataSource dataSource;@Autowired
public void configureGlobal(AuthenticationManagerBuilder auth) throws Exception {auth.jdbcAuthentication().dataSource(dataSource).withDefaultSchema().withUser("user").password("password").roles("USER").and().withUser("admin").password("password").roles("USER", "ADMIN");
}
LDAP 验证
你可以找一些更新来支持LDAP的身份验证, ldap-javaconfig 提供了一个完成的使用基于LDAP的身份验证的示例。
@Autowired
private DataSource dataSource;@Autowired
public void configureGlobal(AuthenticationManagerBuilder auth) throws Exception {auth.ldapAuthentication().userDnPatterns("uid={0},ou=people").groupSearchBase("ou=groups");
}
上面的例子中使用一下LDIF和前如何Apache DS LDAP示例。
dn: ou=groups,dc=springframework,dc=org
objectclass: top
objectclass: organizationalUnit
ou: groupsdn: ou=people,dc=springframework,dc=org
objectclass: top
objectclass: organizationalUnit
ou: peopledn: uid=admin,ou=people,dc=springframework,dc=org
objectclass: top
objectclass: person
objectclass: organizationalPerson
objectclass: inetOrgPerson
cn: Rod Johnson
sn: Johnson
uid: admin
userPassword: passworddn: uid=user,ou=people,dc=springframework,dc=org
objectclass: top
objectclass: person
objectclass: organizationalPerson
objectclass: inetOrgPerson
cn: Dianne Emu
sn: Emu
uid: user
userPassword: passworddn: cn=user,ou=groups,dc=springframework,dc=org
objectclass: top
objectclass: groupOfNames
cn: user
uniqueMember: uid=admin,ou=people,dc=springframework,dc=org
uniqueMember: uid=user,ou=people,dc=springframework,dc=orgdn: cn=admin,ou=groups,dc=springframework,dc=org
objectclass: top
objectclass: groupOfNames
cn: admin
uniqueMember: uid=admin,ou=people,dc=springframework,dc=org
AuthenticationProvider
您可以通过一个自定义的AuthenticationProvider为bean定义自定义身份验证。 例如, 下面这个例子假设自定义身份验证SpringAuthenticationProvider实现了AuthenticationProvider:
NOTE:`AuthenticationManagerBuilder`如果还不密集这将仅被使用。
@Bean
public SpringAuthenticationProvider springAuthenticationProvider() {return new SpringAuthenticationProvider();
}
UserDetailsService
你可以通过一个自定义的UserDetailsService为bean定义自定义身份验证。 例如,下面这个例子假设自定义身份验证SpringDataUserDetailsService实现了UserDetailsService:
NOTE:`AuthenticationManagerBuilder`如果还不密集这将被仅被使用并且没有AuthenticationProviderBean申明。
@Bean
public SpringDataUserDetailsService springDataUserDetailsService() {return new SpringDataUserDetailsService();
}你也可以通过让passwordencoder为bean自定义密码如何编码。 例如,如果你使用BCrypt,你可以添加一个bean定义如下图所示:
@Bean
public BCryptPasswordEncoder passwordEncoder() {return new BCryptPasswordEncoder();
}
LDAP 验证
多个HttpSecurity
我们可以配置多个HttpSecurity实例,就像我们可以有多个<http>块. 关键在于对WebSecurityConfigurationAdapter进行多次扩展。例如下面是一个对/api/开头的URL进行的不同的设置。
@EnableWebSecurity
public class MultiHttpSecurityConfig {@Autowiredpublic void configureGlobal(AuthenticationManagerBuilder auth) { auth.inMemoryAuthentication().withUser("user").password("password").roles("USER").and().withUser("admin").password("password").roles("USER", "ADMIN");}@Configuration@Order(1)                                                        public static class ApiWebSecurityConfigurationAdapter extends WebSecurityConfigurerAdapter {protected void configure(HttpSecurity http) throws Exception {http.antMatcher("/api/**")                               .authorizeRequests().anyRequest().hasRole("ADMIN").and().httpBasic();}}@Configuration                                                   public static class FormLoginWebSecurityConfigurerAdapter extends WebSecurityConfigurerAdapter {@Overrideprotected void configure(HttpSecurity http) throws Exception {http.authorizeRequests().anyRequest().authenticated().and().formLogin();}}
}| 配置正常的验证。 | |
创建一个WebSecurityConfigurerAdapter,包含一个@Order注解,用来指定个哪一个WebSecurityConfigurerAdapter更优先。
|
|
http.antMatcher指出,这个HttpSecurity只应用到以/api/开头的URL上。
|
|
创建另外一个WebSecurityConfigurerAdapter实例。用于不以/api/开头的URL,这个配置的顺序在ApiWebSecurityConfigurationAdapter之后,因为他没有指定@Order值为1(没有指定@Order默认会被放到最后).
|
方法安全
从2.0 开始Spring Security对服务层的方法的安全有了实质性的改善。他提供对JSR-250的注解安全支持像框架原生@Secured注解一样好。从3.0开始你也可以使用新的基于表达式的注解 expression-based annotations。你可以应用安全到单独的bean,使用拦截方法元素去修饰Bean声明,或者你可以在整个服务层使用 AspectJ风格的切入点保护多个bean。
EnableGlobalMethodSecurity
我们可以在任何使用@Configuration的实例上,使用@EnableGlobalMethodSecurity注解来启用基于注解的安全性。例如下面会启用Spring的@Secured注解。
@EnableGlobalMethodSecurity(securedEnabled = true)
public class MethodSecurityConfig {
// ...
}
添加一个注解到一个方法(或者一个类或者接机)会限制对相应方法的访问。Spring Security的原生注解支持定义了一套用于该方法的属性。这些将被传递AccessDecisionManager到来做实际的决定:
public interface BankService {@Secured("IS_AUTHENTICATED_ANONYMOUSLY")
public Account readAccount(Long id);@Secured("IS_AUTHENTICATED_ANONYMOUSLY")
public Account[] findAccounts();@Secured("ROLE_TELLER")
public Account post(Account account, double amount);
}
使用如下代码启用JSR-250注解的支持
@EnableGlobalMethodSecurity(jsr250Enabled = true)
public class MethodSecurityConfig {
// ...
}
这些都是基于标准的,并允许应有个你简单的基于角色的约束,但是没有Spring Security的本地注解的能力。要使用基于表达书的语法,你可以使用:
@EnableGlobalMethodSecurity(prePostEnabled = true)
public class MethodSecurityConfig {
// ...
}
和响应Java代码如下:
public interface BankService {@PreAuthorize("isAnonymous()")
public Account readAccount(Long id);@PreAuthorize("isAnonymous()")
public Account[] findAccounts();@PreAuthorize("hasAuthority('ROLE_TELLER')")
public Account post(Account account, double amount);
}
GlobalMethodSecurityConfiguration
有时候你可能需要执行一些比@EnableGlobalMethodSecurity注解允许的更复杂的操作。对于这些情况,你可以扩展GlobalMethodSecurityConfiguration确保@EnableGlobalMethodSecurity注解出现在你的子类。例如如果你想提供一个定制的MethodSecurityExpressionHandler,你可以使用下面的配置:
@EnableGlobalMethodSecurity(prePostEnabled = true)
public class MethodSecurityConfig extends GlobalMethodSecurityConfiguration {@Overrideprotected MethodSecurityExpressionHandler createExpressionHandler() {// ... create and return custom MethodSecurityExpressionHandler ...return expressionHandler;}
}关于可以被重写的方法的更多信息,请参考GlobalMethodSecurityConfiguration的java文档。
已配置对象的后续处理
Spring Security的Java配置没有公开每个配置对象的每一个属性,这简化了广大用户的配置。毕竟如果要配置每一个属性,用户可以使用标准的Bean配置。
虽然有一些很好的理由不直接暴露所有属性,用户可能仍然需要更多高级配置,为了解决这个Spring Security引入了ObjectPostProcessor概念,用来替换java配置的对象实例。例如:如果你想在filterSecurityPublishAuthorizationSuccess里配置FilterSecurityInterceptor属性,你可以想下面一样:
@Override
protected void configure(HttpSecurity http) throws Exception {http.authorizeRequests().anyRequest().authenticated().withObjectPostProcessor(new ObjectPostProcessor<FilterSecurityInterceptor>() {public <O extends FilterSecurityInterceptor> O postProcess(O fsi) {fsi.setPublishAuthorizationSuccess(true);return fsi;}});
}
安全命名空间配置
简介
命名空间配置在Spring框架的2.0版本就可以使用了,他允许你通过额外的XML架构元素补充传统的Spring bean应用程序上下文。你可以从Spring的参考文档找到更多信息 Reference Documentation.。命名空间元素可以简单的允许配置单个bean,或者更强大的,定义一个可选的配置语法,这样更贴近问题域并且对用户隐藏背后的复杂性。一个简单的元素可以隐藏多个bean和添加到应用程序上下文的多个处理步骤。例如:从安全命名空间添加后面的元素到应用程序上下文将开始一个LDAP服务到应用程序内用于测试:
<security:ldap-server />这比配置一个Apache木服务器bean简单的多。最常见的替代配置需求是ldap-server元素的属性支持,用户不用担心他们要创建的bean属名称:[你可以从:specialcharacters,macros[LDAP 身份验证]找到如何使用ldap-server元素的更多的信息. ] 。当编译应用的Context文件时良好的XML编译器应该可以提供您可用的属性和元素的信息。我们建议你尝试使用 Spring Tool Suite,它具有与标准Spring命名空间工作的特别的功能。
为了在你的应用程序上下文中使用安全命名空间,你需要将spring-security-config包含到你的classpath中。然后在你的上下文文件中加入以下的结构声明:
<beans xmlns="http://www.springframework.org/schema/beans"
xmlns:security="http://www.springframework.org/schema/security"
xmlns:xsi="http://www.w3.org/2001/XMLSchema-instance"
xsi:schemaLocation="http://www.springframework.org/schema/beanshttp://www.springframework.org/schema/beans/spring-beans-3.0.xsdhttp://www.springframework.org/schema/securityhttp://www.springframework.org/schema/security/spring-security.xsd">...
</beans>
在很多示例(包括示例应用程序)中你将会看到,我们经常使用security作为默认的命名空间而不是使用beans,这样我们可以在所有安全命名空间中忽略前缀,使得内容更加容易阅读。如果你的应用程序上下文被分割成单独的文件,大部分的安全配置被放到一个文件中,你可能也想这样做。你的安全应用上下文文件应该像下面的一样:
<beans:beans xmlns="http://www.springframework.org/schema/security"
xmlns:beans="http://www.springframework.org/schema/beans"
xmlns:xsi="http://www.w3.org/2001/XMLSchema-instance"
xsi:schemaLocation="http://www.springframework.org/schema/beanshttp://www.springframework.org/schema/beans/spring-beans-3.0.xsdhttp://www.springframework.org/schema/securityhttp://www.springframework.org/schema/security/spring-security.xsd">...
</beans:beans>
我们假设在这一章节我们都使用这种语法。
命名空间的设计
命名空间是设计用来捕捉框架最常见用途和提供一个简化和简介的语法用来在应用程序中打开他们。设计师基于框架中的大规模依赖,并且可以划分为以下几个方面:
Web/HTTP 安全 - 最复杂的部分,设置过滤器和应用框架验证机制的相关服务bean,渲染登录和错误页面等等。
业务对象(方法)安全 - 业务层安全选项。
AuthenticationManager - 处理来自框架其他部分的认证请求。
AccessDecisionManager - 为网页和方法安全提供访问决策,会注册一个默认的但是你可以使用一个定制的来取代他,使用一般的Spring bean语法即可定义。
AuthenticationProvider- 认证管理器认证用户的机制,命名空间提供多种标准选项的支持,同时使用传统语法添加自定义bean的方法。
UserDetailsService - 和AuthenticationProviders密切相关,但往往也被其他bean需要。
我们将在后续章节查看怎么配置他们。
开始使用安全命名空间配置
在这一章,我们将看看怎么创建一个命名空间配置来使用框架的主要功能。让我们假设你想要快速的使用命名空间配置添加验证支持和访问控制和一些测试的登录到一个已经存在的网站应用程序。然后我们看看如何验证数据库和其他的安全仓库。在后续章节我们将介绍更多高级的命名空间配置选项。
web.xml 配置
你需要做的第一件事情是添加下面的过滤器定义到你的web.xml文件:
<filter>
<filter-name>springSecurityFilterChain</filter-name>
<filter-class>org.springframework.web.filter.DelegatingFilterProxy</filter-class>
</filter><filter-mapping>
<filter-name>springSecurityFilterChain</filter-name>
<url-pattern>/*</url-pattern>
</filter-mapping>
这提供了一个钩子到Spring Security的网页基础设施。DelegatingFilterProxy是一个委托了在应用的Context中定义为bean的过滤器实现的一个Spring框架类,在这种情况下,bean的名字是springSecurityFilterChain,这是网络安全命名空间创建的一个基础类。注意你不能自己使用这个bean名字。一旦你添加这个到你的web.xml,你就可以开始编辑你的应用程序上下文文件,网络安全服务被配置到<http>元素。
最小<http>配置
开始开启网页安全你只需要:
<http>
<intercept-url pattern="/**" access="hasRole('USER')" />
<form-login />
<logout />
</http>这表示,我们想要对我们应用程序中的所有URL进行性检测。需要角色ROLE_USER访问他们,我们使用一个包含username和password的表单登录到应用程序,我们希望有一个注销的URL,让我们可以登出应用程序。<http>元素是所有网站相关的命名空间功能的父元类。<intercept-url>元素定义了一个规则使用ant语法去匹配传入的请求的URL。 (在网站应用基础设施章节,查看 Request Matching and HttpFirewall来了解匹配是如何执行的) 你也可以环衬正则表达式语法(查看附录了解更多)。这个access属性定义了这个匹配的规则需要的访问需求。默认是一个典型的用逗号分隔的角色列表,有其中一个符合则允许执行这个请求。 前缀"ROLE_" 是一个标记,只是一个和用户的授权进行简单的比较。换句话说,一个简单的基于角色的检查会被应用。Spring Security的访问控制不仅限于简单角色(因此使用前缀来区分不同类型的)。
|
你可以使用多个 |
为了添加一些用户,你可以直接在命名空间直接定义一组测试数据。
<authentication-manager>
<authentication-provider><user-service><user name="jimi" password="jimispassword" authorities="ROLE_USER, ROLE_ADMIN" /><user name="bob" password="bobspassword" authorities="ROLE_USER" /></user-service>
</authentication-provider>
</authentication-manager>上面的配置定义了两个用户,他们的密码和在这个应用程序里的角色(这将用于访问控制)。也可以使用用户服务从标准的属性文件properties载入用户信息user-service。查看内存认证部分文件格式的更多细节in-memory authentication 。使用 <authentication-provider>元素意思是这些用户信息将被认证管理器使用到请求验证。你可以设置多个<authentication-provider>元素来定义不同的验证源每一个都会被一次访问到。
此时你应该可以开始你的应用程序,你将被要求登录。尝试一下或者尝试使用附带的项目教程实例。
表单和基本登录选项
你可能会想当系统提示你登录这些登录表单哪里来的,因为我们都没有提供任何HTML和JSP文件。事实上我们并没有明确的设定一个登陆页的URL,Spring Security自动生成了一个,基于处理登录的URL标准值。以及登录后跳转的URL然后命名空间提供了大量的支持,让你可以自定义这些选项,例如如果你想自己设计登录页面,你可以使用:
<http>
<intercept-url pattern="/login.jsp*" access="IS_AUTHENTICATED_ANONYMOUSLY"/>
<intercept-url pattern="/**" access="ROLE_USER" />
<form-login login-page='/login.jsp'/>
</http>另外请注意一个额外的intercept-url元素,来指定登录页的请求可以被任何匿名用户访问:[AuthenticatedVoter 类可以提供更多 匿名身份验证] AuthenticatedVoter IS_AUTHENTICATED_ANONYMOUSLY被处理的细节]. 否则请求会被/**规则匹配这将是不可能访问到登录页面。这是一个常见的配置错误,将导致应用无限循环。Spring Security会产生一条经过到日志中如果你的登录页被保护了。它也可以设置让所有请求完全匹配特定模式而绕过安全过滤器,通过定义像这样单独http元素的规则:
<http pattern="/css/**" security="none"/>
<http pattern="/login.jsp*" security="none"/><http use-expressions="false">
<intercept-url pattern="/**" access="ROLE_USER" />
<form-login login-page='/login.jsp'/>
</http>
从Spring Security 3.1开始允许使用多个http元素来为不用的请求规则分别定义Security Filter Chain配置。如果http元素的pattern属性为设置则匹配所有请求。创建不进行安全检查的规则是这个语法的一个简答的例子,这个规则会被映射到一个空的过滤链。我们将会在后面的安全过滤链章节找到更多细节。[多个<http>元素的使用时一个非常重要的功能,例如它允许命名空间在一个应用程序中同时支持有状态和无状态的相同URL之前的语法,使用filters="none"属性到一个intercept-url元素与这一变化相抵触,在3.1将不再支持 。
重要的一点需要认识到,这些不安全的请求将完全无视任何Spring Security 的web相关的配置或附加属性,例如requires-channel通道的限定,所以在请求期间你将无法访问当前用户信息,或调用需要进行安全验证的方法。如果你想让安全过滤链被应用另外也可以使用 access='IS_AUTHENTICATED_ANONYMOUSLY'。
如果你想使用基本验证来替换掉表单的登录,你可以将配置修改如下:
<http use-expressions="false">
<intercept-url pattern="/**" access="ROLE_USER" />
<http-basic />
</http>
当用户访问被保护的资源时,基本身份验证将优先弹出提示框来进行登录。在这总配置如果想使用基于表单的登录,他仍然有效。例如,将登录嵌入另外一个网页。
设置默认的登录后地址
如果不是由试图访问受保护的资源促成的登录,默认目标URL就会起作用。这是一个当用户成功登录后会被带去的URL默认是"/",你也可以通过配置default-target-target为true让用户一直跳转到这个地址而无论用户是按需还是明确的选择登录。这在你的应用程序需要用户一直从主页开始时很有用。例如:
<http pattern="/login.htm*" security="none"/>
<http use-expressions="false">
<intercept-url pattern='/**' access='ROLE_USER' />
<form-login login-page='/login.htm' default-target-url='/home.htm'always-use-default-target='true' />
</http>为了对跳转目标进行更多控制,你可以使用authentication-success-handler-ref 来替代default-target-url。这个bean的引用应该是AuthenticationSuccessHandler的一个实例。你可以在 Core Filters 章节和命名空间附录找到如何定制认证失败的流程的更多信息。
处理登出
logout元素,增加了一个登出导航到一个特定URL的支持,默认的登出URL是 /logout。但是你可以使用logout-url属性指定为其他的URL。更多的属性你可以从附录找到。
使用其他的验证供应商
在实践中,你将需要将一些名字添加到应用程序上下文文件中更具扩展性的数据源。你有可能想把用户信息存放在注入数据库或者LDAP服务器中。LDAP命名空间的配置在LDAP chapter章节,这里就不说了。,如果你的应用程序上下文中有一个Spring Security的 UserDetailsService的实现叫做"myUserDetailsService",你可以这样使用:
<authentication-manager><authentication-provider user-service-ref='myUserDetailsService'/>
</authentication-manager>
如果你想用一个数据库,你可以这样用:
<authentication-manager>
<authentication-provider><jdbc-user-service data-source-ref="securityDataSource"/>
</authentication-provider>
</authentication-manager>在应用程序上下文中,"securityDataSource"是DataSource bean的名字,指明一个数据库包含标准的 Spring Security user data tables. 另外, 你可以配置一个Spring Security JdbcDaoImpl bean 并且指明它使用user-service-ref属性:
<authentication-manager>
<authentication-provider user-service-ref='myUserDetailsService'/>
</authentication-manager><beans:bean id="myUserDetailsService"class="org.springframework.security.core.userdetails.jdbc.JdbcDaoImpl">
<beans:property name="dataSource" ref="dataSource"/>
</beans:bean>你也可以像下面一样使用标准的AuthenticationProvider
<authentication-manager><authentication-provider ref='myAuthenticationProvider'/>
</authentication-manager>myAuthenticationProvider是应用程序上下文的一个bean名字 。他实现了AuthenticationProvider接口。 你可以设置多个验证供应商,这样这些供应商就会按照定义的顺序被查询。看看 验证管理器和命名空间 章节“验证管理器和命名空间”连接AuthenticationManager在命名空间中怎么被配置。
添加密码编码器
密码应该一直使用一个尽可能安全的哈希算法进行编码(非标准的算法,例如SHA或者MD5)。这在<password-encoder>中进行支持,使用bcrypt编码密码,原始的供应商配置应该类似这样:
<beans:bean name="bcryptEncoder"class="org.springframework.security.crypto.bcrypt.BCryptPasswordEncoder"/><authentication-manager>
<authentication-provider><password-encoder ref="bcryptEncoder"/><user-service><user name="jimi" password="d7e6351eaa13189a5a3641bab846c8e8c69ba39f"authorities="ROLE_USER, ROLE_ADMIN" /><user name="bob" password="4e7421b1b8765d8f9406d87e7cc6aa784c4ab97f"authorities="ROLE_USER" /></user-service>
</authentication-provider>
</authentication-manager>
Bcrypt 在大部分时候是一个好的选择。除非你有一个旧系统强迫你使用一个不用的算法。如果你正在使用一个简单的哈希算法或者更糟糕存储了明文密码,你应该考虑迁移到bcrypt这个更安全的选项。
高级web功能
Remember-Me 验证
查看独立的Remember-Me chapter章节来查看该功能的配置。
添加 HTTP/HTTPS 通道安全
如果你的应用程序同时支持HTTP和HTTPS,你要求特定的URL只能使用HTTPS,这是可以直接使用<intercept-url>的requires-channel属性:
<http>
<intercept-url pattern="/secure/**" access="ROLE_USER" requires-channel="https"/>
<intercept-url pattern="/**" access="ROLE_USER" requires-channel="any"/>
...
</http>
有了这个配置,如果用户试图访问任何匹配的"/secure/**"模式使用HTTP,他们将首先被重定向到一个HTTPS URL脚注:[想要了解channel-processing 如何实现,请查阅java文档ChannelProcessingFilter以及相关的类]。可用的选项是“http”、“https”或“任何”。使用价值“任何”意味着可以使用HTTP或HTTPS。
该选项可选值为"http","https"或者"any",使用"any"意思是使用HTTP或者HTTPS均可。如果应用程序使用HTTP和HTTPS非标准的端口,你可以指定如下端口映射的列表:
<http>
...
<port-mappings><port-mapping http="9080" https="9443"/>
</port-mappings>
</http>
请注意,为了真正的安全,应用程序不应该使用HTTP或HTTP和HTTPS之间切换。它应该开始在HTTPS(与用户进入一个HTTPS URL)使用安全连接,以避免任何中间人攻击的可能性。
Session 管理
检测超时
你可以配置Spring Security检测无效的Session ID提交并且将用户重定向到一个适当的URL,这通过session-management元素来达到:
<http>
...
<session-management invalid-session-url="/invalidSession.htm" />
</http>
请注意,如果你使用这个机制来检测会话超时,如果用户注销,然后重新登录,但不关闭浏览器它可能会错误地抛出一个错误。这是因为当你让Session失效时,Cookie没有被清理干净,就算用户已注销还是会重新提交session的cookie而不会清除。你可以在注销时明确的删除JSESSIONID的cookie,例如:通过在注销处理程序使用一下语法:
<http>
<logout delete-cookies="JSESSIONID" />
</http>
不幸的是这个不保证在所有servlet容器都会正常工作,所以你需要在你的环境下进行测试。
|
如果你的应用程序运行在代理后面,你还可以配置代理服务器去删除session的cookie。例如,使用Apache httpd的mod_headers模块。下面的指令可以通过在注销请求的响应头删除 |
并发Session控制
如果你想限制单个用户访问你的应用程序的能力。Spring Security通过后面简单的配置马上启用。首先你需要添加后面的监听器到你的web.xml文件。让Spring Security获得session的生存事件:
<listener>
<listener-class>org.springframework.security.web.session.HttpSessionEventPublisher
</listener-class>
</listener>
然后添加后面的行到你的应用程序上下文:
<http>
...
<session-management><concurrency-control max-sessions="1" />
</session-management>
</http>
这将放置用户登录多次。第二次登录将导致第一次登录变成无效。通常我们更想放置第二次登录,在这种情况下,你可以使用:
<http>
...
<session-management><concurrency-control max-sessions="1" error-if-maximum-exceeded="true" />
</session-management>
</http>
第二次登录将被拒绝,如果基于表单的验证被启用这个用户将会被发送到 authentication-failure-url。如果第二次登录是通过其他非交互的机制,比如“记住我”功能,进行登录的。那么一个“unauthorized”(401)错误将会被发送给客户端。如果你想替换成一个错误页面,你可以为session-management添加一个session-authentication-error-url属性。
如果你正在使用基于表单的登录定制验证过滤器,那么你必须明确地配置同步会话控制的支持。更多的细节可以在 Session Management chapter章节中找到。
Session Fixation 攻击保护
Session fixation完成攻击是一个潜在的威胁。攻击者访问网站生成一个Session,然后诱使其他用户用同一个会话登录(例如:通过发送包含会话标识符作为一个参数链接)。Spring Security通过在登录时创建新的Session或者修改Session ID来应对这种情况。如果你不需要这个保护或者与一些其他需求冲入你可以通过 <session-management>的session-fixation-protection属性来控制这个行为。它有4个选项:
none- 什么都不做,原来的会话将会保留newSession- 创建一个新的干净的Session,不会复制已经存在的Session属性到新的Session,这是Servlet3.0及之前的容器的默认设置migrateSession- 创建一个新的Session并且拷贝所有已经存在的Session属性到新的Session,这是Servlet3.0及之前的容器的默认设置。changeSessionId- 不创建新的Session,使用Servlet容器提供的Session完成攻击保护(HttpServletRequest#changeSessionId())。这个选项只有在Servlet3.1(java EE 7)和更新的容器下可用。在旧的容器设置这个选项会产生一个异常。在Servlet3.0和更新的容器就默认该选项。
当会话完成保护发生时,它会产生SessionFixationProtectionEvent发布到应用程序上下文,如果使用changeSessionId, 这种保护也将导致 任何javax.servlet.http.HttpSessionIdListener被通知,所以如果你的代码监听这两个事件要特别小心。查看Session Management 管理章节查看更多信息。
OpenID 支持
通过一个简单的改变,命名空间可支持用 OpenID 替换或者添加到普通的基于表单登录:
<http>
<intercept-url pattern="/**" access="ROLE_USER" />
<openid-login />
</http>然后,你应该将自己注册为一个OpenID供应商(如myopenid.com),并添加用户信息到你的基于内存的<user-service>:
<user name="http://jimi.hendrix.myopenid.com/" authorities="ROLE_USER" />你应该能够使用myopenid.com网站登录来进行验证。另外,也可以通过设置 openid-login元素的user-service-ref属性来指定一个UserDetailsService bean来使用OpenID。查看前面的authentication providers章节了解更多信息请注意,我们省略从上述用户配置中的密码属性,由于该组的用户数据只被用于加载当前的用户。内部会产生一个随机密码,放置你意外的将这个用户数据用作验证源到你的配置中的其他地方。
属性交换
OpenID 的属性交换支持 attribute exchange。下面的例子尝试接受从OpenID供应商接收邮件和全名,用于应用程序中:
<openid-login>
<attribute-exchange><openid-attribute name="email" type="http://axschema.org/contact/email" required="true"/><openid-attribute name="name" type="http://axschema.org/namePerson"/>
</attribute-exchange>
</openid-login>
每个OpenID属性的“type”是一个URI,有一种特定的模式来确定,这个例子中是 http://axschema.org/。如果属性必须在成功认证后接收,可以设置required 属性。确切的模式和属性的支持将取决于你的OpenID提供商。该属性值返回作为认证过程的一部分,随后可以使用下面的代码访问:
OpenIDAuthenticationToken token =(OpenIDAuthenticationToken)SecurityContextHolder.getContext().getAuthentication();
List<OpenIDAttribute> attributes = token.getAttributes();OpenIDAttribute包含了属性类型和接收到的值(在有多个属性值的情况下包含多个值),通过查看Spring Security核心组件的technical overview章节我们可以了解更多的SecurityContextHolder类的使用方法。如果希望使用多个身份提供者方,多重属性交换配置也被支持。你可以提供多个attribute-exchange元素。在每个上面使用identifier-matcher属性。它包含一个正则表达式,会匹配由用户提供的OpenID标识符。查看代码库的OpenID示例应用的一个示例配置。对 Google, Yahoo 和MyOpenID 提供了不同的属性列表。
相应头
查看如何定制头元素的更多信息请查看安全HTTP响应头章节。
添加自己的过滤器
如果你以前使用过Spring Security,你就会知道,这个 框架维护一个过滤器链,以便应用它的服务。你可能想要添加自己的过滤器到过滤器堆栈的特定位置,或者使用一个Spring Security还没有一个命名空间配置的选项的过滤器(比如CAS)。或者你想使用一个标准命名空间过滤器的定制化版本,比如UsernamePasswordAuthenticationFilter是由 <form-login>元素显式的使用Bean来获取一些额外的高级配置选项,在过滤器链不直接暴露的情况下,你怎么使用命名空间配置这一点?
使用命名空间时过滤器的顺序始终严格执行,当创建应用程序上下文,过滤器Bean被命名空间处理代码进行排序,标准的Spring Security过滤器都具有的命名空间和一个众所周知的位置的别名。
|
在以前的版本中,排序发生在过滤器实例创建之后,在应用程序上下文后处理中。语法在3.0有一些轻微的改变,这会影响到解析 |
标准过滤器别名和顺序,别名和创建的命名空间元素/属性在下表列出,按照过滤器在链中出现的顺序列出:
| Alias | Filter Class | Namespace Element or Attribute |
|---|---|---|
|
CHANNEL_FILTER |
|
|
|
SECURITY_CONTEXT_FILTER |
|
|
|
CONCURRENT_SESSION_FILTER |
|
|
|
HEADERS_FILTER |
|
|
|
CSRF_FILTER |
|
|
|
LOGOUT_FILTER |
|
|
|
X509_FILTER |
|
|
|
PRE_AUTH_FILTER |
|
N/A |
|
CAS_FILTER |
|
N/A |
|
FORM_LOGIN_FILTER |
|
|
|
BASIC_AUTH_FILTER |
|
|
|
SERVLET_API_SUPPORT_FILTER |
|
|
|
JAAS_API_SUPPORT_FILTER |
|
|
|
REMEMBER_ME_FILTER |
|
|
|
ANONYMOUS_FILTER |
|
|
|
SESSION_MANAGEMENT_FILTER |
|
|
|
EXCEPTION_TRANSLATION_FILTER |
|
|
|
FILTER_SECURITY_INTERCEPTOR |
|
|
|
SWITCH_USER_FILTER |
|
N/A |
你可以添加自己的过滤器到列表中,使用custom-filter过滤元件和这些名字来指定你的过滤器应该出现在的位置之一:
<http>
<custom-filter position="FORM_LOGIN_FILTER" ref="myFilter" />
</http><beans:bean id="myFilter" class="com.mycompany.MySpecialAuthenticationFilter"/>你也可以使用after和before属性来让你的过滤器插入到列表中的其他过滤器的前面和后面。FIRST和LAST可以用在position属性来设置你希望将你的过滤器插入到整个列表的前面或者后面。
|
Avoiding filter position conflicts
如果你插入的定制的过滤器可能会占用由命名空间创建的标准过滤器相同的位置,很重要的一点是不要错误的包含了命名空间的版本。移除所有你想替换的功能的过滤器元素。注意,你不能移除有 |
如果你替换的命名空间过滤器需要一个验证入口点(例如:在认证过程是通过尝试触发未认证用户访问以受保护资源)你也需要添加一个定制的入口点Bean。
创建自定义的 AuthenticationEntryPoint
如果你没有使用表单登录,OpenID或基本验证,你可能想像我们之前看到的一样,使用传统的bean语法,定义一个验证过滤器和入口点链接到命名空间。相应的AuthenticationEntryPoint可以使用<http>元素的entry-point-ref属性进行设置。
CAS示例应用是一个很好的示例,展示命名空间的定制bean的使用。如果你不熟悉认证的入口点,可以在technical overview章节看到相关讨论。
方法安全
从2.0版本开始Spring Security改进了对服务层方法的安全支持,它提供了对JSR-250注解安全支持以及框架的原生@Secured注解支持。从3.0开始你也可以使用新的expression-based annotations。你可以将安全应用到单个bean。使用intercept-methods元素装饰Bean的声明。或者你可以在使用AspectJ风格的切入点应用安全到整个服务层的多个Bean类。
The <global-method-security> 元素
这个元素用来在你的应用程序中启用基于安全性(通过设置元素的appropriate属性),同时分组将应用到整个应用程序上下文的安全切入点声明。你应该只定义一个<global-method-security>元素。下面的定义可以开启Spring Security的@Secured支持:
<global-method-security secured-annotations="enabled" />添加一个注解到类或者接口的方法中可以限制对相应方法的访问。Spring Security的原生注解支持定义了一套用于该方法的属性。这些将被传递到AccessDecisionManager用来做实际的决定:
public interface BankService {@Secured("IS_AUTHENTICATED_ANONYMOUSLY")
public Account readAccount(Long id);@Secured("IS_AUTHENTICATED_ANONYMOUSLY")
public Account[] findAccounts();@Secured("ROLE_TELLER")
public Account post(Account account, double amount);
}
启用 JSR-250 注解使用
<global-method-security jsr250-annotations="enabled" />这些都是基于标准的,并允许应用简单的基于角色的约束,但是没有Spring Security的原生注解强大。要使用新的基于表达式的语法,你可以使用
<global-method-security pre-post-annotations="enabled" />等价的Java代码如下
public interface BankService {@PreAuthorize("isAnonymous()")
public Account readAccount(Long id);@PreAuthorize("isAnonymous()")
public Account[] findAccounts();@PreAuthorize("hasAuthority('ROLE_TELLER')")
public Account post(Account account, double amount);
}
基于表达式的注解是一个很好的选择,如果你需要定义超过一个检查当前用户列表中的角色名称的简单的规则。
|
被注解的方法将仅在被定义为Spring 的Bean的实例时才能确保安全(在相同的应用程序的上下文中该方法-启用方法安全检查)。如果你想确保非Sprign创建的实例的安全性(比如使用 |
|
你可以在同一个应用程序中启用多种注解,但是在一个借口或者类中只能使用一种类型的注解,否则会出现不明确的行为。如果对特定的方法使用了两个注解,只有其中的一个会被应用。 |
使用 protect-pointcut
使用protect-pointcut非常有用, 因为它允许你只用简单的声明就能对很多bean添加安全性。看看下面的例子:
<global-method-security>
<protect-pointcut expression="execution(* com.mycompany.*Service.*(..))"access="ROLE_USER"/>
</global-method-security>这将保护在应用程序上下文定义的所有在com.mycompany包下类名以“service”结尾的类的方法。只有拥有ROLE_USER角色用户才能执行这些方法。和URL匹配一样,列表中多个匹配的话将会使用第一个匹配的安全注解,比切入点有更高的优点级。
默认的 AccessDecisionManager
这一章节假设你有一些Spring Security中访问控制的底层架构的知识。如果没有,你可以跳过它,后面再来看,这部分针对那些真正需要进行一些定制而不是简单的基于角色的安全用户。
当你使用命名空间配置时,一个AccessDecisionManager实例将会自动创建并注册用来按照你在intercept-url和protect-pointcut(还有如果你使用了方法注解安全也包含在内)定义的访问属性进行访问决策。
默认的策略是使用一个AffirmativeBased、AccessDecisionManager和RoleVoter``AuthenticatedVoter,你也可以从authorization章节找到更多信息.
自定义 AccessDecisionManager
如果你需要使用一个更复杂的访问控制策略,那么很容易的为方法和Web安全设置替代方案。
对于方法安全,通过在access-decision-manager-ref上设置global-method-security 属性来为应用程序指导适当的 AccessDecisionManager的Bean ID。
<global-method-security access-decision-manager-ref="myAccessDecisionManagerBean">
...
</global-method-security>网站安全的语法一样,但是是在http元素上。
<http access-decision-manager-ref="myAccessDecisionManagerBean">
...
</http>
验证管理器和命名空间
Spring Security中主要的提高验证服务的借口是AuthenticationManager,这通常是一个Spring Security的ProviderManager类的实例。如果你以前用过框架你可能已经熟悉了。如果不是后面的 technical overview chapter章节会讲到。这个bean是通过authentication-manager命名空间来注册。你不能使用自定义的AuthenticationManager如果通过命名空间使用HTTP或方法安全,但是这不应该是一个问题,因为你可以完全控制所使用的好的AuthenticationProvider。
你可能需要使用ProviderManager注册其他的AuthenticationProvider Bean,你可以使用<authentication-provider>元素的ref属性,属性的值是你要添加的bean的名字,例如:
<authentication-manager>
<authentication-provider ref="casAuthenticationProvider"/>
</authentication-manager><bean id="casAuthenticationProvider"class="org.springframework.security.cas.authentication.CasAuthenticationProvider">
...
</bean>另一个常见的需求是,上下文中的另一个bean可能需要引用AuthenticationManager,你可以注册一个AuthenticationManager的别名在应用程序上下文中的其他地方使用这个名字。
<security:authentication-manager alias="authenticationManager">
...
</security:authentication-manager><bean id="customizedFormLoginFilter"class="com.somecompany.security.web.CustomFormLoginFilter">
<property name="authenticationManager" ref="authenticationManager"/>
...
</bean>
应用程序示例
这里有几个可用的网站应用程序示例。为了避免大量的下载。只有"totorial""contacts"示例包含到了分发的zip文件。其他的可用按照the introduction从源代码构建。你可以很容易的自己构建项,通过 http://spring.io/spring-security/网站可以获取更多信息。本章中提到的所有路径是相对于项目的源目录。
Tutorial 示例
本教程样本是一个让你入门的很好的基础的例子。它完全使用而来简单命名空间配置。编译好的应用程序包含在分发的zip包中。随时可以部署到你的Web容器(spring-security-samples-tutorial-3.1.x.war)。 form-based的认证机制结合remember-me 功能,验证供应商提供使用cookie自动基础登录。
我们建议你从本示例开始,因为XML非常小,易于遵循。最重要的是,你可以把这个XML文件(和它对应的web.xml入口)轻松地添加到现有的应用程序中。在这个基本集成成功的时候,我们建议你试着添加方法验证和领域对象安全。
Contacts 示例
该示例是一个高级的例子,它展示除了基本的应用程序安全领域对象的访问控制列表(ACL)的更强大的功能。本申请提供了一个接口让用户能够管理简单的联系人数据库(域对象)。
拷贝WAR问价你从Spring Security 分发包到你自己的容器的webapps 目录来部署它。war名字是spring-security-samples-contacts-3.1.x.war(扩展的版本号取决于你的版本号)。
开始你的容器后检查应用程序是否可用载入,访问 http://localhost:8080/contacts (或者其他适合你的容器URL)。
接下来,单击"Debug"。系统将提示你进行身份验证,以及页面提示的一系列用户名和密码。简单验证,显示一个结果页面。它应该包含类似于一下成功信息:
Security Debug InformationAuthentication object is of type:
org.springframework.security.authentication.UsernamePasswordAuthenticationTokenAuthentication object as a String:org.springframework.security.authentication.UsernamePasswordAuthenticationToken@1f127853:
Principal: org.springframework.security.core.userdetails.User@b07ed00: Username: rod; \
Password: [PROTECTED]; Enabled: true; AccountNonExpired: true;
credentialsNonExpired: true; AccountNonLocked: true; \
Granted Authorities: ROLE_SUPERVISOR, ROLE_USER; \
Password: [PROTECTED]; Authenticated: true; \
Details: org.springframework.security.web.authentication.WebAuthenticationDetails@0: \
RemoteIpAddress: 127.0.0.1; SessionId: 8fkp8t83ohar; \
Granted Authorities: ROLE_SUPERVISOR, ROLE_USERAuthentication object holds the following granted authorities:ROLE_SUPERVISOR (getAuthority(): ROLE_SUPERVISOR)
ROLE_USER (getAuthority(): ROLE_USER)Success! Your web filters appear to be properly configured!
一旦你成功地收到上述消息,返回到示例应用程序的主页,点击"Manage"。然后,你可以使用这个应用程序。注意只有当前用户的联系人会被显示,并且只有拥有ROLE_SUPERVISOR可用授权去删除联系人,在幕后MethodSecurityInterceptor保护业务对象。
这应用程序允许你修改与不同的联系人相关联的访问控制列表。一定要试试这个,并了解它是如何工作通过检查应用程序上下文XML文件。
LDAP 示例
LDAP例子程序提供了一个基本的配置和使用命名空间和使用传统的bean同等设置在同一个应用程序上下文文件。这意味着,其实是在这个应用程序中配置了两个相同的身份验证提供者。
OpenID 示例
OpenID的示例演示了如何使用命名空间来配置OpenID和如何设置为Google,Yahoo和OpenID设置 attribute exchange配置(如果你愿意的话,也可以添加其他的供应商)。它使用一个基于JQery的 openid-selector,以提供用户友好的登录页面,它允许用户很容易的选择一个验证提供者,而不是输入OpenID标识符。
应用程序的不同之处在于它允许任何用户访问该站点认证情景(只要他们的OpenID身份验证是成功的)。当你第一次登录时,你会得到一个"Welcome [your name]"的消息。如果你注销并重新登录(以相同的身份),那么这应更改为"欢迎回来",这是通过使用一个实现自定义的UserDetailsService它分配一个标准角色给任何用户,并在内部存储身份的map。显然,一个真正的应用程序将使用一个数据库替换它。看一看源代码了解更多信息,此类还考虑到,不同供应商返回不同属性,并建立相应用户名。
CAS 示例
CAS示例要求你同时运行CAS服务器和CAS客户端。 它不包含在发行包,所以你应该按照 the introduction描述签出目标代码。你会发现sample/cas目录下的相关文件。还有在那里一个Readme.txt文件,这也解释了如何直接从源代码运行服务器和客户端,完全支持SSL。
JAAS 示例
该JAAS是很简单的如何用Spring Security 使用JAAS LoginModule 的例子。所提供的LoginModule将成功地验证用户,如果用户名和密码相等,否则抛出一个LoginException异常。在本示例中使用的AuthorityGranter总是授予角色ROLEUSER。示例应用程序还演示了如何通过设置LoginModule的jaas-api-provision等于true返回JAAS Subjec来运行。
Pre-Authentication 示例
此示例应用程序演示了如何绑定bean从pre-authentication 框架从Java EE容器使用登录信息。用户名和角色是由容器设置的。
代码是samples/preauth.
Spring Security 社区
问题跟踪
Spring Security 使用JIRA来管理bug报告和改进请求,如果你发现错误,请使用JIRA记录报告。不要在支持论坛,邮件列表,或通过电子邮件项目的记录。这些方法是临时的,我们更喜欢使用正式的流程。
如果可能的话,在你的问题的报告摸清提供一个JUnit测试,演示任何不正确的行为。或者,更好的是,提供了一个可以解决这个问题的补丁。同样,非常欢迎的提出改进需求,虽然我们只接受、有对应的单元测试的改进请求。这是必要的,以确保保持项目的测试覆盖率。
问题跟踪系统你可以通过这里访问: https://github.com/spring-projects/spring-security/issues.
成为参与者
我们欢迎你参与Spring Security项目。有贡献的方法很多,包括阅读论坛,并响应来自其他人的问题,编写新的代码,改进现有的代码,协助文档,开发样品或教程,或则干脆提出建议。
更多信息
欢迎为Spring Security 提出问题和意见。你可以使用Spring社区 论坛网站http://spring.io/questions[http://spring.io/questions] 和其他Spring Security框架的用户进行讨论。请记住,正如前面说的使用JIRA提交bug报告。
架构与实现
一旦你熟悉了设置和运行一些基于命名空间配置的应用程序,你可能希望开发更多的框架去理解命名空间门面后面实际上是如何运转。类似大部分软件, Spring Security有一定的中央接口,以及通常在整个框架中使用的概念抽象类。在参考指南的这一部分,我们将看看其中的一些,看看它们如何协同工作去支持Spring Security中的身份验证和访问控制。
技术概述
运行环境
Spring Security 3.0需要Java 5.0的运行环境或者更高的版本. 由于 Spring Security 是以独立的方式运作, 就不需要什么特殊的配置文件到你的Java运行环境。特别是, 不需要配置专门的Java认证和授权服务(JAAS)策略文件或将Spring Security的位置放到普通路径中。
同样,如果你使用的是EJB容器或者Servlet容器也没有必要把任何特殊的配置文件放到任何地方,也不包括Spring Security的服务器类加载器。所有必须的文件都将包含在你的应用程序中。
这种设计给部署时间提供了最大的灵活性,你可以简单的复制你的目标文件(可以是JAR, WAR或者EAR)从一个系统到另一个系统,它会立即开始工作。
核心组件
在Spring Security 3.0的版本中,spring-security-core中的内容被精简到了最低限度。它不再包含web应用安全,LDAP或命名空间配置的任何代码。我们来看看一些Java类型,你会在核心模块中找到。它们代表了框架的基石,所有如果你需要越过一个简单的命名空间配置,那么最重要的是你要明白它们是什么,即使你不需要直接与它们进行交互。
SecurityContextHolder, SecurityContext和Authentication 对象
最根本的对象是SecurityContextHolder。我们把当前应用程序的当前安全环境的细节存储到它里边了, 它也包含了应用当前使用的主体细节。默认情况下SecurityContextHolder使用ThreadLocal存储这些信息, 这意味着,安全环境在同一个线程执行的方法一直是有效的, 即使这个安全环境没有作为一个方法参数传递到那些方法里。这种情况下使用ThreadLocal是非常安全的,只要记得在处理完当前主体的请求以后,把这个线程清除就行了。当然,Spring Security自动帮你管理这一切了, 你就不用担心什么了。
有些程序并不适合使用ThreadLocal,因为它们处理线程的特殊方法。比如Swing客户端也许希望Java Virtual Machine里所有的线程 都使用同一个安全环境。SecurityContextHolder可以配置启动策略来指定你希望上下文怎么被存储。对于一个独立的应用程序,你会使用SecurityContextHolder.MODE_GLOBAL策略。其他程序可能也想由安全线程产生的线程也承担同样的安全标识。这是通过使用SecurityContextHolder.MODE_INHERITABLETHREADLOCAL实现。你可以通过两种方式更改默认的SecurityContextHolder.MODE_THREADLOCAL模式。第一个是设置系统属性,第二个是调用SecurityContextHolder的静态方法。大多数应用程序不需要修改默认值,但是如果你想要修改,可以看一下SecurityContextHolder的JavaDocs中的详细信息了解更多。
当前用户获取信息
我们在SecurityContextHolder内存储目前与应用程序交互的主要细节。Spring Security使用一个Authentication对象来表示这些信息。 你通常不需要创建一个自我认证的对象,但它是很常见的用户查询的Authentication对象。你可以使用以下代码块-从你的应用程序的任何部分-获得当前身份验证的用户的名称,例如:
Object principal = SecurityContextHolder.getContext().getAuthentication().getPrincipal();if (principal instanceof UserDetails) {
String username = ((UserDetails)principal).getUsername();
} else {
String username = principal.toString();
}通过调用getContext()返回的对象是SecurityContext接口的实例。这是保存在线程本地存储中的对象。我们将在下面看到,大多数的认证机制以Spring Security返回UserDetails实例为主。
The UserDetailsService
从上面的代码片段中还可以看出一件事,就是你可以从Authentication对象中获得安全主体。这个安全主体就是一个Object。大多数情况下,可以强制转换成UserDetails对象 。 UserDetails是一个Spring Security的核心接口。它代表一个主体,是扩展的,而且是为特定程序服务的。 想一下UserDetails章节,在你自己的用户数据库和如何把Spring Security需要的数据放到SecurityContextHolder里。为了让你自己的用户数据库起作用,我们常常把UserDetails转换成你系统提供的类,这样你就可以直接调用业务相关的方法了(比如 getEmail(), getEmployeeNumber()等等)。
现在,你可能想知道,我应该什么时候提供这个UserDetails对象呢?我怎么做呢?我想你说这个东西是声明式的,我不需要写任何代码,怎么办?简单的回答是,这里有一个特殊的接口叫UserDetailsService。这个接口里的唯一的一个方法,接收String类型的用户名参数,返回UserDetails:
UserDetails loadUserByUsername(String username) throws UsernameNotFoundException;这是Spring Security用户加载信息的最常用的方法并且每当需对用户的信息时你会看到它使用的整个框架。
成功认证后,UserDetails用于构建存储在SecurityContextHolder(详见 以下)的Authentication对象。好消息是,我们提供了一些UserDetailsService的实现,包括一个使用内存映射(InMemoryDaoImpl)而另一个使用JDBC(JdbcDaoImpl)。大多数用户倾向于写自己的,常常放到已有的数据访问对象(DAO)上使用这些实现,表示他们的雇员,客户或其他企业应用中的用户。记住这个优势,无论你用UserDetailsService返回的什么数据都可以通过SecurityContextHolder获得,就像上面的代码片段讲的一样。
|
关于 |
GrantedAuthority
除了主体,另一个Authentication提供的重要方法是getAuthorities()。这个方法提供了GrantedAuthority对象数组。毫无疑问,GrantedAuthority是赋予到主体的权限。这些权限通常使用角色表示,比如ROLE_ADMINISTRATOR或ROLE_HR_SUPERVISOR。这些角色会在后面,对web验证,方法验证和领域对象验证进行配置。Spring Security的其他部分用来拦截这些权限,期望他们被表现出现。GrantedAuthority对象通常是使用UserDetailsService读取的。
通常情况下,GrantedAuthority对象是应用程序范围下的授权。它们不会特意分配给一个特定的领域对象。因此,你不能设置一个GrantedAuthority,让他有权限展示编号54的Employee对象,因为如果有成千上万的这种授权,你会很快用光内存(或者,至少,导致程序花费大量时间去验证一个用户)。当然,Spring Security被明确设计成处理常见的需求,但是你最好别因为这个目的使用项目领域模型安全功能。
小结
简单回顾一下,Spring Security主要由以下几部分组成的:
SecurityContextHolder, 提供几种访问SecurityContext的方式。SecurityContext, 保存Authentication信息和请求对应的安全信息。Authentication, 展示Spring Security特定的主体。GrantedAuthority, 反应,在应用程序范围你,赋予主体的权限。UserDetails,通过你的应用DAO,提供必要的信息,构建Authentication对象。UserDetailsService, 创建一个UserDetails,传递一个String类型的用户名(或者证书ID或其他).
现在,你应该对这种重复使用的组件有一些了解了。 让我们贴近看一下验证的过程。
验证
Spring Security可以在很多不同的认证环境下使用。虽然我们推荐人们使用Spring Security,不与已存在的容器管理认证系统结合,但它也是支持的-使用你自己的属性验证系统进行整合。
什么是Spring Security验证?
让我们考虑一个大家都很熟悉的标准的验证场景。
提示用户输入用户名和密码进行登录。
该系统 (成功) 验证该用户名的密码正确。
获取该用户的环境信息 (他们的角色列表等).
为用户建立安全的环境。
用户进行,可能执行一些操作,这是潜在的保护的访问控制机制,检查所需权限,对当前的安全的环境信息的操作。
前三个项目构成的验证过程,所以我们将看看这些是如何发生在Spring Security中的。
用户名和密码进行组合成一个实例
UsernamePasswordAuthenticationToken(一个Authentication接口的实例, 我们之前看到的).令牌传递到
AuthenticationManager实例进行验证。该
AuthenticationManager完全填充Authentication实例返回成功验证。安全环境是通过调用
SecurityContextHolder.getContext().setAuthentication(…), 传递到返回的验证对象建立的。
从这一点上来看,用户被认为是被验证的。让我们看看一些代码作为一个例子:
import org.springframework.security.authentication.*;
import org.springframework.security.core.*;
import org.springframework.security.core.authority.SimpleGrantedAuthority;
import org.springframework.security.core.context.SecurityContextHolder;public class AuthenticationExample {
private static AuthenticationManager am = new SampleAuthenticationManager();public static void main(String[] args) throws Exception {BufferedReader in = new BufferedReader(new InputStreamReader(System.in));while(true) {System.out.println("Please enter your username:");String name = in.readLine();System.out.println("Please enter your password:");String password = in.readLine();try {Authentication request = new UsernamePasswordAuthenticationToken(name, password);Authentication result = am.authenticate(request);SecurityContextHolder.getContext().setAuthentication(result);break;} catch(AuthenticationException e) {System.out.println("Authentication failed: " + e.getMessage());}}System.out.println("Successfully authenticated. Security context contains: " +SecurityContextHolder.getContext().getAuthentication());
}
}class SampleAuthenticationManager implements AuthenticationManager {
static final List<GrantedAuthority> AUTHORITIES = new ArrayList<GrantedAuthority>();static {AUTHORITIES.add(new SimpleGrantedAuthority("ROLE_USER"));
}public Authentication authenticate(Authentication auth) throws AuthenticationException {if (auth.getName().equals(auth.getCredentials())) {return new UsernamePasswordAuthenticationToken(auth.getName(),auth.getCredentials(), AUTHORITIES);}throw new BadCredentialsException("Bad Credentials");
}
}在这里我们已经写了一个小程序,要求用户输入一个用户名和密码并执行上述序列。这个AuthenticationManager我们这里将验证用户的用户名和密码将其设置成一样的,它给每一个用户分配一个单一的角色。从上面输出的将是类似的东西:
Please enter your username:
bob
Please enter your password:
password
Authentication failed: Bad Credentials
Please enter your username:
bob
Please enter your password:
bob
Successfully authenticated. Security context contains: \
org.springframework.security.authentication.UsernamePasswordAuthenticationToken@441d0230: \
Principal: bob; Password: [PROTECTED]; \
Authenticated: true; Details: null; \
Granted Authorities: ROLE_USER
请注意,你通常不需要写任何这样的代码。这个过程通常会发生在内部,以一个web认证过滤器为例,我们刚刚在这里的代码显示,在Spring Security中究竟是什么构成了验证的问题,有一个相对简单的答案。用户验证时,SecurityContextHolder包含一个完全填充的Authentication对象的用户进行身份验证。
直接设置SecurityContextHolder的内容
事实上,Spring Security不介意你如何把Authentication对象包含在SecurityContextHolder内。唯一的关键要求是SecurityContextHolder包含Authentication在AbstractSecurityInterceptor之前(我们会看到更多的版本)需要用户授权操作。
你可以(很多用户都这样做)写一个自己的过滤器或MVC控制器来提供验证系统的交互,这些都不是基于Spring Security的。比如,你也许使用容器管理认证,从ThreadLocal或JNDI里获得当前用户信息。或者,你的公司可能有一个遗留系统,它是一个企业标准,你不能控制它。这种情况下,很容易让Spring Security工作,也能提供验证能力。你所需要的就是写一个过滤器(或等价物)从指定位置读取第三方用户信息,把它放到SecurityContextHolder里。在这种情况下,你还需要考虑的事情通常是由内置的认证基础设施自动照顾。例如,缓存请求的情况下你可能需要事先创建一个HTTP会话,在编写客户端响应之前 [1]。
如果你想知道AuthenticationManager是如何以现实世界的例子来实现,我们可以来看看 核心服务一章.
在Web应用程序中的身份验证
现在让我们来看看你在Web应用程序中使用Spring Security的情况(不启用web.xml安全性)。用户如何进行身份验证和建立安全环境?
考虑一个典型的Web应用程序的身份验证过程:
你访问首页, 点击一个链接。
向服务器发送一个请求,服务器判断你是否在访问一个受保护的资源。
如果你还没有进行过认证,服务器发回一个响应,提示你必须进行认证。响应可能是HTTP响应代码,或者是重新定向到一个特定的web页面。
依据验证机制,你的浏览器将重定向到特定的web页面,这样你可以添加表单,或者浏览器使用其他方式校验你的身份(比如,一个基本校验对话框,cookie,或者X509证书,或者其他)。
浏览器会发回一个响应给服务器。 这将是HTTP POST包含你填写的表单内容,或者是HTTP头部,包含你的验证信息。
下一步,服务器会判断当前的证书是否是有效的, 如果他们是有效的,下一步会执行。 如果他们是非法的,通常你的浏览器会再尝试一次(所以你返回的步骤二)。
你发送的原始请求,会导致重新尝试验证过程。有希望的是,你会通过验证,得到足够的授权,访问被保护的资源。如果你有足够的权限,请求会成功。否则,你会收到一个HTTP错误代码403,意思是访问被拒绝。
Spring Security使用鲜明的类负责上面提到的每个步骤。主要的部分是(为了使用他们) ExceptionTranslationFilter, 一个 AuthenticationEntryPoint 一个验证机制, 我们在上一节看到它负责调用AuthenticationManager。
ExceptionTranslationFilter
ExceptionTranslationFilter是一个Spring Security过滤器,用来检测是否抛出了Spring Security异常。这些异常会被AbstractSecurityInterceptor抛出,它主要用来提供验证服务。我们会在下一节讨论AbstractSecurityInterceptor,但是现在,我们只需要知道,它是用来生成Java,并且要知道和HTTP没什么关系,或者如何验证一个主体。而ExceptionTranslationFilter提供这些服务,使用特点那个的响应,返回错误代码403(如果主体被验证了,但是权限不足-在上边的步骤七),或者启动一个AuthenticationEntryPoint(如果主体没有被认证,然后我们需要进入步骤三)。
AuthenticationEntryPoint
AuthenticationEntryPoint对应上面列表中的步骤三。如你所想的,每个web应用程序都有默认的验证策略(好的,这可以在Spring Security里配置一切,但是让我们现在保持简单)。每个主要验证系统会有它自己的AuthenticationEntryPoint实现, 会执行动作,如同步骤三里的描述一样。
验证机制
在你的浏览器决定提交你的认证证书之后(使用HTTP表单发送或者是HTTP头),服务器部分需要有一些东西来"收集"这些验证信息。现在我们到了上述的第六步。 在Spring Security里,我们需要一个特定的名字,来描述从用户代码(通常是浏览器)收集验证信息的功能,这个名字就是"验证机制"。实例是窗体的基本登录和基本的身份验证。一旦认证细节已从用户代理收集,建立一个Authentication "request"对象,然后提交给AuthenticationManager。
验证机制重新获得了组装好的Authentication对象时,它会认为请求有效,把Authentication放到SecurityContextHolder里的,然后导致原始请求重审(第七步)。另一方面,如果AuthenticationManager驳回了请求,验证机制会让用户代码重试(第二步)。
Storing the SecurityContext between requests
根据不同的应用程序类型,在用户操作的过程中需要有合适的策略来保存security信息。在一个典型的web应用中,一个用户登录系统之后就会被一个特有的session Id所唯一标识,服务器会将session作用期间的principal数据保存在缓存中。在Spring Security中,保存SecurityContext的任务落在了SecurityContextPersistenceFilter身上,它默认将上下文当做HttpSession属性保存在HTTP请求中,并且将每一个请求的上下文保存在SecurityContextHolder中,最重要的功能,是在请求结束之后,清理SecurityContextHolder。你不需要处于安全的目的直接和HttpSession打交道。在这里仅仅只是不需要那样做-总是使用SecurityContextHolder来代替HttpSession。
许多其他的应用(举个例子:一个无状态的RESTful风格web服务)不使用Http Session并且每次请求过来都会进行验证。然而比较重要的是:`SecurityContextPersistenceFilter`被包含在过滤器链中,并确保每次请求完毕之后清理SecurityContextHolder。
|
其中有一个应用程序接收一个会话的并发请求,同样的 |
Spring Security的访问控制(授权)
负责Spring Security访问控制决策的主要接口是AccessDecisionManager。它有一个decide方法,它需要一个Authentication对象请求访问,一个"secure object"(见下文)和安全元数据属性的列表适用的对象(如一个列表哪些角色需要被访问授权)。
安全和AOP建议
如果你熟悉AOP的话,就会知道有几种不同的拦截方式:之前,之后,抛异常和环绕。 其中环绕是非常有用的,因为advisor可以决定是否执行这个方法,是否修改返回的结果,是否抛出异常。 Spring Security为方法调用提供了一个环绕advice,就像web请求一样。 我们使用Spring的标准AOP支持制作了一个处理方法调用的环绕advice,我们使用标准Filter建立了对web请求的环绕advice。
对那些不熟悉AOP的人,需要理解的关键问题是Spring Security可以帮助你保护方法的调用,就像保护web请求一样。大多数人对保护服务层里的安全方法非常按兴趣。这是因为在目前这一代J2EE程序里,服务器放了更多业务相关的逻辑。如果你只是需要保护服务层的方法调用,Spring标准AOP平台就够了。如果你想直接保护领域对象,你会发现AspectJ非常值得考虑。
可以选择使用AspectJ还是SpringAOP处理方法验证,或者你可以选择使用filters处理web请求验证。 你可以不选,选择其中一个,选择两个,或者三个都选。主流的应用是处理一些web请求验证,再结合一些在服务层里的Spring AOP方法调用验证。
安全对象和AbstractSecurityInterceptor
那么什么是一个"安全对象"呢?Spring Security使用术语是指可以有安全性的任何对象(如授权决策)应用于它。最常见的例子就是方法调用和web请求。
Spring Security支持的每个安全对象类型都有它自己的类型,他们都是AbstractSecurityInterceptor的子类。很重要的是,如果主体是已经通过了验证,在AbstractSecurityInterceptor被调用的时候,SecurityContextHolder将会包含一个有效的Authentication。
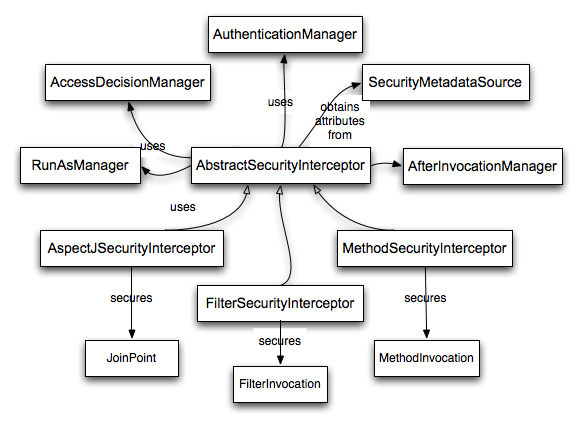
AbstractSecurityInterceptor提供了一套一致的工作流程,来处理对安全对象的请求,通常是:
查找当前请求里分配的"配置属性"。
把安全对象,当前的
Authentication和配置属性,提交给AccessDecisionManager来进行以此认证决定。有可能在调用的过程中,对
Authentication进行修改。允许安全对象进行处理(假设访问被允许了)。
在调用返回的时候执行配置的
AfterInvocationManager。如果调用引发异常,AfterInvocationManager将不会被调用。
配置属性是什么?
一个"配置属性"可以看做是一个字符串,它对于AbstractSecurityInterceptor使用的类是有特殊含义的。它们由框架内接口ConfigAttribute表示。它们可能是简单的角色名称或拥有更复杂的含义,这就与AccessDecisionManager实现的先进程度有关了。AbstractSecurityInterceptor和配置在一起的 SecurityMetadataSource 用来为一个安全对象搜索属性。通常这个属性对用户是不可见的。配置属性将以注解的方式设置在受保护方法上,或者作为受保护URLs的访问属性。例如,当我们看到像<intercept-url pattern='/secure/**' access='ROLE_A,ROLE_B'/>命名空间中的介绍,这是说配置属性ROLE_A和ROLE_B适用于匹配Web请求的特定模式。在实践中,使用默认的AccessDecisionManager配置, 这意味着,任何人谁拥有GrantedAuthority只要符合这两个属性将被允许访问。严格来说,它们只是依赖于AccessDecisionManager实施的属性和解释。使用前缀ROLE_是一个标记,以表明这些属性是角色,应该由Spring Security的RoleVoter前缀被消耗掉。这只是使用AccessDecisionManager的选择基础。我们将在授权章看到AccessDecisionManager是如何实现的。
RunAsManager
假设AccessDecisionManager决定允许执行这个请求,AbstractSecurityInterceptor会正常执行这个请求。话虽如此,罕见情况下,用户可能需要把SecurityContext的Authentication换成另一个Authentication, 这是由AccessDecisionManager 调用RunAsManager。这也许在,有原因,不常见的情况下有用,比如服务层方法需要调用远程系统表现不同的身份。 因为Spring Security自动传播安全身份,从一个服务器到另一个(假设你使用了配置好的RMI或者HttpInvoker远程调用协议客户端),就可以用到它了。
AfterInvocationManager
按照下面安全对象执行和返回的方式-可能意味着完全的方法调用或过滤器链的执行-在AbstractSecurityInterceptor得到一个最后的机会来处理调用。这种状态下AbstractSecurityInterceptor对有可能修改返回对象感兴趣。你可能想让它发生,因为验证决定不能“关于如何在”一个安全对象调用。高可插拔性,AbstractSecurityInterceptor通过控制AfterInvocationManager在实际需要的时候修改对象。这里类实际上可能替换对象,或者抛出异常,或者什么也不做。如果调用成功后,检查调用才会执行。如果出现异常,额外的检查将被跳过。
AbstractSecurityInterceptor 和它的相关对象 Security interceptors and the "secure object" model
扩展安全对象模型
只有当开发人员考虑一个全新的拦截方法和授权请求时才需要直接使用安全对象。例如,为了确保对消息系统的调用,它有可能建立建立一个新的安全对象。任何东西都需要安全,并且还提供了一种方法去调用(如建议语义的AOP)能够被做成一个安全对象。不得不说的是,大多数Spring应用程序将只使用三种目前完全支持的安全对象类型(AOP Alliance MethodInvocation, AspectJ JoinPoint和web请求FilterInvocation)。
Localization
Spring Security支持终端用户看到异常消息的本地化。如果你的应用程序是专为讲英语的用户设计的,你不需要做任何事情,因为默认所有的安全信息都是英文的,如果你需要支持其他地方,你需要知道的一切都被包含在这部分。
所有异常消息都可以本地化,包括有关验证失败和访问被拒绝(授权失败)的消息。这主要集中在开发者和系统发布(包括不正确的属性,接口违反合同,使用不正确的构造器,开始验证,日志调试等级)异常和日志消息没有本地化,而是使用硬编码的Spring Security的英文代码。
在spring-security-core-xx.jar的运输中你会发现一个org.springframework.security 包含了 messages.properties文件,以及一些常用版本的本地化语言。这应该是你的ApplicationContext,因为Spring Security实现了Spring的MessageSourceAware界面,希望这些消息是依赖于应用程序上下文启动的时候注入。通常你需要做的是创建你的应用程序上下文参考消息里面的bean。一个例子如下所示:
<bean id="messageSource"class="org.springframework.context.support.ReloadableResourceBundleMessageSource">
<property name="basename" value="classpath:org/springframework/security/messages"/>
</bean>该messages.properties是按照标准的资源束命名方式,为Spring Security的消息所支持的默认语言。这个默认的文件是英文的。
如果您希望自定义messages.properties文件,或支持其他语言,您应该复制该文件,相应地重命名它,并在上面的bean定义中注释它。在这个文件中没有大量的消息密钥,因此本地化不应该被认为是一个重大举措。如果你对这个文件执行定为操作,请考虑与社区分享你的工作通过记录JIRA任务和附加被你恰当命名的messages.properties本地化版本。
Spring Security依赖于Spring"s的本地化支持,以实际查找适当的消息。为了这项工作,你必须确保从传入请求的区域存储在Spring’s`org.springframework.context.i18n.LocaleContextHolder`。Spring MVC的` DispatcherServlet 会自动为你的程序做,但因为Spring Security的过滤器在那之前被调用,`localecontextholder需在过滤器被呼叫之前建立在包含正确的Locale里。你也可以在你自己的过滤器里面做这个(必须做完这项在Spring Security的web.xml过滤之前)或者你可以使用Spring的RequestContextFilter。请参阅Spring Framework文档,以进一步详细说明使用Spring定位。
“联系人”示例应用程序设置为使用本地化消息。
核心服务
现在,我们对Spring Security的架构和核心类进行高级别的概述,让我们在一个或两个核心接口及其实现的仔细看看,尤其是AuthenticationManager,UserDetailsService和AccessDecisionManager这些东西的信息都在这个文档的里面,所以这一点很重要,你要知道他们是如何配置如何操作的。
The AuthenticationManager, ProviderManager and AuthenticationProvider
该 AuthenticationManager只是一个接口,这样的实现可以是我们选择的任何东西,但它是如何在实践中运作的?如果我们需要检查多个授权数据库或者将不同的授权服务结合起来,类似数据库和LDAP服务器?
Spring Security的默认实现被称为ProviderManager而非处理身份验证请求本身,它委托给一个列表去配置AuthenticationProvider,其中每个查询反过来,看它是否能进行认证。每个提供程序都将抛出一个异常或返回一个完全填充的身份验证对象。还记得我们的好朋友,UserDetails和UserDetailsService吗?如果没有,回到前面的章节刷新你的记忆。到验证的认证请求的最常见的方法是加载相应UserDetails并针对已经由用户输入所述一个检查加载密码。这是由DaoAuthenticationProvider所使用的方法(见下文)。加载的UserDetails对象-尤其是GrantedAuthority的IT包含-建设是返回一个成功验证,并存储在SecurityContext完全填充Authentication对象时,将被使用。
如果你使用的命名空间,创建并在内部进行维护ProviderManager的一个实例,您可以通过使用命名空间身份验证提供元素添加提供商。(see 命名空间章节)。在这种情况下,你不应该声明在应用程序上下文中的ProviderManager bean。但是,如果你没有使用命名空间,那么你会这样声明:
<bean id="authenticationManager"class="org.springframework.security.authentication.ProviderManager"><constructor-arg><list><ref local="daoAuthenticationProvider"/><ref local="anonymousAuthenticationProvider"/><ref local="ldapAuthenticationProvider"/></list></constructor-arg>
</bean>在上面的例子中,我们有三个提供者。它们试图在顺序显示(它是通过使用一个List的暗示),每个提供者都能尝试验证,或者通过简单的返回null跳过认证。如果所有的实现都返回null,则ProviderManager将抛出一个ProviderNotFoundException。如果你有兴趣了解更多的有关提供者,请参考ProviderManager的JavaDocs。
身份验证机,如Web表单登录处理过滤器被注入到ProviderManager的引用,将调用它来处理自己的身份验证请求。你需要的供应商有时可以与认证机制互换,而在其他时间,他们将依赖于特定的认证机制。例如,DaoAuthenticationProvider和LdapAuthenticationProvider给它提交一个简单的用户名/密码验证请求,并因此将与基于表单登录或HTTP基本验证工作的机制兼容。另一方面,一些认证机制创建只能由单一类型AuthenticationProvider解释的认证请求对象。这一方面的一个例子是JA-SIG CAS,它使用一个服务票据的概念,因此可以仅通过一个CasAuthenticationProvider进行认证。你不必太在意这一点,因为如果你忘记注册一个合适的供应商,你会简单地收到一个ProviderNotFoundException不进行认证的尝试。
清楚成功认证的凭据
默认情况下(从Spring Security 3.1开始)的ProviderManager将试图清除它返回一个成功的认证请求的Authentication`对象的任何敏感的身份验证信息。这可以防止密码等个人资料超过保留时间。
当使用用户对象的高速缓存时,例如,改善在无状态情况下应用程序的性能,这可能导致问题。如果Authentication包含在高速缓存(诸如UserDetails实例)的对象的引用中,将其凭证移除,则它将不再能够进行对缓存的值进行验证。你需要考虑到这一点,如果你使用的是高速缓存。一个显而易见的解决方案是让一个对象的副本,无论是在高速缓存中执行或在AuthenticationProvider它创建返回Authentication对象。另外,你可以在ProviderManager中禁用eraseCredentialsAfterAuthentication。查看Javadoc了解更多信息。
DaoAuthenticationProvider
Spring Security中实现最简单的AuthenticationProvider是DaoAuthenticationProvider,也是最早支持的框架。它利用了UserDetailsService(作为DAO)去查找用户名和密码。它的用户进行身份验证通过userdetailsservice加载`usernamepasswordauthenticationtoken `提交密码进行一对一的比较。配置提供程序是非常简单的:
<bean id="daoAuthenticationProvider"class="org.springframework.security.authentication.dao.DaoAuthenticationProvider">
<property name="userDetailsService" ref="inMemoryDaoImpl"/>
<property name="passwordEncoder" ref="passwordEncoder"/>
</bean>这个PasswordEncoder是可选的。一个PasswordEncoder提供编码以及UserDetails对象提出的密码是从配置UserDetailsService返回的解码。 这将更加详细 如下。
UserDetailsService实现
本参考指南早些时候提到的,大多数的认证供应商利用的` userdetails 和 userdetailsservice 接口。回想一下,`UserDetailsService是一个方法:
UserDetails loadUserByUsername(String username) throws UsernameNotFoundException;返回的UserDetails是提供给getters的一个接口,以保证非空的认证信息,例如,用户名,密码,授权和用户帐户是否被启用或禁用。大多数认证供应商将使用UserDetailsService,即使用户名和密码不作为认证决定的一部分。他们可以使用返回的UserDetails对象为其GrantedAuthority信息对象,因为其他的一些系统(如LDAP或X.509或CAS等)承担了实际验证凭证的的责任。
鉴于UserDetailsService就是这么简单实现的,它应该便于用户检索使用自己选择的持久化策略的认证信息。话虽如此,Spring Security确实包括了许多有用的基本实现,我们将在下面看到。
在内存认证
简单的使用去创建一个自定义的UserDetailsService实现选择从一个持久性引擎中提取信息,但许多应用程序不需要这么复杂。尤其是如果你正在建设一个原型应用或刚刚开始结合Spring Security当你真的不想花时间配置数据库或写作userdetailsservice实现。对于这种情况,一个简单的选项是使用安全性 命名空间的user-service元素:
<user-service id="userDetailsService">
<user name="jimi" password="jimispassword" authorities="ROLE_USER, ROLE_ADMIN" />
<user name="bob" password="bobspassword" authorities="ROLE_USER" />
</user-service>
这也支持一个外部属性文件的使用:
<user-service id="userDetailsService" properties="users.properties"/>属性文件应包含在表单条目
username=password,grantedAuthority[,grantedAuthority][,enabled|disabled]例如
jimi=jimispassword,ROLE_USER,ROLE_ADMIN,enabled
bob=bobspassword,ROLE_USER,enabled
JdbcDaoImpl
Spring Security还包括UserDetailsService,它可以从一个JDBC数据源获得认证信息。内部Spring JDBC的使用,避免了一个全功能对象关系映射(ORM)的复杂性来存储用户信息。如果你的应用程序不使用ORM工具,你可以写一个自定义UserDetailsService重用在你可能已经创建好的映射文件上。回到 JdbcDaoImpl,实例的配置如下::
<bean id="dataSource" class="org.springframework.jdbc.datasource.DriverManagerDataSource">
<property name="driverClassName" value="org.hsqldb.jdbcDriver"/>
<property name="url" value="jdbc:hsqldb:hsql://localhost:9001"/>
<property name="username" value="sa"/>
<property name="password" value=""/>
</bean><bean id="userDetailsService"class="org.springframework.security.core.userdetails.jdbc.JdbcDaoImpl">
<property name="dataSource" ref="dataSource"/>
</bean>您可以通过修改上面的DriverManagerDataSource使用不同的关系型数据库管理系统。你也可以从JNDI获得,与任何其他的Spring配置使用一个全球性的数据源。
Authority Groups
默认情况下,JdbcDaoImpl加载权限直接映射到用户的角色(见 数据库架构附录)。另一种方法是将权限分成组并分配组给用户。有些人喜欢这种方式作为管理用户权限的一种手段。见 JdbcDaoImpl Javadoc获得如何能够使用权限组的更多信息。该组架构也包括在附录中。
Password Encoding
Spring Security的 PasswordEncoder接口用于支持密码以某种方式在持久存储中进行编码。你不应该在纯文本中存储密码。总是使用单向密码算法如BCrypt使用内置的混淆值,对于每个存储的密码都是不同的。不要使用普通的哈希函数,如MD5或SHA,甚至是一个混淆的版本。BCrypt是故意设计成慢,用于阻碍离线密码破解,而标准的散列算法是快速和能轻易地被用来测试在并行密码定制的硬件上。你可能会认为这并不适用于你,因为你的密码数据库是安全的,和离线攻击不是一个风险线上的。如果是这样的话,做一些研究并阅读所有的高知名度、一直被嘲笑存储密码不安全并已妥协的网站。最好是在安全的一边。对于安全性使用org.springframework.security.crypto.bcrypt.BCryptPasswordEncoder"是一个不错的选择。在其他常见的编程语言中也有兼容的实现,所以对于互相操作性它也是一个很好的选择。
如果你使用的是已经有哈希密码的遗留系统,那么你需要使用一个解码器来匹配你当前的算法,至少要等到你可以将用户迁移到一个更安全的方案(通常这将涉及到要求用户设置一个新的密码,因为哈希值是不可逆的)。Spring Security具有包含传统的密码编码功能的实现,即org.springframework.security.authentication.encoding包。该DaoAuthenticationProvider可与新的或旧的PasswordEncoder类型注入。
什么是hash?
密码散列对于Spring Security不是唯一的,但是一个共同的来源是对于不熟悉概念的用户。哈希(或摘要)算法是一个单向函数,它由一些输入数据,如密码产生一块固定长度的输出数据(散列)的。作为一个例子,字符串"密码"(十六进制)的MD5哈希。
5f4dcc3b5aa765d61d8327deb882cf99从这一方面来说hash的是"单向",要获得给定的散列值这是很困难的(实际上是不可能的),或者说实际上任何可能的输出都会产生散列值的原始输入。这个属性使得哈希值对于进行身份验证是非常有用的。它们可以被存储在用户数据库作为替代明文口令,即使值受到损害它们也不会立刻露出可用于登录的密码。请注意,这也意味着一旦它被编码,你就没有办法恢复密码。
在Hash中添加Salt
随着密码的哈希值的使用有一个潜在的问题就是如果一个普通的词用于输入,则相对容易得到哈希的单向属性。人们倾向于选择类似的密码和巨大的字典,这些以前被黑客攻击的网站都可以在线。例如,如果你使用谷歌搜索哈希值5f4dcc3b5aa765d61d8327deb882cf99,你会很快发现原来的"密码"。以类似的方式,攻击者可以构建散列的字典从标准单词列表中查找原来的密码。有一种方法帮助防止这种情况就是有一个合适的强密码策略,以防止常用的单词被使用。另一个是计算散列何时使用"salt"。这是它与计算散列之前密码组合的每个用户的已知数据的附加字符串。理想情况下,数据应该是随机的,但在实践中,任何salt值通常是最好没有。使用的salt意味着攻击者必须建立散列每个salt值的一个单独的字典,使得攻击更加复杂(但不是不可能)。
Bcrypt自动生成每个密码随机salt值时,它被编码,并存储在一个标准格式的BCrypt的字符串。
|
传统的方法来处理salt是注入一个 |
Hashing and Authentication
当一个认证供应商(如Spring Security的DaoAuthenticationProvider)需要对某个用户的已知值提交的认证请求来检查密码和存储的密码以某种方式进行编码,然后提交的值必须准确使用编码相同的算法。这个取决于你的检查,这些都是兼容的,因为Spring Security没有对持久值的控制。如果添加的密码散列以你的身份验证配置Spring Security的,和你的数据库中包含明文密码,那么就没有办法验证成功。即使你知道你的数据库是使用MD5编码的密码,例如,你的应用程序被配置为使用Spring Security的Md5PasswordEncoder,那么有很多事情会是错误的。数据库可以具有在Base 64编码的密码,例如当编码器使用十六进制字符串(缺省值)。替代地数据库可以是使用大写,而从编码器的输出为小写。为了确保,你需要写一个测试,以检查输出从你配置的密码编码器与一个已知的密码和salt的组合,并检查它相匹配的数据库值之前,进一步尝试通过您的应用程序进行验证。使用诸如BCrypt标准将避免这些问题。
如果你想生成您的用户数据库编码密码,直接在Java中进行存储,那么你可以使用PasswordEncoder上的encode方法。
Testing
This section describes the testing support provided by Spring Security.
|
To use the Spring Security test support, you must include |
Testing Method Security
This section demonstrates how to use Spring Security’s Test support to test method based security. We first introduce a MessageService that requires the user to be authenticated in order to access it.
public class HelloMessageService implements MessageService {@PreAuthorize("authenticated")public String getMessage() {Authentication authentication = SecurityContextHolder.getContext().getAuthentication();return "Hello " + authentication;}
}
The result of getMessage is a String saying "Hello" to the current Spring Security Authentication. An example of the output is displayed below.
Hello org.springframework.security.authentication.UsernamePasswordAuthenticationToken@ca25360: Principal: org.springframework.security.core.userdetails.User@36ebcb: Username: user; Password: [PROTECTED]; Enabled: true; AccountNonExpired: true; credentialsNonExpired: true; AccountNonLocked: true; Granted Authorities: ROLE_USER; Credentials: [PROTECTED]; Authenticated: true; Details: null; Granted Authorities: ROLE_USERSecurity Test Setup
Before we can use Spring Security Test support, we must perform some setup. An example can be seen below:
@RunWith(SpringJUnit4ClassRunner.class)
@ContextConfiguration
public class WithMockUserTests {
This is a basic example of how to setup Spring Security Test. The highlights are:
@RunWith instructs the spring-test module that it should create an ApplicationContext This is no different than using the existing Spring Test support. For additional information, refer to the Spring Reference
|
|
@ContextConfiguration instructs the spring-test the configuration to use to create the ApplicationContext. Since no configuration is specified, the default configuration locations will be tried. This is no different than using the existing Spring Test support. For additional information, refer to the Spring Reference
|
Spring Security hooks into Spring Test support using theWithSecurityContextTestExecutionListener which will ensure our tests are ran with the correct user. It does this by populating the SecurityContextHolder prior to running our tests. After the test is done, it will clear out the SecurityContextHolder. If you only need Spring Security related support, you can replace @ContextConfiguration with @SecurityExecutionListeners.
|
Remember we added the @PreAuthorize annotation to our HelloMessageService and so it requires an authenticated user to invoke it. If we ran the following test, we would expect the following test will pass:
@Test(expected = AuthenticationCredentialsNotFoundException.class)
public void getMessageUnauthenticated() {messageService.getMessage();
}
@WithMockUser
The question is "How could we most easily run the test as a specific user?" The answer is to use @WithMockUser. The following test will be ran as a user with the username "user", the password "password", and the roles "ROLE_USER".
@Test
@WithMockUser
public void getMessageWithMockUser() {
String message = messageService.getMessage();
...
}
Specifically the following is true:
The user with the username "user" does not have to exist since we are mocking the user
The
Authenticationthat is populated in theSecurityContextis of typeUsernamePasswordAuthenticationTokenThe principal on the
Authenticationis Spring Security’sUserobjectThe
Userwill have the username of "user", the password "password", and a singleGrantedAuthoritynamed "ROLE_USER" is used.
Our example is nice because we are able to leverage a lot of defaults. What if we wanted to run the test with a different username? The following test would run with the username "customUser". Again, the user does not need to actually exist.
@Test
@WithMockUser("customUsername")
public void getMessageWithMockUserCustomUsername() {String message = messageService.getMessage();
...
}
We can also easily customize the roles. For example, this test will be invoked with the username "admin" and the roles "ROLE_USER" and "ROLE_ADMIN".
@Test
@WithMockUser(username="admin",roles={"USER","ADMIN"})
public void getMessageWithMockUserCustomUser() {String message = messageService.getMessage();...
}
If we do not want the value to automatically be prefixed with ROLE_ we can leverage the authorities attribute. For example, this test will be invoked with the username "admin" and the authorities "USER" and "ADMIN".
@Test
@WithMockUser(username = "admin", authorities = { "ADMIN", "USER" })
public void getMessageWithMockUserCustomAuthorities() {String message = messageService.getMessage();...
}
Of course it can be a bit tedious placing the annotation on every test method. Instead, we can place the annotation at the class level and every test will use the specified user. For example, the following would run every test with a user with the username "admin", the password "password", and the roles "ROLE_USER" and "ROLE_ADMIN".
@RunWith(SpringJUnit4ClassRunner.class)
@ContextConfiguration
@WithMockUser(username="admin",roles={"USER","ADMIN"})
public class WithMockUserTests {
@WithAnonymousUser
Using @WithAnonymousUser allows running as an anonymous user. This is especially convenient when you wish to run most of your tests with a specific user, but want to run a few tests as an anonymous user. For example, the following will run withMockUser1 and withMockUser2 using @WithMockUser and anonymous as an anonymous user.
@RunWith(SpringJUnit4ClassRunner.class)
@WithMockUser
public class WithUserClassLevelAuthenticationTests {@Testpublic void withMockUser1() {}@Testpublic void withMockUser2() {}@Test@WithAnonymousUserpublic void anonymous() throws Exception {// override default to run as anonymous user}
}
@WithUserDetails
While @WithMockUser is a very convenient way to get started, it may not work in all instances. For example, it is common for applications to expect that the Authentication principal be of a specific type. This is done so that the application can refer to the principal as the custom type and reduce coupling on Spring Security.
The custom principal is often times returned by a custom UserDetailsService that returns an object that implements both UserDetails and the custom type. For situations like this, it is useful to create the test user using the custom UserDetailsService. That is exactly what @WithUserDetails does.
Assuming we have a UserDetailsService exposed as a bean, the following test will be invoked with an Authentication of type UsernamePasswordAuthenticationToken and a principal that is returned from the UserDetailsService with the username of "user".
@Test
@WithUserDetails
public void getMessageWithUserDetails() {String message = messageService.getMessage();...
}
We can also customize the username used to lookup the user from our UserDetailsService. For example, this test would be executed with a principal that is returned from the UserDetailsService with the username of "customUsername".
@Test
@WithUserDetails("customUsername")
public void getMessageWithUserDetailsCustomUsername() {String message = messageService.getMessage();...
}
We can also provide an explicit bean name to look up the UserDetailsService. For example, this test would look up the username of "customUsername" using the UserDetailsService with the bean name "myUserDetailsService".
@Test
@WithUserDetails(value="customUsername", userDetailsServiceBeanName="myUserDetailsService")
public void getMessageWithUserDetailsServiceBeanName() {String message = messageService.getMessage();...
}
Like @WithMockUser we can also place our annotation at the class level so that every test uses the same user. However unlike @WithMockUser, @WithUserDetails requires the user to exist.
@WithSecurityContext
We have seen that @WithMockUser is an excellent choice if we are not using a custom Authentication principal. Next we discovered that @WithUserDetails would allow us to use a custom UserDetailsService to create our Authentication principal but required the user to exist. We will now see an option that allows the most flexibility.
We can create our own annotation that uses the @WithSecurityContext to create any SecurityContext we want. For example, we might create an annotation named @WithMockCustomUser as shown below:
@Retention(RetentionPolicy.RUNTIME)
@WithSecurityContext(factory = WithMockCustomUserSecurityContextFactory.class)
public @interface WithMockCustomUser {String username() default "rob";String name() default "Rob Winch";
}
You can see that @WithMockCustomUser is annotated with the @WithSecurityContext annotation. This is what signals to Spring Security Test support that we intend to create a SecurityContext for the test. The @WithSecurityContext annotation requires we specify a SecurityContextFactory that will create a new SecurityContext given our @WithMockCustomUser annotation. You can find our WithMockCustomUserSecurityContextFactory implementation below:
public class WithMockCustomUserSecurityContextFactoryimplements WithSecurityContextFactory<WithMockCustomUser> {@Overridepublic SecurityContext createSecurityContext(WithMockCustomUser customUser) {SecurityContext context = SecurityContextHolder.createEmptyContext();CustomUserDetails principal =new CustomUserDetails(customUser.name(), customUser.username());Authentication auth =new UsernamePasswordAuthenticationToken(principal, "password", principal.getAuthorities());context.setAuthentication(auth);return context;}
}
We can now annotate a test class or a test method with our new annotation and Spring Security’s WithSecurityContextTestExecutionListener will ensure that our SecurityContext is populated appropriately.
When creating your own WithSecurityContextFactory implementations, it is nice to know that they can be annotated with standard Spring annotations. For example, the WithUserDetailsSecurityContextFactory uses the @Autowired annotation to acquire the UserDetailsService:
final class WithUserDetailsSecurityContextFactoryimplements WithSecurityContextFactory<WithUserDetails> {private UserDetailsService userDetailsService;@Autowiredpublic WithUserDetailsSecurityContextFactory(UserDetailsService userDetailsService) {this.userDetailsService = userDetailsService;}public SecurityContext createSecurityContext(WithUserDetails withUser) {String username = withUser.value();Assert.hasLength(username, "value() must be non empty String");UserDetails principal = userDetailsService.loadUserByUsername(username);Authentication authentication = new UsernamePasswordAuthenticationToken(principal, principal.getPassword(), principal.getAuthorities());SecurityContext context = SecurityContextHolder.createEmptyContext();context.setAuthentication(authentication);return context;}
}
Test Meta Annotations
If you reuse the same user within your tests often, it is not ideal to have to repeatedly specify the attributes. For example, if there are many tests related to an administrative user with the username "admin" and the roles ROLE_USER and ROLE_ADMIN you would have to write:
@WithMockUser(username="admin",roles={"USER","ADMIN"})Rather than repeating this everywhere, we can use a meta annotation. For example, we could create a meta annotation named WithMockAdmin:
@Retention(RetentionPolicy.RUNTIME)
@WithMockUser(value="rob",roles="ADMIN")
public @interface WithMockAdmin { }
Now we can use @WithMockAdmin in the same way as the more verbose @WithMockUser.
Meta annotations work with any of the testing annotations described above. For example, this means we could create a meta annotation for @WithUserDetails("admin") as well.
Spring MVC Test Integration
Spring Security provides comprehensive integration with Spring MVC Test
Setting Up MockMvc and Spring Security
In order to use Spring Security with Spring MVC Test it is necessary to add the Spring Security FilterChainProxyas a Filter. It is also necessary to add Spring Security’s TestSecurityContextHolderPostProcessor to support Running as a User in Spring MVC Test with Annotations. This can be done using Spring Security’s SecurityMockMvcConfigurers.springSecurity(). For example:
| Spring Security’s testing support requires spring-test-4.1.3.RELEASE or greater. |
import static org.springframework.security.test.web.servlet.setup.SecurityMockMvcConfigurers.*;@RunWith(SpringJUnit4ClassRunner.class)
@ContextConfiguration
@WebAppConfiguration
public class CsrfShowcaseTests {@Autowiredprivate WebApplicationContext context;private MockMvc mvc;@Beforepublic void setup() {mvc = MockMvcBuilders.webAppContextSetup(context).apply(springSecurity()) .build();}...
SecurityMockMvcConfigurers.springSecurity() will perform all of the initial setup we need to integrate Spring Security with Spring MVC Test
|
SecurityMockMvcRequestPostProcessors
Spring MVC Test provides a convenient interface called a RequestPostProcessor that can be used to modify a request. Spring Security provides a number of RequestPostProcessor implementations that make testing easier. In order to use Spring Security’s RequestPostProcessor implementations ensure the following static import is used:
import static org.springframework.security.test.web.servlet.request.SecurityMockMvcRequestPostProcessors.*;Testing with CSRF Protection
When testing any non safe HTTP methods and using Spring Security’s CSRF protection, you must be sure to include a valid CSRF Token in the request. To specify a valid CSRF token as a request parameter using the following:
mvc.perform(post("/").with(csrf()))If you like you can include CSRF token in the header instead:
mvc.perform(post("/").with(csrf().asHeader()))You can also test providing an invalid CSRF token using the following:
mvc.perform(post("/").with(csrf().useInvalidToken()))Running a Test as a User in Spring MVC Test
It is often desirable to run tests as a specific user. There are two simple ways of populating the user:
Running as a User in Spring MVC Test with RequestPostProcessor
Running as a User in Spring MVC Test with Annotations
Running as a User in Spring MVC Test with RequestPostProcessor
There are a number of options available to associate a user to the current HttpServletRequest. For example, the following will run as a user (which does not need to exist) with the username "user", the password "password", and the role "ROLE_USER":
|
The support works by associating the user to the
|
mvc.perform(get("/").with(user("user")))You can easily make customizations. For example, the following will run as a user (which does not need to exist) with the username "admin", the password "pass", and the roles "ROLE_USER" and "ROLE_ADMIN".
mvc.perform(get("/admin").with(user("admin").password("pass").roles("USER","ADMIN")))If you have a custom UserDetails that you would like to use, you can easily specify that as well. For example, the following will use the specified UserDetails (which does not need to exist) to run with a UsernamePasswordAuthenticationToken that has a principal of the specified UserDetails:
mvc.perform(get("/").with(user(userDetails)))You can run as anonymous user using the following:
mvc.perform(get("/").with(anonymous()))This is especially useful if you are running with a default user and wish to execute a few requests as an anonymous user.
If you want a custom Authentication (which does not need to exist) you can do so using the following:
mvc.perform(get("/").with(authentication(authentication)))You can even customize the SecurityContext using the following:
mvc.perform(get("/").with(securityContext(securityContext)))We can also ensure to run as a specific user for every request by using MockMvcBuilders's default request. For example, the following will run as a user (which does not need to exist) with the username "admin", the password "password", and the role "ROLE_ADMIN":
mvc = MockMvcBuilders.webAppContextSetup(context).defaultRequest(get("/").with(user("user").roles("ADMIN"))).apply(springSecurity()).build();If you find you are using the same user in many of your tests, it is recommended to move the user to a method. For example, you can specify the following in your own class named CustomSecurityMockMvcRequestPostProcessors:
public static RequestPostProcessor rob() {return user("rob").roles("ADMIN");
}
Now you can perform a static import on SecurityMockMvcRequestPostProcessors and use that within your tests:
import static sample.CustomSecurityMockMvcRequestPostProcessors.*;...mvc.perform(get("/").with(rob()))Running as a User in Spring MVC Test with Annotations
As an alternative to using a RequestPostProcessor to create your user, you can use annotations described in Testing Method Security. For example, the following will run the test with the user with username "user", password "password", and role "ROLE_USER":
@Test
@WithMockUser
public void requestProtectedUrlWithUser() throws Exception {
mvc.perform(get("/"))...
}
Alternatively, the following will run the test with the user with username "user", password "password", and role "ROLE_ADMIN":
@Test
@WithMockUser(roles="ADMIN")
public void requestProtectedUrlWithUser() throws Exception {
mvc.perform(get("/"))...
}
Testing HTTP Basic Authentication
While it has always been possible to authenticate with HTTP Basic, it was a bit tedious to remember the header name, format, and encode the values. Now this can be done using Spring Security’s httpBasic RequestPostProcessor. For example, the snippet below:
mvc.perform(get("/").with(httpBasic("user","password")))will attempt to use HTTP Basic to authenticate a user with the username "user" and the password "password" by ensuring the following header is populated on the HTTP Request:
Authorization: Basic dXNlcjpwYXNzd29yZA==SecurityMockMvcRequestBuilders
Spring MVC Test also provides a RequestBuilder interface that can be used to create the MockHttpServletRequest used in your test. Spring Security provides a few RequestBuilder implementations that can be used to make testing easier. In order to use Spring Security’s RequestBuilder implementations ensure the following static import is used:
import static org.springframework.security.test.web.servlet.request.SecurityMockMvcRequestBuilders.*;Testing Form Based Authentication
You can easily create a request to test a form based authentication using Spring Security’s testing support. For example, the following will submit a POST to "/login" with the username "user", the password "password", and a valid CSRF token:
mvc.perform(formLogin())It is easy to customize the request. For example, the following will submit a POST to "/auth" with the username "admin", the password "pass", and a valid CSRF token:
mvc.perform(formLogin("/auth").user("admin").password("pass"))We can also customize the parameters names that the username and password are included on. For example, this is the above request modified to include the username on the HTTP parameter "u" and the password on the HTTP parameter "p".
mvc.perform(formLogin("/auth").user("u","admin").password("p","pass"))Testing Logout
While fairly trivial using standard Spring MVC Test, you can use Spring Security’s testing support to make testing log out easier. For example, the following will submit a POST to "/logout" with a valid CSRF token:
mvc.perform(logout())You can also customize the URL to post to. For example, the snippet below will submit a POST to "/signout" with a valid CSRF token:
mvc.perform(logout("/signout"))SecurityMockMvcResultMatchers
At times it is desirable to make various security related assertions about a request. To accommodate this need, Spring Security Test support implements Spring MVC Test’s ResultMatcher interface. In order to use Spring Security’s ResultMatcher implementations ensure the following static import is used:
import static org.springframework.security.test.web.servlet.response.SecurityMockMvcResultMatchers.*;Unauthenticated Assertion
At times it may be valuable to assert that there is no authenticated user associated with the result of a MockMvcinvocation. For example, you might want to test submitting an invalid username and password and verify that no user is authenticated. You can easily do this with Spring Security’s testing support using something like the following:
mvc.perform(formLogin().password("invalid")).andExpect(unauthenticated());Authenticated Assertion
It is often times that we must assert that an authenticated user exists. For example, we may want to verify that we authenticated successfully. We could verify that a form based login was successful with the following snippet of code:
mvc.perform(formLogin()).andExpect(authenticated());If we wanted to assert the roles of the user, we could refine our previous code as shown below:
mvc.perform(formLogin().user("admin")).andExpect(authenticated().withRoles("USER","ADMIN"));Alternatively, we could verify the username:
mvc.perform(formLogin().user("admin")).andExpect(authenticated().withUsername("admin"));We can also combine the assertions:
mvc.perform(formLogin().user("admin").roles("USER","ADMIN")).andExpect(authenticated().withUsername("admin"));Web应用程序的安全性
大多数Spring Security的用户将使用在这使得HTTP和Servlet API的用户应用程序的框架。在这一部分中,我们将看看Spring Security提供身份验证和访问控制特性的应用程序的web层。我们会看看该命名空间的门面后面,看看哪些类和接口实际上是组装提供web层安全。在某些情况下需要使用传统的bean配置提供完全控制配置,所以我们也将看到怎样的情况下直接配置这些类的命名空间。
The Security Filter Chain
Spring Security的web基础设施是完全基于标准的servlet过滤器。它不使用servlet或任何其他基于servlet框架(比如Spring MVC)在内部,所以它与任何特定的web技术没有紧密的联系。它涉及到HttpServletRequest和HttpServletResponse并不在乎请求是否来自一个浏览器,一个web服务客户端,一个HttpInvoker或一个AJAX应用程序。
Spring Security维护过滤器链内部,每个过滤器都有一个特定的责任和过滤器中添加或删除的配置取决于哪些服务是必需的。过滤器的顺序很重要,因为它们之间有依赖关系。如果你一直使用命名空间配置,那么过滤器会为你自动配置和你不需要明确定义任何Spring bean但可能有时你想要完全控制安全过滤器链,因为您正在使用的功能中不支持在命名空间中,或你使用你自己的自定义版本的类。
DelegatingFilterProxy
当使用Servlet过滤器时,你显然需要声明他们的web.xml,否则将被servlet容器忽略。在Spring Security,过滤器类也都在Spring bean中定义应用上下文,从而能够利用Spring的丰富的依赖注入的设施和生命周期接口的优势。Spring的DelegatingFilterProxy提供web.xml和应用程序上下文之间的链接
当使用DelegatingFilterProxy,你会看到这样的事情在web.xml文件中:
<filter>
<filter-name>myFilter</filter-name>
<filter-class>org.springframework.web.filter.DelegatingFilterProxy</filter-class>
</filter><filter-mapping>
<filter-name>myFilter</filter-name>
<url-pattern>/*</url-pattern>
</filter-mapping>请注意,该过滤器实际上是一个DelegatingFilterProxy,而不是类,会实现过滤器的逻辑。什么DelegatingFilterProxy所做的是通过向其从Spring应用程序上下文中的bean委托Filter的方法。这使得bean来从Spring Web应用程序上下文的生命周期支持和配置灵活性中受益。bean必须实现javax.servlet.Filter并且必须具有相同的名称,在filter-name元素。阅读DelegatingFilterProxy的Javadoc的更多信息
FilterChainProxy
Spring Security的网络基础设施,只能通过委托给FilterChainProxy的一个实例使用。安全过滤器不应该由自己来使用。理论上你可以声明每个弹簧安全过滤器bean,你需要在你的应用程序的上下文文件并添加相应的DelegatingFilterProxy到web.xml每个过滤器中,确保他们正确排序,但是这是很麻烦的并且如果你有很多的过滤器会很快弄乱了web.xml文件。FilterChainProxy让我们将一个条目添加到web.xml和完全处理应用程序上下文文件来管理我们的网络安全bean。它是使用DelegatingFilterProxy连接的,就像在上面的例子,随着filter-name设为"filterChainProxy"bean的名称。然后过滤器链中声明应用程序上下文相同的bean的名称。这里有一个例子:
<bean id="filterChainProxy" class="org.springframework.security.web.FilterChainProxy">
<constructor-arg><list><sec:filter-chain pattern="/restful/**" filters="securityContextPersistenceFilterWithASCFalse,basicAuthenticationFilter,exceptionTranslationFilter,filterSecurityInterceptor" /><sec:filter-chain pattern="/**" filters="securityContextPersistenceFilterWithASCTrue,formLoginFilter,exceptionTranslationFilter,filterSecurityInterceptor" /></list>
</constructor-arg>
</bean>命名空间元素filter-chain是用来方便设置应用程序中所需的安全过滤器链。 [2]它映射一个特定的URL模式的从filters元素指定的bean的名字建立了过滤器列表,并结合SecurityFilterChain类型的bean。该pattern属性需要一个Ant路径和最具体的URI应该首先出现。 [3] 在运行时,FilterChainProxy将定位相匹配的当前Web请求,并由filters属性指定的过滤器bean列表将被应用到该请求的第一个URI模式。过滤器会按照它们定义的顺序调用,所以你必须在这是适用于一个特定的URL过滤器链的完全控制。
您可能已经注意到,我们已宣布两个SecurityContextPersistenceFilter在过滤器链(ASC的简称allowSessionCreation,SecurityContextPersistenceFilter的属性)。因为web服务从来不会在请求jsessionid,创造HttpSession表示这样的用户代理是一种浪费。如果你这需要这最大的扩展能力高容量的应用程序,我们建议您使用上面的方法。对于较小的应用程序,使用SecurityContextPersistenceFilter(其默认allowSessionCreation为true)就足够了。
需要注意的是FilterChainProxy不会调用它配置了过滤器标准过滤器生命周期方法。我们建议你使用Spring的应用程序上下文的生命周期接口作为替代,就像你对任何其他的Spring bean一样。
当我们看到如何使用命名空间配置建立网络安全,我们使用了DelegatingFilterProxy和"springSecurityFilterChain"这个名字。您现在应该能够看到,这是由FilterChainProxy的名称创建的命名空间。
绕过过滤器链
你可以使用属性filters = "none"替代供应一个过滤器bean列表。这将完全忽略安全筛选器链中的请求模式。请注意,任何匹配此路径将没有任何身份验证或授权服务应用,将可自由访问。如果你想在一个请求中使用的SecurityContext内容的内容,那么它必须通过保安过滤器链。否则,SecurityContextHolder不会被填充且内容也将空。
Filter Ordering
过滤器链中定义的顺序是非常重要的。不论你使用的是哪一种过滤器,顺序应该如下:
ChannelProcessingFilter,因为它可能需要重定向到其他协议。SecurityContextPersistenceFilter,所以SecurityContext可在SecurityContextHolder在web请求的开始设立,并且当web请求结束时SecurityContext任何改变可以被复制到HttpSession(准备下一个使用Web请求)ConcurrentSessionFilter,因为它使用了SecurityContextHolder功能和需要更新SessionRegistry以反映反映主要正在处理的请求。认证处理机制 -
UsernamePasswordAuthenticationFilter,CasAuthenticationFilter,BasicAuthenticationFilter等 - 使得SecurityContextHolder可以被修饰以包含有效的Authentication请求令牌SecurityContextHolderAwareRequestFilter,如果你使用它来安装一个Spring Security意识HttpServletRequestWrapper到你的servlet容器JaasApiIntegrationFilter,如果JaasAuthenticationToken是在SecurityContextHolder这将处理F`RememberMeAuthenticationFilter, so that if no earlier authentication processing mechanism updated theSecurityContextHolder, and the request presents a cookie that enables remember-me services to take place, a suitable rememberedAuthenticationobject will be put thereilterChain`作为Subject在JaasAuthenticationTokenRememberMeAuthenticationFilter,所以如果早期的认证处理机制没有更新SecurityContextHolder并且请求给出一个Cookie使remember-me服务发生,一个合适的记忆Authentication对象将被放在那里AnonymousAuthenticationFilter,这样如果之前的验证执行机制没有更新SecurityContextHolder,一个匿名Authentication对象将被放在那里ExceptionTranslationFilter,捕获任何Spring安全异常,以便响应可以返回一个HTTP错误或适当的AuthenticationEntryPoint可以启动FilterSecurityInterceptor,保护网络的URI,当访问被拒绝引发异常
Request Matching and HttpFirewall
Spring Security有几个方面,你已经定义模式对传入的请求,以决定该请求应如何处理测试。这发生在FilterChainProxy决定的请求应通过传递该过滤器链,也当FilterSecurityInterceptor决定哪些安全约束适用于请求。要了解什么机制和针对你定义的模式进行测试时使用什么URL值是非常重要的。
Servlet规范定义了HttpServletRequest其中有几个属性是通过getter方法访问,以及我们可能要匹配。这些都是contextPath,servletPath,pathInfo和queryString。 Spring Security唯一感兴趣的仅仅是在确保应用程序中的路径,所以contextPath被忽略。不幸的是,servlet规范并没有定义到底什么是servletPath和pathInfo的值将包含特定请求URI。例如,一个URL的每个路径段可包含参数, 定义在 RFC 2396 [4]. 该规范并没有明确说明是否这些都应该被包含在`servletPath和pathInfo的价值观和行为的不同servlet容器之间变化。有一种危险,当一个应用程序被部署在一个容器中,而不是从这些值中的路径参数,攻击者可以将它们添加到请求的URL,以意外导致模式匹配成功或失败。 [5]. 在传入的URL的其他变化也可能。它可能包含路径遍历序列(如/../)或多个斜杠(//),这也可能导致匹配失败。一些容器标准化这些之前执行servlet映射,但其他人没有。为了防止类似这些问题,FilterChainProxy采用了HttpFirewall战略,检查和包装的要求。未规范化请求默认自动拒绝和路径参数和复制斜线匹配的目的被删除。 [6]. 因此,至关重要的一个FilterChainProxy用于管理安全过滤器链。需要注意的是servletPath和pathInfo值由容器解码,所以你的应用程序不应该有任何有效的路径包含分号,这些部分将被删除匹配的目的。
正如上面提到的,默认的策略是使用Ant风格的路径进行匹配,这可能是大多数用户的最佳选择。该策略在使用Spring的AntPathMatcher执行对级联servletPath和pathInfo的格局不区分大小写的匹配类AntPathRequestMatcher实现,忽视了queryString。
如果由于某种原因,你需要一个更强大的匹配策略,您可以使用正则表达式。然后RegexRequestMatcher战略的实现。看到这个类的Javadoc获取更多信息。
在实践中我们建议你使用方法安全服务层,控制您的应用程序访问,并不完全依赖于在Web应用程序级别定义的安全约束的使用。URL改变,很难考虑所有可能的应用程序的URL可能支持和如何处理请求。你应该尝试限制自己使用一些简单的容易理解的路径。总是试图用"deny-by-default"的方法,全方位通配符( /or) 定义和拒绝访问。
安全在服务层定义更健壮且难以绕过,所以你应该利用Spring Security的方法安全选项。
与其它过滤器-基于框架使用
如果您使用的过滤器也基于其他一些框架,那么你需要确保Spring Security过滤器是第一位的。这使得SecurityContextHolder到时由其他过滤器被填充以供使用。例子是使用SiteMesh的来装饰您的网页或类似Wicket的Web框架,它使用一个过滤器来处理其请求。
高级的命名空间配置
正如我们在命名空间章节前面所看到的,它可以使用多个http元素来定义不同的URL模式来进行不同的安全配置。每个元素创建内部FilterChainProxy内的过滤器链和应该映射的URL模式。这些元素将声明它们的添加顺序,所以最具体的模式必须再次先声明。这里的另一个例子,与上面有一个类似的情况,在应用程序支持一个无国籍的RESTful API和一个正常的网络应用,用户可以登录使用的一种形式。
<!-- Stateless RESTful service using Basic authentication -->
<http pattern="/restful/**" create-session="stateless">
<intercept-url pattern='/**' access="hasRole('REMOTE')" />
<http-basic />
</http><!-- Empty filter chain for the login page -->
<http pattern="/login.htm*" security="none"/><!-- Additional filter chain for normal users, matching all other requests -->
<http>
<intercept-url pattern='/**' access="hasRole('USER')" />
<form-login login-page='/login.htm' default-target-url="/home.htm"/>
<logout />
</http>
核心安全过滤器
总是会有一些关键的过滤器在web应用程序中使用Spring Security,所以我们来看看这些和他们的支持类和接口。我们不会覆盖所有功能,所以如果你想获得完整的信息一定要看看它们的Javadoc。
FilterSecurityInterceptor
我们已经看到了 FilterSecurityInterceptor简要讨论访问控制 ,我们已经与其中<intercept-url>元素相结合,在内部配置的命名空间中使用它。现在,我们将看到如何明确将其FilterChainProxy其配置为使用,其配套过滤器ExceptionTranslationFilter一起。典型的配置示例如下所示:
<bean id="filterSecurityInterceptor"class="org.springframework.security.web.access.intercept.FilterSecurityInterceptor">
<property name="authenticationManager" ref="authenticationManager"/>
<property name="accessDecisionManager" ref="accessDecisionManager"/>
<property name="securityMetadataSource"><security:filter-security-metadata-source><security:intercept-url pattern="/secure/super/**" access="ROLE_WE_DONT_HAVE"/><security:intercept-url pattern="/secure/**" access="ROLE_SUPERVISOR,ROLE_TELLER"/></security:filter-security-metadata-source>
</property>
</bean>FilterSecurityInterceptor负责处理HTTP资源的安全性。它需要一个AuthenticationManager和AccessDecisionManager参考。它也有提供适用于不同的HTTP URL请求的配置属性。回头参考技术介绍中这些原始的讨论。
在FilterSecurityInterceptor配置属性可以两种方式进行配置。上面显示的第一个,使用<filter-security-metadata-source>命名空间元素。这类似于<http>元素的命名空间,但 <intercept-url>的子元素只使用pattern和 access的属性。使用逗号分隔不同的配置属性,适用于每个HTTP URL。第二个选择是编写自己的‘SecurityMetadataSource’,但这超出了本文的范围。不管采用哪种方式,在SecurityMetadataSource负责返回一个List<ConfigAttribute>包含所有用一个安全的HTTP URL相关联的配置属性。
应当指出的是,FilterSecurityInterceptor.setSecurityMetadataSource()方法实际上是FilterInvocationSecurityMetadataSource的一个实例。这是一个标记接口,它的子类是SecurityMetadataSource。它只是表示SecurityMetadataSource明白FilterInvocation。在简单的利益,我们将继续参考FilterInvocationSecurityMetadataSource作为SecurityMetadataSource,因为区别是无关紧要大多数用户。为了简单起见,我们将继续参考FilterInvocationSecurityMetadataSource作为SecurityMetadataSource,因为对于大多数用户区别是无关紧要。
通过命名空间的语法创建的SecurityMetadataSource获得通过匹配在配置的pattern属性请求的URL特定FilterInvocation配置属性。这表现在,它确实为命名空间配置相同的方式。默认的是处理所有表达式作为Apache Ant的路径和正则表达式还支持更复杂的情况。request-matcher属性用于指定模式的类型被使用。它是不可能的相同的定义内混合表达式语法。作为一个例子,使用正则表达式,而不是Ant paths的先前的配置将按如下表示:
<bean id="filterInvocationInterceptor"class="org.springframework.security.web.access.intercept.FilterSecurityInterceptor">
<property name="authenticationManager" ref="authenticationManager"/>
<property name="accessDecisionManager" ref="accessDecisionManager"/>
<property name="runAsManager" ref="runAsManager"/>
<property name="securityMetadataSource"><security:filter-security-metadata-source request-matcher="regex"><security:intercept-url pattern="\A/secure/super/.*\Z" access="ROLE_WE_DONT_HAVE"/><security:intercept-url pattern="\A/secure/.*\" access="ROLE_SUPERVISOR,ROLE_TELLER"/></security:filter-security-metadata-source>
</property>
</bean>模式总是按照它们被定义的顺序进行。因此,重要的是,更具体的模式被定义在列表中比不太具体的模式更高。这是反映在我们的例子上面,在更具体的/secure/super/模式似乎比/secure/模式更高。如果它们被逆转,/secure/模式会一直匹配,并且/secure/super/模式将永远不会被评估。
ExceptionTranslationFilter
该ExceptionTranslationFilter在FilterSecurityInterceptor安全过滤器堆栈的上面。它没有做任何实际的安全执法本身,而是处理由安全拦截器抛出的异常,并提供合适的HTTP响应。
<bean id="exceptionTranslationFilter"
class="org.springframework.security.web.access.ExceptionTranslationFilter">
<property name="authenticationEntryPoint" ref="authenticationEntryPoint"/>
<property name="accessDeniedHandler" ref="accessDeniedHandler"/>
</bean><bean id="authenticationEntryPoint"
class="org.springframework.security.web.authentication.LoginUrlAuthenticationEntryPoint">
<property name="loginFormUrl" value="/login.jsp"/>
</bean><bean id="accessDeniedHandler"class="org.springframework.security.web.access.AccessDeniedHandlerImpl">
<property name="errorPage" value="/accessDenied.htm"/>
</bean>
AuthenticationEntryPoint
如果用户请求一个安全HTTP资源这个AuthenticationEntryPoint将被调用,但他们不被认证。适当的AuthenticationException或AccessDeniedException将被安全拦截器进一步拆毁了调用堆栈,触发入口点的commence方法。这确实呈现给用户的适当的反应,使认证可以开始工作。我们这里使用的是LoginUrlAuthenticationEntryPoint,这将请求重定向到一个不同的URL(一般是一个登录页面)。使用将取决于你想要的认证机制的实际实现在应用程序中使用。
AccessDeniedHandler
如果用户已经通过身份验证,他们试图访问受保护的资源会发生什么?在正常使用情况下,这不应该发生,因为应用程序的工作流程应该仅限于用户访问的操作。例如,HTML链接到一个管理页面可能隐藏唉一个没有管理员角色的用户中。你不能依赖隐藏链接的安全,总是有一个可能性,用户只会直接输入URL,以绕过限制。或者,他们可能会修改一个RESTful URL来改变一些参数值。您的应用程序必须对这些方案进行保护,或者它绝对会是不安全的。您通常会使用简单的网络层安全性约束适用于基本的网址,并使用更具体的方法,基于安全上的服务层接口真正明确什么是允许的。
如果一个AccessDeniedException被抛出并且用户已经被认证,那么这意味着一个操作已经尝试了它们不具有足够的权限。在这种情况下,ExceptionTranslationFilter将调用第二策略,AccessDeniedHandler。默认情况下,AccessDeniedHandlerImpl被使用,这只是发送一个403(禁止)响应于客户端。此外,还可以配置明确的实例(如在上面的例子),并设置一个错误页面的URL,它会请求转发 [7]. 这可以是一个简单的“拒绝访问”页上,如一个JSP,或者它可以是更复杂的处理程序,如一个MVC的控制器。当然,你可以自己实现接口,并使用自己的实现。
它也可以提供当你自定义你的应用程序时使用命名空间来配置AccessDeniedHandler。详见 命名空间附录 了解更多详情。
SavedRequest s and the RequestCache Interface
ExceptionTranslationFilter另一个责任是调用AuthenticationEntryPoint之前保存当前的请求。这允许使用已经验证后要恢复的请求(看到之前的概述 web 认证).一个典型示例是在用户登录表单,然后重定向到默认的原始URL SavedRequestAwareAuthenticationSuccessHandler(见 下方).
该RequestCache封装用于存储和检索HttpServletRequest实例所需的功能。默认HttpSessionRequestCache被使用,其中该请求存储在HttpSession。该RequestCacheFilter具有实际恢复从当用户被重定向到原始URL缓存中保存的请求工作。
在正常情况下,你不需要修改任何此功能,但保存的请求处理是一个“尽力而为”的做法,有可能是其默认的配置是无法处理的情况。使用这些接口,使得它完全可插入从Spring Security 3.0起。
SecurityContextPersistenceFilter
我们涵盖所有重要的过滤器在技术概述这一章,所以你可能想在这一点上重新阅读该部分。让我们先来看看,你会如何配置它与一个FilterChainProxy使用。一个基本的配置只需要bean本身。
<bean id="securityContextPersistenceFilter"
class="org.springframework.security.web.context.SecurityContextPersistenceFilter"/>
正如我们之前看到的,这个过滤器有两个主要的任务。它负责存储` securitycontext 内容之间的HTTP请求和当请求完成结算securitycontextholder`。清除ThreadLocal其中存储的上下文是必不可少的,因为它可能会以其他方式可能是一个线程被替换成servlet容器的线程池,仍连接一个特定的用户的安全上下文。这个线程可能在稍后的阶段中使用,与错误的凭证执行操作。
SecurityContextRepository
从Spring Security 3.0起,加载和存储安全上下文的工作现在是委托给一个单独的策略接口:
public interface SecurityContextRepository {SecurityContext loadContext(HttpRequestResponseHolder requestResponseHolder);void saveContext(SecurityContext context, HttpServletRequest request,HttpServletResponse response);
}该HttpRequestResponseHolder只是一个容器传入的请求和响应对象,允许实现替换这些包装类。返回的内容将被传递给过滤器链。
默认实现HttpSessionSecurityContextRepository,存储安全上下文作为HttpSession的属性 [8]. 对于此实现最重要的配置参数是allowSessionCreation属性,它默认为true,从而使类来创建一个会话如果它需要一个存储身份验证的用户的安全上下文(它不会创建一个除非认证发生和安全上下文的内容改变了)。如果你不希望创建一个会话,则可以将此属性设置为false:
<bean id="securityContextPersistenceFilter"class="org.springframework.security.web.context.SecurityContextPersistenceFilter">
<property name='securityContextRepository'><bean class='org.springframework.security.web.context.HttpSessionSecurityContextRepository'><property name='allowSessionCreation' value='false' /></bean>
</property>
</bean>
或者你可以提供 NullSecurityContextRepository的一个实例, 一个 null object 的实现, 这将防止安全上下文被存储,即使已经在会话期间创建一个该实例请求。
UsernamePasswordAuthenticationFilter
我们现在看到的三个主要的过滤器总是存在在一个Spring Security web配置。这些也都是这是由命名空间<http>元素自动创建,并且不能被替代被取代的三种。现在唯一缺少的是一个实际的认证机制,而这将允许用户进行身份验证。该过滤器是最常用的身份验证过滤器,也是最常用的一种认证过滤器 [9]. 另外,它还提供了<form-login>元素的命名空间的实现。有三个阶段需要进行配置。
配置一个
LoginUrlAuthenticationEntryPoint登录页面的URL,就像我们上面,并设置ExceptionTranslationFilter。实现登录页面(使用JSP或MVC控制器)。
配置一个
UsernamePasswordAuthenticationFilter应用程序上下文的实例将过滤器bean添加到您的过滤器链代理(确保你要注意顺序)。
登录表单包含username和password输入字段,并发布到由过滤器(默认情况下这是/login)监测的URL。基本的过滤器配置看起来是这样的:
<bean id="authenticationFilter" class=
"org.springframework.security.web.authentication.UsernamePasswordAuthenticationFilter">
<property name="authenticationManager" ref="authenticationManager"/>
</bean>
认证成功和失败的应用程序流程
该过滤器调用配置AuthenticationManager处理每个认证请求。继成功认证或认证失败的目的地是由AuthenticationSuccessHandler和AuthenticationFailureHandler策略接口分别控制。过滤器属性允许你设置这些,所以你可以完全自定义行为 [10]. 一些标准的实现,如SimpleUrlAuthenticationSuccessHandler,SavedRequestAwareAuthenticationSuccessHandler,SimpleUrlAuthenticationFailureHandler和ExceptionMappingAuthenticationFailureHandler提供。看一看这些类的Javadoc和AbstractAuthenticationProcessingFilter来获取它们是如何工作的概述和所支持的特性。
如果认证成功,将所得Authentication对象将被放置到SecurityContextHolder。配置的AuthenticationSuccessHandler将被重定向或用户转发给适当的目的地。默认情况下使用SavedRequestAwareAuthenticationSuccessHandler,这意味着用户将被重定向到他们要求的原始目的地之前,他们被要求登录。
|
|
如果身份验证失败,则将调用AuthenticationFailureHandler配置。
Servlet API的集成
本节描述如何与Servlet API集成Spring Security。 servletapi-xml示例应用程序演示了使用这些方法。
Servlet 2.5+ 集成
HttpServletRequest.getRemoteUser()
HttpServletRequest.getRemoteUser() 将返回SecurityContextHolder.getContext().getAuthentication().getName()的结果。 这通常是当前的用户名。这可能是有用的,如果你想在应用程序中显示当前用户名。此外,检查如果这是空可以用来表示如果一个用户已经通过身份验证或者是匿名的。知道用户是否通过身份验证可以用于确定特定UI元素应该显示(即注销链接应该只显示如果用户身份验证)。
HttpServletRequest.getUserPrincipal()
HttpServletRequest.getUserPrincipal()将返回SecurityContextHolder.getContext().getAuthentication()的结果。这意味着它是一个 Authentication 通常是 UsernamePasswordAuthenticationToken的一个实例使用基于用户名和密码的身份验证。这可能是有用的,如果你需要更多关于用户的信息。例如,您可能已经创建了一个自定义UserDetailsService,返回一个自定义的UserDetails包含您的用户的姓名。你可以用以下获得这些信息:
Authentication auth = httpServletRequest.getUserPrincipal();
// assume integrated custom UserDetails called MyCustomUserDetails
// by default, typically instance of UserDetails
MyCustomUserDetails userDetails = (MyCustomUserDetails) auth.getPrincipal();
String firstName = userDetails.getFirstName();
String lastName = userDetails.getLastName();|
应该指出的是,它通常是坏的做法,在你的应用程序执行这么多的逻辑。相反,应该集中它减少任何Spring Security和Servlet API的耦合。 |
HttpServletRequest.isUserInRole(String)
The HttpServletRequest.isUserInRole(String) 将确定 SecurityContextHolder.getContext().getAuthentication().getAuthorities() 包含一个 GrantedAuthority 角色传入的 isUserInRole(String)。 一般用户不应通过"ROLE_" 前缀到这个方法,因为它是自动添加的。例如,如果你想要确定当前用户有权力"ROLE_ADMIN",你可以使用以下:
boolean isAdmin = httpServletRequest.isUserInRole("ADMIN");这可能是有用的确定应该显示特定的UI组件。例如,您可能只显示管理链接如果当前用户是管理员。
Servlet 3+ 集成
以下部分将介绍Servlet 3集成Spring Security的方法。
HttpServletRequest.authenticate(HttpServletRequest,HttpServletResponse)
The HttpServletRequest.authenticate(HttpServletRequest,HttpServletResponse)方法可用于确保用户身份验证。如果他们没有身份验证,配置AuthenticationEntryPoint将用于请求用户进行身份验证(即重定向到登录页面)。
HttpServletRequest.login(String,String)
The HttpServletRequest.login(String,String) 方法可用于验证用户与当前AuthenticationManager。例如,下面将尝试验证用户名 "user"和密码"password":
try {
httpServletRequest.login("user","password");
} catch(ServletException e) {
// fail to authenticate
}|
没有必要捕获ServletException如果你想让Spring Security来处理失败的身份验证。 |
HttpServletRequest.logout()
The HttpServletRequest.logout() 方法可以用于记录当前用户。
通常这意味着SecurityContextHolder将被清除,HttpSession将失效,任何“记住我”身份验证将清理干净,等。然而,LogoutHandler配置实现将取决于你的Spring Security配置。需要注意是,在HttpServletRequest.logout()被调用,你要还负责编写一个响应。通常这将涉及一个重定向到欢迎页面。
AsyncContext.start(Runnable)
The AsynchContext.start(Runnable) 的方法,确保您的凭据将传播到新的线程。使用 Spring Security的并发支持Spring Security覆盖AsyncContext.start(可运行),以确保当前SecurityContext处理可运行时使用。例如,以下将输出当前用户的身份验证:
final AsyncContext async = httpServletRequest.startAsync();
async.start(new Runnable() {public void run() {Authentication authentication = SecurityContextHolder.getContext().getAuthentication();try {final HttpServletResponse asyncResponse = (HttpServletResponse) async.getResponse();asyncResponse.setStatus(HttpServletResponse.SC_OK);asyncResponse.getWriter().write(String.valueOf(authentication));async.complete();} catch(Exception e) {throw new RuntimeException(e);}}
});
Async Servlet Support
如果你使用的是基于Java的配置,你已经准备好了。如果你使用XML配置中,有一些是必要的更新。第一步是确保你更新你的web.xml使用至少3.0模式如下所示:
<web-app xmlns="http://java.sun.com/xml/ns/javaee"
xmlns:xsi="http://www.w3.org/2001/XMLSchema-instance"
xsi:schemaLocation="http://java.sun.com/xml/ns/javaee http://java.sun.com/xml/ns/javaee/web-app_3_0.xsd"
version="3.0"></web-app>
接下来你需要确保你的springSecurityFilterChain设置处理异步请求。
<filter>
<filter-name>springSecurityFilterChain</filter-name>
<filter-class>org.springframework.web.filter.DelegatingFilterProxy
</filter-class>
<async-supported>true</async-supported>
</filter>
<filter-mapping>
<filter-name>springSecurityFilterChain</filter-name>
<url-pattern>/*</url-pattern>
<dispatcher>REQUEST</dispatcher>
<dispatcher>ASYNC</dispatcher>
</filter-mapping>
就是这样!现在的Spring Security将确保您的SecurityContext是在异步请求传播了。
那么它是怎样工作的?如果你是不是真的感兴趣,请随时跳过这一节的其余部分,否则就继续阅读。这是内置在Servlet规范,但有一点调整,Spring Security确保事情妥善处理异步请求。Spring Security 3.2之前,securitycontextholder的securitycontext自动保存只要httpservletresponse承诺。这可能会导致在异步环境下的问题。例如,考虑以下:
httpServletRequest.startAsync();
new Thread("AsyncThread") {@Overridepublic void run() {try {// Do workTimeUnit.SECONDS.sleep(1);// Write to and commit the httpServletResponsehttpServletResponse.getOutputStream().flush();} catch (Exception e) {e.printStackTrace();}}
}.start();
问题是,这个线程是未知的Spring Security,所以SecurityContext中不会传播到它。这意味着当我们提交HttpServletResponse没有SecuriytContext。当Spring Security的自动保存SecurityContext支持HttpServletResponse就会失去我们的登录用户。
自从3.2版本开始,Spring Security是足够聪明,不再自动保存SecurityContext,一旦遵守协议 HttpServletResponse的HttpServletRequest.startAsync()将尽快被调用。
Servlet 3.1+ 集成
以下部分描述了Servlet3.1与Spring Security集成的方法。
HttpServletRequest#changeSessionId()
The HttpServletRequest.changeSessionId() 是默认的方法防止 固定会话 损害Servlet 3.1或更高的版本。
Basic和Digest认证
Basic和digest认证是在web应用中流行的替代身份验证机制。基本身份验证通常是使用无状态的客户对每个请求通过他们的凭证。这是相当常见的结合,其中一个应用程序通过两个基于浏览器的用户界面,并作为Web服务使用基于表单的身份验证中使用它。但是,基本身份验证发送密码以纯文本,所以应该只在真正加密传输层可以使用,例如HTTPS。
BasicAuthenticationFilter
BasicAuthenticationFilter负责处理HTTP头部中的基本认证证书。这可以用于验证由Spring远程协议(如Hessian和Burlap)的呼叫以及正常的浏览器的用户代理(如Firefox和Internet Explorer)。 HTTP基本认证的标准是由RFC 1945,第11条规定,以及BasicAuthenticationFilter符合这个RFC。基本身份验证是一个有吸引力的认证方法,因为它是非常广泛的,部署在用户代理和实施是非常简单的(它只是一个用户名的Base64编码:密码,在HTTP头中指定)。
Configuration
为了实现HTTP基本身份验证,您需要添加一个BasicAuthenticationFilter到你的过滤器链。应用程序上下文应包含BasicAuthenticationFilter及其所需的合作者:
<bean id="basicAuthenticationFilter"
class="org.springframework.security.web.authentication.www.BasicAuthenticationFilter">
<property name="authenticationManager" ref="authenticationManager"/>
<property name="authenticationEntryPoint" ref="authenticationEntryPoint"/>
</bean><bean id="authenticationEntryPoint"
class="org.springframework.security.web.authentication.www.BasicAuthenticationEntryPoint">
<property name="realmName" value="Name Of Your Realm"/>
</bean>配置的AuthenticationManager处理每个认证请求。如果认证失败,配置AuthenticationEntryPoint将被用来重试认证过程。通常你会在组合使用过滤器BasicAuthenticationEntryPoint,它会返回一个合适的头部重试HTTP基本身份验证的401响应。如果认证成功,将所得Authentication对象将和平常一样被放入SecurityContextHolder。
如果认证事件成功,或者认证不需要执行,因为HTTP头部没有包含支持的认证请求,过滤器链将继续正常工作。过滤器链中断的唯一情况是,如果认证失败了,Auth`DigestAuthenticationFilter能够消化处理HTTP头部中的认证证书。摘要式身份验证试图解决许多基本身份验证的弱点,特别是保证凭据从不通过线路明文形式发送。许多用户支持摘要式身份验证,包括Firefox和Internet Explorer。标准管理HTTP摘要认证由RFC 2617定义,更新摘要式身份验证的一个早期版本由RFC 2069标准规定。大多数用户代理实现RFC 2617。Spring Security的DigestAuthenticationFilter兼容“auth”质量认证的保护(qop)规定的RFC 2617,这也与RFC 2069提供向后兼容性。摘要式身份验证是一个更有吸引力的选择,如果您需要使用未加密的HTTP(即没有TLS / HTTPS)并希望最大化安全的身份验证过程。事实上WebDAV协议摘要式身份验证是一个强制性的要求,指出由RFC 2518 17.1节。 enticationEntryPoint`被调用。
DigestAuthenticationFilter
DigestAuthenticationFilter能够消化处理HTTP头部中的认证证书。摘要式身份验证试图解决许多基本身份验证的弱点,特别是保证凭据从不通过线路明文形式发送。许多用户支持摘要式身份验证,包括Firefox和Internet Explorer。标准管理HTTP摘要认证由RFC 2617定义,更新摘要式身份验证的一个早期版本由RFC 2069标准规定。大多数用户代理实现RFC 2617。Spring Security的DigestAuthenticationFilter兼容“auth”质量认证的保护(qop)规定的RFC 2617,这也与RFC 2069提供向后兼容性。摘要式身份验证是一个更有吸引力的选择,如果您需要使用未加密的HTTP(即没有TLS / HTTPS)并希望最大化安全的身份验证过程。事实上WebDAV协议摘要式身份验证是一个强制性的要求,指出由RFC 2518 17.1节可见。
|
你不应该在现代应用中使用摘要,因为它被认为是不安全的。 最明显的问题是,你必须把您的密码以明文,加密,或一个MD5格式。 所有这些存储格式被认为是不安全的。 相反,你应该使用一种自适应的哈希密码(即BCrypt,PBKDF2,SCrypt等)。 |
摘要式身份验证的核心是一个"nonce"。这是一个服务器生成的值。Spring Security nonce采用以下格式:
base64(expirationTime + ":" + md5Hex(expirationTime + ":" + key))
expirationTime:   The date and time when the nonce expires, expressed in milliseconds
key: A private key to prevent modification of the nonce tokenDigestAuthenticatonEntryPoint有一个属性指定用于生成nonce令牌的key,以及nonceValiditySeconds属性确定过期时间(默认300,等于5分钟)。只要nonce是有效的,摘要就会通过串联字符串包括用户名,密码,随机数,被请求的URI,一个客户端产生的随机数(仅该用户代理每个请求生成一个随机值),域名等,然后执行MD5哈希值。如果他们不同意一个包含值(如密码),服务器和用户代理执行此计算消化,就会导致不同的哈希码。在Spring Security实现中,如果服务器生成的nonce已经过期(但是摘要还是有效),在DigestAuthenticationEntryPoint将发送一个"stale=true"头。这告诉用户代理没有必要打扰用户(如用户名和密码等是正确的),而只是采用了全新的随机数再试一次。
对于DigestAuthenticationEntryPoint的参数nonceValiditySeconds而言一个适当的值取决于您的应用程序。非常安全的应用程序应该注意一个拦截认证头可以用来模拟本体,直到expirationTime中包含的特定场合。这是关键的原则,选择适当的设置,但它是不寻常的,非常安全的应用程序不能运行在第一个实例的TLS/HTTPS。
因为摘要式身份验证的更复杂的实现,经常有用户代理的问题。例如,IE不能在同一个会话的请求提出了一个“opaque”令牌。因此Spring Security封装了所有状态信息进入到“nonce”令牌中。在我们的测试中,Spring Security的实现与FireFox和ie能可靠地工作,正确处理nonce超时等。
Configuration
既然我们已经回顾了理论,让我们看看如何使用它。为了实现HTTP摘要认证,必须在过滤器链定义DigestAuthenticationFilter。这个应用上下文将需要定义DigestAuthenticationFilter及其所需的合作者:
<bean id="digestFilter" class="org.springframework.security.web.authentication.www.DigestAuthenticationFilter">
<property name="userDetailsService" ref="jdbcDaoImpl"/>
<property name="authenticationEntryPoint" ref="digestEntryPoint"/>
<property name="userCache" ref="userCache"/>
</bean><bean id="digestEntryPoint" class="org.springframework.security.web.authentication.www.DigestAuthenticationEntryPoint">
<property name="realmName" value="Contacts Realm via Digest Authentication"/>
<property name="key" value="acegi"/>
<property name="nonceValiditySeconds" value="10"/>
</bean>配置UserDetailsService是必要的因为DigestAuthenticationFilter必须有一个用户的明文密码直接访问。如果您正在使用您的DAO中的编码密码,摘要身份验证将无法工作 [11]. 这个DAO的协作者,与UserCache一起,通常直接与DaoAuthenticationProvider共享。该authenticationEntryPoint属性必须是DigestAuthenticationEntryPoint,使DigestAuthenticationFilter能够获得正确的realmName和key再进行摘要计算。
像BasicAuthenticationFilter,如果认证成功,Authentication请求令牌将被放置到了SecurityContextHolder。如果认证事件成功,或者认证不需要执行,因为HTTP头部没有包含摘要认证请求,过滤器链将继续正常。过滤器链中断的唯一情况是,如果认证失败了AuthenticationEntryPoint被调用,如前一段讨论。
摘要式身份验证的RFC提供了一系列附加功能,以进一步提高安全性。例如,随机数可以在每次请求被改变。尽管如此,Spring Security的实施旨在最大限度地减少执行(和用户代理出现不兼容)的复杂性,并避免保存服务器端的状态。你被邀请审查RFC 2617如果你想更详细地探索这些功能。据我们所知,Spring Security的实现中遵守了RFC的最低标准。
Remember-Me Authentication
Overview
Remember-me或persistent-login身份验证是指网站能够记住一个主体的身份之间的会话。这通常是通过发送cookie给浏览器,以及在未来的会话中发现的cookie,并进行自动登录发生完成的。Spring Security提供了这些操作发生的必要的挂钩,并有两个具体的remember-me实现。其中一个使用散列来保护基于cookie标记的安全性,另一个使用了数据库或其他持久化存储机制来保存生成的标记。
注意,所有实现都需要一个UserDetailsService。如果您正在使用身份验证提供者不使用UserDetailsService(例如,LDAP提供者),那么它不会工作,除非你也有一个UserDetailsService应用程序上下文中的bean。
Simple Hash-Based Token Approach
这种方法使用散列来完成remember-me策略。本质上一个cookie发送到浏览器交互验证成功后,使用的cookie组成结构如下:
base64(username + ":" + expirationTime + ":" +
md5Hex(username + ":" + expirationTime + ":" password + ":" + key))username:          As identifiable to the UserDetailsService
password:          That matches the one in the retrieved UserDetails
expirationTime:    The date and time when the remember-me token expires, expressed in milliseconds
key:               A private key to prevent modification of the remember-me token
因此,remember-me的令牌在指定的期间是有效的,提供的用户名,密码和密钥不会改变。值得注意的是,这有一个潜在的安全问题,任何用户代理在remember-me令牌到期之前捕获到它,令牌将是可用的。这与摘要式身份验证问题是同样的问题。如果本人知道令牌已被抓获,他们可以轻松地更改他们的密码,并立即注销所有的remember-me标记。如果需要更显著的安全性,你应该使用在下一节中描述的方法。另外记得remember-me服务根本不应该被使用。
如果你熟悉在namespace configuration命名空间配置这一章中讨论的主题,你可以启用remember-me认证只需添加<remember-me>元素:
<http>
...
<remember-me key="myAppKey"/>
</http>UserDetailsService一般会自动选择。如果你有一个以上的应用环境,你需要指定哪一个应该使用user-service-ref属性,其中的值在你的UserDetailsService bean的名称中设置。
Persistent Token Approach
这种方法是基于文章 http://jaspan.com/improved_persistent_login_cookie_best_practice 有一些小的修改 [12]. 若要使用命名空间配置的这种方法,你应该提供一个数据源引用:
<http>
...
<remember-me data-source-ref="someDataSource"/>
</http>数据库应该包含一个persistent_logins表,使用以下SQL创建(或同等的):
create table persistent_logins (username varchar(64) not null,series varchar(64) primary key,token varchar(64) not null,last_used timestamp not null)Remember-Me的接口和实现
Remember-me是用于 UsernamePasswordAuthenticationFilter,并通过AbstractAuthenticationProcessingFilter超类的钩子实现。 它也被运用在BasicAuthenticationFilter. 钩子会在合适的时候调用一个具体RememberMeServices。 该接口看起来像这样:
Authentication autoLogin(HttpServletRequest request, HttpServletResponse response);void loginFail(HttpServletRequest request, HttpServletResponse response);void loginSuccess(HttpServletRequest request, HttpServletResponse response,Authentication successfulAuthentication);请参考JavaDocs获得什么方法都做了更充分的讨论,不过注意在这个阶段,AbstractAuthenticationProcessingFilter仅调用loginFail()和loginSuccess()方法。当SecurityContextHolder 不包含 Authentication时autoLogin()方法被RememberMeAuthenticationFilter调用。因此,此接口提供了基本的remember-me的实现与认证相关的事件的充分通知,和代表的执行情况时,一个候选Web请求可能包含一个cookie并希望被记住。这种设计允许任何数目的remember-me实现策略。我们已经看到上面Spring Security提供两种实现方法。我们来看看这些。
TokenBasedRememberMeServices
这个实现支持 Simple Hash-Based Token Approach中描述的简单方法。TokenBasedRememberMeServices生成一个RememberMeAuthenticationToken,由RememberMeAuthenticationProvider处理。一个key认证提供者和TokenBasedRememberMeServices之间共享。此外,TokenBasedRememberMeServices需要一个UserDetailsService可以实现检索比较用户名和密码的目的,并生成RememberMeAuthenticationToken包含正确GrantedAuthority的一个UserDetailsService。如果用户提供无效的cookie,应该应用一些注销命令。TokenBasedRememberMeServices还实现了Spring Security的` logouthandler 接口,所有可以用`LogoutFilter自动清除cookie。
在应用程序环境方面,remember-me服务需要的bean类如下:
<bean id="rememberMeFilter" class=
"org.springframework.security.web.authentication.rememberme.RememberMeAuthenticationFilter">
<property name="rememberMeServices" ref="rememberMeServices"/>
<property name="authenticationManager" ref="theAuthenticationManager" />
</bean><bean id="rememberMeServices" class=
"org.springframework.security.web.authentication.rememberme.TokenBasedRememberMeServices">
<property name="userDetailsService" ref="myUserDetailsService"/>
<property name="key" value="springRocks"/>
</bean><bean id="rememberMeAuthenticationProvider" class=
"org.springframework.security.authentication.RememberMeAuthenticationProvider">
<property name="key" value="springRocks"/>
</bean>不要忘记添加你的RememberMeServices实现UsernamePasswordAuthenticationFilter.setRememberMeServices()的属性,包括RememberMeAuthenticationProvider在AuthenticationManager.setProviders()中的列表,并添加RememberMeAuthenticationFilter到你的FilterChainProxy(一般在你的UsernamePasswordAuthenticationFilter之后)。
PersistentTokenBasedRememberMeServices
这个类可以以同样的方式作为TokenBasedRememberMeServices被使用,但它另外需要与PersistentTokenRepository存储令牌进行配置。有两种标准实现。
InMemoryTokenRepositoryImpl这是只用来测试。JdbcTokenRepositoryImpl其存储在数据库中的标记。
数据库模式如上面所描述 Persistent Token Approach.
Cross Site Request Forgery (CSRF)
本节讨论Spring Security’s Cross Site Request Forgery (CSRF) 支持。
CSRF攻击
在我们讨论Spring Security如何保护应用程序不受CSRF攻击之前,我们将解释什么是CSRF攻击。让我们来看一个具体的例子来更好地理解。
假设你的银行网站提供允许从当前登录的用户转移钱转到另一个银行账户的形式。例如,HTTP请求可能看起来像:
POST /transfer HTTP/1.1
Host: bank.example.com
Cookie: JSESSIONID=randomid; Domain=bank.example.com; Secure; HttpOnly
Content-Type: application/x-www-form-urlencodedamount=100.00&routingNumber=1234&account=9876
现在假装你身份验证你的银行网站,然后再不注销,请访问一个恶意的网站。恶意的网站包含以下形式的HTML页面:
<form action="https://bank.example.com/transfer" method="post">
<input type="hidden"name="amount"value="100.00"/>
<input type="hidden"name="routingNumber"value="evilsRoutingNumber"/>
<input type="hidden"name="account"value="evilsAccountNumber"/>
<input type="submit"value="Win Money!"/>
</form>
你想赢钱,所以你点击submit按钮。在这个过程中,你无意中转移$100到恶意用户。这是因为,虽然恶意的网站不能看到你的cookies,与银行相关的cookies仍然与请求一起发送。
最糟糕的是,这整个过程可能已经使用JavaScript自动化。这意味着你甚至没有需要点击的按钮。那么我们该如何保护自己免受此类攻击?
同步器标记模式
问题是,从银行网站上的HTTP请求,和从恶意的网站的要求是完全一样的。这就意味着没有办法拒绝来自恶意的网站的请求,允许请求来自银行的网站。为了抵御CSRF攻击我们需要确保请求中有一些恶意的网站是无法提供的。
一种解决方案是使用 同步器标记模式. 这个解决方案是保证每个请求除了需要我们的会话cookie,还用随机生成的令牌作为HTTP参数。提交一个请求时,服务器必须查找参数和比较它的期望值和实际值的请求。如果值不匹配,请求失败。
我们可以轻松的预期,只要更新每个HTTP请求的令牌。这样做可以安全地自同源策略保证了恶意的网站无法读取响应。此外,我们不希望包括HTTP GET随机令牌,因为这可能会导致标记被泄露。
让我们来看看我们的例子将如何改变。假定随机产生的标记存在于一个HTTP参数name_csrf。例如,要转账的要求是这样的:
POST /transfer HTTP/1.1
Host: bank.example.com
Cookie: JSESSIONID=randomid; Domain=bank.example.com; Secure; HttpOnly
Content-Type: application/x-www-form-urlencodedamount=100.00&routingNumber=1234&account=9876&_csrf=<secure-random>
你会注意到,我们添加了_csrf参数的随机值。现在,恶意网站将无法猜测_csrf参数(必须提供明确的恶意网站),当服务器将实际的令牌与预期的令牌进行比较时,传输将失败。
何时使用CSRF保护
什么时候应该使用CSRF保护?我们的建议是使用CSRF保护,可以通过浏览器处理普通用户的任何请求。如果你只是创建一个非浏览器客户端使用的服务,你可能会想要禁用CSRF保护。
CSRF保护和JSON
一个常见的问题是"我是否需要保护JSON请求的javascript ?"简短的答案是,这取决于你。但是,你必须非常小心,因为有CSRF攻击可以影响JSON请求。例如,一个恶意用户可以使用以下格式,创建一个 CSRF和JSON使用以下form:
<form action="https://bank.example.com/transfer" method="post" enctype="text/plain">
<input name='{"amount":100,"routingNumber":"evilsRoutingNumber","account":"evilsAccountNumber", "ignore_me":"' value='test"}' type='hidden'>
<input type="submit"value="Win Money!"/>
</form>
这将产生以下JSON结构
{ "amount": 100,
"routingNumber": "evilsRoutingNumber",
"account": "evilsAccountNumber",
"ignore_me": "=test"
}
如果一个应用程序没有验证内容类型,那么它会接触到这种攻击。根据设置,验证内容类型的Spring MVC应用程序仍然可以利用更新URL后缀结尾".json"如下所示:
<form action="https://bank.example.com/transfer.json" method="post" enctype="text/plain">
<input name='{"amount":100,"routingNumber":"evilsRoutingNumber","account":"evilsAccountNumber", "ignore_me":"' value='test"}' type='hidden'>
<input type="submit"value="Win Money!"/>
</form>
CSRF和无状态的浏览器应用程序
如果我的应用程序是无状态的呢?这并不意味着你是受保护的。事实上,如果用户对于一个给定的请求不需要在web浏览器中执行任何操作,他们可能仍然容易受到CSRF攻击。
例如,考虑一个应用程序使用一个定制的cookie,其中包含所有的声明进行身份验证,而不是JSESSIONID。当CSRF是由自定义cookie与在该JSESSIONID cookie在前面的例子中相同的方式发送的,请求被发送。
使用基本身份验证的用户也容易受到CSRF攻击,因为浏览器会自动包括以同样的方式,在我们前面的例子中该JSESSIONID的cookie会发送任何请求的用户名密码。
Using Spring Security CSRF Protection
那么,什么是必要的,使用Spring Security来保护我们的网站不受CSRF攻击的步骤是什么?使用Spring Security的CSRF保护的步骤如下所述:
使用适当的HTTP动词
配置CSRF保护
包括CSRF令牌
使用适当的HTTP动词
防止CSRF攻击的第一步是确保你的网站使用适当的HTTP动词。具体来说,前Spring Security的CSRF支持可以使用,你需要确定你的应用程序使用PATCH,POST, PUT, and/or DELETE对于任何修改状态。
这不是一个Spring安全限制的支持,而是进行适当的预防CSRF的一般要求。原因是包括在一个HTTP GET私人信息可能导致的信息泄露。看到 RFC 2616 Section 15.1.3在URI的敏感信息编码 一般的指导对于敏感信息使用POST而不是GET。
配置CSRF保护
下一步是要包括你的应用程序中的Spring Security的CSRF保护。有些框架处理无效CSRF无效用户的会话令牌,而这将导致 其自身的问题。相反,在默认情况下Spring Security的CSRF保护将产生一个HTTP 403访问被拒绝。这可以通过配置AccessDeniedHandler以不同方式处理。
Spring Security 4.0,CSRF保护与XML配置默认启用。如果你想禁用CSRF保护,下面可以看到相应的XML配置。
<http><!-- ... --><csrf disabled="true"/>
</http>
CSRF保护默认情况下使用Java配置启用。如果您想禁用CSRF,下面可以看到相应的Java配置。请参考Javadoc中的CSRF()在CSRF保护是如何自定义配置的。
@EnableWebSecurity
public class WebSecurityConfig extends
WebSecurityConfigurerAdapter {@Override
protected void configure(HttpSecurity http) throws Exception {http.csrf().disable();
}
}
包括CSRF令牌
Form Submissions
最后一步是确保您包括CSRF令牌在所有补丁,POST,PUT和DELETE方法。一个方法是使用_csrf请求属性来获取当前CsrfToken。用一个JSP这样做的一个示例如下所示:
<c:url var="logoutUrl" value="/logout"/>
<form action="${logoutUrl}"method="post">
<input type="submit"value="Log out" />
<input type="hidden"name="${_csrf.parameterName}"value="${_csrf.token}"/>
</form>
一个更容易的方法是从Spring Security的JSP标签库使用CSRF输入标签 。
|
如果你正在使用Spring MVC的 |
Ajax和JSON请求
如果使用JSON,那么它是不可能在HTTP参数提交CSRF令牌。相反,你可以提交HTTP报头中的令牌。一个典型的模式是将包括您的meta标签内的CSRF令牌。用一个JSP一个例子如下所示:
<html>
<head><meta name="_csrf" content="${_csrf.token}"/><!-- default header name is X-CSRF-TOKEN --><meta name="_csrf_header" content="${_csrf.headerName}"/><!-- ... -->
</head>
<!-- ... -->
而不是手动创建meta标签,您可以从Spring Security JSP标记库中使用简单的csrfMetaTags标签。
然后,您可以包含所有Ajax请求中的令牌。如果你是使用jQuery,这将通过以下:
$(function () {
var token = $("meta[name='_csrf']").attr("content");
var header = $("meta[name='_csrf_header']").attr("content");
$(document).ajaxSend(function(e, xhr, options) {xhr.setRequestHeader(header, token);
});
});
作为一种替代的jQuery,我们建议使用 cujoJS’s rest.js. The rest.js模块提供先进的支持以RESTful方式处理HTTP请求和响应。核心能力是能够说明链接所需的HTTP客户端添加行为拦截器客户端。
var client = rest.chain(csrf, {
token: $("meta[name='_csrf']").attr("content"),
name: $("meta[name='_csrf_header']").attr("content")
});
所配置的客户端可以与需要一个到CSRF保护资源的请求的应用程序共享任何组件。rest.js和jQuery之间有一个显著的不同是只有配置客户端的请求将包含CSRF令牌,vs jQuery将包括所有请求令牌。请求接收令牌能力的范围有助于防止泄露CSRF令牌给第三方。请参阅 rest.js 参考文档获取更多关于rest.js的信息。
CookieCsrfTokenRepository
可能有些情况下,用户想要坚持CSRF Token在cookie中。 默认情况下CookieCsrfTokenRepository将编写一个名为 XSRF-TOKEN的cookie和从头部命名 X-XSRF-TOKEN中读取或HTTP参数 _csrf。 这些默认值来自 AngularJS
你可以使用下面的XML配置CookieCsrfTokenRepository:
<http><!-- ... --><csrf token-repository-ref="tokenRepository"/>
</http>
<b:bean id="tokenRepository"class="org.springframework.security.web.csrf.CookieCsrfTokenRepository"p:cookieHttpOnly="false"/>|
示例显式地设置 |
你可以配置CookieCsrfTokenRepository在Java配置中使用:
@EnableWebSecurity
public class WebSecurityConfig extendsWebSecurityConfigurerAdapter {@Overrideprotected void configure(HttpSecurity http) throws Exception {http.csrf().csrfTokenRepository(CookieCsrfTokenRepository.withHttpOnlyFalse());}
}|
示例显式地设置 |
CSRF警告
在实现CSRF时有几个注意事项.
Timeouts
一个问题是,预期CSRF令牌存储在HttpSession中,所以一旦HttpSession到期你的配置将收到一个InvalidCsrfTokenException AccessDeniedHandler。如果您使用的是默认的AccessDeniedHandler,浏览器将会得到一个HTTP 403并显示错误消息。
|
有人可能会问,为什么预期 |
一个简单的方法,有一些JavaScript可以减轻一个活跃的用户体验超时,让用户知道他们的会话即将到期。用户可以点击一个按钮继续,并刷新会话。
另外,指定一个自定义的AccessDeniedHandler允许你以任何你喜欢的方式处理InvalidCsrfTokenException。 有关如何自定义AccessDeniedHandler的例子参考提供的链接为 xml 和 Java configuration.
最后,应用程序可以配置为使用 CookieCsrfTokenRepository这将不会过期。 正如前面提到的,这不是安全的使用一个会话,但在许多情况下已经足够好。
Logging In
为了防止 forging登录请求 在登录表单中应该也要防止CSRF攻击。因为CsrfToken存储在HttpSession中,这意味着一个HttpSession将尽快创建CsrfToken令牌属性进行访问。 虽然这听起来很糟糕,一个RESTful / stateless的体系结构对于实现实际的安全是必要的。如果没有的状态,我们什么都没有,如果令牌被攻破,我们可以做的。实事求是地讲,在CSRF令牌的尺寸非常小,应该对我们的架构可以忽略不计的影响。如果没有状态,如果令牌被攻破,我们没有什么可以做的。实际上,CSRF令牌的规模和体系结构很小应该对我们的架构有一个微不足道的影响。
一种保护登录常用技术是使用一个javascript函数在表单提交之前获得一个有效的CSRF令牌。通过这样做,没有必要去想会话超时因为表单提交前有创建会话(在上一节中讨论) (假设 CookieCsrfTokenRepository 没有配置而不是), 因此,用户当他想提交用户名/密码可以停留在登录页面上为了达到这个目标,你可以采取Spring Security提供的CsrfTokenArgumentResolver的优势,并像它在这里描述暴露的端点。
Logging Out
添加CSRF将更新LogoutFilter只使用HTTP POST。这确保了注销需要CSRF令牌和一个恶意的用户不能强制注销用户。
一种方法是使用一种形式的日志。如果你真的想要一个链接,你可以(即也许隐藏表单)使用JavaScript,让链接执行POST。对于禁止使用JavaScript的浏览器,您可以选择有链接的用户注销确认页面执行POST。
如果你真的想使用HTTP GET注销你可以这样做,但请记住这一般不推荐。例如,下面的Java配置将执行任意的HTTP方法请求URL /logout执行注销:
@EnableWebSecurity
public class WebSecurityConfig extends
WebSecurityConfigurerAdapter {@Overrideprotected void configure(HttpSecurity http) throws Exception {http.logout().logoutRequestMatcher(new AntPathRequestMatcher("/logout"));}
}
Multipart (文件上传)
有两个选项来使用CSRF保护multipart/form-data.每个选项都有其权衡。
Placing MultipartFilter before Spring Security
Include CSRF token in action
|
之前你和multipart集成Spring Security的CSRF保护文件上传,确保没有CSRF保护你可以第一时间上传。使用multipart表单与Spring的更多信息可以在 17.10 Spring’s multipart (文件上传) 支持 的Spring参考和 MultipartFilter javadoc. |
Placing MultipartFilter before Spring Security
第一个选项是确保MultipartFilter在Spring Security过滤器之前指定。Spring Security过滤器之前指定MultipartFilter意味着没有授权调用MultipartFilter这意味着任何人都可以服务器上上传临时文件。不过,只有授权的用户可以将文件提交由您的应用程序处理。总的来说,这是推荐的方法,因为临时文件上传在大多数服务器上应该只有一个微不足道的影响。
为了确保MultipartFilter是Spring Security的过滤器,在Java配置前指定,用户可以重写beforespringsecurityfilterchain如下所示:
public class SecurityApplicationInitializer extends AbstractSecurityWebApplicationInitializer {@Overrideprotected void beforeSpringSecurityFilterChain(ServletContext servletContext) {insertFilters(servletContext, new MultipartFilter());}
}为了确保MultipartFilter是Spring Security的过滤器,在XML配置前指定,用户可以确定MultipartFilter的<filter-mapping>元素在springSecurityFilterChain前在web.xml中配置如下所示:
<filter><filter-name>MultipartFilter</filter-name><filter-class>org.springframework.web.multipart.support.MultipartFilter</filter-class>
</filter>
<filter><filter-name>springSecurityFilterChain</filter-name><filter-class>org.springframework.web.filter.DelegatingFilterProxy</filter-class>
</filter>
<filter-mapping><filter-name>MultipartFilter</filter-name><url-pattern>/*</url-pattern>
</filter-mapping>
<filter-mapping><filter-name>springSecurityFilterChain</filter-name><url-pattern>/*</url-pattern>
</filter-mapping>
Include CSRF token in action
如果允许未经授权的用户上传temporariy文件是不能接受的,另一种是将Spring Security过滤后的MultipartFilter和CSRF作为查询参数包含在表单的动作属性。在jsp示例如下所示
<form action="./upload?${_csrf.parameterName}=${_csrf.token}" method="post" enctype="multipart/form-data">这种方法的缺点是,查询参数可以被泄露。更普遍的是,最佳的方法是将敏感数据在身体或头部,以确保不泄露。更多信息可以在 RFC 2616 Section 15.1.3 编码URI的敏感信息中找到。
HiddenHttpMethodFilter
该HiddenHttpMethodFilter应放在Spring Security的过滤器之前。一般来说这是事实,但它可能能够对防止CSRF攻击有更多的影响。
请注意,HiddenHttpMethodFilter只覆盖一个POST HTTP方法,所以这实际上是不可能造成任何实际问题。但是,它仍然是最好的做法,以确保它被放置在Spring Security过滤器之前。
重写默认值
Spring Security的目标是提供默认值,保护用户免受攻击。这并不意味着你被迫接受所有的默认设置。
例如,您可以提供一个自定义CsrfTokenRepository覆盖其中CSRF Token的存储方式。
您还可以指定一个自定义RequestMatcher确定哪些请求受CSRF保护(即也许你不在乎注销是利用)。简而言之,如果Spring Security CSRF保护没有做出你想要的,你可以自定义行为。 请参阅 <csrf>将添加元素文档的细节如何自定义使用XML和CsrfConfigurerjavadoc,了解如何使用Java配置将这些自定义设置。
CORS
Spring框架提供了 CORS第一级支持。 CORS必须在Spring Security之前处理因为预检要求将不包含任何cookie(即JSESSIONID)。 如果第一个请求不包含任何cookie和Spring Security,将决定用户的请求没有被验证(因为有请求没有cookies),并拒绝它。
最简单的方法就是确保CORS首先是使用CorsFilter处理。 用户可以把CorsFilter和Spring Security 提供一个 CorsConfigurationSource使用如下:
@EnableWebSecurity
public class WebSecurityConfig extends WebSecurityConfigurerAdapter {@Overrideprotected void configure(HttpSecurity http) throws Exception {http// by default uses a Bean by the name of corsConfigurationSource.cors().and()...}@BeanCorsConfigurationSource corsConfigurationSource() {CorsConfiguration configuration = new CorsConfiguration();configuration.setAllowedOrigins(Arrays.asList("https://example.com"));configuration.setAllowedMethods(Arrays.asList("GET","POST"));UrlBasedCorsConfigurationSource source = new UrlBasedCorsConfigurationSource();source.registerCorsConfiguration("/**", configuration);return source;}
}
或在XML中
<http><cors configuration-source-ref="corsSource"/>...
</http>
<b:bean id="corsSource" class="org.springframework.web.cors.UrlBasedCorsConfigurationSource">...
</b:bean>
如果你正在使用Spring MVC的CORS支持,你可以省略指定CorsConfigurationSource和Spring Security将利用CORS配置提供给Spring MVC。
@EnableWebSecurity
public class WebSecurityConfig extends WebSecurityConfigurerAdapter {@Overrideprotected void configure(HttpSecurity http) throws Exception {http// if Spring MVC is on classpath and no CorsConfigurationSource is provided,// Spring Security will use CORS configuration provided to Spring MVC.cors().and()...}
}
或在XML中
<http><!-- Default to Spring MVC's CORS configuraiton --><cors />...
</http>
安全HTTP响应头
本节讨论Spring Security支持将各种安全头添加到响应。
默认的安全头
Spring Security允许用户轻松地注入的默认安全标头来帮助保护他们的应用程序。Spring Security默认是包括以下头部:
Cache-Control: no-cache, no-store, max-age=0, must-revalidate
Pragma: no-cache
Expires: 0
X-Content-Type-Options: nosniff
Strict-Transport-Security: max-age=31536000 ; includeSubDomains
X-Frame-Options: DENY
X-XSS-Protection: 1; mode=block| Strict-Transport-Security只有添加HTTPS请求 |
有关这些标题的更多详细信息,请参见相应的章节:
Cache Control
Content Type Options
HTTP Strict Transport Security
X-Frame-Options
X-XSS-Protection
而这些头文件被认为是最佳方法,应该注意的是,并不是所有的客户端利用头部,所以鼓励进行额外的测试。
您可以自定义特定的头文件。 例如,假设希望你的HTTP响应头部为以下的样子:
Cache-Control: no-cache, no-store, max-age=0, must-revalidate
Pragma: no-cache
Expires: 0
X-Content-Type-Options: nosniff
X-Frame-Options: SAMEORIGIN
X-XSS-Protection: 1; mode=block
具体而言,你希望自定义所有的默认标题与下列:
X-Frame-Options允许来自同一个域中的任何请求
HTTP Strict Transport Security (HSTS) 将不会被添加到响应
你可以很容易地用下面的Java配置做到这一点:
@EnableWebSecurity
public class WebSecurityConfig extendsWebSecurityConfigurerAdapter {@Overrideprotected void configure(HttpSecurity http) throws Exception {http// ....headers().frameOptions().sameOrigin().httpStrictTransportSecurity().disable();}
}
另外,如果你正在使用Spring Security的XML配置,你可以使用下面的:
<http><!-- ... --><headers><frame-options policy="SAMEORIGIN" /><hsts disable="true"/></headers>
</http>
如果你不想要添加默认值,需要明确控制应该使用什么,您可以禁用默认值。一个例子提供了Java和基于XML的配置:
如果您正在使用Spring安全的Java配置以下只会增加 Cache Control.
@EnableWebSecurity
public class WebSecurityConfig extends
WebSecurityConfigurerAdapter {@Override
protected void configure(HttpSecurity http) throws Exception {http// ....headers()// do not use any default headers unless explicitly listed.defaultsDisabled().cacheControl();
}
}
下面的XML只会增加Cache Control.
<http><!-- ... --><headers defaults-disabled="true"><cache-control/></headers>
</http>
如果有必要,你可以禁用所有的HTTP安全响应头下面的Java配置:
@EnableWebSecurity
public class WebSecurityConfig extends
WebSecurityConfigurerAdapter {@Override
protected void configure(HttpSecurity http) throws Exception {http// ....headers().disable();
}
}
如果有必要,你可以禁用所有的HTTP安全响应头下面的XML配置:
<http><!-- ... --><headers disabled="true" />
</http>
缓存控制
在过去的Spring Security要求你提供自己的缓存控制您的web应用程序。这似乎是合理的,但是浏览器缓存已经进化到包括缓存安全连接。这意味着用户可以查看经过身份验证的页面,注销,然后恶意用户可以使用浏览器历史记录查看缓存页面。为了帮助缓解Spring Security增加了对高速缓存控制的支持,这将插入以下头部作为你的回应。
Cache-Control: no-cache, no-store, max-age=0, must-revalidate
Pragma: no-cache
Expires: 0
简单的添加<头部 没有子元素的元素会自动添加缓存控制和不少其他保护措施。 不过,如果你只想要缓存控制,你可以使用Spring Security的XML命名空间与 <cache-control> 元素和headers@defaults-disabled 属性。
<http><!-- ... --><headers defaults-disable="true"><cache-control /></headers>
</http>
同样,您可以在Java配置中启用缓存控制类似以下:
@EnableWebSecurity
public class WebSecurityConfig extends
WebSecurityConfigurerAdapter {@Override
protected void configure(HttpSecurity http) throws Exception {http// ....headers().defaultsDisabled().cacheControl();
}
}
如果你真的想要缓存特定的反应,您的应用程序可以选择性地调用 HttpServletResponse.setHeader(String,String) 覆盖头部Spring Security的设置。为了保证CSS,JavaScript之类的东西是用的并且图像正确缓存。
当使用Spring Web MVC,这通常是在你的配置中。例如,下面的配置设置将确保缓存头你所有的资源:
@EnableWebMvc
public class WebMvcConfiguration extends WebMvcConfigurerAdapter {@Overridepublic void addResourceHandlers(ResourceHandlerRegistry registry) {registry.addResourceHandler("/resources/**").addResourceLocations("/resources/").setCachePeriod(31556926);}// ...
}
内容类型选项
历史上的浏览器,包括Internet Explorer,试图想请求的内容类型使用 content sniffing。这就使得浏览器通过猜测来改善用户体验的内容类型没有指定内容类型的资源。例如,如果一个浏览器遇到一个JavaScript文件,该文件没有指定的内容类型,它会猜内容类型,然后执行它。
|
有许多额外的一个人应该做的事情(即只显示文档在不同的领域,确保设置内容类型头,清理文件等等)时,从而允许内容上传。然而,这些措施的范围之外的Spring Security提供什么。同样重要的是指出禁用content sniffing的时候,你必须要指定内容类型的东西才能正常工作。 |
content sniffing的问题是,这允许恶意用户使用polyglots(即一个文件,是作为多种内容类型有效)来执行XSS攻击。例如,某些网站可能会允许用户提交一个有效的PostScript文档到网站,并查看它。恶意用户可能会创建一个 postscript文件,这也是一个有效的JavaScript文件 并用它执行XSS攻击。
通过添加以下content sniffing可以禁用我们的响应头:
X-Content-Type-Options: nosniff就像缓存控制元件,nosniff指令添加默认情况下使用<headers>元素时,没有子元素。 然而,如果你想要更多的控制,添加头文件可以使用 <content-type-options>元素和headers@defaults-disabled属性,如下所示:
<http><!-- ... --><headers defaults-disabled="true"><content-type-options /></headers>
</http>
X-Content-Type-Options头默认情况下使用Spring Security添加Java配置。如果你想要更多的控制头,您可以显式地指定以下内容类型选项:
@EnableWebSecurity
public class WebSecurityConfig extends
WebSecurityConfigurerAdapter {@Override
protected void configure(HttpSecurity http) throws Exception {http// ....headers().defaultsDisabled().contentTypeOptions();
}
}
HTTP Strict Transport Security (HSTS)
当你输入你的银行的网站,你输入mybank.example.com 或者你输入 https://mybank.example.com? 如果您省略https协议,你可能容易受到 中间人攻击。即使网站执行重定向到 https://mybank.example.com 恶意用户能够拦截最初的HTTP请求和操作响应(即重定向到 https://mibank.example.com 和窃取他们的凭证)。
很多用户忽略了https协议,这就是为什么 HTTPHTTP严格传输安全(HSTS) 已创建。一旦mybank.example.com 添加为 HSTS host,浏览器可以提前知道任何请求 mybank.example.com 应该解读为 https://mybank.example.com.这大大降低了发生中间人攻击的可能性。
|
按照 RFC6797, HSTS头仅注入到HTTPS响应。为了让浏览器承认头,浏览器必须先信任CA签署的用于建立连接的SSL证书(不只是SSL证书)。 |
一个网站被标记为HSTS主机有主机预装到浏览器的一个方法。另一种是将"Strict-Transport-Security"头添加到响应。例如,以下将指示浏览器把域作为一年的HSTS主机(一年有大约31536000秒):
Strict-Transport-Security: max-age=31536000 ; includeSubDomains可选includeSubDomains指令指示Spring安全子域(即secure.mybank.example.com)也应该被视为一个 HSTS域。
至于其它头部,Spring Security的默认添加HSTS。您可以自定义HSTS头部与<hsts>元素如下所示:
<http><!-- ... --><headers><hstsinclude-subdomains="true"max-age-seconds="31536000" /></headers>
</http>
类似地,您可以只启用HSTS头与Java配置:
@EnableWebSecurity
public class WebSecurityConfig extends
WebSecurityConfigurerAdapter {@Override
protected void configure(HttpSecurity http) throws Exception {http// ....headers().httpStrictTransportSecurity().includeSubdomains(true).maxAgeSeconds(31536000);
}
}
HTTP Public Key Pinning (HPKP)
HTTP Public Key Pinning (HPKP) 是一个安全特性,它讲述了一个web客户端关联特定加密公钥与一个特定的web服务器以防止中间人(MITM)攻击和伪造的证书。
为了确保在TLS会话中使用服务器的公钥的真实性,这个公钥被包装成一个X。509证书通常由一个证书颁发机构(CA)签名。Web客户端如浏览器信任了很多这些CA,这都可以创建任意域名证书。 如果攻击者能够破坏一个CA,他们可以执行各种TLS连接MITM攻击。 HPKP可以规避HTTPS协议这一威胁,告诉客户端公钥属于一个特定的web服务器。 HPKP是在首次使用(TOFU)技术信托。第一次web服务器经由该公钥属于它的特殊HTTP头告诉客户端,客户端存储此信息的给定时间段。 当客户端访问服务器,它预计包含公钥证书的指纹通过HPKP已知。如果服务器提供一个未知的公共密钥,客户端应呈现警告给用户。
|
因为用户代理需要验证对SSL证书链的链销,HPKP头只是注入HTTPS反应。 |
为你的网站启用这个特性很简单,当在HTTPS访问你的网站时返回Public-Key-Pins HTTP头。 例如,以下将指导用户代理只报告密码验证失败的给定URI(via the report-uri directive) 2 引脚:
Public-Key-Pins-Report-Only: max-age=5184000 ; pin-sha256="d6qzRu9zOECb90Uez27xWltNsj0e1Md7GkYYkVoZWmM=" ; pin-sha256="E9CZ9INDbd+2eRQozYqqbQ2yXLVKB9+xcprMF+44U1g=" ; report-uri="http://example.net/pkp-report" ; includeSubDomains一个 pin 验证失败 report 是一个标准的JSON结构,可以捕获通过web应用程序的API或HPKP主办的公开报告服务, 比如, REPORT-URI.
可选的includeSubDomains指令指示浏览器也与给定引脚验证子域。
相对于其他的头部,Spring Security没有默认添加HPKP。你可以定制HPKP头与<hpkp> 元素如下所示:
<http><!-- ... --><headers><hpkpinclude-subdomains="true"report-uri="http://example.net/pkp-report"><pins><pin algorithm="sha256">d6qzRu9zOECb90Uez27xWltNsj0e1Md7GkYYkVoZWmM=</pin><pin algorithm="sha256">E9CZ9INDbd+2eRQozYqqbQ2yXLVKB9+xcprMF+44U1g=</pin></pins></hpkp></headers>
</http>
同样,您可以启用Java配置HPKP头:
@EnableWebSecurity
public class WebSecurityConfig extends
WebSecurityConfigurerAdapter {@Overrideprotected void configure(HttpSecurity http) throws Exception {http// ....headers().httpPublicKeyPinning().includeSubdomains(true).reportUri("http://example.net/pkp-report").addSha256Pins("d6qzRu9zOECb90Uez27xWltNsj0e1Md7GkYYkVoZWmM=", "E9CZ9INDbd+2eRQozYqqbQ2yXLVKB9+xcprMF+44U1g=";}
}
X-Frame-Options
允许给你的网站添加框架可能是一个安全问题。例如,使用巧妙的CSS样式用户可能会被欺骗点击的东西,他们不打算 (video demo)。 例如,登录到他们的银行用户可能会点击一个按钮授予其他用户访问。这种攻击被称为 Clickjacking.
|
另一种现代的方式来处理点击劫持是使用 [headers-content-security-policy]. |
有很多方法来缓解点击劫持攻击。例如,为了保护您可以使用传统的点击劫持的攻击的浏览器 frame breaking code. 虽然并不完美,但断码的框架是可以为传统的浏览器做的最好的。
解决点击劫持更先进的方法是使用 X-Frame-Options 头:
X-Frame-Options: DENYX-Frame-Options响应头指示浏览器阻止任何网站,这个头在响应中被呈现在一个框架中。 默认情况下,Spring Security禁用iframe内呈现。
你可以定制X-Frame-Options和 frame-options 元素。 例如,以下将指示Spring Security用 "X-Frame-Options: SAMEORIGIN" 允许iframes在同一个域:
<http><!-- ... --><headers><frame-optionspolicy="SAMEORIGIN" /></headers>
</http>
同样,您可以自定义框架选项在Java配置中使用相同的起源:
@EnableWebSecurity
public class WebSecurityConfig extends
WebSecurityConfigurerAdapter {@Override
protected void configure(HttpSecurity http) throws Exception {http// ....headers().frameOptions().sameOrigin();
}
}
X-XSS-Protection
有些浏览器已经内置支持过滤掉 reflected XSS attacks。这决不是完整的证明,但协助XSS的保护。
过滤通常是默认启用,所以添加头部通常只是确保它被启用和指示浏览器检测到XSS攻击时该做什么。例如,过滤器可能试图改变的内容至少入侵方式仍然呈现一切。有时,这种类型的替代可以成为 XSS 漏洞本身。相反,它是最好的阻止内容,而不是试图修复它。要做到这一点,我们可以添加以下头部:
X-XSS-Protection: 1; mode=block在默认情况下已经包括了这个头。然而,我们可以自定义它,如果我们想。 例如:
<http><!-- ... --><headers><xss-protection block="false"/></headers>
</http>
同样,您可以在Java配置中自定义XSS保护如下:
@EnableWebSecurity
public class WebSecurityConfig extends
WebSecurityConfigurerAdapter {@Override
protected void configure(HttpSecurity http) throws Exception {http// ....headers().xssProtection().block(false);
}
}
Content Security Policy (CSP)
Content Security Policy (CSP)是一个web应用程序可以利用的机制来减轻内容注入漏洞,如跨站点脚本(XSS)。 CSP是一种声明性政策,为web应用程序提供了一个工具的作者声明,并最终通知客户端(用户代理)对web应用程序的来源将加载资源。
|
内容安全策略不是为了解决所有的内容注入漏洞。相反,CSP可以利用,以帮助减少因内容注入攻击的危害。作为防御的第一道防线,Web应用程序的作者应该验证它们的输入和编码它们的输出。 |
web应用程序可以通过使用CSP使用下列其中一个HTTP头的响应:
Content-Security-Policy
Content-Security-Policy-Report-Only
每个这些头被用作一种机制,以提供一个 security policy 到客户端。 安全策略包含了一组 security policy directives (例如, script-src 和 object-src), 每个负责宣布限制为特定的资源表示形式。
例如,Web应用程序可以声明,预计加载特定,可信来源的脚本,通过再响应以下头部:
Content-Security-Policy: script-src https://trustedscripts.example.com试图加载脚本以外另一个来源是什么中声明script-src指令将被用户代理。 此外,如果 report-uri 指令在安全政策声明,然后违反将由用户代理来声明的URL进行报告.
例如,如果一个web应用程序违反了安全政策声明,下面的响应头将指导用户代理发送违反政策的报告中指定的URL report-uri 指令。
Content-Security-Policy: script-src https://trustedscripts.example.com; report-uri /csp-report-endpoint/Violation reports 是标准JSON结构,可以捕获通过web应用程序的API或公开托管CSP违反报告服务,比如, REPORT-URI.
Content-Security-Policy-Report-Only头提供了web应用程序的作者的能力和管理员监控安全策略,而不是执行它们。 这个头通常用在当试验and/or开发一个网站的安全策略。 当一个政策被认为是有效的,它可以执行使用 Content-Security-Policy 头字段。
鉴于以下响应头,政策声明脚本可能加载两种可能的来源。
Content-Security-Policy-Report-Only: script-src 'self' https://trustedscripts.example.com; report-uri /csp-report-endpoint/如果违反了这一政策,试图从 evil.加载脚本, 用户代理将发送一个违反报告宣布 _report-uri 指令指定的URL,但仍然允许违反资源负载。
Configuring Content Security Policy
重要的是要注意 Spring Security 不添加内容默认安全策略。 web应用程序的作者必须声明安全策略执行and/or对受保护的资源进行监测。
例如,下面的安全策略:
script-src 'self' https://trustedscripts.example.com; object-src https://trustedplugins.example.com; report-uri /csp-report-endpoint/你可以使用XML配置启用CSP头与 <content-security-policy元素如下所示:
<http><!-- ... --><headers><content-security-policypolicy-directives="script-src 'self' https://trustedscripts.example.com; object-src https://trustedplugins.example.com; report-uri /csp-report-endpoint/" /></headers>
</http>
要启用CSP 'report-only'头部, 配置元素如下所示:
<http><!-- ... --><headers><content-security-policypolicy-directives="script-src 'self' https://trustedscripts.example.com; object-src https://trustedplugins.example.com; report-uri /csp-report-endpoint/"report-only="true" /></headers>
</http>
类似地,您可以使用Java配置启用CSP头,如下所示:
@EnableWebSecurity
public class WebSecurityConfig extends
WebSecurityConfigurerAdapter {@Override
protected void configure(HttpSecurity http) throws Exception {http// ....headers().contentSecurityPolicy("script-src 'self' https://trustedscripts.example.com; object-src https://trustedplugins.example.com; report-uri /csp-report-endpoint/");
}
}
要启用CSP 'report-only' 头部, 提供以下Java配置:
@EnableWebSecurity
public class WebSecurityConfig extends
WebSecurityConfigurerAdapter {@Override
protected void configure(HttpSecurity http) throws Exception {http// ....headers().contentSecurityPolicy("script-src 'self' https://trustedscripts.example.com; object-src https://trustedplugins.example.com; report-uri /csp-report-endpoint/").reportOnly();
}
}
Additional Resources
内容安全策略应用到一个web应用程序通常是一个不简单的事情。 以下资源可以为你的网站发展有效的安全策略提供进一步的援助。
An Introduction to Content Security Policy
CSP Guide - Mozilla Developer Network
W3C Candidate Recommendation
Custom Headers
Spring安全机制,使它更加方便的将共同安全头添加到您的应用程序。并且,它还提供了钩子,能够添加自定义头部。
Static Headers
也许有些时候你希望注入自定义的安全标头不支持您的应用程序的。例如,下面的自定义安全头:
X-Custom-Security-Header: header-value当使用XML命名空间,这些头部可以添加到响应使用 <header>元素如下所示:
<http><!-- ... --><headers><header name="X-Custom-Security-Header" value="header-value"/></headers>
</http>
同样,头部可以在Java配置中添加到响应如下所示:
@EnableWebSecurity
public class WebSecurityConfig extends
WebSecurityConfigurerAdapter {@Override
protected void configure(HttpSecurity http) throws Exception {http// ....headers().addHeaderWriter(new StaticHeadersWriter("X-Custom-Security-Header","header-value"));
}
}
Headers Writer
当命名空间或Java配置不支持你想要的头部你可以自定义一个HeadersWriter 实例甚至提供一个自定义实现的 HeadersWriter。
让我们看看一个例子使用一个自定义的XFrameOptionsHeaderWriter的实例。也许你想允许框架内容有着相同的起源。这很容易支持通过设置 policy 属性 "SAMEORIGIN", 但让我们看看一个更明确的例子使用 ref 属性。
<http><!-- ... --><headers><header ref="frameOptionsWriter"/></headers>
</http>
<!-- Requires the c-namespace.
See http://docs.spring.io/spring/docs/current/spring-framework-reference/htmlsingle/#beans-c-namespace
-->
<beans:bean id="frameOptionsWriter"class="org.springframework.security.web.header.writers.frameoptions.XFrameOptionsHeaderWriter"c:frameOptionsMode="SAMEORIGIN"/>
我们还可以限制框架的内容为与Java配置相同的起源:
@EnableWebSecurity
public class WebSecurityConfig extends
WebSecurityConfigurerAdapter {@Override
protected void configure(HttpSecurity http) throws Exception {http// ....headers().addHeaderWriter(new XFrameOptionsHeaderWriter(XFrameOptionsMode.SAMEORIGIN));
}
}
DelegatingRequestMatcherHeaderWriter
有时你可能想要只对某些请求写头部。例如,也许你想只保护你的登录页面不被攻击,你可以使用 DelegatingRequestMatcherHeaderWriter 。 当使用XML命名空间配置, 这可以如下所示:
<http><!-- ... --><headers><frame-options disabled="true"/><header ref="headerWriter"/></headers>
</http><beans:bean id="headerWriter"class="org.springframework.security.web.header.writers.DelegatingRequestMatcherHeaderWriter"><beans:constructor-arg><bean class="org.springframework.security.web.util.matcher.AntPathRequestMatcher"c:pattern="/login"/></beans:constructor-arg><beans:constructor-arg><beans:beanclass="org.springframework.security.web.header.writers.frameoptions.XFrameOptionsHeaderWriter"/></beans:constructor-arg>
</beans:bean>
我们还可以使用java配置防止框架的内容到登录页面:
@EnableWebSecurity
public class WebSecurityConfig extends
WebSecurityConfigurerAdapter {@Override
protected void configure(HttpSecurity http) throws Exception {RequestMatcher matcher = new AntPathRequestMatcher("/login");DelegatingRequestMatcherHeaderWriter headerWriter =new DelegatingRequestMatcherHeaderWriter(matcher,new XFrameOptionsHeaderWriter());http// ....headers().frameOptions().disabled().addHeaderWriter(headerWriter);
}
}
会话管理
HTTP会话相关的功能性是通过SessionManagementFilter和SessionAuthenticationStrategy接口结合来处理,筛选出一个代表.典型用法包括会话固定保护攻击预防,检测到会话超时并且限制有多少会话经过身份验证的用户可以同时打开。
会话管理过滤器
SessionManagementFilter检测 SecurityContextRepository的内容违背了现在SecurityContextHolder的内容来决定是否在当前请求用户已经通过身份验证,通常由一个非交互式的身份验证机制,如验证或记脚注:[身份验证机制验证后进行重定向(例如form-login)将不会被SessionManagementFilter检测到,过滤器将不调用身份验证请求,会话管理功能必须在这些情况下分别处理].如果存储库包含一个安全文档,过滤器什么都不做,如果这没有这么做,局部线程SecurityContext包含了一个(不是匿名)Authentication对象.
如果用户当前没有经过身份验证,过滤器将检查是否一个无效的请求会话ID(例如由于超时),并将调用InvalidSessionStrategy的配置,如果一个被设置了.最通常的行为是重定向到一个固定的URL,这是将实现SimpleRedirectInvalidSessionStrategy进行实施.无效的会话时后者也会使用当通过命名空间配置.as described earlier.
会话的身份验证策略
SessionAuthenticationStrategy通过SessionManagementFilter 和AbstractAuthenticationProcessingFilter被利用,所以如果你利用了一个定制的form-login例如,你将需要把它注入到这两个,在这种情况下,一个典型的配置,结合命名空间和自定义的beans可能看起来像这样 :
<http>
<custom-filter position="FORM_LOGIN_FILTER" ref="myAuthFilter" />
<session-management session-authentication-strategy-ref="sas"/>
</http><beans:bean id="myAuthFilter" class=
"org.springframework.security.web.authentication.UsernamePasswordAuthenticationFilter"><beans:property name="sessionAuthenticationStrategy" ref="sas" />...
</beans:bean><beans:bean id="sas" class=
"org.springframework.security.web.authentication.session.SessionFixationProtectionStrategy" />注意默认的使用,SessionFixationProtectionStrategy可能会导致问题,如果你是存储在session中的bean实施HttpSessionBindingListener,包括Spring session-scoped beans,看这个类中的javadoc寻找更多信息.
并发控制
Spring Security能防止主体同时访问同一应用程序的多个指定的次数,许多软件公司利用这一强制许可.虽然网络管理员喜欢这个功能,因为它有助于防止人们共享登录名.例如你能停止"Batman"用户从两个不同的会话登录到Web应用程序 ,您可以终止他们的以前的登录,或者当他们尝试再次登录时,你可以报告一个错误 ,预防第二次登陆,请注意,如果您使用的第二种方法,一个没有显式退出的用户(例如谁刚刚关闭了浏览器)将无法再次登录,直到他们的原始会话过期.
并发控制是由命名空间支持的,所以请检查早期的命名空间章节的最简单的配置。虽然有时你需要自定义的东西。
该实现使用了一个SessionAuthenticationStrategy的专门的版本,叫做ConcurrentSessionControlAuthenticationStrategy.
|
以前并发的身份验证检查通过 |
要使用并发会话支持,您需要添加以下 web.xml:
<listener><listener-class>org.springframework.security.web.session.HttpSessionEventPublisher</listener-class>
</listener>除此之外,你将需要添加ConcurrentSessionFilter 到你的FilterChainProxy.ConcurrentSessionFilter要求两个属性,sessionRegistry一般是指一个SessionRegistryImpl的实例,expiredUrl指向页面时显示会话已过期的页面,一个配置利用命名空间去创建FilterChainProxy和不符合要求的beans如下:
<http>
<custom-filter position="CONCURRENT_SESSION_FILTER" ref="concurrencyFilter" />
<custom-filter position="FORM_LOGIN_FILTER" ref="myAuthFilter" /><session-management session-authentication-strategy-ref="sas"/>
</http><beans:bean id="concurrencyFilter"
class="org.springframework.security.web.session.ConcurrentSessionFilter">
<beans:property name="sessionRegistry" ref="sessionRegistry" />
<beans:property name="expiredUrl" value="/session-expired.htm" />
</beans:bean><beans:bean id="myAuthFilter" class=
"org.springframework.security.web.authentication.UsernamePasswordAuthenticationFilter">
<beans:property name="sessionAuthenticationStrategy" ref="sas" />
<beans:property name="authenticationManager" ref="authenticationManager" />
</beans:bean><beans:bean id="sas" class="org.springframework.security.web.authentication.session.CompositeSessionAuthenticationStrategy">
<beans:constructor-arg><beans:list><beans:bean class="org.springframework.security.web.authentication.session.ConcurrentSessionControlAuthenticationStrategy"><beans:constructor-arg ref="sessionRegistry"/><beans:property name="maximumSessions" value="1" /><beans:property name="exceptionIfMaximumExceeded" value="true" /></beans:bean><beans:bean class="org.springframework.security.web.authentication.session.SessionFixationProtectionStrategy"></beans:bean><beans:bean class="org.springframework.security.web.authentication.session.RegisterSessionAuthenticationStrategy"><beans:constructor-arg ref="sessionRegistry"/></beans:bean></beans:list>
</beans:constructor-arg>
</beans:bean><beans:bean id="sessionRegistry"class="org.springframework.security.core.session.SessionRegistryImpl" />每一次HttpSession开始或者结束,添加一个监听到web.xml 导致一个ApplicationEvent被发布到Spring ApplicationContext.这很关键,因为当一个会话结束时这个允许SessionRegistryImpl被通知,即使他们退出了另一个会话或它超时.
查询sessionregistry目前身份验证的用户和他们的会话
建立并发控制通过命名空间或使用bean具有有益的副作用,为您提供一个参考的` sessionregistry 可以直接应用在在您的应用程序.因此,即使你不想限制用户会话的数量,它可能值得建立基础设施.你可以建立`maximumSession财产到- 1允许无限的会话.如果你使用的命名空间,您可以利用session-registry-alias属性为内部创建SessionRegistry的别名设置.提供一个参考,你可以注射到你自己的bean.
getAllPrincipals()方法为您提供当前身份验证的用户的列表.您可以列出用户会话通过呼叫getAllSessions(Object principal, boolean includeExpiredSessions)方法,返回SessionInformation对象列表.您也可以终止用户会话通过在SessionInformation实例中呼叫expireNow(),当用户返回到应用程序时,他们将被阻止进行。您可能会发现这些方法在一个管理应用程序中是有用的,例如.看看javadoc的更多信息
匿名身份验证
概述
采取 "deny-by-default"在您显式指定什么是允许和禁止一切,它通常被认为是良好的安全实践.定义什么是未经身份验证的用户访问的是一个类似的情况,特别是用于Web应用程序.许多网站要求用户必须对其他比一些网址的任何东西进行身份验证(例如,主界面和登录页面).在这种情况下,它是最简单的定义访问这些特定的网址的访问配置属性,而不是为每一个安全的资源.不同的,在默认情况下` role_something `要求很好说,但有时候也有例外.例如一个应用的登陆,注销,和主页面.你也可以从过滤器链完全忽略这些页面,从而绕过访问控制检查,但这可能是不受欢迎的其他原因,特别是如果经过身份验证的用户的页面的行为会有所不同.
这就是我们所说的匿名身份验证,请注意,没有真正的概念区别用户"anonymously authenticated"和未经过身份验证的用户.Spring Security的匿名身份验证只给您一个更加方便的方式来配置您的访问控制属性.如getCallerPrincipal调用servlet API,仍将返回null,尽管实际上SecurityContextHolder中的一个匿名认证对象.
还有其他的匿名身份验证的情况下是有用的,例如,当一个审计拦截器查询SecurityContextHolder来识别哪个主要是负责一个给定的操作.类可以创建更强劲,如果他们知道SecurityContextHolder总是包含一个“身份验证”对象,而且从不null.
配置
匿名认证提供支持自动使用HTTP配置Spring Security 3时可定制(或禁用)使用<anonymous>元元素.您不需要配置这里所描述的beans,除非你使用传统的bean配置.
三个类 一起提供匿名身份验证功能.AnonymousAuthenticationToken 是一个实现 Authentication ,商店的` GrantedAuthority 适用于匿名委托,有相应的 anonymousauthenticationprovider ,这是链接到 providermanager ,以至于 `AnonymousAuthenticationToken能接受.最后,有一个` anonymousauthenticationfilter ,这是把正常的认证机制后,自动添加一个 anonymousauthenticationtoken 的 securitycontextholder `,如果没有现有的身份验证在那里举行.筛选器和身份验证提供程序的定义如下 :
<bean id="anonymousAuthFilter"class="org.springframework.security.web.authentication.AnonymousAuthenticationFilter">
<property name="key" value="foobar"/>
<property name="userAttribute" value="anonymousUser,ROLE_ANONYMOUS"/>
</bean><bean id="anonymousAuthenticationProvider"class="org.springframework.security.authentication.AnonymousAuthenticationProvider">
<property name="key" value="foobar"/>
</bean>
在筛选器和身份验证提供程序之间共享“key”,使前者所创建的符号被后者的脚注所接受[ key属性的使用不应被视为在这里提供任何真正的安全性.它仅仅是一个簿记锻炼, 如果你是共享一个` providermanager 包含 anonymousauthenticationprovider ,在这样的情形下,它是可能的认证客户端构建`Authentication对象(如RMI调用),然后,一个恶意的客户端可以提交一个` anonymousauthenticationtoken ,它创造了自己 (选择的用户名和权限列表 ).如果`key是人或能被发现,然后代表将被匿名者接受,这不是正常使用的问题,但如果你使用RMI你最好使用一个定制的没有匿名的` providermanager 提供者而不是分享你使用HTTP认证机制. ]. ` userattribute `表达的形式 usernameintheauthenticationtoken,授予权威,这是相同的语法使用等号后的`InMemoryDaoImpl的`userMap”属性.
如前所述,匿名身份验证的好处是,所有URI模式可以安全应用。例如
<bean id="filterSecurityInterceptor"class="org.springframework.security.web.access.intercept.FilterSecurityInterceptor">
<property name="authenticationManager" ref="authenticationManager"/>
<property name="accessDecisionManager" ref="httpRequestAccessDecisionManager"/>
<property name="securityMetadata"><security:filter-security-metadata-source><security:intercept-url pattern='/index.jsp' access='ROLE_ANONYMOUS,ROLE_USER'/><security:intercept-url pattern='/hello.htm' access='ROLE_ANONYMOUS,ROLE_USER'/><security:intercept-url pattern='/logoff.jsp' access='ROLE_ANONYMOUS,ROLE_USER'/><security:intercept-url pattern='/login.jsp' access='ROLE_ANONYMOUS,ROLE_USER'/><security:intercept-url pattern='/**' access='ROLE_USER'/></security:filter-security-metadata-source>" +
</property>
</bean>
验证信任解析器
排在匿名身份验证讨论是AuthenticationTrustResolver界面,与相应的AuthenticationTrustResolverImpl实现.这个接口提供了一个isAnonymous(Authentication)的方法,感兴趣的类可以考虑这种特殊类型的身份验证状态.ExceptionTranslationFilter使用这个接口在处理AccessDeniedException,如果抛出AccessDeniedException ,和一个匿名类型的身份验证,而不是扔403(禁止)的反应,过滤器将开始` authenticationentrypoint 所以可以验证正确.这是一个必要的区别,否则,负责将永远被视为"authenticated",并没有得到一个机会通过表格登录,基本、摘要或其他一些正常的身份验证机制。你会经常看到 role_anonymous 属性在上述拦截器配置更换 is_authenticated_anonymously ,这实际上是一样的定义访问控制,这是一个例子,使用的 authenticatedvoter 我们将看到在authorization chapter.它使用一个 authenticationtrustresolver 处理这个特定的配置属性和访问权限授予匿名用户.它使用一个 authenticationtrustresolver 处理这个特定的配置属性和访问权限授予匿名用户. authenticatedvoter 方法更强大,因为它允许你区分匿名,请记住我和完全身份验证的用户.如果你不需要这个功能,然后你可以坚持`ROLE_ANONYMOUS,这将是由Spring Security的标准` rolevoter `.
WebSocket Security
Spring Security 4 added support for securing Spring’s WebSocket support. This section describes how to use Spring Security’s WebSocket support.
| You can find a complete working sample of WebSocket security in samples/javaconfig/chat. |
WebSocket Configuration
Spring Security 4.0 has introduced authorization support for WebSockets through the Spring Messaging abstraction. To configure authorization using Java Configuration, simply extend the AbstractSecurityWebSocketMessageBrokerConfigurer and configure the MessageSecurityMetadataSourceRegistry. For example:
@Configuration
public class WebSocketSecurityConfigextends AbstractSecurityWebSocketMessageBrokerConfigurer {  protected void configureInbound(MessageSecurityMetadataSourceRegistry messages) {messages.simpDestMatchers("/user/*").authenticated() }
}
This will ensure that:
| Any inbound CONNECT message requires a valid CSRF token to enforce Same Origin Policy | |
| The SecurityContextHolder is populated with the user within the simpUser header attribute for any inbound request. | |
| Our messages require the proper authorization. Specifically, any inbound message that starts with "/user/" will require ROLE_USER. Additional details on authorization can be found in WebSocket Authorization |
Spring Security also provides XML Namespace support for securing WebSockets. A comparable XML based configuration looks like the following:
<websocket-message-broker>  <intercept-message pattern="/user/**" access="hasRole('USER')" />
</websocket-message-broker>
This will ensure that:
| Any inbound CONNECT message requires a valid CSRF token to enforce Same Origin Policy | |
| The SecurityContextHolder is populated with the user within the simpUser header attribute for any inbound request. | |
| Our messages require the proper authorization. Specifically, any inbound message that starts with "/user/" will require ROLE_USER. Additional details on authorization can be found in WebSocket Authorization |
WebSocket Authentication
WebSockets reuse the same authentication information that is found in the HTTP request when the WebSocket connection was made. This means that the Principal on the HttpServletRequest will be handed off to WebSockets. If you are using Spring Security, the Principal on the HttpServletRequest is overridden automatically.
More concretely, to ensure a user has authenticated to your WebSocket application, all that is necessary is to ensure that you setup Spring Security to authenticate your HTTP based web application.
WebSocket Authorization
Spring Security 4.0 has introduced authorization support for WebSockets through the Spring Messaging abstraction. To configure authorization using Java Configuration, simply extend the AbstractSecurityWebSocketMessageBrokerConfigurer and configure the MessageSecurityMetadataSourceRegistry. For example:
@Configuration
public class WebSocketSecurityConfig extends AbstractSecurityWebSocketMessageBrokerConfigurer {@Overrideprotected void configureInbound(MessageSecurityMetadataSourceRegistry messages) {messages.nullDestMatcher().authenticated() .simpSubscribeDestMatchers("/user/queue/errors").permitAll() .simpDestMatchers("/app/**").hasRole("USER") .simpSubscribeDestMatchers("/user/**", "/topic/friends/*").hasRole("USER") .simpTypeMatchers(MESSAGE, SUBSCRIBE).denyAll() .anyMessage().denyAll(); }
}
This will ensure that:
| Any message without a destination (i.e. anything other that Message type of MESSAGE or SUBSCRIBE) will require the user to be authenticated | |
| Anyone can subscribe to /user/queue/errors | |
| Any message that has a destination starting with "/app/" will be require the user to have the role ROLE_USER | |
| Any message that starts with "/user/" or "/topic/friends/" that is of type SUBSCRIBE will require ROLE_USER | |
| Any other message of type MESSAGE or SUBSCRIBE is rejected. Due to 6 we do not need this step, but it illustrates how one can match on specific message types. | |
| Any other Message is rejected. This is a good idea to ensure that you do not miss any messages. |
Spring Security also provides XML Namespace support for securing WebSockets. A comparable XML based configuration looks like the following:
<websocket-message-broker><intercept-message type="CONNECT" access="permitAll" /><intercept-message type="UNSUBSCRIBE" access="permitAll" /><intercept-message type="DISCONNECT" access="permitAll" /><intercept-message pattern="/user/queue/errors" type="SUBSCRIBE" access="permitAll" /> <intercept-message pattern="/app/**" access="hasRole('USER')" />      <intercept-message pattern="/user/**" access="hasRole('USER')" /><intercept-message pattern="/topic/friends/*" access="hasRole('USER')" /><intercept-message type="MESSAGE" access="denyAll" /><intercept-message type="SUBSCRIBE" access="denyAll" /><intercept-message pattern="/**" access="denyAll" />
</websocket-message-broker>
This will ensure that:
| Any message of type CONNECT, UNSUBSCRIBE, or DISCONNECT will require the user to be authenticated | |
| Anyone can subscribe to /user/queue/errors | |
| Any message that has a destination starting with "/app/" will be require the user to have the role ROLE_USER | |
| Any message that starts with "/user/" or "/topic/friends/" that is of type SUBSCRIBE will require ROLE_USER | |
| Any other message of type MESSAGE or SUBSCRIBE is rejected. Due to 6 we do not need this step, but it illustrates how one can match on specific message types. | |
| Any other message with a destination is rejected. This is a good idea to ensure that you do not miss any messages. |
WebSocket Authorization Notes
In order to properly secure your application it is important to understand Spring’s WebSocket support.
WebSocket Authorization on Message Types
It is important to understand the distinction between SUBSCRIBE and MESSAGE types of messages and how it works within Spring.
Consider a chat application.
The system can send notifications MESSAGE to all users through a destination of "/topic/system/notifications"
Clients can receive notifications by SUBSCRIBE to the "/topic/system/notifications".
While we want clients to be able to SUBSCRIBE to "/topic/system/notifications", we do not want to enable them to send a MESSAGE to that destination. If we allowed sending a MESSAGE to "/topic/system/notifications", then clients could send a message directly to that endpoint and impersonate the system.
In general, it is common for applications to deny any MESSAGE sent to a message that starts with the broker prefix (i.e. "/topic/" or "/queue/").
WebSocket Authorization on Destinations
It is also is important to understand how destinations are transformed.
Consider a chat application.
User’s can send messages to a specific user by sending a message to the destination of "/app/chat".
The application sees the message, ensures that the "from" attribute is specified as the current user (we cannot trust the client).
The application then sends the message to the recipient using
SimpMessageSendingOperations.convertAndSendToUser("toUser", "/queue/messages", message).The message gets turned into the destination of "/queue/user/messages-<sessionid>"
With the application above, we want to allow our client to listen to "/user/queue" which is transformed into "/queue/user/messages-<sessionid>". However, we do not want the client to be able to listen to "/queue/*" because that would allow the client to see messages for every user.
In general, it is common for applications to deny any SUBSCRIBE sent to a message that starts with the broker prefix(i.e. "/topic/" or "/queue/"). Of course we may provide exceptions to account for things like
Outbound Messages
Spring contains a section titled Flow of Messages that describes how messages flow through the system. It is important to note that Spring Security only secures the clientInboundChannel. Spring Security does not attempt to secure the clientOutboundChannel.
The most important reason for this is performance. For every message that goes in, there are typically many more that go out. Instead of securing the outbound messages, we encourage securing the subscription to the endpoints.
Enforcing Same Origin Policy
It is important to emphasize that the browser does not enforce the Same Origin Policy for WebSocket connections. This is an extremely important consideration.
Why Same Origin?
Consider the following scenario. A user visits bank.com and authenticates to their account. The same user opens another tab in their browser and visits evil.com. The Same Origin Policy ensures that evil.com cannot read or write data to bank.com.
With WebSockets the Same Origin Policy does not apply. In fact, unless bank.com explicitly forbids it, evil.com can read and write data on behalf of the user. This means that anything the user can do over the websocket (i.e. transfer money), evil.com can do on that users behalf.
Since SockJS tries to emulate WebSockets it also bypasses the Same Origin Policy. This means developers need to explicitly protect their applications from external domains when using SockJS.
Spring WebSocket Allowed Origin
Fortunately, since Spring 4.1.5 Spring’s WebSocket and SockJS support restricts access to the current domain. Spring Security adds an additional layer of protection to provide defence in depth.
Adding CSRF to Stomp Headers
By default Spring Security requires the CSRF token in any CONNECT message type. This ensures that only a site that has access to the CSRF token can connect. Since only the Same Origin can access the CSRF token, external domains are not allowed to make a connection.
Typically we need to include the CSRF token in an HTTP header or an HTTP parameter. However, SockJS does not allow for these options. Instead, we must include the token in the Stomp headers
Applications can obtain a CSRF token by accessing the request attribute named _csrf. For example, the following will allow accessing the CsrfToken in a JSP:
var headerName = "${_csrf.headerName}";
var token = "${_csrf.token}";
If you are using static HTML, you can expose the CsrfToken on a REST endpoint. For example, the following would expose the CsrfToken on the URL /csrf
@RestController
public class CsrfController {@RequestMapping("/csrf")public CsrfToken csrf(CsrfToken token) {return token;}
}
The javascript can make a REST call to the endpoint and use the response to populate the headerName and the token.
We can now include the token in our Stomp client. For example:
...
var headers = {};
headers[headerName] = token;
stompClient.connect(headers, function(frame) {...}
Disable CSRF within WebSockets
If you want to allow other domains to access your site, you can disable Spring Security’s protection. For example, in Java Configuration you can use the following:
@Configuration
public class WebSocketSecurityConfig extends AbstractSecurityWebSocketMessageBrokerConfigurer {...@Overrideprotected boolean sameOriginDisabled() {return true;}
}
Working with SockJS
SockJS provides fallback transports to support older browsers. When using the fallback options we need to relax a few security constraints to allow SockJS to work with Spring Security.
SockJS & frame-options
SockJS may use an transport that leverages an iframe. By default Spring Security will deny the site from being framed to prevent Clickjacking attacks. To allow SockJS frame based transports to work, we need to configure Spring Security to allow the same origin to frame the content.
You can customize X-Frame-Options with the frame-options element. For example, the following will instruct Spring Security to use "X-Frame-Options: SAMEORIGIN" which allows iframes within the same domain:
<http><!-- ... --><headers><frame-optionspolicy="SAMEORIGIN" /></headers>
</http>
Similarly, you can customize frame options to use the same origin within Java Configuration using the following:
@EnableWebSecurity
public class WebSecurityConfig extendsWebSecurityConfigurerAdapter {@Overrideprotected void configure(HttpSecurity http) throws Exception {http// ....headers().frameOptions().sameOrigin();}
}
SockJS & Relaxing CSRF
SockJS uses a POST on the CONNECT messages for any HTTP based transport. Typically we need to include the CSRF token in an HTTP header or an HTTP parameter. However, SockJS does not allow for these options. Instead, we must include the token in the Stomp headers as described in Adding CSRF to Stomp Headers.
It also means we need to relax our CSRF protection with the web layer. Specifically, we want to disable CSRF protection for our connect URLs. We do NOT want to disable CSRF protection for every URL. Otherwise our site will be vulnerable to CSRF attacks.
We can easily achieve this by providing a CSRF RequestMatcher. Our Java Configuration makes this extremely easy. For example, if our stomp endpoint is "/chat" we can disable CSRF protection for only URLs that start with "/chat/" using the following configuration:
@Configuration
@EnableWebSecurity
public class WebSecurityConfigextends WebSecurityConfigurerAdapter {@Overrideprotected void configure(HttpSecurity http) throws Exception {http.csrf()// ignore our stomp endpoints since they are protected using Stomp headers.ignoringAntMatchers("/chat/**").and().headers()// allow same origin to frame our site to support iframe SockJS.frameOptions().sameOrigin().and().authorizeRequests()...
If we are using XML based configuration, we can use the csrf@request-matcher-ref. For example:
<http ...><csrf request-matcher-ref="csrfMatcher"/><headers><frame-options policy="SAMEORIGIN"/></headers>...
</http><b:bean id="csrfMatcher"class="AndRequestMatcher"><b:constructor-arg value="#{T(org.springframework.security.web.csrf.CsrfFilter).DEFAULT_CSRF_MATCHER}"/><b:constructor-arg><b:bean class="org.springframework.security.web.util.matcher.NegatedRequestMatcher"><b:bean class="org.springframework.security.web.util.matcher.AntPathRequestMatcher"><b:constructor-arg value="/chat/**"/></b:bean></b:bean></b:constructor-arg>
</b:bean>
Spring Security 参考手册(一)相关推荐
- Spring AMQP参考手册
一.快速入门 Maven依赖声明 <dependency> <groupId>org.springframework.amqp</groupId> ...
- spring中文参考手册-核心技术_ioc
为什么80%的码农都做不了架构师?>>> https://docs.spring.io/spring/docs/5.1.1.RELEASE/spring-framework-r ...
- Spring框架参考手册(4.2.6版本)翻译——第三部分 核心技术 6.10.6 给自动检测组件命名...
6.10.6 给自动检测组件命名 当组件作为扫描过程的一部分被自动检测到时,其bean名称由该扫描程序已知的BeanNameGenerator策略生成.默认情况下,任何包含名称值的Spring构造型注 ...
- Spring框架参考手册(4.2.6版本)翻译——第三部分 核心技术 6.4.4 延迟初始化的bean...
6.4.4 延迟初始化的bean 默认情况下,ApplicationContext实现会迫切地创建和配置所有单例bean,作为初始化过程的一部分.普遍情况下,这种预先实例化是合适的,因为配置或周围环境 ...
- Spring Security 5.0.x 参考手册 【翻译自官方GIT-2018.06.12】
源码请移步至: https://github.com/aquariuspj/spring-security/tree/translator/docs/manual/src/docs/asciidoc ...
- Spring Security OAuth2.0认证授权知识概括
Spring Security OAuth2.0认证授权知识概括 安全框架基本概念 基于Session的认证方式 Spring Security简介 SpringSecurity详解 分布式系统认证方 ...
- 使用Spring Security添加RememberMe身份验证
我在" 将社交登录添加到Jiwhiz博客"中提到,RememberMe功能不适用于Spring Social Security. 好吧,这是因为该应用程序现在不通过用户名和密码对用 ...
- 使用Spring Security保护GWT应用程序
在本教程中,我们将看到如何将GWT与Spring的安全模块(即Spring Security)集成在一起. 我们将看到如何保护GWT入口点,如何检索用户的凭据以及如何记录各种身份验证事件. 此外,我们 ...
- Spring Boot 2.0.0参考手册_中文版
Spring Boot参考文档 第一部分:Spring Boot文档 1. 关于文档 Sring参考文档可以通过html,pdf和epub 三种形式得到.最新的文档可以从docs.spring.io/ ...
最新文章
- linux执行加密的shell,Linux下Shell脚本文件的加密
- clientHeight,offsetHeight,scrollHeight迷一样的三个值
- HTML笔记一,部分常用的元素与属性
- Hadoop(六)搭建分布式HBase集群
- IDEA中引入Bootstrap并展示第一个模板
- Grails Quartz插件 定时调度任务
- 看清我辈基本盘!罗振宇2020跨年演讲全文来了(未删减)
- MediaWiki配置
- redis分布式锁的安全性及与zookeeper的对比
- ios 关闭更新(第三方软件 添加描述文件)
- includes的作用
- python 儿童 游戏_儿童编程教学 – 推荐几款Python编程类游戏
- /Zc:strictStrings配置
- 第9节 蒙卡模拟计算美式期权价格(b)
- 辞职时被老板叫去谈话挽留,怎样避免被套路
- 计算机毕业设计SSM电子病历系统【附源码数据库】
- (三)流体运动学(质量守恒)
- unity 标准资源包中的围绕旋转摄像机
- PPT图表素材 模板 扁平化 复古 时尚 微立体 动态 综合分类大合集
- OPERA AR学习