Imagick的图像水印
Imagine a friend of yours approaches you one day and would like you to build her a website so she can showcase her photography. She wants to be able to easily upload her photographs and have them watermarked so that people can’t easily steal them. “Don’t worry!” you tell her, because you know there are functions provided by the Imagick extension that makes watermarking images a breeze in PHP.
想象一下,您的一个朋友有一天会接近您,并希望您建立一个网站,以便她展示自己的摄影作品。 她希望能够轻松上传自己的照片并为照片加水印,以使人们无法轻易窃取它们。 “不用担心!” 您告诉她,是因为您知道Imagick扩展提供的功能使PHP中的水印图像变得轻而易举。
This article shares a few pointers on what makes an effective watermark, and then shows you how to use the Imagick functions to add a watermark to your image. Before you get started, make sure the Imagick extension is available on your host. It’s also advisable to find a few pictures you can test the watermark on to gauge it’s effectiveness.
本文分享了一些有关有效水印的内容,然后向您展示了如何使用Imagick函数向图像添加水印。 在开始之前,请确保主机上有Imagick扩展程序可用。 还建议您找到一些可以测试水印的图片,以评估其有效性。
什么造就了良好的水印 (What Makes a Good Watermark)
For a watermark to be effective, it needs to visible against a wide variety of backgrounds. I suggest that you try to find at least one test photo that is very light, and another that is very dark. For example, these two prairie dog pictures from Shutterstock make a good test pair:
为了使水印有效,它需要在多种背景下可见。 我建议您尝试找到至少一张非常亮的测试照片,以及另一张非常暗的照片。 例如,来自Shutterstock的这两张草原土拨鼠图片构成了很好的测试对:
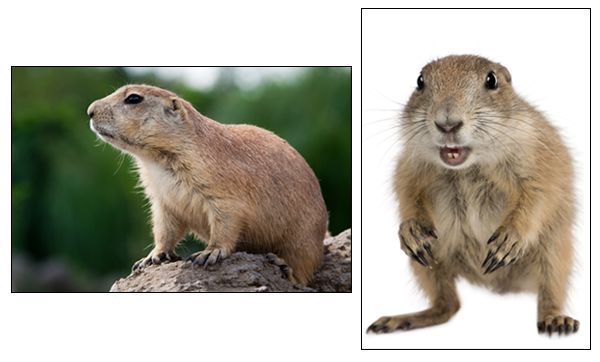
It’s important that the watermark is transparent enough for you to still be able to see the original image, but opaque enough so it’s difficult for an unscrupulous person to remove. A 40% opacity level is probably a good starting point, and you can increase it or decrease it depending on the situation.
重要的是,水印必须足够透明,以使您仍然能够看到原始图像,但又要足够透明,因此不道德的人很难将其删除。 不透明度40%的水平可能是一个不错的起点,您可以根据情况增加或减少它。
You also want the watermark to be large enough. If you simply put a small watermark in the lower right-hand corner, it’s a prime target for being cropped out. Watermarks that cover a large portion of the original image are more effective. See how iStockPhoto and Shutterstock watermark their work for an example.
您还希望水印足够大。 如果仅在右下角放置一个小水印,则这是裁剪的主要目标。 覆盖原始图像大部分的水印效果更好。 以iStockPhoto和Shutterstock为工作加水印为例。
Finally, the watermark should have contrast. Consider making the watermark dark with a light stroke or visa-versa. This is what iStockPhoto and Shutterstock do, and their mark is easily visible on all of their images whether the original image is light or dark.
最后,水印应具有对比度。 考虑通过轻击或反之使水印变黑。 这就是iStockPhoto和Shutterstock所做的,无论原始图像是浅色还是深色,它们的标记都可以在其所有图像上轻松看到。
For this article I’ll be using this as my watermark, a PNG file with about 40% opacity:
对于本文,我将使用它作为水印,这是一个约40%不透明的PNG文件:

添加水印 (Adding a Watermark)
Adding the watermark is a simple 4-step process: first you open the original image, next you open the watermark, then you overlay the watermark on top of the first image, and then either save or output the result. Here’s the code:
添加水印是一个简单的四步过程:首先打开原始图像,然后打开水印,然后将水印叠加在第一张图像的顶部,然后保存或输出结果。 这是代码:
<?php
// Open the original image
$image = new Imagick();
$image->readImage("/path/to/image.jpg");
// Open the watermark
$watermark = new Imagick();
$watermark->readImage("/path/to/watermark.png");
// Overlay the watermark on the original image
$image->compositeImage($watermark, imagick::COMPOSITE_OVER, 0, 0);
// send the result to the browser
header("Content-Type: image/" . $image->getImageFormat());
echo $image;
You can open images from a path by creating a new instance of the Imagick class and using its readImage() method. One nice thing about Imagick is that it can open any time of file that ImageMagick was compiled to support, so you don’t need to explicitly tell it that the file is a JPEG or PNG; it’s smart enough to figure it out on its own.
您可以通过创建Imagick类的新实例并使用其readImage()方法从路径打开图像。 关于Imagick的一件好事是,它可以在ImageMagick被编译为支持的文件的任何时间打开,因此您无需明确告诉它文件是JPEG还是PNG。 它足够聪明,可以自行解决。
To overlay the watermark image, you use the compositeImage() method. In this example, the method accepts four parameters: the first is the image that will be overlaid, the second is a predefined constant representing which type of composition operation Imagick should perform (there’s a whole slew to choose from to achieve different effects), and the third and fourth parameters are the X and Y coordinates at which to place the watermark measured in pixels from the top-left corner.
要覆盖水印图像,请使用compositeImage()方法。 在此示例中,该方法接受四个参数:第一个是将要覆盖的图像,第二个是预定义的常量,表示Imagick应该执行哪种类型的构图操作( 可以选择一个整体来实现不同的效果),以及第三个和第四个参数是在左上角以像素为单位放置的水印的X和Y坐标。
By default, PHP assumes your script’s output is HTML and sends a text/html Content-Type header automatically. If you output the image, the browser won’t handle it properly since the headers tell it you’re sending text. To avoid your visitors being greeted with a page of gibberish, you need to instruct PHP to send a more appropriate header using header() before sending the image. Instead of just hard-coding the Content-Type header’s value, the example accesses the image’s type using Imagick itself which is then used to construct an appropriate MIME type on the fly.
默认情况下,PHP假定脚本的输出为HTML,并自动发送text / html Content-Type标头。 如果输出图像,则浏览器将无法正确处理图像,因为标题会告诉您您正在发送文本。 为了避免访问者看到乱码页面,您需要指示PHP在发送图像之前使用header()发送更合适的标header() 。 该示例不仅仅是使用硬编码Content-Type标头的值,还使用Imagick本身访问了图像的类型,该图像随后用于动态构造适当的MIME类型。
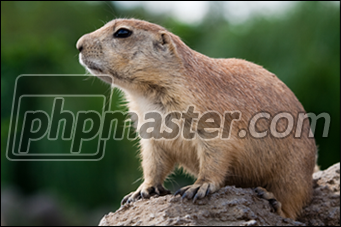
Here’s the end result, a watermarked image:
这是最终结果,带有水印的图像:
缩放水印 (Scaling the Watermark)
The previous example positioned the watermark at the top-left of the original image. While this approach is fine if you know the size of the original images beforehand since you can create the watermark with the appropriate dimensions, you might want a more robust approach in case the sizes of the original images vary. Such an approach might be to place the watermark in the center of the image, and scaling the watermark beforehand if it is larger than the original image.
前面的示例将水印放置在原始图像的左上角。 如果您可以事先以适当的尺寸创建水印,但如果您事先知道原始图像的大小,则此方法很好,但是,如果原始图像的大小有所变化,则可能需要一种更可靠的方法。 这样的方法可能是将水印放置在图像的中心,如果水印大于原始图像,则预先缩放水印。
<?php
$image = new Imagick();
$image->readImage("/path/to/image.jpg");
$watermark = new Imagick();
$watermark->readImage("/path/to/watermark.png");
// how big are the images?
$iWidth = $image->getImageWidth();
$iHeight = $image->getImageHeight();
$wWidth = $watermark->getImageWidth();
$wHeight = $watermark->getImageHeight();
if ($iHeight < $wHeight || $iWidth < $wWidth) {
// resize the watermark
$watermark->scaleImage($iWidth, $iHeight);
// get new size
$wWidth = $watermark->getImageWidth();
$wHeight = $watermark->getImageHeight();
}
// calculate the position
$x = ($iWidth - $wWidth) / 2;
$y = ($iHeight - $wHeight) / 2;
$image->compositeImage($watermark, imagick::COMPOSITE_OVER, $x, $y);
header("Content-Type: image/" . $image->getImageFormat());
echo $image;
The getImageWidth() and getImageHeight() methods return the width and height of an image respectively, measured in pixels. By comparing the width and height of the watermark image to the those of the the original image, you can determine whether or not it is necessary to resize the watermark so it will fit on smaller images.
getImageWidth()和getImageHeight()方法分别返回图像的宽度和高度,以像素为单位。 通过将水印图像的宽度和高度与原始图像的宽度和高度进行比较,可以确定是否需要调整水印的大小,以使其适合较小的图像。
Resizing the watermark is accomplished by calling the scaleImage() method which takes an allowed width and height. The method will scale the image down so that the maximum width is no larger than the allowed width, and the maximum height is no larger than the allowed height, while maintaining the image’s aspect ratio.
调整水印的大小可通过调用scaleImage()方法来实现,该方法采用允许的宽度和高度。 该方法将按比例缩小图像,以使最大宽度不大于允许的宽度,并且最大高度不大于允许的高度,同时保持图像的长宽比。
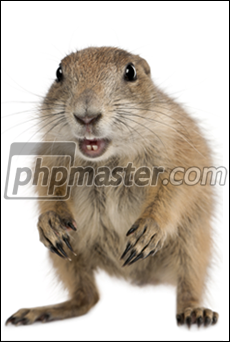
And here’s the watermarked image that results from this example:
这是此示例产生的带有水印的图像:
摘要 (Summary)
The Imagick library provides a comprehensive image processing API. Indeed, you’ve seen how easy it is to open images files, determine their dimensions and image format, scale them, and overlay one on top of another to watermark them.
Imagick库提供了全面的图像处理API。 确实,您已经看到了打开图像文件,确定其尺寸和图像格式,对其进行缩放以及将一个文件叠加在另一个文件上以对其进行水印处理是多么容易。
Usually I suggest the documentation on php.net if you want to learn more about about the capabilities of an extension, but in the case of Imagick the documentation is spotty. Many methods have just their parameter list given. So if you want to learn more, php.net is still a good place to start but you may have to look for more information for the methods in some other form (the command line application, for example) on the ImageMagick site itself and Google.
通常,如果您想了解有关扩展功能的更多信息,那么我建议您使用php.net上的文档,但是对于Imagick而言,该文档不可靠。 许多方法只给出了其参数列表。 因此,如果您想了解更多信息,php.net仍然是一个不错的起点,但是您可能不得不在ImageMagick网站本身和Google上以其他某种形式(例如,命令行应用程序)寻找有关方法的更多信息。 。
翻译自: https://www.sitepoint.com/watermarking-images/
Imagick的图像水印相关推荐
- 基于GAN的图像水印去除器,效果堪比PS高手
作者 | 李翔 转载自视说AI(ID:techtalkai) 简介:李翔,国内某互联网大厂AI民工,前携程酒店图像技术负责人,计算机视觉和深度学习重度爱好者,在ICCV和CVPR等会议上发表论文十余篇 ...
- AI技术在图像水印处理中的应用
点击上方"小白学视觉",选择加"星标"或"置顶" 重磅干货,第一时间送达 简介 水印作为一种保护版权的有效方式被广泛地应用于海量的互联网图像 ...
- php灰度化,PHP Imagick – 将图像转换为灰度(非常糟糕的结果)
我正在用 PHP进行一些图像编辑,因为GD提供的功能较少,我切换到了Imagick. 其中一个过程是灰度图像.一切顺利(在Windows 7本地,Imagick 2.2.1-dev 6.5.8-7 Q ...
- Word控件Spire.Doc 【页面背景】教程(8) ;在 C# 中将文本水印和图像水印添加到 Word 文档
文字水印和图片水印是Word文档中的两种水印.文本水印总是显示一些与单词上下文相关的附加信息.而图像水印用于使Word文档更具吸引力.本节将演示如何使用 Spire.Doc 在 C# 中为 Word ...
- matlab实现LSB图像水印的嵌入与提取
这篇是我在网上参考的原文,当时我要完成这个任务,搜集资料,也是从别人那找到的. 这篇文章的目的就是将这些整理出来,方便大家参考. LSB图像水印嵌入与提取原创:https://blog.csdn.ne ...
- DCT域图像水印技术
DCT域图像水印技术 1数字水印技术的概念和特点 数字水印(Digital Watermark)技术是将与多媒体内容相关或不相关的一些标示信息直接嵌入多媒体内容当中,但不影响原内容的使用价值,并不容易 ...
- On the Effectiveness of Visible Watermarks 利用AI技术去除图像水印
我的个人微信公众号: Microstrong 微信公众号ID: MicrostrongAI 微信公众号介绍: Microstrong(小强)同学主要研究机器学习.深度学习.计算机视觉.智能对话系统相关 ...
- 图像水印添加工具Watermark Sense for Mac
Watermark Sense for Mac是一款支持添加文本和图像水印的图像水印工具,Watermark Sense Mac版可以控制水印透明度.选择混合模式.应用阴影.复制水印等外观及参数.Wa ...
- 使用C#在PDF文件中插入或删除文本/图像水印
PDF文件中经常使用水印.只需几个简单的步骤即可在PDF文件中插入或删除文本和图像水印.同样可以轻松控制用于处理水印的许多属性.例如,不透明度,位置,旋转度,颜色,字体,图像等,等等.同样,可以使用快 ...
最新文章
- List循环添加对象时遇到问题的解决
- C++ 虚函数个人理解
- CVE-2010-0249 极光
- UOJ #587. 天天和不可描述
- 没有共享存储和仲裁盘的SQL Server 2012HADR故障手动切换TSQL
- 使用一些宏跟踪调试__LINE__ __FILE__ __DATE__ __TIME__ __STDC__
- global position
- Twhirl's limit exceeded
- 【INDIRECT】函数教你制作多级下拉菜单
- 安装服务器系统提示加载驱动程序,启动sqlserver服务时,总是出现“系统错误(126),指定驱动程序无法加载,...
- 测试工程师,必备图片测试工具 image-test-tools
- 嵌入式软件项目流程、项目启动说明书(示例)
- CORBA Programming with TAO - 3.IDL Data Type(数据类型与Mapping)例子常见问题篇
- 小时候读不懂鲁迅笔下的闰土,人到中年才知道,自己其实就是闰土
- ubuntu不支持安装搜狗_Ubuntu下安装搜狗输入法已经fcitx升级后搜狗输入法不能使用的解决办法...
- c++ RMI demo(使用RCF库)
- 瑞幸咖啡砸10亿教育市场,会成为下一个“小黄车”吗?
- 无人机相关的基本术语小结
- matlab怎么写卷积过程,离散卷积过程举例图示详解
- UVA207 ac心得