基于ZXing实现个性彩色好看的二维码
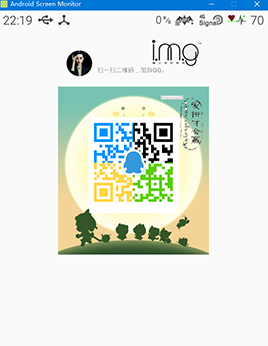
先给大家展示下效果图,亲们感觉效果还不错,很满意的话,请继续往下阅读。
之前呢,也写过用安卓实现二维码生成彩色的二维码和带logo的二维码,也知道可以使用QRCode和ZXing两种方式,然后这一篇呢也是写二维码使用BarcodeFormat.QR_CODE,主要也是看见很多的非常漂亮的二维码,这里呢主要模仿qq的二维码,并且也高仿实现了长按发送给朋友和保存到图库的功能,觉得不错呢就请多支持下,哪里不好呢也可以说出来。好了我们一步一步来。
第一步:简单二维码实现
先来个最简单的二维码:
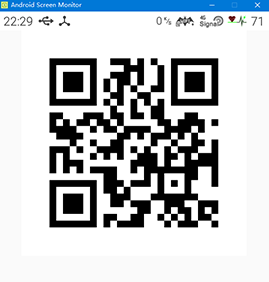
看下简单代码实现:
/**
* 根据指定内容生成自定义宽高的二维码图片
*
* @param content
* 需要生成二维码的内容
* @param width
* 二维码宽度
* @param height
* 二维码高度
* @throws WriterException
* 生成二维码异常
*/
public static Bitmap makeQRImage(String content, int width, int height)
throws WriterException {
Hashtable<EncodeHintType, String> hints = new Hashtable<EncodeHintType, String>();
hints.put(EncodeHintType.CHARACTER_SET, "UTF-8");
// 图像数据转换,使用了矩阵转换
BitMatrix bitMatrix = new QRCodeWriter().encode(content,
BarcodeFormat.QR_CODE, width, height, hints);
int[] pixels = new int[width * height];
// 按照二维码的算法,逐个生成二维码的图片,两个for循环是图片横列扫描的结果
for (int y = 0; y < height; y++) {
for (int x = 0; x < width; x++) {
if (bitMatrix.get(x, y))//范围内为黑色的
pixels[y * width + x] = 0xff000000;
else//其他的地方为白色
pixels[y * width + x] = 0xffffffff;
}
}
// 生成二维码图片的格式,使用ARGB_8888
Bitmap bitmap = Bitmap.createBitmap(width, height,
Bitmap.Config.ARGB_8888);
//设置像素矩阵的范围
bitmap.setPixels(pixels, 0, width, 0, 0, width, height);
return bitmap;
}
第二步:简单二维码加logo
接下来给二维码加logo:(看图)

/**
* 根据指定内容生成自定义宽高的二维码图片
*
* param logoBm
* logo图标
* param content
* 需要生成二维码的内容
* param width
* 二维码宽度
* param height
* 二维码高度
* throws WriterException
* 生成二维码异常
*/
public static Bitmap makeQRImage(Bitmap logoBmp, String content,
int QR_WIDTH, int QR_HEIGHT) throws WriterException {
try {
// 图像数据转换,使用了矩阵转换
Hashtable<EncodeHintType, Object> hints = new Hashtable<EncodeHintType, Object>();
hints.put(EncodeHintType.CHARACTER_SET, "utf-8");
hints.put(EncodeHintType.ERROR_CORRECTION, ErrorCorrectionLevel.H);// 容错率
hints.put(EncodeHintType.MARGIN, 2); // default is 4
hints.put(EncodeHintType.MAX_SIZE, 350);
hints.put(EncodeHintType.MIN_SIZE, 100);
BitMatrix bitMatrix = new QRCodeWriter().encode(content,
BarcodeFormat.QR_CODE, QR_WIDTH, QR_HEIGHT, hints);
int[] pixels = new int[QR_WIDTH * QR_HEIGHT];
for (int y = 0; y < QR_HEIGHT; y++) {
// 下面这里按照二维码的算法,逐个生成二维码的图片,//两个for循环是图片横列扫描的结果
for (int x = 0; x < QR_WIDTH; x++) {
if (bitMatrix.get(x, y))
pixels[y * QR_WIDTH + x] = 0xff000000;
else
pixels[y * QR_WIDTH + x] = 0xffffffff;
}
}
// ------------------添加图片部分------------------//
Bitmap bitmap = Bitmap.createBitmap(QR_WIDTH, QR_HEIGHT,
Bitmap.Config.ARGB_8888);
// 设置像素点
bitmap.setPixels(pixels, 0, QR_WIDTH, 0, 0, QR_WIDTH, QR_HEIGHT);
// 获取图片宽高
int logoWidth = logoBmp.getWidth();
int logoHeight = logoBmp.getHeight();
if (QR_WIDTH == 0 || QR_HEIGHT == 0) {
return null;
}
if (logoWidth == 0 || logoHeight == 0) {
return bitmap;
}
// 图片绘制在二维码中央,合成二维码图片
// logo大小为二维码整体大小的1/2
float scaleFactor = QR_WIDTH * 1.0f / 2 / logoWidth;
try {
Canvas canvas = new Canvas(bitmap);
canvas.drawBitmap(bitmap, 0, 0, null);
canvas.scale(scaleFactor, scaleFactor, QR_WIDTH / 2,
QR_HEIGHT / 2);
canvas.drawBitmap(logoBmp, (QR_WIDTH - logoWidth) / 2,
(QR_HEIGHT - logoHeight) /2, null);
canvas.save(Canvas.ALL_SAVE_FLAG);
canvas.restore();
return bitmap;
} catch (Exception e) {
bitmap = null;
e.getStackTrace();
}
} catch (WriterException e) {
e.printStackTrace();
}
return null;
}
上段代码可以看出要给二维码图片中间加logo,但是图片不能占据整个二维码图片的很大一部分。然后还必须设置容错率:容错率有M,L,Q,H几个等级,容错率越高,二维码的有效像素点就越多。这里使用小写的utf-8编码,大写会出现]Q2\000026开头内容,为了好看点还设置了边距和大小。
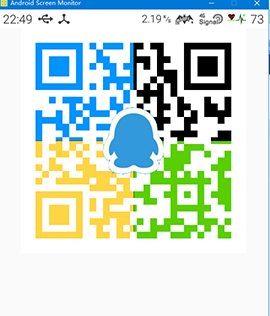
第三步:实现带logo的彩色二维码
接下来我们把黑白矩阵变为彩色矩阵:
就把
if (bitMatrix.get(x, y))
pixels[y * width + x] = 0xff000000;
else
pixels[y * width + x] = 0xffffffff;
替换为:(这里的颜色随便设置,效果随便改)
if (x < QR_WIDTH / 2 && y < QR_HEIGHT / 2) {
pixels[y * QR_WIDTH + x] = 0xFF0094FF;// 蓝色
Integer.toHexString(new Random().nextInt());
} else if (x < QR_WIDTH / 2 && y > QR_HEIGHT / 2) {
pixels[y * QR_WIDTH + x] = 0xFFFED545;// 黄色
} else if (x > QR_WIDTH / 2 && y > QR_HEIGHT / 2) {
pixels[y * QR_WIDTH + x] = 0xFF5ACF00;// 绿色
} else {
pixels[y * QR_WIDTH + x] = 0xFF000000;// 黑色
}
} else {
pixels[y * QR_WIDTH + x] = 0xffffffff;// 白色
}
改后的效果:
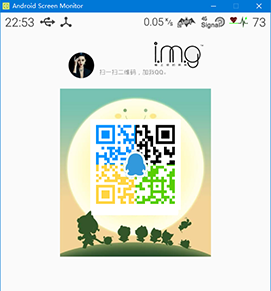
第四步:给二维码加背景
接下来我们来给二维码图片加背景:
/**
* 给二维码图片加背景
*
*/
public static Bitmap addBackground(Bitmap foreground,Bitmap background){
int bgWidth = background.getWidth();
int bgHeight = background.getHeight();
int fgWidth = foreground.getWidth();
int fgHeight = foreground.getHeight();
Bitmap newmap = Bitmap
.createBitmap(bgWidth, bgHeight, Bitmap.Config.ARGB_8888);
Canvas canvas = new Canvas(newmap);
canvas.drawBitmap(background, 0, 0, null);
canvas.drawBitmap(foreground, (bgWidth - fgWidth) / 2,
(bgHeight - fgHeight) *3 / 5+70, null);
canvas.save(Canvas.ALL_SAVE_FLAG);
canvas.restore();
return newmap;
}
这样效果就变为:
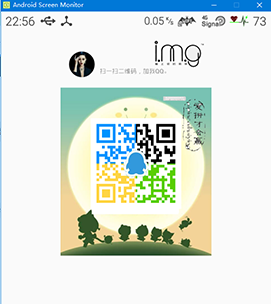
第五步:给二维码加水印
然后二维码的个性化制作就最后一步了:加水印,位置随便放
/**
* 在图片右下角添加水印
*
* @param srcBMP
* 原图
* @param markBMP
* 水印图片
* @return 合成水印后的图片
*/
public static Bitmap composeWatermark(Bitmap srcBMP, Bitmap markBMP) {
if (srcBMP == null) {
return null;
}
// 创建一个新的和SRC长度宽度一样的位图
Bitmap newb = Bitmap.createBitmap(srcBMP.getWidth(),
srcBMP.getHeight(), Bitmap.Config.ARGB_8888);
Canvas cv = new Canvas(newb);
// 在 0,0坐标开始画入原图
cv.drawBitmap(srcBMP, 0, 0, null);
// 在原图的右下角画入水印
cv.drawBitmap(markBMP, srcBMP.getWidth() - markBMP.getWidth()*4/5,
srcBMP.getHeight()*2/7 , null);
// 保存
cv.save(Canvas.ALL_SAVE_FLAG);
// 存储
cv.restore();
return newb;
}
这里贴下实现二维码个性化的完整代码类:
package com.ry.personalizedcode.uitls;
import android.content.Context;
import android.graphics.Bitmap;
import android.graphics.BitmapFactory;
import android.graphics.Canvas;
import com.google.zxing.BarcodeFormat;
import com.google.zxing.EncodeHintType;
import com.google.zxing.WriterException;
import com.google.zxing.common.BitMatrix;
import com.google.zxing.qrcode.QRCodeWriter;
import com.google.zxing.qrcode.decoder.ErrorCorrectionLevel;
import java.util.Hashtable;
import java.util.Random;
/**
* Created on 2016/2/24.
* 生成二维码的工具类
*/
public class MakeQRCodeUtil {
/**
* 根据指定内容生成自定义宽高的二维码图片
*
* param logoBm
* logo图标
* param content
* 需要生成二维码的内容
* param width
* 二维码宽度
* param height
* 二维码高度
* throws WriterException
* 生成二维码异常
*/
public static Bitmap makeQRImage(Bitmap logoBmp, String content,
int QR_WIDTH, int QR_HEIGHT) throws WriterException {
try {
// 图像数据转换,使用了矩阵转换
Hashtable<EncodeHintType, Object> hints = new Hashtable<EncodeHintType, Object>();
hints.put(EncodeHintType.CHARACTER_SET, "utf-8");
hints.put(EncodeHintType.ERROR_CORRECTION, ErrorCorrectionLevel.H);// 容错率
hints.put(EncodeHintType.MARGIN, 2); // default is 4
hints.put(EncodeHintType.MAX_SIZE, 350);
hints.put(EncodeHintType.MIN_SIZE, 100);
BitMatrix bitMatrix = new QRCodeWriter().encode(content,
BarcodeFormat.QR_CODE, QR_WIDTH, QR_HEIGHT, hints);
int[] pixels = new int[QR_WIDTH * QR_HEIGHT];
for (int y = 0; y < QR_HEIGHT; y++) {
// 下面这里按照二维码的算法,逐个生成二维码的图片,//两个for循环是图片横列扫描的结果
for (int x = 0; x < QR_WIDTH; x++) {
if (bitMatrix.get(x, y)) {
if (x < QR_WIDTH / 2 && y < QR_HEIGHT / 2) {
pixels[y * QR_WIDTH + x] = 0xFF0094FF;// 蓝色
Integer.toHexString(new Random().nextInt());
} else if (x < QR_WIDTH / 2 && y > QR_HEIGHT / 2) {
pixels[y * QR_WIDTH + x] = 0xFFFED545;// 黄色
} else if (x > QR_WIDTH / 2 && y > QR_HEIGHT / 2) {
pixels[y * QR_WIDTH + x] = 0xFF5ACF00;// 绿色
} else {
pixels[y * QR_WIDTH + x] = 0xFF000000;// 黑色
}
} else {
pixels[y * QR_WIDTH + x] = 0xffffffff;// 白色
}
}
}
// ------------------添加图片部分------------------//
Bitmap bitmap = Bitmap.createBitmap(QR_WIDTH, QR_HEIGHT,
Bitmap.Config.ARGB_8888);
// 设置像素点
bitmap.setPixels(pixels, 0, QR_WIDTH, 0, 0, QR_WIDTH, QR_HEIGHT);
// 获取图片宽高
int logoWidth = logoBmp.getWidth();
int logoHeight = logoBmp.getHeight();
if (QR_WIDTH == 0 || QR_HEIGHT == 0) {
return null;
}
if (logoWidth == 0 || logoHeight == 0) {
return bitmap;
}
// 图片绘制在二维码中央,合成二维码图片
// logo大小为二维码整体大小的1/2
float scaleFactor = QR_WIDTH * 1.0f / 2 / logoWidth;
try {
Canvas canvas = new Canvas(bitmap);
canvas.drawBitmap(bitmap, 0, 0, null);
canvas.scale(scaleFactor, scaleFactor, QR_WIDTH / 2,
QR_HEIGHT / 2);
canvas.drawBitmap(logoBmp, (QR_WIDTH - logoWidth) / 2,
(QR_HEIGHT - logoHeight) /2, null);
canvas.save(Canvas.ALL_SAVE_FLAG);
canvas.restore();
return bitmap;
} catch (Exception e) {
bitmap = null;
e.getStackTrace();
}
} catch (WriterException e) {
e.printStackTrace();
}
return null;
}
/**
* 获取十六进制的颜色代码.例如 "#6E36B4" , For HTML ,
* @return String
*/
public static String getRandColorCode(){
String r,g,b;
Random random = new Random();
r = Integer.toHexString(random.nextInt(256)).toUpperCase();
g = Integer.toHexString(random.nextInt(256)).toUpperCase();
b = Integer.toHexString(random.nextInt(256)).toUpperCase();
r = r.length()==1 ? "0" + r : r ;
g = g.length()==1 ? "0" + g : g ;
b = b.length()==1 ? "0" + b : b ;
return r+g+b;
}
/**
* 根据指定内容生成自定义宽高的二维码图片
*
* @param content
* 需要生成二维码的内容
* @param width
* 二维码宽度
* @param height
* 二维码高度
* @throws WriterException
* 生成二维码异常
*/
public static Bitmap makeQRImage(String content, int width, int height)
throws WriterException {
Hashtable<EncodeHintType, String> hints = new Hashtable<EncodeHintType, String>();
hints.put(EncodeHintType.CHARACTER_SET, "UTF-8");
// 图像数据转换,使用了矩阵转换
BitMatrix bitMatrix = new QRCodeWriter().encode(content,
BarcodeFormat.QR_CODE, width, height, hints);
int[] pixels = new int[width * height];
// 按照二维码的算法,逐个生成二维码的图片,两个for循环是图片横列扫描的结果
for (int y = 0; y < height; y++) {
for (int x = 0; x < width; x++) {
if (bitMatrix.get(x, y))
pixels[y * width + x] = 0xff000000;
else
pixels[y * width + x] = 0xffffffff;
}
}
// 生成二维码图片的格式,使用ARGB_8888
Bitmap bitmap = Bitmap.createBitmap(width, height,
Bitmap.Config.ARGB_8888);
bitmap.setPixels(pixels, 0, width, 0, 0, width, height);
return bitmap;
}
/**
* 从资源文件中获取图片
*
* @param context
* 上下文
* @param drawableId
* 资源文件id
* @return
*/
public static Bitmap gainBitmap(Context context, int drawableId) {
Bitmap bmp = BitmapFactory.decodeResource(context.getResources(),
drawableId);
return bmp;
}
/**
* 在图片右下角添加水印
*
* @param srcBMP
* 原图
* @param markBMP
* 水印图片
* @return 合成水印后的图片
*/
public static Bitmap composeWatermark(Bitmap srcBMP, Bitmap markBMP) {
if (srcBMP == null) {
return null;
}
// 创建一个新的和SRC长度宽度一样的位图
Bitmap newb = Bitmap.createBitmap(srcBMP.getWidth(),
srcBMP.getHeight(), Bitmap.Config.ARGB_8888);
Canvas cv = new Canvas(newb);
// 在 0,0坐标开始画入原图
cv.drawBitmap(srcBMP, 0, 0, null);
// 在原图的右下角画入水印
cv.drawBitmap(markBMP, srcBMP.getWidth() - markBMP.getWidth()*4/5,
srcBMP.getHeight()*2/7 , null);
// 保存
cv.save(Canvas.ALL_SAVE_FLAG);
// 存储
cv.restore();
return newb;
}
/**
* 给二维码图片加背景
*
*/
public static Bitmap addBackground(Bitmap foreground,Bitmap background){
int bgWidth = background.getWidth();
int bgHeight = background.getHeight();
int fgWidth = foreground.getWidth();
int fgHeight = foreground.getHeight();
Bitmap newmap = Bitmap
.createBitmap(bgWidth, bgHeight, Bitmap.Config.ARGB_8888);
Canvas canvas = new Canvas(newmap);
canvas.drawBitmap(background, 0, 0, null);
canvas.drawBitmap(foreground, (bgWidth - fgWidth) / 2,
(bgHeight - fgHeight) *3 / 5+70, null);
canvas.save(Canvas.ALL_SAVE_FLAG);
canvas.restore();
return newmap;
}
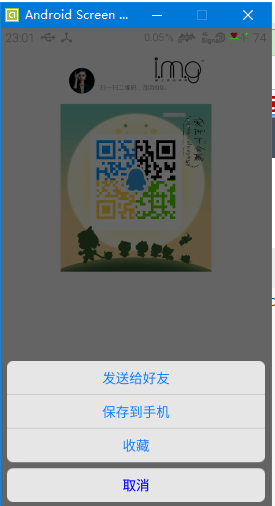
}第六步:给二维码实现长按功能
最后为了模拟下qq的查看二维码名片功能,还加了一个长按弹出actionSheet的功能。
看效果:
具体的 安卓版actionSheet的实现,前面博客有介绍需要的请移步。
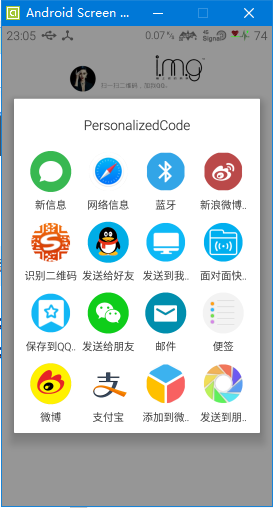
这里我们先来实现发送给好友功能:(这里就不做第三方的发送)
private void sendToFriends() {
Intent intent=new Intent(Intent.ACTION_SEND);
Uri imageUri= Uri.parse(Environment.getExternalStorageDirectory()+"/code/qrcode.jpg");
intent.setType("image/*");
intent.putExtra(Intent.EXTRA_STREAM, imageUri);
intent.setFlags(Intent.FLAG_ACTIVITY_NEW_TASK);
startActivity(Intent.createChooser(intent, getTitle()));
}
发送给朋友效果图:
然后就是要实现保存到本地图库的功能:
/**
* 先保存到本地再广播到图库
* */
public static void saveImageToGallery(Context context, Bitmap bmp) {
// 首先保存图片
File appDir = new File(Environment.getExternalStorageDirectory(),
"code");
if (!appDir.exists()) {
appDir.mkdir();
}
String fileName = "qrcode.jpg";
file = new File(appDir, fileName);
try {
FileOutputStream fos = new FileOutputStream(file);
bmp.compress(CompressFormat.JPEG, 100, fos);
fos.flush();
fos.close();
} catch (FileNotFoundException e) {
e.printStackTrace();
} catch (IOException e) {
e.printStackTrace();
}
// 其次把文件插入到系统图库
try {
MediaStore.Images.Media.insertImage(context.getContentResolver(), file.getAbsolutePath(), fileName, null);
// 最后通知图库更新
context.sendBroadcast(new Intent( Intent.ACTION_MEDIA_SCANNER_SCAN_FILE, Uri.parse("file://"
+ file)));
} catch (FileNotFoundException e) {
e.printStackTrace();
}
}
基于ZXing实现个性彩色好看的二维码相关推荐
- 安卓实现个性彩色好看的二维码
前言 二维码以前也写过好几篇,今天姑且是对以前知识的总结,顺便复习一下,圣人说过:温故知新. 还是和以前一样先看下效果,再来对着代码讲解. 看效果图: 之前呢,也写过用安卓实现二维码生成彩色的二维 ...
- 开发一个基于ZXing库以及安卓Studio的二维码扫描小程序(二)
开发一个基于ZXing库以及安卓Studio的二维码扫描小程序(二) 下面我们做一个ZXing扫描二维码的例子,是通过安卓库的方式引用ZXing应用代码. 开发步骤 建立一个安卓工程(Project) ...
- Android 基于google Zxing实现对手机中的二维码进行扫描
转载请注明出处:http://blog.csdn.net/xiaanming/article/details/14450809 我之前写了一篇关于google Zxing扫描二维码的文章,效果是仿微信 ...
- vue3+ts+vue-qr 使用canvas生成彩色实点二维码
先上一波效果图 背景 最近看到很多好看的二维码,例如这样的创意二维码,觉得非常有意思,但是经过一番研究,以我目前的实力还做不出来这样的效果hhhh,那我就退而求其次,做个彩色的吧! 安装vue-qr ...
- Zxing图片识别 从相册选二维码图片解析总结
Zxing图片识别 从相册选取二维码图片进行解析总结 在Zxing扫描识别和图片识别的解析对象是相同的 本文分三个步骤: 1 获取相册的照片 2 解析二维码图片 3 返回结果 1) 获取相册照片 go ...
- 如何用手机快速制作好看的二维码
由于二维码的出现,给我们的生活带来了很大的方便.由于工作的原因,小编经常会看到一些制作精美的二维码,很是好奇他们是怎么制作出如此好看的二维码的.为了给大家推荐真正好用的二维码制作软件,小编对比了市面上 ...
- C# 利用ZXing.Net来生成条形码和二维码
本文是利用ZXing.Net在WinForm中生成条形码,二维码的小例子,仅供学习分享使用,如有不足之处,还请指正. 什么是ZXing.Net? ZXing是一个开放源码的,用Java实现的多种格式的 ...
- 基于phpqrcode生成带LOGO图标的二维码(源代码例子)
基于phpqrcode生成带LOGO图标的二维码(源代码例子) <?php //文件输出 include('phpqrcode.php'); // 二维码数据 $data = 'http://w ...
- 前端vue uni-app基于uQRCode封装简单快速实用全端二维码生成插件
快速实现基于uQRCode封装简单快速实用全端二维码生成插件; 下载完整代码请访问uni-app插件市场地址:https://ext.dcloud.net.cn/plugin?id=12677 效果图 ...
- Java分别使用zxing及qrcode-plugin生成各种样式二维码
二维码 二维条形码能够在横向和纵向两个方位同时表达信息,因此能在很小的面积内表达大量的信息. 二维码又称二维条码,常见的二维码为QR Code,QR全称Quick Response,是一个近几年来移动 ...
最新文章
- 怎样做网络推广浅析网站被K之后,优化人员们要注意的方面是哪些?
- sql必知必会(第四版) 学习笔记二 视图
- 自反访问控制列表(ACL)
- VTK:网格之ElevationFilter
- android pdu 编码规则,[转载]PDU编码规则
- PostgreSQL学习手册(数据库维护) 转
- JAVA牛客专项练习2020.12.31
- java 设置控制台标题_修改Tomcat控制台标题以及标题乱码处理
- 屠杀机器人和无处不在的监控:AI是我们最大的生存威胁?
- 用户和组 win2003
- 菜鸟驿站发布“新成长计划” 未来三年要让站点平均收入翻倍
- 使用java Graphics 绘图工具生成顺丰快递电子面单
- wireshark数据包分析 中职网络安全
- 年薪50万的程序员_程序员年薪50万 ! 工资是不是太高了?
- ECNU || 梵高先生
- Hulu | 美国人民看电视流行趋势大赏(2020)
- 新世纪Nerv战士 - 京东首页补完计划
- hdu 2576 Queen Collisions
- 20210726 java基础复习
- 基于C++的AGV机器人无线控制