系统的学习linux
1.什么是GNU,linux,unix
GNU是一个自由软件操作系统—就是说,它尊重其使用者的自由。GNU操作系统包括GNU软件包(专门由GNU工程发布的程序)和由第三方发布的自由软件。GNU的开发使你能够使用电脑而无需安装可能会侵害你自由的软件。
Linux,全称GNU/Linux,是一套免费使用和自由传播的类UNIX操作系统,其内核由林纳斯·本纳第克特·托瓦兹于1991年第一次释出,它主要受到Minix和Unix思想的启发,是一个基于POSIX和Unix的多用户、多任务、支持多线程和多CPU的操作系统。它能运行主要的Unix工具软件、应用程序和网络协议。
![]()
##通常我们所说的linux是指linux内核,linuxos 是他的系统,他的系统包含linux内核+gnu组织的软件+厂商开发出来的软件组成系统,我们怎么查看自己linux的信息:
[cxg@localhost ~]$ hostnamectl
Static hostname: localhost.localdomainIcon name: computer-vmChassis: vmMachine ID: 4dd8bf0a62964b709726bb3d5cdda54eBoot ID: a6969ca5f83a48bd9605f65c680f7fc5Virtualization: vmwareOperating System: Red Hat Enterprise Linux Server 7.6 (Maipo)CPE OS Name: cpe:/o:redhat:enterprise_linux:7.6:GA:serverKernel: Linux 3.10.0-957.el7.x86_64Architecture: x86-64
##可以看到我们是linux7.6的,内核是Linux 3.10.0-957.el7.x86_64版本
UNIX操作系统(尤尼斯),是一个强大的多用户、多任务操作系统,支持多种处理器架构,按照操作系统的分类,属于分时操作系统,特点是多用户,多任务
整个UNIX系统可分为五层:最底层是裸机,即硬件部分;第二层是UNIX的核心,它直接建立在裸机的上面,实现了操作系统重要的功能,如进程管理、存储管理、设备管理、文件管理、网络管理等,用户不能直接执行UNIX内核中的程序,而只能通过一种称为"系统调用"的指令,以规定的方法访问核心,以获得系统服务;第三层系统调用构成了第四层应用程序层和第二层核心层之间的接口界面;应用层主要是UNIX系统的核外支持程序,如文本编辑处理程序、编译程序、系统命令程序、通信软件包和窗口图形软件包、各种库函数及用户自编程序;UNIX系统的最外层是Shell解释程序,它作为用户与操作系统交互的接口,分析用户键入的命令和解释并执行命令,Shell中的一些内部命令可不经过应用层,直接通过系统调用访问核心层。
内核(kernel)负责对我们的电脑里面的程序,谁优先谁处理做一个解释和调度,所以内核是我们硬件(CPU,磁盘)和软件(打开的客户端)的调度器,内核是我们系统的核心。如果内核是linux(red hat 等等很多厂商)的,操作系统使用linux,如果kernel是windows(win10 win8),我们操作系统就是windows,内核是unix,操作系统是unix(贝尔实验室,闭合的)系统
计算机五大设备:输入,输出,寄存器,调度器,计算器
![]()
##这个最底层就是硬件(硬件外边还有一层驱动),硬件里层是内核,内核里面是软件,我们举例一个运行过程,我们想要运行一个app,首先内核告诉硬件需要处理app,然后硬件对app的处理进行支持,如何我们让app的运行速度提高,那我们就可以提升这个APP的优先级,提升优先级,就是从内核进行提升(调度器),但是如果app都这样提升自己的优先级,让系统就混乱了,因此我们需要对自己的内核进行保护,因此我们需要再给内核外部加一个壳,就是下面这样的层级分布:
![]()
所以我们下来的运行就是,app给shell一个指令,shell觉得是坏的,就把他阻挡在外部,如果觉得是好的,就让他进入到内核,内核然后再传递到硬件,给app提供运行的工具。所以shell是保护内核的
2.图形出现问题怎么解决和进入shell
(1)ctrl+alt+F2-F6 ##切换到linux虚拟控制台
(2)登录系统获得root权限
(3)init 3 ##是系统的运行级别为3,linux系统后面的数字 0表示关机,6表示重启,1表示单用户模式,2-4表示五图形网络模式,5有图形网络模式
(4)再次登录
(5)init 5
##在操作过程中图形出现问题比如说卡死,我们先切换到其他的linux终端(控制台),然后切换到无图形模式,重新启动后,再切换回图形模式就行
3.什么是内核,什么是shell,如何开启shell
##这个东西相当于我们的任务管理器
![]()
##我们可以在里面看到我们的bash,登录一个用户就会有bash
![]()
##我们现在用logout或者ctrl+d关闭掉登录的用户,就会发现bash没有了
##我们再重新登录用户,让bash启动,右键bash
![]()
可以看到end就类似于我们的关闭,但是可能会受到堵塞,类似于我们前面学的杀进程的kill -15 ,正常关闭,我们要是正在运行,他可能就会收到堵塞
而kill就类似于kill -9或者poweroff,强行关闭,不会被堵塞
##那么bash是个什么东西?
[cxg@localhost ~]$ whatis bash
bash (1) - GNU Bourne-Again SHell
##那么shell是个什么东西?
bash是属于shell的一种,shell还有sh,tcsh,ksh等等,我们这里rhel7.6用的是bash
##我们怎么打开shell?
一般的可以用鼠标右键点击进入open terminal,也可以在命令行输入[cxg@localhost ~]$ gnome-terminal来打开shell,所以说我们打开shell是进行gnome-terminal这个命令,所以我们可以设置一个快捷键来让他运行这个命令,来达到快速进入shell的目的:
[cxg@localhost ~]$ gnome-control-center##可以直接打开我们的系统控制中心,这个指令和我们用鼠标进入setting是一样的
![]()
##然后再找到keyboard(键盘设置),在最下方找到+,添加新的快捷键,在输入如下的内容
![]()
##输入完成后发现我们的快捷键没有disable,没有自己启动,我们需要再点进去给他输入快捷键让他启动
![]()
##这下我们在桌面输入F10就可以直接进入shell了
3.在linux运行命令,创建和删除文件,编辑文件,复制文件
![]()
##我们在输入shell命令的时候,参数这部分比如我们输入:-ls与我们输入-l加上-s或者输入-s加上-l是一样的
[root@localhost ~]# ls -s ##显示出来文件的大小
total 107244 anaconda-ks.cfg
9380 apache-tomcat-7.0.103.tar.gz4 initial-setup-ks.cfg
1272 yum-3.4.3-167.el7.centos.noarch.rpm28 yum-metadata-parser-1.1.4-10.el7.x86_64.rpm36 yum-plugin-fastestmirror-1.1.31-53.el7.noarch.rpm
[root@localhost ~]# ls -l##显示出来文件的属性
total 10724
-rw-------. 1 root root    1864 Mar 31 18:21 anaconda-ks.cfg
-rw-r--r--. 1 root root 9604761 May  3 16:13 apache-tomcat-7.0.103.tar.gz
-rw-r--r--. 1 root root    1940 Mar 31 18:23 initial-setup-ks.cfg
-rw-r--r--. 1 root root 1298645 May  3 19:52 yum-3.4.3-167.el7.centos.noarch.rpm
-rw-r--r--. 1 root root   28348 May  3 19:53 yum-metadata-parser-1.1.4-10.el7.x86_64.rpm
-rw-r--r--. 1 root root   35004 May  3 19:53 yum-plugin-fastestmirror-1.1.31-53.el7.noarch.rpm
[root@localhost ~]# ls -ls##和上面两个指令加起来是一个效果
total 107244 -rw-------. 1 root root    1864 Mar 31 18:21 anaconda-ks.cfg
9380 -rw-r--r--. 1 root root 9604761 May  3 16:13 apache-tomcat-7.0.103.tar.gz4 -rw-r--r--. 1 root root    1940 Mar 31 18:23 initial-setup-ks.cfg
1272 -rw-r--r--. 1 root root 1298645 May  3 19:52 yum-3.4.3-167.el7.centos.noarch.rpm28 -rw-r--r--. 1 root root   28348 May  3 19:53 yum-metadata-parser-1.1.4-10.el7.x86_64.rpm36 -rw-r--r--. 1 root root   35004 May  3 19:53 yum-plugin-fastestmirror-1.1.31-53.el7.noarch.rpm
[root@localhost ~]# touch file
[root@localhost ~]# touch file1 file2 file3##可以touch 后面直接加多个文件名,来创建多个文件
[root@localhost ~]# ls
anaconda-ks.cfg
apache-tomcat-7.0.103.tar.gz
file
file1
file2
file3
[root@localhost ~]# ls -l file##列出长清单格式,可以看到file文件创建的时间是5月9号12.13
-rw-r--r--. 1 root root 0 May 9 12:13 file
[root@localhost ~]# touch -t 11111111 file##我们可以touch -t 后面加上日期时分进行创建,让他创建的时间变为11月11日11点11分
[root@localhost ~]# ls -l file
-rw-r--r--. 1 root root 0 Nov 11 2020 file
##可以看到已经修改创建时间了
[root@localhost Desktop]# mkdir test##创建test目录
[root@localhost Desktop]# mkdir lee/linux/westos##创建一个lee下的linux下的westos层级目录
mkdir: cannot create directory ‘lee/linux/westos’: No such file or directory
##显示不能直接创建,因为我们都不存在lee这个第一层的目录,后面的目录就出现堵塞,无法创建
[root@localhost Desktop]# mkdir -p lee/linux/westos##mkdir -p代表当我们创建目录的时候,要是缺少目录,就自动进行创建,这个时候我们就创建出来这个多级目录了
[root@localhost Desktop]# cd
[root@localhost ~]# ls
anaconda-ks.cfg
apache-tomcat-7.0.103.tar.gz
file
file1
file2
file3
[root@localhost ~]# rm -f file file1 file2 file3##刚刚我们创建的文件1 2 3还都存在,现在我们删除,如果只输入rm file file1 file2他就会竟然弹出来问你是否确定删除,你必须按y确认让他删除,很麻烦,因此我们使用rm -f file1 file2 file3代表删除但不询问,代表强制删除
[root@localhost Desktop]# rm -f test
rm: cannot remove ‘test’: Is a directory
##我们不能使用删除文件的方式删除目录,因为目录是一个容器,我们不能直接删除容器,而保存他内部的内容,目录和文件的东西叫递归(Recursion),所以我们使用
[root@localhost Desktop]# rm -f -r test
[root@localhost Desktop]# rm -fr test
[root@localhost Desktop]# rm -rf test##这三条指令都可以达到删除test目录的目的
[root@localhost Desktop]# gedit file##这个只针对图形模式
[root@localhost Desktop]# vim file##图形和多任务模式都可以
##有时候我们在vim编辑器里面编辑文本的时候,有时候就会点右上角的×退出编辑器,这就造成编辑器异常退出,我们输入的内容没有保存,那么如何解决呢?
![]()
[root@localhost Desktop]# ls -a
. .. file .file.swp
##多了个.file.swp隐藏文件,这个就是我们异常退出的没有保存的内容
[root@localhost Desktop]# vim file##进入file就会出现如下情况
![]()
##o只读打开,E忽略当前的显示,R把远来没有保存的恢复,D删除隐藏文件删除(就是把自己编辑的未保存的内容删除),Q退出,A也是退出
##所以当我们出现在编辑文本的时候异常退出shell的时候,我们重新进入编辑模式,然后按R进行内容恢复(这个恢复是建立在隐藏文件上的),然后wq,然后再进入编辑模式,D删除掉我们隐藏文件以后再进入file编辑模式就不会出现上面图片的报错了
[root@localhost Desktop]# ls -a##.file.swap文件也不存在了(再进行上面的恢复操作后)
. .. file
–
![]()
[root@localhost Desktop]# cp file westos##复制file文件到westos
[root@localhost Desktop]# ls
file westos
[root@localhost Desktop]# mkdir lee
[root@localhost Desktop]# cp file westos lee##将file和westos都复制到lee目录下
[root@localhost Desktop]# mkdir test
[root@localhost Desktop]# cp -r lee test##cp-r代表递归,将里面所有东西都迁移的意思,将lee目录的内容都复制到test目录里
![]()
[root@localhost Desktop]# ls -i westos##ls -i查看文件的节点号(inode)
35410086 westos
##可以看到westos的节点号是35410086,每个文件都有它的节点号,如果他被修改了或者原本他的位置被别的文件占领了,他的节点号就会发生改变,也就是说这个文件被修改过
[root@localhost Desktop]# rm -f westos
[root@localhost Desktop]# touch westos
[root@localhost Desktop]# ls -i westos
35410086 westos
##删除westos,重新创建后发现节点号没有发生改变,这是因为原本在Desktop里面他的位置没有被其他文件占领
[root@localhost Desktop]# rm -f westos
[root@localhost Desktop]# touch file1
[root@localhost Desktop]# touch westos
[root@localhost Desktop]# ls -i westos
35410102 westos
##我们在删除westos后,先重新创建个file1,再创建westos,发现他的inode已经修改了,是因为他的位置已经被file1占领
[root@localhost Desktop]# mv westos test
[root@localhost Desktop]# ls -i test/westos##这个移动只相当于重命名(相同磁盘)
35410102 test/westos
##我们使用mv移动指令发现他的节点没有被修改,是因为我们相当于剪贴粘贴,westos原本的位置(Desktop)没有被别的文件,但是这个是建立在同一个磁盘的移动,相同磁盘的移动相当于重命名,如果从一个磁盘移动到另外一个磁盘,他的节点号是会改变的,因为这个磁盘与磁盘之间的移动相当于先复制再删除,再重新创建的过程
4.文件内容的查看,文件寻址,路径命令
![]()
##我们在查看文件的时候,想要显示关键词需要在命令窗口输入/内容,n向下匹配,N向上匹配,在less模式里面按v进入vim编辑模式
![]()
[root@localhost Desktop]# history > westos##这个是将历史都输入过的命令都输出到westos里面,主要是为了给查看命令增加看的内容
[root@localhost Desktop]# head -n 3 westos##查看westos的前三行
1  poweroff
2  cd /etc/sysconfig/network-scripts/
3  vim ifcfg-ens33
[root@localhost Desktop]# tail -n 3 westos##查看westos的后三行
347 df348 history349 history > westos
补充:cat westos##表示查看westos从前往后,把cat反着写tac westos##表示查看westos 从后往前
![]()
[root@localhost Desktop]# touch file##这个是相对路径
[root@localhost Desktop]# touch /home/cxg/Desktop##这个是绝对路径
##表示的都是在同一个位置创建文件
[root@localhost Desktop]# touch home/cxg/Desktop
touch: cannot touch ‘home/cxg/Desktop’: No such file or directory
##这是因为home前面没有根/,绝对路径必须在最前方有根/,相对路径没有/,他会自动加上pwd前面的路径
##[root@localhost Desktop]# pwd
/home/cxg/Desktop
![]()
[root@localhost ~]# cd ~cxg##进入到指定用户的家(home)目录
[root@localhost cxg]# pwd
/home/cxg
[root@localhost ~]# cd /mnt/
[root@localhost mnt]# cd /dev
[root@localhost dev]# cd -
/mnt
[root@localhost mnt]# cd -
/dev
[root@localhost dev]#
##这是对cd -的示例
![]()
![]()
##history命令的补充:
[root@localhost ~]# history
349 cd /etc/350 ;s351 ls352 cd353 history
[root@localhost ~]# !l##!l代表运行最近一条l开头的相关命令,这里是ls
ls
anaconda-ks.cfg               initial-setup-ks.cfg                 yum-metadata-parser-1.1.4-10.el7.x86_64.rpm
apache-tomcat-7.0.103.tar.gz  yum-3.4.3-167.el7.centos.noarch.rpm  yum-plugin-fastestmirror-1.1.31-53.el7.noarch.rpm
(reverse-i-search)ho': cd /home/cxg##ctrl+r进入搜索模式,然后打入ho就会自动检索和ho有关的历史命令,这里是cd /home/cxg,然后回车就执行了
![]()
![]()
[root@localhost ~]# timedatectl##控制系统的时间和日期
   Local time: Mon 2020-05-11 15:46:58 CSTUniversal time: Mon 2020-05-11 07:46:58 UTCRTC time: Mon 2020-05-11 15:46:57Time zone: Asia/Shanghai (CST, +0800)NTP enabled: no
NTP synchronized: noRTC in local TZ: noDST active: n/a
[root@localhost ~]# timedatectl set-timezone "Asia/shanghai"##把市区设置为亚洲上海
Failed to set time zone: Invalid time zone 'Asia/shanghai'
[root@localhost ~]# history --help##当我们用help命令不能查询到他的使用方法时候
-bash: history: --: invalid option
history: usage: history [-c] [-d offset] [n] or history -anrw [filename] or history -ps arg [arg...]
[root@localhost ~]# man history##这个时候可以用man + history,这里man是mannual的简写
![]() ##这里面和less的用法一样,/his可以高亮包含的内容
##这里面和less的用法一样,/his可以高亮包含的内容
[root@localhost ~]# man man ##man有不同的级别划分
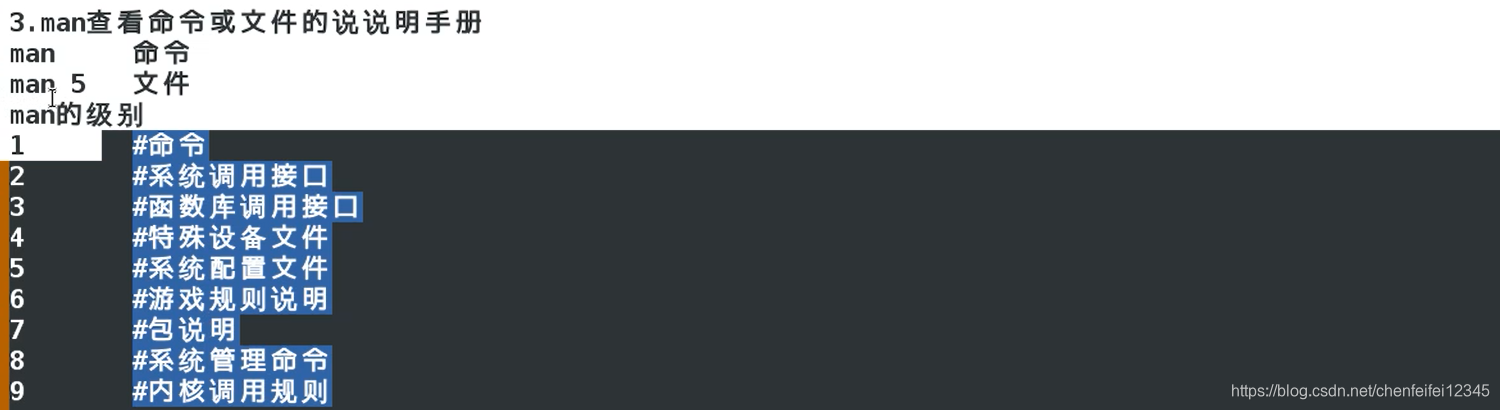
DESCRIPTIONman is the system's manual pager. Each page argument given toman is normally the name of a program, utility or function.The manual page associated with each of these arguments isthen found and displayed. A section, if provided, will directman to look only in that section of the manual. The defaultaction is to search in all of the available sections, follow‐ing a pre-defined order and to show only the first page found,even if page exists in several sections.The table below shows the section numbers of the manual fol‐lowed by the types of pages they contain.1 Executable programs or shell commands2 System calls (functions provided by the kernel)3 Library calls (functions within program libraries)4 Special files (usually found in /dev)5 File formats and conventions eg /etc/passwd6 Games7 Miscellaneous (including macro packages and conventions),e.g. man(7), groff(7)8 System administration commands (usually only for root)9 Kernel routines [Non standard]
[root@localhost ~]# man 5 passwd##查看passwd代表的文本的数据
[root@localhost ~]# man passwd##查看命令的帮助
[root@localhost ~]# man -k passwd##查看passwd在man所有的级别
[root@localhost ~]# man -k passwd##查看passwd所有的级别
chpasswd (8)         - update passwords in batch mode
fgetpwent_r (3)      - get passwd file entry reentrantly
getpwent_r (3)       - get passwd file entry reentrantly
gpasswd (1)          - administer /etc/group and /etc/gshadow
grub2-mkpasswd-pbkdf2 (1) - Generate a PBKDF2 password hash.
lpasswd (1)          - Change group or user password
lppasswd (1)         - add, change, or delete digest passwords.
pam_localuser (8)    - require users to be listed in /etc/passwd
passwd (1)           - update user's authentication tokens
sslpasswd (1ssl)     - compute password hashes
passwd (5)           - password file
passwd2des (3)       - RFS password encryption
pwhistory_helper (8) - Helper binary that transfers password hashes ...
saslpasswd2 (8)      - set a user's sasl password
smbpasswd (5)        - The Samba encrypted password file
userpasswd (1)       - A graphical tool to allow users to change the...
vncpasswd (1)        - change the VNC password
[root@localhost ~]# touch --help##在touch后面的FILE后面三个点就代表它可以加入多个任意文件,我们前面也学过一次性touch多个文件, [OPTION]这个代表可加可不加
[root@localhost ~]# passwd --help##<accountName>这个要求必须加入 Usage是查看命令用法
Usage: passwd [OPTION...] <accountName>
![]()
##linux中中括号[]表示模糊的指令,{}表示精确的指令
[root@localhost etc]# cp /etc/*.conf /home/cxg/Desktop/##*.conf代表匹配.conf结尾的所有文件,将这些文件都拷贝到桌面
[root@localhost etc]# cd /home/cxg/Desktop
[root@localhost Desktop]# ls##可以看到已经批量拷贝了
asound.conf                 ld.so.conf        resolv.conf
brltty.conf                 lee               rsyncd.conf
chrony.conf                 libaudit.conf     rsyslog.conf
dleyna-server-service.conf  libuser.conf      sestatus.conf
dnsmasq.conf                locale.conf       sos.conf
dracut.conf                 logrotate.conf    sudo.conf
e2fsck.conf                 man_db.conf       sudo-ldap.conf
file                        mke2fs.conf       sysctl.conf
file1                       mtools.conf       tcsd.conf
fprintd.conf                nfs.conf          test
fuse.conf                   nfsmount.conf     updatedb.conf
GeoIP.conf                  nsswitch.conf     usb_modeswitch.conf
host.conf                   numad.conf        vconsole.conf
idmapd.conf                 oddjobd.conf      westos
ipsec.conf                  pbm2ppa.conf      wvdial.conf
kdump.conf                  pnm2ppa.conf      yum.conf
krb5.conf                   radvd.conf
ksmtuned.conf               request-key.conf
[root@localhost Desktop]# rm -fr *##rm -fr删除后面价格*就是将所有的删除
[root@localhost Desktop]# ls##可以看到已经全部删除了
[root@localhost Desktop]# rm -fr /*##所有我们现在理解删除库命令的原因了将根目录下的所有信息都删除
##我们怎么批量删除目录里面的文件而不删除目录呢
[root@localhost Desktop]# mkdir westos##创建westos目录
[root@localhost Desktop]# cp /etc/*.conf westos/
[root@localhost Desktop]# ls westos
asound.conf                 ld.so.conf      request-key.conf
brltty.conf                 libaudit.conf   resolv.conf
chrony.conf                 libuser.conf    rsyncd.conf
dleyna-server-service.conf  locale.conf     rsyslog.conf
dnsmasq.conf                logrotate.conf  sestatus.conf
dracut.conf                 man_db.conf     sos.conf
e2fsck.conf                 mke2fs.conf     sudo.conf
fprintd.conf                mtools.conf     sudo-ldap.conf
fuse.conf                   nfs.conf        sysctl.conf
GeoIP.conf                  nfsmount.conf   tcsd.conf
host.conf                   nsswitch.conf   updatedb.conf
idmapd.conf                 numad.conf      usb_modeswitch.conf
ipsec.conf                  oddjobd.conf    vconsole.conf
kdump.conf                  pbm2ppa.conf    wvdial.conf
krb5.conf                   pnm2ppa.conf    yum.conf
ksmtuned.conf               radvd.conf
[root@localhost Desktop]# rm -fr westos/*##删除的时候目录后面加上/*,就是删除westos目录里面的文件
[root@localhost Desktop]# ls -s##可以看到目录存在,文件不存在了
total 0 westos
##对?进行示例
[root@localhost Desktop]# touch file file1 file2 file11
[root@localhost Desktop]# rm -fr file?##我们把file?意思是file后面任意只匹配一个字符,所有只删除了file1,file2
![]()
root@localhost Desktop]# rm -fr ????##删除桌面上四个字符的文件file
![]()
[root@localhost Desktop]# rm -fr ??????##删除6个字符的文件file11
![]()
[root@localhost Desktop]# touch fi8le fi8le fiale fiAle fi@le "fi le"##创建这几个文件名,其中"fi le"代表加上双引号file中间价格空格但是这个空格没有特殊含义
[root@localhost Desktop]# rm -fr fi?le##这个删除的是file的i和l中间任何字符的文件
[root@localhost Desktop]# touch fi8le fi8le fiale fiAle fi@le "fi le"
[root@localhost Desktop]# rm -fr fi[[:digit:]]le##删除中间是数字的文件
[root@localhost Desktop]# rm -fr fi[[:alpha:]]le##删除中间是字母的文件
[root@localhost Desktop]# rm -fr fi[[:alnum:]]le##删除中间是数字或者字母的文件
[root@localhost Desktop]# touch fi8le fi8le fiale fiAle fi@le "fi le"
[root@localhost Desktop]# rm -fr fi[[:punct:]]le##删除单个符号和?是一样的
[root@localhost Desktop]# rm -fr fi[[:space:]]le##删除中间是空格
[root@localhost Desktop]# touch fi8le fi8le fiale fiAle fi@le "fi le"``[root@localhost Desktop]# rm -fr fi[[:punct:][:digit]]le##删除中间是字符或者数字的文件
*##linux中中括号[]表示模糊的指令,{}表示精确的指令
[root@localhost mnt]# cp /etc/passwd ~-##这个~-就是代表复制psswd文件到前一个文件主目录,和cd -差不多
[root@localhost Desktop]# touch file1 file2 file4
[root@localhost Desktop]# cp file[1-4] /mnt/##复制文件1-4到mnt目录,但是我们不存在file3,因为[]属于模糊匹配,虽然我们没有file3,但是如果没有系统默认系统跳过file3,也不会出现报错
[root@localhost Desktop]# rm -fr /mnt/*
[root@localhost Desktop]# cp file{1..4} /mnt/##我们再使用精确匹配复制file1-4到mnt中这次出现报错,是因为{}属于精确匹配,就类似点名一样,file3是肯定要点名的,点到他不在就肯定要提示和报错
cp: cannot stat ‘file3’: No such file or directory
[root@localhost Desktop]# rm -fr *
[root@localhost Desktop]# touch file[1-4]##作为模式匹配,创建file1-4我们不能使用模糊匹配,因为系统不知道我们要创建的是file1还是2还是3还是4,只能创建出来一个文件file[1-4]
![]()
[root@localhost Desktop]# touch file{1..4}##但是使用精确匹配就可以批量创建文件
![]()
[root@localhost Desktop]# touch file{c,sh}##创建文件c和sh,和数字的区别是没有排序
[root@localhost Desktop]# cp /etc/*.{conf,d}##复制etc下的conf和d结尾的文件,这个d结尾的好多目录
[root@localhost Desktop]# cp -r /etc/*.{conf,d} .##所有我们需要加上-r来复制目录
[root@localhost Desktop]# rm -fr *[[:digit:]p]*##删除掉数字和含有p的文件
[root@localhost Desktop]# rm -fr *[0-9p]*##删除掉数字和含有p的文件
[root@localhost Desktop]# touch fi8le fiple fiale fi@le
[root@localhost Desktop]# rm -fr fi*[!0-9p]*le##!可以看到file中间出了数字和p的其他的都被删除了
![]()
![]()
##bin下放的系统的常用命令(普通用户),比如touch,rm -fr,cp,mv这些常规命令
##sbin下放的是系统的系统高级命令(超级用户),比如useradd,userdel
##boot删除里面的文件系统重启就会出现问题,重启就会提示缺失文件
##dev下放的是看得见的设备,比如硬盘,前面学过sda,sdb硬盘的信息就存在这里面
##etc下是配置文件
![]()
##比如我们进入etc下的passwd将cxg的cxg改为hahah,保存后,我们的新用户的名字就叫hahah了
##home为普通用户的家目录
##lib系统加载的模块还有函数库保存的地方
[root@localhost ~]# date##比如说我们运行date命令
Sat May 23 01:49:03 CST 2020
##我们现在删除lib64
![]()
[root@localhost ~]# date##再运行date就显示缺失运行的文件
![]()
##可以看到运行缺失 lib64下的文件
##mnt和media,run都是挂载点,mnt挂载的是系统设备(磁盘创建新分区),media挂载的是类似u盘的临时设备
![]()
##opt是安装第三方软件的位置(比如wps,酷狗音乐了)
##proc
[root@localhost ~]# firefox
Running without a11y support!
^Z[1]+  Stopped                 firefox
[root@localhost ~]# ps##可以查看到firefox的pid码是12079
PID TTY TIME CMD9715 pts/0 00:00:00 su9734 pts/0 00:00:00 bash12079 pts/0 00:00:02 firefox12087 pts/0 00:00:00 dbus-launch12148 pts/0 00:00:00 Web Content12189 pts/0 00:00:00 file:// Content12740 pts/0 00:00:00 ps
##我们在根 下的proc目录里面可以搜索到12079,里面的文件就是firxfox的软件信息
![]()
##现在我们关掉火狐浏览器,可以看到
[root@localhost ~]# fg
firefox
##可以看到最早锁定的firxfox空间已经没有了
![]()
##打开这个数据发现已经不存在了
![]()
##其实根下的bin和sbin是usr下的bin和sbin的快捷方式。
##更加详细的内容可以百度FHS
系统的学习linux相关推荐
- 如何系统的学习linux
http://bbs.chinaunix.net/thread-4067151-1-1.html 首先,我想引用一下别人说过的一句话:除非在过去的十年你一直生活在山洞里,否则你一定听说过linux. ...
- 如何系统的学习linux?
本文转自 海天旭日的BLOG [url]www.xpb.cn[/url] 首先,我想引用一下别人说过的一句话:除非在过去的十年你一直生活在山洞里,否则你一定听说过linux. 是的,现在听说过linu ...
- 初学者如何系统性地学习Linux?
作为一个大一的同学,可以采取下面的步骤进行系统的学习Linux. 1.选择一个发行版:对于初学者,推荐使用Ubuntu或者Linux Mint.Ubuntu适合新手,使用广泛,社区活跃,遇到问题容易找 ...
- 如何系统的学习linux 系统学习Linux的十一点建议
linux太难用了!(一通鼠标点击,进入/etc) 学习linux,你忘记windows的思维方式了吗? 怎么安装软件阿?那一堆文件是干什么的阿? 学习linux,你还在浮躁吗? 进入linux,随便 ...
- linux系统入门学习Linux认证:linux系统学习方法入门体
Linux认证考试:操作系统linux学习方法入门体 在学习linux的工程中,linux学习方法有很多种,这里是小编的学习,给大家拿出来分享一下, Linux!Linux只是个内核!这点很重要,你必 ...
- linux 查看防火墙状态_每天五分钟学习Linux系列之 - 系统安全配置
20年IT从业,二哥的团队使用最多的系统就是Linux,开发,运维的小伙伴们都离不开Linux系统,特别是大数据和人工智能领域更是如此,但由于日常工作忙,小伙伴们没有太多成块的时间系统的学习Linux ...
- 如何系统学习Linux
linux太难用了!(一通鼠标点击,进入/etc) 学习linux,你忘记windows的思维方式了吗? 怎么安装软件阿?那一堆文件是干什么的阿? 学习linux,你还在浮躁吗? 进入linux,随便 ...
- 如何学习linux系统
如何系统的学习linux. 首先,我想引用一下别人说过的一句话:除非在过去的十年你一直生活在山洞里,否则你一定听说过linux. 是 的,现在听说过linux,会一点linux基本操作的人多如牛毛,然 ...
- 渗透测试是否需要学习Linux
渗透测试是一种利用模拟黑客攻击的手段,来评估生产系统的安全性能,用黑客惯用的破坏攻击方式,行的却是维护安全之事,也就是大家所说的白帽黑客.白帽黑客通常受雇于各大公司,是维护网络与计算机安全的主要力量. ...
最新文章
- [CareerCup] 11.2 Sort Anagrams Array 异位词数组排序
- 2014年下半年信息系统项目管理师上午试题试题与答案 54
- 使用 SQL Server Mobile 创建移动应用程序
- opencv光流Optical Flow
- Linux环境:NFS--网络文件系统部署
- python随机生成模块的应用
- 【Boost】boost库中thread多线程详解3——细说lock_guard
- 好用的MARKDOWN编辑器一览
- JAVA理财管理系统(JAVA 毕业设计)
- 改进YOLOv5系列:首发结合最新CSPNeXt主干结构,高性能,低延时的单阶段目标检测器主干,通过COCO数据集验证高效涨点
- error launching idea
- flex布局实现骰子六面的示例
- Android 实现拍照功能,并将图片保存到本地存储
- 深圳水上乐园有哪些 而且便宜还好玩
- 蓝牙协议栈认证:什么是蓝牙Core Layer的BQB认证要求
- 关于win10笔记本右键无响应的问题解决
- 【渝粤题库】陕西师范大学163211 会展管理作业
- 规模指数介绍,如何使用Python获取数据
- 树莓派4B入门及应用
- 阿里云ECS训练营第三天——微信公众号管理系统