zxing 二维码生成深度定制
二维码生成服务之深度定制
之前写了一篇二维码服务定制的博文,现在则在之前的基础上,再进一步,花样的实现深度定制的需求,我们的目标是二维码上的一切都是可以由用户来随意指定
设计
1. 技术相关
- zxing 开源包用于生成二维码
- springboot 搭建基本web服务,提供http接口
- awt 用于图片的编辑
- httpclient 用于从网络下载图片
- lombok 简化编码
2. 目的
既然是对二维码服务的深度定制,那我们的目的基本上就是二维码上面出现的东西,都可以按照我们的需求进行改造
这里,我们设计两个目的,一个基础版,一个进阶版
基础版
- 二维码大小
- 边距留白指定
- 添加logo
- 加背景
进阶版
- 二维码中前置色和背景色可自由指定颜色
- 二维码中前置色(黑白二维码中的黑色区域)可换成圆点,三角形等其他图形
- 前置色可用图片替换
- 探测点(三个矩形框就是探测点,也叫做定位点)颜色可配置
- 探测点可用图片替换
- 二维码样式(圆角矩形,添加边框,边框颜色可指定)
- 背景支持填充(填充在背景图片的某个区域)和覆盖方式(全覆盖背景图,二维码设置透明度)
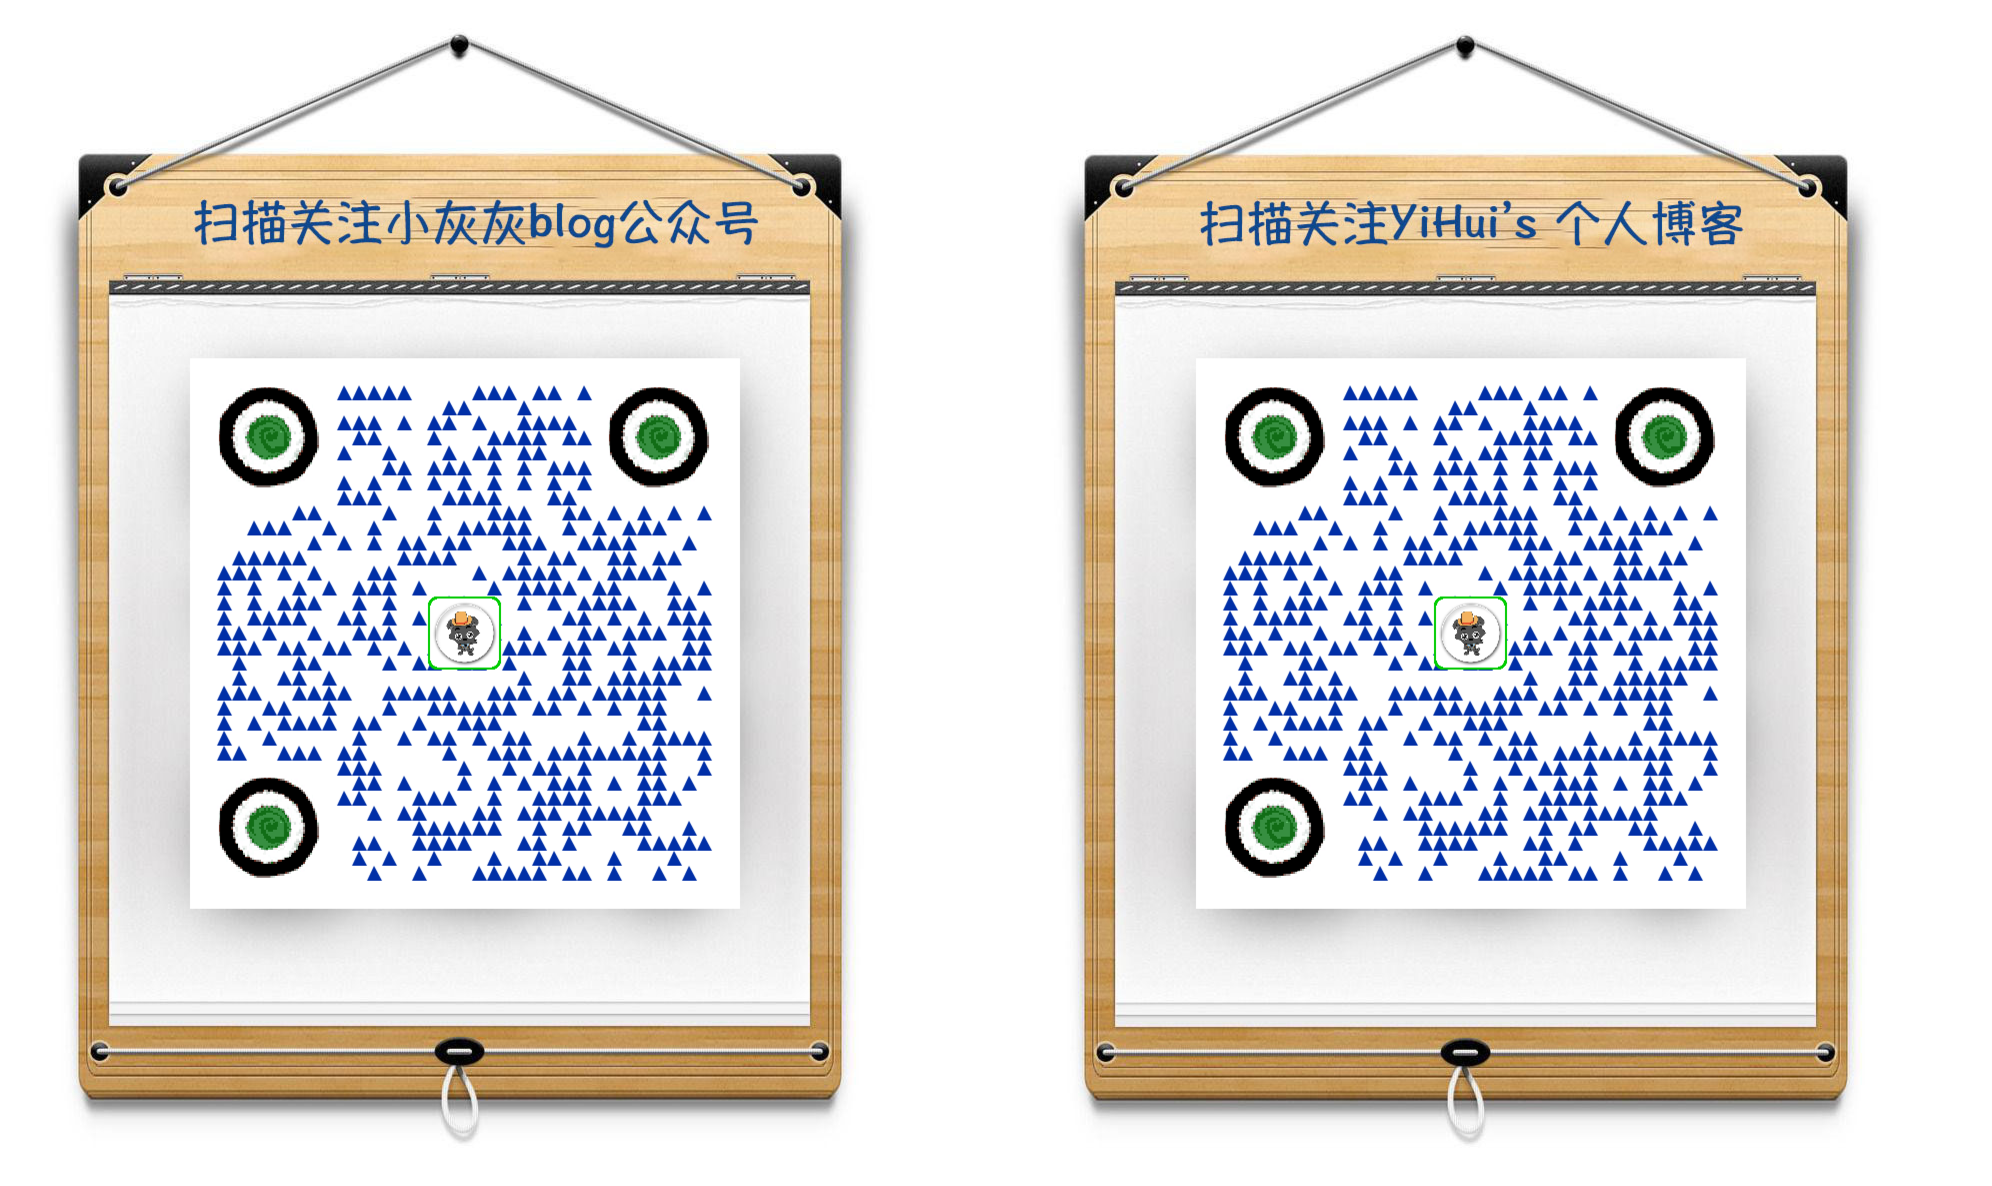
上面是我们希望达到的目的,下面给几个实际生成的二维码瞅瞅最终的效果
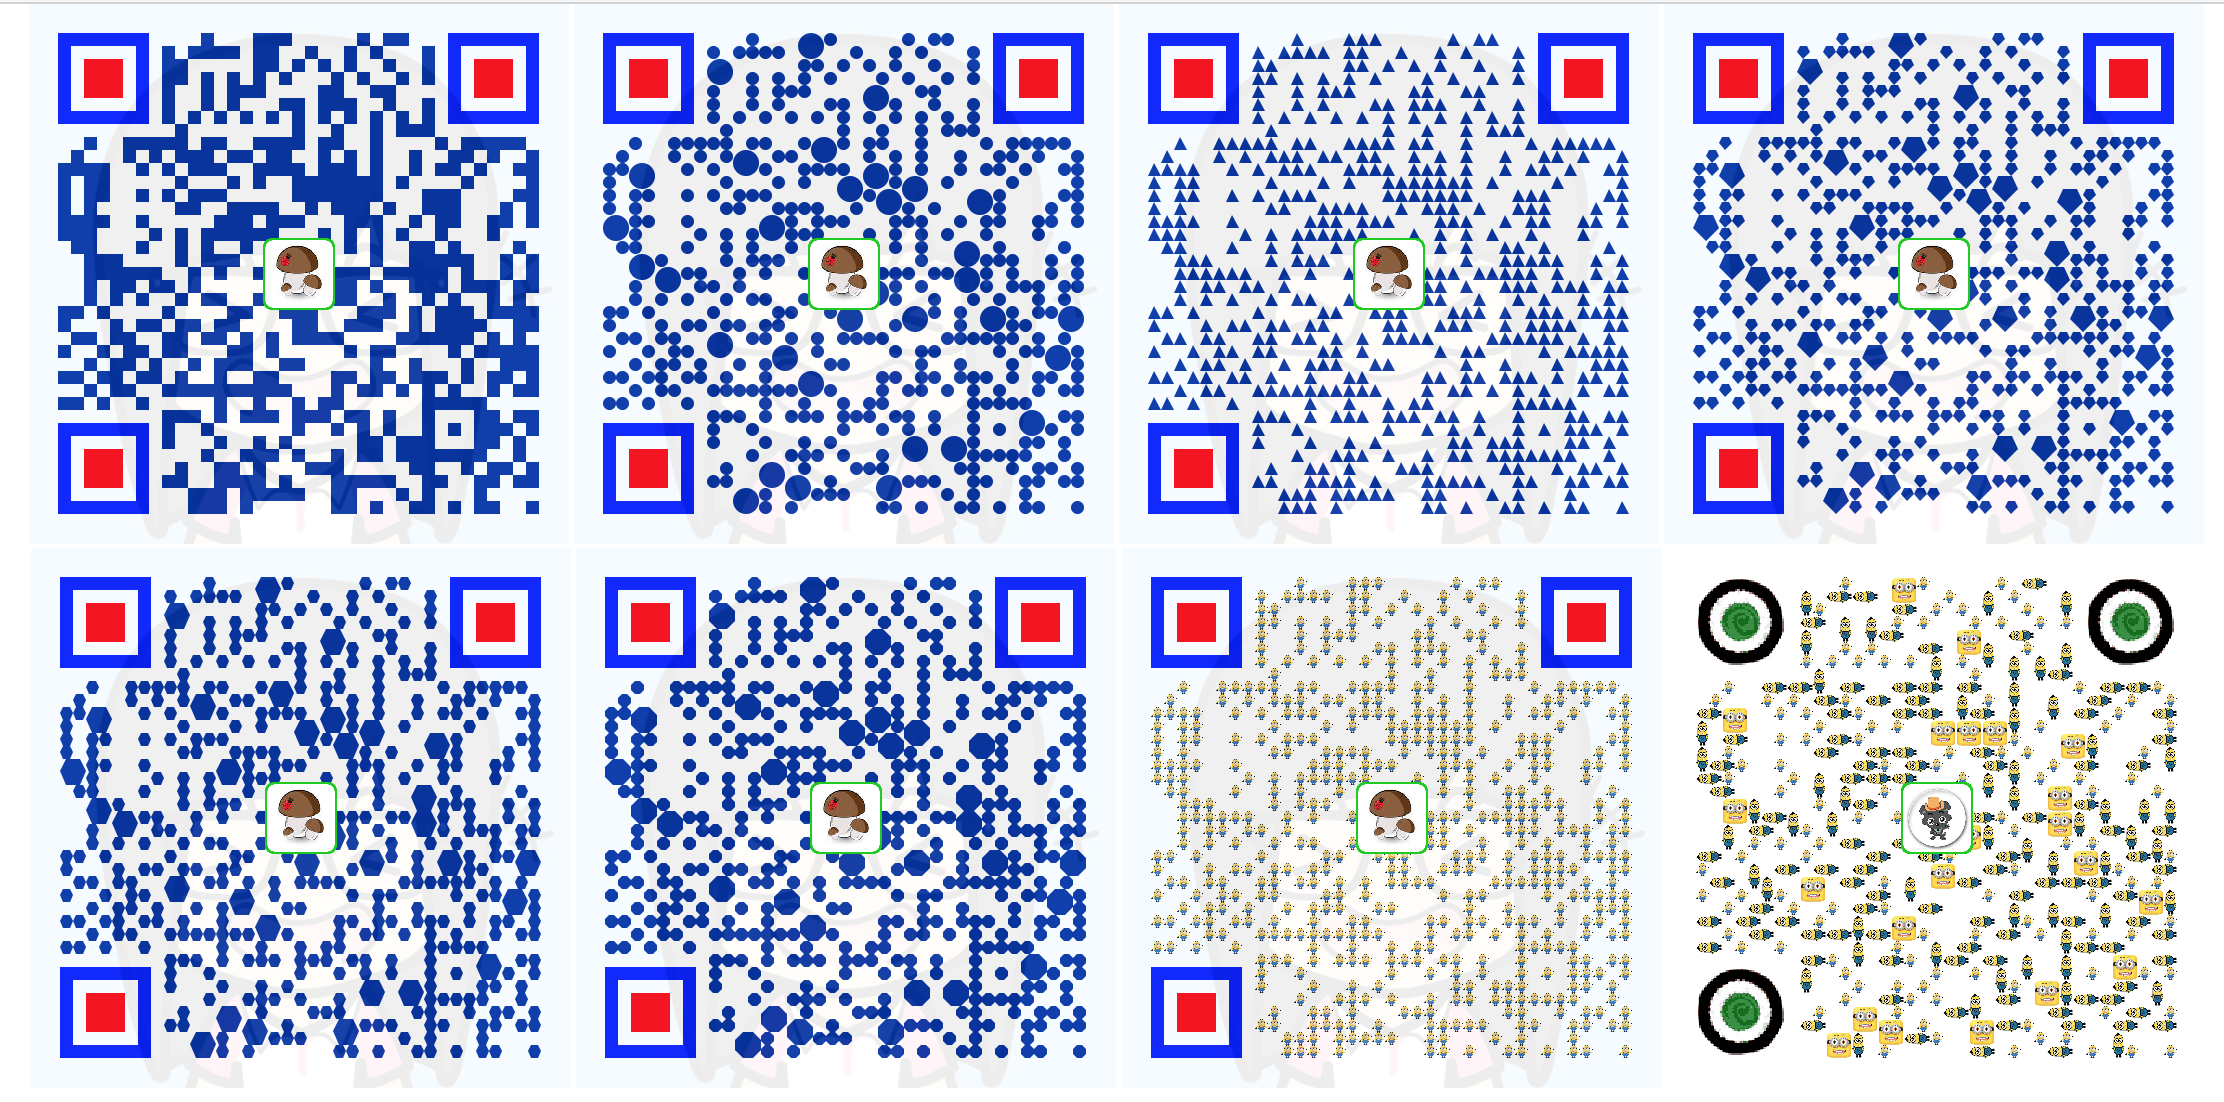
(小灰灰blog公众号,实际测试时,请用微信扫一扫)
3. 前提准备
1.相关博文
在直接进入上面花样的二维码生成之前,有必要安利一把zxing的基本使用方式,本篇将不会对如何使用zxing进行说明,有需求了解的可以参考下面几篇相关博文,此篇博文是 《spring-boot & zxing 搭建二维码服务》 的衍生
- java 实现二维码生成工具类
- zxing 二维码大白边一步一步修复指南
- spring-boot & zxing 搭建二维码服务
- 二维码服务拓展(支持logo,圆角logo,背景图,颜色配置)
2. 源码介绍
此外下面直接贴代码,可能有些地方不太容易理解,下面将简单对一些辅助类进行必要的功能说明
源码直通车:quick-media
涉及到的工具类:
QrCodeUtil: 二维码生成工具类- 生成二维码矩阵
- 根据二维码矩阵渲染二维码图片
ImageUtil: 图片处理工具类- 加载图片(支持从本地,网络获取图片)
- 绘制二维码logo
- 图片圆角化
- 图片添加纯色边框
- 背景绘制
- 二维码绘制
QrCodeOptions: 二维码配置类BitMatrixEx: 二维码矩阵信息扩展类QrCodeGenWrapper: 二维码生成服务包装类,与用户进行交互的主要接口,设置配置信息,生成二维码,选择输出方式,都是通过它来设定
4. 实现说明
第一步,生成矩阵
我们直接利用zxing来生成二维码矩阵信息,并用来实例我们的矩阵拓展类 BitMatrixEx
在我们的工程中,相关的代码为
com.hust.hui.quickmedia.common.util.QrCodeUtil#encode在这里,只关心下面几个参数的生成,其他的基本上就是zxing库的调用了
/*** 实际生成二维码的宽*/
private int width;/*** 实际生成二维码的高*/
private int height;/*** 左白边大小*/
private int leftPadding;/*** 上白边大小*/
private int topPadding;/*** 矩阵信息缩放比例*/
private int multiple;private ByteMatrix byteMatrix;在理解为什么有上面的几个参数之前,有必要看一下byteMatrix到底是个什么东西?(自问自答:二维码矩阵)
下面截出前面二维码中对应的矩阵信息,在生成一张二维码时,下面的1表示一个小黑块,0表示一个小白块;
1 1 1 1 1 1 1 0 0 0 0 1 0 0 0 1 1 1 0 0 0 0 0 1 0 1 1 0 0 0 1 1 1 1 1 1 11 0 0 0 0 0 1 0 1 0 1 1 1 1 0 1 1 0 0 1 0 0 1 0 1 0 0 0 1 0 1 0 0 0 0 0 11 0 1 1 1 0 1 0 1 1 0 0 0 0 0 1 1 0 1 0 1 0 1 0 0 1 0 0 1 0 1 0 1 1 1 0 11 0 1 1 1 0 1 0 1 1 0 1 0 1 0 1 0 1 0 0 0 1 0 1 0 0 1 0 1 0 1 0 1 1 1 0 11 0 1 1 1 0 1 0 1 0 0 1 0 1 1 1 0 0 0 0 1 1 0 0 1 1 0 0 0 0 1 0 1 1 1 0 11 0 0 0 0 0 1 0 1 0 0 1 0 1 0 0 0 1 1 0 1 1 1 0 0 1 0 0 1 0 1 0 0 0 0 0 11 1 1 1 1 1 1 0 1 0 1 0 1 0 1 0 1 0 1 0 1 0 1 0 1 0 1 0 1 0 1 1 1 1 1 1 10 0 0 0 0 0 0 0 0 1 0 0 0 0 0 0 0 0 1 0 0 1 0 0 1 0 1 1 1 0 0 0 0 0 0 0 00 0 1 0 0 1 1 1 1 1 0 1 1 0 0 1 1 1 1 0 1 1 0 0 1 0 0 0 0 1 0 1 1 1 1 1 00 1 0 0 0 1 0 1 0 1 1 1 0 1 1 0 1 1 0 0 1 0 1 0 1 0 0 1 0 0 1 1 0 1 0 0 11 1 1 1 0 0 1 0 1 0 1 1 1 0 0 1 1 1 1 0 1 1 1 0 1 0 0 1 0 1 1 0 1 0 0 1 11 0 1 1 0 0 0 0 0 1 0 0 0 1 0 1 0 0 1 1 1 1 1 1 1 0 1 0 0 0 0 1 0 0 0 0 11 0 1 1 0 0 1 0 1 0 1 1 1 0 0 0 0 0 1 1 1 1 1 1 1 0 0 0 1 1 1 0 0 0 0 1 11 0 1 0 0 0 0 0 0 1 1 0 0 1 1 1 1 0 0 1 0 1 1 1 0 1 0 0 1 1 1 0 0 0 1 0 11 1 1 1 0 0 1 0 0 0 0 0 1 1 1 0 1 1 1 0 0 0 1 1 1 0 0 1 0 1 1 0 0 1 1 0 11 1 1 0 0 0 0 1 0 1 0 1 1 1 1 1 1 0 0 0 1 0 1 0 1 0 1 0 0 1 0 0 0 1 0 0 00 1 1 0 0 0 1 0 0 1 0 1 0 0 1 0 0 0 0 0 0 0 1 0 1 0 0 1 1 0 1 0 0 0 0 1 00 0 1 1 1 0 0 0 0 1 0 1 1 1 0 0 1 0 1 1 1 0 0 0 1 0 0 1 1 1 1 1 0 0 1 0 10 0 1 1 1 1 1 1 0 0 1 0 1 0 0 1 0 0 0 1 1 1 1 1 0 1 1 1 1 1 0 1 0 0 1 0 10 0 1 0 1 1 0 1 1 0 1 0 0 0 0 0 1 0 0 0 1 1 1 0 1 0 0 1 1 1 0 1 1 1 0 1 10 0 1 0 1 0 1 0 0 1 0 1 1 0 0 1 1 0 0 0 1 1 1 0 0 1 0 0 1 0 1 0 0 1 0 1 01 1 0 1 0 0 0 0 1 0 0 0 0 1 1 0 0 1 1 1 0 0 0 1 1 1 0 1 0 1 1 1 0 1 1 1 11 0 0 0 1 0 1 1 0 1 1 0 1 1 0 0 0 0 1 1 0 0 1 1 1 0 0 1 0 1 1 1 1 0 0 1 10 1 1 0 1 1 0 0 1 1 0 1 1 0 1 0 1 0 1 1 1 1 0 0 0 0 1 1 1 1 1 1 0 1 0 1 01 0 0 1 0 1 1 0 1 1 0 0 0 1 1 0 1 0 0 0 0 0 1 0 1 1 0 0 0 0 1 0 1 1 1 1 10 0 1 0 1 1 0 1 0 0 1 0 1 1 1 0 0 1 1 0 0 0 0 0 1 0 0 1 0 0 0 1 0 0 1 1 11 1 0 1 1 0 1 1 0 1 0 0 1 0 0 1 1 0 0 0 0 1 1 0 1 1 0 1 1 1 0 1 0 1 1 0 10 0 1 0 1 1 0 0 1 1 1 1 1 1 1 1 1 1 0 0 0 1 0 1 1 0 1 0 1 0 1 0 0 1 0 1 11 1 0 1 0 0 1 0 0 0 0 0 1 0 0 1 0 0 1 0 1 1 0 0 0 0 0 0 1 1 1 1 1 0 0 0 00 0 0 0 0 0 0 0 1 1 1 0 1 0 1 1 1 0 1 1 1 0 1 1 0 1 0 0 1 0 0 0 1 1 0 1 11 1 1 1 1 1 1 0 1 0 0 1 0 0 0 0 0 0 1 0 0 1 0 1 0 1 0 0 1 0 1 0 1 1 1 0 11 0 0 0 0 0 1 0 1 0 0 0 1 0 0 1 0 1 0 0 0 0 0 1 1 0 1 1 1 0 0 0 1 1 0 1 01 0 1 1 1 0 1 0 0 0 0 1 0 0 1 1 1 0 1 0 0 1 0 1 1 0 1 1 1 1 1 1 1 0 0 1 01 0 1 1 1 0 1 0 0 1 0 0 1 1 0 1 0 0 0 1 1 1 0 0 0 0 0 1 1 0 0 1 0 1 1 0 11 0 1 1 1 0 1 0 1 1 0 0 1 1 1 1 0 1 0 0 0 1 1 1 1 1 0 0 1 1 0 0 1 1 0 1 11 0 0 0 0 0 1 0 0 0 1 1 1 0 1 1 1 1 1 0 0 1 1 0 0 0 1 0 1 0 0 0 1 0 0 0 01 1 1 1 1 1 1 0 0 0 1 1 1 0 1 0 0 0 0 0 0 1 1 0 1 0 0 1 1 0 1 0 1 1 0 0 1当生成了上面的人矩阵之后,最终的二维码绘制都是根据上面的矩阵来的,将1的地方用我们希望绘制的样式(如圆点,三角形,图形等)来替换;
上面的矩阵表示的基本的二维码信息,最终渲染二维码图片时,我们还需要知道最终的图片大小,四周的留白空间,每个二维码信息在放射到最终二维码图片时放大的倍数,有这些参数之后才能唯一指定最终的输出结果,所以就有了上面的几个参数
第二步, 二维码信息的绘制
根据上面的二维码矩阵来渲染二维码图片,先考虑最简单的,没有任何配置时,可以怎么玩?
下面用到的参数来自BitMatirxEx
绘制整个背景(直接根据给定的宽高绘制矩形背景即可)
g2.setColor(Color.WHITE);
g2.fillRect(0, 0, qrCodeWidth, qrCodeHeight);
二维码矩阵中(x,y) == 1的地方绘制小方块
g2.setColor(Color.BLACK); g2.fillRect(x+leftPadding, y+topPadding, multiple, multiple);- 根据2可知,整个渲染就是矩阵(二维数组)的遍历而已
根据上面的生成逻辑,我们可以很清晰的发现,有几个目标是可以很简单实现的
- 二维码背景色&前置色的指定(就是在1,2步骤中的setColor用指定的颜色替换即可)
- 替换二维码黑色小方块为其他图形
这里是一个小关键点了,在具体的实现中,我提供了:
- 三角形,
- 矩形(即二维码默认格式),
- 五边形(钻石),
- 六边形,
- 八边形,
- 圆形,
- 图片
比较遗憾的是五角星没有支持,没想到合适的绘制方式
不同的样式,对应的绘制不同,我们定义了一个枚举,来定义不同的样式对应的绘制规则,优势就是扩展自定义样式方便,下面给出具体的绘制代码
/*** 绘制二维码信息的样式*/
public enum DrawStyle {RECT { // 矩形@Overridepublic void draw(Graphics2D g2d, int x, int y, int w, int h, BufferedImage img) {g2d.fillRect(x, y, w, h);}@Overridepublic boolean expand(ExpandType expandType) {return true;}},CIRCLE {// 圆点@Overridepublic void draw(Graphics2D g2d, int x, int y, int w, int h, BufferedImage img) {g2d.fill(new Ellipse2D.Float(x, y, w, h));}@Overridepublic boolean expand(ExpandType expandType) {return expandType == ExpandType.SIZE4;}},TRIANGLE {// 三角形@Overridepublic void draw(Graphics2D g2d, int x, int y, int w, int h, BufferedImage img) {int px[] = {x, x + (w >> 1), x + w};int py[] = {y + w, y, y + w};g2d.fillPolygon(px, py, 3);}@Overridepublic boolean expand(ExpandType expandType) {return false;}},DIAMOND {// 五边形-钻石@Overridepublic void draw(Graphics2D g2d, int x, int y, int size, int h, BufferedImage img) {int cell4 = size >> 2;int cell2 = size >> 1;int px[] = {x + cell4, x + size - cell4, x + size, x + cell2, x};int py[] = {y, y, y + cell2, y + size, y + cell2};g2d.fillPolygon(px, py, 5);}@Overridepublic boolean expand(ExpandType expandType) {return expandType == ExpandType.SIZE4;}},SEXANGLE {// 六边形@Overridepublic void draw(Graphics2D g2d, int x, int y, int size, int h, BufferedImage img) {int add = size >> 2;int px[] = {x + add, x + size - add, x + size, x + size - add, x + add, x};int py[] = {y, y, y + add + add, y + size, y + size, y + add + add};g2d.fillPolygon(px, py, 6);}@Overridepublic boolean expand(ExpandType expandType) {return expandType == ExpandType.SIZE4;}},OCTAGON {// 八边形@Overridepublic void draw(Graphics2D g2d, int x, int y, int size, int h, BufferedImage img) {int add = size / 3;int px[] = {x + add, x + size - add, x + size, x + size, x + size - add, x + add, x, x};int py[] = {y, y, y + add, y + size - add, y + size, y + size, y + size - add, y + add};g2d.fillPolygon(px, py, 8);}@Overridepublic boolean expand(ExpandType expandType) {return expandType == ExpandType.SIZE4;}},IMAGE {// 自定义图片@Overridepublic void draw(Graphics2D g2d, int x, int y, int w, int h, BufferedImage img) {g2d.drawImage(img, x, y, w, h, null);}@Overridepublic boolean expand(ExpandType expandType) {return true;}},;private static Map<String, DrawStyle> map;static {map = new HashMap<>(7);for (DrawStyle style : DrawStyle.values()) {map.put(style.name(), style);}}public static DrawStyle getDrawStyle(String name) {if (StringUtils.isBlank(name)) { // 默认返回矩形return RECT;}DrawStyle style = map.get(name.toUpperCase());return style == null ? RECT : style;}public abstract void draw(Graphics2D g2d, int x, int y, int w, int h, BufferedImage img);/*** 返回是否支持绘制图形的扩展** @param expandType* @return*/public abstract boolean expand(ExpandType expandType);
}
上面完成了二维码样式的定制,还有一个探测点(或者叫做定位点)的定制,也得在这一步中进行;
普通的二维码结构如下
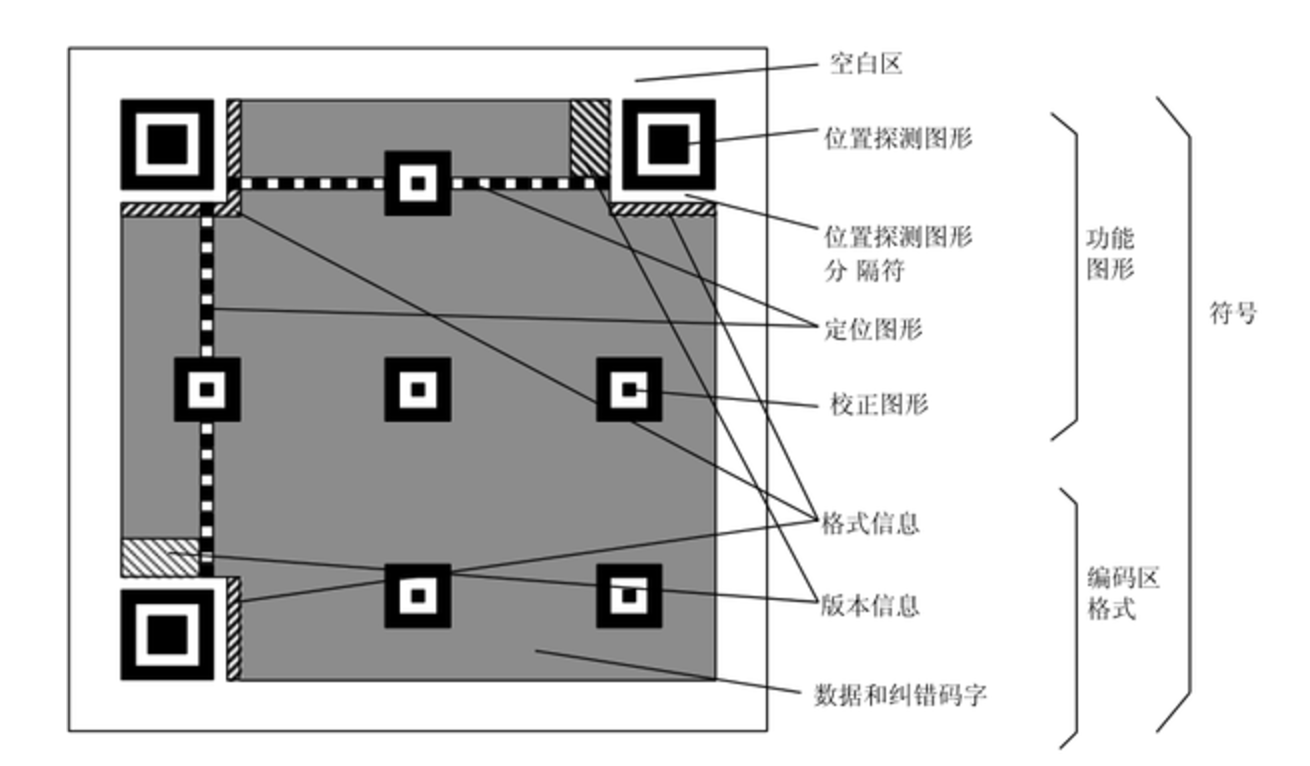
探测点就是二维码中的三个方块,再看上面的二维码矩阵,下图中的两个红框内的其实就是上面的两个探测图形,外面的那层全0是分割符
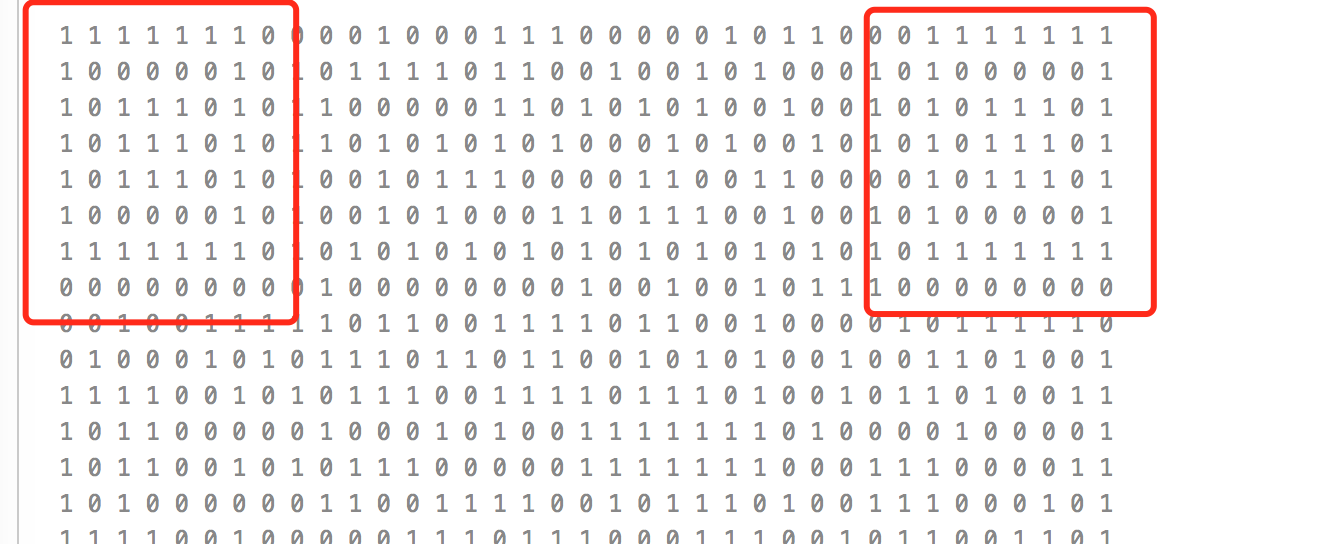
两者一结合,很容易就可以搞定探测图形的位置,第一行有多少个连续的1就表示探测图形的size是多大
所以探测图形的私人定制就比较简单了,下面是具体的绘制代码(下面实现图片绘制,内外框采用不同颜色的实现)
// 设置三个位置探测图形
if (x < detectCornerSize && y < detectCornerSize // 左上角|| (x < detectCornerSize && y >= byteH - detectCornerSize) // 左下脚|| (x >= byteW - detectCornerSize && y < detectCornerSize)) { // 右上角if (qrCodeConfig.getDetectOptions().getDetectImg() != null) {// 绘制图片g2.drawImage(qrCodeConfig.getDetectOptions().getDetectImg(),leftPadding + x * infoSize, topPadding + y * infoSize,infoSize * detectCornerSize, infoSize * detectCornerSize, null);for (int addX = 0; addX < detectCornerSize; addX++) {for (int addY = 0; addY < detectCornerSize; addY++) {bitMatrix.getByteMatrix().set(x + addX, y + addY, 0);}}continue;}if (x == 0 || x == detectCornerSize - 1 || x == byteW - 1 || x == byteW - detectCornerSize|| y == 0 || y == detectCornerSize - 1 || y == byteH - 1 || y == byteH - detectCornerSize) {// 外层的框g2.setColor(detectOutColor);} else {// 内层的框g2.setColor(detectInnerColor);}g2.fillRect(leftPadding + x * infoSize, topPadding + y * infoSize, infoSize, infoSize);
}
到此,二维码主体的定制基本上over了,就最终的实现来看,我们的目标中除了logo和背景外,其他的基本上都是ok的,这里稍稍拓展了一点,如果连续两个为1,或一个小矩形全是1,则将这相同的几个串在一起,因此才有了上面的部分图形较大的情况(当然这个是可选的配置)
下面贴出整个绘制代码
public static BufferedImage drawQrInfo(QrCodeOptions qrCodeConfig, BitMatrixEx bitMatrix) {int qrCodeWidth = bitMatrix.getWidth();int qrCodeHeight = bitMatrix.getHeight();int infoSize = bitMatrix.getMultiple();BufferedImage qrCode = new BufferedImage(qrCodeWidth, qrCodeHeight, BufferedImage.TYPE_INT_RGB);// 绘制的背景色Color bgColor = qrCodeConfig.getDrawOptions().getBgColor();// 绘制前置色Color preColor = qrCodeConfig.getDrawOptions().getPreColor();// 探测图形外圈的颜色Color detectOutColor = qrCodeConfig.getDetectOptions().getOutColor();// 探测图形内圈的颜色Color detectInnerColor = qrCodeConfig.getDetectOptions().getInColor();int leftPadding = bitMatrix.getLeftPadding();int topPadding = bitMatrix.getTopPadding();Graphics2D g2 = qrCode.createGraphics();g2.setComposite(AlphaComposite.Src);g2.setRenderingHint(RenderingHints.KEY_ANTIALIASING, RenderingHints.VALUE_ANTIALIAS_ON);// 直接背景铺满整个图g2.setColor(bgColor);g2.fillRect(0, 0, qrCodeWidth, qrCodeHeight);// 探测图形的大小int detectCornerSize = bitMatrix.getByteMatrix().get(0, 5) == 1 ? 7 : 5;int byteW = bitMatrix.getByteMatrix().getWidth();int byteH = bitMatrix.getByteMatrix().getHeight();boolean row2 = false;boolean col2 = false;QrCodeOptions.DrawStyle drawStyle = qrCodeConfig.getDrawOptions().getDrawStyle();for (int x = 0; x < byteW; x++) {for (int y = 0; y < byteH; y++) {if (bitMatrix.getByteMatrix().get(x, y) == 0) {continue;}// 设置三个位置探测图形if (x < detectCornerSize && y < detectCornerSize // 左上角|| (x < detectCornerSize && y >= byteH - detectCornerSize) // 左下脚|| (x >= byteW - detectCornerSize && y < detectCornerSize)) { // 右上角if (qrCodeConfig.getDetectOptions().getDetectImg() != null) {g2.drawImage(qrCodeConfig.getDetectOptions().getDetectImg(),leftPadding + x * infoSize, topPadding + y * infoSize,infoSize * detectCornerSize, infoSize * detectCornerSize, null);for (int addX = 0; addX < detectCornerSize; addX++) {for (int addY = 0; addY < detectCornerSize; addY++) {bitMatrix.getByteMatrix().set(x + addX, y + addY, 0);}}continue;}if (x == 0 || x == detectCornerSize - 1 || x == byteW - 1 || x == byteW - detectCornerSize|| y == 0 || y == detectCornerSize - 1 || y == byteH - 1 || y == byteH - detectCornerSize) {// 外层的框g2.setColor(detectOutColor);} else {// 内层的框g2.setColor(detectInnerColor);}g2.fillRect(leftPadding + x * infoSize, topPadding + y * infoSize, infoSize, infoSize);} else { // 着色二维码主题g2.setColor(preColor);if (!qrCodeConfig.getDrawOptions().isEnableScale()) {drawStyle.draw(g2,leftPadding + x * infoSize,topPadding + y * infoSize,infoSize,infoSize,qrCodeConfig.getDrawOptions().getImg());continue;}// 支持拓展时row2 = rightTrue(bitMatrix.getByteMatrix(), x, y);col2 = belowTrue(bitMatrix.getByteMatrix(), x, y);if (row2 && col2 && diagonalTrue(bitMatrix.getByteMatrix(), x, y) &&qrCodeConfig.getDrawOptions().enableScale(QrCodeOptions.ExpandType.SIZE4)) {// 四个相等bitMatrix.getByteMatrix().set(x + 1, y, 0);bitMatrix.getByteMatrix().set(x + 1, y + 1, 0);bitMatrix.getByteMatrix().set(x, y + 1, 0);drawStyle.draw(g2,leftPadding + x * infoSize,topPadding + y * infoSize,infoSize << 1,infoSize << 1,qrCodeConfig.getDrawOptions().getSize4Img());} else if (row2 && qrCodeConfig.getDrawOptions().enableScale(QrCodeOptions.ExpandType.ROW2)) { // 横向相同bitMatrix.getByteMatrix().set(x + 1, y, 0);drawStyle.draw(g2,leftPadding + x * infoSize,topPadding + y * infoSize,infoSize << 1,infoSize,qrCodeConfig.getDrawOptions().getRow2Img());} else if (col2 && qrCodeConfig.getDrawOptions().enableScale(QrCodeOptions.ExpandType.COL2)) { // 列的两个bitMatrix.getByteMatrix().set(x, y + 1, 0);drawStyle.draw(g2,leftPadding + x * infoSize,topPadding + y * infoSize,infoSize,infoSize << 1,qrCodeConfig.getDrawOptions().getCol2img());} else {drawStyle.draw(g2,leftPadding + x * infoSize,topPadding + y * infoSize,infoSize,infoSize,qrCodeConfig.getDrawOptions().getImg());}}}}g2.dispose();return qrCode;
}private static boolean rightTrue(ByteMatrix byteMatrix, int x, int y) {return x + 1 < byteMatrix.getWidth() && byteMatrix.get(x + 1, y) == 1;
}private static boolean belowTrue(ByteMatrix byteMatrix, int x, int y) {return y + 1 < byteMatrix.getHeight() && byteMatrix.get(x, y + 1) == 1;
}// 对角是否相等
private static boolean diagonalTrue(ByteMatrix byteMatrix, int x, int y) {return byteMatrix.get(x + 1, y + 1) == 1;
}
第三步. logo&背景的绘制
到第二步,其实二维码就已经绘制完成了,二维码和背景都是在二维码这种图片上做文章,一个是往二维码上加图片,一个是将二维码绘制在另一张图片上
一个图片在另一个图片上绘制没啥技术含量,稍微特别点的就是logo的圆角和边框了
《二维码服务拓展(支持logo,圆角logo,背景图,颜色配置)》 较清晰的说了如何绘制圆角图片,圆角边框
不想看上面博文的没啥关系,下面直接贴出代码,算是比较通用的方法了,与二维码项目本身没什么黏合
/*** 生成边框** @param image        原图* @param cornerRadius 角度 0表示直角* @param color        边框颜色* @return*/
public static BufferedImage makeRoundBorder(BufferedImage image,int cornerRadius,Color color) {int size = image.getWidth() / 15;int w = image.getWidth() + size;int h = image.getHeight() + size;BufferedImage output = new BufferedImage(w, h, BufferedImage.TYPE_INT_ARGB);Graphics2D g2 = output.createGraphics();g2.setComposite(AlphaComposite.Src);g2.setRenderingHint(RenderingHints.KEY_ANTIALIASING, RenderingHints.VALUE_ANTIALIAS_ON);g2.setColor(color == null ? Color.WHITE : color);g2.fill(new RoundRectangle2D.Float(0, 0, w, h, cornerRadius, cornerRadius));g2.setComposite(AlphaComposite.getInstance(AlphaComposite.SRC_ATOP, 1.0f));g2.drawImage(image, size >> 1, size >> 1, null);g2.dispose();return output;
}/*** 生成圆角图片** @param image        原始图片* @param cornerRadius 圆角的弧度大小(根据实测效果,一般建议为图片宽度的1/4), 0表示直角* @return 返回圆角图*/
public static BufferedImage makeRoundedCorner(BufferedImage image,int cornerRadius) {int w = image.getWidth();int h = image.getHeight();BufferedImage output = new BufferedImage(w, h,BufferedImage.TYPE_INT_ARGB);Graphics2D g2 = output.createGraphics();g2.setComposite(AlphaComposite.Src);g2.setRenderingHint(RenderingHints.KEY_ANTIALIASING,RenderingHints.VALUE_ANTIALIAS_ON);g2.setColor(Color.WHITE);g2.fill(new RoundRectangle2D.Float(0, 0, w, h, cornerRadius,cornerRadius));g2.setComposite(AlphaComposite.SrcAtop);g2.drawImage(image, 0, 0, null);g2.dispose();return output;
}
与上一篇定制博文有一点区别的是,对背景图的支持进行了扩展,除了支持之前的设置二维码透明度,全覆盖背景图之外,又支持了在背景图的指定位置处进行绘制二维码,因为这一块确实没什么好讲的,干脆贴下代码好了
/*** 绘制背景图** @param source       二维码图* @param bgImgOptions 背景图信息* @return*/
public static BufferedImage drawBackground(BufferedImage source, QrCodeOptions.BgImgOptions bgImgOptions) {int sW = source.getWidth();int sH = source.getHeight();// 背景的图宽高不应该小于原图int bgW = bgImgOptions.getBgW() < sW ? sW : bgImgOptions.getBgW();int bgH = bgImgOptions.getBgH() < sH ? sH : bgImgOptions.getBgH();// 背景图缩放BufferedImage bg = bgImgOptions.getBgImg();if (bg.getWidth() != bgW || bg.getHeight() != bgH) {BufferedImage temp = new BufferedImage(bgW, bgH, BufferedImage.TYPE_INT_ARGB);temp.getGraphics().drawImage(bg.getScaledInstance(bgW, bgH, Image.SCALE_SMOOTH), 0, 0, null);bg = temp;}Graphics2D g2d = bg.createGraphics();if (bgImgOptions.getBgImgStyle() == QrCodeOptions.BgImgStyle.FILL) {// 选择一块区域进行填充g2d.setComposite(AlphaComposite.getInstance(AlphaComposite.SRC_ATOP, 1.0f));g2d.setRenderingHint(RenderingHints.KEY_ANTIALIASING, RenderingHints.VALUE_ANTIALIAS_ON);g2d.drawImage(source, bgImgOptions.getStartX(), bgImgOptions.getStartY(), sW, sH, null);} else {// 覆盖方式int x = (bgW - sW) >> 1;int y = (bgH - sH) >> 1;g2d.setComposite(AlphaComposite.getInstance(AlphaComposite.SRC_ATOP, bgImgOptions.getOpacity())); // 透明度, 避免看不到背景g2d.setRenderingHint(RenderingHints.KEY_ANTIALIASING, RenderingHints.VALUE_ANTIALIAS_ON);g2d.drawImage(source, x, y, sW, sH, null);g2d.setComposite(AlphaComposite.getInstance(AlphaComposite.SRC_ATOP, 1.0f));}g2d.dispose();bg.flush();return bg;
}
测试
开发完了之后,就要开始愉快的进行测试了,测试一个全乎的
@Test
public void testGenStyleCodeV2() {String msg = "http://weixin.qq.com/r/FS9waAPEg178rUcL93oH";try {String logo = "logo.jpg";String bg = "qrbg.jpg";BufferedImage img = QrCodeGenWrapper.of(msg).setW(550).setDrawPreColor(0xff002fa7) // 宝石蓝.setDetectOutColor(0xff0000ff).setDetectInColor(Color.RED).setDetectImg("detect.png").setPadding(1).setErrorCorrection(ErrorCorrectionLevel.H).setLogo(logo).setLogoStyle(QrCodeOptions.LogoStyle.ROUND).setLogoBgColor(0xff00cc00).setLogoRate(15).setDrawStyle(QrCodeOptions.DrawStyle.IMAGE.name()).setDrawEnableScale(true).setDrawImg("xhrBase.jpg").setDrawRow2Img("xhrr2.jpeg").setDrawCol2Img("xhrc2.jpeg").setDrawSize4Img("xhrSize4.jpg").setBgStyle(QrCodeOptions.BgImgStyle.FILL).setBgImg(bg).setBgStartX(230).setBgStartY(330).asBufferedImage();ByteArrayOutputStream outputStream = new ByteArrayOutputStream();ImageIO.write(img, "png", outputStream);String img64 = Base64Util.encode(outputStream);System.out.println("<img src=\"data:image/png;base64," + img64 + "\" />");} catch (Exception e) {System.out.println("create qrcode error! e: " + e);Assert.assertTrue(false);}
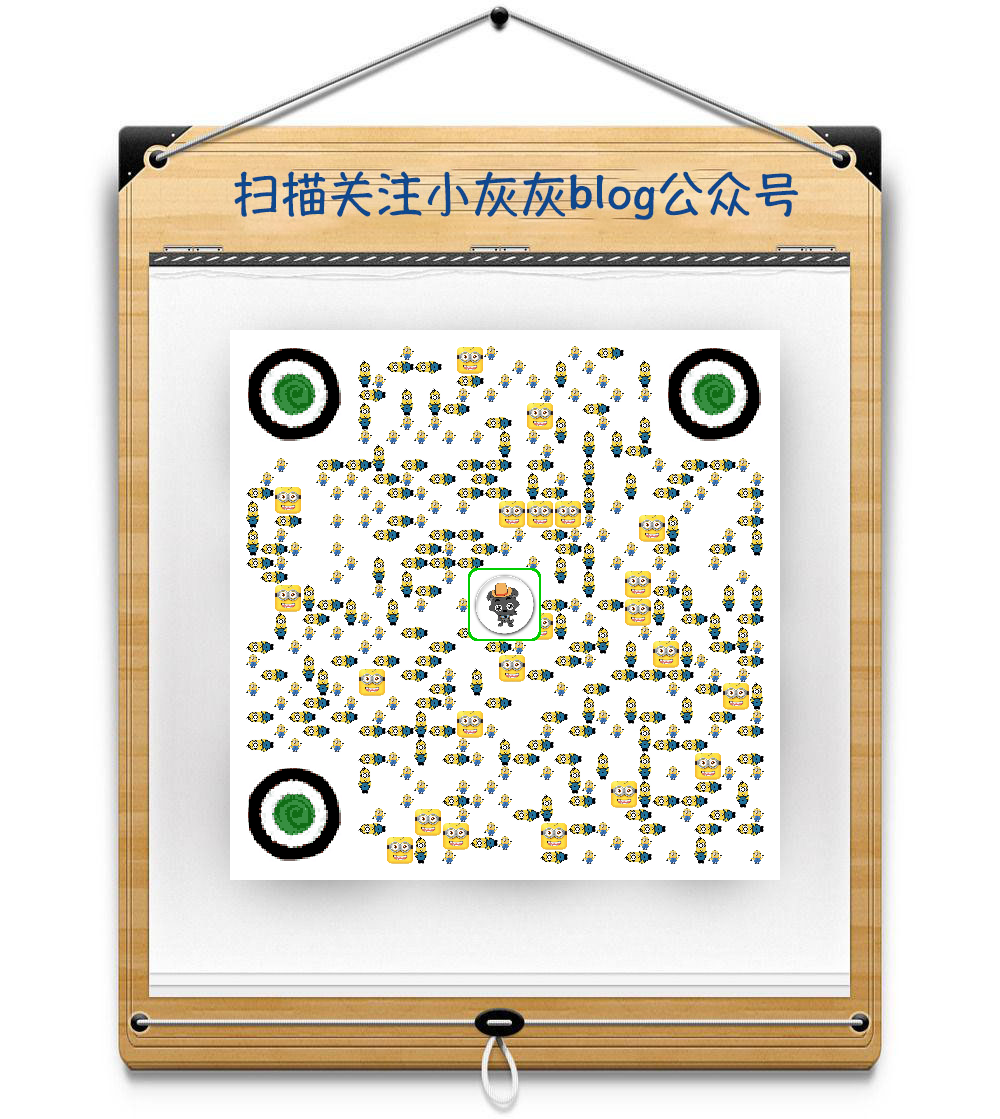
}演示case:

一个最终定格的二维码
说明
上面的改造,在实际使用时,建议多测试测试是否可以扫描出来,腾讯系列产品的二维码扫描特别给力,一般都能很迅速的识别,其他的就不好说了
其他
相关博文
- java 实现二维码生成工具类
- zxing 二维码大白边一步一步修复指南
- spring-boot & zxing 搭建二维码服务
- 二维码服务拓展(支持logo,圆角logo,背景图,颜色配置)
项目地址: https://github.com/liuyueyi/quick-media
个人博客:一灰的个人博客
公众号获取更多:
参考
- 二维码基础原理
zxing 二维码生成深度定制相关推荐
- 谷歌zxing 二维码生成工具
一.加入maven依赖 <!-- 谷歌zxing 二维码 --> <dependency><groupId>com.google.zxing</groupId ...
- zxing二维码生成工具类
图片生成工具生成 1.支持多中形式的图片,二维码,条形码 2.支持一张图片多个二维码 3.支持二维码图片上加logo 4.支持图片头部底部添加文字描述 public class ZxingEncode ...
- Marco's Java【小工具篇 之 Google Zxing 二维码生成】
前言 二维码相信大家一定不陌生啦,去菜市场买菜,路边摊买个小吃都可以扫一扫,近几年来中国的二维码技术的普及也是大家有目共睹的,而二维码在其他国家虽然有用到,但极少,更没有说全国普及. 二维码又称二维条 ...
- android Zxing二维码生成带Logo
生成二维码效果: 1:导入zxing依赖 implementation 'com.google.zxing:core:3.3.0' 2: 导入一个工具类,直接复制就可以注意包名 package com ...
- C#(Zxing)二维码生成 并去除白边
引入包 1.通过NuGet引入ZXing.Net 2.生成二维码并保存 public string ErWeMaPrint(string name)//内容{// 配置参数============== ...
- 聊聊 Web 项目二维码生成的最佳姿势
在设计和实现的过程之后,你永远不知道部署上去的程序会已什么样的姿势运行. 本篇借一次生成二维码逻辑的不同实现,阐述 Web 项目中二维码生成的正确姿势. 文中如有批量,欢迎各位看客老爷拍砖.试运行前5 ...
- Android 二维码 生成和识别(附Demo源码)
Posted on 2013-08-25 23:15 泡泡糖 阅读( 20424) 评论( 7) 编辑 收藏 今天讲一下目前移动领域很常用的技术--二维码.现在大街小巷.各大网站都有二维码的踪迹,不管 ...
- Android用Zxing扫二维码/生成二维码功能
新年已过,一切恢复真正常,新的一年给自己几句指引: 光努力还不行,方向很重要. 总是想着最坏的结果,就会让人失去改变的勇气. 你当然有权利选择自己的人生--但只有在你真正强大后,逆行的阻力才会降到最小 ...
- 舒工深度解析不规则场地座位二维码生成规则
<!DOCTYPE html> <html lang="en"> <head><meta charset="UTF-8" ...
最新文章
- openjudge-NOI 2.6基本算法之动态规划 专题题解目录
- 元宇宙中可跨语种交流,Meta 发布新语音模型,支持128种语言无障碍对话
- atm java代码_用JAVA制作简单的ATM的代码 求教
- java default locale_Java JSON.defaultLocale方法代码示例
- 【计算机视觉】背景建模之PBAS
- HTML Input 属性
- PHP怎么读写XML?(四种方法)
- MySQL主从复制(Master-Slave)与读写分离(MySQL-Proxy)实践
- AssetBundle系列——共享资源打包/依赖资源打包
- python中name没有定义_python中__name__的使用
- canvas js 绘图插件_快速入门前端图表插件Echart
- 这是人类高手输给AI的第一场辩论赛
- shell脚本批量导出MYSQL数据库日志/按照最近N天的形式导出二进制日志[连载之构建百万访问量电子商务网站]...
- php 获取来源域名方法,PHP获取域名方法
- Memcached在Windows7上的安装问题
- intel服务器无线网卡,英特尔网卡: Intel无线网卡Win7驱动 12.4.1.53版发布
- 12帧跑步动画分解图_跑步动画原理讲解
- Dart语言之旅(完全翻译版)
- Python 使用pyinstaller打包exe文件报错: TypeError: an integer is required (got type bytes) 的解决方法
- 通知:首届CISM大赛华东赛区决赛将于30日在马鞍山举行