css 颤动_颤动-微光效果
css 颤动
When launching apps, we usually see a loading view while the app is fetching the data from the local database or the server. It is quite easy to implement a loading indicator with Flutter, just use ProgressIndicator.
启动应用程序时,我们通常会在应用程序从本地数据库或服务器中获取数据时看到加载视图。 用Flutter实现加载指示器非常容易,只需使用ProgressIndicator 。


Or maybe you can customize your loading view.
或者,也许您可以自定义您的加载视图。

And here comes another way to present this kind of loading concepts to users — Shimmer. Shimmer is a little harder to achieve than other approaches because it requires all the widgets to animate simultaneously and also keep their shapes to let users know what will the final view look like. It is much different from the single loading widget. But it is definitely worth doing this since it lets users easier to understand what is going to happen after the loading animation by keeping all the widgets in the same positions with the same sizes and shapes, that enhance the user experience.
这是向用户展示这种加载概念的另一种方法Shimmer 。 Shimmer比其他方法更难实现,因为它要求所有小部件同时进行动画处理,并保持其形状以使用户知道最终视图的外观。 它与单个加载小部件有很大不同。 但是这样做绝对值得,因为它可以通过将所有小部件以相同的大小和形状放置在相同的位置,从而使用户更容易理解加载动画之后将要发生的情况,从而增强用户体验。
So today we are going to talk about how to make a Shimmer and also learn the theory behind it. Let’s get started!
因此,今天我们将讨论如何制作Shimmer ,并学习其背后的理论。 让我们开始吧!
目录 (Table of Contents)
How to make the
Shimmereffect in Flutter?如何在Flutter中产生
Shimmer效果?- How does it work?它是如何工作的?
如何在Flutter中产生Shimmer效果? (How to make the Shimmer effect in Flutter?)
There are some Shimmer libraries already on pub.dev, here we take the highest score library for example:
pub.dev上已经有一些Shimmer库,这里我们以得分最高的库为例:
首先,按照安装步骤 (First, follow the installing steps)
Add this to your package’s
pubspec.yamlfile:将此添加到包的
pubspec.yaml文件中:
dependencies: shimmer: ^1.1.12. Install packages from the command line with Flutter:
2.使用Flutter从命令行安装软件包:
$ flutter pub get3. Now in your Dart code, you can use:
3.现在,在Dart代码中,您可以使用:
import 'package:shimmer/shimmer.dart';在您的代码中实现 (Implement it in your code)
It’s quite easy to use. Just need to wrap your loading widget into Shimmer.
它很容易使用。 只需将您的加载小部件包装到Shimmer 。
class MyApp extends StatelessWidget {@overrideWidget build(BuildContext context) => MaterialApp(title: 'Flutter Demo',theme: ThemeData(primarySwatch: Colors.blue),home: Scaffold(body: SafeArea(child: SingleChildScrollView(child: Shimmer.fromColors( // Wrap your widget into Shimmer.baseColor: Colors.grey[200],highlightColor: Colors.grey[350],child: FacebookPostWidget('This is a title','This is a content, This is a content','https://r-cf.bstatic.com/images/hotel/max1024x768/116/116281457.jpg',backgroundColor: Colors.white,),),),),),);
}class FacebookPostWidget extends StatelessWidget {FacebookPostWidget(this.title, this.content, this.imageUrl, {this.backgroundColor});final String title;final String content;final String imageUrl;final Color backgroundColor;@overrideWidget build(BuildContext context) => Column(children: [Align(alignment: Alignment.topLeft,child: Text(title, style: TextStyle(backgroundColor: backgroundColor, fontSize: 30)),),SizedBox(height: 8),Align(alignment: Alignment.topLeft,child: Text(content, style: TextStyle(backgroundColor: backgroundColor, fontSize: 20)),),SizedBox(height: 8),Image.network(imageUrl, width: double.infinity, height: 200, color: backgroundColor, fit: BoxFit.fitWidth),SizedBox(height: 8),],);
}
它是如何工作的? (How does it work?)
So, how do we make this kind of amazing animation? We need to extend SingleChildRenderObjectWidget and create our customized RenderProxyBox in the createRenderObject() method and update its layout in updateRenderObject(). The key point is creating a ShaderMaskLayout and mask the widget layout with it.
那么,我们如何制作这种惊人的动画呢? 我们需要扩展SingleChildRenderObjectWidget并在createRenderObject()方法中创建自定义的RenderProxyBox ,并在updateRenderObject()更新其布局。 关键是创建一个ShaderMaskLayout并用它掩盖小部件的布局。
A composited layer that applies a shader to its children.
将着色器应用于其子级的复合层。
The shader is only applied inside the given maskRect. The shader itself uses the top left of the maskRect as its origin.
着色器仅应用于给定的maskRect内部。 着色器本身使用maskRect的左上角作为其原点。
The maskRect does not affect the positions of any child layers.
maskRect不会影响任何子图层的位置。
Here are three things we need to do:
这是我们需要做的三件事:
Define the
Gradientto render a color gradient.定义
Gradient以渲染颜色渐变。Define the
maskRectto make a shimmer animation from left to right.定义
maskRect以maskRect制作微光动画。- Make the shimmer only affect the overlapping parts.使微光只影响重叠部分。
定义Gradient以渲染颜色渐变。 (Define the Gradient to render a color gradient.)
There are many kinds of Gradient we can use, LinearGradient, RadialGradient, SweepGradient, etc. In this case, LinearGraent seems the best choice to meet our expectations. We can make an effect like this:
有多种Gradient我们可以使用, LinearGradient , RadialGradient , SweepGradient等。在这种情况下, LinearGraent似乎是最好的选择,以满足我们的期望。 我们可以产生如下效果:
gradient = LinearGradient( begin: Alignment.topLeft, end: Alignment.centerRight, colors: [baseColor, baseColor, highlightColor, baseColor, baseColor], stops: const [0.0, 0.35, 0.5, 0.65, 1.0],);This is what it looks like before we adjust the mask layout’s size or position.
这是我们调整蒙版布局的大小或位置之前的样子。

定义maskRect以maskRect制作微光动画。 (Define the maskRect to make a shimmer animation from left to right.)
As the official docs mentioned, we can define the position of ShaderMaskLayout by offering the maskRect.
如官方文档所述,我们可以通过提供maskRect来定义ShaderMaskLayout的位置。

The concept is like the image above. We shift the mask layout from left to right. When the mask layout overlaps the widget, it does a shimmer effect on it. As the pseudo-code shows below, we define the mask layout as bigger as the widget. And also we create a AnimationController to offer the percentage of current dx to keep updating the mask layout position.
这个概念就像上面的图片。 我们将遮罩布局从左向右移动。 当蒙版布局与小部件重叠时,它将对它产生闪烁效果。 如下所示的伪代码所示,我们将掩码布局定义为与小部件一样大。 并且我们还创建了AnimationController来提供当前dx的百分比,以不断更新蒙版布局位置。
class _ShimmerState extends State<Shimmer> with TickerProviderStateMixin {// An animation controller to shift the mask layoutAnimationController _controller;@overridevoid initState() {super.initState();_controller = AnimationController(vsync: this, duration: widget.duration)..addListener(() {setState(() {});})..repeat();}...@overrideWidget build(BuildContext context) => buildShimmer(percent: _controller.value);
}class _ShimmerFilter extends RenderProxyBox {_ShimmerFilter(this._gradient);final Gradient _gradient;double _shiftPercentage = 0.0;// Keep updating this value to shift the mask layout.set shiftPercentage(double newValue) {if (_shiftPercentage != newValue) {_shiftPercentage = newValue;markNeedsPaint();}}...@overridevoid paint(PaintingContext context, Offset offset) {if (child != null) {assert(needsCompositing);final width = child.size.width;final height = child.size.height;// Calculate the `dx` offset of mask layout.// dx from `-width` to `width`.double dx = _offset(-width, width, _shiftPercentage);double dy = 0.0;// Define the mask layout size and position.// Here is the same as widget.final rect = Rect.fromLTWH(dx, dy, width, height);layer ??= ShaderMaskLayer();layer..shader = _gradient.createShader(rect)..maskRect = offset & size..blendMode = BlendMode.srcOver;context.pushLayer(layer, super.paint, offset);}}// Calculate the `dx` offset of mask layout with `shiftPercentage`, which offers by the `AnimationController`.double _offset(double start, double end, double shiftPercentage) => start + (end - start) * shiftPercentage;
}
Here is what it looks like:
看起来是这样的:

使微光只影响重叠部分。 (Make the shimmer only affect the overlapping parts.)
So we already got a gradient and we also made it animate from left to right. The final question is how to make the shimmer only affect the overlapping between mask layout and widget to allow the user to see the widgets’ shape.
因此,我们已经有了一个渐变,并且还从左到右对其进行了动画处理。 最后一个问题是如何使闪光仅影响蒙版布局和小部件之间的重叠,以使用户能够看到小部件的形状。
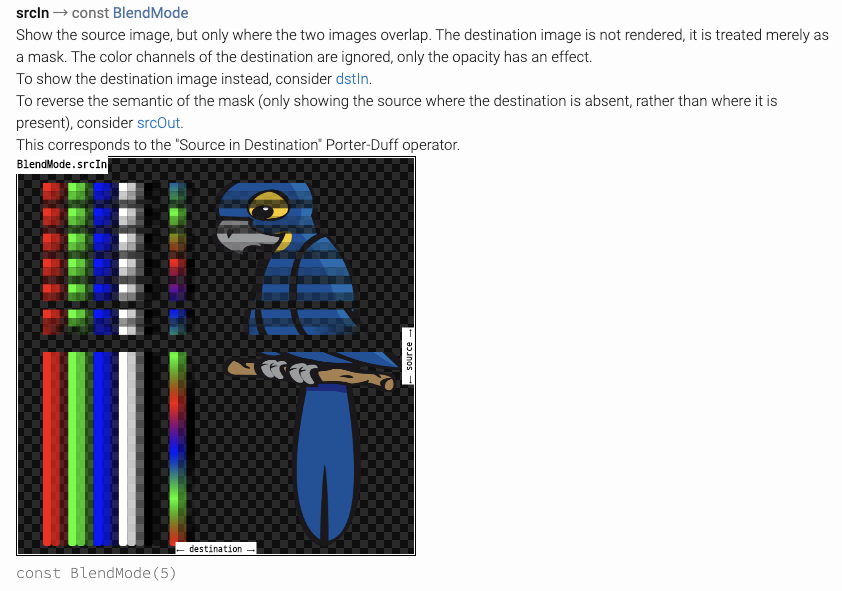
Luckily, BlendMode comes to save our lives. This is an enum class that defines the algorithm for blending the pixels. You can change use this enum to make lots of impressive effects.
幸运的是, BlendMode拯救了我们的生命。 这是一个枚举类,定义了混合像素的算法。 您可以更改使用此枚举来产生很多令人印象深刻的效果。
When drawing a shape or image onto a canvas, different algorithms can be used to blend the pixels. The different values of BlendMode specify different such algorithms.
在画布上绘制形状或图像时,可以使用不同的算法来混合像素。 BlendMode的不同值指定了不同的此类算法。
After going through all the enums, ScrIn seems like what we want. It allows the shine effect only on the overlapping part with the widget.
经过所有枚举后, ScrIn看起来像我们想要的。 它仅允许在与小部件重叠的部分上发光效果。
@overridevoid paint(PaintingContext context, Offset offset) { ... layer ??= ShaderMaskLayer(); layer ..shader = _gradient.createShader(rect) ..maskRect = offset & size ..blendMode = BlendMode.srcIn; // Add the blendMode here context.pushLayer(layer, super.paint, offset); }}
最终代码 (The final code)
Basically the code is pretty much like the Shimmer library, I only modify some parameter values. You can fine-tune the value like gradient, shader layout size and position, duration by yourself to meet what you want.
基本上,代码非常类似于Shimmer库,我只修改一些参数值。 您可以自己调整诸如渐变,着色器布局大小和位置,持续时间之类的值,以满足您的需要。
import 'package:flutter/material.dart';
import 'package:flutter/rendering.dart';class Shimmer extends StatefulWidget {Shimmer({@required this.child,@required Color baseColor,@required Color highlightColor,this.duration = const Duration(milliseconds: 1500),}) : gradient = LinearGradient(begin: Alignment.topLeft,end: Alignment.centerRight,colors: [baseColor, baseColor, highlightColor, baseColor, baseColor],stops: const [0.0, 0.2, 0.5, 0.8, 1.0],);final Widget child;final Duration duration;final Gradient gradient;@override_ShimmerState createState() => _ShimmerState();
}class _ShimmerState extends State<Shimmer> with TickerProviderStateMixin {AnimationController _controller;@overridevoid initState() {super.initState();_controller = AnimationController(vsync: this, duration: widget.duration)..addListener(() {setState(() {});})..repeat();}@overridevoid dispose() {_controller.dispose();super.dispose();}@overrideWidget build(BuildContext context) => _Shimmer(child: widget.child,gradient: widget.gradient,percent: _controller.value,);
}class _Shimmer extends SingleChildRenderObjectWidget {_Shimmer({Widget child, this.gradient, this.percent}) : super(child: child);final Gradient gradient;final double percent;@overrideRenderObject createRenderObject(BuildContext context) => _ShimmerFilter(gradient);@overridevoid updateRenderObject(BuildContext context, RenderObject renderObject) {super.updateRenderObject(context, renderObject);(renderObject as _ShimmerFilter).shiftPercentage = percent;}
}class _ShimmerFilter extends RenderProxyBox {_ShimmerFilter(this._gradient);final Gradient _gradient;double _shiftPercentage = 0.0;set shiftPercentage(double newValue) {if (_shiftPercentage != newValue) {_shiftPercentage = newValue;markNeedsPaint();}}@overrideShaderMaskLayer get layer => super.layer;@overridebool get alwaysNeedsCompositing => child != null;@overridevoid paint(PaintingContext context, Offset offset) {if (child != null) {assert(needsCompositing);final width = child.size.width;final height = child.size.height;double dx = _offset(start: -width, end: width * 2, percent: _shiftPercentage);double dy = 0.0;final rect = Rect.fromLTWH(dx, dy, width, height);layer ??= ShaderMaskLayer();layer..shader = _gradient.createShader(rect)..maskRect = offset & size..blendMode = BlendMode.srcIn;context.pushLayer(layer, super.paint, offset);}}double _offset({double start, double end, double percent}) => start + (end - start) * percent;
}
That’s all for today. Thank you for reading this article. Hope it helps you to learn more about how the Shimmer works and how to implement it. Try to make incredible loading animation by using it! If you have any suggestions or questions, welcome leaving a comment below. See you next time
css 颤动_颤动-微光效果相关推荐
- css 背景效果_软件技术:我写CSS的常用套路(附demo的效果实现与源码)
前言 本文是笔者写CSS时常用的套路.不论效果再怎么华丽,万变不离其宗. 1.交错动画 有时候,我们需要给多个元素添加同一个动画,播放后,不难发现它们会一起运动,一起结束,这样就会显得很平淡无奇.那么 ...
- css 毛玻璃_前端开发,CSS的常用套路附demo的效果实现与源码)
前言 本文是笔者写CSS时常用的套路.不论效果再怎么华丽,万变不离其宗. 1.交错动画 有时候,我们需要给多个元素添加同一个动画,播放后,不难发现它们会一起运动,一起结束,这样就会显得很平淡无奇.那么 ...
- css 毛玻璃_我写CSS的常用套路(附demo的效果实现与源码)
作者:alphardex 出自:掘金 原文:https://juejin.im/post/5e070cd9f265da33f8653f00 前言 本文是笔者写CSS时常用的套路.不论效果再怎么华丽,万 ...
- css 背景效果_前端教程 :20个CSS的常用套路附demo的效果实现与源码
前言 本文是笔者写CSS时常用的套路.不论效果再怎么华丽,万变不离其宗. 1.交错动画 有时候,我们需要给多个元素添加同一个动画,播放后,不难发现它们会一起运动,一起结束,这样就会显得很平淡无奇.那么 ...
- html文本下划虚线代码,CSS文字链接下划虚线效果
CSS文字链接下划虚线效果_网页代码站(www.webdm.cn) BODY { MARGIN-TOP: 0px; FONT-SIZE: 9pt; MARGIN-LEFT: 0px; MARGIN-R ...
- HTML+CSS+JavaScript制作3D云效果,叼炸天!可用鼠标控制方向!
HTML+CSS+JavaScript制作3D云效果,叼炸天!可用鼠标控制方向! 作品介绍 1.网页作品简介方面 :3D云效果,叼炸天!可用鼠标控制方向! 2.网页作品编辑方面:此作品为学生个人主页网 ...
- 使用css实现瀑布流的效果
使用css实现瀑布流的效果主要是通过display:flex弹性布局的方式. 注意要设置列数 图片的宽度要一致,否则图片显示会有问题 <!DOCTYPE html> <html la ...
- 一行代码实现微光效果
快速实现微光效果 导入 Shimmer 库 dependencies {...implementation 'com.github.huangziye:Shimmer:${latest_version ...
- css有些效果不显示,css导入成功但没有效果怎么办
css导入成功但没有效果的解决办法:1.打开网页调试工具,根据显示错误进行修改:2.查看link标签的"rel="stylesheet""是否有错,并修改即可. ...
最新文章
- linux bash Shell脚本经典之Fork炸弹解析:() { :|: };:
- android 起动APP时锁住(Lock apps)
- 4.Maven概念模型,maven的生命周期,Maven坐标,依赖管理(依赖范围,依赖声明),仓库管理,私服概念
- [BZOJ 2200][Usaco2011 Jan]道路和航线 spfa+SLF优化
- 顶峰Android手机视频转换器,顶峰3GP手机视频转换器
- dubbo官方文档_不可忽视的Dubbo线程池
- 一个简单的PHP Web论坛
- Farthest points Sampling on 3D meshes with mesh kept based on diffusion distance
- iOS 开发应用内跳转到App Store
- deepin tim(wine)无法安装_「原创」Deepin详细安装教程 原来这么简单啊
- 线性反馈移位寄存器(Linear Feedback Shift Register, LFSR)
- UI设计原型交互基础
- 【Python】一元线性回归的分析
- 微信大数据推荐算法比赛
- 树莓派基于QT实现利用USB转485模块进行串口通讯
- 远程报:这可能是由于credssp加密oracle修正
- 【OpenHarmony】napi基本用法之promise实现
- 企业微信聊天工具栏怎么开启?如何调整位置?
- 软件的破解原理是什么?
- 与通用计算机相比较 单片机优势在哪,单片机原理与嵌入式系统-中国大学mooc-题库零氪...