DSkinLite界面库 Demo系列(二):游戏大厅类软件
游戏大厅类软件是UIEASY开发团队制作的又一个软件demo,此次发布只是一个雏形,我们还将继续完善此Demo,使其各项功能特性更加贴近实际软件。游戏大厅Demo主要演示DSkinLite界面库对Tree control, list control, radio buttons等控件各项特性的完全支持,同时也展示了DSkinLite界面库对控件透明等特性的支持。
下载示例(安装后 主界面 ->Demos –> Game Demo )
> DSkinLite界面库对Tree control 的支持
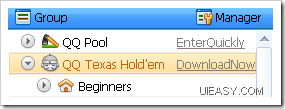
游戏大厅Demo主要演示DSkinLite界面库对Tree control的支持。 DSkinLite界面库从3.0开始加入了对List box, list control, tree control控件的item绘制支持,即可以通过在XML中配置Item的样式及相关API函数来绘制Item内容。如下图游戏列表:

在DSkinlite中,items内容的绘制,以一个item为单位来定义其风格。这种设计比较符合Win32 tree control本身的机制,我们知道如果需要自绘tree control,须设置tree control的OWN_DRAW属性,然后在DrawItem等消息中绘制绘制的item,即以一个Item为单位绘制。从这种机制得到启发,DSkinlite对tree control内容的绘制也以item为单位,首先在xml中定义item的风格样式,用户可以定义一个或者多个item样式,也可以通过改变一个样式中的元素属性来组合不同的item样式。
生成多种Item样式的方式一,在xml 的tree control定义中,直接定义多个item样式。如下面代码所示:
<treectrlinfo bDrawOver="true" itemheight="24" levelpos="0">
<drawitem id="default" >
<image id="collapseicon" picfile="#tree2.collapse" left="14"
top="0" width="16" height="16" state="non"/>
<image id="expandicon" picfile="#tree2.expand" left="14"
top="0" width="16" height="16" state="non"/>
<text content="#default" left="57" top="2" state="normal"
textcolor="RGB(0,0,0)" font="#default"/>
<text content="#default" left="57" top="2" state="over"
textcolor="RGB(0,0,0)" font="#default"/>
<text content="#default" left="57" top="2" state="checked"
textcolor="RGB(0,0,0)" font="#default_bold" />
<image id="treeitemicon" picfile="#tree2.alltask" left="32"
top="0" width="24" height="24" state="all"/>
drawitem>
<drawitem id="Parent" >
<image id="collapseicon" picfile="#tree2.collapse" left="14"
top="0" width="16" height="16" state="non"/>
<image id="expandicon" picfile="#tree2.expand" left="14"
top="0" width="16" height="16" state="non"/>
<text content="#default" left="57" top="2" state="normal"
textcolor="RGB(0,0,0)" font="#default"/>
<text content="#default" left="57" top="2" state="over"
textcolor="RGB(0,0,0)" font="#default"/>
<text content="#default" left="57" top="2" state="checked"
textcolor="RGB(0,0,0)" font="#default_bold" />
<image picfile="#tree2.search" left="136" top="3" state="normal"
rectinfile="0,0,15,15" width="15" height="15" />
<image picfile="#tree2.search" left="136" top="3" state="over"
rectinfile="16,0,15,15" width="15" height="15"/>
<image picfile="#tree2.search" left="136" top="3" state="checked"
rectinfile="32,0,15,15" width="15" height="15" />
<image id="treeitemicon" picfile="#tree2.alltask" left="32"
top="0" width="24" height="24" state="all"/>
drawitem>
treectrlinfo>
.csharpcode, .csharpcode pre { font-size: small; color: black; font-family: consolas, "Courier New", courier, monospace; background-color: #ffffff; /*white-space: pre;*/ } .csharpcode pre { margin: 0em; } .csharpcode .rem { color: #008000; } .csharpcode .kwrd { color: #0000ff; } .csharpcode .str { color: #006080; } .csharpcode .op { color: #0000c0; } .csharpcode .preproc { color: #cc6633; } .csharpcode .asp { background-color: #ffff00; } .csharpcode .html { color: #800000; } .csharpcode .attr { color: #ff0000; } .csharpcode .alt { background-color: #f4f4f4; width: 100%; margin: 0em; } .csharpcode .lnum { color: #606060; }
上面的XML代码,我们定义了两个item 风格,一个id为“default”,另一个id为“Parent”。在treectrlinfo,必须有一个id为“default”item风格,此为item的默认风格。DSkinLite默认使用id为“default”的风格来绘制item,开发人员可以通过函数dsSetItemStyle来设置item的风格。
1: tvInsert.item.pszText = _T("Downloaded");
2: HTREEITEM hDownloaded = pCtrl->InsertItem(&tvInsert);
3: dsSetItemStyle( pCtrl->GetSafeHwnd(),
4: (int)hDownloaded,
5: 0,
6: _T("Parent"),
7: FALSE);
.csharpcode, .csharpcode pre { font-size: small; color: black; font-family: consolas, "Courier New", courier, monospace; background-color: #ffffff; /*white-space: pre;*/ } .csharpcode pre { margin: 0em; } .csharpcode .rem { color: #008000; } .csharpcode .kwrd { color: #0000ff; } .csharpcode .str { color: #006080; } .csharpcode .op { color: #0000c0; } .csharpcode .preproc { color: #cc6633; } .csharpcode .asp { background-color: #ffff00; } .csharpcode .html { color: #800000; } .csharpcode .attr { color: #ff0000; } .csharpcode .alt { background-color: #f4f4f4; width: 100%; margin: 0em; } .csharpcode .lnum { color: #606060; }
生成多种Item样式的方式二,通过修改item风格定义中的元素的属性来组合出不同的item风格。常用的函数有:
1: BOOL __stdcall dsSetDrawItemVisibleEx2( HWND hwnd,
2: int nItem,
3: int nSubItem,
4: int nMinIndex,
5: int nMaxIndex,
6: BOOL bVisible ,
7: BOOL bRedrawItem );
8:
9: BOOL __stdcall dsSetDrawItemVisibleEx( HWND hwnd,
10: int nItem,
11: int nSubItem,
12: LPCTSTR strID,
13: BOOL bVisible,
14: BOOL bRedrawItem);
15:
16: BOOL __stdcall dsSetDrawItemValueEx( HWND hwnd,
17: int nItem,
18: int nSubItem,
19: LPCTSTR strID,
20: LPCTSTR strValue,
21: BOOL bRedrawItem);
.csharpcode, .csharpcode pre { font-size: small; color: black; font-family: consolas, "Courier New", courier, monospace; background-color: #ffffff; /*white-space: pre;*/ } .csharpcode pre { margin: 0em; } .csharpcode .rem { color: #008000; } .csharpcode .kwrd { color: #0000ff; } .csharpcode .str { color: #006080; } .csharpcode .op { color: #0000c0; } .csharpcode .preproc { color: #cc6633; } .csharpcode .asp { background-color: #ffff00; } .csharpcode .html { color: #800000; } .csharpcode .attr { color: #ff0000; } .csharpcode .alt { background-color: #f4f4f4; width: 100%; margin: 0em; } .csharpcode .lnum { color: #606060; }
这三个函数主要用来控制item中元素是否显示,及设置某个元素的值。例如:
此为游戏大厅示例中游戏列表 tree control的item定义,我们可以看到虽然不同的item风格不一样,但是我们没有定义多个不同的item风格。而是通过对某些元素的显示和隐藏来配置不同风格的item定义。例如index 100-117 定义了不同游戏的图标,在程序中我们根据程序的逻辑来配置item的此图标。
1: <treectrlinfo bDrawOver="true" itemheight="24" levelpos="0">
2: <drawitem id="default" >
3: <image id="collapseicon" picfile="#tree2.collapse" left="14"
4: top="0" width="16" height="16" state="non"/>
5: <image id="expandicon" picfile="#tree2.expand" left="14"
6: top="0" width="16" height="16" state="non"/>
7: <text content="#default" left="57" top="2" state="normal"
8: textcolor="RGB(0,0,0)" font="#default"/>
9: <text content="#default" left="57" top="2" state="over"
10: textcolor="RGB(0,0,0)" font="#default"/>
11: <text content="#default" left="57" top="2" state="checked"
12: textcolor="RGB(0,0,0)" font="#default_bold" />
13: <image id="treeitemicon" picfile="#tree2.alltask" left="32"
14: top="0" width="24" height="24" state="all"/>
15: drawitem>
16: <drawitem id="Parent" >
17: <image id="collapseicon" picfile="#tree2.collapse" left="14"
18: top="0" width="16" height="16" state="non"/>
19: <image id="expandicon" picfile="#tree2.expand" left="14"
20: top="0" width="16" height="16" state="non"/>
21: <text content="#default" left="57" top="2" state="normal"
22: textcolor="RGB(0,0,0)" font="#default"/>
23: <text content="#default" left="57" top="2" state="over"
24: textcolor="RGB(0,0,0)" font="#default"/>
25: <text content="#default" left="57" top="2" state="checked"
26: textcolor="RGB(0,0,0)" font="#default_bold" />
27: <image picfile="#tree2.search" left="136" top="3" state="normal"
28: rectinfile="0,0,15,15" width="15" height="15" />
29: <image picfile="#tree2.search" left="136" top="3" state="over"
30: rectinfile="16,0,15,15" width="15" height="15"/>
31: <image picfile="#tree2.search" left="136" top="3" state="checked"
32: rectinfile="32,0,15,15" width="15" height="15" />
33: <image id="treeitemicon" picfile="#tree2.alltask" left="32"
34: top="0" width="24" height="24" state="all"/>
35: drawitem>
36: treectrlinfo>
37:
38:
39: <drawitem id="default" >
40: <image id="collapseicon" picfile="#tree.expand.icon"
41: rectinfile="0,0,14,15" left="12" top="3" width="14"
42: height="15" state="non"/>
43: <image id="expandicon" picfile="#tree.expand.icon"
44: rectinfile="14,0,14,15" left="12" top="3" width="14"
45: height="15" state="non"/>
46: <text content="#default" left="54" top="0" state="normal"
47: textcolor="RGB(0,0,0)" bsingleline="true" />
48: <text content="#default" left="54" top="0" state="over"
49: textcolor="RGB(0,0,0)" bsingleline="true" />
50: <text content="#default" left="54" top="0" state="checked"
51: textcolor="RGB(198,97,11)" bsingleline="true" />
52:
53:
54: to specify which to be show and which to be hide-->
55: <image index="100" visible="false" picfile="#tree.gametype.icon"
56: rectinfile="0,0,18,18" left="32" top="1" width="18"
57: height="18" state="all"/>
58: <image index="101" visible="false" picfile="#tree.gametype.icon"
59: rectinfile="18,0,18,18" left="32" top="1" width="18"
60: height="18" state="all"/>
61: <image index="102" visible="false" picfile="#tree.gametype.icon"
62: rectinfile="36,0,18,18" left="32" top="1" width="18"
63: height="18" state="all"/>
64: <image index="103" visible="false" picfile="#tree.gametype.icon"
65: rectinfile="54,0,18,18" left="32" top="1" width="18"
66: height="18" state="all"/>
67: <image index="104" visible="false" picfile="#tree.gametype.icon"
68: rectinfile="72,0,18,18" left="32" top="1" width="18"
69: height="18" state="all"/>
70: <image index="105" visible="false" picfile="#tree.gametype.icon"
71: rectinfile="90,0,18,18" left="32" top="1" width="18"
72: height="18" state="all"/>
73: <image index="106" visible="false" picfile="#tree.gametype.icon"
74: rectinfile="108,0,18,18" left="32" top="1" width="18"
75: height="18" state="all"/>
76: <image index="107" visible="false" picfile="#tree.gametype.icon"
77: rectinfile="126,0,18,18" left="32" top="1" width="18"
78: height="18" state="all"/>
79: <image index="108" visible="false" picfile="#tree.gametype.icon"
80: rectinfile="144,0,18,18" left="32" top="1" width="18"
81: height="18" state="all"/>
82: <image index="109" visible="false" picfile="#tree.gametype.icon"
83: rectinfile="162,0,18,18" left="32" top="1" width="18"
84: height="18" state="all"/>
85: <image index="110" visible="false" picfile="#tree.gametype.icon"
86: rectinfile="180,0,18,18" left="32" top="1" width="18"
87: height="18" state="all"/>
88: <image index="111" visible="false" picfile="#tree.gametype.icon"
89: rectinfile="198,0,18,18" left="32" top="1" width="18"
90: height="18" state="all"/>
91: <image index="112" visible="false" picfile="#tree.gametype.icon"
92: rectinfile="216,0,18,18" left="32" top="1" width="18"
93: height="18" state="all"/>
94: <image index="113" visible="false" picfile="#tree.gametype.icon"
95: rectinfile="234,0,18,18" left="32" top="1" width="18"
96: height="18" state="all"/>
97: <image index="114" visible="false" picfile="#tree.gametype.icon"
98: rectinfile="252,0,18,18" left="32" top="1" width="18"
99: height="18" state="all"/>
100: <image index="115" visible="false" picfile="#tree.gametype.icon"
101: rectinfile="270,0,18,18" left="32" top="1" width="18"
102: height="18" state="all"/>
103: <image index="116" visible="false" picfile="#tree.gametype.icon"
104: rectinfile="288,0,18,18" left="32" top="1" width="18"
105: height="18" state="all"/>
106: <image index="117" visible="false" picfile="#tree.gametype.icon"
107: rectinfile="306,0,18,18" left="32" top="1" width="18"
108: height="18" state="all"/>
109:
110: <image index="120" visible="false" left="32" top="1" width="18"
111: picfile="#tree.unknown" height="18" state="all"/>
112: <image index="121" visible="false" left="32" top="1" width="18"
113: picfile="#tree.unknown.dis" height="18" state="all"/>
114:
115: <image index="200" visible="false" picfile="#tree.icon"
116: left="32" top="1" width="18" height="18" state="all" />
117:
118:
119: <eventitem id="EnterQuickly" visible="false" left="168" top="4"
120: event="LButtonDown" cursor="#handcur"
121: state="all" sendparent="true">
122: <text id="textdefault" content="EnterQuickly" left="0"
123: horzalign="left" top="0" state="all"
124: textcolor="RGB(128,128,128)"
125: font="#default_link"/>
126: eventitem>
127:
128: <eventitem id="DownloadNow" visible="false" left="168" top="4"
129: event="LButtonDown" cursor="#handcur"
130: state="all" sendparent="true">
131: <text id="textdefault" content="DownloadNow" left="0"
132: horzalign="left" top="0" state="all"
133: textcolor="RGB(128,128,128)" font="#default_link"/>
134: eventitem>
135: drawitem>
.csharpcode, .csharpcode pre { font-size: small; color: black; font-family: consolas, "Courier New", courier, monospace; background-color: #ffffff; /*white-space: pre;*/ } .csharpcode pre { margin: 0em; } .csharpcode .rem { color: #008000; } .csharpcode .kwrd { color: #0000ff; } .csharpcode .str { color: #006080; } .csharpcode .op { color: #0000c0; } .csharpcode .preproc { color: #cc6633; } .csharpcode .asp { background-color: #ffff00; } .csharpcode .html { color: #800000; } .csharpcode .attr { color: #ff0000; } .csharpcode .alt { background-color: #f4f4f4; width: 100%; margin: 0em; } .csharpcode .lnum { color: #606060; }
> 使用DSkinLite界面库构建功能强大的TabBar
游戏大厅Demo需要一个类似TabCtrl的控件来显示当前打开的游戏。显然使用传统的Tab control 有很多地方难以实现,比如不同tab item的风格可能不同,不同的tab item长度可能不同,右端需要一个关闭按钮等。基于这些因素的考虑,我们建议使用一组Radio butons来实现,这样更加灵活。但同时我们也发现,不能只是简单的将一组radio buttons放置到一起,还需要处理增加button,关闭button等。在此Demo中,CButtonGroup类为管理一组Radio Buttons的容器,可以通过此类来添加,删除button及其他管理。其中右上角的关闭按钮为radio button的子控件。

DSkinLite界面库 Demo系列(二):游戏大厅类软件相关推荐
- 35款锁屏勒索程序曝光,多为抢红包、游戏外挂类软件...
雷锋网(公众号:雷锋网)4月7日消息,据新华社报道,国家互联网应急中心天津分中心通过自主监测和样本交换形式在近日发现了35款锁屏勒索类恶意程序变种,其中"吃鸡神器"相关的应用占据多 ...
- 35款锁屏勒索程序曝光,多为抢红包、游戏外挂类软件
雷锋网(公众号:雷锋网)4月7日消息,据新华社报道,国家互联网应急中心天津分中心通过自主监测和样本交换形式在近日发现了35款锁屏勒索类恶意程序变种,其中"吃鸡神器"相关的应用占据多 ...
- Duilib界面库 Demo实例XML编写规则 模仿QQ登录模块
下面是个人 自己动手编写的XML文件,主要是实现 QQ登录界面的设计 下面代码,粘贴之后,有点乱,实现效果如上图所示. <?xml version="1.0" encodin ...
- 一些界面库比较以及如何选择界面库
记得很早的时候看了一个哥们写的界面库的使用历程,当时还挺有感触的,不断地尝试,不断地被坑,最后有两条结论: 1.自己积累界面库: 2.买就买贵的.好的,并且提前根据自己需要协商好. 今天又重看关于界面 ...
- 深入浅出CChart 每日一课——快乐高四第五十七课 新的起点,炫彩界面库之老树新芽
CChart对多种DirectUI库具有良好的适配性,炫彩界面库也不例外.前面已经有两篇关于炫彩界面库的课程,分别是第17课"深入浅出CChart 每日一课--第十七课 时尚加潮流,Dire ...
- 基于Java的五子棋游戏大厅的设计与实现
技术:Java等 摘要: 游戏软件是当今世界发展最迅速,最有影响力,最有潜力与活力的领域之一。游戏软件深受广大青年人喜爱,而且在发达国家中老年人也有大部分喜欢游戏的,因此游戏软件在很大程度上给予绝大部 ...
- HandsFree——OpenRE库学习(二)
HandsFree--OpenRE库学习(二) Board类介绍 Board类对硬件进行抽象,封装了STM32F1和F4的底层配置函数,使得上层功能包的开发变得简洁. Board类的定义如下: cla ...
- C# Winform 窗体美化(二、LayeredSkin 界面库)
二.LayeredSkin 界面库 概况 这部分资源是 Winform 美化最多的了,效果还不错,使用时只需引入 LayeredSkin.dll - 696 KB 即可. 网上能找到的最后 Layer ...
- 【液晶模块系列基础视频】4.5.X-GUI图形界面库-进度条等函数简介
[液晶模块系列基础视频]4.5.X-GUI图形界面库-进度条等函数简介 ============================== 技术论坛:http://www.eeschool.org 博客地址 ...
最新文章
- [高中作文赏析]感受冬天
- FPGA中状态机的稳定性
- HDU1247Hat’s Words(字典树)
- Serializing Lua objects into Lua Code
- python之布尔值——待补充……
- 第七节:WebApi与Unity整合进行依赖注入和AOP的实现
- RabbitMQ集群并处理失败
- 微软宣布将永久关闭所有零售店:专注于线上
- linux下Led的设备驱动程序实验总结,Linux让LED灯闪起来
- WaitForSingleObject与WaitForMultipleObjects用法详解
- C语言:编写一个程序,打印乘法“九九表”
- 浅谈软件项目开发过程中的主要项目风险及对策
- php+转义反斜线,PHP 转义序列(反斜线)
- python爬虫系列序
- PyTorch开发者福音, OpenVINO整合PyTorch实现推理加速!
- ThinkPHP简介
- omnet学习记录之tictoc1-18
- 尚学堂Java第五章所有题目
- 网页文本编辑器插入网页中无法正常显示运行
- win7 删除java_windows7系统卸载java的操作方法?