使用Canvas基于手势可以使树秋千
用Canvas制作能够依据手势摆动的树
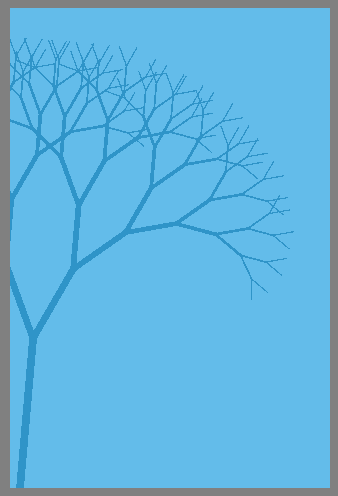
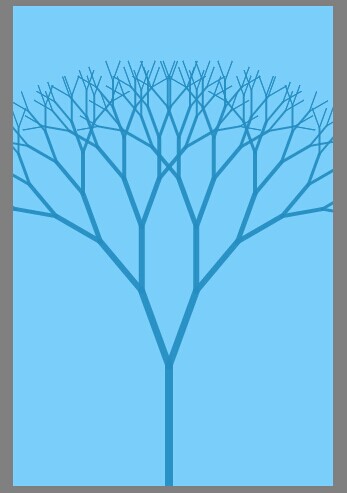
依据工作的须要。制作一个摆动的树做为页面的背景。为了添加页面的交互性,我又为背景中的树添加了鼠标(触控)事件,使他可以依据鼠标(触控)做出对应的动作,当手指做上下或者左右滑动的时候树会跟着摆动。先看看终于效果。
Step1.完毕HTML页面。新建一个Tree类
完毕HTML页面后新建一个Tree类用来记录树的各个属性。当中x,y为树根部的坐标值。branchLen,branchWidth各自是树枝的长度与宽度,depth为树枝的层数。canvas用来接页面中的canvas元素(默认是ID为canvas的元素)。
function Tree(x,y,branchLen,branchWidth,depth,canvas){this.canvas = canvas || document.getElementById('canvas');this.ctx = this.canvas.getContext('2d');this.x = x||0;this.y = y||0;this.branchLen = branchLen||0;this.branchWidth = branchWidth||0;var depth = depth || 5;
}
点击查看历史代码
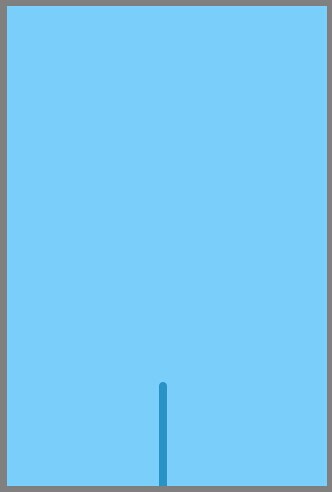
Step2.加入drawRoot方法,用来绘制树干
首先在drawRoot中画第一个枝干。
drawRoot的參数意义同上。而且在Tree类的构造函数中执行drawRoot并把Tree接受到的參数传入。最后new一个Tree类,使树根位于屏幕的底部正中心。树枝长100px,树枝宽度为8px,树枝层数为8层(临时用不上)。
var atree = new Tree(canvas.width/2-4,canvas.height,100,8,8,canvas);
在drawRoot中我们须要用lineTo()画出树枝。树枝的起始的坐标值(x,y)已经给出,结束的坐标值(toX,toY)须要进行计算。第一个画的是树干,因为树干垂直于地面所以结束坐标toX等于初始坐标x,而结束坐标toY等于初始y减去树干长度branchLen(注意坐标的0,0点在canvas的左上角)。var toX = x;var toY = y-branchLen;
function Tree(x,y,branchLen,branchWidth,depth,canvas){this.canvas = canvas || document.getElementById('canvas');this.ctx = this.canvas.getContext('2d');this.x = x||0;this.y = y||0;this.branchLen = branchLen||0;this.branchWidth = branchWidth||0;var depth = depth || 5;this.drawRoot(this.x,this.y,this.branchLen,this.branchWidth);
}
Tree.prototype.drawRoot = function(x,y,branchLen,branchWidth){var toX = x;var toY = y-branchLen;this.ctx.save();this.ctx.strokeStyle="rgba(37, 141, 194, 0.93)";this.ctx.beginPath();this.ctx.lineCap = "butt";this.ctx.lineJoin="round";this.ctx.lineWidth = branchWidth;this.ctx.moveTo(x,y);this.ctx.lineTo(toX,toY);this.ctx.closePath();this.ctx.stroke();this.ctx.restore();
}
var atree = new Tree(canvas.width/2-4,canvas.height,100,8,8,canvas);
执行代码:
点击查看历史代码
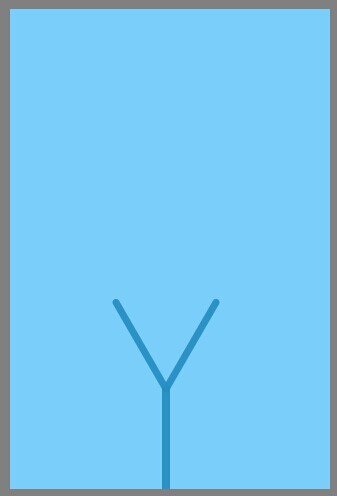
Step3.加入drawBranch方法,用来绘制树枝
drawBranch相同是依据初始与结束坐标画出一条直线代表树枝。
与树干不同的是树枝不再是垂直与地面而是与树干保持一定的角度。并且树枝的初始值是树干的结束点(toX,toY)。所以在drawBranch中我们增加新參数angle用来表示树枝与树干的垂直夹角α,这样就能够依据α算出toX与toY。请看图。

这样我们在画完树干后再分别画两个不同角度的树枝。一个是30°一个-30°。并将传给树枝的宽度branchWidth减小一个像素。使其与树干粗细不同。
Tree.prototype.drawRoot = function(x,y,branchLen,branchWidth){var toX = x;var toY = y-branchLen;this.ctx.save();this.ctx.strokeStyle="rgba(37, 141, 194, 0.93)";this.ctx.beginPath();this.ctx.lineCap = "butt";this.ctx.lineJoin="round";this.ctx.lineWidth = branchWidth;this.ctx.moveTo(x,y);this.ctx.lineTo(toX,toY);this.ctx.closePath();this.ctx.stroke();this.ctx.restore();this.drawBranch(toX,toY,branchLen,branchWidth-1,30);this.drawBranch(toX,toY,branchLen,branchWidth-1,-30);
}
Tree.prototype.drawBranch = function(x,y,branchLen,branchWidth,angle){var angle = angle || 0;var radian = (90-angle)*(Math.PI/180);var toX = x+Math.cos(radian)*branchLen;var toY = y-Math.sin(radian)*branchLen;this.ctx.save();this.ctx.strokeStyle="rgba(37, 141, 194, 0.93)";this.ctx.beginPath();this.ctx.lineCap = "butt";this.ctx.lineJoin="round";this.ctx.lineWidth = branchWidth;this.ctx.moveTo(x,y);this.ctx.lineTo(toX,toY);this.ctx.closePath();this.ctx.stroke();this.ctx.restore();
}
执行代码:
点击查看历史代码
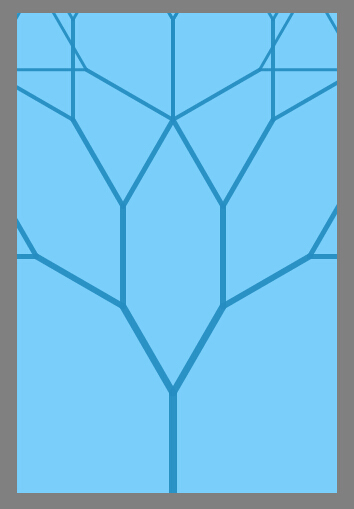
Step4.改动drawBranch函数,反复画树枝
在drawBranch函数的最后再次调用两次drawBranch
this.drawBranch(toX,toY,branchLen,branchWidth-1,angle+30);
this.drawBranch(toX,toY,branchLen,branchWidth-1,angle-30);
使其调用自己完毕递归,注意这里传入的角度是在之前的角度的基础上在添加或者降低30度。
为了使递归停下来我们须要一个停止条件,就是之前一直没实用到的depth參数。我们在每次画下一层之前使其减1表示已经完毕了一层树枝的绘制,直至depth减小到0表示绘制全然部的层数。
function Tree(x,y,branchLen,branchWidth,depth,canvas){this.canvas = canvas || document.getElementById('canvas');this.ctx = this.canvas.getContext('2d');this.x = x||0;this.y = y||0;this.branchLen = branchLen||0;this.branchWidth = branchWidth||0;var depth = depth || 5;this.drawRoot(this.x,this.y,this.branchLen,this.branchWidth,depth);
}
Tree.prototype.drawRoot = function(x,y,branchLen,branchWidth,depth){var toX = x;var toY = y-branchLen;var depth = depth||5;this.ctx.save();this.ctx.strokeStyle="rgba(37, 141, 194, 0.93)";this.ctx.beginPath();this.ctx.lineCap = "butt";this.ctx.lineJoin="round";this.ctx.lineWidth = branchWidth;this.ctx.moveTo(x,y);this.ctx.lineTo(toX,toY);this.ctx.closePath();this.ctx.stroke();this.ctx.restore();depth--;if(depth>0){this.drawBranch(toX,toY,branchLen,branchWidth-1,30,depth);this.drawBranch(toX,toY,branchLen,branchWidth-1,-30,depth);}
}
Tree.prototype.drawBranch = function(x,y,branchLen,branchWidth,angle,depth){var angle = angle || 0;var radian = (90-angle)*(Math.PI/180);var toX = x+Math.cos(radian)*branchLen;var toY = y-Math.sin(radian)*branchLen;this.ctx.save();this.ctx.strokeStyle="rgba(37, 141, 194, 0.93)";this.ctx.beginPath();this.ctx.lineCap = "butt";this.ctx.lineJoin="round";this.ctx.lineWidth = branchWidth;this.ctx.moveTo(x,y);this.ctx.lineTo(toX,toY);this.ctx.closePath();this.ctx.stroke();this.ctx.restore();depth--;if(depth>0){this.drawBranch(toX,toY,branchLen,branchWidth-1,angle+30,depth);this.drawBranch(toX,toY,branchLen,branchWidth-1,angle-30,depth);}
}
执行代码:
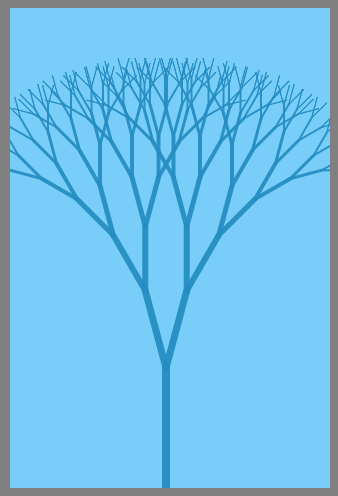
因为树之间角度过大,并且全部树枝长度都相等,看起来并不像一棵树。所以我们须要在Tree的构造函数中增加几个參数用来调整树的姿态。
function Tree(x,y,branchLen,branchWidth,depth,canvas){......this.branchLenFactor = 0.8;this.rootLenFactor = 1.2;this.branchAngle = 20;......
}
branchLenFactor:画每一层树枝的时候乘在branchLen上面,用来控制树枝长度。
rootLenFactor:画树根的时候乘在branchLen上面,用来控制树根长度。branchAngle: 用来控制树枝之间的角度。
Tree.prototype.drawRoot = function(x,y,branchLen,branchWidth,depth){var toX = x;var toY = y-branchLen*this.rootLenFactor;var depth = depth||5;this.ctx.save();this.ctx.strokeStyle="rgba(37, 141, 194, 0.93)";this.ctx.beginPath();this.ctx.lineCap = "butt";this.ctx.lineJoin="round";this.ctx.lineWidth = branchWidth;this.ctx.moveTo(x,y);this.ctx.lineTo(toX,toY);this.ctx.closePath();this.ctx.stroke();this.ctx.restore();depth--;if(depth>0){this.drawBranch(toX,toY,branchLen*this.branchLenFactor,branchWidth-1,this.branchAngle,depth);this.drawBranch(toX,toY,branchLen*this.branchLenFactor,branchWidth-1,-this.branchAngle,depth);}}Tree.prototype.drawBranch = function(x,y,branchLen,branchWidth,angle,depth){var angle = angle || 0;var radian = (90-angle)*(Math.PI/180);var toX = x+Math.cos(radian)*branchLen;var toY = y-Math.sin(radian)*branchLen;this.ctx.save();this.ctx.strokeStyle="rgba(37, 141, 194, 0.93)";this.ctx.beginPath();this.ctx.lineCap = "butt";this.ctx.lineJoin="round";this.ctx.lineWidth = branchWidth;this.ctx.moveTo(x,y);this.ctx.lineTo(toX,toY);this.ctx.closePath();this.ctx.stroke();this.ctx.restore();depth--;if(depth>0){this.drawBranch(toX,toY,branchLen*this.branchLenFactor,branchWidth-1,angle+this.branchAngle,depth);this.drawBranch(toX,toY,branchLen*this.branchLenFactor,branchWidth-1,angle-this.branchAngle,depth);}}执行代码:
点击查看历史代码
Step5.使树枝晃动起来
为了使树枝有摇晃的效果。我们仅仅须要改变树枝之间的角度branchAngle就能够了。我须要在Tree的构造函数中添加三个新属性:oBranchAngle用来记录初始角度。branchAngleFactor用来控制角度随时间变化的变化量;swingAngle:随时间添加用来记录摇动的角度。
同一时候改动下drawRoot函数使其不用接受參数。调用更加方便。
function Tree(x,y,branchLen,branchWidth,depth,canvas){......this.branchAngle = 20;this.oBranchAngle = this.branchAngle;this.branchAngleFactor = 5;this.swingAngle = 0;......this.drawRoot();
}Tree.prototype.drawRoot = function(){var x = this.x,y=this.y,branchLen = this.branchLen,depth = this.depth,branchWidth = this.branchWidth;var toX = x;var toY = y-branchLen*this.rootLenFactor;var depth = depth||5;this.ctx.save();this.ctx.strokeStyle="rgba(37, 141, 194, 0.93)";this.ctx.beginPath();this.ctx.lineCap = "butt";this.ctx.lineJoin="round";this.ctx.lineWidth = this.branchWidth;this.ctx.moveTo(x,y);this.ctx.lineTo(toX,toY);this.ctx.closePath();this.ctx.stroke();this.ctx.restore();depth--;if(depth>0){this.drawBranch(toX,toY,branchLen*this.branchLenFactor,branchWidth-1,this.branchAngle,depth);this.drawBranch(toX,toY,branchLen*this.branchLenFactor,branchWidth-1,-this.branchAngle,depth);}}添加循环函数,在循环函数中重绘整个树。而且每次重绘都要改动branchAngle值,使大树摇动起来。atree.swingAngle++;使摇动角度随时间变化。这里使用Math.sin(atree.swingAngle*(Math.PI/180))能够获得一个-1至1之间的连续变化值。atree.branchAngle = Math.sin(atree.swingAngle*(Math.PI/180))*atree.branchAngleFactor+atree.oBranchAngle;乘以系数并加在原角度上。
function loop(time){ctx.clearRect(0,0,canvas.width,canvas.height);atree.branchAngle = Math.sin(atree.swingAngle*(Math.PI/180))*atree.branchAngleFactor+atree.oBranchAngle;atree.drawRoot()requestAnimFrame(loop);}loop(0);执行代码:
点击查看历史代码
Step6.加入手势
这里为了省事仅仅加入了touch事件,mouse事件与touch事件的处理方法大体一致。
首先为Tree新加一个属性swingSwitch = true用来表示大树是否摆动。当手指触控到屏幕的时候摆动停止,离开屏幕的时候摆动继续。
加入strengthX,strengthY两个属性;分别表示树在x轴与y轴因受到的力而移动的距离。
加入strengthXFactor,strengthYFactor;分别用来表示再一次滑动中x轴与y轴移动的最大距离。
function Tree(x,y,branchLen,branchWidth,depth,canvas){......this.swingSwitch = true;......this.strengthX = 0;this.strengthY = 0;......}//记录触控開始时的信息
var touchStart = {x:0,y:0,strengthX:0,strengthY:0};
document.addEventListener('touchstart',function(e){//让树停止摆动atree.swingSwitch = false;touchStart.x = e.touches[0].clientX;touchStart.y = e.touches[0].clientY;//记录触控開始时,原strength的值touchStart.strengthX = atree.strengthX;touchStart.strengthY = atree.strengthY;
});
document.addEventListener('touchmove',function(e){//阻止浏览器默认动作e.preventDefault();//(touchStart.x-e.touches[0].clientX)/canvas.width能够依据滑动距离获得一个0-1的值atree.strengthX = touchStart.strengthX-(touchStart.x-e.touches[0].clientX)/canvas.width*atree.strengthXFactor;atree.strengthY = touchStart.strengthY-(touchStart.y-e.touches[0].clientY)/canvas.height*atree.strengthYFactor;
});
document.addEventListener('touchend',function(e){//恢复摆动atree.swingSwitch = true;
});改动drawBranch将strength的变化加入到角度与toX,toY的计算中,详情见凝视。
Tree.prototype.drawBranch = function(x,y,branchLen,branchWidth,angle,depth){var angle = angle || 0;//用strengthX乘以(depth/this.depth)使得树枝末梢对角度的变化不敏感angle += this.strengthX*(depth/this.depth)/this.strengthXFactor*this.branchAngle;var radian = (90-angle)*(Math.PI/180);//用strengthX乘以(1-depth/this.depth)使得树枝末梢对角度的变化敏感var toX = x+Math.cos(radian)*branchLen+this.strengthX*(1-depth/this.depth);var toY = y-Math.sin(radian)*branchLen+this.strengthY*(1-depth/this.depth);......
}
在动画循环中加入恢复代码,使strengthX,strengthY恢复为0。并添加swingSwitch的推断。
function loop(time){......//当swingSwitch开启时開始摆动if(atree.swingSwitch){//将strength恢复到0if(atree.strengthX >0){atree.strengthX -= 1;}if(atree.strengthX <0){atree.strengthX += 1;}if(atree.strengthY >0){atree.strengthY -= 1;}if(atree.strengthY <0){atree.strengthY += 1;}atree.swingAngle++;atree.branchAngle = Math.sin(atree.swingAngle*(Math.PI/180))*atree.branchAngleFactor+atree.oBranchAngle;}......
}
loop(0);
执行代码:
点击查看历史代码
Step7.加入缓动效果
Step6中的恢复strengthX,strengthY的代码过于简单,动画匀速恢复到0,显得过于突兀。比較真实的情况应该是由快变慢的恢复,所以我们要为恢复代码加上缓动。首先在Tree中加入recoverStartTime = 0用来记录恢复開始的时间。在手指离开屏幕的时候(touchend)将其赋为0,同一时候用oStrengthX,oStrengthY记录下来strengthX与strengthY的目标值。
function Tree(x,y,branchLen,branchWidth,depth,canvas){......this.recoverStartTime = 0;......
}
function loop(time){......if(atree.swingSwitch){if(atree.strengthX > 0){if(atree.recoverStartTime == 0){atree.recoverStartTime = time;}var t = time-atree.recoverStartTime;//五次方的缓动atree.strengthX =  Math.max(atree.oStrengthX-atree.oStrengthX*((t=t/2000-1)*t*t*t*t + 1)+0,0);}if(atree.strengthX < 0){if(atree.recoverStartTime == 0){atree.recoverStartTime = time;}var t = time-atree.recoverStartTime;//五次方的缓动atree.strengthX =  Math.min(atree.oStrengthX-atree.oStrengthX*((t=t/2000-1)*t*t*t*t + 1)+0,0);}if(atree.strengthY > 0){if(atree.recoverStartTime == 0){atree.recoverStartTime = time;}var t = time-atree.recoverStartTime;//五次方的缓动atree.strengthY =  Math.max(atree.oStrengthY-atree.oStrengthY*((t=t/2000-1)*t*t*t*t + 1)+0,0);}if(atree.strengthY < 0){if(atree.recoverStartTime == 0){atree.recoverStartTime = time;}var t = time-atree.recoverStartTime;//五次方的缓动atree.strengthY =  Math.min(atree.oStrengthY-atree.oStrengthY*((t=t/2000-1)*t*t*t*t + 1)+0,0);}}......
}
document.addEventListener('touchend',function(e){atree.recoverStartTime = 0;atree.oStrengthX = atree.strengthX;atree.oStrengthY = atree.strengthY;......
});
执行代码:
 点击查看历史代码
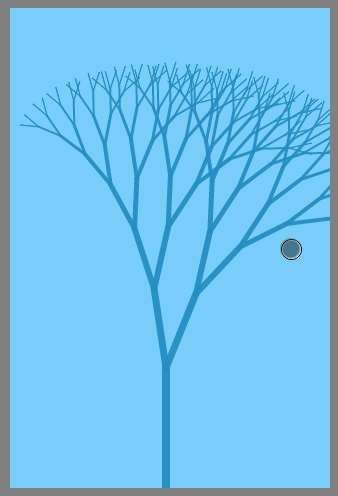
Step7.使树干摇动并移至屏幕左边
改动drawRoot使树干也能够晃动,并改动var atree = new Tree(10,canvas.height,100,8,8,canvas);使其移至左边。
Tree.prototype.drawRoot = function(){......//添加strengthvar angle = 0;angle += this.strengthX/this.strengthXFactor*this.branchAngle;var radian = (90-angle)*(Math.PI/180);var toX = x+Math.cos(radian)*branchLen*this.rootLenFactor;var toY = y-Math.sin(radian)*branchLen*this.rootLenFactor;......
}
var atree = new Tree(10,canvas.height,100,8,8,canvas);
执行代码:
点击查看历史代码
Step8.
将动画循环中处理角度的部分加入到Tree的swing()中。
Tree.prototype.swing = function(time){this.ctx.clearRect(0,0,this.canvas.width,this.canvas.height);if(this.swingSwitch){if(this.strengthX > 0){if(this.recoverStartTime == 0){this.recoverStartTime = time;}var t = time-this.recoverStartTime;this.strengthX =  Math.max(this.oStrengthX-this.oStrengthX*((t=t/2000-1)*t*t*t*t + 1)+0,0);}if(this.strengthX < 0){if(this.recoverStartTime == 0){this.recoverStartTime = time;}var t = time-this.recoverStartTime;this.strengthX =  Math.min(this.oStrengthX-this.oStrengthX*((t=t/2000-1)*t*t*t*t + 1)+0,0);}if(this.strengthY > 0){if(this.recoverStartTime == 0){this.recoverStartTime = time;}var t = time-this.recoverStartTime;this.strengthY =  Math.max(this.oStrengthY-this.oStrengthY*((t=t/2000-1)*t*t*t*t + 1)+0,0);}if(this.strengthY < 0){if(this.recoverStartTime == 0){this.recoverStartTime = time;}var t = time-this.recoverStartTime;this.strengthY =  Math.min(this.oStrengthY-this.oStrengthY*((t=t/2000-1)*t*t*t*t + 1)+0,0);}this.swingAngle++;this.branchAngle = Math.sin(this.swingAngle*(Math.PI/180))*this.branchAngleFactor+this.oBranchAngle;}this.drawRoot();
}
var atree = new Tree(10,canvas.height,100,8,8,canvas);
function loop(time){atree.swing(time);requestAnimFrame(loop);
}
loop(0);
执行代码:
查看全部代码请去Github
如有问题或者建议请微博@UED天机。
我会及时回复
也能够收藏天机的官网,http://ued.sexy/ 经常更新了最新的教程。
版权声明:本文博客原创文章,博客,未经同意,不得转载。
转载于:https://www.cnblogs.com/mengfanrong/p/4730466.html
使用Canvas基于手势可以使树秋千相关推荐
- 【STM32入门】这个项目绝了,用手势来产生波形,基于手势控制的波形发生器
大家好,我是张巧龙,之前有给实验室学生出了一道关于STM32的题:基于手势控制的波形产生题,题目简单,但综合性较强. 有些学生完成的还不错,个人觉得此题用来 入门 STM32再合适不过了. 展示视频: ...
- 八皇后问题python回溯_解决Python基于回溯法子集树模板实现8皇后问题
这篇文章主要介绍了Python基于回溯法子集树模板实现8皇后问题,简单说明了8皇后问题的原理并结合实例形式分析了Python回溯法子集树模板解决8皇后问题的具体实现技巧,需要的朋友可以参考下 本文实例 ...
- 基于深度搜索的树路径求解_基于深度学习的自动验证码求解器
基于深度搜索的树路径求解 计算机视觉,网络安全,深度学习(Computer Vision, Cybersecurity, Deep Learning) Disclaimer: The followin ...
- python找零钱问题_Python基于回溯法子集树模板解决找零问题示例
本文实例讲述了Python基于回溯法子集树模板解决找零问题.分享给大家供大家参考,具体如下: 问题 有面额10元.5元.2元.1元的硬币,数量分别为3个.5个.7个.12个.现在需要给顾客找零16元, ...
- python回溯方法的模板_Python基于回溯法子集树模板解决0-1背包问题实例
本文实例讲述了Python基于回溯法子集树模板解决0-1背包问题.分享给大家供大家参考,具体如下: 问题 给定N个物品和一个背包.物品i的重量是Wi,其价值位Vi ,背包的容量为C.问应该如何选择装入 ...
- python全排列问题_Python基于回溯法子集树模板解决全排列问题示例
本文实例讲述了Python基于回溯法子集树模板解决全排列问题.分享给大家供大家参考,具体如下: 问题 实现 'a', 'b', 'c', 'd' 四个元素的全排列. 分析 这个问题可以直接套用排列树模 ...
- python棋盘放米问题_Python基于回溯法子集树模板解决马踏棋盘问题示例
本文实例讲述了Python基于回溯法子集树模板解决马踏棋盘问题.分享给大家供大家参考,具体如下: 问题 将马放到国际象棋的8*8棋盘board上的某个方格中,马按走棋规则进行移动,走遍棋盘上的64个方 ...
- python回溯方法的模板_实例讲解Python基于回溯法子集树模板实现图的遍历功能
这篇文章主要介绍了Python基于回溯法子集树模板实现图的遍历功能,结合实例形式分析了Python使用回溯法子集树模板针对图形遍历问题的相关操作技巧与注意事项,需要的朋友可以参考下 本文实例讲述了Py ...
- c语言五子棋人机对弈算法,使用canvas基于AI算法实现人机对战之五子棋
这是我使用canvas基于AI算法实现的人机对战之五子棋 黑棋是我 下了几局,真心下不过啊!!! 不说了,源码奉上: 人机大战之五子棋 canvas{ display: block; margin:5 ...
- java集合转js数值,基于jsTree的无限级树JSON数据的转换
评论 # re: 基于jsTree的无限级树JSON数据的转换 回复 更多评论 exttree最好了!配合dwr ok 2009-05-05 22:50 | 大罗卜 # re: 基于jsTree的 ...
最新文章
- python uiautomation选择list内容_使用python UIAutomation从QQ2017(v8.9)群界面获取所有群成员详细资料,...
- hdu 4336 Card Collector
- 科大星云诗社动态20210406
- C#LeetCode刷题之#16-最接近的三数之和(3Sum Closest)
- html5小说阅读器源码,文本源码阅读器(NexusTextView)
- 安装了jdk和jre无法打开jar文件(测试过多个jdk版本和win系统,绝对百试百灵)
- 记录Linux开发板串口调试、静态ip
- eureka client无法启动,java.lang.IllegalStateException: Failed to introspect Class
- 电子邮件附件下载器简介
- Linux DTS中和中断相关属性的解释和用法
- PCB原理图绘制(2)——工程文件的初步修改与设置
- Linux bc小数点前补0
- 嵌入式Linux基础教程-读书笔记
- 读书笔记:《成为技术领导者 掌握全面解决问题的方法》
- HCIA 的认证证书含金量?
- Unity 关于Ugui之text组件的扩展
- 2021遥感应用组二等奖:基于长时序Landsat遥感影像的赣南脐橙时空变化分析
- Serverless SSR 技术在「腾讯在线教育」的实践
- 5款热门可视化工具对比,老板直呼酷炫!
- .NET桌面开发的一些思考
热门文章
- 计算机打出音乐小樱,《火影忍者》插曲——小樱主题曲
- 全面详解c语言使用cJSON解析JSON字符
- CentOS6/CentOS7系统配置IPv6地址的方法
- 三大技术要素为互联网金融2.0保驾护航
- Hibernate一级缓存、二级缓存以及查询缓存的关系
- Spark Architecture
- 请教 indy 中的 tldUdpServer 如何实现对本地端口6100进行监听!
- nodemon运行 提示错误:无法加载文件 C:\Users\gxf\AppData\Roaming\npm\nodemon.ps1,因为在此系统上禁止运行脚本。...
- JMeter java.net.SocketException:Operationnotsupported:connect解决方案
- 最全解析如何正确学习JavaScript指南,必看!