UWP中的Direct2D
介绍
DirectX一直是Windows平台中高性能图形的代名词,自Win7开始,微软又推出了Direct2D技术,包装于Direct3D,但专注于2D图形,并且准备取代GDI这样的传统2D图形技术。对于Direct2D是怎么怎么好的具体描述,可以参考附录1.
不过Direct2D是基于COM技术的,看上去有些老旧的气息,而且是非托管的,似乎也和常见的.net语言有些隔阂。
不过微软也为我们提供了一个工具,一个跨越这一边界的工具,那就是SurfaceImageSource一族。该族中SurfaceImageSource继承自Windows.UI.Xaml.Media.ImageSource,VirtualSurfaceImageSource则继承自SurfaceImageSource,它们和BitmapSource在托管领域有着同样的地位。但同时这两个类又将触角伸到了COM的领域,分别可以query interface至ISurfaceImageSourceNative和IVirtualSurfaceImageSourceNative,再与Direct2D技术接轨。至此,XAML快速的界面技术,Direct2D高效的图形功能,得以合二为一。
本文将简单的介绍一下SurfaceImageSource的使用,为大家呈现一个高效图形应用的小例子(演示代码使用XAML和C++/CX)。
准备
代码主要是C++的(略有C++/CX扩展),因为要操作Direct2D和COM。大家可以根据需要自行包装自己的组件来调用。
用到了WIC(Windows Imaging Component)等技术,不过不是本文重点。
问题
熟悉WPF的读者可能想到,在classical desktop中使用的WPF,里面的一部分组件有一个神奇的属性,OpacityMask,利用它可以给控件的渲染显示加上一个蒙版,实现各种透明渐变和不规则轮廓等等。
不过到了UWP(更早的从Windows Store App出现开始),虽然大家写的还是一样的XAML,但是OpacityMask属性没了。估计是为了性能考虑吧,不给用这么繁琐的东西了。
但难免有时要用到这样的功能,我们可以依靠高效的Direct2D图形技术来实现它。
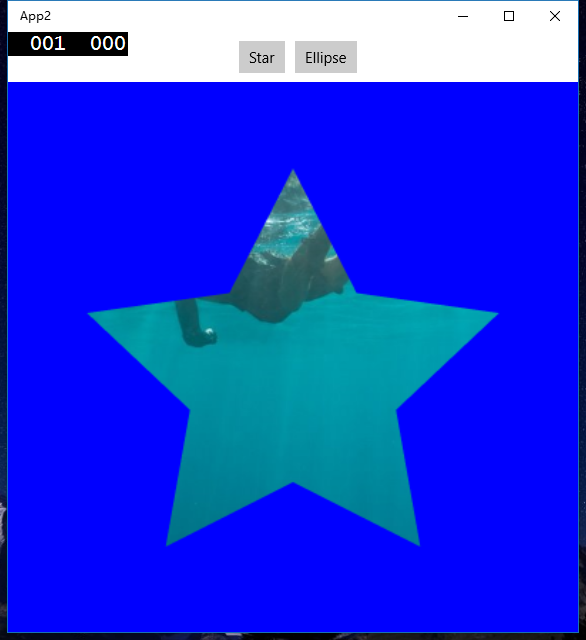
看看效果先:

托管的SurfaceImageSource
上文已经提到了,SurfaceImageSource是Windows.UI.Xaml.Media.ImageSource的子类,可以像使用BitmapSource一样使用它,赋给BitmatBrush的ImageSource什么的。这有点像WriteableBitmap,不过它却是操作Direct2D的入口。
我们先用XAML做一个这样的界面:
 1 <Page x:Class="App2.MainPage"
 2       xmlns="http://schemas.microsoft.com/winfx/2006/xaml/presentation"
 3       xmlns:x="http://schemas.microsoft.com/winfx/2006/xaml"
 4       xmlns:local="using:App2"
 5       xmlns:d="http://schemas.microsoft.com/expression/blend/2008"
 6       xmlns:mc="http://schemas.openxmlformats.org/markup-compatibility/2006"
 7       mc:Ignorable="d">
 8
 9     <Grid Background="{ThemeResource ApplicationPageBackgroundThemeBrush}">
10         <Grid.RowDefinitions>
11             <RowDefinition Height="50" />
12             <RowDefinition Height="*" />
13         </Grid.RowDefinitions>
14
15         <Grid.Resources>
16             <Style TargetType="Button">
17                 <Setter Property="Margin" Value="10,0,0,0" />
18             </Style>
19         </Grid.Resources>
20
21         <StackPanel HorizontalAlignment="Center"
22                     Orientation="Horizontal"
23                     x:Name="btns">
24             <Button Tag="Assets/star.png">Star</Button>
25             <Button Tag="Assets/ellipse.png">Ellipse</Button>
26         </StackPanel>
27
28         <Rectangle Grid.Row="1" x:Name="canvas" />
29     </Grid>
30 </Page>
Button的Tag记载的是用来做蒙版的图片,我们的例子里使用的图片,为了方便都是400*400的。并且这两个蒙版图片都是用黑白表示的。黑色表示没有,白色表示全有,灰色就是半透明了,操作的是Alpha通道。

这分别是要显示的图片,和两种蒙版。
先看看MainPage声明了哪些成员:
1 Microsoft::WRL::ComPtr<IWICImagingFactory> m_factory; // WIC工厂,因为多处使用,可以复用一下
2 Microsoft::WRL::ComPtr<IDXGIDevice> m_dxgiDevice; // DXGI Device
3 Microsoft::WRL::ComPtr<ID2D1DeviceContext> m_d2dDeviceContext; // D2D Device Context
4 Microsoft::WRL::ComPtr<IWICBitmapSource> m_img; // 这个就是要被蒙版处理的原始图片了
我们善用ComPtr,让C++的RAII机制(资源获取就是初始化)来帮我们实现简单的“垃圾回收”。
在MainPage::CreateDevice函数中,我们初始化Direct2D的相关设备:
void MainPage::CreateDevice()
{static D3D_FEATURE_LEVEL featureLevels[] ={D3D_FEATURE_LEVEL_11_1,D3D_FEATURE_LEVEL_11_0,D3D_FEATURE_LEVEL_10_1,D3D_FEATURE_LEVEL_10_0,D3D_FEATURE_LEVEL_9_3,D3D_FEATURE_LEVEL_9_2,D3D_FEATURE_LEVEL_9_1};HRESULT hr;ComPtr<ID3D11Device> d3dDevice;HR(D3D11CreateDevice(nullptr,D3D_DRIVER_TYPE_HARDWARE,0,D3D11_CREATE_DEVICE_BGRA_SUPPORT, // 注意,Direct2D画图是BGRA通道顺序,不是常见的RGB
        featureLevels,extent<decltype(featureLevels)>::value, // C++ type traits,获取array长度
        D3D11_SDK_VERSION,&d3dDevice,nullptr,nullptr));HR(d3dDevice.As(&m_dxgiDevice));HR(D2D1CreateDevice(m_dxgiDevice.Get(), nullptr, &m_d2dDevice));HR(m_d2dDevice->CreateDeviceContext(D2D1_DEVICE_CONTEXT_OPTIONS_NONE, &m_d2dDeviceContext));
}
然后我们看看主要的画图流程:
这是那两个有蒙版设置的button,它们的Tag属性记录了要应用的蒙版的路径。
void MainPage::OnButtonClick(Object^ sender, RoutedEventArgs^ e)
{HRESULT hr;auto btn = safe_cast<Button^>(sender);auto maskPath = btn->Tag->ToString();SurfaceImageSource^ sis = ref new SurfaceImageSource(400, 400); // SurfaceImageSource创建时就必须指定大小,这个大小相当于画纸的大小ComPtr<ISurfaceImageSourceNative> sisn;// 跨越托管和非托管的边界// 转换成IUnknown*也可以HR(reinterpret_cast<IInspectable*>(sis)->QueryInterface(IID_PPV_ARGS(&sisn)));HR(sisn->SetDevice(m_dxgiDevice.Get()));// 这里需要注意,尽管SurfaceImageSource本身是个ImageSource,但是我们也应该在ImageBrush的层面上完成操作。如果我们将ImageBrush留在XAML上,而只新建和替换(在之后的流程里)SurfaceImageSource,会发生SurfaceImageSource赋值给ImageSource后引用计数增加量,和将ImageSource设为nullptr后引用计数减少量不相等的情况,发生“内存泄漏”。auto brush = ref new ImageBrush();brush->ImageSource = sis;canvas->Fill = brush;Draw(sisn.Get(), maskPath->Data());
}
Draw函数。画图的操作我们需要在UI线程上完成:
void MainPage::Draw(ISurfaceImageSourceNative* sisn, const wchar_t* mask)
{HRESULT hr;ComPtr<IDXGISurface> surface;RECT rect = { 0, 0, 400, 400 };POINT renderTargetOffset; // 可视区域在surface中的偏移量// 可以想象成surface是一张大画板,比我们的显示区域400*400要大。每次Direct2D会选择一个区域来画,不一定是(0,0),因为可能有一些缓冲策略,使得每次画图的区域都不一样HR(PrepareDraw(sisn, rect, &surface, &renderTargetOffset));// 创建所有我们需要的图形ComPtr<IWICBitmapSource> maskSrc = GetMask(LoadImageByWIC(mask).Get());ComPtr<ID2D1Bitmap> maskBmp;ComPtr<ID2D1Bitmap> imgBmp;ComPtr<ID2D1BitmapBrush> imgBrush;ComPtr<ID2D1Bitmap1> tgrBmp; // Note ID2D1Bitmap1HR(m_d2dDeviceContext->CreateBitmapFromWicBitmap(maskSrc.Get(), &maskBmp));HR(m_d2dDeviceContext->CreateBitmapFromWicBitmap(m_img.Get(), &imgBmp));HR(m_d2dDeviceContext->CreateBitmapBrush(imgBmp.Get(), &imgBrush));HR(m_d2dDeviceContext->CreateBitmapFromDxgiSurface(surface.Get(), nullptr, &tgrBmp));m_d2dDeviceContext->SetTarget(tgrBmp.Get());m_d2dDeviceContext->BeginDraw();m_d2dDeviceContext->SetTransform(D2D1::Matrix3x2F::Translation(renderTargetOffset.x, renderTargetOffset.y)); // 应用可视区域的偏移量来调整device context的位置m_d2dDeviceContext->Clear({0, 0, 1, 1}); // 将画布填充成蓝色,让我们的改变变得明显一些
m_d2dDeviceContext->SetAntialiasMode(D2D1_ANTIALIAS_MODE_ALIASED); // 必须先设置这个,才能调用下面的函数m_d2dDeviceContext->FillOpacityMask(maskBmp.Get(), imgBrush.Get()); // 应用蒙版
HR(m_d2dDeviceContext->EndDraw());m_d2dDeviceContext->SetTarget(nullptr);HR(sisn->EndDraw());
}
以下是我们的一些辅助函数:
尝试开始画图。这会确定我们需要画图的区域(在surface上)。如果这个开始调用失败了,我们检测一下原因,尝试第二次。
HRESULT MainPage::PrepareDraw(ISurfaceImageSourceNative* sisn, const RECT& updateRect, IDXGISurface** surface, POINT* offset)
{HRESULT hr;hr = sisn->BeginDraw(updateRect, surface, offset);if ((hr == DXGI_ERROR_DEVICE_REMOVED) || (hr == DXGI_ERROR_DEVICE_RESET)){CreateDevice();// 设备有更改,并不是单纯的失败,重新创建设备,再试一次return PrepareDraw(sisn, updateRect, surface, offset);}else{return hr;}
}
ComPtr<IWICBitmapSource> MainPage::LoadImageByWIC(const wchar_t* file)函数,通过WIC加载图片,既加载我们的原图像,也加载蒙版图像。
ComPtr<IWICBitmapSource> MainPage::LoadImageByWIC(const wchar_t* file)
{    ComPtr<IWICBitmapDecoder> decoder;ComPtr<IWICBitmapFrameDecode> frame;ComPtr<IWICFormatConverter> converter;HRESULT hr;HR(m_factory->CreateDecoderFromFilename(file, nullptr, GENERIC_READ, WICDecodeMetadataCacheOnDemand, &decoder));HR(decoder->GetFrame(0, &frame));HR(m_factory->CreateFormatConverter(&converter));HR(converter->Initialize(frame.Get(),GUID_WICPixelFormat32bppPBGRA, // 这个预处理的BGRA,因为两个透明图层叠加时需要把RGB通道和Alpha通道相乘相加,而预处理就是预先把相乘的步骤完成了,可以增加一点效率
        WICBitmapDitherTypeNone,nullptr,0,WICBitmapPaletteTypeCustom));return converter;
}
MainPage::GetMask函数把黑白色的图片处理成用alpha通道表示透明度的bitmap。因为只有黑白色的话,颜色是通过RGB通道确定的,alpha通道一直是1.0。而direct2D提供的API呢,却是使用的alpha通道来进行蒙版应用。这样看似合理一些,但我们生成一张利用alpha通道来表现透明度的蒙版图片,肯定是要比我们用单纯的黑白色来表现蒙版要麻烦一些的。
ComPtr<IWICBitmapSource> MainPage::GetMask(IWICBitmapSource* src)
{uint32_t width, height;src->GetSize(&width, &height);size_t len = width * 4 * height;unique_ptr<byte[]> pixels(new byte[len]);src->CopyPixels(nullptr, width * 4, len, pixels.get());for (size_t i = 0; i < width * height; i++){pixels[i * 4 + 3] = (pixels[i * 4] + pixels[i * 4 + 1] + pixels[i * 4 + 2]) / 3;}ComPtr<IWICBitmap> bmp;m_factory->CreateBitmapFromMemory(width, height, GUID_WICPixelFormat32bppPBGRA, width * 4, len, pixels.get(), &bmp);return bmp;
}
用Direct2D的好处
图形应用(包括图像处理,地图),游戏,这些特殊的应用需要一个强悍的图形技术来支撑它们的运作和体验,而Direct2D无疑为我们提供了这样的可能,让我们能在XAML之中,发挥图形技术的强大威力。
扩展
对于SurfaceImageSource,除了转换成ISurfaceImageSourceNative接口外,还能转换成ISurfaceImageSourceNativeWithD2D接口,区别就在于withD2D的这一个,可以在后台线程上画图,只要在UI线程上刷新就可以了。
SurfaceImageSource还有一个子类,VirtualSurfaceImageSource,它主要是起虚拟化的作用,用于图像区域比可视区域大的情况,比如地图。
附录
[1] 关于Direct2D:
https://msdn.microsoft.com/zh-cn/library/windows/desktop/dd370987(v=vs.85).aspx
[2] DirectX 和 XAML 互操作
https://msdn.microsoft.com/zh-cn/library/windows/apps/hh825871.aspx
[3] SurfaceImageSource类:
https://msdn.microsoft.com/zh-cn/library/windows/apps/windows.ui.xaml.media.imaging.surfaceimagesource.aspx
[4] ISurfaceImageSourceNative接口:
https://msdn.microsoft.com/zh-cn/library/windows/apps/hh848322.aspx
完整代码
MainPage.xaml.h


//
// MainPage.xaml.h
// Declaration of the MainPage class.
//

#pragma once#include "MainPage.g.h"namespace App2
{
/// <summary>
/// An empty page that can be used on its own or navigated to within a Frame.
/// </summary>
public ref class MainPage sealed
{
public:MainPage();void OnNavigatedTo(Windows::UI::Xaml::Navigation::NavigationEventArgs^ e) override;
private:void OnButtonClick(Platform::Object^ sender, Windows::UI::Xaml::RoutedEventArgs^ e);void CreateDevice();Microsoft::WRL::ComPtr<IWICBitmapSource> LoadImageByWIC(const wchar_t* file);Microsoft::WRL::ComPtr<IWICBitmapSource> GetMask(IWICBitmapSource* src);void Draw(ISurfaceImageSourceNative* sisn, const wchar_t* mask);HRESULT PrepareDraw(ISurfaceImageSourceNative* sisn, const RECT& updateRect, IDXGISurface** surface, POINT* offset);Microsoft::WRL::ComPtr<IWICImagingFactory> m_factory;Microsoft::WRL::ComPtr<IDXGIDevice> m_dxgiDevice;Microsoft::WRL::ComPtr<ID2D1DeviceContext> m_d2dDeviceContext;Microsoft::WRL::ComPtr<IWICBitmapSource> m_img;
};
}
View Code
MainPage.xaml.cpp
//
// MainPage.xaml.cpp
// Implementation of the MainPage class.
//

#include "pch.h"
#include "MainPage.xaml.h"using namespace App2;using namespace Platform;
using namespace Windows::Foundation;
using namespace Windows::Foundation::Collections;
using namespace Windows::UI::Xaml;
using namespace Windows::UI::Xaml::Controls;
using namespace Windows::UI::Xaml::Controls::Primitives;
using namespace Windows::UI::Xaml::Data;
using namespace Windows::UI::Xaml::Input;
using namespace Windows::UI::Xaml::Media;
using namespace Windows::UI::Xaml::Media::Imaging;
using namespace Windows::UI::Xaml::Navigation;using namespace Microsoft::WRL;
using namespace std;#define  HR(exp) hr = exp; assert(SUCCEEDED(hr))// The Blank Page item template is documented at http://go.microsoft.com/fwlink/?LinkId=402352&clcid=0x409

MainPage::MainPage()
{InitializeComponent();
}void MainPage::OnNavigatedTo(Windows::UI::Xaml::Navigation::NavigationEventArgs^ e)
{for (UIElement^ uiElem : btns->Children){auto btn = safe_cast<Button^>(uiElem);btn->Click += ref new RoutedEventHandler(this, &MainPage::OnButtonClick);}CreateDevice();HRESULT hr;HR(CoCreateInstance(CLSID_WICImagingFactory, nullptr, CLSCTX_INPROC_SERVER, IID_PPV_ARGS(&m_factory)));m_img = LoadImageByWIC(L"Assets/img.png");
}void MainPage::CreateDevice()
{static D3D_FEATURE_LEVEL featureLevels[] ={D3D_FEATURE_LEVEL_11_1,D3D_FEATURE_LEVEL_11_0,D3D_FEATURE_LEVEL_10_1,D3D_FEATURE_LEVEL_10_0,D3D_FEATURE_LEVEL_9_3,D3D_FEATURE_LEVEL_9_2,D3D_FEATURE_LEVEL_9_1};HRESULT hr;ComPtr<ID3D11Device> d3dDevice;ComPtr<ID2D1Device> d2dDevice;HR(D3D11CreateDevice(nullptr,D3D_DRIVER_TYPE_HARDWARE,0,D3D11_CREATE_DEVICE_BGRA_SUPPORT,featureLevels,extent<decltype(featureLevels)>::value,D3D11_SDK_VERSION,&d3dDevice,nullptr,nullptr));HR(d3dDevice.As(&m_dxgiDevice));HR(D2D1CreateDevice(m_dxgiDevice.Get(), nullptr, &d2dDevice));HR(d2dDevice->CreateDeviceContext(D2D1_DEVICE_CONTEXT_OPTIONS_NONE, &m_d2dDeviceContext));
}ComPtr<IWICBitmapSource> MainPage::LoadImageByWIC(const wchar_t* file)
{    ComPtr<IWICBitmapDecoder> decoder;ComPtr<IWICBitmapFrameDecode> frame;ComPtr<IWICFormatConverter> converter;HRESULT hr;HR(m_factory->CreateDecoderFromFilename(file, nullptr, GENERIC_READ, WICDecodeMetadataCacheOnDemand, &decoder));HR(decoder->GetFrame(0, &frame));HR(m_factory->CreateFormatConverter(&converter));HR(converter->Initialize(frame.Get(),GUID_WICPixelFormat32bppPBGRA, // Pre-multipled BGRA
        WICBitmapDitherTypeNone,nullptr,0,WICBitmapPaletteTypeCustom));return converter;
}ComPtr<IWICBitmapSource> MainPage::GetMask(IWICBitmapSource* src)
{uint32_t width, height;src->GetSize(&width, &height);size_t len = width * 4 * height;unique_ptr<byte[]> pixels(new byte[len]);src->CopyPixels(nullptr, width * 4, len, pixels.get());for (size_t i = 0; i < width * height; i++){// BGRA. The average of RGB channels is used as Alpha channel.pixels[i * 4 + 3] = (pixels[i * 4] + pixels[i * 4 + 1] + pixels[i * 4 + 2]) / 3;}ComPtr<IWICBitmap> bmp;m_factory->CreateBitmapFromMemory(width, height, GUID_WICPixelFormat32bppPBGRA, width * 4, len, pixels.get(), &bmp);return bmp;
}void MainPage::OnButtonClick(Object^ sender, RoutedEventArgs^ e)
{HRESULT hr;auto btn = safe_cast<Button^>(sender);auto maskPath = btn->Tag->ToString();SurfaceImageSource^ sis = ref new SurfaceImageSource(400, 400);ComPtr<ISurfaceImageSourceNative> sisn;HR(reinterpret_cast<IInspectable*>(sis)->QueryInterface(IID_PPV_ARGS(&sisn)));HR(sisn->SetDevice(m_dxgiDevice.Get())); // set device as DXGI device.// Note thisauto brush = ref new ImageBrush();brush->ImageSource = sis;canvas->Fill = brush;Draw(sisn.Get(), maskPath->Data());
}void MainPage::Draw(ISurfaceImageSourceNative* sisn, const wchar_t* mask)
{HRESULT hr;ComPtr<IDXGISurface> surface;RECT rect = { 0, 0, 400, 400 };POINT renderTargetOffset; // view port offset in surface.HR(PrepareDraw(sisn, rect, &surface, &renderTargetOffset));ComPtr<IWICBitmapSource> maskSrc = GetMask(LoadImageByWIC(mask).Get());ComPtr<ID2D1Bitmap> maskBmp;ComPtr<ID2D1Bitmap> imgBmp;ComPtr<ID2D1BitmapBrush> imgBrush;ComPtr<ID2D1Bitmap1> tgrBmp; // Note ID2D1Bitmap1HR(m_d2dDeviceContext->CreateBitmapFromWicBitmap(maskSrc.Get(), &maskBmp));HR(m_d2dDeviceContext->CreateBitmapFromWicBitmap(m_img.Get(), &imgBmp));HR(m_d2dDeviceContext->CreateBitmapBrush(imgBmp.Get(), &imgBrush));HR(m_d2dDeviceContext->CreateBitmapFromDxgiSurface(surface.Get(), nullptr, &tgrBmp));m_d2dDeviceContext->SetTarget(tgrBmp.Get());m_d2dDeviceContext->BeginDraw();m_d2dDeviceContext->SetTransform(D2D1::Matrix3x2F::Translation(renderTargetOffset.x, renderTargetOffset.y));m_d2dDeviceContext->Clear({0, 0, 1, 1}); // Clear with blue color.
    m_d2dDeviceContext->SetAntialiasMode(D2D1_ANTIALIAS_MODE_ALIASED); // Must set antialias mode.m_d2dDeviceContext->FillOpacityMask(maskBmp.Get(), imgBrush.Get());HR(m_d2dDeviceContext->EndDraw());m_d2dDeviceContext->SetTarget(nullptr);HR(sisn->EndDraw());
}HRESULT MainPage::PrepareDraw(ISurfaceImageSourceNative* sisn, const RECT& updateRect, IDXGISurface** surface, POINT* offset)
{HRESULT hr;hr = sisn->BeginDraw(updateRect, surface, offset);if ((hr == DXGI_ERROR_DEVICE_REMOVED) || (hr == DXGI_ERROR_DEVICE_RESET)){CreateDevice();// Device changed, try again.return PrepareDraw(sisn, updateRect, surface, offset);}else{return hr;}
}
View Code
MainPage.xaml见正文。
UWP中的Direct2D相关推荐
- 在 WinForm 中使用 Direct2D
在 C# 的 WinForm 应用中,界面的绘制使用的是 GDI+.不过在一些特别的应用中,可能需要用硬件加速来提高绘制的效率.下面就来介绍两种在 WinForm 应用中嵌入 Direct2D 的方法 ...
- 揭秘Windows10 UWP中的httpclient接口[2]
2019独角兽企业重金招聘Python工程师标准>>> 阅读目录: 概述 如何选择 System.Net.Http Windows.Web.Http HTTP的常用功能 修改http ...
- 淘宝UWP中的100个为什么
从淘宝UWP第一版发布到现在,已经有十个月了,期间收到了用户各种各样的反馈,感谢这些用户的反馈,指导我们不断的修正.完善应用.但是也有一部分需求或建议,由于资源或技术的限制,目前确实无法做到,只能对广 ...
- 在UWP中自定义半边框样式的输入框
Windows10发布已经有一阵子了,已经有一些公司上架了自己的UWP应用程序,为WindowsStore增添光彩.已经安装Windows10的用户也或多或少的安装了一些UWP的应用程序,针对这些UW ...
- UWP 中的 LaunchUriAsync,使用默认浏览器或其他应用打开链接
古老的 Win32 应用启动其他程序太过方便,以至于一部分开发者都已经不记得 Windows 能通过关联协议的方式通过统一资源定位符(URI)来启动应用程序了. 转到 UWP 后,使用 URI 启动应 ...
- 关于UWP中下载文件夹操作问题
代码最后结果总结: private async void btn3_Click(object sender, RoutedEventArgs e){//两种方式应对创建时已有相同文件:1.try-ca ...
- uwp连接mysql数据库_在UWP中使用SQLite数据库,支持加密
这个库支持Xamarin.*(iOS,Android等). .NET, .NET Core.Mono.UWP等主流系统和程序.支持对数据库文件的加密,其sqlcipher加密版为sqlite-net- ...
- 离线地图显示连接服务器未打开,如何在uwp中使用OSM离线地图?没有可用的互联网连接时出现问题...
在脱机映射运行良好的情况下,OSM的所有位图都来自同一台计算机上的localhost服务器.一切正常,可以看到我的所有地图,但是,如果wifi未连接到互联网,则该地图将完全停止工作,并显示黑屏.&qu ...
- xamarin UWP中MessageDialog与ContentDialog的区别
MessageDialog与ContentDialog的异同点解析: 相同点一:都是uwp应用上的一个弹窗控件.都能做为弹出应用. 相异点一:所在命名空间不同,MessageDialog在Window ...
最新文章
- java json的使用,java中json的使用
- ARM构架之cache初探
- iLogtail使用入门-iLogtail本地配置模式部署(For Kafka Flusher)
- sae php api,api.php · silenceper/saeApi - Gitee.com
- 基础才是重中之重~类是怎么执行的
- 应用程序拒绝访问_让你的ASP.NET Core应用程序更安全
- Could not initialize English chunker/Could not load file from classpath: ‘/en-token.bin‘
- php城市切换,城市切换 - 网下淘
- Java代码计算2019新个税
- 卡内基梅隆大学计算机科学博士,2020年卡内基梅隆大学博士专业设置
- php中的refresh,PHP mysqli_refresh() 函数用法及示例
- 数据库 流量切分_基于hash计算的多层实验流量切分的实现
- WRSC无人帆船航行基本原理
- 解决安卓手机H5页面input获得焦点时页面挤压或者底部上移
- Nginx反向代理http和https
- elasticsearch-6.5.4集群部署(图文详细)及常见错误
- table中文排序,间隔色HTC组件
- 《基础知识》提示学习的基本知识
- mysql5.7.16安装 初始密码获取及密码重置
- 想突破现状,就得付出更大的努力!
热门文章
- 界面美化 —— 布局
- 计算机网络-常用英文简写与名词解释
- iis ftp服务器修改端口号,iis ftp服务器指定端口
- VMware ESXi 8.0 Unlocker OEM BIOS 集成网卡驱动和 NVMe 驱动 (集成驱动版)
- 元宇宙基础-Three.js | 大帅老猿threejs特训营
- “一帮一学习小组”是中小学中常见的学习组织方式,老师把学习成绩靠前的学生跟学习成绩靠后的学生排在一组。本题就请你编写程序帮助老师自动完成这个分配工作,即在得到全班学生的排名后,在当前尚未分组的学生中,
- windows下x265下载安装与配置
- 80行代码自己动手写一个表格拆分与合并小工具(文末附工具下载)
- 设备扩展(DEVICE_EXTENSION)
- 如何查看一个IP地址是哪里的