postfix+postfixadmin+extmail邮件服务器架设过程
近段时间由于工作原因,没有完成......
六、SASL、Authlib安装和配置
先安装courier-authlib,因为后面配置 SASL验证smtp时需要authlib的socket路径。
1、 courier-authlib安装和配置(实现带验证的pop3服务器)
[root@localhost courier-authlib-0.63.0]# ./configure --prefix=/usr/local/authlib --without-sthheaderdir --with-mysql-libs=/usr/local/mysql/lib/mysql --with-mysql-includes=/usr/local/mysql/include/mysql --with-redhat --with-mailuser=vmail --with-mailgroup=vmail --with-authmysql
如果courier-authlib安装到非标准位置(例如安装到/usr/local下),一定记得在./configure时增加--without-stdheaderdir,这样以后在编译Courier-IMAP和maildrop的时候,不用特别指定courier-authlib的库文件位置
configure: error: Cannot find either the gdbm or the db library.
解决方法:安装安装rpm -ihv gdbm-devel-1.8.0-25.i386.rpm
[root@localhost courier-authlib-0.63.0]# Make && make install
[root@localhost courier-authlib-0.63.0]#make install-migrate
[root@localhost courier-authlib-0.63.0]#make install-configure
[root@localhost courier-authlib-0.63.0]#vi /usr/local/authlib/etc/authlib/authdaemonrc
authmodulelist="authmysql"
authmodulelistorig="authmysql"
DEBUG_LOGIN=2
[root@localhost courier-authlib-0.63.0]#vi /usr/local/authlib/etc/authlib/authmysqlrc
MYSQL_SERVER localhost
MYSQL_USERNAME postfix
MYSQL_PASSWORD postfix
MYSQL_DATABASE postfix
MYSQL_SOCKET /tmp/mysql.sock--enable-thread-safe-client
MYSQL_USER_TABLE mailbox
MYSQL_CRYPT_PWFIELD password
DEFAULT_DOMAIN gcp.com
MYSQL_UID_FIELD '1001'
MYSQL_GID_FIELD '1001'
MYSQL_LOGIN_FIELD username
MYSQL_HOME_FIELD '/var/mailbox/'
MYSQL_NAME_FIELD name
MYSQL_MAILDIR_FIELD maildir
MYSQL_QUOTA_FIELD concat(quota,’S’)
MYSQL_WHERE_CLAUSE active='1'
[root@localhost courier-authlib-0.63.0]# cp courier-authlib.sysvinit /etc/rc.d/init.d/courier-authlib
[root@localhost courier-authlib-0.63.0]# chmod 755 /etc/rc.d/init.d/courier-authlib
[root@localhost courier-authlib-0.63.0]# chkconfig --add courier-authlib
[root@localhost courier-authlib-0.63.0]# chkconfig courier-authlib on
[root@localhost courier-authlib-0.63.0]# service courier-authlib start
[root@localhost courier-authlib-0.63.0]# echo "/usr/local/authlib/lib/courier-authlib">>/etc/ld.so.conf
[root@localhost courier-authlib-0.63.0]# ldconfig
[root@localhost courier-authlib-0.63.0]#chmod +x /usr/local/authlib/var/spool/authdaemon
[root@localhost courier-authlib-0.63.0]# /usr/local/authlib/sbin/authdaemond start
[root@localhost courier-authlib-0.63.0]# ln -s /usr/local/authlib/bin/courierauthconfig /usr/bin/courierauthconfig
2、SASL安装和配置. (用于实现身份验证的smtp服务器)
(1)安装
[root@localhost ~]# rpm -qa|grep cyrus-sasl
[root@localhost ~]# rpm -qa|grep cyrus-sasl |xargs rpm -e --nodeps
[root@localhost ~]#rm –rf /usr/lib/sasl
[root@localhost ~]#rm –rf /usr/lib/sasl2
[root@localhost cyrus-sasl-2.1.23]# ./configure --disable-anon -enable-plain --enable-login --enable-sql --with-mysql=/usr/local/mysql --with-mysql-includes=/usr/local/mysql/include/mysql --with-mysql-libs=/usr/local/mysql/lib/mysql --with-authdaemond
[root@localhost cyrus-sasl-2.1.23]#make && make install
[root@localhost cyrus-sasl-2.1.23]# mkdir -pv /var/state/saslauthd
[root@localhost cyrus-sasl-2.1.23]# /usr/local/sbin/saslauthd -a shadow pam
[root@localhost cyrus-sasl-2.1.23]# /usr/local/sbin/testsaslauthd -u root -p 用户密码 如果提示OK "Success.",则成功
http://blog.csdn.net/longhui2012/archive/2009/08/07/4422709.aspx
[root@localhost cyrus-sasl-2.1.23]# ln -s /usr/local/lib/sasl2 /usr/lib/sasl2
配置库文件搜索路径
[root@localhost cyrus-sasl-2.1.23]# echo "/usr/local/lib" >> /etc/ld.so.conf
[root@localhost cyrus-sasl-2.1.23]# ldconfig
[root@localhost cyrus-sasl-2.1.23]# ldconfig –V
[root@localhost cyrus-sasl-2.1.23]# vi /usr/local/lib/sasl2/smtpd.conf
pwcheck_method: authdaemond
mech_list: PLAIN LOGIN
log_level: 3
authdaemond_path: /usr/local/authlib/var/spool/authdaemon/socket
七、postfixadmin安装和配置
所以用2.1.0是因为有DATABASE_MYSQL.TXT文件,但它却没有增加邮件目录和删除目录的脚本,postfixadmin-2.3.2.tar.gz中却提供脚本
[root@localhost ]#tar zxvf postfixadmin-2.1.0.tar.gz
[root@localhost ]# cp -r /root/postfixadmin-2.1.0 /var/www/postfixadmin
[root@localhost ~]# vim /usr/local/apache2/conf/httpd.conf
Alias /postfixadmin /var/www/postfixadmin
<Directory /var/www/postfixadmin>
Options Indexes FollowSymLinks
AllowOverride None
Order allow,deny
Allow from all
</Directory>
[root@localhost ]#mysql -u root 1 < /var/www/postfixadmin/DATABASE_MYSQL.TXT
[root@localhost ]#chown -R vmail:vmail /var/www/postfixadmin
[root@localhost ]#vim /var/www/postfixadmin/config.inc.php
$CONF['default_language'] = 'cn';
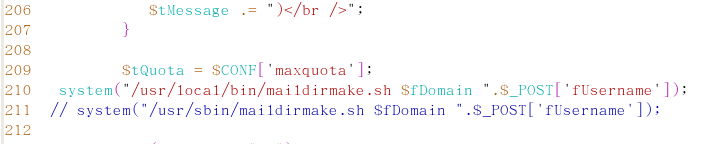
[root@localhost ~]# vim /var/www/postfixadmin/admin/create-mailbox.php
$tQuota = $CONF['maxquota'];
233 system("sudo /usr/local/bin/maildirmake.sh $fDomain ".$_POST['fUsername']);
[root@localhost ~]# vim /var/www/postfixadmin/admin/delete.php
$result = db_query ("SELECT * FROM mailbox WHERE username='$fDelete' AND domain='$fDomain'");
$userarray=explode("@",$fDelete);
$user=$userarray[0];
$domain=$userarray[1];
system("sudo /usr/sbin/maildirdel.sh $domain $user");
注意/var/www/postfixadmin目录下create-mailbox.php,delete.php作同样的修改
八、Postfix安装和配置
[root@localhost postfix-2.6.5]# groupadd -g 12345 postfix
[root@localhost postfix-2.6.5]#groupadd -g 54321 postdrop
[root@localhost postfix-2.6.5]# make -f Makefile.init makefiles 'CCARGS=-DHAS_MYSQL -I/usr/local/mysql/include/mysql -DUSE_SASL_AUTH -DUSE_CYRUS_SASL -I/usr/ \
local/include/sasl' 'AUXLIBS=-L/usr/local/mysql/lib/mysql -lmysqlclient -lz -lm -L/usr/local/lib -lsasl2'
[root@localhost postfix-2.6.5]#make -f Makefile.in MAKELEVEL= Makefiles
(echo "# Do not edit -- this file documents how Postfix was built for your machine."; /bin/sh makedefs) >makedefs.tmp
No <db.h> include file found.
Install the appropriate db*-devel package first.
See the RELEASE_NOTES file for more information.
make: *** [Makefiles] 错误 1
make: *** [makefiles] 错误 2
下载地址
http://www.oracle.com/technology/global/cn/software/products/berkeley-db/db/index.html
tar –zxvpf db-4.8.26.tar.gz
cd db-4.8.26
cd build_unix
../dist/configure
make &&make install
解决方法(同上实验一样):安装 db*-devel 包 db4-4.3.29-10.el5.i386.rpm
http://rpm.pbone.net/index.php3/stat/4/idpl/13943838/dir/centos_5/com/db4-4.3.29-10.el5.i386.rpm.html
重新编译
[root@localhost postfix-2.6.5]#make makefiles 'CCARGS=-DHAS_MYSQL -I/usr/local/mysql/include/mysql -DUSE_SASL_AUTH -DUSE_CYRUS_SASL -I/usr/ \
local/include/sasl -I/usr/local/BerkeleyDB.4.5/include' 'AUXLIBS=-L/usr/local/mysql/lib/mysql -lmysqlclient -lz -lm -L/usr/local/lib -lsasl2 -L/usr/local/BerkeleyDB.4.5/lib'
[root@localhost postfix-2.6.5]# make &&make install
[root@localhost postfix-2.6.5]#vi /etc/postfix/main.cf
#=====================BASE=========================
mydomain = gcp.com
myhostname = mail.gcp.com
mynetworks = 168.168.1.0/24, 127.0.0.0/8
mydestination = $myhostname, localhost.$mydomain, localhost, $mydomain
myorigin = $mydomain
inet_interfaces = all
#=====================Vritual Mailbox settings======================
#===========配置参考postfixadmin/DOCUMENTS/POSTFIX_CONF.txt=====
virtual_mailbox_base = /var/mailbox
virtual_mailbox_maps = mysql:/etc/postfix/mysql/mysql_virtual_mailbox_maps.cf
virtual_mailbox_domains = mysql:/etc/postfix/mysql/mysql_virtual_domains_maps.cf
virtual_alias_maps = mysql:/etc/postfix/mysql/mysql_virtual_alias_maps.cf
virtual_uid_maps = static:1001
virtual_gid_maps = static:1001
virtual_transport = maildrop
maildrop_destination_recipient_limit = 1
maildrop_destination_concurrency_limit = 1
#====================QUOTA===================================
#===========配置参考postfixadmin/DOCUMENTS/POSTFIX_CONF.txt======
message_size_limit = 14336000
virtual_mailbox_limit = 20971520
virtual_create_maildirsize = yes
virtual_mailbox_extended = yes
virtual_mailbox_limit_maps = mysql:/etc/postfix/mysql/mysql_virtual_mailbox_limit_maps.cf
virtual_mailbox_limit_override = yes
virtual_maildir_limit_message = Sorry, the user's maildir has overdrawn his diskspace quota, please try again later.
virtual_overquota_bounce = yes
#====================SASL=========================================
#=====配置参考postfix-2.6.5/html/SASL_README.html中的SASL Authentication====
broken_sasl_auth_clients = yes
smtpd_recipient_restrictions = permit_mynetworks,permit_sasl_authenticated,reject_invalid_hostname,
reject_non_fqdn_hostname,
reject_unknown_sender_domain,
reject_non_fqdn_sender,reject_non_fqdn_recipient,
reject_unknown_recipient_domain,reject_unauth_pipelining,
reject_unauth_destination,
permit
smtpd_sasl_auth_enable = yes
smtpd_sasl_local_domain =
smtpd_sasl_security_options = noanonymous
smtpd_sasl_application_name = smtpd
smtpd_banner=$myhostname ESMTP "Version not Available"
alias_maps = hash:/etc/aliases
unknown_local_recipient_reject_code = 450
alias_maps = hash:/etc/aliases
unknown_local_recipient_reject_code = 450
[root@localhost postfix-2.6.5]#vi master.cf
flags=DRhu user=vmail:vmail argv=/usr/local/maildrop/bin/maildrop -d ${recipient}
//这个配置文件,"flags=DRhu user=vmail:vmail argv=/usr/local/maildrop/bin/maildrop -d ${recipient}"是修改过的,flags前面必须有2个空格
[root@localhost postfix-2.6.5]# mkdir /var/mailbox
[root@localhost postfix-2.6.5]#chown -R vmail:vmail /var/mailbox
[root@localhost postfix-2.6.5]#chmod -R ug+rwx,o-rwx /var/mailbox
[root@localhost postfix-2.6.5]# mkdir -p /etc/postfix/mysql
//创建目录/etc/postfix/mysql,然后手动创建如下四个配置文件
[root@localhost mysql]# ls -l
总计 60
-rw------- 1 root root 125 09-30 18:21 mysql_virtual_alias_maps.cf
-rw------- 1 root root 134 10-23 20:46 mysql_virtual_domains_maps.cf
-rw------- 1 root root 129 09-30 18:23 mysql_virtual_mailbox_limit_maps.cf
-rw------- 1 root root 172 10-05 13:39 mysql_virtual_mailbox_maps.cf
[root@localhost mysql]# more mysql_virtual_alias_maps.cf
user = postfix
password = postfix
hosts = localhost
dbname = postfix
table = alias
select_field = goto
where_field = address
[root@localhost mysql]# more mysql_virtual_domains_maps.cf
user = postfix
password = postfix
hosts = localhost
dbname = postfix
table = domain
select_field = description
where_field = domain
[root@localhost mysql]# more mysql_virtual_mailbox_maps.cf
user = postfix
password = postfix
hosts = localhost
dbname = postfix
table = mailbox
select_field = maildir
where_field = username
additional_conditions = AND active = '1'
[root@localhost mysql]# more mysql_virtual_mailbox_limit_maps.cf
user = postfix
password = postfix
hosts = localhost
dbname = postfix
table = mailbox
select_field = quota
where_field = username
#===========配置参考postfixadmin/DOCUMENTS/POSTFIX_CONF.txt=====
[root@localhost postfix-2.6.5]# tail /var/log/maillog
[root@localhost maildrop-2.5.0.20100815]# postfix
postfix: fatal: /etc/postfix/main.cf, line 674: missing '=' after attribute name: "reject_non_fqdn_hostname,"
解决方法:将”=”后改为一行

//main.cf是一个 key = value 格式的配置文件,如果value部分一行写不完,要分多行来写,必须以空格开头,否则postfix将认为它是一个key,而一个key 之后必须跟着一个=号,启动的时候会造成错误。
[root@localhost ~]#vim /etc/postfix/master.cf
maildrop unix - n n - - pipe
flags=DRhu user=vmail argv=/usr/local/maildrop/bin/maildrop -d ${recipient}
注意: flags=DRhu user=vmail:vmail argv=/usr/local/maildrop/bin/maildrop -d ${recipient}"是修改过的,flags前面必须有2个空格
[root@localhost postfix-2.2.11]# telnet 192.168.1.108 25
Trying 192.168.1.108...
Connected to 192.168.1.108 (192.168.1.108).
Escape character is '^]'.
220 Welcome to our mail.gcp.com ESMTP,Warning: Version not Available!
ehlo localhost
250-mail.gcp.com
250-PIPELINING
250-SIZE 10240000
250-VRFY
250-ETRN
250-AUTH PLAIN LOGIN
250-AUTH=PLAIN LOGIN(请确保您的输出以类似两行)
250 8BITMIME
[root@localhost postfix-2.6.5]# echo "/usr/sbin/postfix start" >>/etc/rc.d/rc.local //开机启动
九、Corurier-imap安装和配置
编译出错 configure: error: courierauthconfig not found
解决方法:设置变量COURIERAUTHCONFI
[root@localhost courier-imap-4.5.0]# export COURIERAUTHCONFIG=/usr/local/authlib/bin/courierauthconfig
然后重新执行编译,还是不行出现configure: error: This option is no longer supported
版本问题:courier-imap-4.8.0.20100628.tar.bz2不行,换成如下版本则可以courier-imap-4.5.0.tar.bz2
[root@localhost courier-imap-4.5.0]# ./configure --prefix=/usr/local/imap --with-redhat --disable-root-check --enable-unicode=utf-8,gb2312,gbk --with-trashquota --with-dirsync --with-mysql-libs=/usr/local/mysql/lib/mysql --with-mysql-includes=/usr/local/mysql/include/mysql/ --with-authmysql --with-authmysql=yes
imaplogin.c:35:25: 错误:courierauth.h:没有那个文件或目录
imaplogin.c:36:30: 错误:courierauthdebug.h:没有那个文件或目录
imaplogin.c:144: 警告:‘struct authinfo’ 在形参表内部声明
imaplogin.c:144: 警告:它的作用域仅限于此定义或声明,这可能并不是您想要的
imaplogin.c: 在函数 ‘login_callback’ 中:
imaplogin.c:154: 错误:提领指向不完全类型的指针
imaplogin.c:155: 警告:隐式声明函数 ‘auth_getoption’
imaplogin.c:155: 错误:提领指向不完全类型的指针
imaplogin.c:156: 警告:赋值时将整数赋给指针,未作类型转换
[root@localhost courier-imap-4.5.0]# ./configure --prefix=/usr/local/imap --with-redhat --disable-root-check --enable-unicode=utf-8,gb2312,gbk --with-trashquota --with-dirsync --with-mysql-libs=/usr/local/mysql/lib/mysql --with-mysql-includes=/usr/local/mysql/include/mysql/ --with-authmysql --with-authmysql=yes CPPFLAGS='-I/usr/local/authlib/include'
[root@localhost courier-imap-4.5.0]# make && make install
[root@localhost courier-imap-4.5.0]#make install-configure
[root@localhost courier-imap-4.5.0]# make install-configure
[root@localhost courier-imap-4.5.0]# cp courier-imap.sysvinit /usr/local/imap/sbin/imapd
[root@localhost courier-imap-4.5.0]# chmod 755 /usr/local/imap/sbin/imapd
[root@localhost courier-imap-4.5.0]#vim /usr/local/imap/etc/pop3d
POP3DSTART=YES
[root@localhost courier-imap-4.5.0]#vim /usr/local/imap/etc/pop3d/imapd
IMAPDSTART=YES
[root@localhost courier-imap-4.5.0]# /usr/local/imap/sbin/imapd start
[root@localhost ~]# echo " /usr/local/imap/sbin/imapd start">> /etc/rc.d/rc.local
十、courier-maildrop 安装和配置
Maiidrop的作用是本地投递,即把收到的邮件移动到相应的用户目录。它是安装maildrop所必须的,所以需要先安装这个软件(如果系统不存在这个软件的话)。
安装 Unzip pcre-8.10.zip
[root@localhost pcre-8.10]# ./configure
[root@localhost pcre-8.10]# Make&& make istall
安装maildrop
[root@localhost maildrop-2.5.0.20100815]# ./configure --prefix=/usr/local/maildrop --enable-sendmail=/usr/sbin/sendmail --enable-trusted-users='root vmail' --enable-syslog=1 --enable-maildirquota --enable-maildrop-uid=1001 --enable-maildrop-gid=1001 --with-trashquota --with-dirsync
courierauthdebug.h: 没有那个文件或目录
解决方法:编译时加CPPFLAGS='-I/usr/local/courier-authlib/include'
[root@localhost maildrop-2.5.0.20100815]# Make&& make istall
[root@localhost maildrop-2.5.0.20100815]# cp /usr/local/maildrop/bin/maildrop /usr/bin
[root@localhost maildrop-2.5.0.20100815]# maildrop –v
maildrop 2.5.0 Copyright 1998-2005 Double Precision, Inc.
GDBM extensions enabled.
Courier Authentication Library extension enabled. /*保证有这一行输出,表明maildrop */
Maildir quota extension enabled. /* SASL和courier-authlib紧密结合在一起*/
This program is distributed under the terms of the GNU General Public
License. See COPYING for additional information.
[root@localhost ~]# more /etc/maildroprc
logfile "/var/mailbox/maildrop.log"
to "$HOME/$DEFAULT
[root@localhost maildrop-2.5.0.20100815]# /usr/local/imap/sbin/imapd start
[root@localhost postfix-2.6.5]# telnet 192.168.1.1.117 25
192.168.1.1.117/25: Temporary failure in name resolution
解决方法:修改/etc/resolv.conf文件
maidrop没有创建和删除邮件用户目录的能力,在配置postfixadmin时,我们提到需要使用2个shell脚本 /usr/sbin/maildirdel.sh及/usr/local/bin/maildirmake.sh,这2个脚本的作用就是用来弥补maildrop不能创建/删除目录这个缺陷的。
[root@localhost extmail]# more /usr/local/bin/maildirmake.sh
#!/bin/sh
# Auto create maildir under FreeBSD
# Author: He zhiqiang <hzqbbc@hzqbbc.com>
# copyright (c) 1998-2005
BASE="/var/mailbox"
umask 077
# mkdir -p to omit error
mkdir -p "$BASE/$1"
# step into the new dir and call maildirmake
/usr/local/bin/maildirmake "$BASE/$1/$2"
[root@localhost extmail]# more /usr/sbin/maildirdel.sh
#!/bin/bash
rm -rf /var/mailbox/$1/$2
[root@localhost extmail]#chmod +x /usr/local/bin/maildirmake.sh
[root@localhost extmail]#chmod +x /usr/sbin/maildirdel.sh
这2个脚本由web调用,而web(apache)的执行用户为vmail,出于安全考虑,我们给vmail用户的权限非常有限,为了保证这2个 shell脚本能正常执行使用vi这样的编辑器来修改/etc/sudoers这个配置文件,把行"vmail ALL = NOPASSWD: /usr/local/bin/maildirmake.sh, /usr/sbin/maildirdel.sh"追加到文件末尾即可!
##/etc/sudoers里需要把 "Defaults requiretty"这行注释掉式//
# Example script for removing a Maildir from a Courier-IMAP virtual mail
# hierarchy.
# The script looks at arguments 1 and 2, assuming that they
# indicate username and domain, respectively.
# The script will not actually delete the maildir. I moves it
# to a special directory which may once in a while be cleaned up
# by the system administrator.
# This script should be run as the user which owns the maildirs. If
# the script is actually run by the apache user (e.g. through PHP),
# then you could use "sudo" to grant apache the rights to run
# this script as the relevant user.
# Assume this script has been saved as
# /usr/local/bin/postfixadmin-mailbox-postdeletion.sh and has been
# made executable. Now, an example /etc/sudoers line:
# apache ALL=(courier) NOPASSWD: /usr/local/bin/postfixadmin-mailbox-postdeletion.sh
# The line states that the apache user may run the script as the
# user "courier" without providing a password.
十一、Extmail安装和配置
[root@localhost ~]# tar zxvf extmail-1[1][1].1.1.tar.gz -C /var/www
[root@localhost ~]# mv /var/www/extmail-1.1.1 /var/www/extsuite/extmail
[root@localhost ~]#cd /var/www/extsuite/extmail
[root@localhost ~]# chown -R postfix:postfix /var/www/extsuite/extmail/cgi/
[root@localhost extmail]# cp webmail.cf.default webmail.cf
[root@localhost extmail]#vim webmail.cf
SYS_MAILDIR_BASE =/var/mailbox //虚拟用户mail存放的根目录
SYS_MYSQL_HOST = localhost
SYS_MYSQL_USER = postfix
SYS_MYSQL_PASS = postfix
SYS_MYSQL_DB = postfix
SYS_MYSQL_SOCKET =/tmp/mysql.sock--enable-thread-safe-client
SYS_AUTHLIB_SOCKET = /usr/local/authlib/var/spool/authdaemon/socket
[root@localhost ~]# vim /usr/local/apache2/conf/httpd.conf
ScriptAlias /extmail/cgi/ /var/www/extsuite/extmail/cgi/
<Directory "/var/www/extsuite/extmail/cgi">
AllowOverride None
Options None
Order allow,deny
Allow from all
</Directory>
Alias /extmail /var/www/extsuite/extmail/html
<Directory "/var/www/extsuite/extmail/cgi/html">
AllowOverride None
Options None
Order allow,deny
Allow from all
</Directory>
在文件/var/www/extsuite/extmail/html/default/index.html 加入下面的标识,可以得到不同邮件域的下拉列表
<TD><%domain%></TD>
<TD>
<select name="domain" size="1" class="input_select"></option>
<option value="gcp.com">gcp.com</option>
<option value="mail.gcp.com">mail.gcp.com</option>
</select>
</TD>
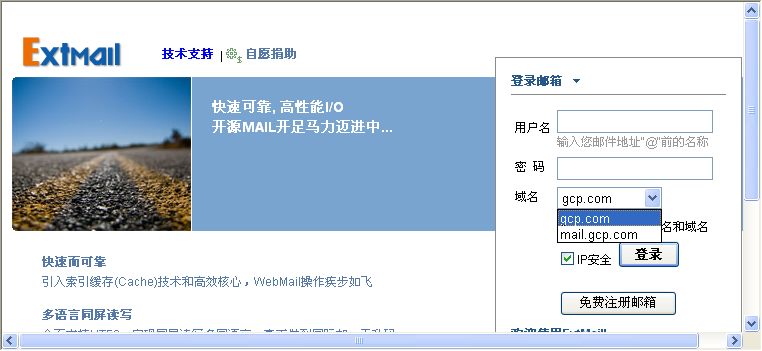
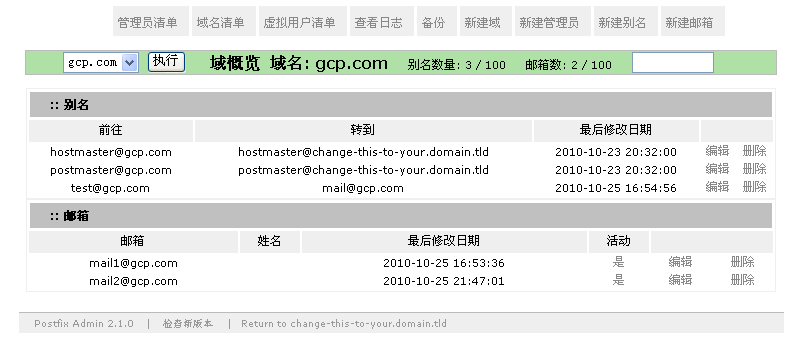
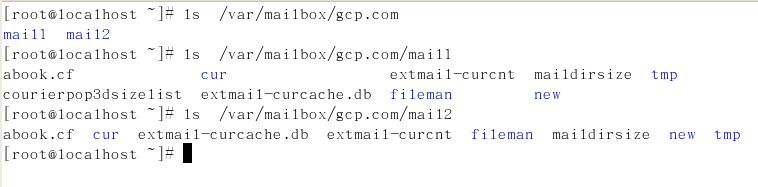
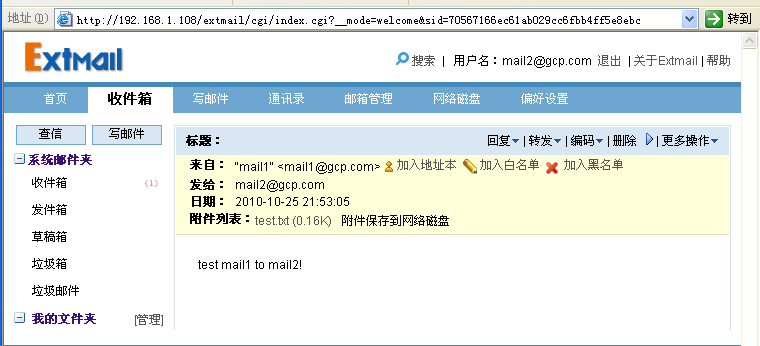
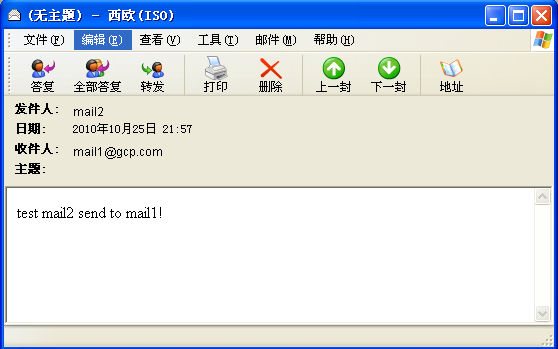
十二、测试图片
postfixadmin创建邮箱
Webmail,outlook发送,接收
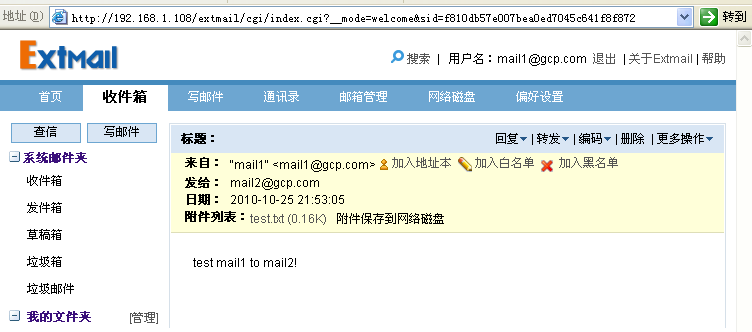
mail2接收
参考文章
http://sery.blog.51cto.com/10037/45500
http://coolerfeng.blog.51cto.com/133059/58075
转载于:https://blog.51cto.com/angf2/401442
postfix+postfixadmin+extmail邮件服务器架设过程相关推荐
- 企业邮箱及邮件服务器架设
新手入门:企业邮箱及邮件服务器架设 电子邮件是互联网最基本.但却是最重要的组成部分,通过电子邮件进行方便.快捷的信息交流,已经逐渐成为企业工作中不可或缺的行为习惯.企业邮箱是指以企业的域名作为后缀的电 ...
- CentOS4.4下邮件服务器架设笔记之windows AD整合功能实现
1.通过"CentOS4.4下邮件服务器架设笔记之邮件网关功能实现"这一篇文章,我们已经实现了邮件网关功能,但是对于microsoft ad 平台下exchange邮件系统用户来说 ...
- LAMP+Postfix+Dovecot+SquirrelMail邮件服务器搭建
LAMP+Postfix+Dovecot+SquirrelMail邮件服务器搭建 前段时间介绍过了在RHEL5下如何搭建LAMP环境,今天来介绍如何在LAMP下搭建邮件服务器,这一篇是构建基于post ...
- 搭建邮件服务器,过程非常简单
搭建邮件服务器,过程非常简单,只需几个步骤即可. 通常在Linux搭建邮件服务器是需要安装很多软件和配置文件的,所以我们可以使用一个开源邮件服务器软件来搭建的. 准备一台服务器与系统 云服务器或本地虚 ...
- postfix+squirrelmail实现邮件服务器
postfix+squirrelmail实现邮件服务器 [root@localhost ~]# vim /etc/sysconfig/network [root@localhost ~]# hostn ...
- 全开源中小规模邮件服务器架设方案
一.安装apache+php+mysql+phpMyAdmin 官方网站:http://www.apache.org http://www.php.net http://www.mysql.com 安 ...
- 【企业邮件服务器搭建过程】
企业邮件服务器搭建 一.准备环境 二.DNS服务搭建 三.发送端配置 四.接收端配置 五.mail+web界面 一.准备环境 Centos7以上 yum -y install bind yum -y ...
- 小型邮件服务器,windows 2003 server小型邮件服务器架设
一.安装pop3和smtp服务组件: 1.安装pop3服务组件:以系统管理员身份登录windows 2003 server系统,依次进入"控制面 板--添加或删除程序--添加/删除windo ...
- 医疗行业邮件服务器架设方案
客户案例: 港大深圳医院2007年11月奠基,是"十一五"期间深圳市政府投资兴建的最大规模公立医院.港大医院医疗手段不断丰富,充分应用各种精密医疗仪器,为病患者提供优质服务.为了适 ...
最新文章
- centos删除php_Linux CentOS完全卸载PHP
- 菜鸟做设计必看!有关如何做设计的整体思路,以及能否综合的笔记
- 美国科学院公布新一批院士名单,中科院曹晓风及五名华裔教授当选
- 中科大410分计算机排名第几,2021考研成绩发布:中科大400分无缘复试,中山大学321分登顶第二...
- gcc 安装在服务器的问题总结
- Atitit 工作流之道 艾提拉著 BPM,即业务流程管理 目录 1. 流程入门 思想 历史 分类 1 第二篇 第2章 初识工作流 2 1.1. 2.3 工作流技术相关规范 2.3.1 W
- Unity 官方教程2
- A9财务管理软件与金蝶、用友财务管理软件功能比较表(一)
- win10安装steam有损计算机,Win10专业版修复Steam磁盘写入错误的方法
- 搭建petalinux开发环境
- Element 表格序号问题
- 课程设计题四:LED彩灯控制器设计
- Ubuntu 20 / 21 - KDE 配置Nvidia 独立显卡
- 在若依项目中添加导入excel功能
- 同步线程和异步线程的区别
- HTTPS(ssl)
- 2021-06-10 multisim仿真,高温报警电路555
- 2021个人年度计划怎么制定?
- 杭州java校园招聘_网易校园招聘杭州Java笔试题
- 怎样营造线上购物氛围-纽黑文教育