SpringMVC 学习系列 (4) 之 数据绑定 -1
2019独角兽企业重金招聘Python工程师标准>>> 
在系列(3)中我们介绍了请求是如何映射到一个action上的,下一步当然是如何获取到请求中的数据,这就引出了本篇所要讲的内容—数据绑定。
首先看一下都有哪些绑定数据的注解:
1.@RequestParam,绑定单个请求数据,可以是URL中的数据,表单提交的数据或上传的文件;
2.@PathVariable,绑定URL模板变量值;
3.@CookieValue,绑定Cookie数据;
4.@RequestHeader,绑定请求头数据;
5.@ModelAttribute,绑定数据到Model;
6.@SessionAttributes,绑定数据到Session;
7.@RequestBody,用来处理Content-Type不是application/x-www-form-urlencoded编码的内容,例如application/json, application/xml等;
8.@RequestPart,绑定“multipart/data”数据,并可以根据数据类型进项对象转换;
下面我们来看如何使用:
1.@RequestParam:
为了验证文件绑定我们需要先做以下工作:
a.把commons-fileupload-1.3.1.jar和commons-io-2.4.jar两个jar包添加到我们项目。
b.配置我们项目中的springservlet-config.xml文件使之支持文件上传,内容如下:

<!-- 支持上传文件 -->
<bean id="multipartResolver" class="org.springframework.web.multipart.commons.CommonsMultipartResolver">  <!-- 设置上传文件的最大尺寸为1MB -->  <property name="maxUploadSize">  <value>1048576</value>  </property><property name="defaultEncoding"> <value>UTF-8</value> </property>
</bean>
其中maxUploadSize用于限制上传文件的最大大小,也可以不做设置,这样就代表上传文件的大小木有限制。defaultEncoding用于设置上传文件的编码格式,用于解决上传的文件中文名乱码问题。
下面就看具体如何使用:
添加一个DataBindController,里面有2个paramBind的action分别对应get和post请求:

package com.demo.web.controllers;import javax.servlet.http.HttpServletRequest;
import org.springframework.stereotype.Controller;
import org.springframework.web.bind.ServletRequestUtils;
import org.springframework.web.bind.annotation.RequestMapping;
import org.springframework.web.bind.annotation.RequestMethod;
import org.springframework.web.bind.annotation.RequestParam;
import org.springframework.web.multipart.MultipartFile;
import org.springframework.web.multipart.MultipartHttpServletRequest;
import org.springframework.web.servlet.ModelAndView;@Controller
@RequestMapping(value = "/databind")
public class DataBindController {@RequestMapping(value="/parambind", method = {RequestMethod.GET})public ModelAndView paramBind(){ModelAndView modelAndView = new ModelAndView();  modelAndView.setViewName("parambind");  return modelAndView;}@RequestMapping(value="/parambind", method = {RequestMethod.POST})public ModelAndView paramBind(HttpServletRequest request, @RequestParam("urlParam") String urlParam, @RequestParam("formParam") String formParam, @RequestParam("formFile") MultipartFile formFile){//如果不用注解自动绑定,我们还可以像下面一样手动获取数据String urlParam1 = ServletRequestUtils.getStringParameter(request, "urlParam", null);String formParam1 = ServletRequestUtils.getStringParameter(request, "formParam", null);MultipartFile formFile1 = ((MultipartHttpServletRequest) request).getFile("formFile"); ModelAndView modelAndView = new ModelAndView();  modelAndView.addObject("urlParam", urlParam);  modelAndView.addObject("formParam", formParam);  modelAndView.addObject("formFileName", formFile.getOriginalFilename());  modelAndView.addObject("urlParam1", urlParam1);  modelAndView.addObject("formParam1", formParam1);  modelAndView.addObject("formFileName1", formFile1.getOriginalFilename());  modelAndView.setViewName("parambindresult");  return modelAndView;}}
在views文件夹中添加parambind.jsp和parambindresult.jsp两个视图,内容分别如下:

<%@ page language="java" contentType="text/html; charset=UTF-8"pageEncoding="UTF-8"%>
<!DOCTYPE html PUBLIC "-//W3C//DTD HTML 4.01 Transitional//EN" "http://www.w3.org/TR/html4/loose.dtd">
<html>
<head>
<meta http-equiv="Content-Type" content="text/html; charset=UTF-8">
<title>Insert title here</title>
</head>
<body><form action="parambind?urlParam=AAA" method="post" enctype="multipart/form-data"> <input type="text" name="formParam" /><br/> <input type="file" name="formFile" /><br/><input type="submit" value="Submit" /></form>
</body>
</html>

<%@ page language="java" contentType="text/html; charset=UTF-8"pageEncoding="UTF-8"%>
<!DOCTYPE html PUBLIC "-//W3C//DTD HTML 4.01 Transitional//EN" "http://www.w3.org/TR/html4/loose.dtd">
<html>
<head>
<meta http-equiv="Content-Type" content="text/html; charset=UTF-8">
<title>Insert title here</title>
</head>
<body>自动绑定数据:<br/><br/>${urlParam}<br/>${formParam}<br/>${formFileName}<br/><br/><br/><br/>手动获取数据:<br/><br/>${urlParam1}<br/>${formParam1}<br/>${formFileName1}<br/>
</body>
</html>
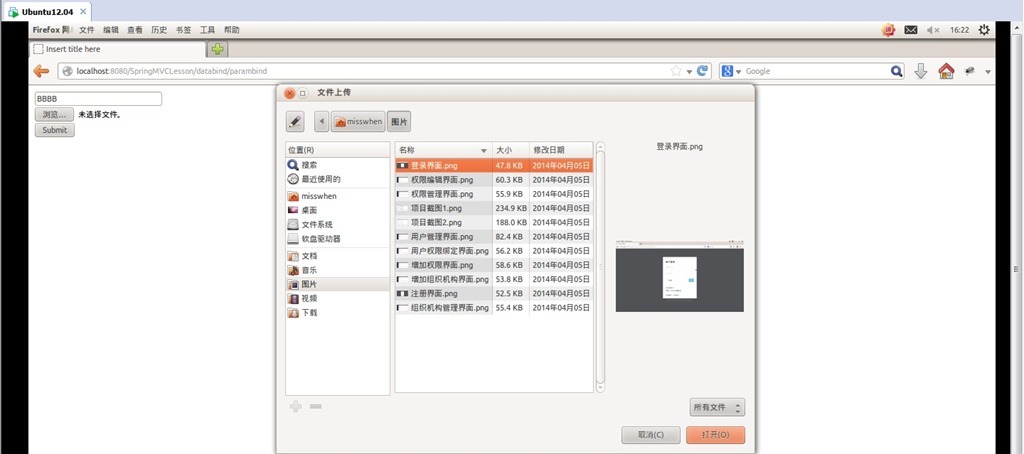
运行项目,输入内容,选择上传文件:

提交查看结果:

可以看到绑定的数据已经获取到了。
上面我们演示了如何把数据绑定到单个变量,但在实际应用中我们通常需要获取的是model对象,别担心,我们不需要把数据绑定到一个个变量然后在对model赋值,只需要把model加入相应的action参数(这里不需要指定绑定数据的注解)Spring MVC会自动进行数据转换并绑定到model对象上,一切就是这么简单。测试如下:
添加一个AccountModel类作为测试的model:

package com.demo.web.models;public class AccountModel {private String username;private String password;public void setUsername(String username){this.username=username;}public void setPassword(String password){this.password=password;}public String getUsername(){return this.username;}public String getPassword(){return this.password;}
}
在DataBindController里面添加2个modelAutoBind的action分别对应get和post请求:

@RequestMapping(value="/modelautobind", method = {RequestMethod.GET})
public String modelAutoBind(HttpServletRequest request, Model model){model.addAttribute("accountmodel", new AccountModel());return "modelautobind";
}@RequestMapping(value="/modelautobind", method = {RequestMethod.POST})
public String modelAutoBind(HttpServletRequest request, Model model, AccountModel accountModel){model.addAttribute("accountmodel", accountModel);return "modelautobindresult";
}
在views文件夹中添加modelautobind.jsp和modelautobindresult.jsp 2个视图用于提交数据和展示提交的数据:
modelautobind.jsp:

<%@ page language="java" contentType="text/html; charset=UTF-8"pageEncoding="UTF-8"%>
<!DOCTYPE html PUBLIC "-//W3C//DTD HTML 4.01 Transitional//EN" "http://www.w3.org/TR/html4/loose.dtd"><%@ taglib prefix="form" uri="http://www.springframework.org/tags/form" %><html>
<head>
<meta http-equiv="Content-Type" content="text/html; charset=UTF-8">
<title>Insert title here</title>
</head>
<body><form:form modelAttribute="accountmodel" method="post">     用户名:<form:input path="username"/><br/>密 码:<form:password path="password"/><br/><input type="submit" value="Submit" /></form:form>
</body>
</html>
modelautobindresult.jsp :

<%@ page language="java" contentType="text/html; charset=UTF-8"pageEncoding="UTF-8"%>
<!DOCTYPE html PUBLIC "-//W3C//DTD HTML 4.01 Transitional//EN" "http://www.w3.org/TR/html4/loose.dtd">
<html>
<head>
<meta http-equiv="Content-Type" content="text/html; charset=UTF-8">
<title>Insert title here</title>
</head>
<body>用户名:${accountmodel.username}<br/>密 码:${accountmodel.password}
</body>
</html>
运行测试:

用户名 输入AAA 密码 输入BBB,提交:

可以看到结果显示正确,说明自动绑定成功。
注:
1.关于@RequestParam的参数,这是一个@RequestParam的完整写法@RequestParam(value="username", required=true, defaultValue="AAA")。
value表示要绑定请求中参数的名字;
required表示请求中是否必须有这个参数,默认为true这是如果请求中没有要绑定的参数则返回404;
defaultValue表示如果请求中指定的参数值为空时的默认值;
要绑定的参数如果是值类型必须要有值否则抛异常,如果是引用类型则默认为null(Boolean除外,默认为false);
2.在刚才添加的2个action中可以看到返回类型和以前的不一样了由ModelAndView变成了String,这是由于Spring MVC 提供Model、ModelMap、Map让我们可以直接添加渲染视图需要的模型数据,在返回时直接指定对应视图名称就可以了。同时Map是继承于ModelMap的,而Model和ModelMap是继承于ExtendedModelMap的。
3.在刚才添加的视图modelautobind.jsp中可以看到<form:form、<form:input 等标签,这是Spring MVC提供的表单标签,借助于这些标签我们可以很方便的把模型数据绑定到表单上面(当然你也可以选择继续使用原生的HTML表单标签),要使用Spring MVC只要在视图中添加引用 <%@ taglib prefix="form" uri="http://www.springframework.org/tags/form" %>即可,关于Spring MVC表单标签的具体内容会在以后的文章中作介绍。
转载于:https://my.oschina.net/gaoguofan/blog/753237
SpringMVC 学习系列 (4) 之 数据绑定 -1相关推荐
- SpringMVC学习系列(11) 之 表单标签
2019独角兽企业重金招聘Python工程师标准>>> 本篇我们来学习Spring MVC表单标签的使用,借助于Spring MVC提供的表单标签可以让我们在视图上展示WebMode ...
- SpringMVC 学习系列 (3) 之 URL请求到Action的映射规则
2019独角兽企业重金招聘Python工程师标准>>> 在系列(2)中我们展示了一个简单的get请求,并返回了一个简单的helloworld页面.本篇我们来学习如何来配置一个acti ...
- SpringMVC学习系列(6) 之 数据验证
在系列(4).(5)中我们展示了如何绑定数据,绑定完数据之后如何确保我们得到的数据的正确性?这就是我们本篇要说的内容 -> 数据验证. 这里我们采用Hibernate-validator来进行验 ...
- SpringMVC学习笔记四:数据绑定
转载请注明原文地址:http://www.cnblogs.com/ygj0930/p/6831344.html 参考:http://www.cnblogs.com/HD/p/4107674.html ...
- SpringMVC学习系列(5) 之 数据验证
原文地址 http://www.cnblogs.com/liukemng/p/3738055.html 这里我们采用Hibernate-validator来进行验证,Hibernate-validat ...
- SpringMVC学习系列(六)------图片的上传
前言 在表单数据中,我们可能会遇到头像.照片等图片的上传等需求,那么如果表单中包含一个图片元素,我们在controller中应该如何接收呢? 正文 在实际的项目中,我们通常都会有专门的 ...
- SpringMVC学习系列(8) 之 国际化
一.基于浏览器请求的国际化实现: 1)在 spring的配置文件中添加 <bean id="messageSource" class="org.springfram ...
- SpringMVC学习系列-解决GET请求时中文乱码的问题
<Connector connectionTimeout="20000" port="8080" protocol="HTTP/1.1" ...
- SpringMVC:学习笔记(5)——数据绑定及表单标签
SpringMVC--数据绑定及表单标签 理解数据绑定 为什么要使用数据绑定 基于HTTP特性,所有的用户输入的请求参数类型都是String,比如下面表单: 按照我们以往所学,如果要获取请求的所有参数 ...
最新文章
- Bengio、Hinton的不懈追求——深度学习算法揭示大脑如何学习
- 探索ElasticSearch(一)
- Ontology的研究和应用
- HTML的语义化,你需要深入了解
- django的url控制系统
- Kubernetes Resource QoS Classes介绍
- Boosting原理学习
- 集合经验模态分解matlab,matlab集合经验模态分解EEMD工具包
- python连接服务器完整过程
- 警惕!关于5G的最新骗局!
- opensource项目_2020 Opensource.com夏季阅读列表
- Spring Cloud Gateway的断路器(CircuitBreaker)功能
- 图片转ICO工具新版本(支持更多图片格式,支持更多分辨率,原生更快)
- 基于Matlab模拟AWGN 信道上 OFDM附完整代码
- 考研计算机专业课408,【21计算机考研】专业课统考408院校汇总
- 自动下载RDS MySQL备份文件
- 单片机c语言基础知识,c语言必背100代码有哪些?
- 毕业设计 stm32人体健康监护系统 - 单片机 嵌入式 物联网
- Win2k3架设PPPOE服务器方法(RASPPPOE)
- UCINET入门案例
