ROSDUCT:通过rosbridge在本地公开远程ROS主题、服务和参数
软件包:https://github.com/uts-magic-lab/rosduct
历史:
在实验室中,我们遇到了设置机器(新生、访问学生、黑客游戏......)与ROS机器人进行通信的问题,网络始终是一个问题。安装ROS、设置ROS_MASTER_URI、ROS_IP、在同一个本地网络或建立一个VPN或许多其他事情包括运行Windows、Mac、奇怪的Linux版本的机器...
最简单的解决方案是将ROS节点放入Docker容器中,以便它们可以从任何机器运行。由于不能公开所有端口,并使用与主机相同的IP(我们错了,使用标志 - 网络主机,你会做到这一点...... 但它不适用于Mac!we were wrong, use the flag –net host and you’ll be doing exactly that… but it doesn’t work on Mac!)。所以我们采用了rosbridge的方式(因为我们所有的机器人都使用rosbridge)。
说明:
ROSduct,ROS消息的管道。ROSduct充当代理,通过rosbridge协议将ROS主题、服务和参数从远程roscore公开到本地roscore。
假设您的网络中有一个启用了ROS的机器人,并且您想与其通信,但是您的网络配置不允许直接通信(例如,来自Docker容器内部)。通过使用ROSduct,您可以配置一组主题、服务和参数(动作服务器,因为它们在内部作为主题实施)在本地roscore中公开以透明地向机器人发送和接收ROS流量。
顺便说一下,该软件包内部包含一个Python 1中的rosbridge客户端实现。我们正在计划给它更多的关注,并分别在PyPI中发布它。这有效地允许没有安装ROS的计算机通过Python通过ROS消息进行通信(没有安装这些消息)。
你可以运行多个rosduct来分隔处理一组主题/服务的每一个。如果他们中的任何人处理发布快速或大量数据的主题,则推荐他们。您还可以将不同的机器人主题重新映射到本地的一个roscore中,并像处理共享相同的roscore一样处理它们。
请注意,通过rosbridge进行转换意味着通过将事情转换为JSON或从JSON转换出来的开销。我随机尝试了一些小主题,以达到500Hz,joint_states达到100Hz,TF 200Hz ......当然还有良好的网络。你也有rosbridge引入的延迟。将rosduct视为一种便利工具
让我知道如果你觉得它有趣/有用!
----
rosduct
ROSduct,ROS消息的管道。ROSduct充当代理,通过rosbridge协议将ROS主题,服务和参数从远端暴露roscore到本地。roscore
假设您的网络中有一个启用了ROS的机器人,并且您想与其通信,但是您的网络配置不允许直接通信(例如,来自Docker容器内部)。通过使用ROSduct,您可以配置一组主题,服务和参数(动作服务器,因为它们在内部作为主题实施)在本地roscore中公开以透明地向机器人发送和接收ROS流量。
TODO:图片解释它。
用法
填写YAML文件与您的主题发布者,订阅者,服务服务器访问,服务服务器公开和参数。也是ROSbridge websocket服务器的IP和端口。
# ROSbridge websocket server info
rosbridge_ip: 192.168.1.31
rosbridge_port: 9090
# Topics being published in the robot to expose locally
remote_topics: [['/joint_states', 'sensor_msgs/JointState'], ['/tf', 'tf2_msgs/TFMessage'],['/scan', 'sensor_msgs/LaserScan']]
# Topics being published in the local roscore to expose remotely
local_topics: [['/test1', 'std_msgs/String'],['/closest_point', 'sensor_msgs/LaserScan']]
# Services running in the robot to expose locally
remote_services: [['/rosout/get_loggers', 'roscpp/GetLoggers']]
# Services running locally to expose to the robot
local_services: [['/add_two_ints', 'beginner_tutorials/AddTwoInts']]
# Parameters to be sync, they will be polled to stay in sync
parameters: ['/robot_description']
parameter_polling_hz: 1
注意:不要将远程或本地主题添加到主题中/rosout。
Docker的示例用法
这个工具主要是为了解决Docker容器的一个问题。如果您正在运行需要与ROS机器人进行双向通信的Docker容器,并且您正在使用Linux,则可以将其添加--net host到您的docker run命令中(仅在运行后)。但是,如果您使用的是Mac,这将无法正常工作。要解决它,你可以使用这个包。
只需进入你的Docker镜像行列:
mkdir -p ~/rosduct_ws/src
cd ~/rosduct_ws/src
git clone https://github.com/uts-magic-lab/rosduct
cd ..
catkin_make
. devel/setup.bash
制作一个启动文件,将其配置为公开您需要的主题/服务。例如,对于与move_base您进行交互的工具而言,可能具有如下的启动文件:
<launch><node pkg="rosduct" name="rosduct" type="rosduct_main.py" output="screen"><rosparam># ROSbridge websocket server inforosbridge_ip: YOUR.ROBOT.IP.HERErosbridge_port: 9090# Topics being published in the robot to expose locallyremote_topics: [['/amcl_pose', 'geometry_msgs/PoseWithCovarianceStamped'], ['/move_base/feedback', 'move_base_msgs/MoveBaseActionFeedback'],['/move_base/status', 'actionlib_msgs/GoalStatusArray'],['/move_base/result', 'move_base_msgs/MoveBaseActionResult'],]# Topics being published in the local roscore to expose remotelylocal_topics: [['/move_base/goal', 'move_base_msgs/MoveBaseActionGoal'],['/mover_base/cancel', 'actionlib_msgs/GoalID']]# Services running in the robot to expose locallyremote_services: [['/move_base/clear_costmaps', 'std_srvs/Empty']]# Services running locally to expose to the robotlocal_services: []# Parameters to be sync, they will be polled to stay in sync#parameters: []#parameter_polling_hz: 1</rosparam></node>
</launch>
因此,您运行Docker镜像公开端口9090(用于rosbridge通信),docker run -p 9090:9090 -it your_docker_image并在运行ROS节点之前运行先前的启动文件。
要构建配置,您可以执行rosnode info YOUR_NODE并检查Publications(local_topics)和Subscriptions(remote_topics)和Services(local_services)。为了填充remote_services,你需要知道你的节点调用了哪些服务。
----
Fiducial Marker Based Localization System
Overview
This package provides a system that allows a robot to determine its position and orientation by looking at a number of fiducial markers (similar to QR codes) that are fixed in the environment of the robot. Initially, the position of one marker is specified, or automatically determined. After that, a map (in the form of a file of 6DOF poses) is created by observing pairs of fiducial markers and determining the translation and rotation between them.
How it works
The Ubiquity Robotics localization system uses a number of fiducial markers of known size to determine the robot's position. Detection of the markers is done by the aruco_detect node. For each marker visible in the image, a set of vertices in image coordinates is produced. Since the intrinsic parameters of the camera and the size of the fiducial are known, the pose of the fiducial relative to the camera can be estimated. Note that if the camera intrinsics are not known, they can be determined using the process described in the camera calibration tutorial.
The diagram below shows the coordinate system of a fiducial marker, which has a length of 2d. The image coordinates (x, y)of each vertex correspond to a ray from the camera. The pose estimation code solves a set of linear equations to determine the world (X, Y, Z) coordinate of each of the vertices. From this, we obtain the *transform* of the fiducial's coordinate system to the camera's coordinate system T_fid_cam. This represents the *pose* of the marker in the camera's coordinate system. Since we know the camera's pose in the coordinate system of the robot,c image. In the diagram below, two fiducials, fid1and fid2 are shown. If fid1 is at a known pose in the world, T_map_fid1 and we know the marker to camera transforms for both markers, we can compute the pose of fid2 thus:
T_map_fid2 = T_map_fid1 * T_cam_fid2 * T_fid1_cam
In this way, the map is built up as more fiducial pairs are observed. multiple observations are combined with weighting, to produce an estimate of the 6DOF pose of each fiducial marker.

Getting Started
A camera is required, and it is necessary to know the position of the camera relative to the robot's base_link. Software for the Raspberry Pi is available at:
https://github.com/UbiquityRobotics/raspicam_node
To install the fiducial software from binary packages:
sudo apt-get install ros-kinetic-fiducials
Fiducial markers can be generated with a command like this:
rosrun aruco_detect create_markers.py 100 112 fiducials.pdf
Once printed, they can be affixed to the environment. They don't need to be placed in any particular pattern but the density should be such that two or more markers can be seen by the camera on the robot, so the map can be built. Placing them on the ceiling reduces problems with occlusion, but is not required, since a full 6DOF pose is estimated.
Two nodes should be run, aruco_detect, which handles the detection of the fiducials, and fiducial_slam, which combines the fiducial pose estimates and builds the map and makes an estimate of the robot's position. The map is in the form of a text file specifying the 6DOF pose of each of the markers, and is automatically saved.
There are launch files for both of these nodes:
roslaunch aruco_detect aruco_detect.launch
roslaunch fiducial_slam fiducial_slam.launch
A launch file is also provided to visualize the map in rviz.
roslaunch fiducial_slam fiducial_rviz.launch
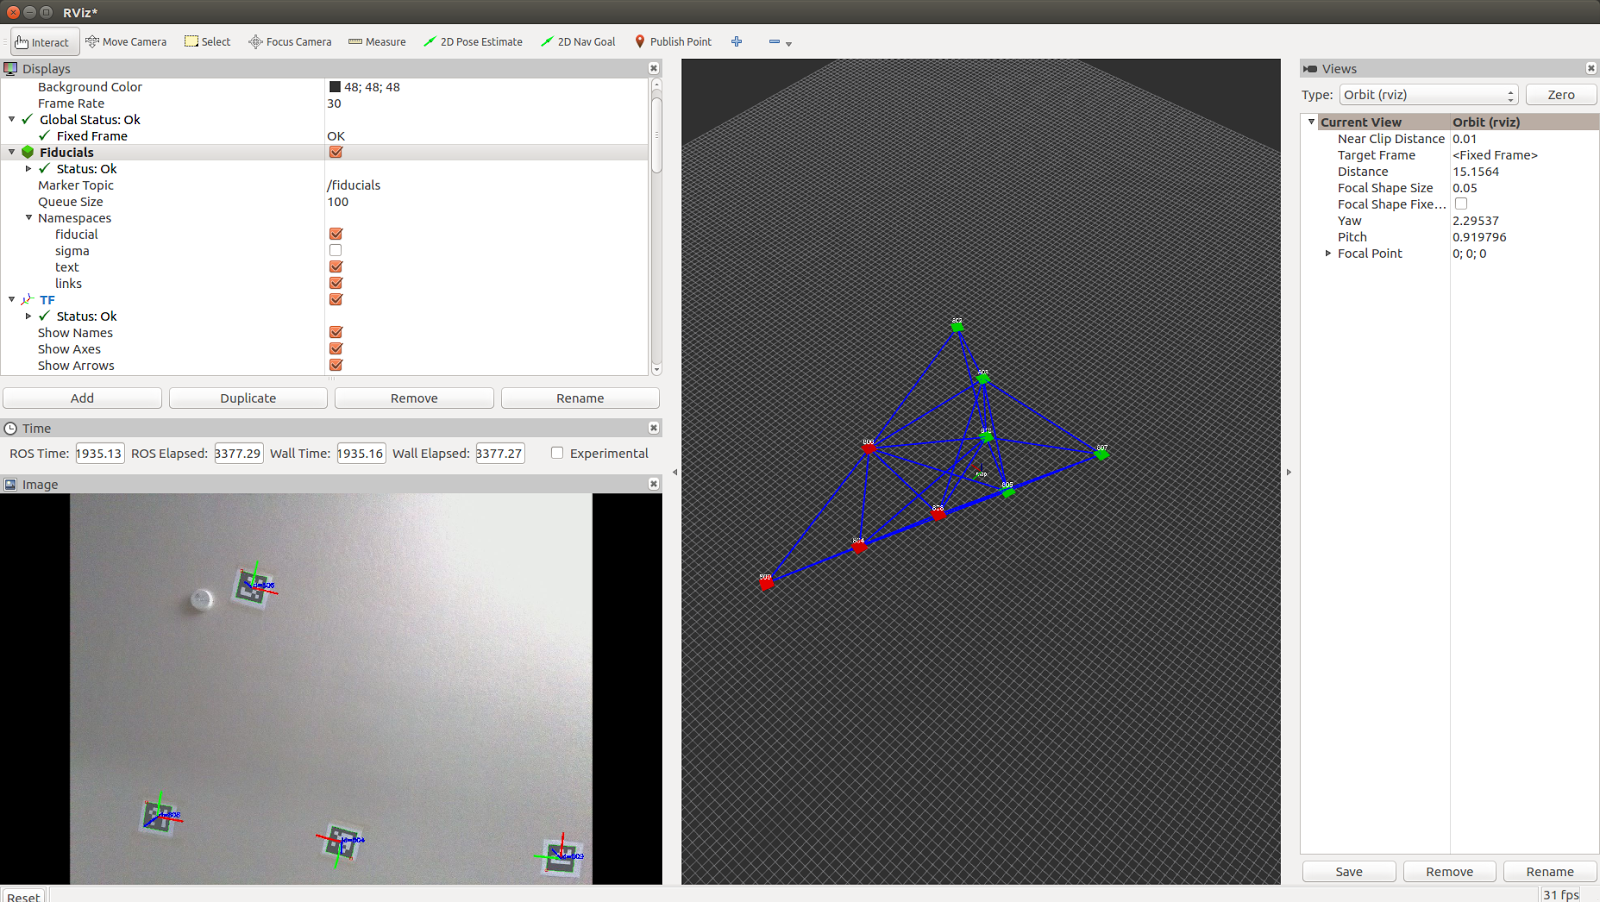
This will produce a display as shown below. The bottom left pane shows the current camera view. This is useful for determining if the fiducial density is sufficient. The right-hand pane shows the map of fiducials as it is being built. Red cubes represent fiducials that are currently in view of the camera. Green cubes represent fiducials that are in the map, but not currently in the view of the camera. The blue lines show connected pairs of fiducials that have been observed in the camera view at the same time. The robustness of the map is increased by having a high degree of connectivity between the fiducials.
Automatic Map Initialization
If the map is empty, then it will auto-initialize when a fiducial is visible. The auto-initialization calculates the pose of the nearest fiducial in the map frame, such that base_link of the robot is at the origin of map. For best results, this should be done with the robot stationary.
Clearing the Map
The map can be cleared with the following command:
rosservice call /fiducial_slam/clear_map
After this command is issued, the map can be auto-initialized, as described above.
We are excited to announce our fiducial based localization system fiducials15.
We love current LIDAR based localization methods, however they require expensive LIDAR for good results. LIDAR methods are also subject to the “kidnapped robot problem” which is the inability to unambiguously localize ab-initio in spaces which have a similar layout (e.g. if you move your robot to one of many similar offices it will get lost). Common LIDAR localization packages like amcl need to be initialized with a pose estimate on every run, something that can be difficult to do accurately. LIDAR based methods can also be difficult to tune and set up.
Our fiducial localization system enables a robot with a camera to engage in robust unequivocal localization based on pre-placed fiducial markers. The node simultaneously maps and localizes with these markers, and is robust against movements of single fiducials. This robustness is due to the fact that it continuously recomputes both the map of fiducials and the error associated with each fiducial. It then computes the reliability of each fiducial based on the estimate error of each fiducial. The required sensor is inexpensive and the method is relatively simple to set up. We use the Raspberry Pi Camera V2 ($25), but any calibrated camera with a ROS driver will work.
Here is a screenshot of rviz visualizing the fiducial map:

This localization method may be used stand-alone or it can be used as a compliment to more traditional LIDAR methods to create unambiguous localization at all times, using a system like robot_localization2.
For creating and detecting fiducial markers we use OpenCV’s ArUco module.
More about operation and usage can be found on the wiki page15
Have an issue, or an idea for improvement? Open an issue or PR on the GitHub repo7.
This package will be part of the robots that we will release via crowdfunding on Indiegogo at 1 minute past midnight EST on March 10th 2018 (less than 2 weeks from now).
The Ubiquity Robotics Team
https://ubiquityrobotics.com
I haven’t had a chance to go through your repository, but you might be interested in some work I did a little while back ( https://github.com/qutas/marker_localization ). More of a quick hack, but my method uses a refining tree structure to get a precise camera pose estimate across the whole map.
----
ROSDUCT:通过rosbridge在本地公开远程ROS主题、服务和参数相关推荐
- ejb 2.0 3.0_定义EJB 3.1视图(本地,远程,无接口)
ejb 2.0 3.0 这篇文章将讨论使用批注定义EJB视图的可能方法(最后我将只提到使用EJB部署描述符).我将重点介绍最新的EJB 3.1视图,这些视图将省略旧的本地,远程和本地接口. 因此,我们 ...
- 定义EJB 3.1视图(本地,远程,无接口)
这篇文章将讨论使用批注定义EJB视图的可能方法(最后我将只提到使用EJB部署描述符).我将重点介绍最新的EJB 3.1视图,这些视图将省略旧的本地,远程和本地接口. 因此,我们可以选择: 远程业务界面 ...
- git 入门教程之本地和远程仓库的本质
本地仓库和远程仓库在本质上没有太大区别,只不过一个是本地电脑,一个是远程电脑. 远程仓库不一定非得是 github 那种专门的"中央服务器",甚至局域网的另外一台电脑也可以充当&q ...
- C#通过WMI的wind32 的API函数实现msinfo32的本地和远程计算机的系统摘要信息查看功能...
最近做一个项目碰到要实现查看本地和远程计算机的摘要信息,采用命令行msinfo32可以很快查看到,如下图: 需要在用C#来实现类似信息查看.尤其远程计算机的..因此通过MSDN查询到.win32的AP ...
- windows下本地或者远程连接MYSQL数据库,报1130错误的解决方法
windows下本地或者远程连接MYSQL数据库,报1130错误的解决方法 参考文章: (1)windows下本地或者远程连接MYSQL数据库,报1130错误的解决方法 (2)https://www. ...
- 本地Windows远程桌面连接阿里云Ubuntu服务器
本地Windows远程桌面连接阿里云Ubuntu 16.04服务器: 1.目的:希望通过本地的Windows远程桌面连接到阿里云的Ubuntu服务器,通过远程桌面图形界面的方式操作服务器. 2.条件: ...
- 本地Windows远程桌面连接阿里云Ubuntu 16.04服务器:
本地Windows远程桌面连接阿里云Ubuntu 16.04服务器: 1.目的:希望通过本地的Windows远程桌面连接到阿里云的Ubuntu服务器,通过远程桌面图形界面的方式操作服务器. 2.条件: ...
- 四章: CentOS6.5 配置连接Windows远程桌面、创建新用户、禁用root在本地或远程使用ssh登录
1,配置连接Windows远程桌面 yum -y install freerdp xfreerdp -g 800x600 -u administrator 192.168.31.13 2,rz.sz ...
- git本地ben远程分支_Git本地分支和远程分支关联
1.创建分支 git branch develop 2.查看本地分支: git branch 注:名称前面加* 号的是当前的分支 3.查看远程分支: 加上-a参数可以查看远程分支,远程分支会用红色表示 ...
- git强行让本地分支覆盖远程分支
学习笔记,仅供参考 参考自:https://www.imooc.com/wenda/detail/542766 如果远程分支上的提交都不需要了,可以强行让本地分支覆盖远程分支: git push or ...
最新文章
- mysql五补充部分:SQL逻辑查询语句执行顺序
- 分享:手机应用存5个严重的信息安全隐患你晓得吗?
- OverLoad与override的区别
- hadoop学习4 调测错误备案
- 开发中的“软”与“硬”:高画质移动游戏开发之道
- 保利管道微服务1_.netcore 3.1高性能微服务架构:webapi规范
- 经过实践的小企业的生存之道
- Windows 下使用 TFTPD32+HTTP PXE引导安装linux
- 实例教学!12种透明背景的万能设计方法
- 谈谈Java对象的生命周期
- MAVEN依赖jar版本下载错误:xxx.pom.part.lock (文件名、目录名或卷标语法不正确。)
- 安卓系统培训!Android高级工程师系列学习路线介绍,详细的Android学习指南
- chisel Reset的三种类型和同步异步寄存器
- android扫码支付宝ofo,六大共享单车接入支付宝 ofo 等免押金扫一扫可骑走
- 硬盘分区表错误导致的问题和解决过程
- ASP .NET CORE 源码地址
- excel内容拆分怎么做?
- 怎样看oracle锁,oracle查看锁和解锁
- 交通事故频繁发生,未来我们做点什么?
- 2020年中国彩超设备市场规模、销量、进出口现状分析,国产进口替代进行时「图」