Hexo的入门教程及Next主题配置
博主博客链接
1.Node及Hexo安装
hexo是什么?简单的说,就是一个静态博客的生成工具也可以说是一个搭建静态博客的框架,我这个博客就是就是基于hexo生成的。9月份把这个博客用hexo折腾出来,前几天ACM区域赛事结束了,所以想记录下来折腾的过程,留着以后备用。这里只说如何在windows下成功安装hexo并运行起来,关于主题以及配置不做记录。
安装Node.js
因为Hexo是基于Node.js的,所以必须先安装Node,所以请点击这里去下载适合自己windows版本的Node吧。
(注意:在安装步骤里Custom Setup这一步记得选Add to PATH)。
安装好以后,打开CMD,(那对于小白来说如何打开CMD呢?win+R然后输入cmd,点击确定,这样CMD就打开了.),输入npm -v,如果出现版本号,那说明安装成功了,并且环境变量也配置好了,如果是未知命令那就要配置下环境变量。
安装Hexo
还是打开CMD然后输入安装hexo的命令:
npm install -g hexo-cli
这一步需要一点时间,请稍等一会,让他安装好。
安装完成后在CMD里输入hexo -v出现一系列版本号就是安装成功啦QAQ

到这里,就要恭喜你成功完成了Hexo的安装了。
2.生成一个博客
初始化个人博客仓库
在电脑中建一个文件夹(路径根据自己爱好,我是在E盘里建了一个名为Blog的文件夹),我在这里命名为Blog吧。
然后通过CMD的cd到这个文件夹下,运行命令:
hexo init
这个时候会将这个文件夹初始化为一个博客专用文件夹,生成过程稍微要点时间,耐心等待。
然后输入:
npm install
之后npm将会自动安装你需要的组件,只需要等待npm操作即可。
开始生成博客
继续操作:
hexo g
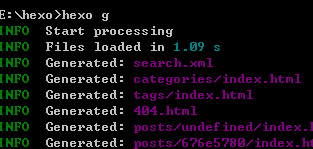
然后输入:
hexo s
会出现:
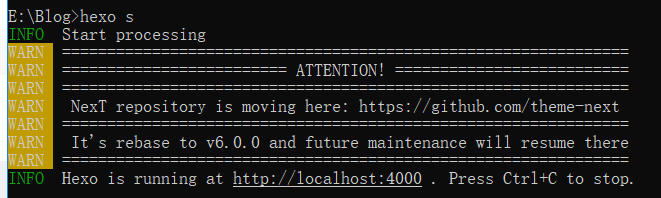
在浏览器里打开http://localhost:4000/,你将会看到:

到这里你已经有了一个属于你的本地Blog了。
3.Coding部署
why不是Github,因为我个人认为搭建一个个人博客用Github会有诸多不便。
比如:1.搭建一个博客肯定就要往百度推送,不然别人搜不到你的博客有什么意思。而如果部署Github的话,百度无法抓取blog链接。2.Coding服务器在中国,所以Blog加载速度比GitHub快很多。
注册Coding
现在我们的博客已经在本地搭建完成,那要怎么才能让别人看到我们的博客呢?我们选择把我们的静态网页的代码发到coding上去,然后由coding负责将我们的代码展现出来。注册步骤比较简单,点击这里去注册。需要声明的是,如果你以后不想绑定独立域名,那么coding给你的域名默认为 仓库名.coding.me
而你需要建立的仓库名需要与你的用户名保持一致,不然会出现问题,所以慎重起名字。然后填好个人信息,就会升级为银牌会员(能拥有5个私人仓库)。
新建仓库
在coding上面新建仓库
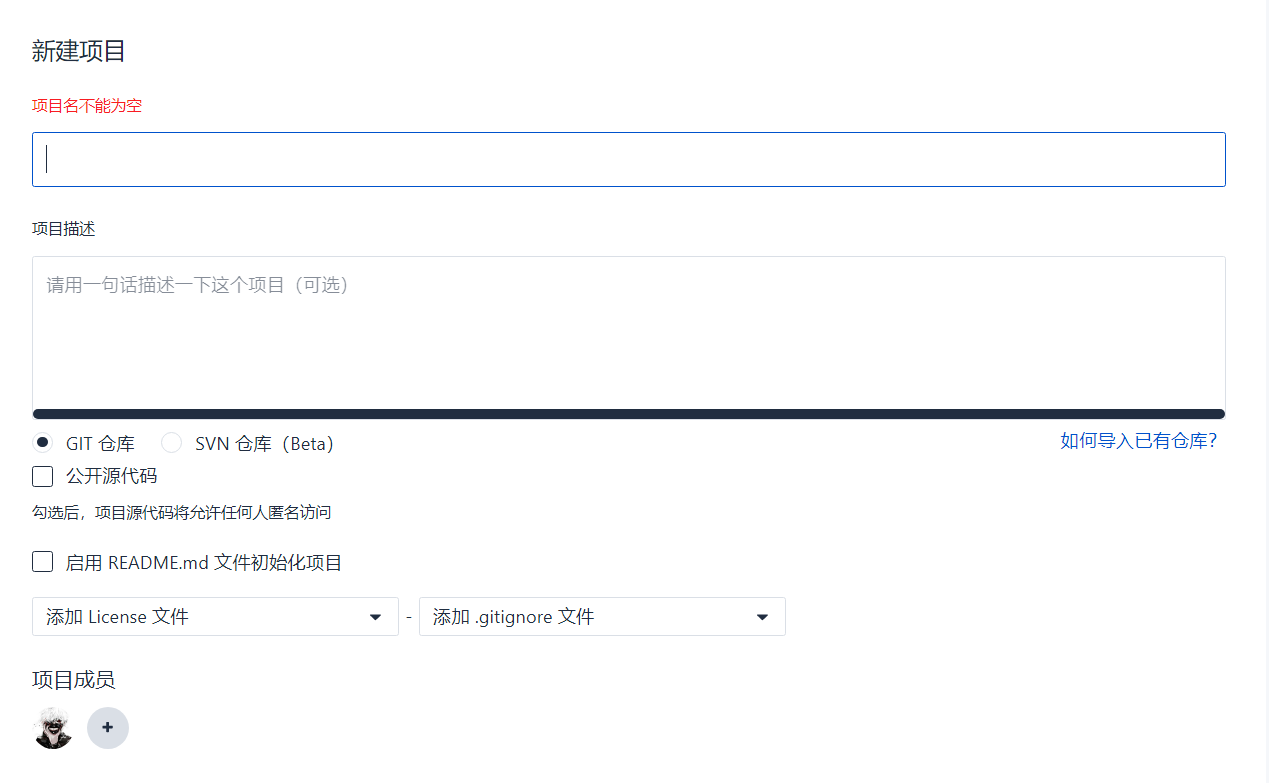
项目名称写成你的用户名,比如我的仓库名字为Blog,然后描述写不写都行,自己选择公有还是私有,然后直接选择创建项目。
配置ssh
这个过程的目的是在你的电脑和coding之间建立联系的通道,不然谁都能往上面增加内容,那你的博客岂不乱套了?
首先查看目录C:Users\用户名
有没有.ssh目录,如果没有,cmd在本地blog路径下,输入命令:
ssh-keygen -t rsa -C "这里填上你的邮箱地址"
然后按3个回车。
再检查有没有.ssh目录,打开目录,你会看到出现3个文件:
然后用notepad++打开id——rsa.pub(这个是公钥,不带pub的是私钥,这个不要泄露出去),你会开到一堆字母,全选复制下来。
下面打来浏览器,进入你刚才创建的仓库,设置-部署公钥-新建部署公钥,公钥名称可以不填,将刚才复制的公钥粘贴在公钥内容里面。把授予权限打上勾!,然后添加就可以了。
站点配置
下面我们进行博客的站点配置,打开Blog文件夹,你会看到这样的文件
这个文件的意思就是对你的博客进行一些设置,比如的你的用户名等等,记住这个文件特别重要!,以后你进行配置都要在这里进行,下面我们用notepad++打开它,这是你的网站信息
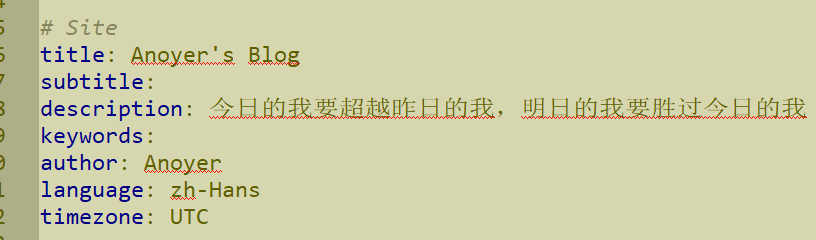
要是不懂英文就查字典写,注意:名称后面要放空格,不然会出错!!!。然后滑倒最下面,填写你的git地址,这一步特别关键,你可以照我这个写,同样,别忘了空格!
(本张图片来自vzhiwen,因为我Blog修改了域名,后面会讲到)
然后点击文件保存
上传代码
在Blog文件路径里,依次输入下列命令:
hexo clean
hexo d
hexo g
如果提及不上去,就下载一个插件,在命令行里输入:
npm install hexo-deployer-git --save
再次提交就可以了
clean表示清除缓存,d是deploy的缩写,意思是将代码推送到coding,然后等待一些时间,第一次需要输入coding的用户名和密码或者询问你yes/no,按照说明输入即可,出现下面的字样说明推送完毕
打开pages服务
打开浏览器,进入coding,代码-pages服务,部署来源选择master,然后可以选择https访问()这个就是打开你网页的时候地址栏前面显示的绿锁头,后面写着安全,如果不选择,就会出现叹号,不过影响不大。
现在,你的博客已经基本配置完成,现在就打开你的浏览器,输入你的网址试试吧!
4.主题配置
如果你感觉默认Blog主题可以通过这一块来学习,如果给自己Blog换个主题。
主题安装
为了使博客不太难看,我们需要安装一个主题,切换至刚刚生成的Hexo 目录,安装主题
$ cd Blog
$ git clone https://github.com/iissnan/hexo-theme-next themes/next
如果没有Git可以去下一个,百度有一堆
这里选了一个极简的主题,也是Hexo众多主题中最受欢迎的一个。上面出现的喵神的主题 在这里。Hexo也有更多主题供你选择。
启用主题:
在你的站点配置文件_config.yml里修改``theme: next //刚刚安装主题的,名字
主题配置:

这是 NexT 默认的 Scheme —— Muse ,现在,你已经成功安装并启用了 NexT 主题。下一步我们将要更改一些主题的设定,包括个性化以及集成第三方服务。 4)主题设定 选择 Scheme Scheme 是 NexT 提供的一种特性,借助于 Scheme,NexT 为你提供多种不同的外观。同时,几乎所有的配置都可以 在 Scheme 之间共用。目前 NexT 支持三种 Scheme,他们是:
Muse - 默认 Scheme,这是 NexT 最初的版本,黑白主调,大量留白
Mist - Muse 的紧凑版本,整洁有序的单栏外观
Pisces - 双栏 Scheme,小家碧玉似的清新
Scheme 的切换通过更改 主题配置文件,搜索 scheme 关键字。 你会看到有三行 scheme 的配置,将你需用启用的 scheme 前面
注释 # 即可。 选择 Pisce Scheme
#scheme: Muse
#scheme: Mist
scheme: Pisces
写文章
所有基础框架都已经创建完成,接下来可以开始写你的第一篇博客了
在Blog/source/_posts下创建你的第一个博客吧,例如,创建一个名为FirstNight.md的文件,用Markdown大肆发挥吧,注意保存。
如:
---title: First Night---> 我有一头**小毛驴**,可是我从来都不骑。
然后本体测试看看,输入hexo s
测试服务启动,你可以在浏览器中输入https://localhost:4000 访问了
如果测试没问题,就可以上传到Coding了
依次输入下面命令
hexo clean
hexo d
hexo g
然后你就可以再浏览器里输入你的Coding项目链接访问了
5.标签 分类 关于 标签图标 侧边栏菜单
创建文章
在Blog路径下输入:
hexo new "文章名称"
生产后会提示你文件路径,一般在Blog/source/_posts下
文章基本设置
---
title: CentOS7下Tomcat启动慢的原因及解决方案
date: 2017-12-02 21:01:24
comments: true #是否可评论
toc: true #是否显示文章目录
categories: "云服务器" #分类
tags:   #标签- centOS- tomcat
---
创建标签
hexo new page tags
基本设置
title: tags
date: 2017-12-02 21:01:24
type: "tags"
创建分类
hexo new page categories
基本设置
title: categories
date: 2017-12-02 21:01:24
type: "categories"
标签图标
实现效果图

修改模板/themes/next/layout/_macro/post.swig,搜索 rel="tag">#,将 # 换成<i class="fa fa-tag"></i>
设置菜单:
设置 菜单 菜单配置包括三个部分,第一是菜单项(名称和链接),第二是菜单项的显示文本,第三是菜单项对应的图标。 NexT 使用的是 Font Awesome 提供的图标, Font Awesome 提供了 600+ 的图标,可以满足绝大的多数的场景,同时无须担心在 Retina 屏幕下 图标模糊的问题。 编辑主题配置文件,修改以下内容: 设定菜单内容,对应的字段是 menu。 菜单内容的设置格式是:item name: link。其中 item name 是一个名称,这个名称并不直接显示在页面上,她将用于匹配图标以及翻译。 菜单示例配置(在主题配置文件中)
menu:home: /archives: /archives#about: /about#categories: /categoriestags: /tags#commonweal: /404.html
若你的站点运行在子目录中,请将链接前缀的 / 去掉 NexT 默认的菜单项有(标注 的项表示需要手动创建这个页面):
| 键值 | 设定值 | 显示文本(简体中文) |
|---|---|---|
| home | home: / | 主页 |
| archives | archives: /archives | 归档页 |
| categories | categories: /categories | 分类页 |
| tags | tags: /tags | 标签页 |
| about | about: /about | 关于页面 |
| commonweal | commonweal: /404.html | 公益 404 |
设置菜单项的显示文本。在第一步中设置的菜单的名称并不直接用于界面上的展示。Hexo 在生成的时候将使用 这个名称查找对应的语言翻译,并提取显示文本。这些翻译文本放置在 NexT 主题目录下的 languages/{language}.yml ({language} 为你所使用的语言)。 以简体中文为例,若你需要添加一个菜单项,比如 something。那么就需要修改简体中文对应的翻译文件 languages/zh-Hans.yml,在 menu 字段下添加一项:
menu:home: 首页archives: 归档categories: 分类tags: 标签about: 关于search: 搜索commonweal: 公益404something: 有料
设定菜单项的图标,对应的字段是 menu_icons。 此设定格式是 item name: icon name,其中 item name 与上一步所配置的菜单名字对应,icon name 是 Font Awesome 图标的 名字。而 enable 可用于控制是否显示图标,你可以设置成 false 来去掉图标。 菜单图标配置示例
menu_icons:enable: true# Icon Mapping.home: homeabout: usercategories: thtags: tagsarchives: archivecommonweal: heartbeat
在菜单图标开启的情况下,如果菜单项与菜单未匹配(没有设置或者无效的 Font Awesome 图标名字) 的情况下,NexT 将会使用 作为图标。 请注意键值(如 home)的大小写要严格匹配 7)** 侧栏** 默认情况下,侧栏仅在文章页面(拥有目录列表)时才显示,并放置于右侧位置。 可以通过修改 主题配置文件 中的 sidebar 字段来控制侧栏的行为。侧栏的设置包括两个部分,其一是侧栏的位置, 其二是侧栏显示的时机。 设置侧栏的位置,修改 sidebar.position 的值,支持的选项有:
left - 靠左放置
right - 靠右放置
目前仅 Pisces Scheme 支持 position 配置。影响版本5.0.0及更低版本。
sidebar:position: left
设置侧栏显示的时机,修改 sidebar.display 的值,支持的选项有:
post - 默认行为,在文章页面(拥有目录列表)时显示
always - 在所有页面中都显示
hide - 在所有页面中都隐藏(可以手动展开)
remove - 完全移除
sidebar:display: post
6.搜索
搜索功能真心好用,当文章多起来的时候,标签提供的作用已经很少了,只能简单索引,搜索却能精确查找,这里我用的依旧是最简单的本地站内搜索。
安装插件
npm install hexo-generator-searchdb --save
修改 站点配置 文件
search:path: search.xmlfield: postformat: htmllimit: 10000
修改 主题配置文件
local_search:enable: true
7.头像 (头像旋转)
实现效果图:

设置头像
编辑 主题配置文件_config.yml
, 修改字段
avatar
, 值设置成头像的链接地址。其中,头像的链接地址可以是
| 地址 | 值 |
|---|---|
| 完整的互联网 |
URI:http://example.com/avatar.png
|
| 站点内的地址 |
将头像放置主题目录下的source/uploads/(新建 uploads 目录若不存在) 配置为:avatar: /uploads/avatar.png或者 放置在 source/images/ 目录下, 配置为:avatar: /images/avatar.png
|
avatar: http://example.com/avatar.png
实现头像旋转:
打开\themes\next\source\css\_common\components\sidebar\sidebar-author.styl,在里面添加如下代码:
.site-author-image {display: block;margin: 0 auto;padding: $site-author-image-padding;max-width: $site-author-image-width;height: $site-author-image-height;border: $site-author-image-border-width solid $site-author-image-border-color;/* 头像圆形 */border-radius: 80px;-webkit-border-radius: 80px;-moz-border-radius: 80px;box-shadow: inset 0 -1px 0 #333sf;/* 设置循环动画 [animation: (play)动画名称 (2s)动画播放时长单位秒或微秒 (ase-out)动画播放的速度曲线为以低速结束 (1s)等待1秒然后开始动画 (1)动画播放次数(infinite为循环播放) ]*//* 鼠标经过头像旋转360度 */-webkit-transition: -webkit-transform 1.0s ease-out;-moz-transition: -moz-transform 1.0s ease-out;transition: transform 1.0s ease-out;
}img:hover {/* 鼠标经过停止头像旋转 -webkit-animation-play-state:paused;animation-play-state:paused;*//* 鼠标经过头像旋转360度 */-webkit-transform: rotateZ(360deg);-moz-transform: rotateZ(360deg);transform: rotateZ(360deg);
}/* Z 轴旋转动画 */
@-webkit-keyframes play {0% {-webkit-transform: rotateZ(0deg);}100% {-webkit-transform: rotateZ(-360deg);}
}
@-moz-keyframes play {0% {-moz-transform: rotateZ(0deg);}100% {-moz-transform: rotateZ(-360deg);}
}
@keyframes play {0% {transform: rotateZ(0deg);}100% {transform: rotateZ(-360deg);}
}
8.友链
编辑主题配置文件
添加:
# title
links_title: Links
links:MacTalk: http://macshuo.com/Title: http://example.com/
9.社交网站
侧栏社交链接的修改包含两个部分,第一是链接,第二是链接图标。 两者配置均在主题配置文件
中。
1、 链接放置在 social字段下,一行一个链接。其键值格式是 显示文本: 链接地址。
# Social links
social:GitHub: https://github.com/your-user-nameTwitter: https://twitter.com/your-user-name微博: http://weibo.com/your-user-name豆瓣: http://douban.com/people/your-user-name知乎: http://www.zhihu.com/people/your-user-name# 等等12345678
2、 设定链接的图标,对应的字段是 social_icons。其键值格式是 匹配键:Font Awesome图标名称, 匹配键 与上一步所配置的链接的 显示文本 相同(大小写严格匹配),图标名称 是Font Awesome图标的名字(不必带 fa- 前缀)。 enable 选项用于控制是否显示图标,你可以设置成 false 来去掉图标。
# Social Icons
social_icons:enable: true# Icon MappingsGitHub: githubTwitter: twitter微博: weibo
10.浏览量 访客量 阅读数
打开文件: themes/next/_config.yml
# Show PV/UV of the website/page with busuanzi.
# Get more information on http://ibruce.info/2015/04/04/busuanzi/
busuanzi_count:# count values only if the other configs are falseenable: true# custom uv span for the whole sitesite_uv: truesite_uv_header: <i class="fa fa-user"></i> 访问人数site_uv_footer: 人# custom pv span for the whole sitesite_pv: truesite_pv_header: <i class="fa fa-eye"></i> 总访问量site_pv_footer: 次# custom pv span for one page onlypage_pv: truepage_pv_header: <i class="fa fa-file-o"></i> 阅读数page_pv_footer:
相关操作:
- enable: true
- 添加相关中文说明,不添加也行。
修改统计规则及busuanzi失效修复
打开\themes\next\layout_partials\footer.swig文件,在copyright前加上画红线这句话:
代码如下:
<script async src="https://busuanzi.ibruce.info/busuanzi/2.3/busuanzi.pure.mini.js"></script>
然后再合适的位置添加显示统计的代码,如图:
代码如下:
<div class="powered-by">
<i class="fa fa-user-md"></i><span id="busuanzi_container_site_uv">本站访客数:<span id="busuanzi_value_site_uv"></span>
</span>
</div>
在这里有两中不同计算方式的统计代码:
pv的方式,单个用户连续点击n篇文章,记录n次访问量
<span id="busuanzi_container_site_pv">本站总访问量<span id="busuanzi_value_site_pv"></span>次
</span>
uv的方式,单个用户连续点击n篇文章,只记录1次访客数
<span id="busuanzi_container_site_uv">本站总访问量<span id="busuanzi_value_site_uv"></span>次
</span>
添加之后再执行hexo d -g,然后再刷新页面就能看到效果
11.字数统计 阅读时长 总字数
在站点的根目录下:
$ npm i --save hexo-wordcount打开 themes/next/_config.yml ,搜索关键字 post_wordcount:
# Post wordcount display settings
# Dependencies: https://github.com/willin/hexo-wordcount
post_wordcount:item_text: true#字数统计wordcount: true#预览时间min2read: true#总字数,显示在页面底部totalcount: trueseparated_meta: true
13.文章发表 更新时间
打开主题配置文件 _config.yml ,搜索关键字 updated_at 设置为 true :
# Post meta display settings
post_meta:item_text: truecreated_at: trueupdated_at: turecategories: true
编辑文章,增加关键字updated(next可以根据文章改变时间自动更改)
---
layout: layout
title: 关于
date: 2017-08-18 15:41:18
updated: 2017-09-05 20:18:54 #手动添加更新时间,不加这一行会自动更新
14.背景图片
在 themes/next/source/css/_custom/custom.styl 中添加如下代码:
body{background:url(/images/bg.jpg);background-size:cover;background-repeat:no-repeat;background-attachment:fixed;background-position:center;
}
15.动态粒子
修改_layout.swig
打开 next/layout/_layout.swig
在 < /body>之前添加代码(注意不要放在< /head>的后面)
{% if theme.canvas_nest %}
<script type="text/javascript" src="//cdn.bootcss.com/canvas-nest.js/1.0.0/canvas-nest.min.js"></script>
{% endif %}
修改配置文件
打开 /next/_config.yml,在里面添加如下代码:(可以放在最后面)
# --------------------------------------------------------------
# background settings
# --------------------------------------------------------------
# add canvas-nest effect
# see detail from https://github.com/hustcc/canvas-nest.js
canvas_nest: true
到此就结束了,运行 hexo clean,然后运行 hexo g,然后运行 hexo s,最后打开浏览器在浏览器的地址栏输入 localhost:4000 就能看到效果了\( ̄︶ ̄)/
如果你感觉默认的线条太多的话
可以这么设置====>
在上一步修改 _layout.swig中,把刚才的这些代码:
{% if theme.canvas_nest %}
<script type="text/javascript" src="//cdn.bootcss.com/canvas-nest.js/1.0.0/canvas-nest.min.js"></script>
{% endif %}
改为
{% if theme.canvas_nest %}
<script type="text/javascript"
color="0,0,255" opacity='0.7' zIndex="-2" count="99" src="//cdn.bootcss.com/canvas-nest.js/1.0.0/canvas-nest.min.js"></script>
{% endif %}
配置项说明
color:线条颜色, 默认:'0,0,0';三个数字分别为(R,G,B)opacity: 线条透明度(0~1), 默认:0.5count: 线条的总数量, 默认:150zIndex:背景的z-index属性,css属性用于控制所在层的位置, 默认:-1
16.加载动画
打开 themes/next/_config.yml ,搜索关键字 pace ,设置为 true ,可以更换加载样式:
# Progress bar in the top during page loading.
pace: true
# Themes list:
#pace-theme-big-counter
#pace-theme-bounce
#pace-theme-barber-shop
#pace-theme-center-atom
#pace-theme-center-circle
#pace-theme-center-radar
#pace-theme-center-simple
#pace-theme-corner-indicator
#pace-theme-fill-left
#pace-theme-flash
#pace-theme-loading-bar
#pace-theme-mac-osx
#pace-theme-minimal
# For example
# pace_theme: pace-theme-center-simple
pace_theme: pace-theme-flash #替换更换样式
17.透明背景
内容板块透明
博客根目录 themes\next\source\css\_schemes\Pisces\_layout.styl 文件 .content-wrap 标签下 background: white修改为:
background: rgba(255,255,255,0.7); //0.7是透明度
菜单栏背景
博客根目录 themes\next\source\css\_schemes\Pisces\_layout.styl 文件 .header-inner 标签下 background: white修改为:
background: rgba(255,255,255,0.7); //0.7是透明度
站点概况背景
博客根目录 themes\next\source\css\_schemes\Pisces\_sidebar.styl 文件 .sidebar-inner 标签下 background: white修改为:
background: rgba(255,255,255,0.7); //0.7是透明度
然后修改博客根目录 themes\next\source\css\_schemes\Pisces\_layout.styl 文件 .sidebar 标签下 background: $body-bg-color修改为:
background: rgba(255,255,255,0.7); //0.7是透明度
按钮背景
博客根目录 themes\next\source\css\_common\components\post\post-button.styl 同上修改对应位置为 background: transparent;
18.修改底部Hexo和主题信息
- 在图标库中找到你自己喜欢的图标, 修改桃心,打开
themes/next_config.yml,搜索关键字authoricon,替换图标名
# icon between year and author @Footer
authoricon: id-card
2.隐藏网页底部 Hexo 强力驱动
打开主题配置文件,搜索关键字 copyright ,如下:(或者直接删除)
# Footer `powered-by` and `theme-info` copyright
copyright: false
19.博客运行时间
打开next\layout\_partials路径中的footer.swig,在文件中合适位置~~(我加在了最后面)~~加入下面代码段:
<span id="timeDate" title="网站运行时间">载入天数...</span><span id="times" title="网站运行时间">载入时分秒...</span>
在next\layout\_layout.swig中插入下面代码块:
<!--此处为建站时间 --><script>var now = new Date(); function createtime() { var grt= new Date("09/24/2018 23:45:01");now.setTime(now.getTime()+250); days = (now - grt ) / 1000 / 60 / 60 / 24; dnum = Math.floor(days); hours = (now - grt ) / 1000 / 60 / 60 - (24 * dnum); hnum = Math.floor(hours); if(String(hnum).length ==1 ){hnum = "0" + hnum;} minutes = (now - grt ) / 1000 /60 - (24 * 60 * dnum) - (60 * hnum); mnum = Math.floor(minutes); if(String(mnum).length ==1 ){mnum = "0" + mnum;} seconds = (now - grt ) / 1000 - (24 * 60 * 60 * dnum) - (60 * 60 * hnum) - (60 * mnum); snum = Math.round(seconds); if(String(snum).length ==1 ){snum = "0" + snum;} document.getElementById("timeDate").innerHTML ="(ㆆᴗㆆ)本弱已菜菜的存活了"+dnum+" 天"; document.getElementById("times").innerHTML = hnum + " 时" + mnum + " 分" + snum + " 秒"; } setInterval("createtime()",250);
然后就可以上传看效果啦
20.版权声明
自己使用的Hexo+NexT主题,主题默认的版权声明配置在themes\next\_config.yml文件中
Copy# Declare license on posts
post_copyright:enable: falselicense: CC BY-NC-SA 3.0license_url: https://creativecommons.org/licenses/by-nc-sa/3.0/
直接把enable 改为true即可开启。
21.文章结尾–加入感谢阅读
实现效果图

具体实现方法
在路径 \themes\next\layout\_macro 中新建 passage-end-tag.swig 文件,并添加以下内容:
<div>{% if not is_index %}<div style="text-align:center;color: #ccc;font-size:14px;">-------------本文结束<i class="fa fa-paw"></i>感谢您的阅读-------------</div>{% endif %}
</div>
接着打开\themes\next\layout\_macro\post.swig文件,在post-body 之后, post-footer 之前添加如下画红色部分代码(post-footer之前两个DIV):

代码如下:
<div>{% if not is_index %}{% include 'passage-end-tag.swig' %}{% endif %}
</div>
然后打开主题配置文件(_config.yml),在末尾添加:
# 文章末尾添加“本文结束”标记
passage_end_tag:enabled: true
完成以上设置之后,在每篇文章之后都会添加如上效果图的样子。
22.Valine评论
注册Leancloud
评论系统其实是放在Leancloud上的,因此首先需要去注册一个账号
Leancloud官网,点我注册
注册完以后需要创建一个应用,名字可以:blog ,然后 进入应用->设置->应用key
获取你的appid 和 appkey 如图所示:

博客主题配置文件配置
拿到你的appid和appkey之后,打开主题配置文件 搜索 valine,填入appid 和 appkey
valine:enable: trueappid: your app idappkey: your app keynotify: false # mail notifier , https://github.com/xCss/Valine/wikiverify: false # Verification codeplaceholder: just so soguest_info: nick,mail,linkpageSize: 10
配置域名
记得在Leancloud -> 设置 -> 安全中心 -> Web 安全域名 把你的域名加进去
23.百度分享

ShareSDK
开始使用
注册一个账号,然后打开后台,找到appkey打开

博客\themes\next\layout\_partials\share- 新建一个文件名为
sharesdk.swig,并输入以下代码:
<!--MOB SHARE BEGIN--><div class="-mob-share-ui-button -mob-share-open">分享</div><div class="-mob-share-ui" style="display: none"><ul class="-mob-share-list"><li class="-mob-share-weibo"><p>新浪微博</p></li><li class="-mob-share-tencentweibo"><p>腾讯微博</p></li><li class="-mob-share-qzone"><p>QQ空间</p></li><li class="-mob-share-qq"><p>QQ好友</p></li><li class="-mob-share-weixin"><p>微信</p></li><li class="-mob-share-douban"><p>豆瓣</p></li><li class="-mob-share-renren"><p>人人网</p></li><li class="-mob-share-kaixin"><p>开心网</p></li><li class="-mob-share-facebook"><p>Facebook</p></li><li class="-mob-share-twitter"><p>Twitter</p></li><li class="-mob-share-pocket"><p>Pocket</p></li><li class="-mob-share-google"><p>Google+</p></li><li class="-mob-share-youdao"><p>有道云笔记</p></li><li class="-mob-share-mingdao"><p>明道</p></li><li class="-mob-share-pengyou"><p>朋友网</p></li><li class="-mob-share-tumblr"><p>Tumblr</p></li><li class="-mob-share-instapaper"><p>Instapaper</p></li><li class="-mob-share-linkedin"><p>LinkedIn</p></li></ul><div class="-mob-share-close">取消</div></div><div class="-mob-share-ui-bg"></div><script id="-mob-share" src="http://f1.webshare.mob.com/code/mob-share.js?appkey={{ theme.shareSDKappkey }}"></script><!--MOB SHARE END-->
- 打开:
LX-Blog\themes\next\layout\post.swig
- 将以下代码:
<div class="post-spread">{% if theme.jiathis %}{% include '_partials/share/jiathis.swig' %}{% elseif theme.baidushare %}{% include '_partials/share/baidushare.swig' %}{% elseif theme.add_this_id %}{% include '_partials/share/add-this.swig' %}{% elseif theme.duoshuo_shortname and theme.duoshuo_share %}{% include '_partials/share/duoshuo_share.swig' %}{% endif %}</div>
- 改成:
<div class="post-spread">{% if theme.jiathis %}{% include '_partials/share/jiathis.swig' %}{% elseif theme.baidushare %}{% include '_partials/share/baidushare.swig' %}{% elseif theme.add_this_id %}{% include '_partials/share/add-this.swig' %}{% elseif theme.duoshuo_shortname and theme.duoshuo_share %}{% include '_partials/share/duoshuo_share.swig' %}{% elseif theme.sharesdk %}{% include '_partials/share/sharesdk.swig' %}{% endif %}</div>
- 打开
主题配置文件,添加以下代码:
sharesdk: true
shareSDKappkey: 你的appkey
24.向百度站长推送
当我们一开始建完博客时,搜索引擎是搜索不到的,我们需要做一项工作就是通知搜索引擎收录我们的网站。
如何被百度收录
这里需要做两个事情,一个是验证网站,一个是链接提交.
验证网证
我们到百度站长平台里面的站长工具里面去验证网站,大概步骤如下:
- 第一步:输入网站
- 第二步:站点属性
- 第三步:验证网站
前两步都很简单,第三步:验证网站有以下三种方法:
- 文件验证
- HTML标签验证
- CNAME验证
这里我们选择文件验证的方法,然后会得到一个baidu_verify_xxxxx.html文件。
我使用的主题是next,所以我把这个验证文件放在theme/next/source/根目录下面,
这样当我们编译网站hexo generate的时候,这个文件会被原封不动的拷贝到我们博客的public/根目录下。
好,重要编译hexo并部署,完成验证.
链接提交
接下来我们进入链接提交.
链接提交有手动和自动两种方法,手动就是每次你有新的链接生成,你就需要手动提交链接到百度,这种方法太麻烦了,不使用。
自动提交有三种方式:
- 主动推送(实时)
- 自动推送
- sitemap
这里我们选择sitemap方式。
安装hexo的sitemap网站地图生成插件
npm install hexo-generator-baidu-sitemap --save在你的hexo站点的
_config.yml添加下面的代码# hexo sitemap网站地图 baidusitemap:path: baidusitemap.xml配置成功后,hexo编译时会在hexo站点根目录生成
baidusitemap.xml,部署网站后,提交到百度:
25.代码复制
下载插件clipboard.js 。
打开
themes/next/source/lib/,新建文件夹clipboard。把下载
clipboard.js下的src文件夹下的文件拖动到clipboard文件夹下。打开
themes/next/source/js/src/,新建文件custom.js,代码如下://此函数用于创建复制按钮 function createCopyBtns() {var $codeArea = $("figure table");//查看页面是否具有代码区域,没有代码块则不创建 复制按钮if ($codeArea.length > 0) {//复制成功后将要干的事情function changeToSuccess(item) {$imgOK = $("#copyBtn").find("#imgSuccess");if ($imgOK.css("display") == "none") {$imgOK.css({opacity: 0,display: "block"});$imgOK.animate({opacity: 1}, 1000);setTimeout(function() {$imgOK.animate({opacity: 0}, 2000);}, 2000);setTimeout(function() {$imgOK.css("display", "none");}, 4000);};};//创建 全局复制按钮,仅有一组。包含:复制按钮,复制成功响应按钮//值得注意的是:1.按钮默认隐藏,2.位置使用绝对位置 position: absolute; (position: fixed 也可以,需要修改代码)$(".post-body").before('<div id="copyBtn" style="opacity: 0; position: absolute;top:0px;display: none;line-height: 1; font-size:1.5em"><span id="imgCopy" ><i class="fa fa-paste fa-fw"></i></span><span id="imgSuccess" style="display: none;"><i class="fa fa-check-circle fa-fw" aria-hidden="true"></i></span>');//创建 复制 插件,绑定单机时间到 指定元素,支持JQueryvar clipboard = new Clipboard('#copyBtn', {target: function() {//返回需要复制的元素内容return document.querySelector("[copyFlag]");},isSupported: function() {//支持复制内容return document.querySelector("[copyFlag]");}});//复制成功事件绑定clipboard.on('success',function(e) {//清除内容被选择状态e.clearSelection();changeToSuccess(e);});//复制失败绑定事件clipboard.on('error',function(e) {console.error('Action:', e.action);console.error('Trigger:', e.trigger);});//鼠标 在复制按钮上滑动和离开后渐变显示/隐藏效果$("#copyBtn").hover(function() {$(this).stop();$(this).css("opacity", 1);},function() {$(this).animate({opacity: 0}, 2000);});} } //感应鼠标是否在代码区 $("figure").hover(function() {//-------鼠标活动在代码块内//移除之前含有复制标志代码块的 copyFlag$("[copyFlag]").removeAttr("copyFlag");//在新的(当前鼠标所在代码区)代码块插入标志:copyFlag$(this).find(".code").attr("copyFlag", 1);//获取复制按钮$copyBtn = $("#copyBtn");if ($copyBtn.lenght != 0) {//获取到按钮的前提下进行一下操作//停止按钮动画效果//设置为 显示状态//修改 复制按钮 位置到 当前代码块开始部位//设置代码块 左侧位置$copyBtn.stop();$copyBtn.css("opacity", 0.8);$copyBtn.css("display", "block");$copyBtn.css("top", parseInt($copyBtn.css("top")) + $(this).offset().top - $copyBtn.offset().top + 3);$copyBtn.css("left", -$copyBtn.width() - 3);}},function() {//-------鼠标离开代码块//设置复制按钮可见度 2秒内到 0$("#copyBtn").animate({opacity: 0}, 2000);} ); //页面载入完成后,创建复制按钮 $(document).ready(function() {createCopyBtns(); });打开
themes/next/layout/_custom/,新建文件custom.swig,代码如下:<script type="text/javascript" src="/lib/clipboard/clipboard.js"></script> <script type="text/javascript" src="/js/src/custom.js"></script>修改文件
themes/next/layout/_layout.swig,在标签</body>上面插入代码:{% include '_custom/custom.swig' %}
26.博客压缩加速访问
在站点的根目录下执行以下命令:
$ npm install gulp -g
$ npm install gulp-minify-css gulp-uglify gulp-htmlmin gulp-htmlclean gulp --save
在如下图所示,新建 gulpfile.js ,并填入以下内容:
var gulp = require('gulp');
var minifycss = require('gulp-minify-css');
var uglify = require('gulp-uglify');
var htmlmin = require('gulp-htmlmin');
var htmlclean = require('gulp-htmlclean');
// 压缩 public 目录 css
gulp.task('minify-css', function() {return gulp.src('./public/**/*.css').pipe(minifycss()).pipe(gulp.dest('./public'));
});
// 压缩 public 目录 html
gulp.task('minify-html', function() {return gulp.src('./public/**/*.html').pipe(htmlclean()).pipe(htmlmin({removeComments: true,minifyJS: true,minifyCSS: true,minifyURLs: true,})).pipe(gulp.dest('./public'))
});
// 压缩 public/js 目录 js
gulp.task('minify-js', function() {return gulp.src('./public/**/*.js').pipe(uglify()).pipe(gulp.dest('./public'));
});
// 执行 gulp 命令时执行的任务
gulp.task('default', ['minify-html','minify-css','minify-js'
]);
生成博文是执行 hexo g && gulp 就会根据 gulpfile.js 中的配置,对 public 目录中的静态资源文件进行压缩。
27. 主页文章添加阴影效果
实现效果图

具体实现方法
打开\themes\next\source\css_custom\custom.styl,向里面加入:
/*主页文章添加阴影效果*/.post {margin-top: 60px;margin-bottom: 60px;padding: 25px;-webkit-box-shadow: 0 0 5px rgba(202, 203, 203, .5);-moz-box-shadow: 0 0 5px rgba(202, 203, 204, .5);}
28.修改``代码块自定义样式
打开\themes\next\source\css\_custom\custom.styl,向里面加入:(颜色可以自己定义)
// Custom styles.
code {color: #ff7600;background: #fbf7f8;margin: 2px;
}
// 大代码块的自定义样式
.highlight, pre {margin: 5px 0;padding: 5px;border-radius: 3px;
}
.highlight, code, pre {border: 1px solid #d6d6d6;
}
29.博客宝宝
效果如图

安装依赖包,在站点根目录,打开Git Bash ,安装hexo-helper-live2d
npm install --save hexo-helper-live2d
在站点配置文件或者主题配置文件添加以下内容
live2d:enable: truescriptFrom: localpluginRootPath: live2dw/pluginJsPath: lib/pluginModelPath: assets/model:use: live2d-widget-model-wankodisplay:position: rightwidth: 150height: 300mobile:show: true安装需要的宠物文件
npm install {packagename}
如效果图所示的宠物名为haruto, 则为 npm install live2d-widget-model-haruto,其他宠物包点击live2d-widget-models。如果需要修改宠物的位置,可以在display下添加
# 水平位置
hOffset: 0
# 垂直位置
vOffset: -20
详细内容可参考hexo-helper-live2d
30.点击红心特效和爆炸特效
红心特效
实现效果图:

实现方法:
在网址输入:http://7u2ss1.com1.z0.glb.clouddn.com/love.js
然后将里面的代码copy一下,新建love.js文件并且将代码复制进去,然后保存。将love.js文件放到路径/themes/next/source/js/src里面,然后打开\themes\next\layout\_layout.swig文件,在末尾(在前面引用会出现找不到的bug)添加以下代码:
<!-- 页面点击小红心 -->
<script type="text/javascript" src="/js/src/love.js"></script>
爆炸特效
实现效果图:

实现方法:
跟那个红心是差不多的,首先在themes/next/source/js/src里面建一个叫fireworks.js的文件,代码如下:
"use strict";function updateCoords(e){pointerX=(e.clientX||e.touches[0].clientX)-canvasEl.getBoundingClientRect().left,pointerY=e.clientY||e.touches[0].clientY-canvasEl.getBoundingClientRect().top}function setParticuleDirection(e){var t=anime.random(0,360)*Math.PI/180,a=anime.random(50,180),n=[-1,1][anime.random(0,1)]*a;return{x:e.x+n*Math.cos(t),y:e.y+n*Math.sin(t)}}function createParticule(e,t){var a={};return a.x=e,a.y=t,a.color=colors[anime.random(0,colors.length-1)],a.radius=anime.random(16,32),a.endPos=setParticuleDirection(a),a.draw=function(){ctx.beginPath(),ctx.arc(a.x,a.y,a.radius,0,2*Math.PI,!0),ctx.fillStyle=a.color,ctx.fill()},a}function createCircle(e,t){var a={};return a.x=e,a.y=t,a.color="#F00",a.radius=0.1,a.alpha=0.5,a.lineWidth=6,a.draw=function(){ctx.globalAlpha=a.alpha,ctx.beginPath(),ctx.arc(a.x,a.y,a.radius,0,2*Math.PI,!0),ctx.lineWidth=a.lineWidth,ctx.strokeStyle=a.color,ctx.stroke(),ctx.globalAlpha=1},a}function renderParticule(e){for(var t=0;t<e.animatables.length;t++){e.animatables[t].target.draw()}}function animateParticules(e,t){for(var a=createCircle(e,t),n=[],i=0;i<numberOfParticules;i++){n.push(createParticule(e,t))}anime.timeline().add({targets:n,x:function(e){return e.endPos.x},y:function(e){return e.endPos.y},radius:0.1,duration:anime.random(1200,1800),easing:"easeOutExpo",update:renderParticule}).add({targets:a,radius:anime.random(80,160),lineWidth:0,alpha:{value:0,easing:"linear",duration:anime.random(600,800)},duration:anime.random(1200,1800),easing:"easeOutExpo",update:renderParticule,offset:0})}function debounce(e,t){var a;return function(){var n=this,i=arguments;clearTimeout(a),a=setTimeout(function(){e.apply(n,i)},t)}}var canvasEl=document.querySelector(".fireworks");if(canvasEl){var ctx=canvasEl.getContext("2d"),numberOfParticules=30,pointerX=0,pointerY=0,tap="mousedown",colors=["#FF1461","#18FF92","#5A87FF","#FBF38C"],setCanvasSize=debounce(function(){canvasEl.width=2*window.innerWidth,canvasEl.height=2*window.innerHeight,canvasEl.style.width=window.innerWidth+"px",canvasEl.style.height=window.innerHeight+"px",canvasEl.getContext("2d").scale(2,2)},500),render=anime({duration:1/0,update:function(){ctx.clearRect(0,0,canvasEl.width,canvasEl.height)}});document.addEventListener(tap,function(e){"sidebar"!==e.target.id&&"toggle-sidebar"!==e.target.id&&"A"!==e.target.nodeName&&"IMG"!==e.target.nodeName&&(render.play(),updateCoords(e),animateParticules(pointerX,pointerY))},!1),setCanvasSize(),window.addEventListener("resize",setCanvasSize,!1)}"use strict";function updateCoords(e){pointerX=(e.clientX||e.touches[0].clientX)-canvasEl.getBoundingClientRect().left,pointerY=e.clientY||e.touches[0].clientY-canvasEl.getBoundingClientRect().top}function setParticuleDirection(e){var t=anime.random(0,360)*Math.PI/180,a=anime.random(50,180),n=[-1,1][anime.random(0,1)]*a;return{x:e.x+n*Math.cos(t),y:e.y+n*Math.sin(t)}}function createParticule(e,t){var a={};return a.x=e,a.y=t,a.color=colors[anime.random(0,colors.length-1)],a.radius=anime.random(16,32),a.endPos=setParticuleDirection(a),a.draw=function(){ctx.beginPath(),ctx.arc(a.x,a.y,a.radius,0,2*Math.PI,!0),ctx.fillStyle=a.color,ctx.fill()},a}function createCircle(e,t){var a={};return a.x=e,a.y=t,a.color="#F00",a.radius=0.1,a.alpha=0.5,a.lineWidth=6,a.draw=function(){ctx.globalAlpha=a.alpha,ctx.beginPath(),ctx.arc(a.x,a.y,a.radius,0,2*Math.PI,!0),ctx.lineWidth=a.lineWidth,ctx.strokeStyle=a.color,ctx.stroke(),ctx.globalAlpha=1},a}function renderParticule(e){for(var t=0;t<e.animatables.length;t++){e.animatables[t].target.draw()}}function animateParticules(e,t){for(var a=createCircle(e,t),n=[],i=0;i<numberOfParticules;i++){n.push(createParticule(e,t))}anime.timeline().add({targets:n,x:function(e){return e.endPos.x},y:function(e){return e.endPos.y},radius:0.1,duration:anime.random(1200,1800),easing:"easeOutExpo",update:renderParticule}).add({targets:a,radius:anime.random(80,160),lineWidth:0,alpha:{value:0,easing:"linear",duration:anime.random(600,800)},duration:anime.random(1200,1800),easing:"easeOutExpo",update:renderParticule,offset:0})}function debounce(e,t){var a;return function(){var n=this,i=arguments;clearTimeout(a),a=setTimeout(function(){e.apply(n,i)},t)}}var canvasEl=document.querySelector(".fireworks");if(canvasEl){var ctx=canvasEl.getContext("2d"),numberOfParticules=30,pointerX=0,pointerY=0,tap="mousedown",colors=["#FF1461","#18FF92","#5A87FF","#FBF38C"],setCanvasSize=debounce(function(){canvasEl.width=2*window.innerWidth,canvasEl.height=2*window.innerHeight,canvasEl.style.width=window.innerWidth+"px",canvasEl.style.height=window.innerHeight+"px",canvasEl.getContext("2d").scale(2,2)},500),render=anime({duration:1/0,update:function(){ctx.clearRect(0,0,canvasEl.width,canvasEl.height)}});document.addEventListener(tap,function(e){"sidebar"!==e.target.id&&"toggle-sidebar"!==e.target.id&&"A"!==e.target.nodeName&&"IMG"!==e.target.nodeName&&(render.play(),updateCoords(e),animateParticules(pointerX,pointerY))},!1),setCanvasSize(),window.addEventListener("resize",setCanvasSize,!1)};打开themes/next/layout/_layout.swig,在</body>上面写下如下代码:
{% if theme.fireworks %}<canvas class="fireworks" style="position: fixed;left: 0;top: 0;z-index: 1; pointer-events: none;" ></canvas> <script type="text/javascript" src="//cdn.bootcss.com/animejs/2.2.0/anime.min.js"></script> <script type="text/javascript" src="/js/src/fireworks.js"></script>
{% endif %}
打开主题配置文件,在里面最后写下:
# Fireworks
fireworks: true
31.文章加密访问

打开themes->next->layout->_partials->head.swig文件,在以下位置插入这样一段代码:

代码如下:
<script>(function(){if('{{ page.password }}'){if (prompt('请输入文章密码') !== '{{ page.password }}'){alert('密码错误!');history.back();}}})();
</script>
然后在文章上写成类似这样:

32.文章置顶
打开 Hexo 站点下 node_modules/hexo-generator-index/lib/generator.js 文件。代码全部替换为:(next 5.1以后主题已自带此功能)
'use strict';
var pagination = require('hexo-pagination');
module.exports = function(locals){var config = this.config;var posts = locals.posts;posts.data = posts.data.sort(function(a, b) {if(a.top && b.top) { // 两篇文章top都有定义if(a.top == b.top) return b.date - a.date; // 若top值一样则按照文章日期降序排else return b.top - a.top; // 否则按照top值降序排}else if(a.top && !b.top) { // 以下是只有一篇文章top有定义,那么将有top的排在前面(这里用异或操作居然不行233)return -1;}else if(!a.top && b.top) {return 1;}else return b.date - a.date; // 都没定义按照文章日期降序排});var paginationDir = config.pagination_dir || 'page';return pagination('', posts, {perPage: config.index_generator.per_page,layout: ['index', 'archive'],format: paginationDir + '/%d/',data: {__index: true}});
};
打开文章添加top字段,设置数值,数值越大文章越靠前:
---
layout: layout
title: 标签1
date: 2017-08-18 15:41:18
tags: 标签1
top: 100
---
33.域名更换
1.申请域名
- 我在万网购买的域名,地址:https://wanwang.aliyun.com/domain/com?spm=5176.8142029.388261.137.LoKzy7
- 我这里是
.cn结尾的域名,一年39大洋anoyer.cn
2.解析域名
添加如下的解析
得到域名之后,到控制台进行解析
控制台->域名与网站(万网)->域名->域名列表->解析
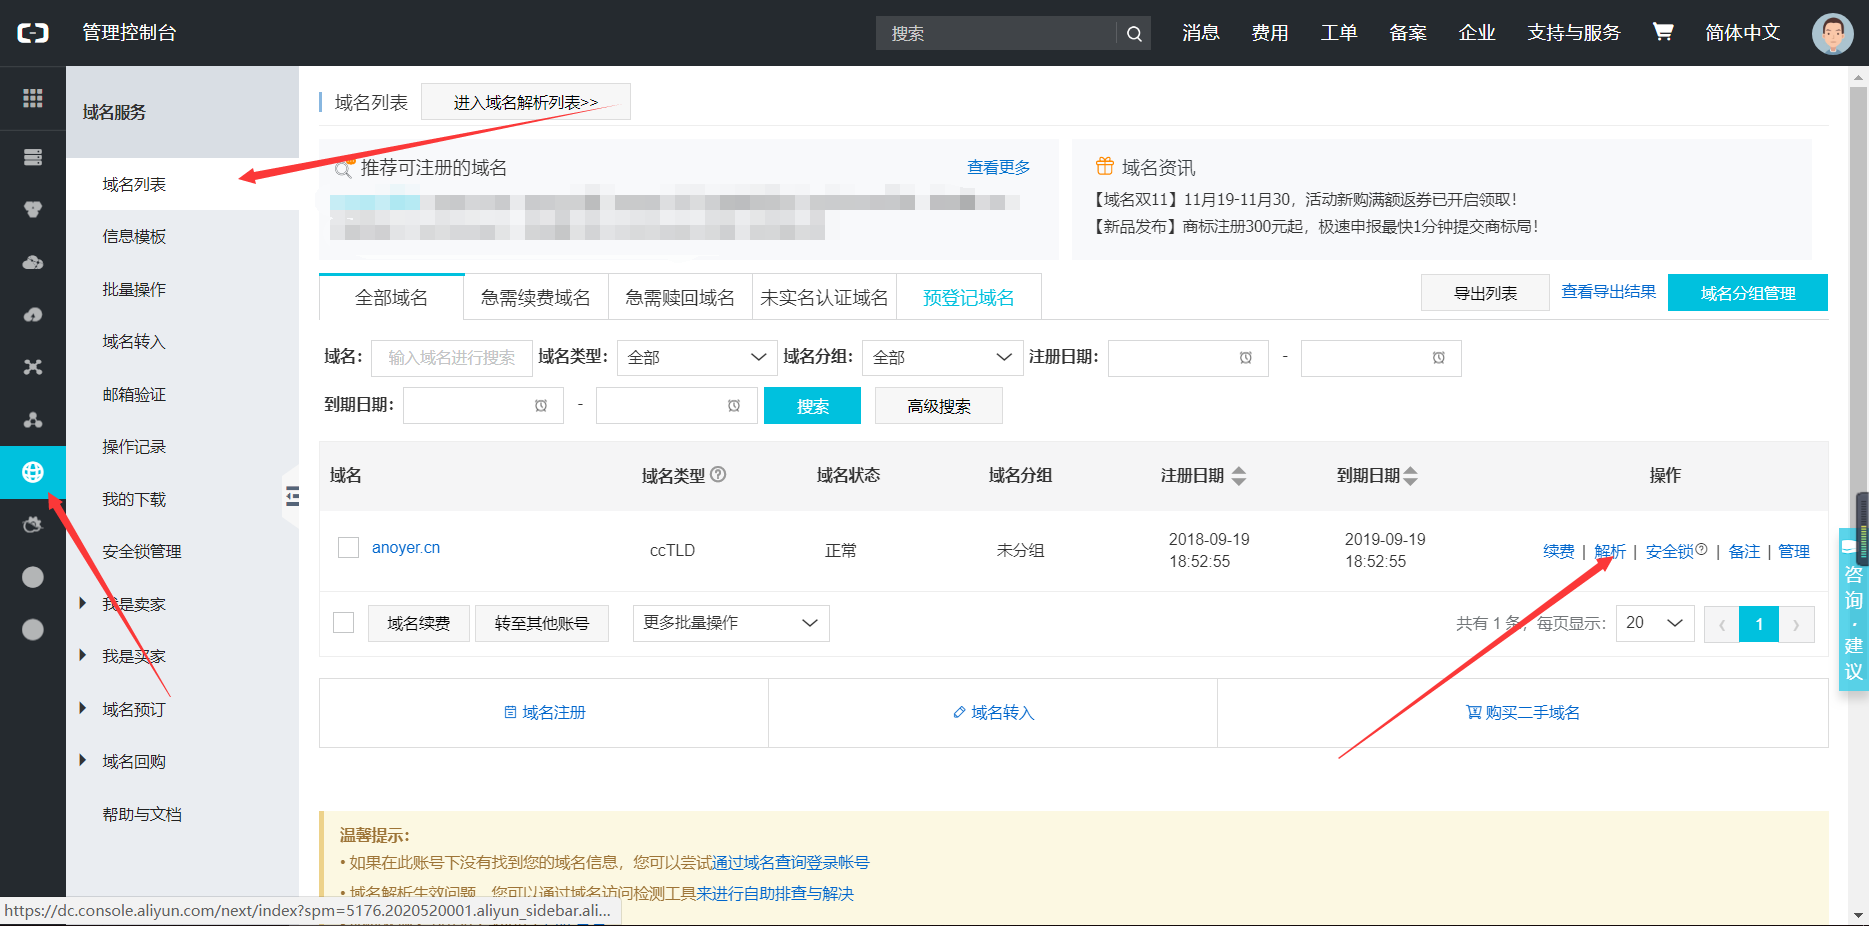
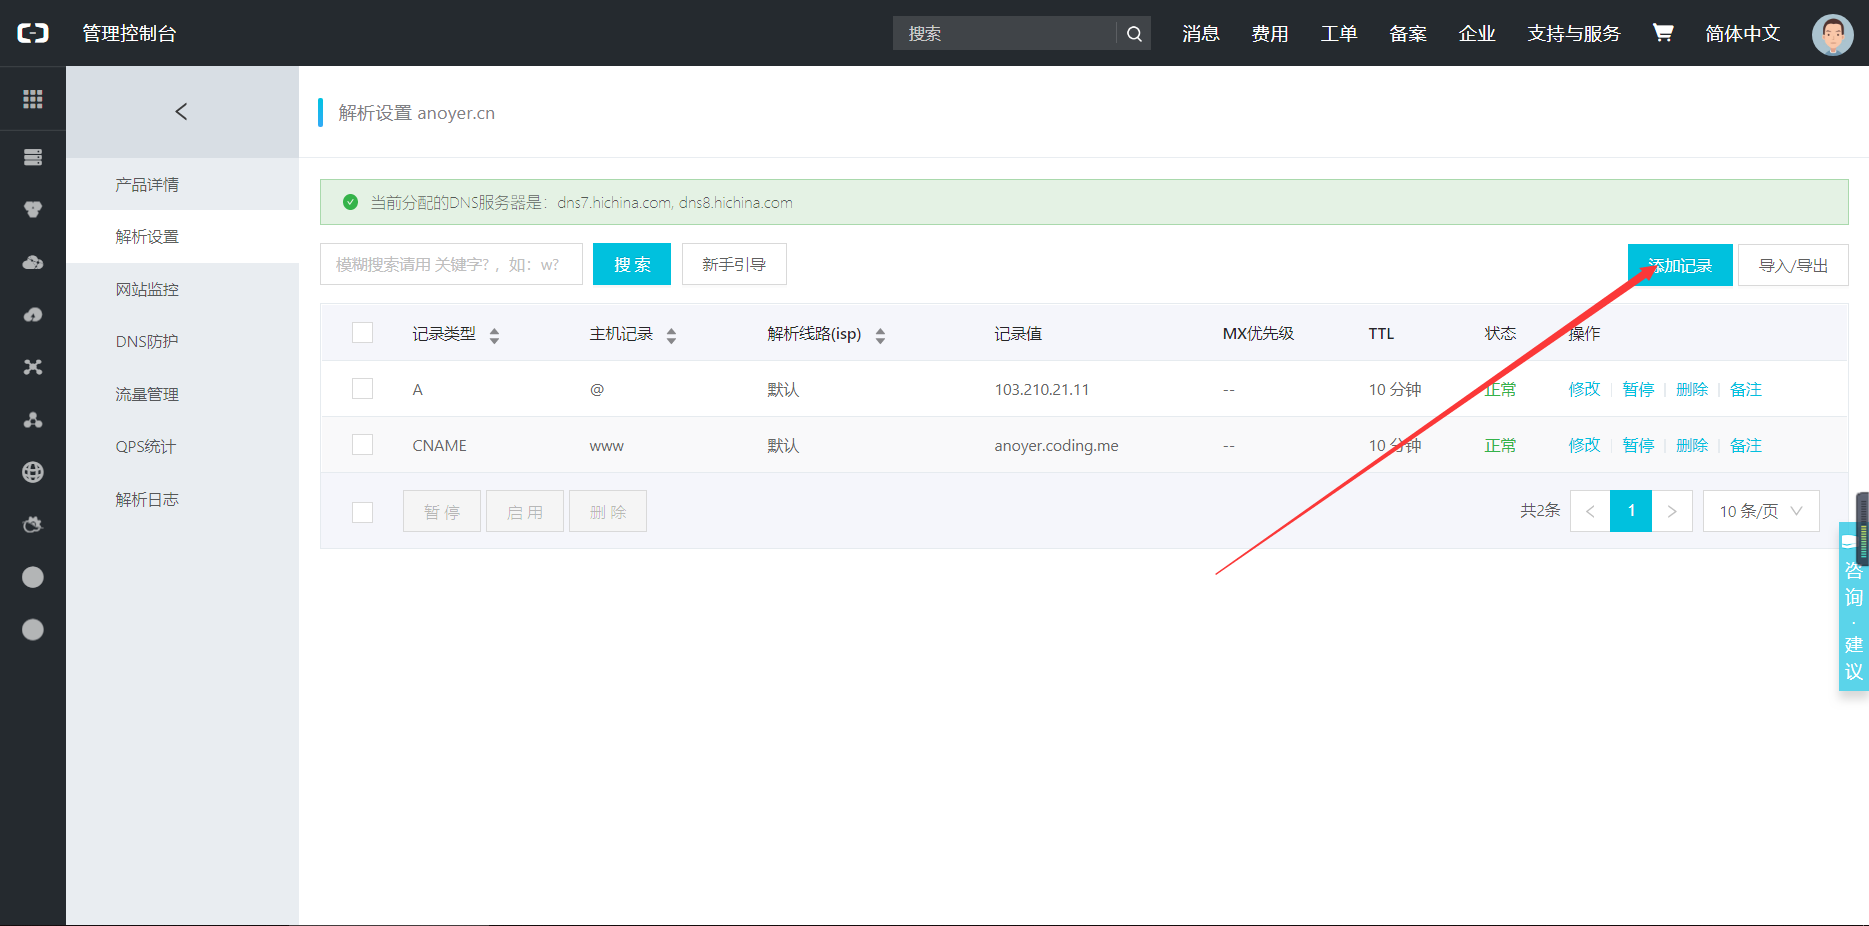
在阿里云控制台,设置主机记录www,记录类型为A,记录值是IP103.210.21.11。其中103.210.21.11是Github Pages服务器指定的IP地址,访问该IP地址即表示访问Coding Pages。
在阿里云控制台,设置主机记录@,记录类型为CNAME,记录值是anoyer.coding.me。表示将https://anoyer.cn这个主域名映射anoyer.coding.me
如何知道知道的 Coding Pages IP
在命令提示符中输入ping anoyer.cn
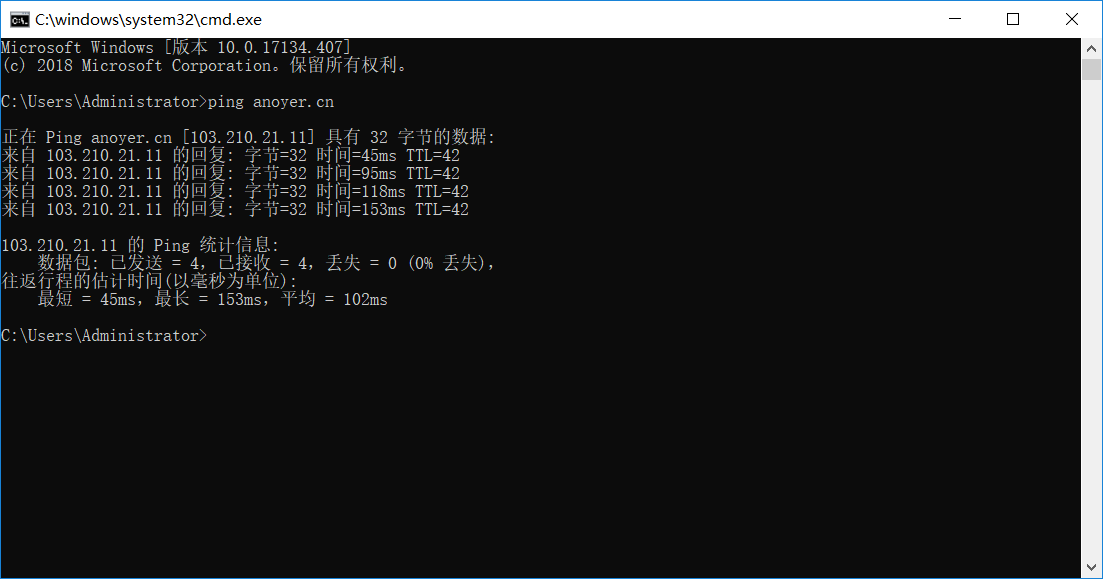
成功之后:
3.配置
- 在
博客的source文件夹下建立一个CNAME的文件 - 内容写入你的域名信息,比如我这里是
anoyer.cn - 发布到Coding即可
4.Coding 配置
进入Coding 项目的Pages服务,进入设置
把刚解析的域名绑定上去。到这里就OK了。
34.插入网易云音乐
在知道了页面的结构之后,你就可以将你的播放器添加在页面的任意位置,开始我是放在了首页,然后发现一上来就自动播放太吵了,于是就放在了侧边栏,想要听得朋友可以手动点击播放,
我们可以直接在网易云音乐中搜索我们想要插入的音乐,然后点击生成外链播放器
![]()
然后可以根据你得设置生成相应的html代码,将获得的html代码插入到你想要插入的位置即可
![]()
我放在了layout/_macro/sidebar.swig 文件下
<div id="music163player"><iframe frameborder="no" border="0" marginwidth="0" marginheight="0" width=280 height=86 src="//music.163.com/outchain/player?type=2&id=38358214&auto=0&height=66"></iframe>
</div>
35.阅读全文
在文章中使用< !--more--> 手动进行截断
这种方法可以根据文章的内容,自己在合适的位置添加 < !--more--> 标签,使用灵活,也是Hexo推荐的方法。
36.在线联系
之前有访问过一些大佬的个人博客,里面有个在线联系功能,看着不错,所以也试着在自己的站点上接入了此功能。
注册
首先在DaoVoice注册个账号,点击->邀请码是2e5d695d。
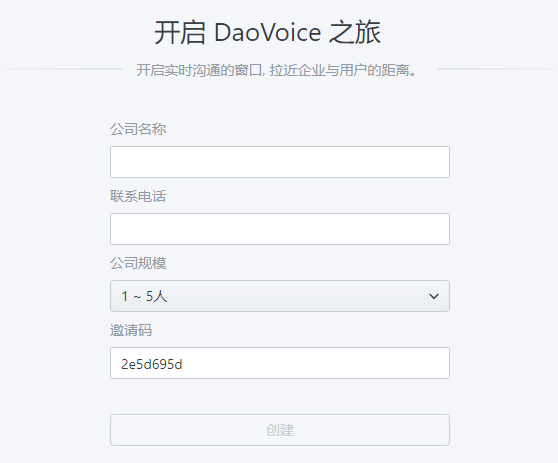
完成后,会得到一个app_id,后面会用到:
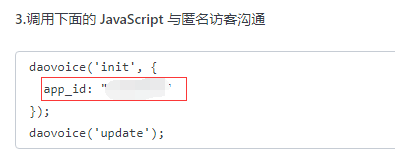
修改head.swig
修改/themes/next/layout/_partials/head.swig文件,添加内容如下:
{% if theme.daovoice %}<script>(function(i,s,o,g,r,a,m){i["DaoVoiceObject"]=r;i[r]=i[r]||function(){(i[r].q=i[r].q||[]).push(arguments)},i[r].l=1*new Date();a=s.createElement(o),m=s.getElementsByTagName(o)[0];a.async=1;a.src=g;a.charset="utf-8";m.parentNode.insertBefore(a,m)})(window,document,"script",('https:' == document.location.protocol ? 'https:' : 'http:') + "//widget.daovoice.io/widget/0f81ff2f.js","daovoice")daovoice('init', {app_id: "{{theme.daovoice_app_id}}"});daovoice('update');</script>
{% endif %}
位置贴图:
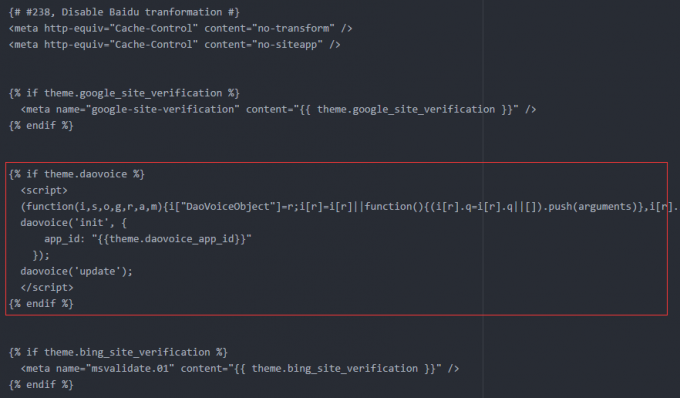
主题配置文件
在_config.yml文件中添加内容:
# Online contact
daovoice: true
daovoice_app_id:   # 这里填你刚才获得的 app_id
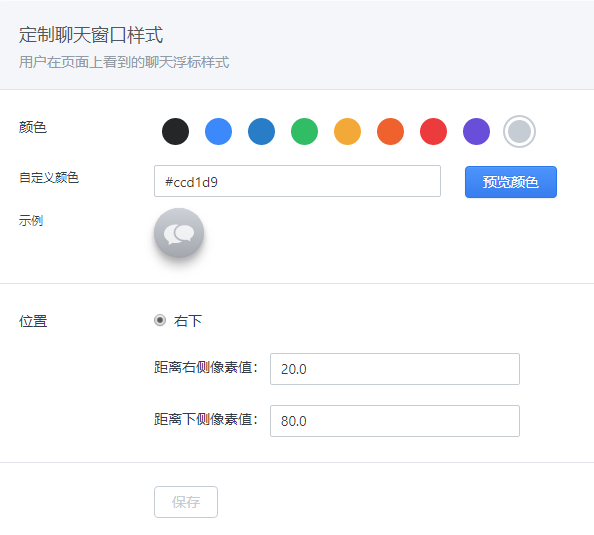
聊天窗口配置
附上我的聊天窗口的颜色、位置等设置信息:
至此,网页的在线联系功能已经完成,重新hexo g,hexo d上传GitHub后,页面上就能看到效果了。
就比如说你现在往右下角看看(~ ̄▽ ̄)~ ,欢迎撩我(滑稽)。
37.打赏
因为next主题自带打赏功能,所以我们只需要在next的主题配置文件中找到如下代码,
image文件夹是我在blog/source下面建立的文件夹,然后把你的微信及支付宝收钱码图片拉进去,修改名字为wechatreward.png和alipayreward.png
reward_comment: 坚持原创技术分享,您的支持将鼓励我继续创作!
wechatpay: /image/wechatreward.png
alipay: /image/alipayreward.png
38.修改文章间分割线
打开 themes/next/source/css/_common/components/post/post-eof.styl ,修改:
.posts-expand {.post-eof {display: block;//  margin: $post-eof-margin-top auto $post-eof-margin-bottom;width: 0%; //分割线长度height: 0px; // 分割线高度background: $grey-light;text-align: center;}
}
参考博客:
1.https://www.jianshu.com/p/f054333ac9e6
2.https://blog.csdn.net/qsdsn/article/details/77946677
3.https://www.aisun.org/2017/10/hexo-next+dingzhi/
Hexo的入门教程及Next主题配置相关推荐
- linux nginx 配置端口访问,Linux入门教程:ubuntu 16.04配置nginx服务器实现一个IP一个端口多个站点,ubuntunginxNginx 使用异步...
Linux入门教程:ubuntu 16.04配置nginx服务器实现一个IP一个端口多个站点,ubuntunginxNginx 使用异步 特点: Nginx 可以部署在网络上使用 FastCGI,脚本 ...
- VAPS XT开发入门教程02:安装配置
开工第一步是安装软件 windows下 windows下有安装手册,但是此安装手册在安装包里面,只有在安装完成后才能看到.没有安装手册又无法安装. 先准备安装文件和授权证书. License_Tool ...
- Linux7查看防火墙日志,Linux入门教程:CentOS7防火墙firewalld配置,防火墙日志在哪呢...
Linux入门教程:CentOS7防火墙firewalld配置,防火墙日志在哪呢 启动: systemctl start firewalld 停止: systemctl stop firewalld ...
- GitHub+Hexo搭建自己的Blog之-主题配置
前言 前两章我们已经把Blog的环境全部搭建完毕了,但是还没有内容,而且hexo默认的主题是不是感觉挺丑的,其实hexo给我们提供了很多主题模板,总有一款是你喜欢的,本篇文章将继续说一说如何配置主题, ...
- 通过Hexo搭建个人博客以及主题配置
这是蓝鸟x发布的第一篇文章 前言 直接在github page平台上托管我们的博客.这样就可以安心的来写作,又不需要定期维护,而且hexo作为一个快速简洁的博客框架,用它来搭建博客真的非常容易. He ...
- 转载:【opencv入门教程之一】:配置
本系列文章由@浅墨_毛星云 出品,转载请注明出处. 文章链接: http://blog.csdn.net/poem_qianmo/article/details/19809337 作者:毛星云(浅 ...
- Hexo 简明入门教程(一)
导言 对于个人独立博客的搭建,或者一些产品网站的介绍我个人比较推崇直接用静态网站生成器来完成这个事情,对于,静态网页部署方便,浏览速度快. 以下为部分静态网站生成器简要列表 Ruby Jekyll ( ...
- Hexo博客Next6.0版本主题配置(背景图片加载、侧边栏社交小图标设置、设置网站图标)
随机背景图片加载 原理 自动更换背景是修改添加背景的css样式实现 图片来源 https://source.unsplash.com/ 修改背景样式 修改themes\next\source\css\ ...
- Git 新手入门教程 - 如何注册与配置公钥
Git 是一个开源的分布式版本控制系统,用于敏捷高效地处理任何或小或大的项目. Git 是 Linus Torvalds 为了帮助管理 Linux 内核开发而开发的一个开放源码的版本控制软件. Git ...
- Docker 入门教程-----supervisor(进程管家)配置与Docker使用
supervisord的官网:http://supervisord.org supervisor管理进程,是通过fork/exec的方式将这些被管理的进程当作supervisor的子进程来启动,所以我 ...
最新文章
- uGUI知识点剖析之RectTransform
- 开课吧:为什么指针被誉为C语言灵魂?
- 大话RAC介质恢复---联机日志损坏
- vlc android tv版,VLC播放器电视版本v1.6.0 Android版本
- android 添加文件打开方式
- 一些网站后台模板源码分析
- 计算机打印中 进纸盘2,纸盘纸张设置
- phpmailer 私密抄送_PHPMailer发匿名邮件及Extension missing: openssl的解决
- Leetcode有效数独的Python解法
- 一文看懂ARM Cortex-M处理器 ARM Cortex-M 处理器家族介绍和比较
- SpingCloud获取当前服务ip地址
- 2:STM32CubeMX配置STM32F103C8T6驱动-TIM1配置
- 上海大学计算机专硕学制,上海大学一月专硕在职读研学制详解
- Python爬虫学习笔记:概念、知识和简单应用
- 机械振动学习笔记1-3章
- 美化上传文件框(上传图片框)
- SpringBoot——@ConfigurationProperties注解
- Apache Camel中的recipientList和routingSlip的区别?
- 松弛(SOR)迭代法
- 新城控股集团董事长王晓松:由增量转向提质,聚焦有质量的发展