高级SmartGWT教程,第1部分
贾斯汀(Justin),帕特(Pat)和我已经开始着手一个需要用户界面进行管理和管理的副项目。 在与SmartGWT和GWT共同工作了一段时间之后,我们决定使用SmartGWT创建接口。 我们非常喜欢视觉组件(请查看SmartGWT展示柜 )以及它有助于快速开发的事实。
在本教程中,我将向您展示如何在短短几个小时内为用户界面创建原型。 该界面在很大程度上受Drools Guvnor应用程序的影响。 我们在许多项目中都使用了Drools,并且有Guvnor来创建业务规则。 我们只是喜欢用户界面,它既美观又实用。 查看一些Guvnor屏幕截图 。
让我们开始吧。 我假设您已经安装了GWT SDK和Eclipse的Google插件 。 SmartGWT与GWT 1.5.3,GWT 1.6.4,GWT 1.7.x和GWT 2.0.x兼容。 当前,我正在使用GWT 2.1.0 SDK和SmartGWT 2.2版本。 从本质上讲,这是有关SmartGWT的更高级的教程,因此您可能必须检查一下我的介绍性文章“ SmartGWT入门以获取出色的GWT接口”教程。 此外,另一个有用的资源是“布局用户界面”教程,我们曾用来启动我们自己的界面的开发。
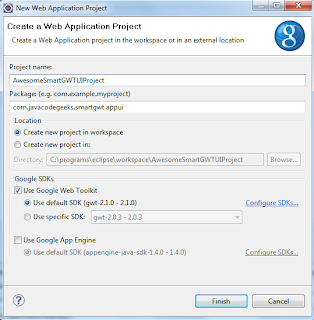
首先,我们在Eclipse中创建一个新的“ Web应用程序项目”。 我选择“ AwesomeSmartGWTUIProject”作为项目名称,选择“ com.javacodegeeks.smartgwt.appui”作为程序包名称。
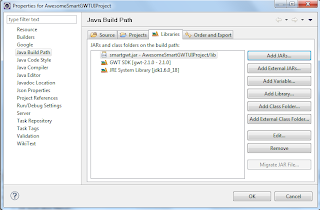
接下来,将提取的ZIP中的“ smartgwt.jar”文件添加到项目的类路径中。 请注意,该文件也应添加到“ war / WEB-INF / lib”目录中。
然后编辑模块xml文件(名为“ AwesomeSmartGWTUIProject.gwt.xml”),并在标准“继承”声明之后添加以下行:
<inherits name="com.smartgwt.SmartGwt"/>另外,注释掉声明GWT主题用法的现有部分:
<!--<inherits name='com.google.gwt.user.theme.standard.Standard'/> -->这是模块XML文件的外观:
<?xml version="1.0" encoding="UTF-8"?>
<module rename-to='awesomesmartgwtuiproject'><!-- Inherit the core Web Toolkit stuff.                        --><inherits name='com.google.gwt.user.User'/><!-- Inherit the default GWT style sheet.  You can change       --><!-- the theme of your GWT application by uncommenting          --><!-- any one of the following lines.                            --><!-- <inherits name='com.google.gwt.user.theme.standard.Standard'/>  --><!-- <inherits name='com.google.gwt.user.theme.chrome.Chrome'/> --><!-- <inherits name='com.google.gwt.user.theme.dark.Dark'/>     --><!-- Other module inherits                                      --><inherits name="com.smartgwt.SmartGwt"/><!-- Specify the app entry point class.                         --><entry-point class='com.javacodegeeks.smartgwt.appui.client.AwesomeSmartGWTUIProject'/><!-- Specify the paths for translatable code                    --><source path='client'/><source path='shared'/></module>
下一步是删除“ AwesomeSmartGWTUIProject.html”文件中存在的一些自动生成的代码,尤其是H1和Table标记。 这是您应该得到的:
<!doctype html>
<!-- The DOCTYPE declaration above will set the    -->
<!-- browser's rendering engine into               -->
<!-- "Standards Mode". Replacing this declaration  -->
<!-- with a "Quirks Mode" doctype may lead to some -->
<!-- differences in layout.                        --><html><head><meta http-equiv="content-type" content="text/html; charset=UTF-8"><!--                                                               --><!-- Consider inlining CSS to reduce the number of requested files --><!--                                                               --><link type="text/css" rel="stylesheet" href="AwesomeSmartGWTUIProject.css"><!--                                           --><!-- Any title is fine                         --><!--                                           --><title>Web Application Starter Project</title><!--                                           --><!-- This script loads your compiled module.   --><!-- If you add any GWT meta tags, they must   --><!-- be added before this line.                --><!--                                           --><script type="text/javascript" language="javascript" src="awesomesmartgwtuiproject/awesomesmartgwtuiproject.nocache.js"></script></head><!--                                           --><!-- The body can have arbitrary html, or      --><!-- you can leave the body empty if you want  --><!-- to create a completely dynamic UI.        --><!--                                           --><body><!-- OPTIONAL: include this if you want history support --><iframe src="javascript:''" id="__gwt_historyFrame" tabIndex='-1' style="position:absolute;width:0;height:0;border:0"></iframe><!-- RECOMMENDED if your web app will not function without JavaScript enabled --><noscript><div style="width: 22em; position: absolute; left: 50%; margin-left: -11em; color: red; background-color: white; border: 1px solid red; padding: 4px; font-family: sans-serif">Your web browser must have JavaScript enabledin order for this application to display correctly.</div></noscript></body>
</html>
同样,删除所有存在于EntryPoint类中的名为“ AwesomeSmartGWTUIProject”的代码,并仅保留一个空的onModuleLoad方法,如下所示:
package com.javacodegeeks.smartgwt.appui.client;import com.google.gwt.core.client.EntryPoint;public class AwesomeSmartGWTUIProject implements EntryPoint {public void onModuleLoad() {}}现在,我们准备开始编写SmartGWT代码,因此请确保已为SmartGWT Javadocs添加了书签。 在构建接口时,我们将继续使用两个非常重要的类。
- HLayout :这是一个与布局相关的类,沿水平轴应用大小调整策略,即,其所有内部组件将以水平方式放置。
- VLayout :这是一个与布局相关的类,沿垂直轴应用大小调整策略,即,所有内部组件都将以垂直方式放置。
这些类都从父Layout扩展,因此它们继承了addMember方法,该方法允许它们添加其他Canvas对象或Widget 。
使用各种布局对象,我们会将整个屏幕区域分解为特定的子区域(北,南,东,西和主区域)。 让我们看看入口点类的第一个版本如何:
package com.javacodegeeks.smartgwt.appui.client;import com.google.gwt.core.client.EntryPoint;
import com.google.gwt.user.client.Window;
import com.google.gwt.user.client.ui.RootLayoutPanel;
import com.javacodegeeks.smartgwt.appui.client.ui.ApplicationMenu;
import com.javacodegeeks.smartgwt.appui.client.ui.HeaderArea;
import com.javacodegeeks.smartgwt.appui.client.ui.MainArea;
import com.javacodegeeks.smartgwt.appui.client.ui.NavigationArea;
import com.smartgwt.client.widgets.layout.HLayout;
import com.smartgwt.client.widgets.layout.VLayout;public class AwesomeSmartGWTUIProject implements EntryPoint {private static final int HEADER_HEIGHT = 85;private VLayout mainLayout;private HLayout northLayout;private HLayout southLayout;private VLayout eastLayout;private HLayout westLayout;public void onModuleLoad() {Window.enableScrolling(false);Window.setMargin("0px");// main layout occupies the whole areamainLayout = new VLayout();mainLayout.setWidth100();mainLayout.setHeight100();northLayout = new HLayout();northLayout.setHeight(HEADER_HEIGHT);VLayout vLayout = new VLayout();vLayout.addMember(new HeaderArea());vLayout.addMember(new ApplicationMenu());northLayout.addMember(vLayout);westLayout = new NavigationArea();westLayout.setWidth("15%");eastLayout = new MainArea();eastLayout.setWidth("85%");southLayout = new HLayout();southLayout.setMembers(westLayout, eastLayout);mainLayout.addMember(northLayout);mainLayout.addMember(southLayout);// add the main layout container to GWT's root panelRootLayoutPanel.get().add(mainLayout);}}
不用担心编译错误,我们稍后将创建必要的类。 如您所见,我们将整个屏幕区域划分为较小的块,并使用SmartGWT API将所有组件连接在一起。 请注意使用setWidth100和setHeight100方法,它们方便地允许特定组件占据整个可用区域。 最后, RootLayoutPanel是GWT类,它使我们可以访问屏幕的根面板。 现在让我们创建各种组件。
* ApplicationMenu:
package com.javacodegeeks.smartgwt.appui.client.ui;import com.smartgwt.client.types.Alignment;
import com.smartgwt.client.types.Overflow;
import com.smartgwt.client.widgets.Label;
import com.smartgwt.client.widgets.layout.HLayout;public class ApplicationMenu extends HLayout {private static final int APPLICATION_MENU_HEIGHT = 27;private Label label;public ApplicationMenu() {super();this.setHeight(APPLICATION_MENU_HEIGHT);label = new Label();label.setContents("Application Menu");label.setAlign(Alignment.CENTER);label.setOverflow(Overflow.HIDDEN);this.addMember(label);}}
这里没什么特别的,我们只是在布局中添加了一个Label并将Alignment设置为居中。
*标头区域:
package com.javacodegeeks.smartgwt.appui.client.ui;import com.smartgwt.client.types.Alignment;
import com.smartgwt.client.types.Overflow;
import com.smartgwt.client.widgets.Img;
import com.smartgwt.client.widgets.Label;
import com.smartgwt.client.widgets.layout.HLayout;public class HeaderArea extends HLayout {private static final int HEADER_AREA_HEIGHT = 60;public HeaderArea() {super();this.setHeight(HEADER_AREA_HEIGHT);Img logo = new Img("jcg_logo.png", 282, 60);Label name = new Label();name.setOverflow(Overflow.HIDDEN);  name.setContents("Java 2 Java Developers Resource Center"); HLayout westLayout = new HLayout();westLayout.setHeight(HEADER_AREA_HEIGHT);    westLayout.setWidth("70%");westLayout.addMember(logo);westLayout.addMember(name);Label signedInUser = new Label();signedInUser.setContents("Fabrizio Chami ");   HLayout eastLayout = new HLayout();eastLayout.setAlign(Alignment.RIGHT);  eastLayout.setHeight(HEADER_AREA_HEIGHT);eastLayout.setWidth("30%");eastLayout.addMember(signedInUser);this.addMember(westLayout);      this.addMember(eastLayout);}}
同样,很简单。 我们使用Img类添加了图像,并提供了文件名。 请注意,图像URL自动位于“ images”文件夹下,因此基本上“ jcg_logo.png”文件必须位于“ war / images”文件夹中。
*导航区域:
package com.javacodegeeks.smartgwt.appui.client;import com.smartgwt.client.types.Overflow;
import com.smartgwt.client.types.VisibilityMode;
import com.smartgwt.client.widgets.Label;
import com.smartgwt.client.widgets.layout.HLayout;
import com.smartgwt.client.widgets.layout.SectionStack;
import com.smartgwt.client.widgets.layout.SectionStackSection;public class NavigationArea extends HLayout {public NavigationArea() {super();this.setMembersMargin(20);  this.setOverflow(Overflow.HIDDEN);this.setShowResizeBar(true);final SectionStack sectionStack = new SectionStack();  sectionStack.setVisibilityMode(VisibilityMode.MULTIPLE);sectionStack.setShowExpandControls(true);sectionStack.setAnimateSections(true);sectionStack.setVisibilityMode(VisibilityMode.MUTEX);sectionStack.setOverflow(Overflow.HIDDEN);SectionStackSection section1 = new SectionStackSection("Section 1");section1.setExpanded(true);Label label1 = new Label();label1.setContents("Label1");section1.addItem(label1);SectionStackSection section2 = new SectionStackSection("Section 2");section2.setExpanded(false);Label label2 = new Label();label2.setContents("Label2");label2.setOverflow(Overflow.AUTO);label2.setPadding(10);section2.addItem(label2);SectionStackSection section3 = new SectionStackSection("Section 3");section3.setExpanded(false);Label label3 = new Label();label3.setContents("Label3");label3.setOverflow(Overflow.AUTO);label3.setPadding(10);section3.addItem(label3);sectionStack.addSection(section1);sectionStack.addSection(section2);sectionStack.addSection(section3);this.addMember(sectionStack);}}
对于导航区域,我们需要类似手风琴的组件。 这是在SmartGWT中通过我们向其中添加SectionStackSection实例的SectionStack类实现的。 我们可以向这些项目添加任意的小部件,但是为了简单起见,现在我们仅添加一些Label 。 请注意setShowResizeBar方法的使用,该方法允许我们在布局中的该成员之后显示调整大小的条,以允许调整其大小。
*主要区域:
package com.javacodegeeks.smartgwt.appui.client.ui;import com.smartgwt.client.types.Alignment;
import com.smartgwt.client.types.Overflow;
import com.smartgwt.client.widgets.Label;
import com.smartgwt.client.widgets.layout.VLayout;public class MainArea extends VLayout {private Label label;public MainArea() {super();label = new Label();label.setContents("Main Area");label.setAlign(Alignment.CENTER);label.setOverflow(Overflow.HIDDEN);this.addMember(label);}}
主要区域将托管我们界面的大部分小部件,但目前仅包括标签。
好的,让我们看看到目前为止我们做了什么。 启动Eclipse配置(作为Web应用程序项目),然后将浏览器指向提供的URL:
http://127.0.0.1:8888/AwesomeSmartGWTUIProject.html?gwt.codesvr=127.0.0.1:9997
这是您应该看到的图像:

几分钟的代码还不错。 不必弄乱CSS,HTML和JavaScript,我们已经创建了UI的框架,其中包括严格定义的子区域。 剩下的就是通过使用各种精美的小部件填充区域来增强它。
在本教程的下一部分中,我将向您介绍一些最高级的组件(例如树和选项卡)。 现在,您可以在此处找到到目前为止创建的Eclipse项目。 请注意,我删除了一些SmartGWT特定的内容(图像等),因为它们使档案过大。 这些应该由新项目自动创建。 “ gwt-servlet.jar”也已从“ war \ WEB-INF \ lib”目录中删除。
UI编码愉快!
更新:我还发布了本教程的第二部分 。
- SmartGWT入门,提供出色的GWT界面
- 将JSON功能添加到您的GWT应用程序中
- 建立自己的GWT Spring Maven原型
- 将CAPTCHA添加到您的GWT应用程序
- GWT Spring和Hibernate进入数据网格世界
- GWT 2 Spring 3 JPA 2 Hibernate 3.5教程
翻译自: https://www.javacodegeeks.com/2011/01/advanced-smartgwt-tutorial-part-1.html
高级SmartGWT教程,第1部分相关推荐
- smartgwt_高级SmartGWT教程,第2部分
smartgwt 这是我的教程的第二部分,有关使用SmartGWT快速进行UI开发. 在本教程的第一部分中 ,我们创建了基本的界面布局并添加了一些基本组件. 现在是时候解决这个问题,并使用SmartG ...
- 高级SmartGWT教程,第2部分
这是我的教程的第二部分,有关使用SmartGWT快速进行UI开发. 在本教程的第一部分中 ,我们创建了基本的界面布局并添加了一些基本组件. 现在是时候解决这个问题,并使用SmartGWT的真正功能了. ...
- smartgwt_高级SmartGWT教程,第1部分
smartgwt 贾斯汀(Justin),帕特(Pat)和我已经开始着手进行一个需要管理和管理用户界面的副项目. 在与SmartGWT和GWT共同工作了一段时间之后,我们决定使用SmartGWT创建接 ...
- java高级教程_高级Java教程
java高级教程 课程大纲 学习Java基础很容易. 但是,真正钻研该语言并研究其更高级的概念和细微差别将使您成为一名出色的Java开发人员. 网络上充斥着"软","便宜 ...
- python高级教程_Python高级进阶教程
这个系列的教程是在刘金玉编程的<零基础python教程>基础上的高级进阶应用. 教程列表: Python高级进阶教程001期 pycharm+anaconda3+pyqt5可视化界面开发环 ...
- iOS9 3D Touch 标签菜单 peek and pop force 压力触控 功能开发高级版教程
iOS9 3D Touch 标签菜单 peek and pop force 压力触控 功能开发高级版教程 github地址: https://github.com/wyk125/3DTouchDem ...
- 为什么总学不好PS?300集PS从入门到高级自学教程,全面且系统
相信有很多的小伙伴在自学PS设计修图的过程中,一定会经常遇见这样的问题:无论是看别人制作短视频也好,还是收集许多的设计元素也罢,到头来只感觉自己的PS只会个皮毛. 300集PS从入门到高级自学教程+插 ...
- 第一章 ArcGIS Pro python高级脚本教程介绍
文章的很多内容来自于ESRI出版的 Advanced Python Scripting for ArcGIS Pro 一书,该书也提供了实验数据与免费的PDF书籍,可以通过官网链接下载. 不想仅仅做一 ...
- Advanced PHP 高级PHP教程 Lynda课程中文字幕
Advanced PHP 中文字幕 高级PHP教程 中文字幕Advanced PHP 实现命名空间,扩展接口,创建第一个Trait,深入到面向对象的编程中,并发现本课程中的多种脚本方法 Web开发人员 ...
最新文章
- 再见,Python 2.x
- python开发工程师面试题-2019超实用Python开发工程师面试题分享
- scala的传值参数和传名参数
- YUIDoc example代码高亮错误、生成API文档目录不按源文件注释顺序
- 【图像处理】——遍历图像所有像素的方法(for 循环和np.where遍历)应用在模板制作
- 卷积神经网络mnist手写数字识别代码_搭建经典LeNet5 CNN卷积神经网络对Mnist手写数字数据识别实例与注释讲解,准确率达到97%...
- C语言再学习——分支结构
- 点到曲线的距离公式_推导点到直线的距离公式到底有多少种方法?
- LinQ To XML——用LinQ查询XML
- python如何预处理文本分类_文本分类二之文本预处理
- 编程修养 from匠人的百宝箱
- php eclipse 版本_PHPEclipse官方下载
- 业务流程优化设计之思想和原则
- 嘉兴 机器人仓库 菜鸟_菜鸟在嘉兴推出全新智能仓 宣布将在双11启用超级机器人仓群...
- VR广告:通过“虚拟房间”广告在VR中体验Lionsgate的JIGSAW
- 屠龙传说世界【全自动】辅助脚本
- 逻辑备份和物理备份表级恢复
- 雨雨cms-YYCMS5.0新版影视网源码自动采集数据-玥雅CMS
- html5css3选择题,web前端技术(HTML5+CSS3)答案试题题目及答案,期末考试题库,章节测验答案...
- centos解决redis客户端连接不上