Game Center Achievements and Leaderboards part 1 转
原地址:http://blog.sina.com.cn/s/blog_6b3661a901013xb0.html
This is the first part of a step-by-step tutorial on how to use Game Center in your app. Game Center is supported since iOS 4.1. It’s Apple’s new social network. Game Center enables users to track their best score on a leaderboard, compare their achievements, invite friends to play a game, and start a game through auto-matching. This tutorial is only useful if you are a paid developer, because if you are not, you can’t setup the Game Center achievements and leaderboard in iTunes Connect. In the firts part we will create our project and create a new app in iTunes Connect with achievements and a leaderboard for this tutorial
Step 1: Creating the Project
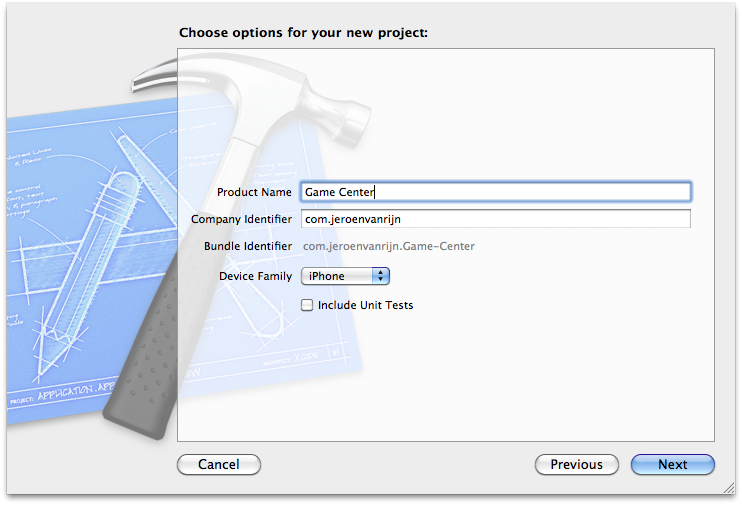
Open Xcode and select “Create a new Xcode project”. Select a View-based Application and click Next. Enter a name for your project, I called mine “Game Center”. Enter your Company Identifier and make sure you select iPhone for Device Family, because we are going to make an iPhone app. If you are done, click next. Choose a place to save your project and click create.
Step 2: Import the GameKit Framework
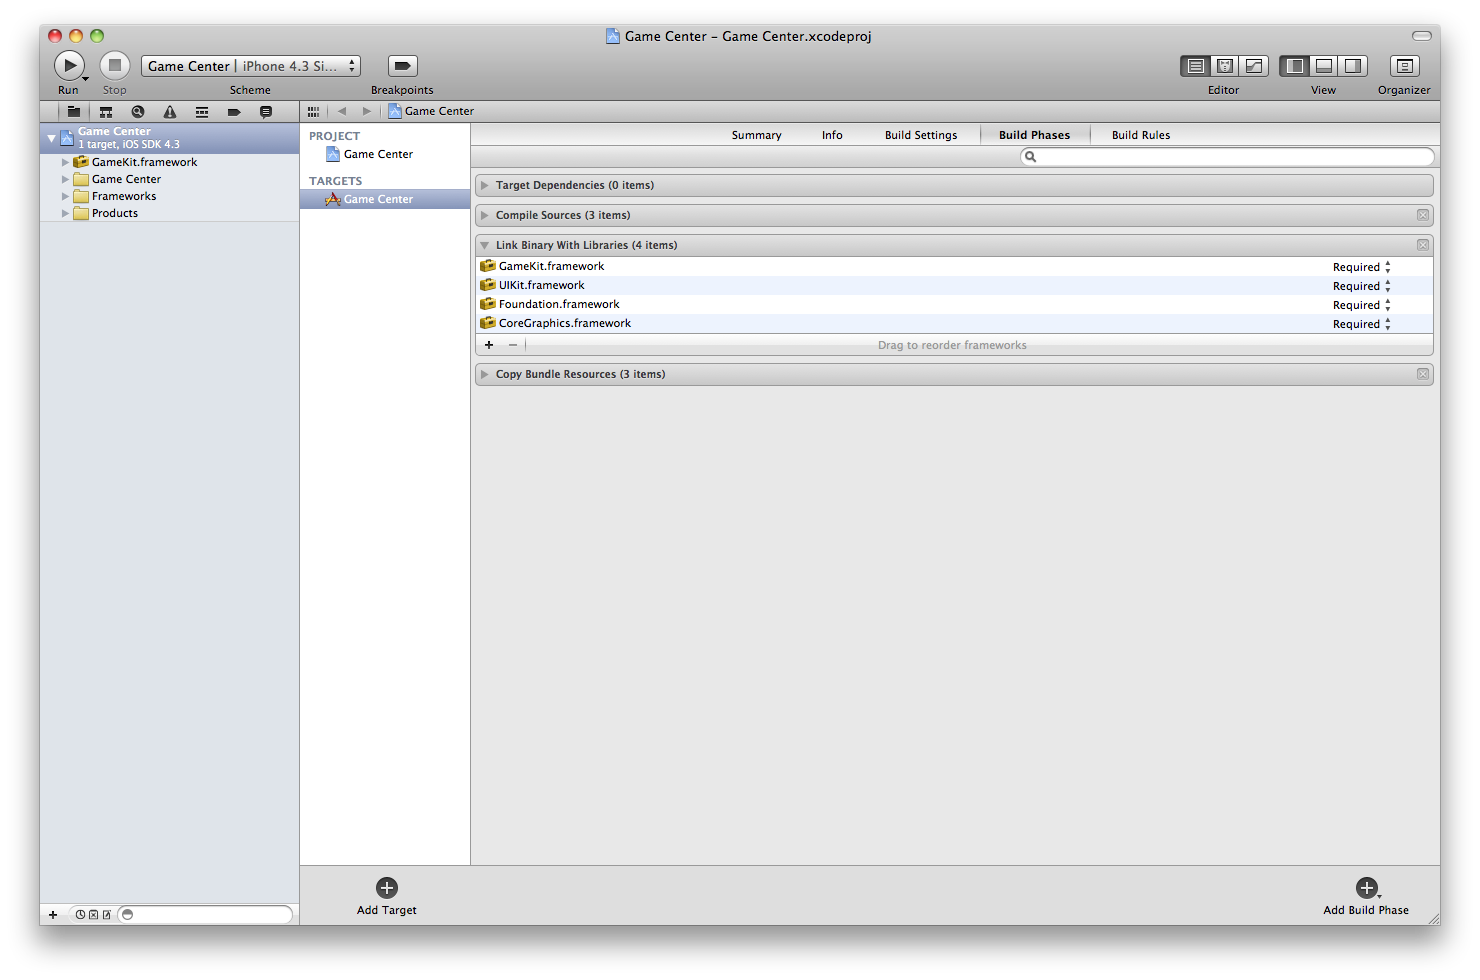
In the navigator area of Xcode 4, select the project name (in this case “Game Center”). Next, select the current target (“Game Center” here again), and then select the “Build Phases” tab. Expand the “Link Binary With Libraries” option, and then click the “+” button to add a new framework. Type “game″ into the search box, and select the GameKit.framework framework that appears in the list. Click “Add” to include this framework in the linking phase of your project.
Step 3: Creating the App ID
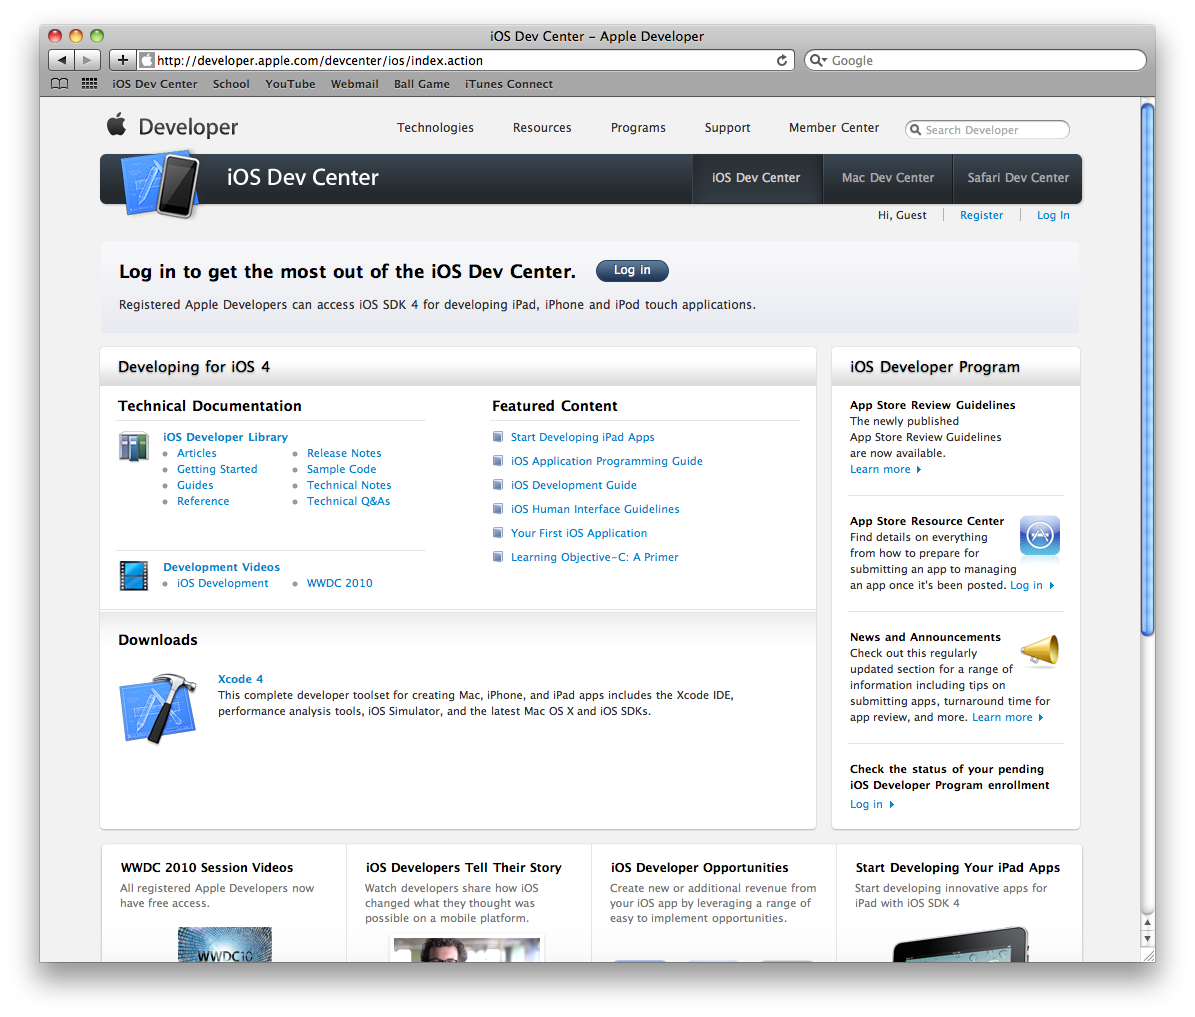
To do this, you have to be a paid developer. To use Game Center you need to add a new app and to that you need an App ID. Open up Safari or another web browser you prefer. Go to the iOS Dev Center and Log in to your iOS Developer account.
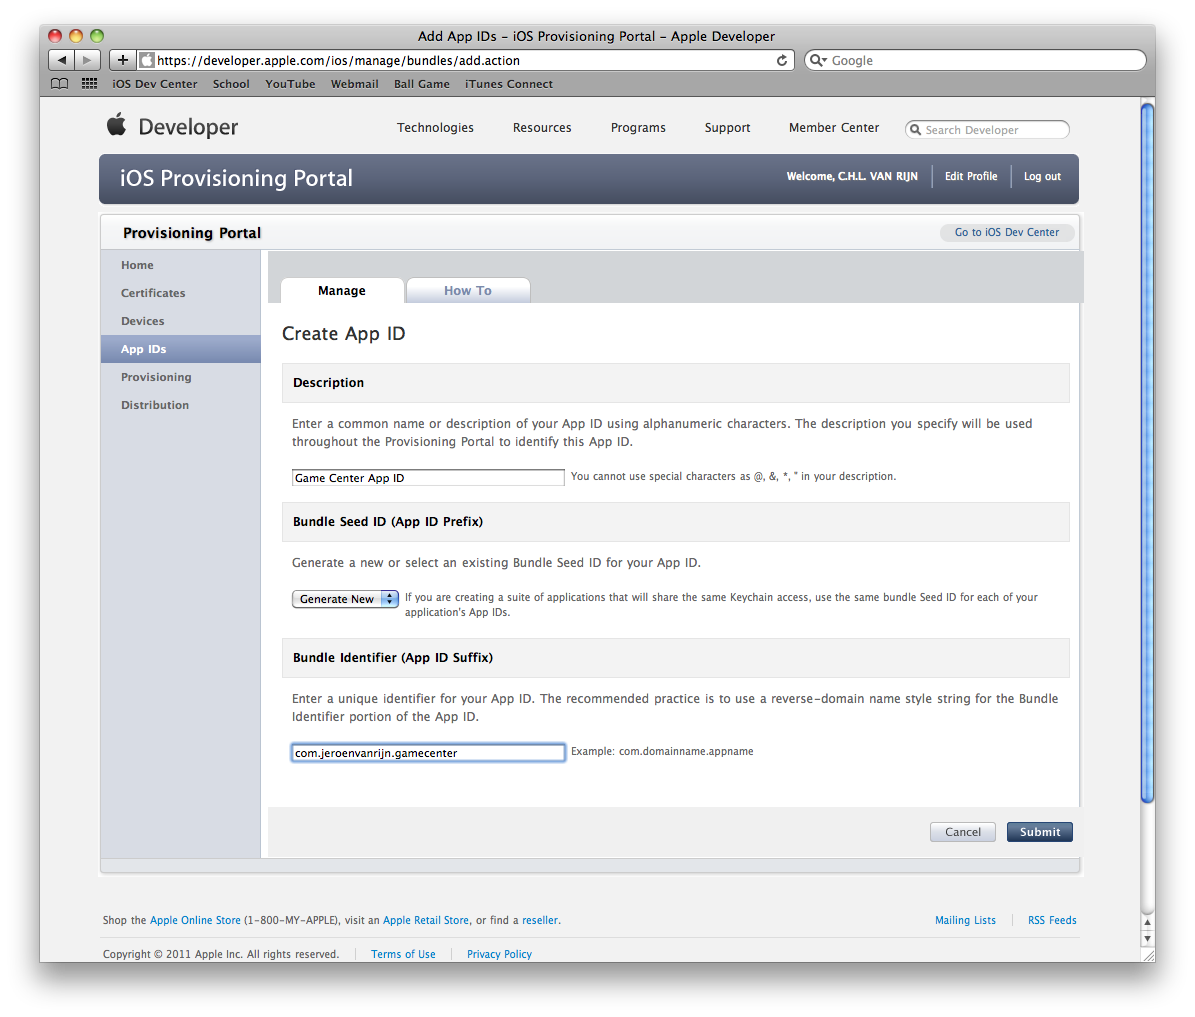
If you are logged in, you see a button to go to the iOS Provisioning portal. Click that button and go to “App ID’s”. Because we want to create a new app ID, click “New App ID”. As description I choose “Game Center App ID” so I know that this app ID is for my Game Center app. We don’t want to make a suite of applications that share the same keychain access, so we leave the Bundle Seed ID to “Generate New”. The recommended usage for a Bundle Identifier is com.domainname.applicationname. As domainname I chose my own name, Jeroen van Rijn. I called my application “Game Center” so my Bundle Identifier is “com.jeroenvanrijn.gamecenter” (without the quotes). Click “submit” to finish the App ID.
Step 4: Adding a New App
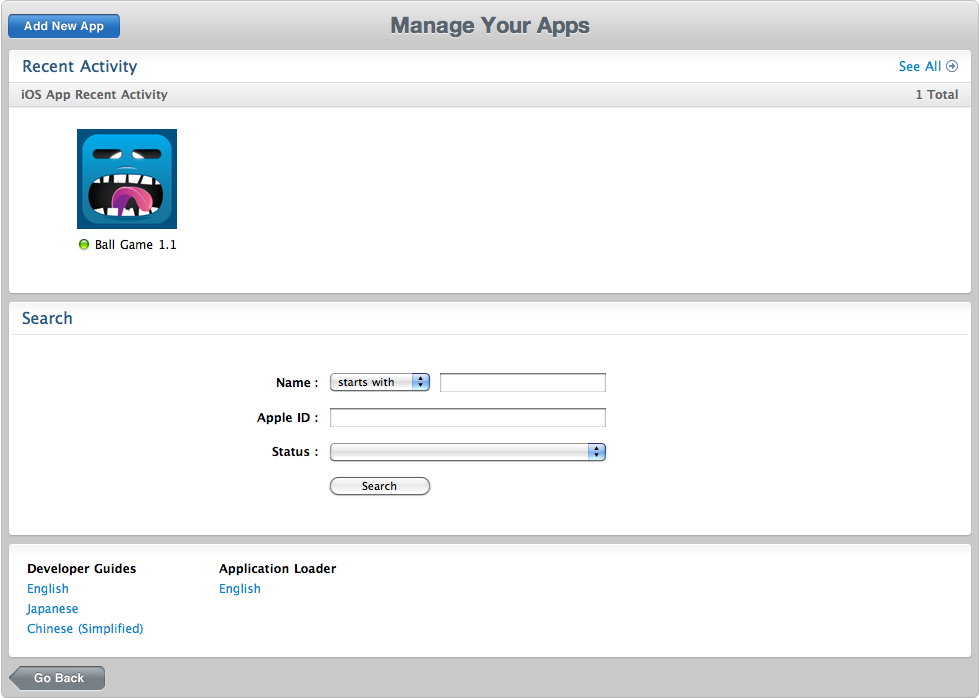
Go back to the iOS Dev Center and go to iTunes Connect by clicking the button that says “iTunes Connect” or go directly to iTunes Connect. Go to “Manage Your Applications”, here we will create a new app, that we will use for our Game Center example. Because I’ve one app in the App Store, this window may look some different. Click “Add New App” to start creating or new app.
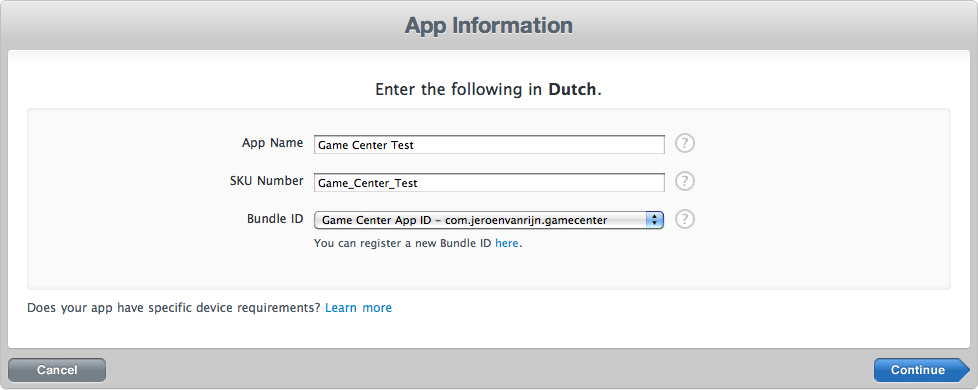
If this is your first app you will need to enter some information, but that is pretty straight forward. If you entered that information, you need to enter an App name, a SKU number and a Bundle ID. The App name is of course the name of your app. The SKU Number is a unique number to identify the app you are adding. For the Bundle ID you need to choose the App ID you just created in the iOS Provisioning Portal. If you are done, click “Continue”.
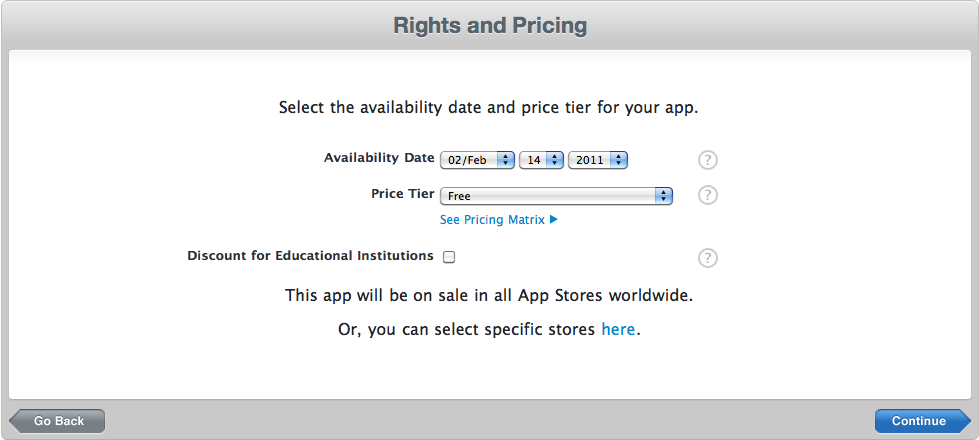
In the next window we will enter an availability date and the price of the app. I chose just a random date, because I’m not going to submit the app in the App Store. As Price Tier I chose “Free”, you can chose whatever you want. I deselected the “Discount for Educational Institutions”. This means that educational institutions can’t buy your app once and install it on different devices. If you are done, click “Continue”.
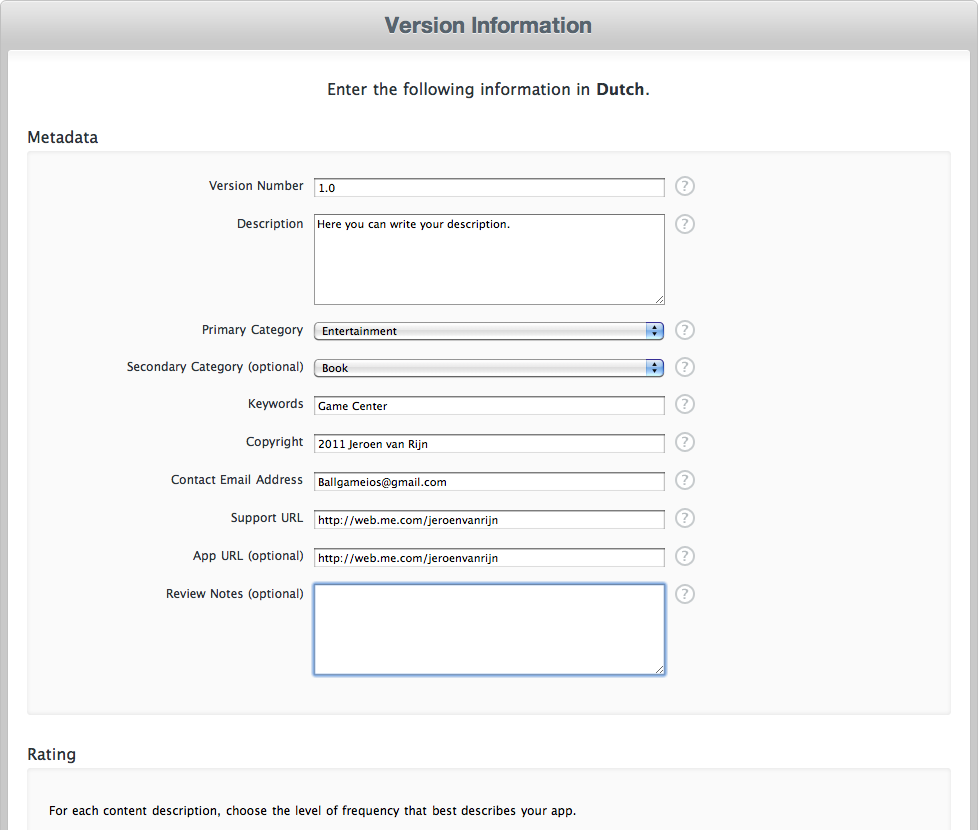
In the third window we will enter our Version information. My screen says that I need to enter the following in Dutch, but yours will say the language you chose for your first application. The Metadata and rating are pretty straight forward. For the Images you need to choose an icon and an iPhone / iPod touch Screenshot. The iPad Screenshot is optional. You can choose your own images or use mine.

If you are done, click “Save”.
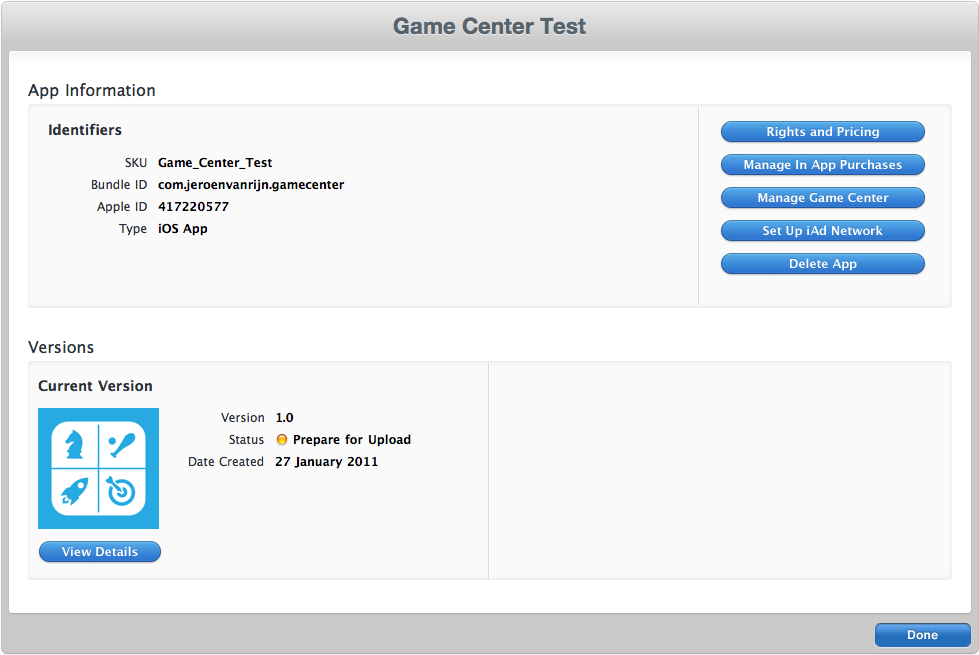
Congratulations, you have created a new app in iTunes Connect.
Step 5: Creating a Leaderboard
Now go to “Manage Game Center”, here we will enable our app for Game Center and later create a leaderboard and some achievements.

Click “Enable”, after you clicked, the button on your screen will chance and you can setup a leaderboard and achievements. First we will setup a leaderboard. In the “Leaderboards” section, click “Set up” and in the next window click “Add Leaderboard”.
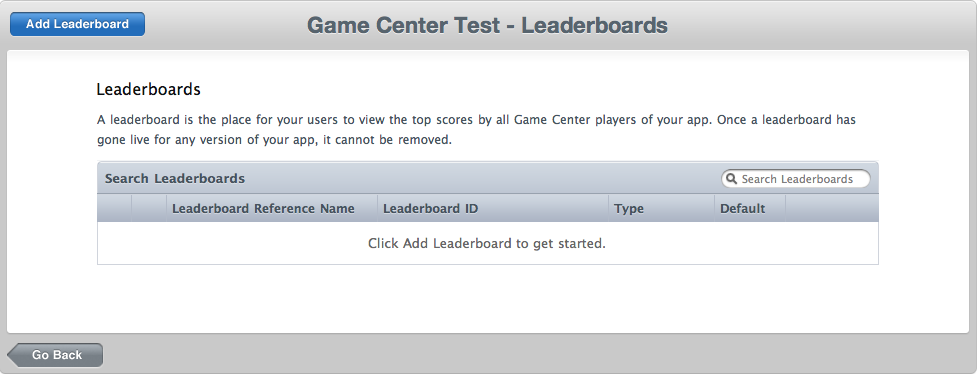
We want to create a single leaderboard, so under “Single Leaderboard” click “Choose”.
In this window, we will enter our leaderboard information. The “Leaderboard Reference Name” is an internal name that you must provide for each leaderboard. I Named mine “Game Center Test Leaderboard”. The “Leaderboard ID” is a unique alphanumeric identifier that you create for this leaderboard. I chose “1”, because this will be the first leaderboard for this app. We will use this leaderboard ID later in Xcode to identity our leaderboard. The “score Format Type” is the type of format in which the score for your app will be expressed on the leaderboard in Game Center. Choose “Integer” as format type. For “Sort Order” choose “Descending”. This means that the highest score will be displayed first. If you want the lowest score to be displayed first, choose “Ascending”
There is still one thing left to do for finishing our leaderboard, and that is adding a language, so click “Add Language”.
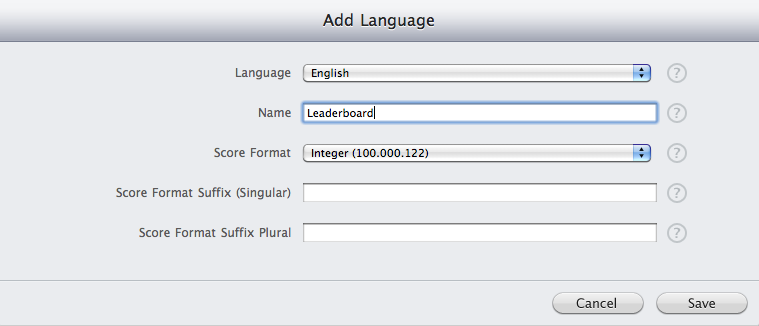
For “Language” I chose “English” Feel free to choose a language you prefer. The “Name”, is the name of the leaderboard displayed in Game Center. I named mine “Leaderboard”. The “score Format” is the format which will displayed on your leaderboard for each specified language. I chose “Integer (100.000.122)” The “Score Format Suffix (Singular)” and “Score Format Suffix (Plural) are optional. The score format suffix will be added to the end of scores displayed on your leaderboard. You can use this for clarifying the type of score your app uses. When you are done entering the language information, click “Save”. Feel free to add more languages, but I leave it at one for this tutorial. To finish the leaderboard click “Save”.
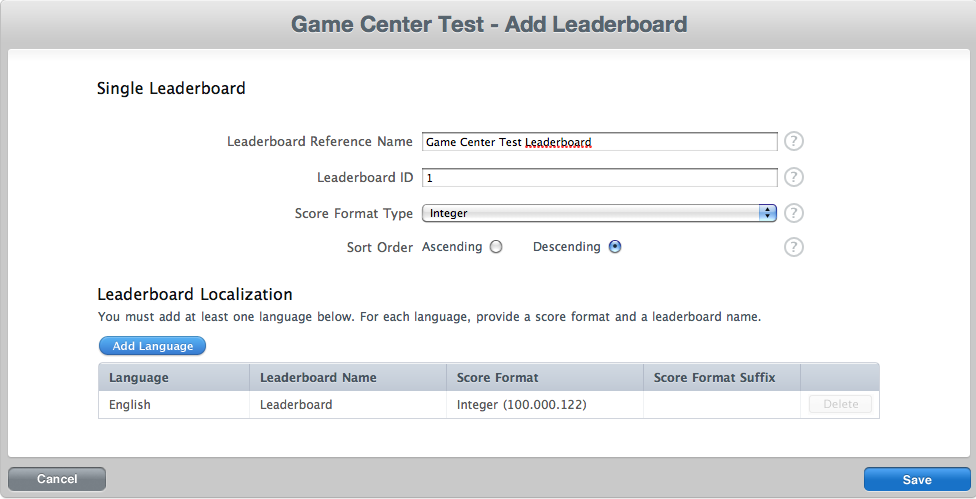
Now, we have created a Game Center leaderboard. As you can see, this leaderboard is selected as the default leaderboard, because it’s the only leaderboard we have for this app. Click “Go Back”, so we can add some achievements.
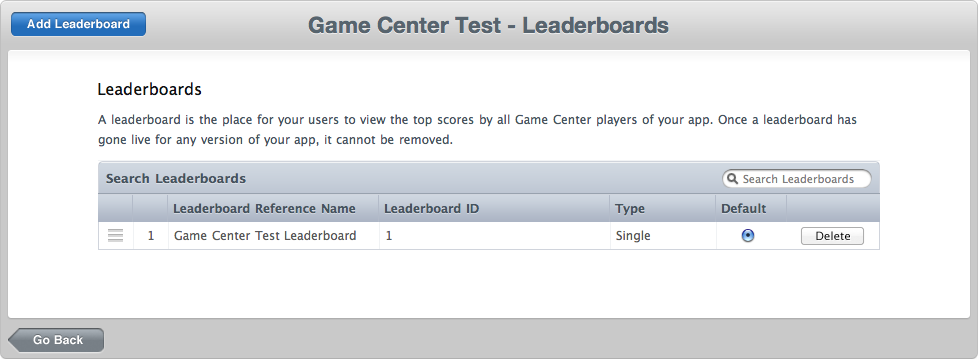
Step 6: Creating the Achievements
Now we are going to create the achievements. For this tutorial I am going to make 2 achievements. In the “Achievements” section click “Set up”. In the next window click “Add New Achievement”, to create the first achievement for this tutorial.
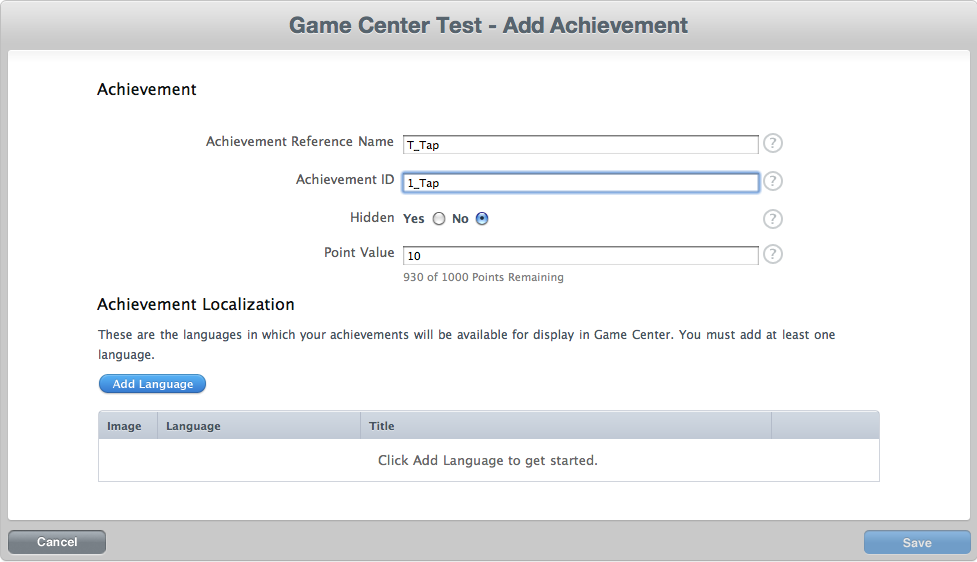
The “Achievement Reference Name” and “Achievement ID” are the same as the ones for the leaderboard, we just created. As “Achievement Reference Name” I chose “1 Tap” and as “Achievement ID” I chose “1_tap”. For “Hidden” I chose “No”, because we don’t want that a achievement will remain hidden on Game Center until a player has achieved it. “Point Value” means the points that your achievement is worth. I chose 10 for this achievement. There is a maximum of 100 points per achievement and a maximum of 1000 point total for all achievements. Again we have to add a language. Click “Add language”. For “Language” I chose “English” again and for “Title”, “1 Tap”. The “Pre-earned Description” is the description of your achievement before they have earned it. I chose “Tap Once”, because that is what they need to do to earn this achievement. The “Earned Description” is of course the description of your achievement when they have earned it. I chose “You tapped the button”. You must provide a 512×512 pixels image. If you click the question mark at “Image” you can see the supported formats. You can choose your own image or use mine.

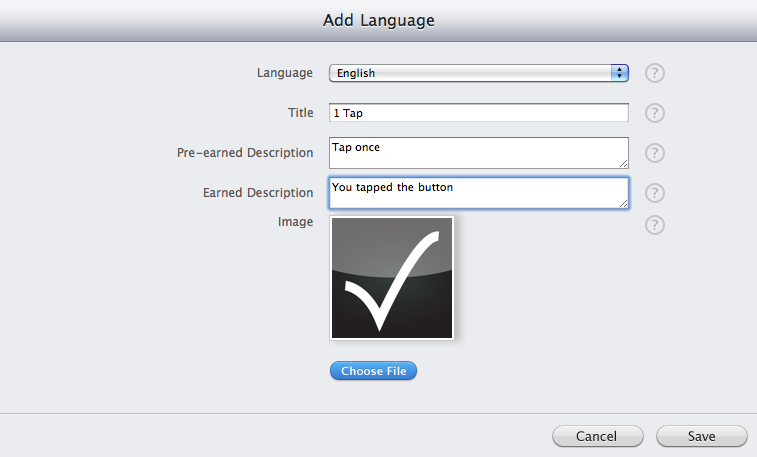
If you are done, click “Save”. You can add more languages, but I leave it at one. Click “Save” to finish this achievement.
In the next window you can add a new achievement. Click “Add New Achievement. This time I entered the following information:
- Achievement Reference Name: 20 Taps
- Achievement ID: 20_Taps
- Hidden: No
- Point Value: 50
Click “Add Language” to enter a language. This time I entered the following information:
- Language: English
- Title: 20 Taps
- Pre-earned Description: Tap 20 Times
- Earned Description: You tapped the button 20 times
- Image: (the same as the first achievement)
If you are done, click “Save”. Click “Save” again to finish the second, and last achievement for this tutorial.
Step 7: Enabling Game Center
Click “Go Back” and in the next window click “Done”. In the “Versions” click “View Details”. In the next window scroll down to the “Game Center” section.

Click “Enable for This Version”. The “Game Center” section should change in this one:

Now we are done in iTunes Connect. You can close your browser and go back to the Game Center project in Xcode we created at the beginning of this tutorial.
Step 8: Download GKTapper
We will use some files from the GKTapper Sample Code from Apple. You can download the GKTapper Sample Code here.
When the download completed, open the project and drag the following files to the “Project Navigator” in our Game Center project:
- GameCenterManager.h
- GameCenterManager.m
- AppSpecificValues.h
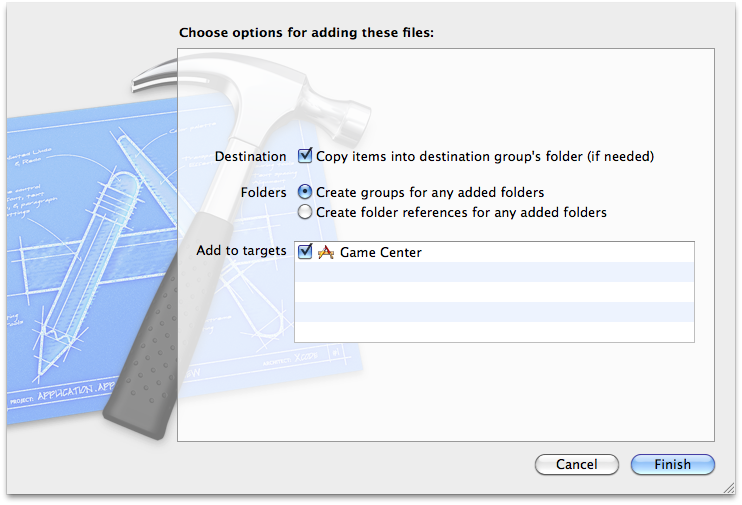
Make sure “Copy Items into destination group’s folder (if needed) is checked, and click “Add”. Now you can close the GKTapper project. You can also delete it, if you want, because we won’t need it anymore for this tutorial. We use those files, because the GameCenterManger classes will do the heavy lifting for us.
Step 9: Change the Bundle identifier
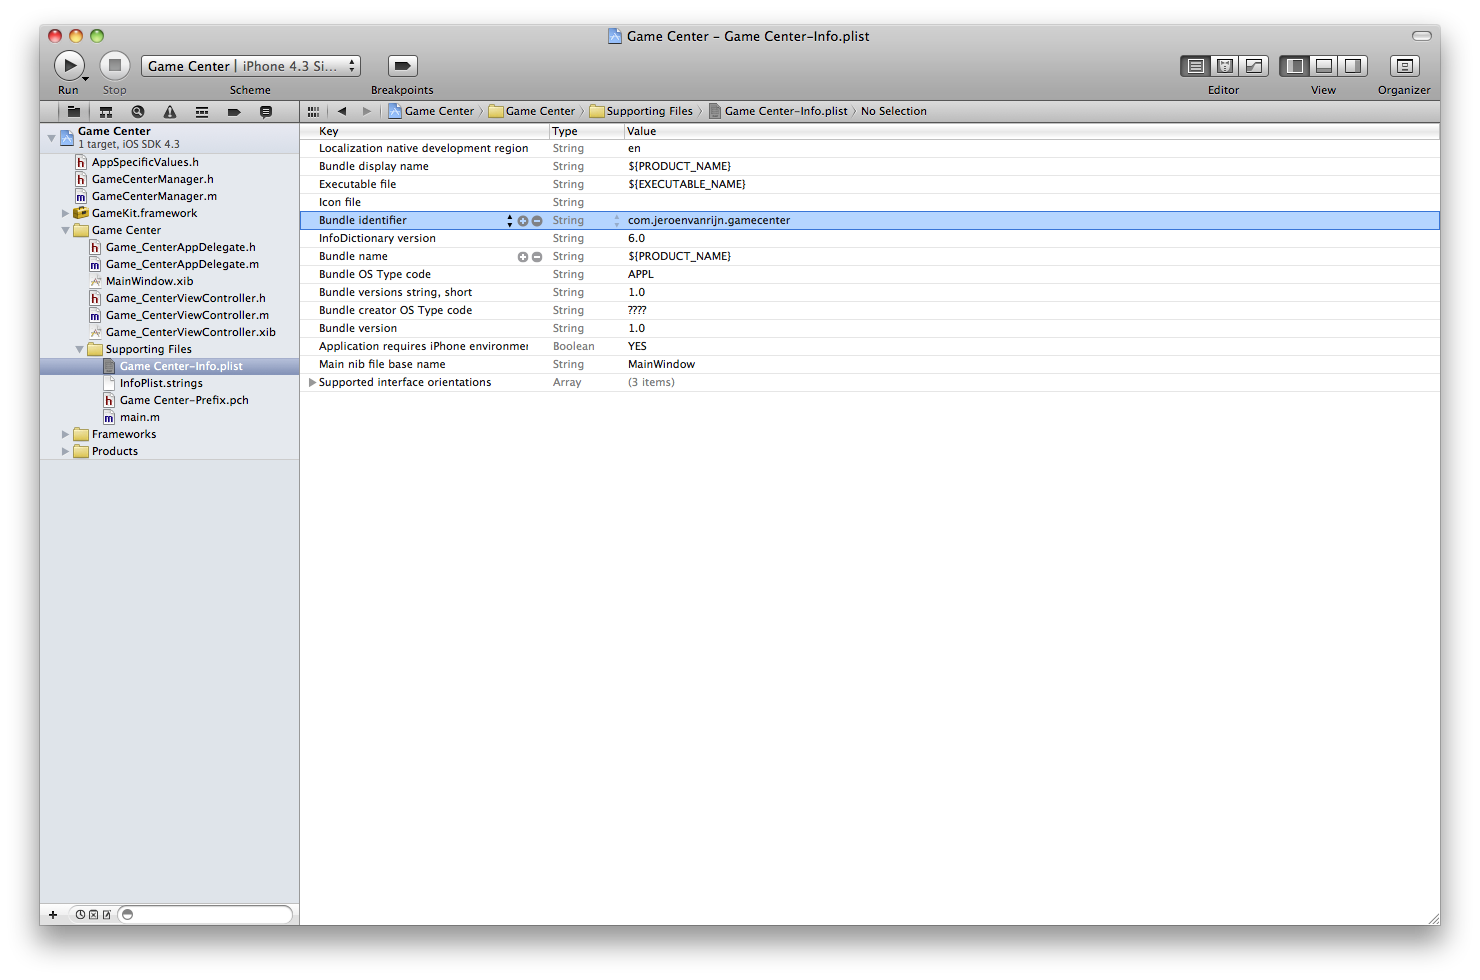
In your Xcode project, open the Game-Ceter-Info.plist file from the “Supporting Files” folder in the “Project Navigator”. Fill in the “Bundle Identifier” value with the one created earlier and associated with the App ID. I named my Bundle Identifier “com.jeroenvanrijn.gamecenter”.
Conclusion
In this part of the tutorial we have covered how to create a new app with achievement and a leaderboard in iTunes Connect. In the second part we will finish the tutorial, so we can use the leaderboard and achievements.
转载于:https://www.cnblogs.com/123ing/p/3722981.html
Game Center Achievements and Leaderboards part 1 转相关推荐
- 内森凯菲兹人口预测模型_团结的面Kong:内森·圣·皮埃尔
内森凯菲兹人口预测模型 Nathan St. Pierre is a full-stack developer with our Cloud Services team in Bellevue, WA ...
- I;P : Leaderboards and Achievements
快捷链接 下载地址 相关随笔 正文 今天把I;P的高分榜和成就系统搞好了, 最终还是使用了Google Play Service的API, 虽然这服务在国内的可靠性和稳定性上很成文档, 但这也是没办法 ...
- 短信、邮件、通讯录、蓝牙、社交、Game Center、应用内购买、iClould、Passbook
来源于:http://www.cocoachina.com/ios/20150129/11068.html iOS开发过程中有时候难免会使用iOS内置的一些应用软件和服务,例如QQ通讯录.微信电话本会 ...
- System Center 2012 r2优点
System Center 2012 System Center2012 是一个全面的管理平台,可帮助你轻松.高效地管理数据中心.客户端设备和混合云 IT 环境.为您提供了针对私有云.托管云和公有云基 ...
- iOS下bound,center和frame
---恢复内容开始--- 本文转发至:http://www.xuebuyuan.com/1846606.html 在写程序的时候发现,iOS下的坐标.位置很容易弄乱,特别是在不同的坐标系统中,必须完成 ...
- 最新发布| Jira官宣中国区本地部署特殊政策,公布Data Center价格
Atlassian官方发布Jira Server版停售消息至今已3个月,面对中国区用户的抗议,官方终于于2021年2月2日推出针对性政策,即将DC版准入门槛从500人下调至25人,并于2月5日召开发 ...
- 在Jira停售后,你决定赌Atlassian Data Center?
随着Atlassian Server产品做出服务调整(停止销售新的本地化部署服务许可证,并停止对本地化部署产品的新功能开发),可能有大批国内Server的用户就要被逼着去选择Atlassians Da ...
- 香港中文大学Center for Gut Microbiota Research招聘启事
香港中文大学Center for Gut Microbiota Research招聘启事 一.香港中文大学Center for Gut Microbiota Research中心简介 该中心致力于各种 ...
- R语言使用caret包的preProcess函数进行数据预处理:对所有的数据列进行center中心化、scale标准化(每个数据列减去平均值、除以标准差)、设置参数为center和scale
R语言使用caret包的preProcess函数进行数据预处理:对所有的数据列进行center中心化.scale标准化(每个数据列减去平均值.除以标准差).设置method参数为center和scal ...
最新文章
- Android内存管理-OnTrimMemory
- 成长的速度一定要超过父母老去的速度
- 从机器学习谈起(机器学习简介)
- NET问答: 如何在 ASP.NET Core Web API 的 Response 中添加自定义的 Header ?
- cf1556B B. Take Your Places!
- oracle事务默认自动提交吗_干货|事务
- logStash收集日志并存储到Elasticsearch
- mybatis与data jpa
- ArcGIS分享: 地图分幅及编号
- 【金融人士工具大全】整理不易,且珍惜
- Java 开发项目管理工具
- 关闭appleid双重认证_如何查看并移除登陆过Apple ID的设备
- 【Mockplus教程】安装Mockplus
- 好用的计算属性clac
- mysql崩 数据同步_MySQL5.7 大大降低了半同步复制-数据丢失的风险
- 干货!微博营销的技巧与利弊
- 【替罪羊树及其应用】替罪羊树总结
- Maven ArtifactDescriptorException: Failed to read artifact descriptor for com.sun.mail 异常
- 配置Druid数据源监控
- PX环境搭建编译px4_fmu-v2_default相关问题的解决方法
热门文章
- 光纤光信号闪红灯_电信光纤光猫光信号闪红灯怎么处理
- mac python安装第三方库jupyter_Mac搭建jupyter环境
- 2016开始工作一点谈
- 网络启动安装linux客户机nfs设置,NFS服务端和客户端安装配置
- jquery控制只监听数字_如何在jQuery中监听并保持单击?
- JAVA netty 定时任务_Netty HashedWheelTimer 定时任务调用
- sht-11c语言程序,温湿度传感器SHT11数据手册(中文)版.pdf
- Oracle11g新特性:在线操作功能增强-Oracle11g在线重定义功能对物化视图... (转载)
- 火狐谷歌浏览器油猴安装过程,扩展一个看付费视频脚本为例,学习通,云课堂等软件辅助学习也能做
- 基于JAVA+SpringBoot+Mybatis+MYSQL的旅游网站系统
